


 Loading...
PLA-407
Powerline Pass-Thru Ethernet Adapter
Firmware Version 4.0.1
Edition 1, 8/2009
www.zyxel.com
Copyright © 2009
ZyXEL Communications Corporation

About This User's Guide
About This User's Guide
Intended Audience
This manual is intended for people who want to configure the PLA-407 using the web configurator.
Tips for Reading User’s Guides On-Screen
When reading a ZyXEL User’s Guide On-Screen, keep the following in mind:
•If you don’t already have the latest version of Adobe Reader, you can download it from http://www.adobe.com.
•Use the PDF’s bookmarks to quickly navigate to the areas that interest you. Adobe Reader’s bookmarks pane opens by default in all ZyXEL User’s Guide PDFs.
•If you know the page number or know vaguely which page-range you want to view, you can enter a number in the toolbar in Reader, then press [ENTER] to jump directly to that page.
•Type [CTRL]+[F] to open the Adobe Reader search utility and enter a word or phrase. This can help you quickly pinpoint the information you require. You can also enter text directly into the toolbar in Reader.
•To quickly move around within a page, press the [SPACE] bar. This turns your cursor into a “hand” with which you can grab the page and move it around freely on your screen.
•Embedded hyperlinks are actually cross-references to related text. Click them to jump to the corresponding section of the User’s Guide PDF.
Related Documentation
•Quick Start Guide
The Quick Start Guide is designed to help you get your PLA-407 up and running right away. It contains information on setting up your network and configuring for Internet access.
•Support Disc
Refer to the included CD for support documents.
|
3 |
PLA-407 User’s Guide |
|
|
|

About This User's Guide
Documentation Feedback
Send your comments, questions or suggestions to: techwriters@zyxel.com.tw
Thank you!
The Technical Writing Team, ZyXEL Communications Corp.,
6 Innovation Road II, Science-Based Industrial Park, Hsinchu, 30099, Taiwan.
Need More Help?
More help is available at www.zyxel.com.
•Download Library
Search for the latest product updates and documentation from this link. Read the Tech Doc Overview to find out how to efficiently use the User Guide, Quick Start Guide and Command Line Interface Reference Guide in order to better understand how to use your product.
•Knowledge Base
If you have a specific question about your product, the answer may be here. This is a collection of answers to previously asked questions about ZyXEL products.
•Forum
This contains discussions on ZyXEL products. Learn from others who use ZyXEL products and share your experiences as well.
4 |
|
|
PLA-407 User’s Guide |
|
|
|
|
|

About This User's Guide
Customer Support
Should problems arise that cannot be solved by the methods listed above, you should contact your vendor. If you cannot contact your vendor, then contact a ZyXEL office for the region in which you bought the device.
See http://www.zyxel.com/web/contact_us.php for contact information. Please have the following information ready when you contact an office.
•Product model and serial number.
•Warranty Information.
•Date that you received your device.
Brief description of the problem and the steps you took to solve it.
|
5 |
PLA-407 User’s Guide |
|
|
|

Document Conventions
Document Conventions
Warnings and Notes
These are how warnings and notes are shown in this User’s Guide.
Warnings tell you about things that could harm you or your device.
Note: Notes tell you other important information (for example, other things you may need to configure or helpful tips) or recommendations.
Syntax Conventions
•The PLA-407 may be referred to as the “PLA-407”, the “ZyXEL device”, the “device” or the “Powerline adapter” in this User’s Guide.
•The PLA-4xx Series Configuration Utility version 3.3.4(AG) may be referred to as the “configuration utility” or the “utility” in this User’s Guide.
•Product labels, screen names, field labels and field choices are all in bold font.
•A key stroke is denoted by square brackets and uppercase text, for example, [ENTER] means the “enter” or “return” key on your keyboard.
•“Enter” means for you to type one or more characters and then press the [ENTER] key. “Select” or “choose” means for you to use one of the predefined choices.
•A right angle bracket ( > ) within a screen name denotes a mouse click. For example, Maintenance > Log > Log Setting means you first click Maintenance in the navigation panel, then the Log sub menu and finally the Log Setting tab to get to that screen.
•Units of measurement may denote the “metric” value or the “scientific” value. For example, “k” for kilo may denote “1000” or “1024”, “M” for mega may denote “1000000” or “1048576” and so on.
•“e.g.,” is a shorthand for “for instance”, and “i.e.,” means “that is” or “in other words”.
6 |
|
|
PLA-407 User’s Guide |
|
|
|
|
|
Document Conventions
Icons Used in Figures
Figures in this User’s Guide may use the following generic icons. The PLA-407 icons used may not be an exact representation of your device.
PLA-407 |
Computer |
Internet |
|
|
|
Modem / Router |
Printer |
Notebook |
|
|
|
TV |
|
|
|
|
|
|
7 |
PLA-407 User’s Guide |
|
|
|

Safety Warnings
Safety Warnings
•Do NOT use this product near water, for example, in a wet basement or near a swimming pool.
•Do NOT expose your device to dampness, dust or corrosive liquids.
•Do NOT store things on the device.
•Do NOT install, use, or service this device during a thunderstorm. There is a remote risk of electric shock from lightning.
•Connect ONLY suitable accessories to the device.
•Do NOT open the device or unit. Opening or removing covers can expose you to dangerous high voltage points or other risks. ONLY qualified service personnel should service or disassemble this device. Please contact your vendor for further information.Make sure to connect the cables to the correct ports.
•Place connecting cables carefully so that no one will step on them or stumble over them.
•Always disconnect all cables from this device before servicing or disassembling.
•Use ONLY an appropriate power adapter or cord for your device.
•Connect the power adapter or cord to the right supply voltage (for example, 110V AC in North America or 230V AC in Europe).
•Do NOT allow anything to rest on the power adapter or cord and do NOT place the product where anyone can walk on the power adapter or cord.
•Do NOT use the device if the power adapter or cord is damaged as it might cause electrocution.
•If the power adapter or cord is damaged, remove it from the power outlet.
•Do NOT attempt to repair the power adapter or cord. Contact your local vendor to order a new one.
•Do not use the device outside, and make sure all the connections are indoors. There is a remote risk of electric shock from lightning.
•Do NOT obstruct the device ventilation slots, as insufficient airflow may harm your device.
•This power unit is intended to be correctly orientated in a vertical or floor mount position.
•CAUTION: Use only in dry locations
•To reduce the risk of show-use only indoors.
•For Household Use Only.
Your product is marked with this symbol, which is known as the WEEE mark. WEEE stands for Waste Electronics and Electrical Equipment. It means that used electrical and electronic products should not be mixed with general waste. Used electrical and electronic equipment should be treated separately.
8 |
|
|
PLA-407 User’s Guide |
|
|
|
|
|

Table of Contents
Table of Contents
About This User's Guide .......................................................................................................... |
3 |
|
Document Conventions............................................................................................................ |
6 |
|
Safety Warnings........................................................................................................................ |
8 |
|
Table of Contents...................................................................................................................... |
9 |
|
Part I: Introduction................................................................................. |
13 |
|
Chapter 1 |
|
|
Introducing the PLA-407 ........................................................................................................ |
15 |
|
1.1 |
Overview .............................................................................................................................. |
15 |
|
1.1.1 Data Transfer ............................................................................................................. |
16 |
|
1.1.2 Pass-Through Design ................................................................................................ |
16 |
|
1.1.3 Noise Filter ................................................................................................................. |
16 |
|
1.1.4 Quality of Service ....................................................................................................... |
17 |
|
1.1.5 Low Power Mode ....................................................................................................... |
18 |
1.2 |
Expand Your Network with the PLA-407 ............................................................................. |
18 |
1.3 |
Ways to Manage the PLA-407 ............................................................................................. |
19 |
1.4 |
Security ................................................................................................................................ |
19 |
|
1.4.1 Passwords .................................................................................................................. |
20 |
|
1.4.2 Setting Up Security .................................................................................................... |
20 |
1.5 |
Multiple Networks ................................................................................................................ |
21 |
Chapter 2 |
|
|
Installing the Utility................................................................................................................. |
23 |
|
2.1 |
Overview .............................................................................................................................. |
23 |
2.2 |
Installing the Utility ............................................................................................................... |
23 |
Part II: Managing the PLA-407 .............................................................. |
27 |
|
Chapter 3 |
|
|
Firmware Tool ......................................................................................................................... |
29 |
|
3.1 |
Overview .............................................................................................................................. |
29 |
3.2 |
Firmware Upgrade Tool ....................................................................................................... |
29 |
PLA-402 v3 User’s Guide |
9 |
|

Table of Contents
Chapter 4 |
|
|
||
The ENCRYPT Button............................................................................................................. |
31 |
|
||
4.1 |
ENCRYPT Button Overview ................................................................................................ |
31 |
|
|
|
4.2 Set Up a HomePlug AV Network with ENCRYPT ............................................................... |
31 |
|
|
|
|
4.2.1 Expanding the Network with ENCRYPT .................................................................... |
33 |
|
4.3 |
Setting Up Multiple Networks .............................................................................................. |
33 |
|
|
4.4 |
ENCRYPT Button Behavior ................................................................................................. |
36 |
|
|
Chapter 5 |
|
|
||
The Configuration Utility ........................................................................................................ |
37 |
|
||
5.1 |
Overview .............................................................................................................................. |
37 |
|
|
|
|
5.1.1 Powerline Network Security ....................................................................................... |
37 |
|
|
|
5.1.2 Device Access Key (DAK) .......................................................................................... |
38 |
|
5.2 |
Starting the Configuration Utility .......................................................................................... |
38 |
|
|
5.3 |
Configuration Screen .......................................................................................................... |
39 |
|
|
5.4 |
Firmware Screen ................................................................................................................ |
41 |
|
|
5.5 |
Network Info Screen ........................................................................................................... |
41 |
|
|
5.6 |
Advanced Screen ............................................................................................................. |
43 |
|
|
5.7 |
About Screen ....................................................................................................................... |
46 |
|
|
Chapter 6 |
|
|
||
The OS X Configuration Utility .............................................................................................. |
47 |
|
||
6.1 |
Overview .............................................................................................................................. |
47 |
|
|
|
|
6.1.1 System Requirements ................................................................................................ |
47 |
|
|
|
6.1.2 Start the Configuration Utility ..................................................................................... |
48 |
|
|
|
6.1.3 Add a Device .............................................................................................................. |
48 |
|
|
|
6.1.4 Change Network Name .............................................................................................. |
48 |
|
|
|
6.1.5 Change Nickname ...................................................................................................... |
49 |
|
|
|
6.1.6 QoS Settings .............................................................................................................. |
49 |
|
|
|
6.1.7 Set HomePlug Light Color .......................................................................................... |
51 |
|
|
|
6.1.8 Link Information .......................................................................................................... |
52 |
|
|
|
6.1.9 Download Firmware ................................................................................................... |
54 |
|
6.2 |
Firmware Detection Tool ..................................................................................................... |
54 |
|
|
6.3 |
Firmware Upgrade Tool ....................................................................................................... |
56 |
|
|
|
|
6.3.1 Notes on Upgrading Firmware ................................................................................... |
56 |
|
|
|
6.3.2 Procedure to Upgrade Firmware ................................................................................ |
56 |
|
Chapter 7 |
|
|
||
Powerline Network Setup Tutorial......................................................................................... |
61 |
|
||
|
|
7.0.1 Overview .................................................................................................................... |
61 |
|
|
|
7.0.2 Important Terms ......................................................................................................... |
62 |
|
|
|
7.0.3 Accessing Your Powerline Adapter ............................................................................ |
62 |
|
|
|
7.0.4 Adding a Powerline Adapter ....................................................................................... |
63 |
|
|
|
|
|
|
10 |
|
|
|
|
|
|
PLA-402 v3 User’s Guide |
|
|
|
|
|
|
|
|
|
Table of Contents |
|
7.0.5 Setting Up a New Network with a New Adapter |
......................................................... 65 |
|
7.0.6 Splitting a Network into Two Networks ....................................................................... |
67 |
7.1 |
Troubleshooting ................................................................................................................... |
70 |
Chapter 8 |
|
|
PLA Compatibility................................................................................................................... |
71 |
|
8.1 |
Overview .............................................................................................................................. |
71 |
8.2 |
Firmware and Utility Compatibility ....................................................................................... |
71 |
8.3 |
Compatibility Diagrams ........................................................................................................ |
72 |
8.4 |
Chipset Compatibility ........................................................................................................... |
73 |
Part III: Appendices and Index.............................................................. |
75 |
|
Chapter 9 |
|
|
LEDs and Troubleshooting.................................................................................................... |
77 |
|
9.1 |
LEDs .................................................................................................................................... |
77 |
9.2 |
Power and Light Problems .................................................................................................. |
79 |
9.3 |
Configuration Utility Problems ............................................................................................. |
81 |
9.4 |
Powerline Problems ............................................................................................................. |
81 |
9.5 |
ENCRYPT Button Problems ................................................................................................ |
82 |
Chapter 10 |
|
|
Product Specifications........................................................................................................... |
85 |
|
Appendix |
A Legal Information ................................................................................................ |
89 |
Index......................................................................................................................................... |
|
93 |
|
11 |
PLA-402 v3 User’s Guide |
|
|
|

Table of Contents
12 |
|
|
PLA-402 v3 User’s Guide |
|
|
|
|
|

PART I
Introduction
Introducing the PLA-407 (15)
Installing the Utility (23)
13

14
1
Introducing the PLA-407
1.1 Overview
This chapter introduces the main applications and features of the PLA-407 HomePlug AV compliant Powerline adapter. In this User’s Guide the electrical wiring network is referred to as the “Powerline network”. The HomePlug AV standard specifies how network devices communicate using standard electrical wiring.
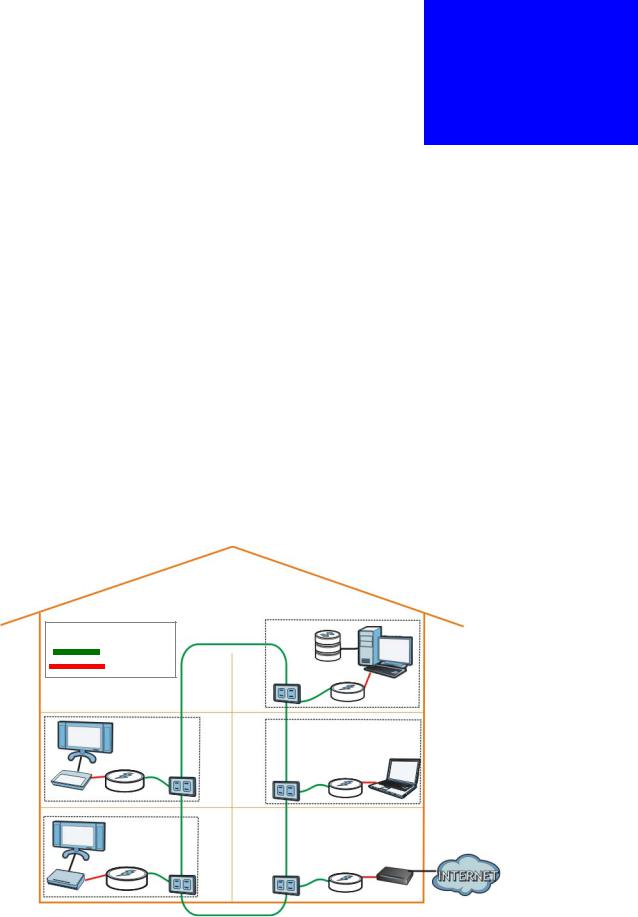
The PLA-407 plugs into an ordinary electrical outlet to easily extend a DSL broadband connection or existing Ethernet (LAN) network to any other electrical outlet in any room of a house, all without the need for any new cabling as shown in the following figure.
Figure 1 PLA-407 Home Setup
LEGEND |
|
Powerline |
|
Ethernet |
NSA |
|
Gaming |
Network |
|
Extension |
Video
Streaming
|
15 |
PLA-407 User’s Guide |
|
|
|

Chapter 1 Introducing the PLA-407
1.1.1 Data Transfer
The PLA-407 securely communicates with each other at high data transfer rates of up to 200 Mbps. The theoretical maximum channel data rate is 200 Mbps on the physical layer. The actual channel data rate will vary depending on noise on the electrical wires and the quality of your electrical installation.
It uses 128-bit Advanced Encryption Standard (AES) to ensure safe transfer of information.
1.1.2 Pass-Through Design
The PLA-407 has a power socket into which you can plug another electrical appliance, network device or power strip. It can support up to 16A current rating making it compatible with other electronic equipment used at home. Specifically, the PLA-407 supports the following current rating:
•EU Type: AC socket, 100 - 240V ~ 16A (maximum), 50 - 60 Hz
•US Type: AC socket, 100 - 240V ~ 15A (maximum), 50 - 60 Hz
•UK Type: AC socket, 100 - 240V ~ 13A (maximum), 50 - 60 Hz
This extra socket frees up an outlet for another device at the same time that your PLA-407 is plugged in. It is recommended that you plug in only network devices, such as your personal computer, computer monitor, router, Device Media Adapter (DMA) to name a few. Plugging in high current electrical devices (microwave, refrigerator and so on) can reduce the performance of the device.
1.1.3 Noise Filter
When you plug in a power strip to the PLA-407’s power socket and use this power strip for other electrical devices in your home, the PLA-407 can filter out
16 |
|
|
PLA-407 User’s Guide |
|
|
|
|
|
Chapter 1 Introducing the PLA-407
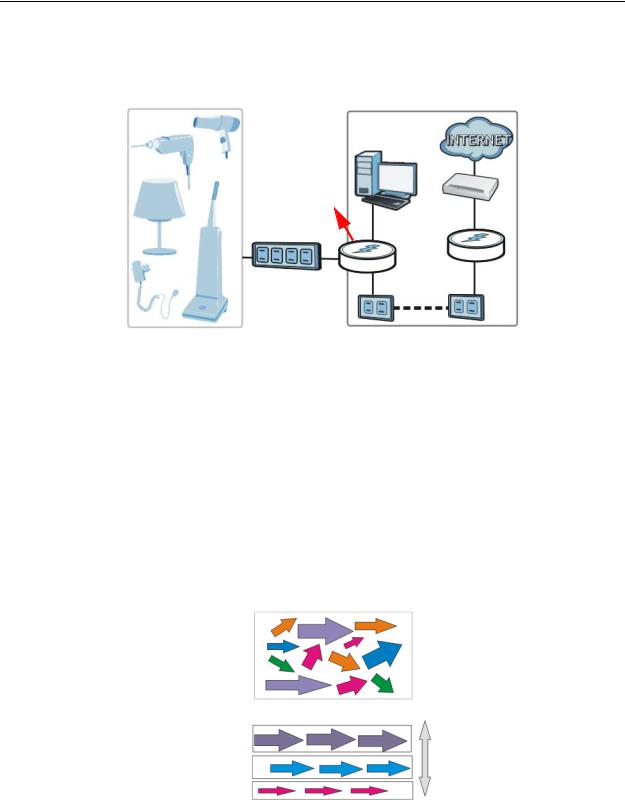
interference from the electrical devices so that it does not affect the Powerline network. This is shown in the following figure.
Figure 2 Noise Filter on PLA-407
Noise Filter
Home Appliances |
Powerline Network |
This setup maximizes the PLA-407’s performance and ensures that the Powerline network is stable. This benefits users who are into gaming or those watching streaming media from the Internet. The internal noise filter is enabled by default.
1.1.4 Quality of Service
Additionally, the Quality of Service (QoS) feature of the PLA-407 (refer to Section 5.6 on page 43) prioritizes voice, video and data traffic (such as web browsing, file transfer and e-mail). The figure below illustrates the advantage of implementing QoS.
Figure 3 QoS on PLA-407
Without QoS
|
All sorts |
Equal Priority |
|
of traffic |
|
|
|
|
|
|
|
With QoS |
Voice |
High Priority |
|
||
|
Video |
|
|
Data |
Low Priority |
|
17 |
PLA-407 User’s Guide |
|
|
|
Chapter 1 Introducing the PLA-407
1.1.5 Low Power Mode
Your PLA-407 is a certified green product. It goes into Low Power mode when there is no Ethernet connection.
When you plug the PLA-407 into an electric socket, it waits for an Ethernet connection. When no connection is detected after sixty (60) seconds, the Power LED ( ) blinks indicating that it is going into Low Power mode.
The same process occurs when you disconnect the PLA-407 from a previously working Ethernet connection. Sixty (60) seconds after disconnecting the Ethernet cable, the PLA-407’s Power LED blinks signalling that it is going into Low Power mode.
The Ethernet and HomePlug LEDs are turned off in Low Power mode.
While in Low Power mode, you cannot use the ENCRYPT button. To enable the ENCRYPT button again, you have to connect the PLA-407’s Ethernet cable to a computer/notebook or modem/router first. The PLA-407 wakes up from Low Power mode and you can start using the ENCRYPT button.
Low Power mode is enabled by default.
See Chapter 10 on page 85 for detailed product specifications.
1.2 Expand Your Network with the PLA-407
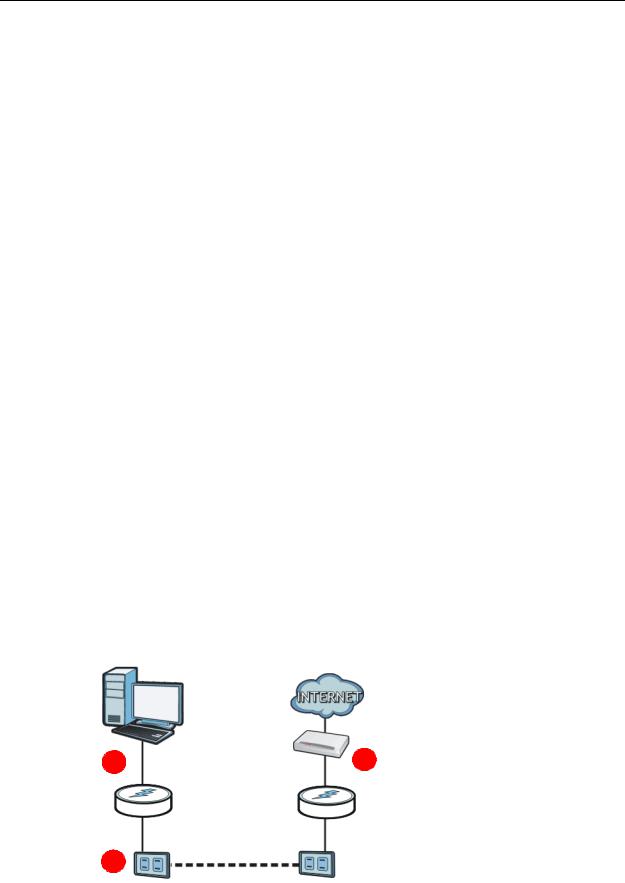
Connect your PLA-407 to an Internet gateway such as a modem and plug it into a power outlet in your home (1). Plug a second PLA-407 into another power outlet (2) and connect a computer to the PLA-407 for Internet access (3).
Figure 4 Expand Your Network with the PLA-407
3 |
1 |
2
18 |
|
|
PLA-407 User’s Guide |
|
|
|
|
|

Chapter 1 Introducing the PLA-407
Your network can be further expanded by plugging additional PLA-407s into other power outlets in your home and connecting other computers or network devices (for example, a printer) to them.
Refer to your Quick Start Guide for hardware connection information.
1.3 Ways to Manage the PLA-407
Use the ENCRYPT button to add Powerline devices to your Powerline network if they have this button. See Chapter 4 on page 31 for instructions on using the ENCRYPT feature.
Use the PLA-4xx Series Configuration Utility (or utility, for short) to manage the PLA-407. See Section 2.2 on page 23 for instructions on installing the utility.
Use the firmware upgrade tool to upgrade to the latest firmware. Because the latest PLA-407s are only compatible with other Powerline devices with the latest HomePlug AV firmware as well as the latest version Utility, this tool is available to help you upgrade. You can download this tool from the ZyXEL website (www.zyxel.com). See Chapter 3 on page 29 for information in using these tools.
This User’s Guide describes the latest version utility. This utility is only compatible with a PLA-407 which has the latest firmware installed. If you don’t already have them, download the latest firmware and utility from the ZyXEL website.
1.4 Security
Since your Powerline network may extend outside your premises, it is important to set up security on your PLA-407.
|
19 |
PLA-407 User’s Guide |
|
|
|

Chapter 1 Introducing the PLA-407
1.4.1 Passwords
You use two types of passwords in the HomePlug AV Powerline network. The following table describes the differences between the passwords.
Table 1 Password Summary
PASSWORD |
DESCRIPTION |
Network Name |
All Powerline adapters that follow the HomePlug AV |
|
standard are shipped with the same Powerline network |
|
name “HomePlugAV”. Change the network name via the |
|
PLA-4xx Series Configuration Utility to create a private |
|
network. See Section 5.3 on page 39. |
|
|
DAK (Data |
In order to manage the Powerline adapters on your |
Access Key) |
Powerline network you must enter the adapters’ DAK |
Password |
password in the PLA-4xx Series Configuration Utility. |
|
This password is printed on the Powerline adapter itself. |
|
You don’t need to add the password for the Powerline |
|
adapter directly connected to the computer running the |
|
configuration utility (local Powerline adapter), you only |
|
have to add the remote Powerline adapters’ passwords |
|
(those on your circuit, but not directly connected to your |
|
computer). |
|
|
1.4.2 Setting Up Security
The ENCRYPT feature automatically sets up security on your Powerline network. Use this feature if your Powerline devices have the ENCRYPT button.
If your devices do not have the ENCRYPT button, use the PLA-4xx Series Configuration Utility to set up security on the PLA-407. Although the PLA-407 is a “plug-and-play” network expanding solution there are several reasons for enabling security on the Powerline network in your home.
1It’s easy and only requires you to change a network name.
2It’s a good idea to ensure privacy of your communication. When you use the PLA407 and other Powerline adapters, the Powerline wiring in your home becomes an extension of your Ethernet network. Your network traffic flows freely within the electrical outlets of your home and is bounded in most cases by a power meter.
Without security (encryption) your information is accessible to anyone using a Powerline adapter on the same electrical circuit. In some cases, a circuit can be shared by more than one household.
To prevent compromising your network security, you can create a private network. A private network uses a secret password (Network Name) to make sure that only permitted Powerline adapters can communicate in your network. See Section 5.3 on page 39 for information on setting up a private network.
20 |
|
|
PLA-407 User’s Guide |
|
|
|
|
|
Chapter 1 Introducing the PLA-407
3You may need to change the Network Name to create multiple Powerline networks. See the next section for more information on how to set up a multiple network.
1.5Multiple Networks
Multiple powerline networks can coexist on a single powerline circuit. You might want to implement multiple powerline networks in a small office environment where you have two separate Ethernet networks.
1Connect one powerline adapter to a router or switch on the first Ethernet network and assign a Network Name (for example “Password1”) to this powerline adapter. Add additional powerline adapters to your network by plugging them into your powerline outlets and assigning them “Password1”. This completes the configuration of your first powerline network.
2Connect another powerline adapter to a router or switch on the second Ethernet network and assign a different Network Name (for example “Password2”) to this powerline adapter. Again, add additional powerline adapters and assign them “Password2”.
You now have two private networks on your powerline circuit. Information is not shared between the two networks as only powerline adapters with the same Network Name can communicate with each other.
|
21 |
PLA-407 User’s Guide |
|
|
|

Chapter 1 Introducing the PLA-407
22 |
|
|
PLA-407 User’s Guide |
|
|
|
|
|

2
Installing the Utility
2.1 Overview
This chapter guides you through the installation of the configuration utility for your PLA-407.
The installation of the configuration utility does the following:
1Checks for and installs Microsoft’s .NET Framework version 2.0 software on your computer. This software is necessary for the installation of the PLA-4xx Series Configuration Utility. If you already have .NET Framework version 2.0 installed on your computer this step will be skipped.
Note: At the time of writing the utility is only compatible with Microsoft Windows XP, Microsoft Windows Vista (32-bit version), MAC OS 10.4 and MAC OS 10.5 operating systems. Users with Windows XP (64-Bit version) operating systems can go to Microsoft’s website to upgrade their systems to .NET Framework version 2.0 so it can work with the utility. To check for your Windows operating system version, right-click on My Computer > Properties. You should see this information in the General tab.
2Installs ZyXEL’s PLA-4xx Series Configuration Utility. This utility allows you to manage the network name (See Section 5.3 on page 39 for more information) or view the devices recognized on your Powerline network.
Note: This User’s Guide describes the latest version utility. This utility is only compatible with a PLA-407 which has the latest firmware installed. If you don’t already have them, download the latest firmware and utility from the ZyXEL website.
2.2Installing the Utility
Follow the steps below to install .NET Framework version 2.0 and the PLA-4xx Series Configuration Utility on your computer.
|
23 |
PLA-407 User’s Guide |
|
|
|
Chapter 2 Installing the Utility
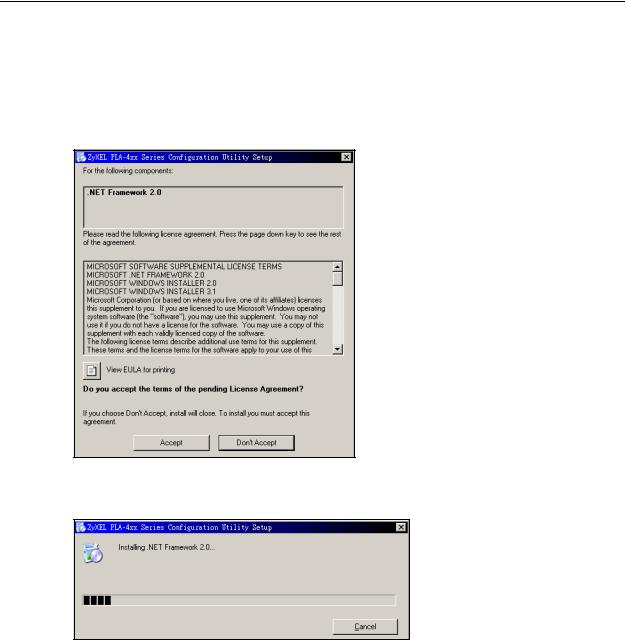
1Insert the included CD-ROM into your computer’s CD-ROM drive. The Setup utility runs automatically. Alternatively this can also be done manually by double clicking the setup.exe file on the CD. A prompt appears asking you to install the .NET Framework version 2.0. Review Microsoft’s License Agreement, select Accept to proceed.
Figure 5 .NET Framework Installation Prompt
2The next screen allows you to see the progress of the installation.
Figure 6 .NET Framework Installation Process
24 |
|
|
PLA-407 User’s Guide |
|
|
|
|
|

Chapter 2 Installing the Utility
3The Setup utility runs automatically. Click Yes or Next to continue through the initial screen. Click Cancel only if you want to abort the installation.
Figure 7 InstallShield Wizard Start Screen
4If you want the utility to be only available to the currently logged in user, select Only for me(...). Otherwise, click Everyone to allow all users to use the configuration utility. Click Next to install the utility to the default folder, or click Browse to specify a different location on your computer.
Figure 8 Install Destination Folder
Note: You can also click Disk Cost to know how much available disk space you have in the hard drives found in your computer.
|
25 |
PLA-407 User’s Guide |
|
|
|

Chapter 2 Installing the Utility
5When the installation is finished, a screen appears to confirm that the PLA-4xx Series Configuration Utility has been successfully installed on your computer. Click Close to exit the wizard.
Figure 9 Installation Complete
Note: You may be asked to restart your computer when the installation is complete. Click “Yes” to restart your computer. If you select “No, I will restart my computer later”, you will not be able to launch the utility until after a restart of your computer.
26 |
|
|
PLA-407 User’s Guide |
|
|
|
|
|

PART II
Managing the PLA-
407
Firmware Tool (29)
The ENCRYPT Button (31)
The Configuration Utility (37)
Powerline Network Setup Tutorial (61)
PLA Compatibility (71)
27

28

3
Firmware Tool
3.1 Overview
Use the Firmware Upgrade Tool to ensure you have the latest firmware (version 4.0.1 or later) on your PLA-407(s).
You need to upgrade all your PLA-407s to the latest firmware to ensure they can connect with each other and they are compatible with the latest version Utility.
If your firmware is an early version (earlier than 4.0.1), then upgrade your firmware using the Firmware Upgrade Tool.
3.2 Firmware Upgrade Tool
Use the firmware upgrade tool to upgrade your PLA-407’s firmware to the latest version.
You can use this tool to upgrade the firmware on the Powerline device directly connected to your computer. This is necessary as devices with ZyXEL’s early version firmware are not compatible with the latest Utility or with devices running ZyXEL’s latest version firmware.
At the time of writing, firmware version 4.0.1 is only available to PLA-407. This firmware version is compatible with version 3.3.4. Firmware version 3.3.4 is available to PLA-401 v3, PLA-402 v3 and PLA-407.
Note: The firmware is included in the Tool. You do not need to download the firmware separately.
|
29 |
PLA-407 User’s Guide |
|
|
|
Loading...