


YAMAHA®
AUTHORIZED PRODUCT MANUAL

YAMAHA

INTRODUCTION
Congratulations on your purchase of the Yamaha PortaSound PSS-680!
You now own one of the most sophisticated portable electronic keyboards available. Controlled by an advanced microcomputer, the PortaSound PSS-680 offers far more musical enjoyment and versatility than any other instrument in its class. In fact, it gives you the fun and functions of a who/e host of digital music machines, namely ...
•An electronic keyboard offering 100 high-quality preset voices using the famous Yamaha FM sound source.
•A digital synthesizer that lets you alter any of the preset
voices to taste and save up to five of these edited versions. • A versatile rhythm machine using 32 percussion instruments, PCM recorded for breath-taking realism. With 100 basic rhythm patterns featuring three intros/fill-ins and one ending each, you have an amazing 400 rhythm variations at your disposal. What’s more, you can even play percussion by hand like a drummer and record you own
original Custom Drummer pattern.
• A sophisticated automatic accompaniment system giving you Single Finger Chords, automatic bass, chords and orchestra, automatic Duet and orchestration capabilities.
• A simple but very useful sequencer offering unique musical possibilities: You can digitally record up to five melodies and chord progressions each and play them back any time at the touch of a button.
• A highly advanced MIDI controller and multi-timbral MIDI sound source. Used as a controller, the PortaSound can play a number of external MIDI instruments simultaneously on various channels. As a sound source, it will perform several voices as well as percussion independently at the same time.
Read this manual carefully while playing your new PortaSound, and you will be able to make full use of its many fantastic features in no time.
ABOUT THIS MANUAL
One look at your new PortaSound PSS-680 tells you:
this is an advanced instrument with a great variety of functions. Though this is true, don’t let the large number of buttons fool you — the PSS-680 is actually very easy to use. As you can see from the INDEX ILLUSTRATION on p.6, the controls are all organized in easy-to-understand functional groups. Once you get to know them, you will have no trouble operating your PortaSound, making it do exactly what you want it to.
To get acquainted with your new keyboard and have fun with it from the start, please read PART I first. You can then use the INDEX ILLUSTRATION to look up information on buttons or functional groups you are especially interested in right away. Otherwise, continue with PART II.
This manual is structured into three main parts. The shortest and simplest one, PART I — GETTING TO KNOW THE PSS-680, gives you all the information you need to play your new instrument, making use of its most basic features. It also shows you how you can listen to the pre-programmed DEMONSTRATION song.
The functions mentioned shortly in the QUICK GUIDE illustration of PART I are explained in greater detail in PART II. Particularly if you already have some experience with digital
keyboards, the QUICK GUIDE will enable you to use these functions immediately. On the other hand, if you are a total newcomer, reading the next part will make operations clearer to you.
PART II — BASIC FEATURES contains a systematic overall introduction of WHAT YOUR PortaSound CAN DO, followed by detailed explanations of most PortaSound functions. It tells you all about voice and style selection, effects, Hand Percussion, the Auto Accompaniment features and the Song Memory.
Each section starts out with a short Overview giving you a general idea of the respective functions. You can then try them out right away by following the steps described under Operation. Note that in the text, bold print indicates basic operational steps, while the regular print below it gives all the necessary explanations. Therefore, you can simply follow the instructions in bold print when you want to get to know a feature, and read the details and Points to Remember later.
Finally, PART III shows you how to use those ADVANCED FEATURES that require a bit of specialized know-how — the Digital Synthesizer section to create your own FM sounds, and the MIDI functions for communication with other MIDI instruments, sequencers and computers.

CONTENS
PRECAUTIONS-TAKING CARE OF YOUR PORTASOUND.. . . . . . . . . . . . . . . . . . . . . . . . . . . . . . . . 1 |
|
CONTROL PANEL.. . . . . . . . . . . . . . . . . . . . . . . . . . . . . . . . . . . . . . . . . . . . . . . . . . . . . . . . . . . . . . . . . . . . . . . . . . . . . . . . . . . . . . . . . . . . . . . . . . . . . . . .. |
2 |
PART I GETTING TO KNOW THE PSS-680 . . . . . . . . . . . . . . . . . . . . . . . . . . . . . . . . . . . . . . . . . . . . . . . . . . . . |
4 |
POWER ................................................................................................................... |
4 |
PLAYING ................................................................................................................ |
4 |
DEMONSTRATION ............................................................................................... |
4 |
QUICK GUIDE.. ................................................................................................................... |
5 |
INDEX ILLUSTRATION ..................................................................................................... |
6 |
PART II BASIC FEATURES ...................................................................................... |
7 |
W H A T YOUR PortaSound CAN DO ............................................................................ |
7 |
Voices, Rhythm and Auto Accompaniment.. ...................................................... 7 |
|
Headphones ........................................................................................................... |
8 |
Connecting the PSS-680 to Your Stereo ........................................................... |
8 |
VOICE/MELODY SECTION ............................................................................................. |
8 |
SELECTING A VOICE . . . . . . . . . . . . . . . . . . . . . . . . . . . . . . . . . . . . . . . . . . . . . . . . . . . . . . . . . . . . . . . . . . . . . . . . . . ... . . . . . . . . . . . . . . . |
8 |
EFFECTS.. ............................................................................................................... |
9 |
PITCH BEND Wheel ............................................................................................... |
10 |
PARAMETER CHANGE Settings.. ....................................................................... 10 |
|
TRANSPOSE ........................ ........................................................................... |
11 |
TUNING ........................................................................................................... |
11 |
MELODY VOLUME ............................ ............................................................ |
11 |
RHYTHM MACHINE FUNCTIONS ............................................................................... |
13 |
STYLE SELECT-Choosing the Rhythm ............................................................. |
13 |
RHYTHM CONTROL ............................................................................................ |
13 |
TEMPO.. .................................................................................................................. |
14 |
BEAT Display.. ....................................................................................................... |
14 |
Changing the Rhythm Style During Performance.. ........................................... 14 |
|
HAND PERCUSSION.. .......................................................................................... |
15 |
CUSTOM DRUMMER .......................................................................................... |
16 |
AUTO ACCOMPANIMENT FEATURES ....................................................................... |
18 |
MODE ..................................................................................................................... |
18 |
ORCHESTRATION ................................................................................................ |
18 |
A) Single Finger Chords.. .................................................................................... |
19 |
B) Single Finger Auto Accompaniment ............................................................ |
20 |
C) Fingered Auto Accompaniment .................................................................... |
20 |
DUET.. ..................................................................................................................... |
21 |
SONG MEMORY ................................................................................................................ |
22 |
MELODY Memory ................................................................................................. |
22 |
CHORD Memory.................................................................................................... |
24 |
PART III ADVANCED FUNCTIONS ..................................................................... |
26 |
DIGITAL SYNTHESIZER.. ................................................................................................. |
26 |
FM SYNTHESIS BASIC COURSE.. ..................................................................... |
26 |
1) Voice Parameters and Values......................................................................... |
26 |
2)A Bit of FM Theory.. ....................................................................................... 26
3)Creating Sounds.. ............................................................................................ 27 SYNTHESIZER PARAMETERS.. .......................................................................... 29
M I D I ....................................................................................................................................... |
30 |
What is MIDI?......................................................................................................... |
30 |
MIDI MODE .................................................................................................... |
31 |
Keyboard Assign M O D E . . . . . |
. . . . . . . . . . . . . . . . . . . . . . . . . . . . . . . . . . . . . . . . . . . . . . . . . . . . . . . . . . . . . . . . . . . . .. |
32 |
Transmitted Data .................................................................................................. |
|
32 |
Memory Bulk Dump.. ............................................................................................ 33 |
||
Received Data ........................................................................................................ |
|
34 |
Sound Source Mode ............................................................................................... |
|
35 |
Transmitted Data.................................................................................................... |
|
35 |
Received Data ........................................................................................................ |
|
35 |
MIDI RECEIVE CHANNEL FILTER . . . . . . . . . . . . . . . . . . . . . . . . . . . . . . . . . . . . . . . . . . . . . . . . . . . . . . . . . . . . . . |
36 |
|
TRANSMIT CHANNEL |
Selection ........................................................ |
36 |
M I D I CONNECTION EXAMPLES .................................................................................. |
|
37 |
ADDITIONAL INFORMATION ......................................................................................... |
|
39 |
ALL RESET ............................................................................................................ |
|
39 |
SPECIFICATIONS ............................................................................................................. |
|
40 |
EXCLUSIVE DATA FORMAT .......................................................................................... |
|
41 |
M I D I Implementation Chart . . .. . . . . |
. . . . . . . . . . . . . . . . . . . . . . . . . . . . . . . . . . . . . . . . . . . . . . . . . . . . . . . . . . . . . . . . . . . . . . |
45 |
PRECAUTIONS — TAKING CARE OF YOUR PORTASOUND
Your new PortaSound is a fine musical instrument — and should be treated as such. Handle it with care and common sense, and it will give you years of enjoyment.
•Location
Avoid exposure to direct sunlight or other sources of heat. Never leave it inside a car where it can get very hot. Vibration, excessive dust, cold, low or high humidity can also cause malfunction.
•Handling
Avoid rough handling. Don’t drop or jolt the PortaSound as this can damage the internal circuitry. Pressing too hard on keys or controls may lead to malfunctions. When cords are plugged into the rear panel jacks, pay particular attention not to apply excessive force to them since this may damage the terminals.
•Adaptors
Use only the power adaptor described in the POWER section. Disconnect the AC adaptor when not using your PortaSound.
•Batteries
•When not using your PortaSound for long periods, be sure to remove the batteries to avoid damage through battery leakage.
•Replace weak batteries before they run down completely.
•Always replace all batteries with new ones.
•Do not use different kinds of batteries at the same time,
•In case electrolyte has leaked into the battery compartment, wipe it off completely before installing new batteries.
•Never disassemble, heat or throw discarded batteries
into a fire. Dispose of them properly.
• Cleaning
Clean the exterior with a soft, dry cloth. Using chemical solvents will damage the finish.
•Interference Through Electromagnetic Fields
Do not use your PortaSound close to television sets or other equipment receiving electromagnetic signals as this could cause interference noise in the other appliance.
•Service and Modifications
Your PortaSound contains no user serviceable parts. Opening it or tampering with it in any way can lead to electrical shock as well as damage. Of course, any resulting damage will no longer be repaired free of charge. Refer all servicing to qualified YAMAHA personnel.
1
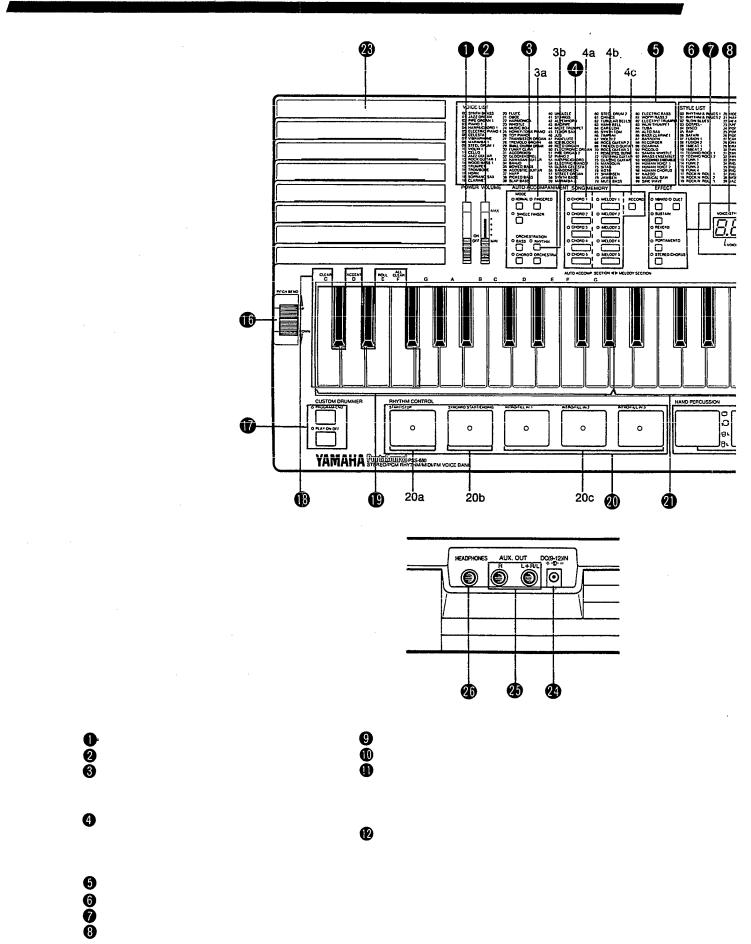
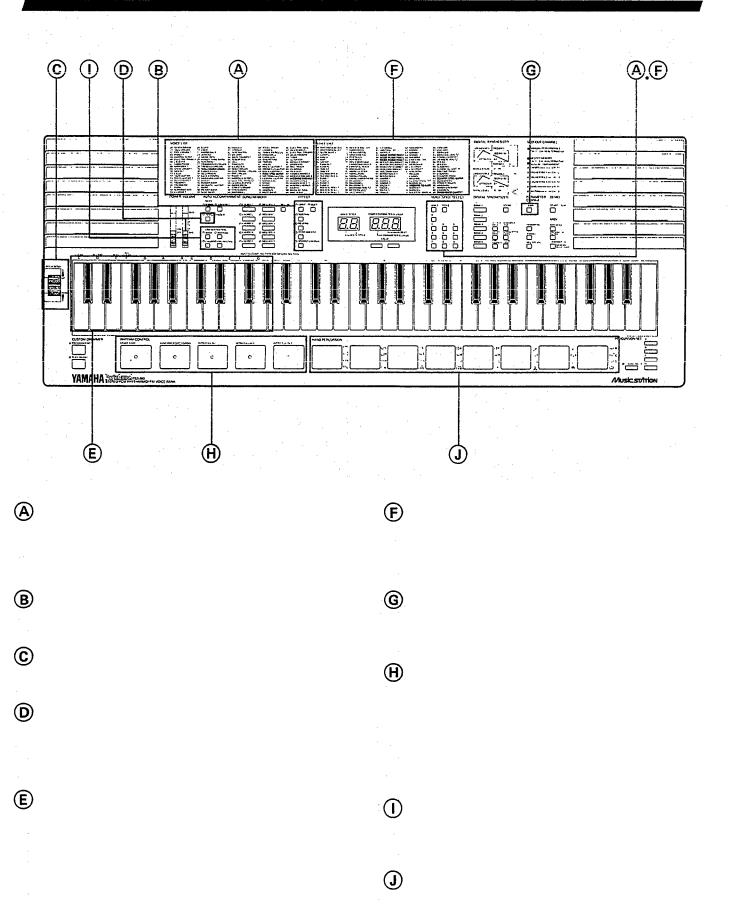
CONTROL PANEL
POWER |
switch |
|
TEMPO/PARAMETER & VALUE display |
|||
VOLUME |
slider |
|
VALUE buttons |
|||
AUTO ACCOMPANIMENT group |
VOICE/STYLE SELECT group |
|||||
3a |
MODE selectors |
11a VOICE switch |
||||
3b |
ORCHESTRATION buttons |
11b STYLE switch |
||||
SONG |
MEMORY |
|
11c Number buttons |
|||
4a |
CHORD |
bank |
selectors |
DIGITAL SYNTHESIZER group |
||
4b |
MELODY |
bank |
selectors |
12a Voice BANK selectors |
||
4c RECORD button |
12b STORE button |
|||||
VOICE |
LIST |
|
|
12c Synthesizer Parameter selectors |
||
STYLE |
LIST |
|
|
12d DIGITAL SYNTHESIZER flowchart |
||
EFFECT |
|
selectors |
|
|
||
VOICE/STYLE |
number display |
|
||||
2
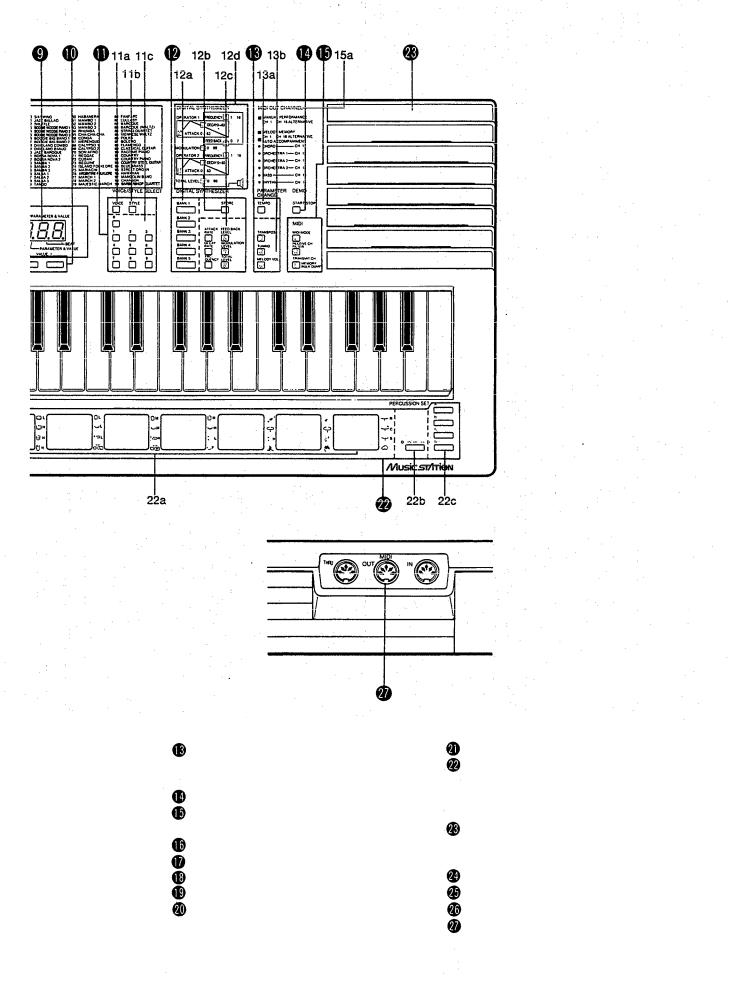
PARAMETER CHANGE group 13a TEMPO button
13b Parameter selectors DEMO START/STOP switch MIDI group
15a MIDI OUT CHANNEL list PITCH BEND wheel CUSTOM DRUMMER controls Percussion control keys
AUTO ACCOMPANIMENT SECTION RHYTHM CONTROL pads
20a START/STOP switch
20b SYNCHRO START/ENDING control
20c INTRO/FILL IN controls
MELODY SECTION
HAND PERCUSSION section 22a HAND PERCUSSION pads 22b SYNCHRO BREAK switch
22c PERCUSSION SET selectors Built-in speakers
REAR PANEL
DC(9-12V)IN AC power adaptor terminal
AUX. OUT jacks
HEADPHONES jack
MIDI terminals
3
PART I
GETTING TO KNOW THE PSS-680
This part of the manual first shows you how to provide the PSS-680 with POWER, using batteries or an AC adaptor. You can then turn it on and start PLAYING it right away.
Next, listen to a DEMONSTRATlON of what the PortaSound PSS-680 can do. Reading PART II will then enable to perform this kind of professional-sounding music all by yourself.
The QUICK GUIDE briefly introduces the most basic features without going into detail so you can enjoy yourself experimenting and discovering.
POWER
Your PortaSound PSS-680 works on batteries or household current. Since batteries are also needed to support the internal RAM memory, buy six 1.5V SUM-2 alkaline batteries. (Be sure to read the precautions concerning batteries on p. 1). To save battery power, you can also use a Yamaha PA-3, PA-4 or PA-40 AC adaptor.
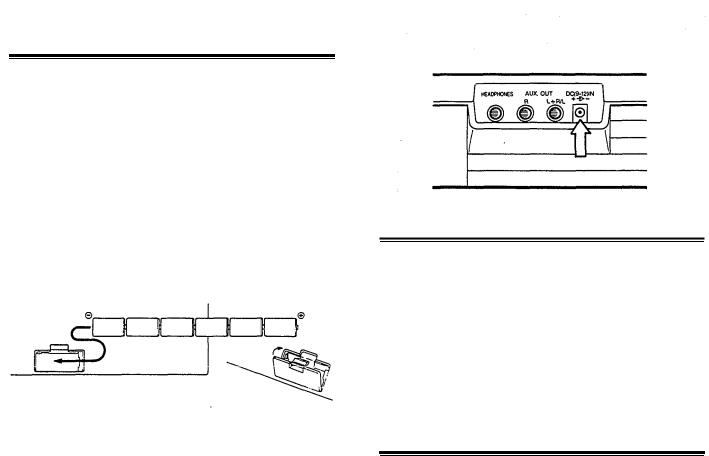
Inserting Batteries
Turn the instrument upside-down and remove the battery compartment lid by pushing its tab in the direction of the arrow embossed on the lid. Insert the six batteries, making sure that their poles are aligned as shown in the illustration below. Replace the lid. It should lock in place with a click.
Low Battery Warning
When the battery voltage drops below a certain level, the LED displays will start to blink. As soon as this happens, replace all six batteries with new ones. If you allow the batteries to become spent completely, any data you have stored in the internal memories will be lost.
Using an AC Power Adaptor
When you want to connect your PortaSound to a wall socket, buy a Yamaha PA-3, PA-4 or PA-40 Power Adaptor. No other adaptor can be used, so be sure to ask for the right kind.
Plug the adaptor into a convenient wall socket and its connector into the DC(9-12V)IN terminal (24) on the back of your PortaSound as shown. (Even when power is turned off, the AC adaptor back up the PortaSound RAM memory.)
PLAYING
Slide the POWER switch (1) upward to the ON position. The LED displays and various indicators will light up to confirm that the PortaSound is turned on.
You can now play the keyboard. Adjust the sound level with the VOLUME slider (2), pushing it up toward MAX to increase volume and down to lower it.
•Be sure to turn your PortaSound off again by sliding the POWER switch (1) back to OFF after you have finished playing. This will save battery power.
DEMONSTRATION
To get an idea of the music your new PortaSound is capable of playing, listen to the factory-programmed demonstration song. Start it by pressing the yellow DEMO START/STOP button (14).
• The song will continue until you press DEMO START/STOP again, or the START/STOP pad (20a). You will soon be playing music in this kind of professional style by yourself — PART II will teach you all the necessary operations. Most of these steps can also be carried while the PortaSound is performing the demonstration song, allowing you to alter this song according to your taste.
4
QUICK GUIDE
Selecting Voices
To choose any instrument sound you like, simply look up its name in the VOICE LIST (5) and input the corresponding number with the number buttons (11c). (It may be necessary to press the blue VOICE switch (11a) first.)
Effects
Add special effects to the instrument sounds by pressing these selectors.
Pitch Bend Wheel
Bend the pitch of melody notes upward or downward with this wheel.
Single Finger Chords
You can play entire chords automatically with just a finger or two — press the SINGLE FINGER selector (3a), then play keys in the AUTO ACCOMPANIMENT SECTION.
Automatic Accompaniment
With SINGLE FINGER mode on, hit the START/STOP pad (20a) to start the rhythm. Play the AUTO ACCOMPANIMENT SECTION and enjoy automatic bass, chord and orchestra accompaniment. To stop it, press SYNCHRO START/ENDING (20b).
Selecting Styles
The STYLE LIST (6) shows you which rhythm and accompaniment styles you can choose from. Press the blue STYLE (11 b) switch, then enter the desired style number with the number buttons (11c).
Tempo
To adjust the speed of the rhythm/accompaniment, press TEMPO (13a), then use the VALUE buttons (10) to make it faster or slower.
Rhythm Control
START/STOP (20a) starts or stops the selected rhythm. Hit the INTRO/FILL IN pads (20c) instead for a different beginning or for variations while the drum sounds are playing. (Works for Auto Accompaniment too.)
SYNCHRO START/ENDING (20b) lets the rhythm begin automatically when you play the AUTO ACCOMPANIMENT SECTION (19), or ends it with a special pattern.
Orchestration
These switches (3b) turn the four components of the Auto Accompaniment — bass, rhythm (drums), chords and orchestra parts — on and off to suit your music.
Hand Percussion
Hit these 8 pads (22a) any time to play your own drums. Use the PERCUSSION SET selectors (22c) to choose one of four different drum sets.
5

INDEX ILLUSTRATION
6
PART II
BASIC FEATURES
WHAT YOUR PortaSound CAN DO
Using the QUICK GUIDE and listening to the DEMO song has already given you a first impression of your new PortaSound’s capabilities. This chapter tells you more about them.
Voices, Rhythm and Auto Accompaniment
To better understand the PortaSound’s functional structure, think of it as comprising the following three sections:
As the names say, the Voice/Melody Section controls all features concerning the voices you play, usually in the form of a melody, while the Auto Accompaniment Section helps you perform the accompaniment to these melodies. The Rhythm Section can be used separately like a drum machine. or in combination with Auto Accompaniment.
• This is not a strict division. These sections are closely interconnected — for instance, RHYTHM CONTROL influences both the Rhythm and the Auto Accompaniment Sections, and the SONG MEMORY MELODY banks are just as much part of Voice/Melody as they are of Auto Accompaniment. Keeping this division in mind, though, makes it easier to understand the PortaSound features.
Voice/Melody Section
In the tradition of Yamaha’s famous DX7 synthesizers, the preset instrument sounds available on the PortaSound PSS-680 are referred to as “voices”. With the Digital Synthesizer functions explained in PART III (p.26), you can alter them to create your own original sounds, then save up to five of these for instant access at the push of a button.
For more expressiveness and realism, you can add various EFFECTS (p.9) to the voices. PORTAMENTO and PITCH BEND (p.10), for instance, can greatly enhance strings, brass or bass sounds.
Easy Play Functions
If the melody you want to play is in a difficult key, you can TRANSPOSE the entire keyboard (p.11) to an easier one. Melodies (or parts of them) you find particularly hard to
perform can be memorized in the MELODY banks of the SONG MEMORY (p.22). For example, if a phrase is too fast for you. record it at a comfortable slow tempo and then play it back any time at the correct speed by simply pressing the corresponding MELODY button.
Rhythm and Auto Accompaniment Sections
Since these sections are so closely interrelated, many of their functions are treated together in this manual.
The Rhythm and Auto Accompaniment features can enhance your performances in four basic ways: The PortaSound PSS-680 is capable of
1.playing a rhythm accompaniment to your music with realistic percussion sound patterns in a hundred different musical styles, functioning like a high-quality drum machine. Many variations of these basic patterns are possible with RHYTHM CONTROL.
2.letting you play complete chords by using only a single finger of your left hand (SINGLE FINGER chords).
3.performing an entire accompaniment arrangement, complete with drums, bass, chords and orchestra, easily controlled by your left hand. Again, RHYTHM CONTROL can be used to add a great number of variations. You can even change the ORCHESTRATION, deleting or adding parts to the accompaniment at the touch of a button.
4.digitally recording whole melodies or various melody sections as well as entire chord progressions in the SONG MEMORY. These can be played back at the touch of a button. The PSS-680 thus also does the job of a simple but particularly flexible sequencer — you can use it either
7
for totally automatic performances, or to enhance any music you are playing live.
In addition, you can play four different sets of 8 percussion instruments by hand like a drummer with the easy-to-use HAND PERCUSSION pads, further enhancing the Rhythm and Auto Accompaniment with your own solos, and record your own original CUSTOM DRUMMER pattern.
Headphones
For private practicing and playing without disturbing others, connect headphones to the rear panel HEADPHONES jack (26). The built-in speakers (23) are automatically cut off when you insert a headphone plug into this jack.
Connecting the PSS-680 to Your Stereo
For a truly powerful sound, connect the AUXILIARY (AUX.) jacks (25) on the rear panel of the PortaSound to your stereo system with optional cables. Both jacks must be used for a stereo effect.
Be sure to turn the PortaSound’s power off when making theses connections.
Reduce the VOLUME (2) on the PortaSound and adjust the sound level with your stereo’s volume control.
If you want to connect the PortaSound to a mono amplification system such as a keyboard amp, use only the L + R/L jack. This will then output a mix of the left and right channel signals.
Only the PCM percussion sounds have distinct left or right positions in the stereo field, while the FM voices are all centered. STEREO CHORUS, however, gives a three-dimensional stereo effect with all FM sounds.
VOICE/MELODY SECTION
SELECTING A VOICE
 Overview
100 preset FM voices are yours for the choosing. Each voice has its own number, indicated in blue next to its name in the VOICE LIST (5), for instant access.
Selecting a voice is very easy, requiring only one or two steps:
Operation
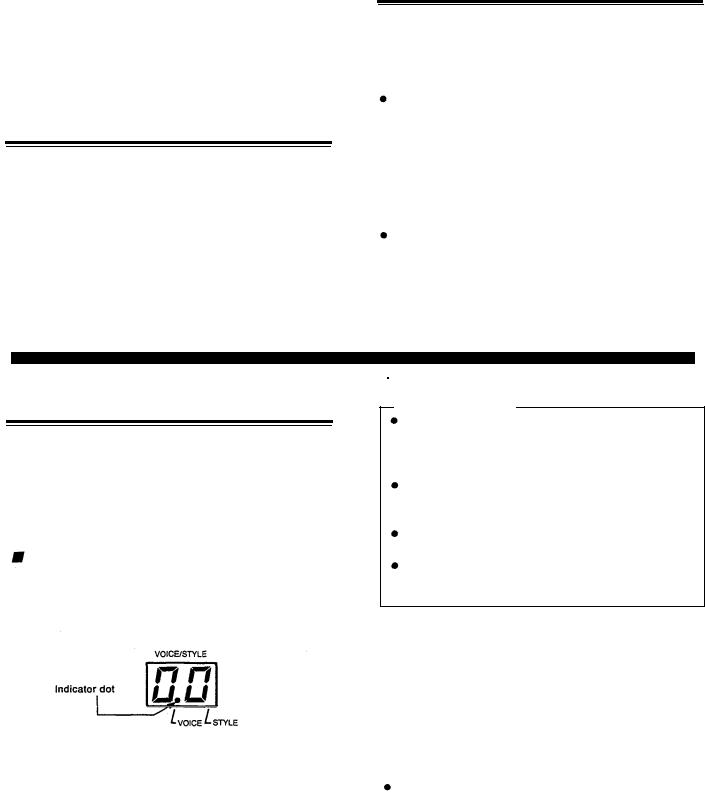
1. Make sure the VOICE indicator is lit.
Check to see that the dot in the VOICE/STYLE number display (8) is located above “VOICE”.
This shows that your PortaSound is ready for voice selection. If it is not, simply press the blue VOICE switch (11a), making sure that the VOICE indicator dot lights up.
2. Enter the voice number.
Use the VOICE/STYLE SELECT number buttons (11c) to input the number of the desired voice.
Points to Remember
Notice that all voice numbers have two digits. Both must be entered for the instrument sound to change. (The first ten voice numbers start with a “0”, which you also have to input.)
You can always check the currently selected voice by looking at the VOICE/STYLE display (making sure the VOICE indicator is lit).
When POWER is turned on, the voice chosen before the PSS-680 was turned off is selected automatically. With each voice, up to twelve keys can be played at the same time — in other words, the PSS-680 is 12-voice polyphonic.
To appreciate the amazing variety of realistic FM instrument sounds now at your disposal, try out as many voices as you like right now.
Playing Along with the Demo Song
If you want, you can even play along with the demonstration song using any instrument of your choice. To do so, select a voice, press the yellow DEMO START/STOP switch and play. You can change to other voices any time.
When playing along like this, you can only play single notes at a time (= “monophonic” performance).
A TIP: Using the Digital Synthesizer Memory Banks for One-Touch Voice Selection.
Sometimes you will want to change voices while playing — but you may not have enough time to look up a voice number and input its two digits during a performance.
8
For instant access at the touch of a button, you can store up to five selected voices in the Digital Synthesizer Memory BANKS 1 thru 5 (12a).
 Operation
1.Select the voice you want to store.
2.Hold down the red STORE button (12b) and simultaneously press the desired BANK button (12a), for example BANK
1.The VOICE/STYLE display will indicate “b.1”. The selected voice is now stored in BANK 1 and can be recalled any time by pressing that button.
Stored voices are retained in their banks even when POWER is turned off.
Saving voice data to a bank deletes any previous settings already stored there.
EFFECTS
 Overview
The PSS-680 offers six different kinds of effects, described below, which can be added to the FM instrument voices for even greater tonal variation. They do not affect the PCM percussion sounds.
 Operation
1.To obtain the effect you want, simply press the corresponding button in the EFFECT group.
The little red indicator next to it will light up, showing that an effect has been selected. You can use several or all effects at the same time.
Points to Remember
DUET and PORTAMENTO depend on other settings as well — see below for details.
Some preset voices are already programmed with effects
— for instance, VIOLIN 1 (10) and STRINGS (41) use vibrato, HARP (37) sustain, and so on. In such cases, the corresponding EFFECT indicator will light up whenever that instrument is selected. For these instruments, you can of course turn OFF that effect by pressing its selector.
With the exception of STEREO CHORUS, all effects influence only the notes you are playing in the MELODY SECTION (21) of the keyboard.
Effects can be stored independently for each SONG MEMORY MELODY bank (see p.22.). During bank playback, these individual effect settings are used automatically and cannot be canceled with the EFFECT selectors.
Try out all six effects to understand how they work and how they influence each instrument sound differently. Here is a
short explanation of what each effect does, and how to adjust PORTAMENTO:
VIBRATO
Vibrato regularly (cyclically) raises and lowers the pitch of a sound. It occurs naturally in the human voice, and many acoustic instruments, for example strings, make use of it. Usually, this effect does not start right away when a note is sung or played, but after a certain delay time.
The PSS-680 VIBRATO also simulates this natural delay. For an even more realistic effect, each voice has the vibrato delay that suits it best.
SUSTAIN
Sustain lengthens the release rate of a voice, causing the sound to linger even after the keys have been released. It works rather like the damper pedal of a piano. The sustain effect is also different (longer or shorter) for each voice.
REVERB
Reverb, short for reverberation, gives a spacious effect similar to an instrument being played in a large hall. It can add atmosphere to almost any voice. Try it with SMALL CHURCH ORGAN (29) or HUMAN VOICES/CHORUS (94 to 96).
PORTAMENTO |
Range: 1 to 5 |
Portamento is the smooth pitch glide effect that occurs between notes played consecutively on some instruments, such as the violin and trombone, or sung by the human voice. The speed with which the pitch changes between the keys you play can be adjusted over a 5-step range (values from 1 = slow to 5 = fast). Fast settings provide a less extreme effect which can make string instrument voices etc., sound very realistic.
 Operation
1.Hold down the PORTAMENTO button.
The TEMPO/PARAMETER & VALUE display will now show the current portamento speed setting. To change this value,
2.keep holding down the PORTAMENTO button and use the VALUE buttons.
Pressing + increases portamento speed, SHORTENING the portamento time for a LESS pronounced effect. – lowers the speed, so it takes longer for the pitch to change between notes, making the effect more noticeable.
Be sure to hold down the PORTAMENTO button while changing this setting, otherwise it will not work. Pressing both VALUE buttons + and – simultaneously returns the setting to the default value of 3.
The PORTAMENTO setting is retained even when power is turned off.
9
STEREO CHORUS
Stereo Chorus creates the “spacy” impression of several instruments being played at the same time for a warm, threedimensional “symphonic” sound. It is the only effect that influences not only the melodies you play, but also all accompaniment sounds (except PCM percussion).
DUET
Duet differs from the other effects in that it can only be used in combination with the AUTO ACCOMPANIMENT functions. A detailed explanation of this feature, which automatically adds a second solo instrument to the one you are playing, is given on p.21.
• Note that the Duet effect will not work in the NORMAL AUTO ACCOMPANIMENT mode, even if the DUET button is pressed and its indicator lit.
PITCH BEND Wheel |
Range: +/-12 |
|
|
|
|
 Overview
This control lets you bend the pitch of notes played in the MELODY SECTION upward or downward. The effect is similar to a guitar being choked by bending the strings, and is often heard during synthesizer solos.
The range of the pitch bend is adjustable. On delivery, it is set to 1 (the default value): Moving the wheel fully in the UP direction raises pitch by a semitone, while moving it fully DOWN lowers the pitch by the same interval. The available range is from one half-tone (semitone, VALUE = 1) to one octave (VALUE = 12). To adjust it —
 Operation
1.Hold the PITCH BEND wheel in either the UP or DOWN position.
The current pitch bend range appears on the TEMPO/PARAMETER & VALUE display.
2.Use the VALUE + or – buttons to set the bend range value.
While doing so, the PITCH BEND wheel must still be held in the UP or DOWN position. Pressing + increases the setting, – decreases it. A value of 1 on the TEMPO/PARAMETER & VALUE display indicates a bend range of one semitone, a value of 2 one whole tone, and so on. A setting of 12 (= 12 semitones) equals one octave.
With positive settings, the pitch bend direction will correspond to the PITCH BEND wheel’s UP or DOWN movement. Setting a negative value (indicated by a “-” on the display) reverses the pitch bend — moving the PITCH BEND wheel UP will then decrease the pitch and vice versa.
The setting can be returned to 1 instantly by pressing both VALUE buttons at the same time.
•The pitch bend range setting is retained even when power is turned off.
Points to Remember
Is a VALUE button pressed for more then a second,
the value will begin to change rapidly. There is no setting with VALUE = 0.
Pitch bend data can be saved with the SONG MEMORY MELODY function.
PARAMETER CHANGE Settings
Overview
The PARAMETER CHANGE group of buttons (13) consists of the TEMPO button (13a), explained elsewhere (p.14), and the three parameter selectors (13b) TRANSPOSE, TUNING and MELODY VOLUME. Though their functions are not connected, the setting method is the same for the latter three, which is why they are grouped together.
It is a good idea to memorize this basic setting method, since you will be using it for the Digital Synthesizer and MIDI functions as well.
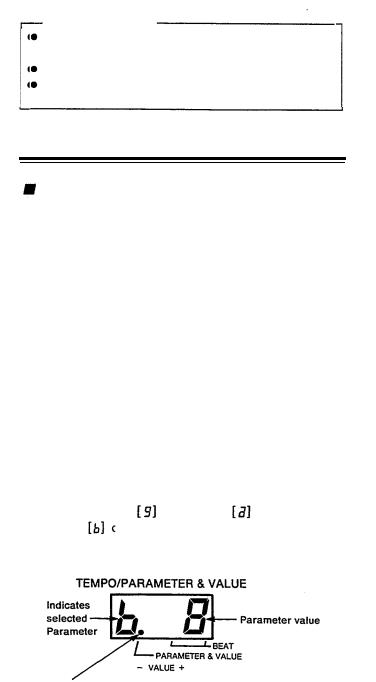
Parameters and Values
A parameter is simply a setting whose value can be changed. The three parameter selectors (13b) have an orange number or letter printed on them, as do the Digital Synthesizer and MIDI buttons to their left and right. This is the parameter identification symbol that appears on the TEMPO/PARAMETER & VALUE display, telling you which parameter is currently selected.
Press TRANSPOSE |
TUNING |
and MELODY |
|
VOLUME |
one after the other. This calls up each pa- |
||
rameter and its current value on the TEMPO/PARAMETER & VALUE display (9).
This dot keeps the parameter symbol on its left apart from the value digits on its right.
The single digit left of the dot on the display is the symbol indicating the selected PARAMETER (the symbol also printed on the button just pressed), in our case or
or  . The oneor two-digit number to the right of the period is the current VALUE of that parameter.
 If there is not dot on the TEMPO/PARAMETER & VALUE display, this means that the display is currently indicating the TEMPO.
Once a parameter is called up on the display, you can change its value with the – and + VALUE buttons (10). Pressing – decreases the value, + increases it. For a more
10
rapid change, hold |
down either button. Pressing both |
– and + simultaneously resets the original value (i.e. the |
|
value before you started to make changes). |
|
TRANSPOSE |
Range: +/– 12 semitones |
Overview
With the exception of the PCM percussion sounds, all PortaSound voices can be transposed over a range of two octaves. In other words, you can use the TRANSPOSE function to raise or lower the pitch of both the MELODY SECTION and the AUTO ACCOMPANIMENT SECTION in semitone steps.
This feature has mainly two applications. First, it lets you set the pitch of the entire keyboard to the easiest key for you to play in. For example, if a song is in B major and you find it difficult to perform in that key, all you have to do is lower the keyboard pitch by a half-tone with TRANSPOSE. Now, if you play the same song in the easy key of C major on the PortaSound keyboard, its pitch will automatically be transposed downward (lowered) by a semitone, so that in effect you will hear it in B major. This is sometimes handy when playing along with other instruments, too.
TRANSPOSE can also be used to raise or lower the pitch of the PortaSound by an octave in order to change the mood of the music or adapt the note range to the character of the instrument voice — e.g. transposing it downward for a deeper and more powerful electric bass sound.
Note, however, that octave transposition is only effective for melody voices — the auto accompaniment section returns to original pitch when a TRANSPOSE value of + or –12 is entered.
Operation |
|
1. Press TRANSPOSE |
. |
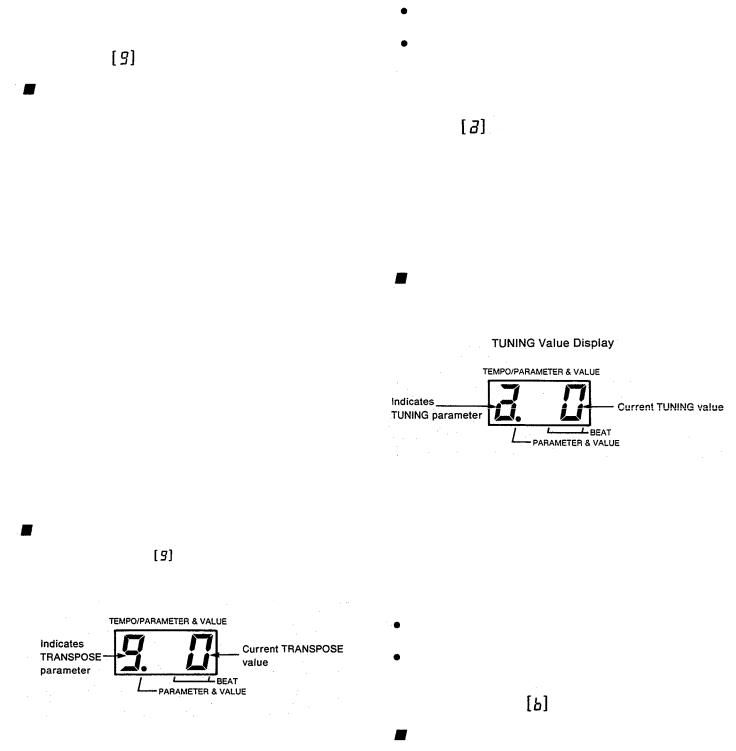
The TEMPO/PARAMETER &VALUE display will show
TRANSPOSE Value Display
This display tells you that the TRANSPOSE value is now 0, meaning that the keyboard is in its regular key.
2. Adjust the key with the VALUE buttons.
To raise the key, use +. Each value increase by 1 means an upward transposition by 1 semitone.
– lowers the key. A minus symbol ”–” in front of the value indicates that the current key is lower than the regular setting of 0.
•Press both VALUE buttons simultaneously to instantly return to the regular key (TRANSPOSE value 0).
|
Points to Remember |
|
|
|
|
|
|
||
The TRANSPOSE value is memorized when power is |
|
|||
|
turned |
off. |
|
|
The TRANSPOSE value influences the pitch of tran- |
|
|||
|
smitted MIDI note data and received data in the 00 |
|
||
|
mode. However, received data is not affected in the |
|
||
|
99 mode. (See MIDI section.) |
|
||
TUNING |
|
Range: +/– 16 |
|
|
 Overview
The overall pitch of your PortaSound is normally set so that A3 = 440 Hz (standard concert pitch). When playing together with other instruments which have a different tuning, you can raise or lower this pitch in steps of approximately 3.13 cents over a +/– 16 step range.
Operation
1.Press TUNING .
.
The TEMPO/PARAMETER VALUE display will show
This display tells you that the TUNING value is now 0, meaning that A3 corresponds to 440 Hz.
2. Adjust the pitch with the VALUE buttons.
To raise the pitch, use +. Each value increase by 1 raises the pitch by about 3.13 cents.
– lowers the pitch. A minus symbol “–” in front of the value indicates that the current pitch is lower than the regular setting.
Press both VALUE buttons simultaneously to instantly return to the regular pitch (TUNING value 0).
The TUNING value is memorized when power is turned off.
MELODY VOLUME |
R a n g e : 1 – 9 |
Overview
This parameter lets you adjust the volume of the keyboard’s MELODY SECTION and the SONG MEMORY MELODY banks in relation to the AUTO ACCOMPANIMENT sounds. (For information on AUTO ACCOMPANIMENT, see below.) Minimum value is 1 for the quietest, maximum is 9 for the loudest sound.
Occasionally, chords will sound distorted if melody volume is set to maximum and the voice has a TOTAL LEVEL (see Digital Synthesizer section) of 90 or more. In such cases, lower the melody volume or the total level.
11
Operation
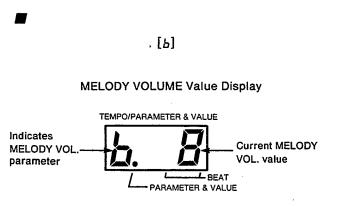
1.Press MELODY VOL. .
The TEMPO/PARAMETER &VALUE display will show
This display tells you that the MELODY VOL. value is now 8 (the normal setting).
2.Adjust the melody volume with the VALUE buttons.
+raises the volume, – lowers it.
•To instantly return to MELODY VOLUME to value 8, press both VALUE buttons simultaneously.
•MELODY VOLUME setting is retained when power is turned off.
12
 Loading...