


 Loading...
Owner’s Manual

SPECIAL MESSAGE SECTION
This product utilizes batteries or an external power supply (adapter). DO NOT connect this product to any power supply or adapter other than one described in the manual, on the name plate, or specifically recommended by Yamaha.
WARNING: Do not place this product in a position where anyone could walk on, trip over ,or roll anything over power or connecting cords of any kind. The use of an extension cord is not recommended! IF you must use an extension cord, the minimum wire size for a 25' cord (or less ) is 18 AWG. NOTE: The smaller the AWG number ,the larger the current handling capacity. For longer extension cords, consult a local electrician.
This product should be used only with the components supplied or; a cart, rack, or stand that is recommended by Yamaha. If a cart, etc., is used, please observe all safety markings and instructions that accompany the accessory product.
SPECIFICATIONS SUBJECT TO CHANGE:
The information contained in this manual is believed to be correct at the time of printing. However, Yamaha reserves the right to change or modify any of the specifications without notice or obligation to update existing units.
This product, either alone or in combination with an amplifier and headphones or speaker/s, may be capable of producing sound levels that could cause permanent hearing loss. DO NOT operate for long periods of time at a high volume level or at a level that is uncomfortable. If you experience any hearing loss or ringing in the ears, you should consult an audiologist. IMPORTANT: The louder the sound, the shorter the time period before damage occurs.
Some Yamaha products may have benches and / or accessory mounting fixtures that are either supplied with the product or as optional accessories. Some of these items are designed to be dealer assembled or installed. Please make sure that benches are stable and any optional fixtures (where applicable) are well secured BEFORE using.
Benches supplied by Yamaha are designed for seating only. No other uses are recommended.
NOTICE:
Service charges incurred due to a lack of knowledge relating to how a function or effect works (when the unit is operating as designed) are not covered by the manufacturer’s warranty, and are therefore the owners responsibility. Please study this manual carefully and consult your dealer before requesting service.
ENVIRONMENTAL ISSUES:
Yamaha strives to produce products that are both user safe and environmentally friendly. We sincerely believe that our products and the production methods used to produce them, meet these goals. In keeping with both the letter and the spirit of the law, we want you to be aware of the following:
Battery Notice:
This product MAY contain a small non-rechargeable battery which (if applicable) is soldered in place. The average life span of this type of battery is approximately five years. When replacement becomes necessary, contact a qualified service representative to perform the replacement.
This product may also use “household” type batteries. Some of these may be rechargeable. Make sure that the battery being charged is a rechargeable type and that the charger is intended for the battery being charged.
When installing batteries, do not mix batteries with new, or with batteries of a different type. Batteries MUST be installed correctly. Mismatches or incorrect installation may result in overheating and battery case rupture.
Warning:
Do not attempt to disassemble, or incinerate any battery. Keep all batteries away from children. Dispose of used batteries promptly and as regulated by the laws in your area. Note: Check with any retailer of household type batteries in your area for battery disposal information.
Disposal Notice:
Should this product become damaged beyond repair, or for some reason its useful life is considered to be at an end, please observe all local, state, and federal regulations that relate to the disposal of products that contain lead, batteries, plastics, etc. If your dealer is unable to assist you, please contact Yamaha directly.
NAME PLATE LOCATION:
The name plate is located on the bottom of the product. The model number, serial number, power requirements, etc., are located on this plate.You should record the model number, serial number, and the date of purchase in the spaces provided below and retain this manual as a permanent record of your purchase.
Model
Serial No.
Purchase Date
PLEASE KEEP THIS MANUAL
92-BP (bottom)
2

PRECAUTIONS
PLEASE READ CAREFULLY BEFORE PROCEEDING
* Please keep these precautions in a safe place for future reference.
 WARNING
Always follow the basic precautions listed below to avoid the possibility of serious injury or even death from electrical shock, short-circuiting, damages, fire or other hazards. These precautions include, but are not limited to, the following:
•Do not open the instrument or attempt to disassemble the internal parts or modify them in any way. The instrument contains no user-serviceable parts. If it should appear to be malfunctioning, discontinue use immediately and have it inspected by qualified Yamaha service personnel.
•Do not expose the instrument to rain, use it near water or in damp or wet conditions, or place containers on it containing liquids which might spill into any openings.
•If the AC adaptor cord or plug becomes frayed or damaged, or if there is a sudden loss of sound during use of the instrument, or if any unusual smells or smoke
should appear to be caused by it, immediately turn off the power switch, disconnect the adaptor plug from the outlet, and have the instrument inspected by qualified Yamaha service personnel.
•Use the specified adaptor (PA-3B or an equivalent recommended by Yamaha) only. Using the wrong adaptor can result in damage to the instrument or overheating.
•Before cleaning the instrument, always remove the electric plug from the outlet. Never insert or remove an electric plug with wet hands.
•Check the electric plug periodically and remove any dirt or dust which may have accumulated on it.
 CAUTION
Always follow the basic precautions listed below to avoid the possibility of physical injury to you or others, or damage to the instrument or other property. These precautions include, but are not limited to, the following:
•Do not place the AC adaptor cord near heat sources such as heaters or radiators, and do not excessively bend or otherwise damage the cord, place heavy objects on it, or place it in a position where anyone could walk on, trip over, or roll anything over it.
•When removing the electric plug from the instrument or an outlet, always hold the plug itself and not the cord.
•Do not connect the instrument to an electrical outlet using a multiple-connector. Doing so can result in lower sound quality, or possibly cause overheating in the outlet.
•Unplug the AC power adaptor when not using the instrument, or during electrical storms.
•Always make sure all batteries are inserted in conformity with the +/- polarity markings. Failure to do so might result in overheating, fire, or battery fluid leakage.
•Always replace all batteries at the same time. Do not use new batteries together with old ones. Also, do not mix battery types, such as alkaline batteries with manganese batteries, or batteries from different makers, or different types of batteries from the same maker, since this can cause overheating, fire, or battery fluid leakage.
•Do not dispose of batteries in fire.
•Do not attempt to recharge batteries that are not intended to be charged.
•When the batteries run out, or if the instrument is not to be used for a long time, remove the batteries from the instrument to prevent possible leakage of the battery fluid.
•Keep batteries away from children.
(4)-7 |
3 |

PRECAUTIONS
PLEASE READ CAREFULLY BEFORE PROCEEDING
* Please keep these precautions in a safe place for future reference.
 CAUTION
Always follow the basic precautions listed below to avoid the possibility of physical injury to you or others, or damage to the instrument or other property. These precautions include, but are not limited to, the following:
•If the batteries do leak, avoid contact with the leaked fluid. If the battery fluid should come in contact with your eyes, mouth, or skin, wash immediately with water and consult a doctor. Battery fluid is corrosive and may possibly cause loss of sight or chemical burns.
•Before connecting the instrument to other electronic components, turn off the power for all components. Before turning the power on or off for all components, set all volume levels to minimum. Also, be sure to set the volumes of all components at their minimum levels and gradually raise the volume controls while playing the instrument to set the desired listening level.
•Do not expose the instrument to excessive dust or vibrations, or extreme cold or heat (such as in direct sunlight, near a heater, or in a car during the day) to prevent the possibility of panel disfiguration or damage to the internal components.
•Do not use the instrument near other electrical products such as televisions, radios, or speakers, since this might cause interference which can affect proper operation of the other products.
•Do not place the instrument in an unstable position where it might accidentally fall over.
•Before moving the instrument, remove all connected adaptor and other cables.
•When cleaning the instrument, use a soft, dry cloth. Do not use paint thinners, solvents, cleaning fluids, or chemical-impregnated wiping cloths. Also, do not place vinyl, plastic or rubber objects on the instrument, since this might discolor the panel or keyboard.
•Do not rest your weight on, or place heavy objects on the instrument, and do not use excessive force on the buttons, switches or connectors.
•Do not operate the instrument for a long period of time at a high or uncomfortable volume level, since this can
cause permanent hearing loss. If you experience any hearing loss or ringing in the ears, consult a physician.
■REPLACING THE BACKUP BATTERY
•This instrument contains a non rechargeable internal backup battery which permits internal data to remain stored even when the power is off. When the backup battery needs replacing, the message "Backup Batt.Low" will display in the LCD display. When this happens, immediately back up your data, then have qualified Yamaha service personnel replace the backup battery.
•Do not attempt to replace the backup battery yourself, in order to prevent the possible serious hazards. Always have qualified Yamaha service personnel replace the backup battery.
•Never place the backup battery in a location that a child can reach, since a child might accidentally swallow the battery. If this should happen, consult a physician immediately.
■SAVING USER DATA
•Always save data to a Memory Card (SmartMedia) frequently, in order to help prevent the loss of important data due to a malfunction or user operating error.
Yamaha cannot be held responsible for damage caused by improper use or modifications to the instrument, or data that is lost or destroyed.
Always turn the power off when the instrument is not in use.
Make sure to discard used batteries according to local regulations.
4 (4)-7

Contents
Meet the QY100.................................. |
7 |
Power & Connections ........................ |
8 |
Power Supply.......................................... |
8 |
Using a Power Adaptor .................... |
8 |
Using Batteries................................. |
9 |
When to Replace the Batteries ...... |
10 |
Setting Up............................................. |
11 |
The Connectors .............................. |
11 |
Audio Connections ......................... |
14 |
MIDI Connections .......................... |
15 |
Connecting to a Personal |
|
Computer ....................................... |
16 |
The Controls...................................... |
19 |
QY100 System Overview: |
|
What It Is and What It Does............. |
29 |
The Sequencer ............................... |
29 |
Tone Generator .............................. |
31 |
Effects ............................................ |
32 |
Controller........................................ |
32 |
Amp Simulator................................ |
32 |
Guided Tour |
|
Listen To the Demo.......................... |
33 |
For Guitarists: Outstanding Amp |
|
Simulation & Effects ........................ |
36 |
Connection & Gain Adjustment ............ |
36 |
Try Out the Preset Guitar Setups.......... |
38 |
Customizing the Setups via the Amp |
|
Simulator Parameters ........................... |
39 |
For Singers: Cool Vocal Processing 45 |
|
Connection & Gain Adjustment ............ |
45 |
Try Out the Preset Microphone Setups 47 |
|
Customizing the Setups via the |
|
Microphone Effect Parameters............. |
48 |
Instant Accompaniment .................. |
53 |
But First … So You’ll Know What |
|
We’re Talking About ............................. |
53 |
Check Out the Preset Styles................. |
55 |
Add Chords & Play Along! .................... |
59 |
Record Your Own Chord |
|
Progression & Pattern Changes...... |
61 |
Fingered Chords ............................. |
69 |
Tempo Changes, too … ................. |
70 |
If You Make Mistakes …................70 |
|
Add Some Details to Complete the |
|
Accompaniment ............................... |
71 |
Voice Assignments ............................... |
71 |
Realtime Recording on the Sequencer |
|
Tracks ................................................... |
73 |
About the “MULTI” Recording............. |
80 |
Step Accompaniment Recording... 81
“Pt” — Step Record Pattern Changes .84
“Cd” — Step Record Chord Changes ..87
Step Sequencer Track Recording ... 91
Creating Original |
|
Accompaniment Patterns................ |
98 |
The Preset Phrases............................... |
98 |
Combining Phrases In the Pattern |
|
Mode .................................................. |
100 |
Recording Original Phrases................. |
105 |
Realtime Phrase Recording .......... |
105 |
Step Phrase Recording................. |
111 |
Pattern Voice mode ............................ |
112 |
The Effect Send Display ..................... |
113 |
Voice Editing ....................................... |
115 |
Play Effects......................................... |
116 |
Reference Section |
|
Playback Control ............................ |
118 |
Play Effects......................................... |
124 |
Swing ........................................... |
126 |
Drum Table Remapping................ |
128 |
The Song Voice Mode.................... |
131 |
The Effect Send Display ..................... |
136 |
Voice Editing ....................................... |
138 |
Drum Edit ..................................... |
142 |
The Song Jobs................................ |
145 |
00 : Undo/Redo................................... |
147 |
01 : Quantize....................................... |
148 |
02 : Modify Velocity ............................ |
151 |
03 : Modify Gate Time ........................ |
153 |
5

Contents
04 |
: Crescendo.................................... |
155 |
05 |
: Transpose .................................... |
157 |
06 |
: Shift Clock.................................... |
158 |
07 |
: Chord Sort.................................... |
160 |
08 |
: Chord Separate ............................ |
161 |
09 |
: Copy Event .................................. |
162 |
10 |
: Erase Event.................................. |
164 |
11 |
: Extract Event................................ |
165 |
12 |
: Create Continuous ....................... |
167 |
13 |
: Thin Out ....................................... |
169 |
14 |
: Time Stretch ................................ |
170 |
15 |
: Create Measure ........................... |
171 |
16 |
: Delete Measure ........................... |
172 |
17 |
: Copy Track ................................... |
173 |
18 |
: Mix Track ..................................... |
174 |
19 |
: Clear Track ................................... |
175 |
20 |
: Expand Backing ........................... |
176 |
21 |
: Normalize..................................... |
177 |
22 |
: Copy Song ................................... |
178 |
23 |
: Clear Song ................................... |
179 |
24 |
: Song Name .................................. |
180 |
The Pattern Jobs ............................ |
181 |
|
00 |
: Undo/Redo................................... |
183 |
01 |
: Quantize....................................... |
184 |
02 |
: Modify Velocity ............................ |
187 |
03 |
: Modify Gate Time ........................ |
189 |
04 |
: Crescendo.................................... |
191 |
05 |
: Transpose .................................... |
193 |
06 |
: Shift Clock.................................... |
194 |
07 |
: Chord Sort.................................... |
196 |
08 |
: Chord Separate ............................ |
197 |
09 |
: Copy Event .................................. |
198 |
10 |
: Erase Event.................................. |
200 |
11 |
: Extract Event................................ |
201 |
12 |
: Create Continuous ....................... |
203 |
13 |
: Thin Out ....................................... |
205 |
14 |
: Time Stretch ................................ |
206 |
15 |
: Copy Phrase................................. |
207 |
16 |
: Get Phrase ................................... |
208 |
17: Put Phrase .................................... |
209 |
|
18 |
: Copy Track ................................... |
210 |
19 |
: Mix Track ..................................... |
211 |
20 |
: Clear Track ................................... |
212 |
21 |
: Copy Pattern ................................ |
213 |
22 : Clear Pattern ................................ |
214 |
23 : Style Name .................................. |
215 |
Editing Songs & Patterns .............. |
216 |
Engaging the SONG or PATTERN |
|
Edit Mode..................................... |
216 |
Moving Around............................. |
219 |
Change Mode Editing................... |
220 |
Insert Mode Editing...................... |
221 |
XG View .............................................. |
232 |
View Filter........................................... |
233 |
Phrase Table (Pattern Edit Only) ......... |
234 |
Effects & Effect Editing .................. |
236 |
Accessing & Editing the Effect |
|
Parameters ......................................... |
236 |
Effect Editing ...................................... |
240 |
Utility Functions ............................. |
242 |
Accessing the Utility Mode .......... |
242 |
System Parameters...................... |
244 |
MIDI Parameters .......................... |
247 |
Bulk Dump.................................... |
250 |
Fingered Zone .............................. |
252 |
Memory Card Functions ................ |
254 |
About SmartMedia™ Memory Cards .254 |
|
Compatible Memory Cards .......... |
255 |
Memory Card Capacity................. |
255 |
Inserting and Removing Memory |
|
Cards ............................................ |
255 |
Format New Memory Cards |
|
Before Use!.................................. |
256 |
Handling Precautions.................... |
256 |
Write-Protecting Memory Cards .. |
257 |
Back Up Your Data ....................... |
257 |
Save .................................................... |
258 |
Load .................................................... |
262 |
Mk Dir (Make Directory) ..................... |
265 |
Format ................................................ |
268 |
Appendix ......................................... |
270 |
Specifications...................................... |
270 |
Troubleshooting .................................. |
272 |
Error Messages .................................. |
274 |
Glossary .............................................. |
277 |
Index ................................................... |
284 |
6

Meet the QY100
16-track sequencer, 525-voice tone module, unmatched automatic accompaniment features and more all rolled into one! The QY100 is a complete mini-studio for accompaniment and electronic music production that you can use just about anywhere — at home or on the road.
Guitarists! The practice and accompaniment tool you’ve been waiting for is here! Use the QY100 as your private “band” to refine and display your talents to the max.
Singers! Think of it as a fully programmable, very versatile accompaniment and “karaoke” machine complete with a range of superb vocal effects.
Keyboard Players, Composers, & All Electronic Musicians! It’s all here: the sequencer, the tone module, the advanced accompaniment features. Everything you need to create even the most complex electronic music.
The screen displays as illustrated in this owner’s manual are for instructional purposes, and may appear somewhat different from the screens which appear on your instrument.
7


 Power
Power  Connections
Power & Connections
Power Supply
Although the QY100 will run either from an optional AC adaptor or batteries, Yamaha recommends use of an AC adaptor whenever possible. Moreover, an AC adaptor is more environmentally friendly than batteries and does not deplete resources.
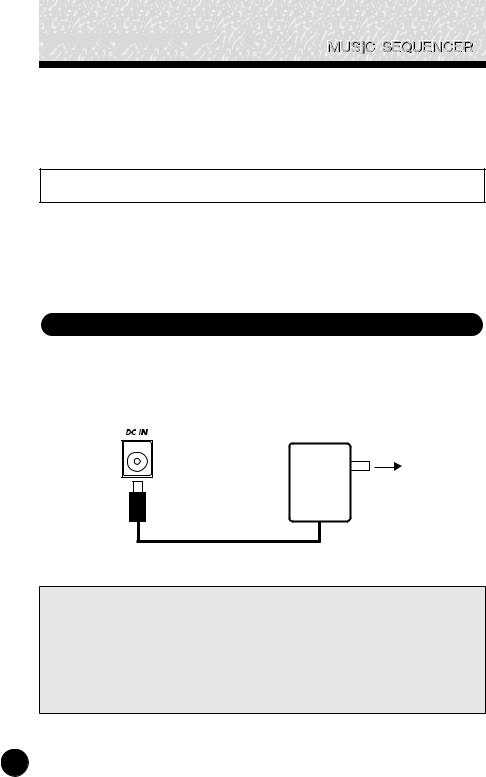
Using a Power Adaptor
Plug the DC output cable from a Yamaha PA-3B AC Adaptor (available from your Yamaha dealer) into the DC IN jack on the rear panel, then plug the adaptor into a convenient wall AC power socket.
AC power
socket.
PA-3B
 CAUTION
•Do not attempt to use an AC adaptor other than the specified unit or an appropriate replacement provided by your Yamaha dealer to power the QY100. The use of an incompatible adaptor may cause irreparable damage to the QY100, and might pose a serious shock hazard!
•Unplug the AC power adaptor when not using the instrument, or during electrical storms.
8
Power & Connections
Using Batteries
Six 1.5V AA size (LR6) or equivalent batteries must first be installed in the battery compartment. Alkaline batteries are recommended for longer life.
Never mix battery types, such as alkaline batteries with manganese batteries or batteries from different makers.
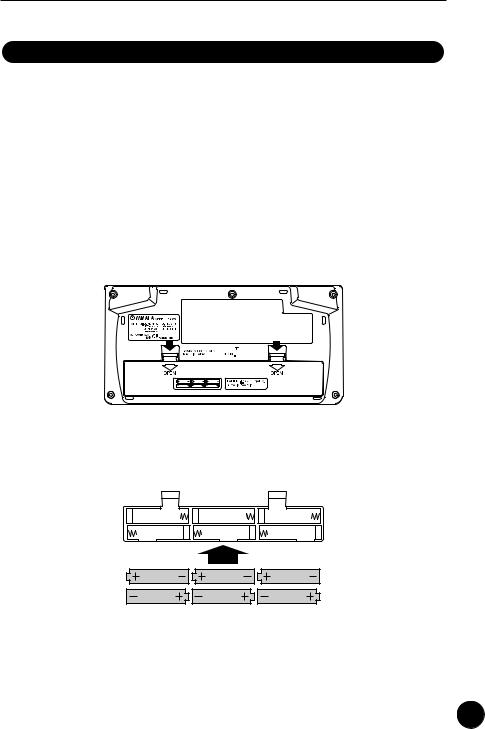
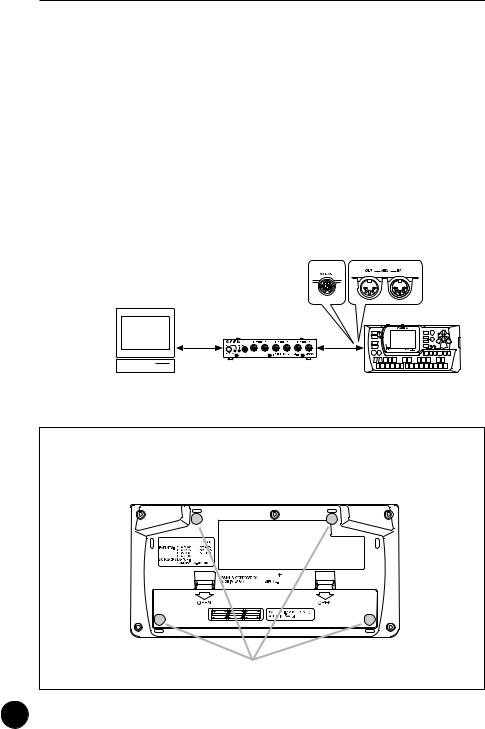
z Open Battery Compartment Cover
Open the battery compartment cover — located on the instrument’s bottom panel — by pressing down on the grooved section of the cover and sliding in the direction of the arrow, as shown in the illustration.
x Insert Batteries
Insert the six batteries, being careful to follow the polarity markings on the bottom panel.
c Replace Cover
Replace the compartment cover, making sure that it locks firmly in place.
9
Power & Connections
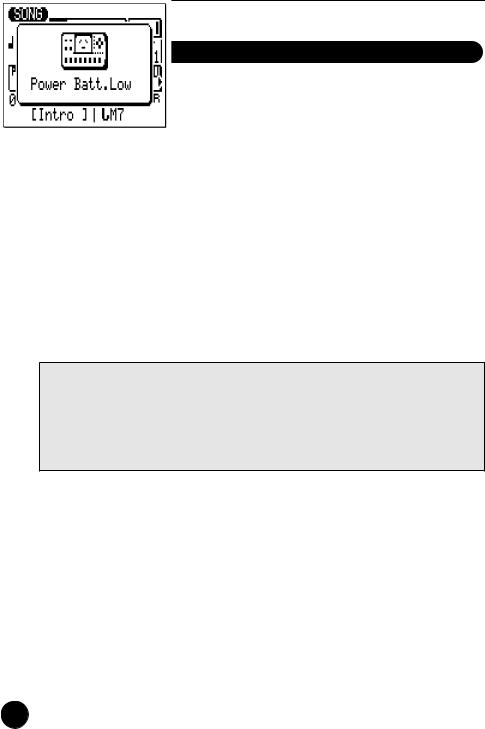
When to Replace the Batteries
When the batteries run down, the following display will appear:
When the batteries run down more seriously, “Power Batt.End” message will appear. In this case, memory card functions are no longer accessible.
When this display appears, replace the batteries with a complete set of six new batteries. NEVER mix old and new batteries!
 CAUTION
•To prevent possible damage due to battery leakage, remove the batteries from the instrument if it is not to be used for an extended period of time.
•If keeping the batteries and memory card inserted, a small current flows through the instrument. When the memory card is not used, remove the memory card from the CARD slot.
10
Power & Connections
Setting Up
What you will connect the QY100 to, and what you will connect to the QY100, will depend entirely on your individual requirements, and it would be impossible to cover all possibilities here. A few examples are provided below to help you get started.
The Connectors
Rear Panel
|
|
|
|
|
|
|
|
|
|
|
|
|
|
|
|
|
|
|
|
|
|
|
|
|
|
|
|
|
|
|
|
|
|
|
|
|
|
|
|
|
|
|
|
|
|
|
|
|
|
|
|
r |
|
w t |
y |
q e |
||||||||
|
|
|
|
|
|
|
Right Side Panel |
|
|
|
|
|
|
|
|
|
|
|
|
|
|
|
|
|
|
|
|
|
|
|
|
|
|
|
|
|
|
|
u
q DC IN Jack (→ page 8)
This jack is only used when you are powering the QY100 from an optional AC adaptor instead of batteries. The DC output cable from an optional Yamaha PA-3B AC Power Adaptor is plugged in here.
■ NOTE
•The batteries are automatically disconnected when a plug is inserted into the DC IN jack.
11

Power & Connections
w MIDI IN & OUT Connectors (→ pages 15, 16)
If you plan to use a MIDI keyboard or other instrument to play and program the QY100, it should be connected to QY100 MIDI IN connector (see “MIDI Connections,” on page 15). The MIDI OUT connector can be connected to an external tone generator if you want to drive external voices from the QY100 sequencer, or a MIDI data recorder such as the Yamaha MDF3 if you want to store your songs and patterns to floppy disk.
e LINE OUT/PHONES Jack (→ page 14)
This miniature stereo phone jack can be used to connect the output of the QY100 to a stereo sound system, or a pair of stereo headphones with a miniature stereo phone plug can be plugged in here for convenient monitoring (see “Audio Connections,” on page 14). The output level is adjusted via the VOLUME control on the left side panel.
r TO HOST Connector & HOST SELECT Switch
(→ pages 15, 16)
This jack and selector switch allow direct connection to a personal computer without the need for a separate MIDI interface. See “Connecting To a Personal Computer” on page 16 for details.
t FOOT SW Jack (→ page 245)
An optional FC-4 or FC-5 foot switch can be connected here to perform a number of switching functions. The footswitch function is selected via the UTILITY functions described on page 245.
Song and Pattern Playback: The footswitch can be used to start and stop song or pattern playback.
Section Switching: The footswitch can be used to select the QY100’s various style “sections” (e.g. INTRO, MAIN A, FILL AB, etc.) during song or pattern playback.
12
Power & Connections
Amp Simulator Switching: The footswitch can be used to switch the specified sections of the QY100 amp simulator in or out. The foot switch can be used to bypass the preamp section only (delay when a microphone setup is selected), the reverb effect only, the chorus effect only, or all three simultaneously (pages 44 and 52).
y GUITAR/MIC INPUT Jack (→ pages 36, 45)
Connect your guitar or microphone here to use the QY100’s superlative guitar and vocal effects. The GAIN control next to the GUITAR/MIC input jack allows matching with a wide range of guitars and microphones.
 CAUTION
•When connecting a microphone to the QY100 GUITAR/MIC input, be sure that a microphone amp simulator setup is selected first (page 48). Loud feedback may occur if one of the guitar setups is selected.
u CARD Slot (→ page 254)
The QY100 CARD slot accepts standard memory cards for convenient storage of settings and sequences. Card access and operations are described on page 254.
13
Power & Connections
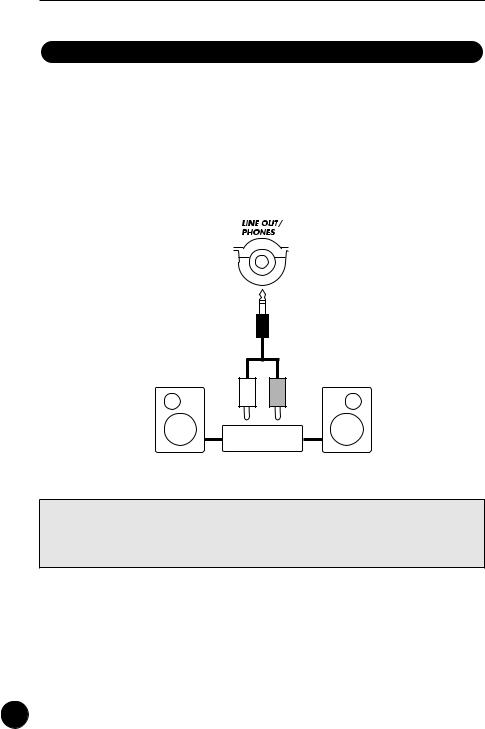
Audio Connections
The simplest way to monitor the QY100 sound is via a pair of stereo headphones (miniature stereo phone plug type) plugged into the LINE OUT/ PHONES jack. If you want to use an external stereo sound system, however, use the supplied “Y” cable (miniature stereo phone plug to dual RCA pin plugs) to connect the LINE OUT/PHONES jack to the inputs of a stereo sound system. The white RCA pin plug goes to the left-channel input of your stereo sound system and the red plug goes to the right-channel input.
L R
Stereo Sound System
 CAUTION
•Make sure that both the QY100 and your sound system are turned OFF (STANDBY) when making connections.
14
Power & Connections
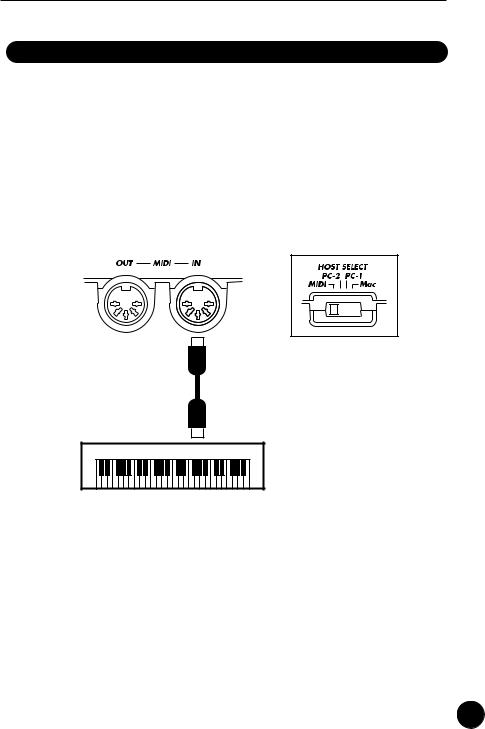
MIDI Connections
Although the QY100 can be played and programmed from the builtin micro-keyboard, an external MIDI keyboard connected to the MIDI IN connector provides the added advantages of standard keyboard size and key velocity sensivity (if your keyboard has a velocity-sensitive keyboard). Connect the MIDI OUT connector of the keyboard to the MIDI IN connector of the QY100, and make sure that the QY100 HOST SELECT switch is set to MIDI. The connected MIDI keyboard will play the voice assigned to the currently selected sequencer track. See page 71 for instructions on how to assign different voices to the sequencer tracks.
(HOST SELECT switch is set to MIDI)
MIDI OUT
External MIDI Keyboard
15
Power & Connections
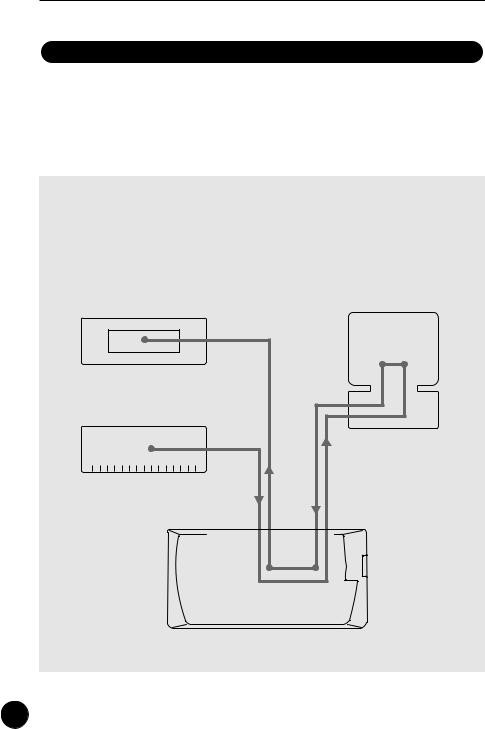
Connecting to a Personal Computer
Although the QY100 can be connected to a personal computer via the MIDI IN/OUT connectors and a MIDI interface, the TO HOST connector and selector switch allow direct connection to Apple Macintosh, or IBM-PC/ AT series personal computers for sequencing and other music applications without the need for a separate MIDI interface.
■ IMPORTANT!
•If the QY100 is to be connected to a computer via the TO HOST connector and a MIDI controller via the MIDI IN connector, the “echo back”(or “MIDI Thru” etc) function of the music software or sequencer you are using must be turned “on” so that the MIDI note data from the controller is returned to the QY100 and any subsequent devices connected to the QY100 MIDI OUT connector.
Tone Generator |
Personal Computer |
|
MIDI IN |
|
|
|
|
|
echo back = ON |
|
MIDI OUT |
|
|
|
MIDI Controller |
|
|
|
(MIDI Keyboard etc) |
|
|
|
MIDI |
MIDI |
TO HOST |
|
IN |
OUT |
||
|
|||
QY100 |
|
||
16
Power & Connections
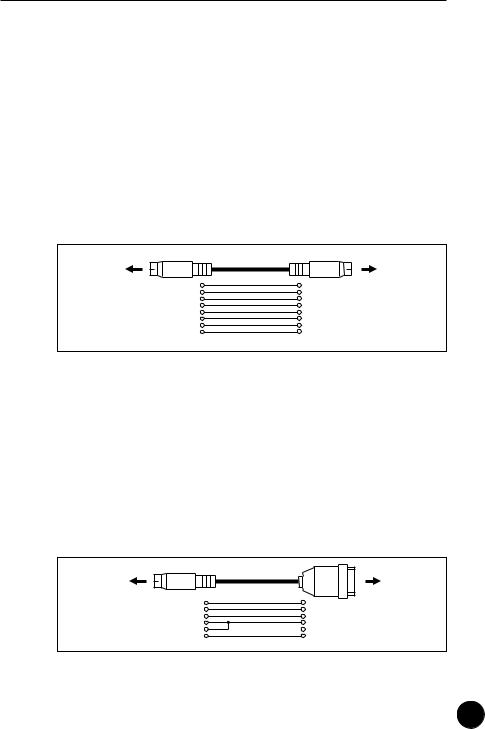
● Connecting to an Apple Macintosh Series Computer
Connect the TO HOST connector of the QY100 to the modem or printer port on your Macintosh, depending on which port your MIDI software is using for MIDI data communication, using a standard Macintosh 8-pin system peripheral cable. Set the HOST SELECT switch to the “Mac” position.
You may also have to make other MIDI interface settings on the computer side, depending on the type of software you use (refer to your software owner’s manual). In any case the clock speed should be set to 1 MHz.
“Mac” Cable Connections
TO HOST |
|
|
|
Modem or |
|
connector |
|
|
|
printer port |
|
MINI DIN |
1 |
2 |
(HSK i) |
MINI DIN |
|
2 |
1 |
(HSK 0) |
|||
8-PIN |
8-PIN |
||||
|
3 |
5 |
(RxD-) |
|
|
|
4 |
4 GND |
|
||
|
5 |
3 |
(TxD-) |
|
|
|
6 |
8 |
(RxD+) |
|
|
|
7 |
7 |
(GP i) |
|
|
|
8 |
6 |
(TxD+) |
|
|
•8-pin system peripheral cable.
•Data transfer rate: 31,250 bps.
●Connecting to an IBM-PC/AT Series Computer
Connect the TO HOST connector of the QY100 to the RS232C port on your IBM computer, using a standard 8-pin MINI DIN → 9-pin D-SUB cross cable. Set the HOST SELECT switch to the “PC-2” position.
Refer to your software owner’s manual for information on any settings you might have to make on the computer side.
“PC-2” Cable Connections
TO HOST |
|
|
|
RS-232C |
connector |
|
|
|
port |
MINI DIN |
|
|
|
|
8-PIN |
1 |
8 |
(CTS) |
D-SUB |
|
2 |
7 |
(RST) |
|
|
9-PIN |
|||
|
3 |
2 |
(RxD) |
|
|
|
|||
|
4 |
5 |
(GND) |
|
|
8 |
|
|
|
|
5 |
3 |
(TxD) |
|
•8-pin mini DIN → 9-pin D-SUB cable.
•Data transfer rate: 38,400 bps.
17
Power & Connections
● Connecting to a USB interface (such as the Yamaha UX256)
If your computer does not have an RS-232C port or modem/printer port, the QY100 can be connected via a separate USB interface such as the Yamaha UX256.
Connect the USB port of your UX256 or other USB interface to the USB port on your computer using a USB cable. Install the appropriate driver software on your computer (the driver software should be supplied with the USB interface. Connect the TO HOST connector or MIDI IN/OUT connector of the QY100 to your USB interface. For detailed information, refer to the owner’s manual that came with your USB interface.
Computer (sequencer software)
UX256
USB cable
QY100
If necessary, attach the included rubber feet to the bottom of the QY100 as shown in the following illustration.


 MODEL
MODEL
Rubber feet
18


 Controls


The Controls
The QY100 has fairly simple, consistent control interface that, once understood, makes operation fast and easy, no matter what operation you are performing. If you read through this section carefully, and try out the procedures in the ”TRY THIS” sections, you should have no problem accessing and operating the QY100’s many advanced features.
Left Side Panel
q !4
Rear Panel
w !5
19
The Controls
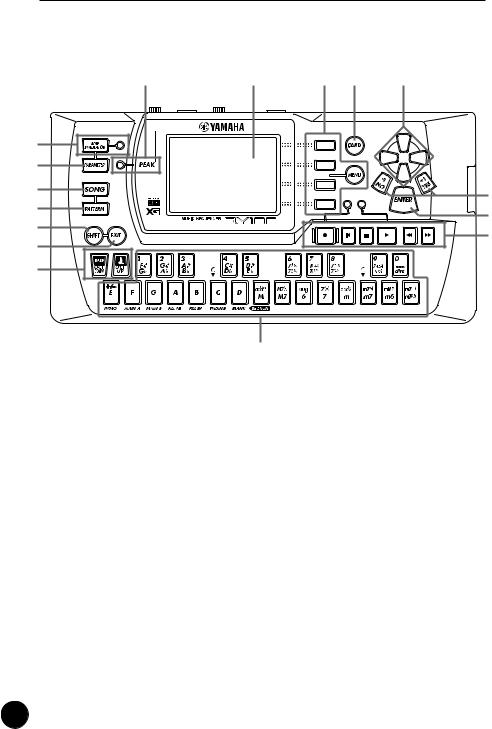
Front Panel
!7
!8
e r t y
!3
!5 |
w |
o !6 u |
i !0 !1
!2
q POWER Switch
Slide to the “ON” position to turn the QY100 on, or to the “STANDBY” position to turn it off.
w LCD Display & CONTRAST Control
This large multi-function liquid crystal display panel shows all parameters and prompts you need to operate the QY100 with optimum ease and efficiency.
Use the CONTRAST control on the rear panel to achieve the best display visibility (LCD visibility varies greatly with viewing angle and lighting).
e [SONG] Button
Use this button to select the QY100 SONG mode from any other mode, and to switch between the SONG, SONG VOICE, and SONG EFFECT displays.
20
The Controls
TRY THIS:
Turn your QY100 on (the power switch is on the left side), then press the [SONG] button a few times and watch how the display changes. The [SONG] button calls the SONG, SONG VOICE, and SONG EFFECT displays in sequence. The order in which the displays is selected is reversed if you press the [SONG] button while holding the [SHIFT] button.
SONG display
SONG VOICE display
SONG EFFECT display
r [PATTERN] Button
The [PATTERN] button selects the QY100 PATTERN mode from any other mode, and switches between the PATTERN, PATTERN VOICE, and PATTERN EFFECT displays.
t [SHIFT] Button
The [SHIFT] button modifies the function of certain other |
|
buttons in certain situations (e.g. it reverses the order in which |
|
the [SONG] or [PATTERN] displays are selected, as described |
|
above). It also allows direct numeric entry via the black micro-key- |
|
board keys (numbered 1 through 0). Situations in which the |
|
[SHIFT] button can be used will be described where appropriate in |
|
the manual. |
21 |

The Controls
y [EXIT] Button
No matter where you are in the QY100 display hierarchy, the [EXIT] button will take to the next highest level (effectively “backing up” one step — unless you’re already at the top display).
u Cursor Buttons
These 4 buttons move the “cursor” around the display screen, highlighting the various parameters that are available for editing (the QY100 cursor appears as a dark block with inverse characters).
TRY THIS:
Select the SONG mode display (use the [SONG] button, as described above), then try using the cursor buttons to move the cursor around the screen.
i [-1/NO] and [+1/YES] Buttons
These buttons are used to edit (change the value of) the parameter at which the cursor is currently located. The [-1/NO] button decrements (decreases stepwise) the value of the selected parameter, while the [+1/YES] button increments (increases stepwise) the parameter. Press either button briefly to decrement or increment the parameter by one, or hold the button for continous decrementing of incrememnting in the specified direction.
The [-1/NO] and [+1/YES] buttons are also used to respond to “Are you sure?” prompts when they appear. Press [+1/YES] to go ahead with the operation, or [-1/NO] to cancel.
■ NOTE
•For even faster decrementing or incrementing, press the opposite increment/decrement button while holding the button corresponding to the direction you want to increment/decrement in.
TRY THIS:
Select the SONG mode display (use the [SONG] button, as described above), use the cursor buttons to select the transpose parameter (“TRNS” on the display), then try using the [-1/NO] and [+1/YES] buttons to change its value.
Set it back to “+00” before continuing.
22
The Controls
o [MENU] and Function Buttons
The [MENU] button calls a menu of functions or sub-modes that can be accessed from the current QY100 mode, and the function buttons (the four small buttons to the right of the display) select the corresponding item from the menu that appears on the display.
The function buttons can also be used, as shown below, with the [SHIFT] button, instead of calling a menu with the [MENU] button.
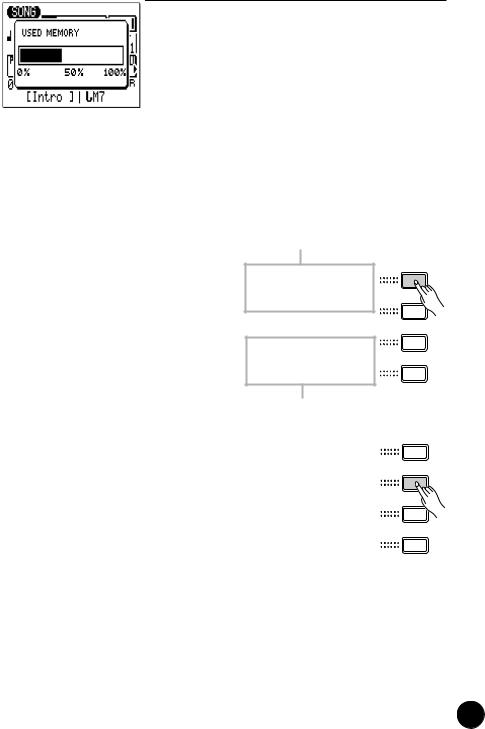
•Pressing the top function button while holding the [SHIFT] button calls a display showing drum instrument assignments to each micro keyboard key at the current octave setting.
Assignment to black keys
Assignment to white keys
• Pressing the second function button while holding the [SHIFT] button calls the Used Memory display.
•Pressing the bottom function button while holding the [SHIFT] button executes the Undo/Redo job for immediately previous edit. (Refer to “Undo/Redo” on page 147).
23
The Controls
TRY THIS:
Select the SONG mode display (use the [SONG] button, as described above), then press the [MENU] button. You should see the menu shown on the right:
Next press the second function button (the one immediately to the right of “Job” on the menu) to call the SONG mode Job List:
You can now use the cursor buttons (up and down only) to select the various items in the Job List. Leave the display as it is for now, and read about the [ENTER] button, below.
!0[ENTER] Button
In addition to “entering” chords in the SONG and PATTERN modes (which we’ll learn about later), the [ENTER] button is used to “enter” a selected menu function.
TRY THIS:
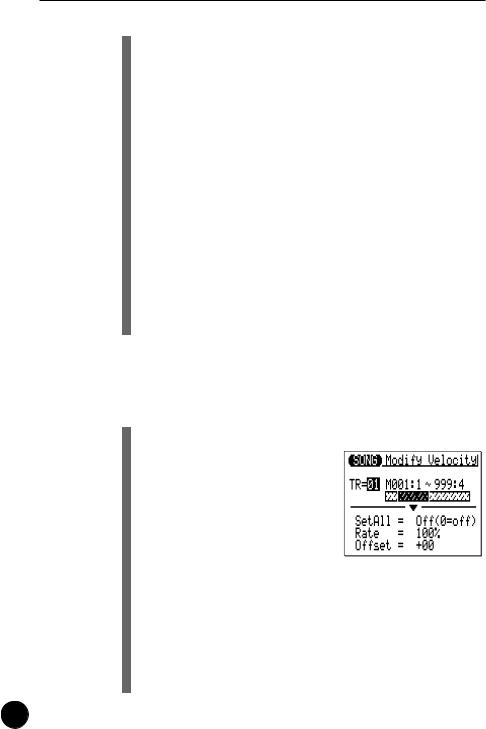
Assuming that you’ve gone through the “TRY THIS:” procedure for the [MENU] and Function buttons, above, you should now have the SONG mode Job List on your QY100 screen. Use the cursor buttons (up and down only) to select job number 02
“Modify Velocity”. Now press the [ENTER] button to actually engage the Modify Velocity job — the display should look like this:
Since we don’t really want to use the Modify Velocity job, press the [EXIT] button twice (or the [SONG] button once) to go back to the SONG mode.
24

The Controls
!1Sequencer Buttons
The sequencer buttons control recording and playback in the SONG and PATTERN modes, and allow you to locate a specific measure within a song or pattern. Their layout and functions are similar to the transport controls on a tape recorder.
[●] RECORD READY: Press this button to engage the record ready mode. You have to press the START button to actually start recording.
[■] STOP: Press to stop recording or playback.
[>] START: Press to start recording or playback.
[p] GO TO TOP: This button takes you directly to the first measure (the “top”) of the current song or pattern.
[r] MOVE BACK: Press briefly to move back one measure, or hold for continuous scrolling.
[f] MOVE FORWARD: Press briefly to move forward one measure, or hold for continuous scrolling.
!2Micro Keyboard
This tiny 2-octave keyboard makes it possible to program the QY100 anywhere, anytime, without having to connect an external MIDI keyboard. It’s even polyphonic, so you can directly enter chords as well as single notes. The only thing it lacks is velocity sensitivity. The QY100 does, however, accept velocity information from an external MIDI keyboard.
When programming accompaniment tracks the micro-key- board is also used to specify the chord roots and types to be entered.
TRY THIS:
In the SONG mode, use the cursor buttons to place the cursor at the track 1 position (“1” on the display).
25
The Controls
Now play the micro keyboard. You should hear the voice that is currently assigned to sequencer track 1.
In the SONG mode, the micro keyboard plays the voice assigned to the currently selected track (unless you’re recording the chord track, in which case it is used to specify chords).
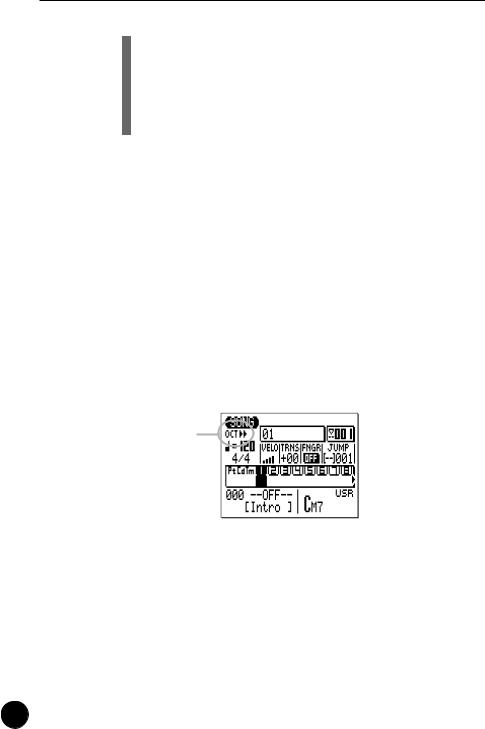
!3Octave Buttons
Since the 2-octave range of the micro-keyboard is not enough for serious music programming, the [OCT DOWN] and [OCT UP] buttons allow the pitch of the keyboard to be shifted up or down in octave steps, over a range of 8 octaves. Each time the [OCT DOWN] button is pressed the pitch of the keyboard is shifted down by one octave, until the lower limit is reached. The [OCT UP] button shifts the pitch of the keyboard up in the same way. The number of octaves the pitch of the micro-keyboard has been shifted down or up is shown by the octave indicator in the upper left corner of the display — the number of arrows indicates the number of octaves shifted in the corresponding direction.
Pressing the [OCT DOWN] and [OCT UP] buttons simultaneously shifts the pitch to ±0.
Octave indicator
When recording the accompaniment chord tracks in the step mode, the [OCT DOWN] button is used to specify the bass note for chords, while the [OCT UP] button is used to enter syncopated chords.
While playing a note on the micro-keyboard, the [OCT DOWN] button will shift the pitch of the note up while held, and the [OCT UP] button will apply modulation while held.
26

The Controls
!4VOLUME Control
The VOLUME control adjusts the volume of the sound delivered via the LINE OUT/PHONES jack. Slide the control toward “MAX.” to increase the volume or toward “MIN.” to decrease the volume.
 CAUTION
•Set the VOLUME control to “MIN.” when connecting the QY100 to a sound system for the first time, then gradually raise the volume level until the required listening level is reached. This simple precaution can prevent unexpectedly high volume levels from damaging your speaker system (and maybe even your ears!).
!5GAIN Control & PEAK Indicator (→ pages 36, 45)
Use the GAIN control on the rear panel to adjust the QY100 input gain to match your guitar or microphone. If the PEAK indicator LED next to the [PARAMETER] button light more than just occasionally as you play or sing, the GAIN setting is too high. The PEAK indicator should flash only briefly on the highest transient peaks.
!6[CARD] Button (→ page 254)
Accesses the QY100’s memory card functions: Save, Load, Make Directory, and Format. Settings and sequences can be saved to and loaded from standard memory cards for convenient, high-volume storage and portability. The CARD functions are only available when an appropriate memory card is installed in the CARD slot on the right side panel. See page 254 for details on the types of memory cards that can be used and the QY100’s card functions.
!7[AMP SIMULATOR] Button & Indicator (→ pages 44, 52)
Turns the specified section(s) of the QY100 amp simulator stage on or off. The [AMP SIMULATOR] button alternately turns the amp simulator preamp section (delay effect when a microphone setup is selected), the reverb effect, the chorus effect, or all three on and off depending on the setting of the “On/Off” parameter described on pages 44 and 52. The button’s indicator
27

The Controls
goes out when the selected sections are bypassed. The same function can be assigned to an optional FC-4 or FC-5 footswitch connected to the rear panel FOOT SW jack (page 12).
!8[PARAMETER] Button (→ pages 38, 47)
Accesses the QY100 amp simulator setups and parameters for guitar and microphone input. See pages 38 and 47 for details.
28
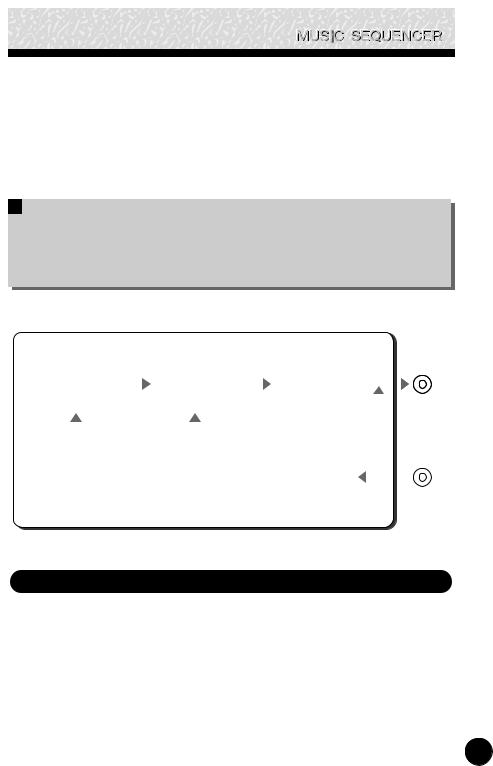
QY100 System Overview:
What It Is and What It Does
This section offers a broad look at the overall QY100 system and how the various features work together … but if you’d rather jump right in start playing, skip ahead. Come back and read this section when you’re ready.
QY100
Sequencer |
|
|
MIDI |
Tone Generator |
|
Audio |
Effects |
|
Audio |
LINE OUT/ |
||||||||||||
|
|
|
|
PHONES |
||||||||||||||||||
|
|
messages |
|
signals |
|
signals |
||||||||||||||||
• 16 sequencer tracks |
|
|
|
• 525 voices |
|
|
|
• reverb, delay, |
|
|
|
|
|
|
|
|||||||
|
|
|
|
|
|
|
|
|
|
|
|
|
||||||||||
• 8 accompaniment |
|
|
|
|
• 22 drum kits |
|
|
|
modulation, |
|
|
|
|
|
|
|
||||||
tracks |
|
|
|
|
|
|
|
|
|
|
distortion, etc |
|
|
|
|
|
|
|||||
|
|
|
|
|
|
|
|
|
|
|
|
|
|
|
|
|
|
|
|
|
|
|
|
|
|
|
|
|
|
|
|
|
|
|
|
|
|
Audio signals |
|
|
|
|
|||
|
|
|
|
|
|
|
|
|
|
|
|
|
|
|
|
|
|
|
||||
|
|
MIDI messages |
|
|
MIDI messages |
|
|
|
|
|
|
|
|
GUITAR/MIC |
||||||||
|
|
|
|
|
|
|
|
|
|
|
|
|||||||||||
|
|
|
|
|
|
|
|
|
|
|
|
|
Amp Simulator |
|
|
|
|
|
INPUT |
|||
|
|
|
|
|
|
|
|
|
|
|
|
|
|
|
|
|
||||||
|
|
|
Controller |
|
|
• 18 guitar setups |
|
|
|
|
|
|
||||||||||
|
|
|
|
|
|
|
|
|
|
|
||||||||||||
|
|
• built-in micro keyboard |
|
|
• 5 microphone |
|
|
|
|
|
|
|||||||||||
|
|
|
|
setups |
|
|
|
|
|
|
||||||||||||
|
|
|
|
|
|
|
|
|
|
|
|
|
|
|
|
|
|
|
|
|
|
|
The Sequencer
16 Sequencer Tracks
You can individually assign any of the QY100’s 525 normal voices or 22 drum kits to the sequencer tracks and record anything you like via the micro-keyboard or a MIDI keyboard or other type of MIDI controller connected to the MIDI IN connector. Think of each sequencer track as a “part” of your composition: the piano part, the bass part, etc. You can separately record up to 16 parts which can be played back simultaneously to create
29

QY100 System Overview: What It Is and What It Does
complex musical structures and rich textures. Of course you can also use just two or three tracks for simpler arrangements. If you’re a guitar player, for example, you might only need to create a drum and bass track to play along with.
The sequencer tracks can be recorded in real time using the “replace” or “overdub” recording mode. When you use the “replace” mode anything you use will replace (overwrite) any material that was previously on the same section of the track being recorded. The “overdub” mode, on the other hand, lets you add new material to a previouslyrecorded track without erasing the previous data. This lets you build up a track bit by bit without having to play the entire part all at once. Another option is the “step” record mode in which you can enter notes one at a time to create extremely fast or complex passages that would be difficult to record in real time. The “step” mode is also useful for adding finishing touches to tracks recorded in real time. Finally, there’s a “multi” record mode in which all 16 sequencer tracks tracks can be recorded simultaneously — a great feature for transferring MIDI data to the QY100 from another sequencer.
8 Accompaniment Tracks
The QY100 accompaniment tracks are what make it a versatile but surprisingly easy-to-use accompaniment machine. Rather than recording individual notes or chords as on the “sequencer” tracks described above, accompaniments are produced by specifying a sequence of “patterns” to be played (we will take a brief look at patterns — in the “Instant Accompaniment” section on page 53). In addition to 128 preset accompaniment “styles”, each with 6 variation “patterns” (for details about styles and patterns, see page 53), the QY100 provides memory for up to 64 original styles that you can record yourself. Chord changes are programmed simply by entering the name of the chord (you can do this via the micro-keyboard simply by pressing the appropriate key), and you can specify the bass note for the chord as well as syncopated chord timing for maximum versatility in creating accompaniments for any type of music. The entire accompaniment is automatically re-harmonized to match the chords you specify. What all this means is that you can put together great-sounding accompaniments in a fraction of the time it would take using a conventional sequencer, so you spend less time programming and more time creating and playing.
30
Loading...