


 Loading...
Version 2.0
November 2010
Xerox® Phaser 4600/4620
System Administrator Guide
©2010 Xerox Corporation. XEROX® and XEROX and Design® are trademarks of Xerox Corporation in the United States and/or other countries.
Changes are periodically made to this document. Changes, technical inaccuracies, and typographic errors will be corrected in subsequent editions.
Document Add Software Version e.g. Version 0.1: February 2009
Contents
1Introduction
Welcome . . . . . . . . . . . . . . . . . . . . . . . . . . . . . . . . . . . . . . . . . . . . . . . . . . . . . . . . . . . . . . . . . . . . . . . . . . . . . . . . .2
Who should use this Guide? . . . . . . . . . . . . . . . . . . . . . . . . . . . . . . . . . . . . . . . . . . . . . . . . . . . . . . . . . . . .2
Machine Models . . . . . . . . . . . . . . . . . . . . . . . . . . . . . . . . . . . . . . . . . . . . . . . . . . . . . . . . . . . . . . . . . . . . . . . . . .3
Xerox Phaser 4600/4620 . . . . . . . . . . . . . . . . . . . . . . . . . . . . . . . . . . . . . . . . . . . . . . . . . . . . . . . . . . . . . . .3
Control Panel Overview . . . . . . . . . . . . . . . . . . . . . . . . . . . . . . . . . . . . . . . . . . . . . . . . . . . . . . . . . . . . . . . . . . . .4
2Machine Connection
Connection Ports . . . . . . . . . . . . . . . . . . . . . . . . . . . . . . . . . . . . . . . . . . . . . . . . . . . . . . . . . . . . . . . . . . . . . . . . . .6
Front View . . . . . . . . . . . . . . . . . . . . . . . . . . . . . . . . . . . . . . . . . . . . . . . . . . . . . . . . . . . . . . . . . . . . . . . . . . . .6
Rear View . . . . . . . . . . . . . . . . . . . . . . . . . . . . . . . . . . . . . . . . . . . . . . . . . . . . . . . . . . . . . . . . . . . . . . . . . . . . .7
Interface Ports . . . . . . . . . . . . . . . . . . . . . . . . . . . . . . . . . . . . . . . . . . . . . . . . . . . . . . . . . . . . . . . . . . . . . . . .7
Initial Connection . . . . . . . . . . . . . . . . . . . . . . . . . . . . . . . . . . . . . . . . . . . . . . . . . . . . . . . . . . . . . . . . . . . . .8
Administrator Access . . . . . . . . . . . . . . . . . . . . . . . . . . . . . . . . . . . . . . . . . . . . . . . . . . . . . . . . . . . . . . . . . .8
Configure Ethernet Settings . . . . . . . . . . . . . . . . . . . . . . . . . . . . . . . . . . . . . . . . . . . . . . . . . . . . . . . . . . . .8
Printing a Configuration Report . . . . . . . . . . . . . . . . . . . . . . . . . . . . . . . . . . . . . . . . . . . . . . . . . . . . . . . .9
CentreWare Internet Services . . . . . . . . . . . . . . . . . . . . . . . . . . . . . . . . . . . . . . . . . . . . . . . . . . . . . . . . . . . . 11
3Network Installation
Network PING Test . . . . . . . . . . . . . . . . . . . . . . . . . . . . . . . . . . . . . . . . . . . . . . . . . . . . . . . . . . . . . . . . . . . . . . 14 TCP/IP. . . . . . . . . . . . . . . . . . . . . . . . . . . . . . . . . . . . . . . . . . . . . . . . . . . . . . . . . . . . . . . . . . . . . . . . . . . . . . . . . . 15 Configure Static Addressing using the Machine. . . . . . . . . . . . . . . . . . . . . . . . . . . . . . . . . . . . . . . . 15 Configure Dynamic Addressing . . . . . . . . . . . . . . . . . . . . . . . . . . . . . . . . . . . . . . . . . . . . . . . . . . . . . . . 16 Configure TCP/IP Settings using CentreWare Internet Services . . . . . . . . . . . . . . . . . . . . . . . . . 17 Service Location Protocol (SLP) . . . . . . . . . . . . . . . . . . . . . . . . . . . . . . . . . . . . . . . . . . . . . . . . . . . . . . . . . . . 21 Simple Service Discovery Protocol (SSDP) . . . . . . . . . . . . . . . . . . . . . . . . . . . . . . . . . . . . . . . . . . . . . . . . . 22 Windows Internet Name Service (WINS). . . . . . . . . . . . . . . . . . . . . . . . . . . . . . . . . . . . . . . . . . . . . . . . . . 23 AppleTalk . . . . . . . . . . . . . . . . . . . . . . . . . . . . . . . . . . . . . . . . . . . . . . . . . . . . . . . . . . . . . . . . . . . . . . . . . . . . . . . 25 NetWare. . . . . . . . . . . . . . . . . . . . . . . . . . . . . . . . . . . . . . . . . . . . . . . . . . . . . . . . . . . . . . . . . . . . . . . . . . . . . . . . 26 NDPS/NEPS . . . . . . . . . . . . . . . . . . . . . . . . . . . . . . . . . . . . . . . . . . . . . . . . . . . . . . . . . . . . . . . . . . . . . . . . . 26 NWAdmin. . . . . . . . . . . . . . . . . . . . . . . . . . . . . . . . . . . . . . . . . . . . . . . . . . . . . . . . . . . . . . . . . . . . . . . . . . . 26 Unix . . . . . . . . . . . . . . . . . . . . . . . . . . . . . . . . . . . . . . . . . . . . . . . . . . . . . . . . . . . . . . . . . . . . . . . . . . . . . . . . . . . . 28 HP-UX Client (Version 10.x) . . . . . . . . . . . . . . . . . . . . . . . . . . . . . . . . . . . . . . . . . . . . . . . . . . . . . . . . . . 28 Solaris 2.x . . . . . . . . . . . . . . . . . . . . . . . . . . . . . . . . . . . . . . . . . . . . . . . . . . . . . . . . . . . . . . . . . . . . . . . . . . . 30 SCO . . . . . . . . . . . . . . . . . . . . . . . . . . . . . . . . . . . . . . . . . . . . . . . . . . . . . . . . . . . . . . . . . . . . . . . . . . . . . . . . 31 Linux CUPS. . . . . . . . . . . . . . . . . . . . . . . . . . . . . . . . . . . . . . . . . . . . . . . . . . . . . . . . . . . . . . . . . . . . . . . . . . 32 Linux LPR via PrintTool . . . . . . . . . . . . . . . . . . . . . . . . . . . . . . . . . . . . . . . . . . . . . . . . . . . . . . . . . . . . . . . 34 Linux LPRng . . . . . . . . . . . . . . . . . . . . . . . . . . . . . . . . . . . . . . . . . . . . . . . . . . . . . . . . . . . . . . . . . . . . . . . . . 35
Phaser 4600/4620 |
iii |
System Administrator Guide |
|
Contents
Cloning . . . . . . . . . . . . . . . . . . . . . . . . . . . . . . . . . . . . . . . . . . . . . . . . . . . . . . . . . . . . . . . . . . . . . . . . . . . . . . . . . 36 Procedure . . . . . . . . . . . . . . . . . . . . . . . . . . . . . . . . . . . . . . . . . . . . . . . . . . . . . . . . . . . . . . . . . . . . . . . . . . . 36 Clone a Machine. . . . . . . . . . . . . . . . . . . . . . . . . . . . . . . . . . . . . . . . . . . . . . . . . . . . . . . . . . . . . . . . . . . . . 36 Install Clone File to another Device . . . . . . . . . . . . . . . . . . . . . . . . . . . . . . . . . . . . . . . . . . . . . . . . . . . 36 Cloning Using TFTP . . . . . . . . . . . . . . . . . . . . . . . . . . . . . . . . . . . . . . . . . . . . . . . . . . . . . . . . . . . . . . . . . . 37
Wireless Networking . . . . . . . . . . . . . . . . . . . . . . . . . . . . . . . . . . . . . . . . . . . . . . . . . . . . . . . . . . . . . . . . . . . . . 38 Procedure . . . . . . . . . . . . . . . . . . . . . . . . . . . . . . . . . . . . . . . . . . . . . . . . . . . . . . . . . . . . . . . . . . . . . . . . . . . 38 Configure Wireless LAN settings . . . . . . . . . . . . . . . . . . . . . . . . . . . . . . . . . . . . . . . . . . . . . . . . . . . . . . 38 SMTP . . . . . . . . . . . . . . . . . . . . . . . . . . . . . . . . . . . . . . . . . . . . . . . . . . . . . . . . . . . . . . . . . . . . . . . . . . . . . . . . . . . 39 WSD. . . . . . . . . . . . . . . . . . . . . . . . . . . . . . . . . . . . . . . . . . . . . . . . . . . . . . . . . . . . . . . . . . . . . . . . . . . . . . . . . . . . 40
4Printer Drivers
Windows Printing. . . . . . . . . . . . . . . . . . . . . . . . . . . . . . . . . . . . . . . . . . . . . . . . . . . . . . . . . . . . . . . . . . . . . . . . 42 LPR Printing . . . . . . . . . . . . . . . . . . . . . . . . . . . . . . . . . . . . . . . . . . . . . . . . . . . . . . . . . . . . . . . . . . . . . . . . . 42 Internet Printing Protocol (IPP) Port. . . . . . . . . . . . . . . . . . . . . . . . . . . . . . . . . . . . . . . . . . . . . . . . . . . 44 Raw TCP/IP Printing (Port 9100) . . . . . . . . . . . . . . . . . . . . . . . . . . . . . . . . . . . . . . . . . . . . . . . . . . . . . . 46 AppleTalk Printing . . . . . . . . . . . . . . . . . . . . . . . . . . . . . . . . . . . . . . . . . . . . . . . . . . . . . . . . . . . . . . . . . . . 48 USB Printing (Windows 2003/XP/Vista or later) . . . . . . . . . . . . . . . . . . . . . . . . . . . . . . . . . . . . . . . . 50 Configure your Printer Driver . . . . . . . . . . . . . . . . . . . . . . . . . . . . . . . . . . . . . . . . . . . . . . . . . . . . . . . . . 51
Configure the Windows Printer Driver . . . . . . . . . . . . . . . . . . . . . . . . . . . . . . . . . . . . . . . . . . . . . . . . . . . . . 54 Bi-Directional Communication . . . . . . . . . . . . . . . . . . . . . . . . . . . . . . . . . . . . . . . . . . . . . . . . . . . . . . . . 54 Manual Printer Driver Configuration . . . . . . . . . . . . . . . . . . . . . . . . . . . . . . . . . . . . . . . . . . . . . . . . . . 55 Apple Mac . . . . . . . . . . . . . . . . . . . . . . . . . . . . . . . . . . . . . . . . . . . . . . . . . . . . . . . . . . . . . . . . . . . . . . . . . . . . . . 56 TCP/IP Printing (OSX and OS9) . . . . . . . . . . . . . . . . . . . . . . . . . . . . . . . . . . . . . . . . . . . . . . . . . . . . . . . 56 AppleTalk Printing (OS9) . . . . . . . . . . . . . . . . . . . . . . . . . . . . . . . . . . . . . . . . . . . . . . . . . . . . . . . . . . . . . 57 Configure your Apple Mac Printer Driver. . . . . . . . . . . . . . . . . . . . . . . . . . . . . . . . . . . . . . . . . . . . . . . 58 UNIX . . . . . . . . . . . . . . . . . . . . . . . . . . . . . . . . . . . . . . . . . . . . . . . . . . . . . . . . . . . . . . . . . . . . . . . . . . . . . . . 59 Printer Driver Options . . . . . . . . . . . . . . . . . . . . . . . . . . . . . . . . . . . . . . . . . . . . . . . . . . . . . . . . . . . . . . . . . . . . 60 Enable/Disable the Banner Sheet . . . . . . . . . . . . . . . . . . . . . . . . . . . . . . . . . . . . . . . . . . . . . . . . . . . . . 60
5Network Accounting
Overview. . . . . . . . . . . . . . . . . . . . . . . . . . . . . . . . . . . . . . . . . . . . . . . . . . . . . . . . . . . . . . . . . . . . . . . . . . . . . . . . 62
Information Checklist. . . . . . . . . . . . . . . . . . . . . . . . . . . . . . . . . . . . . . . . . . . . . . . . . . . . . . . . . . . . . . . . . . . . 63
Enable and Configure Network Accounting. . . . . . . . . . . . . . . . . . . . . . . . . . . . . . . . . . . . . . . . . . . . . . . . 64
Enable Network Accounting in your Printer Driver . . . . . . . . . . . . . . . . . . . . . . . . . . . . . . . . . . . . . . 64
Test Network Accounting . . . . . . . . . . . . . . . . . . . . . . . . . . . . . . . . . . . . . . . . . . . . . . . . . . . . . . . . . . . . . . . . 67
6Security
Security @ Xerox . . . . . . . . . . . . . . . . . . . . . . . . . . . . . . . . . . . . . . . . . . . . . . . . . . . . . . . . . . . . . . . . . . . . . . . . 70 Xerox Secure Access . . . . . . . . . . . . . . . . . . . . . . . . . . . . . . . . . . . . . . . . . . . . . . . . . . . . . . . . . . . . . . . . . . . . . 71 Overview . . . . . . . . . . . . . . . . . . . . . . . . . . . . . . . . . . . . . . . . . . . . . . . . . . . . . . . . . . . . . . . . . . . . . . . . . . . . 71 Information Checklist . . . . . . . . . . . . . . . . . . . . . . . . . . . . . . . . . . . . . . . . . . . . . . . . . . . . . . . . . . . . . . . . 71 Configure Xerox Secure Access on the Device . . . . . . . . . . . . . . . . . . . . . . . . . . . . . . . . . . . . . . . . . . 72 Use Secure Access . . . . . . . . . . . . . . . . . . . . . . . . . . . . . . . . . . . . . . . . . . . . . . . . . . . . . . . . . . . . . . . . . . . 73
ivPhaser 4600/4620
System Administrator Guide
Contents
Administrator and Key User Accounts. . . . . . . . . . . . . . . . . . . . . . . . . . . . . . . . . . . . . . . . . . . . . . . . . . . . . 74
Overview . . . . . . . . . . . . . . . . . . . . . . . . . . . . . . . . . . . . . . . . . . . . . . . . . . . . . . . . . . . . . . . . . . . . . . . . . . . . 74
Information Checklist . . . . . . . . . . . . . . . . . . . . . . . . . . . . . . . . . . . . . . . . . . . . . . . . . . . . . . . . . . . . . . . . 74
Configure the Administrator Account . . . . . . . . . . . . . . . . . . . . . . . . . . . . . . . . . . . . . . . . . . . . . . . . . 74
Configure the Key User Account . . . . . . . . . . . . . . . . . . . . . . . . . . . . . . . . . . . . . . . . . . . . . . . . . . . . . . 74
Disable Security Settings Reset . . . . . . . . . . . . . . . . . . . . . . . . . . . . . . . . . . . . . . . . . . . . . . . . . . . . . . . 75
Configure Access Rights. . . . . . . . . . . . . . . . . . . . . . . . . . . . . . . . . . . . . . . . . . . . . . . . . . . . . . . . . . . . . . 75
802.1X Authentication. . . . . . . . . . . . . . . . . . . . . . . . . . . . . . . . . . . . . . . . . . . . . . . . . . . . . . . . . . . . . . . . . . . 76
Overview . . . . . . . . . . . . . . . . . . . . . . . . . . . . . . . . . . . . . . . . . . . . . . . . . . . . . . . . . . . . . . . . . . . . . . . . . . . . 76
Information Checklist . . . . . . . . . . . . . . . . . . . . . . . . . . . . . . . . . . . . . . . . . . . . . . . . . . . . . . . . . . . . . . . . 76
Enable 802.1X. . . . . . . . . . . . . . . . . . . . . . . . . . . . . . . . . . . . . . . . . . . . . . . . . . . . . . . . . . . . . . . . . . . . . . . 76
Image Overwrite Security . . . . . . . . . . . . . . . . . . . . . . . . . . . . . . . . . . . . . . . . . . . . . . . . . . . . . . . . . . . . . . . . 78
Overview . . . . . . . . . . . . . . . . . . . . . . . . . . . . . . . . . . . . . . . . . . . . . . . . . . . . . . . . . . . . . . . . . . . . . . . . . . . . 78
On Demand Image Overwrite (ODIO). . . . . . . . . . . . . . . . . . . . . . . . . . . . . . . . . . . . . . . . . . . . . . . . . 78
Immediate Image Overwrite . . . . . . . . . . . . . . . . . . . . . . . . . . . . . . . . . . . . . . . . . . . . . . . . . . . . . . . . . 79
IP Filtering . . . . . . . . . . . . . . . . . . . . . . . . . . . . . . . . . . . . . . . . . . . . . . . . . . . . . . . . . . . . . . . . . . . . . . . . . . . . . . 81
Overview . . . . . . . . . . . . . . . . . . . . . . . . . . . . . . . . . . . . . . . . . . . . . . . . . . . . . . . . . . . . . . . . . . . . . . . . . . . . 81
IP Sec . . . . . . . . . . . . . . . . . . . . . . . . . . . . . . . . . . . . . . . . . . . . . . . . . . . . . . . . . . . . . . . . . . . . . . . . . . . . . . . . . . 83
Audit Log . . . . . . . . . . . . . . . . . . . . . . . . . . . . . . . . . . . . . . . . . . . . . . . . . . . . . . . . . . . . . . . . . . . . . . . . . . . . . . . 84
Enable and Download the Audit Log . . . . . . . . . . . . . . . . . . . . . . . . . . . . . . . . . . . . . . . . . . . . . . . . . . 84
View the Audit Log File . . . . . . . . . . . . . . . . . . . . . . . . . . . . . . . . . . . . . . . . . . . . . . . . . . . . . . . . . . . . . . 84
Machine Digital Certificate Management & Trusted Certificate Authorities . . . . . . . . . . . . . . . . . 87
SNMP . . . . . . . . . . . . . . . . . . . . . . . . . . . . . . . . . . . . . . . . . . . . . . . . . . . . . . . . . . . . . . . . . . . . . . . . . . . . . . . . . . 91
SNMPv3 . . . . . . . . . . . . . . . . . . . . . . . . . . . . . . . . . . . . . . . . . . . . . . . . . . . . . . . . . . . . . . . . . . . . . . . . . . . . . . . . 93
7 |
SMart eSolutions |
|
|
Overview . . . . . . . . . . . . . . . . . . . . . . . . . . . . . . . . . . . . . . . . . . . . . . . . . . . . . . . . . . . . . . . . . . . . . . . . . . . . . . . |
96 |
|
Information Checklist . . . . . . . . . . . . . . . . . . . . . . . . . . . . . . . . . . . . . . . . . . . . . . . . . . . . . . . . . . . . . . . . . . . |
97 |
|
SMart eSolutions . . . . . . . . . . . . . . . . . . . . . . . . . . . . . . . . . . . . . . . . . . . . . . . . . . . . . . . . . . . . . . . . . . . . . . . . |
98 |
Device Communication Status. . . . . . . . . . . . . . . . . . . . . . . . . . . . . . . . . . . . . . . . . . . . . . . . . . . . . . . . 98
Meter Assistant™ . . . . . . . . . . . . . . . . . . . . . . . . . . . . . . . . . . . . . . . . . . . . . . . . . . . . . . . . . . . . . . . . . . . . . . . 100
To Enable Meter Assistant™ - Meter E-mail Alerts . . . . . . . . . . . . . . . . . . . . . . . . . . . . . . . . . . . . . 100
Supplies Assistant™ . . . . . . . . . . . . . . . . . . . . . . . . . . . . . . . . . . . . . . . . . . . . . . . . . . . . . . . . . . . . . . . . . . . . 102
Maintenance Assistant . . . . . . . . . . . . . . . . . . . . . . . . . . . . . . . . . . . . . . . . . . . . . . . . . . . . . . . . . . . . . . . . . 103
8CentreWare Internet Services
Overview . . . . . . . . . . . . . . . . . . . . . . . . . . . . . . . . . . . . . . . . . . . . . . . . . . . . . . . . . . . . . . . . . . . . . . . . . . . . . . 106 Information Checklist . . . . . . . . . . . . . . . . . . . . . . . . . . . . . . . . . . . . . . . . . . . . . . . . . . . . . . . . . . . . . . . 106 Enable HTTP on the Machine. . . . . . . . . . . . . . . . . . . . . . . . . . . . . . . . . . . . . . . . . . . . . . . . . . . . . . . . 106 Access CWIS . . . . . . . . . . . . . . . . . . . . . . . . . . . . . . . . . . . . . . . . . . . . . . . . . . . . . . . . . . . . . . . . . . . . . . . . . . . 107 Network Factory Default button . . . . . . . . . . . . . . . . . . . . . . . . . . . . . . . . . . . . . . . . . . . . . . . . . . . . . 107
Phaser 4600/4620 |
v |
System Administrator Guide |
|
Contents
Status . . . . . . . . . . . . . . . . . . . . . . . . . . . . . . . . . . . . . . . . . . . . . . . . . . . . . . . . . . . . . . . . . . . . . . . . . . . . . . . . . 108 Alerts . . . . . . . . . . . . . . . . . . . . . . . . . . . . . . . . . . . . . . . . . . . . . . . . . . . . . . . . . . . . . . . . . . . . . . . . . . . . . . 109 Trays . . . . . . . . . . . . . . . . . . . . . . . . . . . . . . . . . . . . . . . . . . . . . . . . . . . . . . . . . . . . . . . . . . . . . . . . . . . . . . 109 Consumables . . . . . . . . . . . . . . . . . . . . . . . . . . . . . . . . . . . . . . . . . . . . . . . . . . . . . . . . . . . . . . . . . . . . . . . 110 SMart eSolutions . . . . . . . . . . . . . . . . . . . . . . . . . . . . . . . . . . . . . . . . . . . . . . . . . . . . . . . . . . . . . . . . . . . 110
Jobs . . . . . . . . . . . . . . . . . . . . . . . . . . . . . . . . . . . . . . . . . . . . . . . . . . . . . . . . . . . . . . . . . . . . . . . . . . . . . . . . . . . 111 Active Jobs . . . . . . . . . . . . . . . . . . . . . . . . . . . . . . . . . . . . . . . . . . . . . . . . . . . . . . . . . . . . . . . . . . . . . . . . . 111 Personal and Secure Jobs. . . . . . . . . . . . . . . . . . . . . . . . . . . . . . . . . . . . . . . . . . . . . . . . . . . . . . . . . . . . 111 Saved Jobs . . . . . . . . . . . . . . . . . . . . . . . . . . . . . . . . . . . . . . . . . . . . . . . . . . . . . . . . . . . . . . . . . . . . . . . . . 112 Completed Jobs . . . . . . . . . . . . . . . . . . . . . . . . . . . . . . . . . . . . . . . . . . . . . . . . . . . . . . . . . . . . . . . . . . . . 112
Print . . . . . . . . . . . . . . . . . . . . . . . . . . . . . . . . . . . . . . . . . . . . . . . . . . . . . . . . . . . . . . . . . . . . . . . . . . . . . . . . . . . 113 Properties . . . . . . . . . . . . . . . . . . . . . . . . . . . . . . . . . . . . . . . . . . . . . . . . . . . . . . . . . . . . . . . . . . . . . . . . . . . . . . 114 Description . . . . . . . . . . . . . . . . . . . . . . . . . . . . . . . . . . . . . . . . . . . . . . . . . . . . . . . . . . . . . . . . . . . . . . . . . 114 Tray Settings . . . . . . . . . . . . . . . . . . . . . . . . . . . . . . . . . . . . . . . . . . . . . . . . . . . . . . . . . . . . . . . . . . . . . . . 114 Alert Notification . . . . . . . . . . . . . . . . . . . . . . . . . . . . . . . . . . . . . . . . . . . . . . . . . . . . . . . . . . . . . . . . . . . 115 Date and Time . . . . . . . . . . . . . . . . . . . . . . . . . . . . . . . . . . . . . . . . . . . . . . . . . . . . . . . . . . . . . . . . . . . . . 117 Power Management . . . . . . . . . . . . . . . . . . . . . . . . . . . . . . . . . . . . . . . . . . . . . . . . . . . . . . . . . . . . . . . . 118 Billing and Counters . . . . . . . . . . . . . . . . . . . . . . . . . . . . . . . . . . . . . . . . . . . . . . . . . . . . . . . . . . . . . . . . 118 Usage Counters . . . . . . . . . . . . . . . . . . . . . . . . . . . . . . . . . . . . . . . . . . . . . . . . . . . . . . . . . . . . . . . . . . . . 119 Enabling/Disabling USB ports. . . . . . . . . . . . . . . . . . . . . . . . . . . . . . . . . . . . . . . . . . . . . . . . . . . . . . . . 119 Printing Services . . . . . . . . . . . . . . . . . . . . . . . . . . . . . . . . . . . . . . . . . . . . . . . . . . . . . . . . . . . . . . . . . . . . 119 Maintenance . . . . . . . . . . . . . . . . . . . . . . . . . . . . . . . . . . . . . . . . . . . . . . . . . . . . . . . . . . . . . . . . . . . . . . . 122 Support . . . . . . . . . . . . . . . . . . . . . . . . . . . . . . . . . . . . . . . . . . . . . . . . . . . . . . . . . . . . . . . . . . . . . . . . . . . . . . . . 123
9Software Upgrade
Overview. . . . . . . . . . . . . . . . . . . . . . . . . . . . . . . . . . . . . . . . . . . . . . . . . . . . . . . . . . . . . . . . . . . . . . . . . . . . . . . 126 When should I upgrade the software?. . . . . . . . . . . . . . . . . . . . . . . . . . . . . . . . . . . . . . . . . . . . . . . . 126 How do I upgrade the software? . . . . . . . . . . . . . . . . . . . . . . . . . . . . . . . . . . . . . . . . . . . . . . . . . . . . . 126 Manual Upgrade using CentreWare Internet Services . . . . . . . . . . . . . . . . . . . . . . . . . . . . . . . . . . . . . 127 Manual upgrade using CentreWare Internet Services . . . . . . . . . . . . . . . . . . . . . . . . . . . . . . . . . 127 Manual upgrade using a USB flash drive . . . . . . . . . . . . . . . . . . . . . . . . . . . . . . . . . . . . . . . . . . . . . . . . . 129 Information Checklist . . . . . . . . . . . . . . . . . . . . . . . . . . . . . . . . . . . . . . . . . . . . . . . . . . . . . . . . . . . . . . . 129 Procedure . . . . . . . . . . . . . . . . . . . . . . . . . . . . . . . . . . . . . . . . . . . . . . . . . . . . . . . . . . . . . . . . . . . . . . . . . . 129
10 Troubleshooting
Problem Solving Procedure . . . . . . . . . . . . . . . . . . . . . . . . . . . . . . . . . . . . . . . . . . . . . . . . . . . . . . . . . . . . . . 132
Network Accounting . . . . . . . . . . . . . . . . . . . . . . . . . . . . . . . . . . . . . . . . . . . . . . . . . . . . . . . . . . . . . . . . . . . . 133
Printing . . . . . . . . . . . . . . . . . . . . . . . . . . . . . . . . . . . . . . . . . . . . . . . . . . . . . . . . . . . . . . . . . . . . . . . . . . . . . . . . 134
Connectivity . . . . . . . . . . . . . . . . . . . . . . . . . . . . . . . . . . . . . . . . . . . . . . . . . . . . . . . . . . . . . . . . . . . . . . . . . . . 135
Saved Jobs . . . . . . . . . . . . . . . . . . . . . . . . . . . . . . . . . . . . . . . . . . . . . . . . . . . . . . . . . . . . . . . . . . . . . . . . . . . . . 137
AAppendix
Management Information Base (MIB) . . . . . . . . . . . . . . . . . . . . . . . . . . . . . . . . . . . . . . . . . . . . . . . . . . . 140
Index
viPhaser 4600/4620
System Administrator Guide
Introduction |
1 |
•Welcome on page 2
•Machine Models on page 3
•Control Panel Overview on page 4
Phaser 4600/4620 |
1 |
System Administrator Guide
Introduction
Welcome
WELCOME to the Xerox Phaser 4600/4620.
Who should use this Guide?
This Guide is intended for System Administrators who need to install, setup and manage printers and other services on their network.
To use the procedures in this Guide effectively, System Administrators must have previous experience working in a network environment and must possess Supervisor, Administrator, Account Operator, or equivalent rights to the network. They must also have prior knowledge of how to create and manage network user accounts.
2Phaser 4600/4620
System Administrator Guide
Introduction
Machine Models
The Xerox Phaser 4600/4620 is a mono laser printer. The features and functions available on your machine depend on the model you have purchased.
Xerox Phaser 4600/4620
The Xerox Phaser 4600/4620:
•Supports printing from a USB flash drive and has the capability of storing print files on the machine.
•Prints at 55 pages per minute for Letter size paper or 52 pages per minute for A4 size paper.
•Prints at 65 pages per minute for Letter size paper or 62 pages per minute for A4 size paper.
•Supports a Document Feeder, Paper Tray and Bypass Tray are also provided and 2-sided printing is supported.
Features |
Phaser 4600/4620 |
|
|
Direct / Network Printing |
Standard |
|
|
Paper Tray 1(Bypass) |
Standard |
|
|
Paper Tray 2 |
Standard |
|
|
Paper Tray 3, 4, 5 and 6 |
Optional |
|
|
Stand (see note) |
Optional |
|
|
Duplex Assembly |
Standard |
|
|
HCF |
Optional |
|
|
Finisher |
Optional |
|
|
USB flash drive support |
Standard |
|
|
Hard Drive |
Optional |
|
|
System Memory (256MB) |
Standard |
|
|
Additional Memory (512MB) |
Optional |
|
|
Wireless LAN Enabled |
Optional |
|
|
Mailbox |
Optional |
|
|
Note The type of stand available depends on the configuration.
Phaser 4600/4620 |
3 |
System Administrator Guide
Introduction
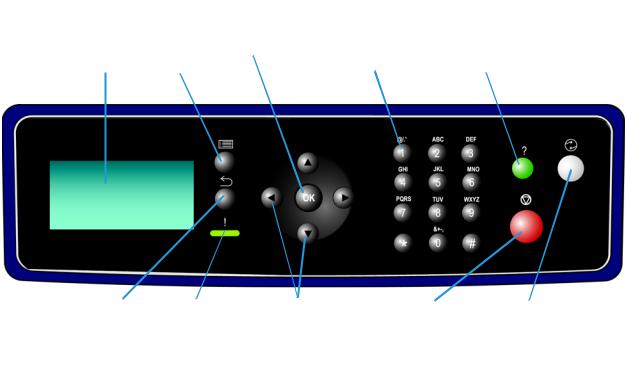
Control Panel Overview
LCD |
Menu |
OK Button |
Alphanumeric |
Help |
Display |
Button |
|
Keypad |
Button |
Return |
Status |
Directional |
Stop |
Power Save |
Button |
Indicator |
Buttons |
Button |
Button |
4Phaser 4600/4620
System Administrator Guide
Machine Connection |
2 |
This chapter shows you how to connect your machine to a network and configure Ethernet settings.
•Connection Ports on page 6
•CentreWare Internet Services on page 11
Phaser 4600/4620 |
5 |
System Administrator Guide
Machine Connection
Connection Ports
Front View
Type A USB Port
6Phaser 4600/4620
System Administrator Guide
Machine Connection
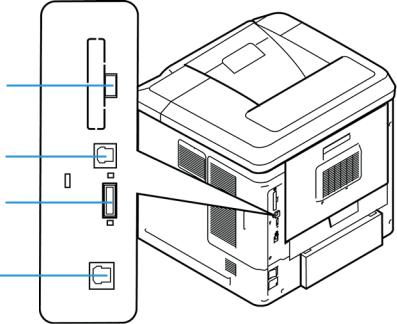
Rear View
Type A USB Port
Type B USB Port
Card Reader Slot
Ethernet Port
Interface Ports
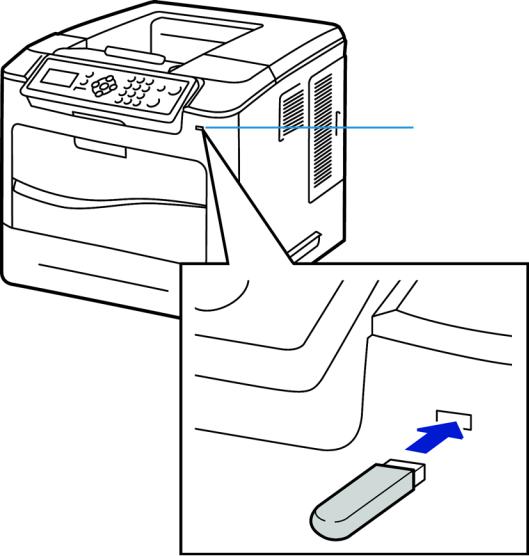
Front
USB 2.0 Port
This port is provided for connection to a USB flash drive and is used as an input port for printing jobs and performing software upgrades.
Rear
Card Reader Slot for the Configuration Card.
By changing the configuration card a failed printer’s network identity can be transferred to a replacement printer in a quick and simple manner or when a machine is inoperable its configuration can be temporarily transferred to a working machine of the same model.
Type A and Type B USB Ports
These ports are used to allow direct printing and firmware upgrades.
Phaser 4600/4620 |
7 |
System Administrator Guide
Machine Connection
Ethernet Port - 10/100/1000 Mbps
The machine is compatible with TCP/IP, SMB, LPD, AppleTalk, NetWare, IPP, HTTP, DHCP, LDAP, SNMP, DNS and Port 9100. It supports an Ethernet connector as a standard feature, and wireless connectivity as an option.
Initial Connection
Follow these steps to physically connect your machine to the network:
1.Connect the Power Cable
Ensure that the machine is connected to a suitable power supply and that the power cord is fully plugged into the electrical outlet.
2.Connect the Ethernet Cable
Connect a 10/100/1000 BaseT Ethernet cable to the Ethernet port on the left side of the machine and the other end of the cable to your network port.
3.Power on the machine
The Power On button is located on the left side of the machine, to the left as you face the machine.
4.Complete the Steps shown by the Installation Wizard
If this is the first time the machine has been powered on, the Installation Wizard will run.
Administrator Access
The Tools menu provides access to the Administrator Tools area. Administrator access is required to change settings such as network information on the machine.
1.Press the Menu button on the Control Panel.
2.Use the arrow buttons to select Tools. Press the OK button.
3.Enter the Administrator’s Password. The default is 1111.
4.Press the OK button.
Configure Ethernet Settings
The Ethernet interface options available are:
1.Auto
2.10 Mbps Full-Duplex
3.100 Mbps Full-Duplex
4.1000 Mbps Full-Duplex (Gigabit)
5.10 Mbps Half-Duplex
6.100 Mbps Half-Duplex
When Auto is selected, the machine detects the communication speed automatically and adjusts its settings accordingly. In most cases Auto should be the Ethernet setting.
8Phaser 4600/4620
System Administrator Guide
Machine Connection
AppleTalk, NetWare and TCP/IP protocols ethernet can be switched automatically according to the applied ethernet transmission protocol.
The Ethernet interface will automatically detect the speed of your network. The machine supports hub/switch speeds of:
•Auto
•10 Mbps Full-Duplex
•100 Mbps Full-Duplex
•1000 Mbps Full-Duplex
•10 Mbps Half-Duplex
•100 Mbps Half-Duplex
Setting the Ethernet speed at the machine
1.Press the Menu button on the machine and select Tools.
2.Enter the Administrator’s Password. The default is 1111.
3.Press the OK button.
4.Select Setup and press the OK button.
5.Select Network Settings and press the OK button.
6.Select Ethernet Speed and press the OK button.
7.Select the ethernet speed to match the speed set on your hub or switch and press the OK button.
8.Press the Menu button to exit the Tools menu.
9.Power off and power on the machine.
Setting the Ethernet Speed using CentreWare Internet Services
1.At your Workstation, open your web browser and enter the TCP/IP Address of the machine in the Address bar.
2.Press Enter.
3.Click on the Properties tab.
4.Click on the Connectivity link.
5.Click on the Physical Connections link.
6.Click on the Ethernet Link.
7.Select the ethernet speed to match the speed set on your hub or switch.
8.Press Apply to save the change.
Printing a Configuration Report
Follow these steps to print a Configuration Report:
1.Press the Menu button on the Control Panel.
2.Select Information and press the OK button.
3.Select Information Pages and press the OK button.
4.Select Configuration Page and press the OK button.
Phaser 4600/4620 |
9 |
System Administrator Guide
Machine Connection
5.Enter the Administrator’s Password. The default is 1111 and press the OK button
6.Confirm printing by selecting Yes and pressing the OK button.
7.Press the Menu button to return to the status screen.
10Phaser 4600/4620
System Administrator Guide

Machine Connection
CentreWare Internet Services
CentreWare Internet Services is the embedded HTTP server application that resides in the machine. Internet Services allows Administrators to change network and system settings on the machine from the convenience of their desktops.
Many features available on your machine will need to be set via the machine and the CentreWare Internet Service.
Many of the features available within Internet Services will require an Administrator Username and Password. The default Username is admin and the default Password is 1111.
System Configuration
To use CentreWare Internet Services, you need to enable both TCP/IP and HTTP on the machine. See Configure Static Addressing using the Machine on page 15, or Configure Dynamic Addressing on page 16.
Access CentreWare Internet Services
To view the CentreWare internet services Status screen:
1.At your Workstation, open the Web browser, enter the TCP/IP Address of the machine in the Address bar.
2.Press Enter or click on the Go button. For example:
Setup HTTP
The Internet Services HTTP screen enables the System Administrator to specify the Keep Alive Timeout, Maximum Connections, Port Number and Secure HTTP (SSL) settings.
1.At your Workstation, open the web browser and enter the TCP/IP Address of the machine in the Address bar and press Enter.
2.Click on the Properties tab.
Note If prompted, enter the Administrator's User Name admin and Password 1111, and click OK.
3.Click on the Connectivity link.
4.Click on the Protocols link.
5.Click on the HTTP link.
Phaser 4600/4620 |
11 |
System Administrator Guide
Machine Connection
6.The Keep Alive Timeout setting determines how long the machine's Internet Services pages will wait for a response from a connected user before terminating the connection. Enter the required number of seconds (1 - 60) in the Keep Alive Timeout entry box.
Note Generally, a user being connected to the machine using Internet Services for an extended period will slow down and tie up connections. Keep Alive Timeout controls the number of seconds that connections remain open from the HTTP server side without any requests from the client reaching the server.
7.The Maximum Connections setting is the maximum number of simultaneous connections that are allowed to Internet Services at any one time. In the Maximum Connections entry box, enter a number from 8 - 32 to indicate the maximum number of clients that can be connected (for example, with open sockets) to the HTTP server.
8.Change the HTTP Port Number if required. The default is 80.
9.Select the Require SSL option as the HTTP Security Mode.
Note The machine must have a Machine Digital Certificate configured to enable Secure HTTP - see Machine Digital Certificate Management & Trusted Certificate Authorities on page 87.
10.Click on the Apply button to accept the changes.
11.Click on the OK button when the confirmation message box appears.
Change the Administrator Password
It is recommended that you change the default administrator password to a more secure password, so this Xerox machine is not compromised.
To change the admin password:
1.At your Workstation, open your web browser and enter the TCP/IP Address of the machine in the Address bar.
2.Press Enter.
3.Click on the Properties tab.
Note If prompted, enter the Administrator's User Name admin and Password 1111, and click OK.
4.Click on the Security link.
5.Click on the Security Settings link.
6.Click on the Administrator Accounts tab.
7.Enter the new admin password in both the Password and Verify Password fields.
Note Do not forget the password or you could be completely locked out of the system, requiring a Service call.
8.Click Apply.
If prompted, enter the Administrator’s User ID admin and Password 1111 and click on Login.
9.Click on the OK button when the confirmation message box appears.
12Phaser 4600/4620
System Administrator Guide
Network Installation |
3 |
This chapter explains how to setup the machine to operate in the following environments:
•Network PING Test on page 14
•TCP/IP on page 15
•Service Location Protocol (SLP) on page 21
•Simple Service Discovery Protocol (SSDP) on page 22
•Windows Internet Name Service (WINS) on page 23
•AppleTalk on page 25
•NetWare on page 26
•Unix on page 28
•Cloning on page 36
•Wireless Networking on page 38
•SMTP on page 39
•WSD on page 40
Phaser 4600/4620 |
13 |
System Administrator Guide
Network Installation
Network PING Test
Ping is a computer network administration utility used to test whether a particular host is reachable across an Internet Protocol (IP) network and to measure the round-trip time for packets sent from the local host to a destination computer, including the local host's own interfaces.
Procedure
1.Press the Menu button on the machine and select Tools.
2.Enter the Administrator’s Password. The default is 1111 and press the OK button
3.Select Setup and press the OK button.
4.Select Network Settings and press the OK button.
5.Select Network Ping Test and press the OK button.
6.Select either IPv4 Address, IPv6 Address or Host Name and press the OK button.
7.Enter the Address to ping using the alphanumeric keypad and press the OK button.
8.The screen displays pinging and will display, in milliseconds, the time taken for ping packets to be returned.
Note Press the OK button to cancel the Ping Test.
9.If the Packets Received is greater than zero then network connectivity has been established.
10.On the display, scroll down to Exit and press the OK button.
14Phaser 4600/4620
System Administrator Guide
Network Installation
TCP/IP
These instructions describe how to configure the following via CentreWare Internet Services:
•TCP/IP v4 and v6
•Domain Name
•DNS
•Zero Configuration Networking
The device supports TCP/IP versions 4 and 6. IPv6 can be used instead of or in addition to IPv4.
IPv4 Settings can be configured directly at the device user interface, or remotely, via a web browser using Internet Services. IPv6 can only be configured using Internet Services. To configure TCP/IP Settings using CentreWare Internet Services, See Configure TCP/IP Settings using CentreWare Internet Services on page 17.
Configure Static Addressing using the Machine
Information Checklist
Before starting the installation procedure, please ensure that the following items are available and/or the tasks have been performed:
•Existing operational network utilising the TCP/IP protocol.
•Ensure that the machine is connected to the network.
•Static IP Address for the machine.
•Subnet Mask Address for the machine.
•Gateway Address for the machine.
•Host Name for the machine.
Procedure
Enter a Static IP Address
1.Press the Menu button on the machine and select Tools.
2.Enter the Administrator’s Password. The default is 1111 and press the OK button
3.Select Setup and press the OK button.
4.Select Network Settings and press the OK button.
5.Select TCP/IPv4 and press the OK button.
6.Select Static and press the OK button.
7.Select IP Address and press the OK button.
8.Use the arrow keys to set the static IP address, then press OK.
9.Use the arrow keys to set the Subnet mask address, then press OK.
10.Use the arrow keys to set the Gateway address, then press OK.
11.Press the Menu button to exit the Tools menu.
Phaser 4600/4620 |
15 |
System Administrator Guide
Network Installation
DNS Configuration
1.Press the Menu button on the machine and select Tools.
2.Enter the Administrator’s Password. The default is 1111 and press the OK button
3.Select Setup and press the OK button.
4.Select Network Settings and press the OK button.
5.Select TCP/IPv4 and press the OK button.
6.Select Static and press the OK button.
7.Select Primary DNS Address and press the OK button.
8.Use the arrow keys to set the IP address of the primary DNS server, then press OK.
9.Select Secondary DNS Address and press the OK button.
10.Use the arrow keys to set the IP address of the secondary DNS server, then press OK. Note An additional alternative DNS address can be set via CentreWare Internet Services.
Note If DHCP is enabled, the Alternate DNS server information is not available as a feature summary.
It is recommended that you change the default administrator password to a more secure password, so this Xerox device is not compromised.
Configure Dynamic Addressing
Information Checklist
Before starting the installation procedure, please ensure that the following items are available and/or the tasks have been performed:
1.Existing operational network utilising the TCP/IP protocol.
2.DHCP or BOOTP Server should be available on the network.
3.Machine should be connected to the network via Ethernet Cable.
Procedure
Installation via DHCP (Dynamic Host Configuration Protocol)
DHCP is enabled on the machine by default. If the machine is connected to the network, the TCP/IP information will be configured when the machine is powered on and no further configuration is required.
1.Print a Configuration Report to verify that the information was assigned correctly. Follow the steps on page 9
Installation via BOOTP or DHCP
Ensure your machine is connected to the network with Ethernet cabling.
1.At your Workstation, open your web browser and enter the TCP/IP Address of the machine in the Address bar.
2.Press Enter.
16Phaser 4600/4620
System Administrator Guide
Network Installation
3.Click on the Properties tab.
4.Click on the Connectivity link.
5.Click on the Protocols link.
6.Click on the TCP/IP tab.
7.In the General section, select the required Dynamic Addressing method:
•BOOTP.
•DHCP.
8.Click Apply.
If prompted, enter the Administrator’s User ID admin and Password 1111 and click on Login.
9.Click on the OK button when the confirmation message box appears.
Configure TCP/IP Settings using CentreWare Internet Services
IPv4
1.At your Workstation, open the Web browser and enter the TCP/IP Address of the machine in the Address bar.
2.Press Enter.
3.Click on the Properties tab.
4.Click on the Connectivity link.
5.Click on the Protocols link.
6.Select TCP/IP from the directory tree.
7.IPv4 is the default protocol. Ensure that in the TCP/IP section the Enabled checkbox is checked.
Note If you deselect the Protocol Enabled checkbox you will not be able to access Internet Services. TCP/IP must then be enabled from the device's user interface.
8.Enter a unique Host Name for your machine.
9.Select the desired method for obtaining a dynamic IP address from the IP Address Resolution drop down list or select Static to give the machine a static IP address.
10.If Static has been selected, type the IP addresses that apply in Machine IP Address, Subnet Mask, and Gateway Address.
Note If BOOTP or DHCP address resolution mode is selected, you cannot change the IP address, Subnet Mask, or default gateway. Select Static if you wish to disable dynamic addressing.
Domain Name
11. Enter a valid Domain Name.
DNS Configuration
12.Enter an IP address for the Preferred DNS Server. Enter an IP address for Alternate DNS Servers 1 and 2.
13.Check the box to enable Dynamic DNS Registration.
Note If your DNS Server does not support dynamic updates there is no need to enable DDNS.
Phaser 4600/4620 |
17 |
System Administrator Guide
Network Installation
Zero-Configuration Networking
14.Select the Self Assigned Address enabled box to allow the machine to assign itself an IP address of 169.254.x.x. This is useful in situations where the device cannot connect to the DHCP server to obtain an IP address.
15.Select the Multicast DNS enabled box if you want to enable the device to perform DNS queries over IP Multicast. This is essential for the Apple Rendezvous protocol to map a host name to an IP address, used to advertise the services of the device.
16.Click on Apply to accept the changes.
IPv6
1.At your Workstation, open the Web browser and enter the TCP/IP Address of the machine in the Address bar.
2.Press Enter.
3.Click on the Properties tab.
4.Click on the Connectivity link.
5.Click on the Protocols link.
6.Select TCP/IP from the directory tree.
7.Scroll down the page to TCP/IPv6 area, for the Protocol click the Enabled checkbox.
Stateless Addresses
The Link-Local Address and Global Address are automatically populated.
Default DHCP (Dynamic Host Configuration Protocol) Settings
The device performs auto-address DHCP configuration every time it powers up. This is used for neighbour discovery and address resolution on the local IPv6 subnet. However, you can choose to use manual configuration, automatic configuration or a combination of automatic and manual configuration.
8.Select one of the following options:
•Use DHCP as directed by a router - this option is fully automatic. The DHCPv6 Address will be obtained and displayed on the screen.
•Always Enable DHCP - this option is fully automatic. The DHCPv6 Address will be obtained and displayed on the screen.
•Never use DHCP - when this option is selected, you must configure the Manual Address Options and DNS separately.
Manual Address Options
The device can be configured with up to 4 manual IPv6 addresses.
9.Click the Enabled checkbox for Manual Address if required.
10.The Router Prefix is derived from router advertisements. Select a router address prefix from the list supplied in the Router Prefix menu to populate the prefix for manual entry address.
18Phaser 4600/4620
System Administrator Guide
Network Installation
DNSv6
11.Enter a valid IPv6 Domain Name.
12.Enter an IP address for the Primary DNSv6 Server Address. Enter an IP address for Secondary DNSv6 Server Address.
13.Check the box to enable Dynamic DNSv6 Registration.
Note If your DNS Server does not support dynamic updates there is no need to enable DDNS.
14.Scroll down the page and click on the Apply button to save the changes.
Test Access
1.At your Workstation, open the Web browser, In the TCP/IP Address bar, enter “http://” followed by the Internet address of the machine. Then press the Enter key on the keyboard.
Note If you use the domain name to specify the machine, use the following format. http://myhost.example.com
Note If you use the IP address to specify the machine, use one of the following formats depending on your machine configuration. The IPv6 format is supported on Windows Vista or later only. An IPv6 address needs to be enclosed in square brackets.
IPv4: http://xxx.xxx.xxx.xxx
IPv6: http://[xxxx:xxxx:xxxx:xxxx:xxxx:xxxx:xxxx:xxxx]
Note If you have changed the port number from the default port number “80”, append the number to the Internet address as follows. In the following examples, the port number is 8080.
Domain name: http://myhost.example.com:8080 IPv4: http://xxx.xxx.xxx.xxx:8080
IPv6: http://[xxxx:xxxx:xxxx:xxxx:xxxx:xxxx:xxxx:xxxx]:8080
2.Verify that the home page of CentreWare Internet Services is displayed.
The CentreWare Internet Services installation process is now completed.
Note If the Accounting feature is enabled, you may be required to enter a user ID and passcode (if one is set up).
Note When your access to CentreWare Internet Services is encrypted, enter “https://” followed by the Internet address, instead of “http://”.
•Automatically Configured Gateway Address – Displays the automatically configured gateway address.
Domain Name:
•Domain Name – Displays the domain name.
DHCP/DDNS:
•Release Registration – Allows DHCP resources to be released when the machine is powering down. This is a display-only item and shows “Enabled”.
Phaser 4600/4620 |
19 |
System Administrator Guide
Network Installation
Zero-Configuration Networking:
•Self Assigned Address (IPv4) – Allocates an IPv4 address without using a DHCP server. This check box is selected when IP Address Resolution is set to Autonet. This is a display-only item.
•Self Assigned Address (IPv6) – Displays “Enabled”. This is a display-only item.
20Phaser 4600/4620
System Administrator Guide
Network Installation
Service Location Protocol (SLP)
SLP is a protocol that provides a flexible and scalable framework for providing hosts with access to information about the existence, location, and configuration of networked services. SLP is useful in enterprise networks.
To change the configuration of the Service Location Protocol (SLP) Service Agent for the printer:
1.At your Workstation, open the Web browser and enter the TCP/IP Address of the machine in the Address bar.
2.Press Enter.
3.Click on the Properties tab.
4.Click on the Connectivity link.
5.Click on the Protocols link.
6.Click on the SLP link.
7.Check the Enable Checkbox.
8.Enter the required parameters for the SLP configuration:
•Directory Agent
•Scope 1
•Scope 2
•Scope 3
•Message Type
•Multicast Radius
•SLP MTU
•Registration Lifetime
9.Click the apply button to save the changes.
Phaser 4600/4620 |
21 |
System Administrator Guide
Network Installation
Simple Service Discovery Protocol (SSDP)
SSDP provides a mechanism which network clients can use to discover network services.
To enable SSDP:
1.At your Workstation, open the Web browser and enter the TCP/IP Address of the machine in the Address bar.
2.Press Enter.
3.Click on the Properties tab.
4.Click on the Connectivity link.
5.Click on the Protocols link.
6.Click on the SSDP link.
7.Check the Enable Checkbox.
8.Set the SSDP Time-To-Live (TTL) to a value between 1 and 60 hops.
9.Click the apply button to save the changes.
22Phaser 4600/4620
System Administrator Guide
Network Installation
Windows Internet Name Service (WINS)
WINS settings enable the printer to register its IP name and address so other devices on the network can refer to it by name.
To enable SSDP:
1.At your Workstation, open the Web browser and enter the TCP/IP Address of the machine in the Address bar.
2.Press Enter.
3.Click on the Properties tab.
4.Click on the Connectivity link.
5.Click on the Protocols link.
6.Click on the WINS link.
7.Check the Enable Checkbox.
8.Enter the primary and secondary WINS server IP addresses.
9.Click the apply button to save the changes.
Phaser 4600/4620 |
23 |
System Administrator Guide
Network Installation
SNMP Configuration
Allows you to configure the following options when accessing the machine via SNMP v1/v2c.
SNMP Properties:
Protocol Enable – Allows you to enable or disable the SNMP v1/v2c protocols.
Edit SNMP Properties – Displays the page which allows you to set the following SNMP v1/v2c properties.
Community Names:
•GET Community Name (Read Only) – Enter the community name used for display.
•SET Community Name (Read/Write) – Enter the community name used for display and update.
Default Trap Community Name:
•TRAP Community Name – Enter the trap notification community name.
Authentication Failure Generic Traps:
•Enable – When the Authentication Failure Generic Trap is enabled, this machine will generate a trap for every SNMP request that is received by the machine which contains an invalid community name.
IP Trap Destination Address:
•IP Address: Enter the IPv4 address of the SNMP agent that you are setting up to receive traps.
•UDP Port Number: Enter the UDP port number of the SNMP agent.
Traps:
•TRAP Community Name: Enter the trap community name of the SNMP agent.
•Trap to be Received: Select the types of traps to receive from the SNMP agent
SNMPv3 Configuration
Allows you to configure the following options when accessing the machine via SNMP v1/v2c.
•Context name: enter the name that allows the SNMPv3 agent to identify the management information associated with the machine.
•User Name: enter the username required for SNMPv3 authentication.
•Authentication Password: enter the password required for SNMPv3 authentication.
•Algorithm: Select the algorithm to be used to encrypt the user authentication information. MD5 or SHA may be used but the algorithm must match that used by the SNMPv3 agent.
•Privacy password: enter the password required for SNMPv3 packet encryption authentication.
•Algorithm: displays the algorithm used for packet encryption, in the case of SNMPv3 this is the DES encryption method.
24Phaser 4600/4620
System Administrator Guide
Loading...