


 Loading...
Operating Manual
The serial number is located on the bottom of the camera.
Chapter 1: Introduction
Read this chapter before use.
This chapter gives you an overview of the RICOH GR III.
Chapter 2: Getting Started
Read this chapter before using the RICOH GR III for the first time.
This chapter explains about basic operations such as turning the camera on, performing shooting, and playing back images.
Chapters 3 and Later
Read these chapters when you want to learn more about the different camera functions.
These chapters explain about shooting and playback functions, as well as how to customize the camera settings and use it with a computer.
Model: R02010

Regarding User Registration
Thank you for purchasing a RICOH IMAGING product.
In order to provide you with the best customer support and service experience for the product you have purchased, we ask you to complete the user registration.
Visit the following website to complete the user registration. http://www.ricoh-imaging.com/registration/
Registered users will be notified by e-mail about important customer support information, such as firmware version updates, etc.

Introduction
This Operating Manual provides information on how to use the shooting and playback functions of this camera and related precautions.
Thoroughly read this Operating Manual to make the best use of the functions available with this camera. Be sure to keep this Operating Manual for future reference.
It is recommended to update the camera firmware to the latest version before using the camera.
For details on the latest firmware version, refer to the following firmware download site. http://www.ricoh-imaging.co.jp/english
|
RICOH IMAGING COMPANY, LTD. |
|
|
Safety precautions |
Read all safety precautions thoroughly to ensure safe use. |
|
|
Test shots |
Take test shots to ensure that the camera is working properly be- |
|
fore taking pictures on important occasions. |
|
|
Copyright |
Reproduction or alteration of copyrighted documents, magazines, |
|
and other materials, other than for personal, home, or other simi- |
|
larly limited purposes, without the consent of the copyright holder, |
|
is prohibited. |
|
|
Exemption from liability |
RICOH IMAGING COMPANY assumes no liability for failure to record |
|
or display images as a result of product malfunction. |
Radio interference |
Operating this camera in the vicinity of other electronic equipment |
|
may adversely affect both the camera and the other device. Inter- |
|
ference is particularly likely if the camera is used in close proximity |
|
to a radio/TV receiver. In such case, take the following measures. |
|
• Keep the camera as far away as possible from the radio/TV re- |
|
ceiver. |
|
• Reorient the antenna of the radio/TV receiver. |
|
• Use a different wall outlet. |
This publication may not be reproduced in whole or in part without RICOH IMAGING COMPANY’s express written permission.
© RICOH IMAGING COMPANY, LTD. 2019
RICOH IMAGING COMPANY reserves the right to change the contents of this manual at any time without prior notice.
Every effort has been made to ensure the accuracy of the information in this manual. Should you nevertheless notice any errors or omissions, we would be grateful if you would notify us at the address listed on the back cover of this manual.
1

About the Wireless LAN and Bluetooth® Functions
•Do not use the camera in a place where electrical products, AV/OA devices, and so on generate magnetic fields and electromagnetic waves.
•If the camera is affected by magnetic fields and electromagnetic waves, it may not be able to communicate.
•If the camera is used near a TV or a radio, poor reception or TV screen glitch may occur.
•If there are multiple wireless LAN access points or Bluetooth® devices near the camera and the same channel is used, search operation may not be executed correctly.
•The security of your data stored, sent, or received is your own responsibility.
In the frequency band used by the camera, along with industrial, scientific, and medical devices such as microwave ovens, premises radio stations (wireless stations requiring license) and specified low power radio stations (wireless stations not requiring license) for mobile object identification used in factory production lines, etc., and amateur radio stations (wireless stations requiring license) are operated.
1.Before using the camera, confirm that premises radio stations and specified low power radio stations for mobile object identification and amateur radio stations are not operated in the vicinity.
2.In the event that the camera causes harmful radio wave interference to premises radio stations for mobile object identification, immediately change the frequency being used to avoid interference.
3.If you have other troubles such that the camera causes harmful radio wave interference to specified low power radio stations for mobile object identification or to amateur radio stations, contact your nearest service center.
This camera conforms to the technical standards under the Radio Law and Telecommunications Business Law and the certification of conformance to technical standards can be displayed on the monitor.
Displaying the Certification Marks------------------------------------------------------------------------------------------------------------------
1
2
Display the menu.
Refer to “Setting from the Menus” (p.25) for how to display the menu.
Select [Certification Marks] in the E8 menu.
Trademarks
•Microsoft and Windows are registered trademarks of Microsoft Corporation in the United States of America and other countries.
•Mac, macOS, OS X, and App Store are trademarks of Apple Inc., registered in the U.S. and other countries.
•IOS is a trademark or registered trademark of Cisco in the U.S. and other countries and is used under license.
•Adobe, the Adobe logo, and Adobe Reader are registered trademarks or trademarks of Adobe Systems Incorporated in the United States and/or other countries.
•This product includes DNG technology under license by Adobe Systems Incorporated.
•The DNG logo is either a registered trademark or trademark of Adobe Systems Incorporated in the United States and/or other countries.
•SDXC Logo is a trademark of SD-3C, LLC.
•Google, Google Play, and Android are trademarks or registered trademarks of Google Inc.
•The Bluetooth® word mark and logos are registered trademarks owned by Bluetooth SIG, Inc., and any use of such marks by Ricoh Company, Ltd. is under license.
•USB Type-C is a trademark of USB Implementers Forum.
•DisplayPort is a trademark owned by the Video Electronics Standards Association in the United States and other countries.
•HDMI, the HDMI logo, and High-Definition Multimedia Interface are trademarks or registered trademarks of HDMI Licensing, LLC in the United States and/or other countries.
All other trademarks are the property of their respective owners.
• This product uses the RICOH RT font designed by Ricoh Company Ltd.
2
AVC Patent Portfolio License
This product is licensed under the AVC Patent Portfolio License for the personal use of a consumer or other uses in which it does not receive remuneration to (i) encode video in compliance with the AVC standard (“AVC video”) and/or (ii) decode AVC video that was encoded by a consumer engaged in a personal activity and/or was obtained from a video provider licensed to provide AVC video. No license is granted or shall be implied for any other use.
Additional information may be obtained from MPEG LA, L.L.C. See http://www.mpegla.com.
Announcement about the Open Source Software
This product includes the open source software (OSS) licensed under the GNU General Public License (GPL), GNU Lesser General Public License (LGPL), and/or other licenses. The information about licenses of each OSS used in this product is saved in the product internal memory as a text file. Connect this product to a computer, access the “oss_license” folder in the “Software License” folder, and open the text file to read the license terms.
The source codes of OSS used in this product are disclosed under the license terms of GPL, LGPL, etc. If you need the source codes, access the following URL.
http://www.ricoh-imaging.co.jp/english/products/oss/
3
Safety Precautions
Warning Symbols
Various symbols are used throughout this Operating Manual and on the product to prevent physical harm to you or other people and damage to property. The symbols and their meanings are explained below.
 Danger
 Warning
 Caution
This symbol indicates matters that may lead to imminent risk of death or serious injury if ignored or incorrectly handled.
This symbol indicates matters that may lead to death or serious injury if ignored or incorrectly handled.
This symbol indicates matters that may lead to injury or physical damage if ignored or incorrectly handled.
Meaning of Symbols
The  symbol alerts you to actions that must be performed.
The  symbol alerts you to prohibited actions.
The  symbol may be combined with other symbols to indicate that a specific action is prohibited.
Example:
 : Do not touch
  : Do not disassemble
Observe the following precautions to ensure safe use of this camera.
 Danger
QQ Do not attempt to disassemble, repair, or alter the camera yourself. The high-voltage circuitry in the equipment poses significant electrical hazard.
QQ Do not attempt to disassemble, alter, or directly solder the battery.
QQ Do not put the battery in a fire, attempt to heat it, use or leave it in a high temperature environment such as next to a fire or inside a car. Do not put it into water or the sea or allow it to get wet.
QQ Do not attempt to pierce, hit, compress, drop, or subject the battery to any other severe impact or force.
QQ Do not use a battery that is significantly damaged or deformed.
QQ Do not connect the positive (+) and negative (-) poles of the battery with a wire or other metallic item. Also, do not carry or store together with metal objects such as ballpoint pens and necklaces.
4

QQ Use the camera or battery charger BJ-11 to charge the battery. Do not use the battery with any camera except the cameras compatible with the DB 110.
QQ Stop using the camera immediately in the event of abnormalities such as smoke, unusual odors, or excessive heat being emitted. Contact your nearest dealer or service center for repair.
QQ If the battery fluid leaks and gets into your eyes, immediately wash your eyes thoroughly with tap water or other clean water without rubbing, and seek medical attention immediately.
 Warning
QQ Turn off the power immediately in the event of abnormalities such as smoke or unusual odors being emitted. Remove the battery as soon as possible, being careful to avoid electric shocks or burns. If you are drawing power from a household electrical outlet, be sure to unplug the power plug from the outlet. Failure to observe this precaution could result in fire or electric shocks. Contact the nearest service center at your earliest convenience. Stop using the camera immediately if it is malfunctioning.
QQ Turn off the power immediately if any metallic object, water, liquid, or other foreign object gets into the camera. Remove the battery and memory card as soon as possible, being careful to avoid electric shocks or burns. If you are drawing power from a household electrical outlet, be sure to unplug the power plug from the outlet. Failure to observe this precaution could result in fire or electric shocks. Contact the nearest service center at your earliest convenience. Stop using the camera immediately if it is malfunctioning.
QQ If the monitor is damaged, avoid any contact with the liquid crystal inside it. Follow the appropriate emergency measures below.
•SKIN: If any of the liquid crystal gets on your skin, wipe it off and rinse the affected area thoroughly with water, then wash well with soap.
•EYES: If it gets in your eyes, wash your eyes with clean water for at least 15 minutes and seek medical advice immediately.
•INGESTION: If any of the liquid crystal is ingested, rinse the mouth out thoroughly with water. Have the person drink a large amount of water and induce vomiting. Seek medical assistance immediately.
5
QQ Follow these precautions to prevent the battery from leaking, overheating, igniting, or exploding.
•Do not use a battery other than those specifically recommended for the camera.
•Do not carry or store the battery together with metal objects such as ballpoint pens, necklaces, coins, and hairpins.
•Do not put the battery into a microwave or high pressure container.
•If leakage of battery fluid, a strange odor, color change, etc. is noticed during use or during charging, remove the battery from the camera or battery charger immediately and keep it away from fire.
QQ Observe the following in order to prevent fire, electrical shock, or cracking of the battery while charging.
•Use only the indicated power supply voltage. Also avoid the use of multisocket adapters and extension cords.
•Do not damage, bundle, or alter power cords. Also, do not place heavy objects on, stretch, or bend power cords.
•Do not connect or disconnect the power plug with wet hands. Always grip the plug section when disconnecting a power plug. Do not cover the camera while charging the battery.
QQ Keep the battery and memory card used in the camera out of the reach of children to prevent accidental swallowing. The battery and memory card are harmful if swallowed. Seek medical assistance immediately.
QQ Keep the camera out of the reach of children. For children, accidents may occur because they cannot understand the contents of “Safety Precautions” and “Precautions for Use”.
QQ Do not touch the internal components of the camera if they become exposed as a result of being dropped or damaged. The high-voltage circuitry in the equipment could lead to electric shocks. Remove the battery as soon as possible, being careful to avoid electric shocks or burns. Take the camera to your nearest dealer or service center if it is damaged.
QQ Do not use the camera in wet areas such as a kitchen. Failure to observe this precaution could result in fire or electric shocks.
QQ Do not use the camera near flammable gases, gasoline, benzine, thinner, or similar substances. Failure to observe this precaution could result in an explosion, fire, or burns.
QQ Do not use the camera in a location where usage is restricted or prohibited, such as on airplanes. Failure to observe this precaution could result in an accident.
QQ Wipe off any dust that accumulates on the power plug. Failure to observe this precaution could result in fire.
QQ When using a household power outlet, always use the dedicated AC adapter. Failure to observe this precaution could result in fire, electric shocks, or product malfunction.
6
QQ Do not use the battery charger or AC adapter with commercially available electronic transformers when traveling abroad. Failure to observe this precaution could result in fire, electric shocks, or product malfunction.
QQ Use only the indicated power supply voltage. Failure to observe this precaution could result in fire or electric shocks.
QQ Do not damage, bundle, or alter power cords. Also, to avoid damaging power cords and the risk of fire or electric shocks, do not place heavy objects on, stretch, or bend power cords.
QQ Do not connect or disconnect the power plug with wet hands. Failure to observe this precaution could result in electric shocks.
QQ Always grip the plug section when disconnecting a power plug. Do not pull the power cord. This can damage the power cord and result in fire or electric shocks.
QQ If any metallic object, water, liquid, or other foreign object gets into the camera, immediately remove the power plug from the outlet and contact a service center for repair. Failure to observe this precaution could result in fire or electric shocks.
QQ If an abnormality such as an unusual sound or smoke is emitted from the camera, immediately remove the power plug from the outlet and contact your nearest dealer or service center for repair. Stop using the camera immediately if it is malfunctioning.
QQ Do not attempt to disassemble the camera yourself. The high-voltage circuitry in the equipment could lead to electric shocks.
QQ Do not use the camera in a bathroom. Failure to observe this precaution could result in fire or electric shocks.
QQ Do not touch the power plug during a lightning storm. Failure to observe this precaution could result in electric shocks.
QQ Keep the battery out of the reach of children.
QQ If the battery does not finish charging after the prescribed charging time, discontinue charging.
QQ Do not put the battery into a microwave or high pressure container.
QQ If the battery leaks or emits an unusual odor, immediately move it away from any sources of fire.
7

 Caution
QQ Contact with fluid leaking from a battery can lead to burns. If part of your body comes in contact with a damaged battery, rinse the area with water immediately. (Do not use soap.)
If a battery starts to leak, remove it immediately from the camera and wipe the battery chamber thoroughly before replacing it with a new battery.
QQ Plug the power plug securely into the electrical outlets. Failure to observe this precaution could result in fire.
QQ Do not allow the camera to get wet. In addition, do not operate it with wet hands. Failure to observe this precaution could result in electric shocks.
QQ Do not fire the flash at drivers of vehicles, as this may cause the driver to lose control and result in a traffic accident. Failure to observe this precaution could result in a traffic accident.
QQ Remove the power plug from the outlets before cleaning the camera. QQ Remove the power plug from the outlets when the camera is not used.
QQ Do not cover the camera while using it. Failure to observe this precaution could result in fire.
QQ Do not short the terminals or metal contacts on the power cords. Failure to observe this precaution could result in fire.
QQ Do not use the camera in wet areas or areas subject to oil smoke such as a kitchen. Failure to observe this precaution could result in fire or electric shocks.
Safety Precautions |
When using optional products, carefully read the user’s manuals pro- |
for Accessories |
vided with the product before using that product. |
8
Contents |
|
|
|
Introduction............................................................................................................................ |
1 |
|
Safety Precautions................................................................................................................ |
4 |
1 |
Introduction |
13 |
|
Checking the Contents of the Package....................................................................... |
13 |
|
Names and Functions of the Working Parts.............................................................. |
14 |
|
Operating Controls............................................................................................................................ |
16 |
|
Indicators on the Monitor................................................................................................ |
18 |
|
Shooting Screen................................................................................................................................. |
18 |
|
Playback Screen.................................................................................................................................. |
19 |
|
Changing the Screen Display......................................................................................................... |
20 |
|
Using the Touch Panel...................................................................................................................... |
21 |
|
How to Change Function Settings................................................................................ |
22 |
|
Using the Button/Lever.................................................................................................................... |
22 |
|
Setting from the Menus................................................................................................................... |
25 |
|
Menu List................................................................................................................................ |
27 |
|
AStill Image Settings Menus...................................................................................................... |
27 |
|
BMovie Settings Menus.............................................................................................................. |
30 |
|
CPlayback Settings Menus......................................................................................................... |
32 |
|
DCustomize Settings Menus...................................................................................................... |
33 |
|
ESetup Menus................................................................................................................................ |
35 |
2 |
Getting Started |
37 |
|
Setting the Battery and a Memory Card..................................................................... |
37 |
|
Inserting the Battery and a Memory Card................................................................................. |
37 |
|
Charging the Battery......................................................................................................................... |
38 |
|
Initial Settings....................................................................................................................... |
40 |
|
Turning the Camera On.................................................................................................................... |
40 |
|
Setting the Language and the Date and Time......................................................................... |
41 |
|
Formatting a Memory Card............................................................................................................ |
42 |
|
Basic Shooting Operation................................................................................................ |
44 |
|
Shooting in the Program Mode.................................................................................................... |
44 |
|
Viewing the Captured Images....................................................................................................... |
46 |
3 |
Taking Pictures |
48 |
|
Taking Still Images.............................................................................................................. |
48 |
|
Setting the Exposure Mode............................................................................................................ |
48 |
|
Using Exposure Compensation..................................................................................................... |
53 |
|
Recording Movies............................................................................................................... |
54 |
Playing Back Movies.......................................................................................................................... |
56 |
9 |
|
|

Setting the Focus................................................................................................................ |
57 |
Setting the Focus Mode................................................................................................................... |
57 |
Shooting Close-ups (Macro)........................................................................................................... |
61 |
Shooting with a Single Press of the Shutter Release Button (Full Press Snap)............. |
62 |
Setting the Exposure.......................................................................................................... |
63 |
Selecting a Metering Method........................................................................................................ |
63 |
Setting the ISO Sensitivity............................................................................................................... |
64 |
Using a Flash........................................................................................................................................ |
65 |
Reducing Noise................................................................................................................................... |
67 |
Setting the White Balance................................................................................................ |
69 |
Setting the White Balance Manually........................................................................................... |
72 |
Setting the Color Temperature...................................................................................................... |
73 |
Setting the Drive Mode..................................................................................................... |
74 |
Shooting Continuously (Continuous Shooting)...................................................................... |
75 |
Shooting with Varied Exposure Values (Bracketing).............................................................. |
76 |
Shooting While Merging Images Together (Multi-exposure)............................................. |
77 |
Shooting Automatically at Set Intervals (Interval Shooting).............................................. |
79 |
Recording Star Trails (Interval Composite)................................................................................ |
81 |
Using the Self-timer........................................................................................................................... |
83 |
Configuring the Capture Settings................................................................................. |
84 |
Image Capture Settings................................................................................................................... |
84 |
Movie Capture Settings................................................................................................................... |
85 |
Setting the Image Finishing Tone and Correction.................................................. |
86 |
Using the ND Filter............................................................................................................................. |
86 |
Reducing Moiré (AA Filter Simulator)......................................................................................... |
86 |
Setting the Image Atmosphere (Image Control).................................................................... |
87 |
Correcting the Peripheral Illumination....................................................................................... |
89 |
Correcting a Range of Tones (D-Range Correction)............................................................... |
89 |
Reducing Blurring of Images......................................................................................................... |
90 |
4 Playback Functions |
91 |
Using the Playback Functions......................................................................................... |
91 |
Changing the Playback Method.................................................................................... |
92 |
Displaying Multiple Images............................................................................................................ |
92 |
Displaying Rotated Images............................................................................................................. |
94 |
Connecting the Camera to an AV Device.................................................................................. |
95 |
Organizing Files................................................................................................................... |
96 |
Deleting Files....................................................................................................................................... |
96 |
Protecting Images from Deletion................................................................................................. |
97 |
Copying Images and Movies in the Internal Memory to a Memory Card...................... |
98 |
Transferring Images........................................................................................................................... |
99 |
10

|
Editing and Processing Images.................................................................................... |
100 |
|
Developing RAW Images............................................................................................................... |
100 |
|
Changing the Image Size.............................................................................................................. |
102 |
|
Correcting Highlight/Shadow Areas (Levels Adjustment)................................................ |
103 |
|
Correcting the White Balance...................................................................................................... |
105 |
|
Correcting Color Moiré................................................................................................................... |
106 |
|
Adjusting the Image Quality........................................................................................................ |
107 |
|
Editing Movies................................................................................................................................... |
108 |
5 |
Sharing Images |
110 |
|
Using the Camera with a Computer........................................................................... |
110 |
|
Using the Camera with a Communication Device................................................ |
111 |
|
Connecting to a Communication Device via Bluetooth®.................................................. |
112 |
|
Enabling the Wireless LAN Function......................................................................................... |
114 |
|
Operating the Camera with a Communication Device...................................................... |
116 |
6 |
Changing the Settings |
117 |
|
Saving Frequently Used Settings................................................................................ |
117 |
|
Saving the Settings.......................................................................................................................... |
117 |
|
Assigning Settings to the Mode Dial......................................................................................... |
119 |
|
Using the Saved User Mode......................................................................................................... |
120 |
|
Customizing the Button Functions............................................................................. |
121 |
|
Registering Functions to the ADJ. Mode................................................................................. |
121 |
|
Changing the Functions of the Fn Button............................................................................... |
123 |
|
Setting the Function of the Shutter Release Button............................................................ |
125 |
|
Display and Sound Settings.......................................................................................... |
126 |
|
Setting the Information Displayed During Shooting/Playback...................................... |
126 |
|
Setting the Instant Review Display............................................................................................ |
127 |
|
Setting the Live View Display....................................................................................................... |
128 |
|
Setting the Brightness and Tone of the Monitor................................................................... |
128 |
|
Setting the Lamp.............................................................................................................................. |
129 |
|
Setting the Sound Effects.............................................................................................................. |
130 |
|
Power Saving Settings..................................................................................................... |
131 |
|
Automatically Turning the Power Off........................................................................................ |
131 |
|
Dimming the Display...................................................................................................................... |
132 |
|
File Management Settings............................................................................................. |
133 |
|
Specifying the Folder/File Settings............................................................................................ |
133 |
|
Setting the Copyright Information............................................................................................ |
138 |
11

7 Appendix |
139 |
Attaching Optional Accessories................................................................................... |
139 |
Conversion Lens/Lens Adapter................................................................................................... |
139 |
AC Adapter......................................................................................................................................... |
140 |
Troubleshooting................................................................................................................ |
141 |
Power Supply..................................................................................................................................... |
141 |
Shooting.............................................................................................................................................. |
142 |
Playback/Deletion............................................................................................................................ |
144 |
Others................................................................................................................................................... |
145 |
Error Messages.................................................................................................................................. |
145 |
Main Specifications.......................................................................................................... |
147 |
Camera................................................................................................................................................. |
147 |
USB Power Adapter AC-U1/AC-U2............................................................................................. |
150 |
Rechargeable Battery DB-110...................................................................................................... |
150 |
Image Storage Capacity................................................................................................................. |
151 |
Operating Environment................................................................................................................. |
152 |
Using the Camera Abroad.............................................................................................. |
153 |
Precautions for Use........................................................................................................... |
154 |
Camera Care and Storage.............................................................................................. |
156 |
Warranty Policy.................................................................................................................. |
157 |
Regulatory Compliance Statements.......................................................................... |
158 |
Index...................................................................................................................................... |
164 |
12
Introduction
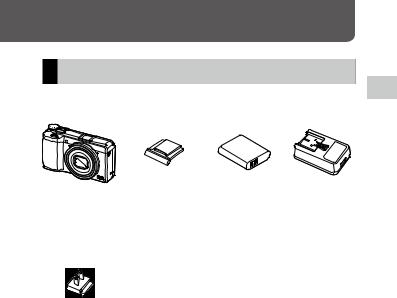
Checking the Contents of the Package
Before using your digital camera, confirm that the package contains the items listed below.
RICOH GR III
Power plug
Hot shoe cover |
Rechargeable |
USB power |
(Installed on the cam- |
battery |
adapter |
era) |
(DB-110) |
(AC-U1 or |
|
|
AC U2)* |
|
|
* Differs depend- |
|
|
ing on the |
|
|
region. |
gUSB cable (I-USB166)
gHand strap
gOperating Manual (this manual)
1 Introduction
13
1 Introduction
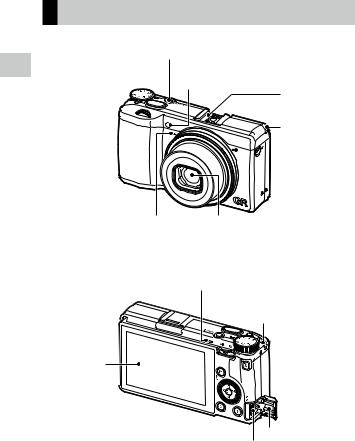
Names and Functions of the Working Parts
Power button lamp
AF assist light/ self-timer lamp
Hot shoe |
Strap eyelet |
 Microphone
Microphone Lens
Status lamp
Strap eyelet
Monitor
Terminal cover
USB terminal (USB Type-C)
14

Speaker
Ring cap
Strap eyelet
Tripod screw hole Battery/card cover
Release lever
1 Introduction
15

Operating Controls
This section explains about operating controls.
The icons in parentheses are used in the descriptions of this manual.
1 |
1 |
2 |
3 |
4 |
5 |
|
Introduction |
||||||
|
|
|
|
|
6
7 |
8 |
|
|
|
13 |
|
|
14 |
|
|
15 |
|
|
16 |
|
|
17 |
9 10 |
11 |
12 |
1 |
Front e-dial (P) |
3 |
Mode dial |
|
Rotate the dial to change values for camera set- |
|
Changes the exposure mode. (p.48) |
|
tings such as exposure. (p.49) |
4 |
Shutter release button (Z) |
|
In the playback mode, rotate the dial to mag- |
|
Press to capture images. |
|
nify the image or display multiple images at the |
|
Press halfway to activate autofocus. (p.44) |
|
same time. (p.46, p.92) |
|
|
2Lock button
Press to allow the mode dial to be turned.
16

5Power button
Turns the power on or off. (p.40)
6Movie/Wireless button (K/M)
Switches between still image mode and movie mode. (p.54)
Press and hold to turn the wireless LAN function on and off. (p.115)
7Fn/Delete button (H/I)
Calls assigned function. (p.24)
In the playback mode, press to delete images. (p.46)
8ADJ./EV compensation lever (N/O/Q)
Press the lever to the left or right to change values for camera settings such as exposure.
In the shooting mode, press to switch to ADJ. mode. (p.23)
9ISO/Left button (U/C)
Press to change the ISO sensitivity. (p.64) Moves the cursor to the left when an item is selected.
10MENU button (F)
Displays a menu. Press this button while the menu is displayed to return to the previous screen. (p.25)
11White balance/Down button (T/B)
Displays the white balance setting screen. (p.70)
Moves the cursor down when an item is selected.
12DISP button (J)
Switches the display between the shooting information and playback information. (p.20) Press and hold this button in shooting mode to magnify the Live View image. (p.45)
13Playback button (G)
Switches between the shooting mode and the playback mode. (p.46)
14Macro/Up button (S/A)
Switches to macro mode. (p.61)
Moves the cursor up when an item is selected.
15Control dial (R)
Rotate this dial to change menu items, values for camera settings such as exposure, or images to be displayed on the screen. (p.49)
16Drive/Right button (V/D)
Displays the drive mode setting screen. (p.74) Moves the cursor to the right when an item is selected.
17OK button (E)
Confirms the selected items such as menus.
1 Introduction
17

Indicators on the Monitor
Shooting Screen
1 |
1 2 3 4 5 |
6 7 8 910 |
11121314 15 |
|||
|
||||||
Introduction |
16 |
|
|
|
|
22 |
|
|
|
|
23 |
||
17 |
|
|
|
|
||
|
|
|
|
24 |
||
18 |
|
|
|
|
25 |
|
19 |
|
|
|
|
26 |
|
|
|
|
|
27 |
||
|
|
|
|
|
||
20 |
|
|
|
|
28 |
|
|
|
|
|
29 |
||
|
21 |
|
|
|
|
|
|
30 31 20 32 |
33 |
34 |
35 36 |
37 |
|
Still image mode
1Drive (p.74)
2Shake Reduction/Movie SR (p.90)
3Focus (p.57)
4White Balance (p.69)
5Image Control (p.87)
6AE Metering (p.63)
7Flash Mode (p.66)
8GPS positioning status (p.116)
9Bluetooth® communication (p.112) 10 Wireless LAN communication (p.114) 11 Temperature warning
12 Snap Focus Distance (p.57)
13 File Format/JPEG Recorded Pixels (p.84)
14 Number of storable images
15 Storage location
16 Self-timer (p.83)
17 Grid Guide (p.126)
18 Macro Mode (p.61)
19 Focus bar/Depth of field (p.60)
20 Operation guide
38 39
Movie mode
21Exposure mode (p.48)
22Full Press Snap (p.62)
23Crop (p.85)
24Conversion lens (p.139)
25ND Filter (p.86)
26Focus frame (p.44)
27Electronic Level (p.126)
28AA Filter Simulator (p.86)
29Histogram (p.126)
30Front e-dial
31Shutter speed (p.49)
32Aperture value (p.49)
33Control dial
34Sensitivity (p.63)
35ADJ./EV compensation lever
36Exposure indicator/Exposure compensation (p.53)
37Battery level (p.19)
38Recording indicator
39Recording time/Remaining recording time
18
Playback Screen
1 |
2 3 4 5 6 |
7 |
8 |
02/02/2019 10:00 

 99998/99999
 9
9
100-0630 |
|
1/2400 F5.6 |
250 |
EV+0.7 |
|
|
10 |
11 |
12 |
13 |
14 |
15 |
16 |
Still image mode
1Shooting date and time
2Protect (p.97)
3GPS information (p.116)
4Bluetooth® communication (p.112)
5Wireless LAN communication (p.114)
6File Format/JPEG Recorded Pixels (p.84)
7Current file/Total files
8Data source
9Histogram
10 Folder number/File number (p.133)
02/02/2019 10:00 |
9998/9999 |
18
999-9999 |
00´ 20˝ |
5 |
17 18
Movie mode
11Image transfer status (p.99)
12Shutter speed
13Aperture Value
14Sensitivity
15Exposure compensation
16Battery level
17Length of time of the recorded movie/ Elapsed time
18Operation guide
Battery Level
The icon display changes depending on the battery level.
The battery level is sufficient.
The battery level started to drop.
The battery level is low. Charge the battery.
The camera will turn off soon.
There is a problem with the battery.
1 Introduction
19

1 Introduction
Changing the Screen Display
You can switch the information displayed on the screen by pressing J.
Shooting Mode
The information displayed on the shooting screen can be switched.
Standard Info. Display |
Displays all the information. |
|
|
Simplified Info. Display |
Displays only the information regarding the exposure, AE lock, autofocus |
|
frame, and MF operation guide. |
|
|
No Information Display |
Displays the information only when camera settings are changed. Autofocus |
|
frame is displayed during range-finding. |
|
|
Display Off |
Does not display the autofocus frame and Live View but the information |
|
when the camera settings are changed. |
|
|
Memo---------------------------------------------------------------------------------------------------------- |
|
• You can specify the displayed information in [Shooting Info. Display] of the D3 menu. (p.126)
20
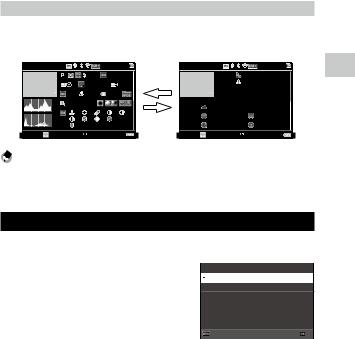
Playback Mode
You can switch the screen display among [Standard Info. Display], [Detailed Info. Display], and [No Information Display] in the single image display.
Use ABto switch the page in [Detailed Info. Display].
02/02/2019 10:00 |
|
99998/99999 |
02/02/2019 10:00 |
99998/99999 |
||||
|
+0.3 |
|
6000x4000 |
a |
|
XXXXXXXXXXX |
||
|
00:00 23˝ |
10 |
|
|
|
|||
1.5m |
|
|
35.0mm |
|
|
|
|
|
G1A1 |
|
|
|
|
|
42m |
|
|
0 |
0 |
0 |
0 |
0 |
|
|
||
b |
N 35° |
02/02/2019 |
||||||
0 |
0 |
0 |
0 |
|
||||
|
E138° |
10:10:01 |
||||||
1 |
R+200%:G-100%:B-100% |
|||||||
100-0630 1/2400 F5.6 |
102400 |
EV+0.7 |
|
100-0630 |
1/2400 F5.6 |
102400 EV+0.7 |
||
Memo----------------------------------------------------------------------------------------------------------
•You can specify the displayed information in [Playback Info. Display] of the D3 menu. (p.126)
•[Histogram], [Grid Guide], and [Highlight Alert] are not displayed for movies.
Using the Touch Panel
You can perform operations such as selecting functions and setting the AF point for shooting with the touch panel.
When not using the touch panel function, set [LCD Touch Operation] to [Off] in the D2 menu.
1 Introduction
21

1 Introduction
How to Change Function Settings
Using the Button/Lever
Using the Direct Keys
Quick settings are possible by pressing ABCD in the shooting mode. The following functions can be activated.
A(S) |
Macro Mode (p.61) |
|
|
|
|
B(T) |
White Balance (p.69) |
|
|
|
|
C(U) |
ISO Setting (p.63) |
|
|
|
|
D(V) |
Drive Mode (p.74) |
|
|
|
|
Memo----------------------------------------------------------------------------------------------------------
•The functions mentioned above can be set from the Amenu by pressing F.
•The functions assigned to C/Dcan be changed with [ISO Button] and [Drive Button] of [Fn Button Setting] in the D2 menu. (p.123)
22

Using the ADJ. Lever
The assigned functions can be easily recalled by pressing Nin the shooting mode.
1 Press Nin the shooting mode.
The mode switches to the ADJ. mode and the icons for the assigned functions appear.
2 Use CDto select a function.
By default, the following functions can be selected.
• Image Control (p.87)
• Focus (p.57)
•AE Metering (p.63)
•File Format (p.84)
•Outdoor View Setting (p.129)
3 Use ABto select a setting.
4 Press E.
The selected function is set and the camera is ready to perform shooting.
Memo----------------------------------------------------------------------------------------------------------
•The functions for ADJ. mode can be changed in [ADJ Mode Setting] of the D2 menu. (p.121)
•When [Shutter Btn. Confirmation] is set to [On] in the D2 menu, pressing Zhalfway completes the setting of ADJ. mode. (p.125)
1 Introduction
23
1 Introduction
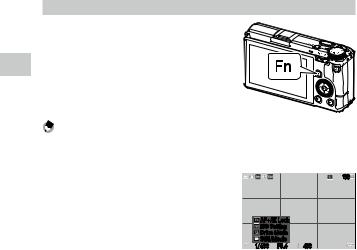
Using the Fn Button
The assigned function can be activated by pressing Hin the shooting mode. By default, [AF+AE Lock] is assigned.
Memo----------------------------------------------------------------------------------------------------------
•The function of Hcan be changed in [Fn Button Setting] of the D2 menu. [ISO Button] (C), [Drive Button] (D), and [Movie/Wireless Button] (K) can also be set in [Fn Button Setting]. (p.123)
•When the power is turned on or the mode dial is turned, the current function of the button is displayed. If [Guide Display] is set to [Off] in the E2 menu, the function is not displayed.
|
|
100 |
AF+AE Lock |
|
|
ISO Setting |
|
|
Drive Mode |
|
|
Still/Movie |
|
|
1/400 |
F5.6 |
400 |
24
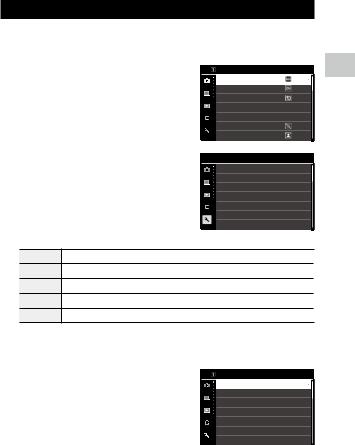
Setting from the Menus
Most functions are set from the menus.
1 Press F.
The A1 menu appears.
2 When changing the menu type, press Ctwice, and then use ABto select a type.
AStill Image Settings menus (p.27)
BMovie Settings menus (p.30)
CPlayback Settings menus (p.32)
DCustomize Settings menus (p.33)
ESetup menus (p.35)
3 Press Dtwice.
4 Use ABto select a function.
Each menu type includes 1 to 11 menus. To switch the screen display on a menu-by- menu basis, press Cand then AB.
1 Introduction
25
1 Introduction
5 Find a function to set, and press D.
The settings for the selected setting item are displayed.
6 Use ABto select a setting, and press E.
The screen in Step 4 reappears.
Press Fto return to the previous screen.
When you have finished setting, press F several times to return to previous screens.
Memo----------------------------------------------------------------------------------------------------------
•When F is pressed, the last used menu screen appears first. To display the most appropriate menus for the camera settings at that time, set [Store Cursor Position] to [Off] in the E2 menu.
•P(front e-dial) or R(control dial) can be turned in place of AB.
•The setting is saved even after the power is turned off. Each menu type can be restored to the default settings in [Reset] of the E11 menu.
26

Menu List
The following menus are available. (The underlined settings and the squarebracketed settings are the default settings.)
AStill Image Settings Menus
1 Introduction
A1 Focus Settings
Focus |
Auto-area AF, Select AF, Pinpoint AF, Tracking AF, Continuous |
p.57 |
|
AF, MF, Snap, Z |
|
|
|
|
Face Detection |
On, Use only in Auto-area AF, Off |
p.58 |
|
|
|
AF Assist Light |
On, Off |
p.58 |
|
|
|
Snap Focus Distance |
1m, 1.5m, 2m, 2.5m, 5m, Z |
p.57 |
|
|
|
Full Press Snap |
On, Off |
p.62 |
|
|
|
Focus Peaking |
Highlight Edge, Extract Edge, Off |
p.58 |
|
|
|
AF.C Setting |
Focus-priority, FPS-priority |
p.57 |
|
|
|
MF Auto Magnification |
On, Off |
p.60 |
|
|
|
A2 Exposure Setting |
|
|
|
|
|
Exposure Mode |
Program AE, Aperture Priority AE, Shutter Priority AE, Manual |
p.120 |
|
Exposure |
|
|
|
|
AE Metering |
Multi-segment, Center-weighted, Spot, Highlight-weighted |
p.63 |
|
|
|
ISO Setting |
ISO Setting: AUTO, 100 to 102400 |
p.64 |
|
ISO Auto Upper Limit: From one setting higher than the lowest |
|
|
ISO sensitivity to the highest ISO sensitivity [6400] |
|
|
ISO Auto Lower Limit: From the lowest ISO sensitivity to one |
|
|
setting lower than the highest ISO sensitivity [100] |
|
|
Minimum Shutter Speed: 1 to 1/1000 sec. [1/30] |
|
|
|
|
Flash Mode |
Flash Mode: Flash On, Flash On+Red-eye, Slow-speed Sync, |
p.66 |
|
Slow Sync+Red-eye |
|
|
Flash Exposure Comp.: -2.0 to +1.0 |
|
|
|
|
27

1 Introduction
Program Line |
Normal, Max Aperture Priority |
p.51 |
|
|
|
ND Filter |
Auto, On, Off |
p.86 |
|
|
|
Auto EV Compensation |
On, Off |
p.49 |
|
|
|
Link AE and AF Point |
On, Off |
p.63 |
|
|
|
A3 White Balance Settings |
|
|
|
|
|
White Balance |
Auto White Balance, Multi Auto White Balance, Daylight, |
p.69 |
|
Shade, Cloudy, Fl. - Daylight Color, Fl. - Daylight White, Fl. - |
|
|
Cool White, Fl. - Warm White, Tungsten, CTE, Manual White |
|
|
Balance, Color Temperature |
|
|
|
|
WB Fine-tuning |
On, Off |
p.71 |
|
|
|
AWB in Tungsten Light |
High, Low |
p.71 |
|
|
|
A4 Shooting Settings |
|
|
|
|
|
Still/Movie |
Still Image, Movie |
p.54 |
|
|
|
Macro Mode |
On, Off |
p.61 |
|
|
|
Drive Mode |
Drive: Single Frame Shooting, Continuous Shooting, Bracket- |
p.74 |
|
ing, Multi-exposure, Interval Shooting, Interval Composite |
|
|
Self-timer: 10sec., 2sec., Off |
|
|
|
|
AA Filter Simulator |
High, Low, Off |
p.86 |
|
|
|
A5 Image Capture Settings |
|
|
|
|
|
File Format |
JPEG, RAW, RAW+JPEG |
p.84 |
|
|
|
Aspect Ratio |
3:2, 1:1 |
|
|
|
|
Crop |
35mm, 50mm, Off |
|
|
|
|
JPEG Recorded Pixels |
L, M, S, XS |
|
|
|
|
Color Space |
sRGB, AdobeRGB |
|
|
|
|
A6 Image Process Settings |
|
|
|
|
|
Image Control |
Standard, Vivid, Monotone, Soft Monotone, Hard Monotone, |
p.87 |
|
Hi-Contrast B&W, Positive Film, Bleach Bypass, Retro, HDR |
|
|
Tone, Custom1, Custom2 |
|
|
|
|
Peripheral Illumin. Corr. |
On, Off |
p.89 |
|
|
|
D-Range Correction |
Highlight Correction: Auto, On, Off |
p.84 |
|
Shadow Correction: Auto, Low, Medium, High, Off |
|
|
|
|
Noise Reduction |
Slow Shutter Speed NR: Auto, On, Off |
p.63 |
|
High-ISO Noise Reduction: Auto, Low, Medium, High, Custom, |
|
|
Off |
|
|
|
|
28
Loading...