


English ................................................................................................. |
2 |
Slovenščina ....................................................................................... |
16 |
Čeština .............................................................................................. |
29 |
Deutsch.............................................................................................. |
43 |
V 1.4

Powerfix PLS 10 A1 |
|
Contents |
|
Introduction................................................................................................ |
3 |
Intended use............................................................................................... |
3 |
Package contents ....................................................................................... |
3 |
Technical specifications ............................................................................... |
4 |
Safety instructions ...................................................................................... |
6 |
Copyright ................................................................................................... |
7 |
Before you start ......................................................................................... |
7 |
Mounting ................................................................................................................................... |
7 |
Charging the battery ................................................................................................................ |
8 |
Getting started ........................................................................................... |
8 |
12/24 V car charger cable .......................................................................... |
9 |
Replacing the fuse................................................................................................................... |
10 |
Maintenance / cleaning ............................................................................ |
11 |
Servicing .................................................................................................................................. |
11 |
Cleaning .................................................................................................................................. |
11 |
Troubleshooting ....................................................................................... |
11 |
Environmental regulations and disposal information ............................... |
12 |
Removing the battery.............................................................................................................. |
12 |
Conformity notes ...................................................................................... |
13 |
Warranty and Service Information ........................................................... |
14 |
2 - English
Powerfix PLS 10 A1
Introduction
Thank you for buying a Powerfix product.
The 10 W Rechargeable Battery LED Working Light Powerfix PLS 10 A1, hereinafter called "battery LED emitter", is suitable for domestic inside and outside use. A long-life and highefficient LED light provides a great overall illumination. The built-in Li-Ion battery guarantees a long runtime.
Intended use
The battery LED emitter is suitable for domestic inside and outside use. The battery LED emitter is not destined for commercial use. The battery LED emitter must be used with the stand only; wall-mounting is not permitted. The device fulfils all relevant norms and standards relating to CE conformity. Any modifications to the battery LED emitter other than recommended changes by the manufacturer may result in these standards no longer being met.
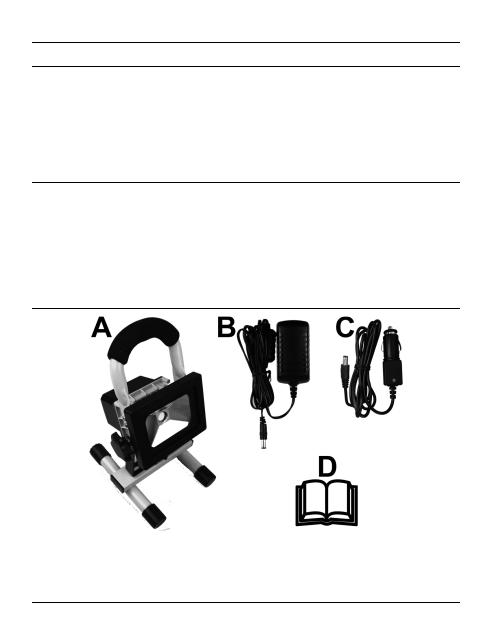
Package contents
A 10 W Rechargeable Battery LED Working Light Powerfix PLS 10 A1 B Wall plug battery charger
C12/24 V car charger cable
DThese operating instructions (line-art illustration)
English - 3

Powerfix PLS 10 A1
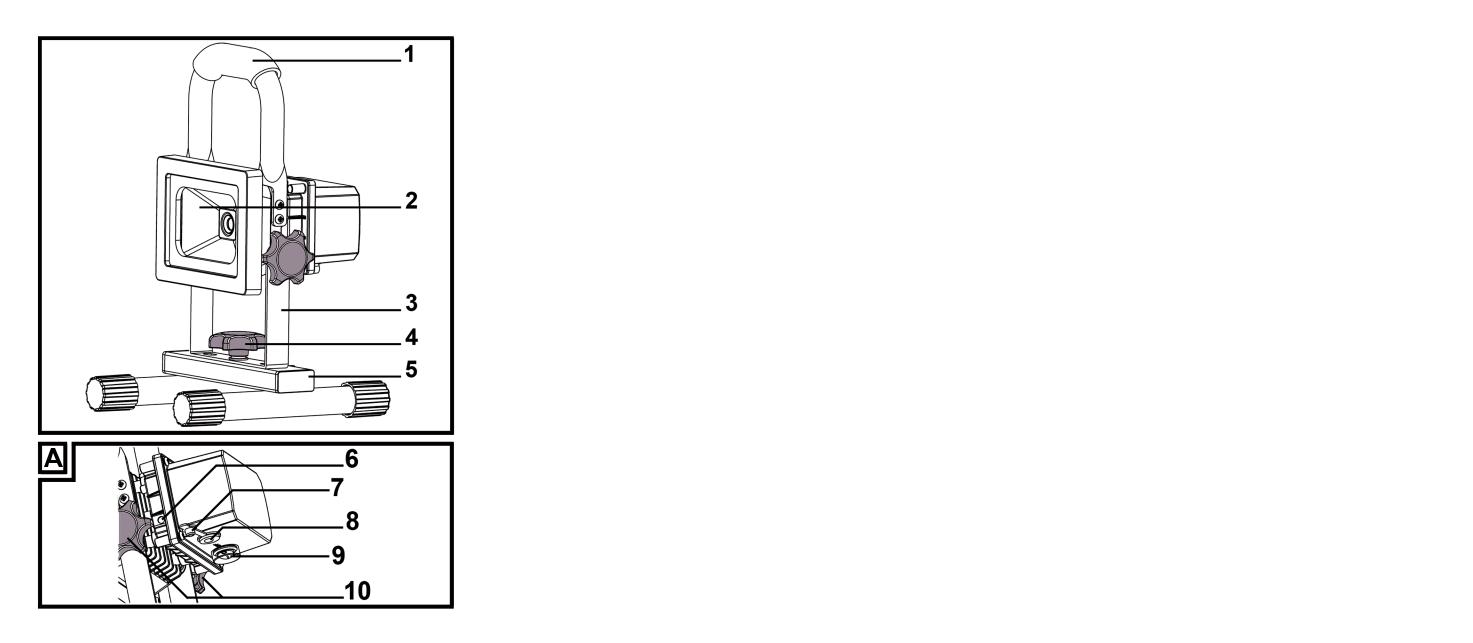
These operating instructions have a fold-out cover. On the inside of the cover is a diagram of the battery LED emitter with the components numbered. The meanings of the numbers are as follows:
1Handle
2 10 W Rechargeable Battery LED Working Light
3 Mounting bracket
4Knurled screw
5Stand
6LED charging indicator
7 Rubber cover (for DC-IN receptacle)
8 DC-IN receptacle
9 On/Off switch
10 Knurled screws
Technical specifications
Battery LED emitter
|
Brand: |
Powerfix |
|
|
|
|
Model name: |
PLS 10 A1 |
|
|
|
|
Operating voltage: |
12 – 24 V |
|
|
|
|
Rechargeable battery: |
Rechargeable Li-Ion battery 7.4 V / 5200 mAh |
|
|
|
|
Battery charging time: |
approx. 6 hours |
|
|
|
|
Runtime with fully charged battery |
approx. 3 hours at around 80% of luminous flux |
|
|
|
|
Power consumption |
approx. 10 W |
|
complete battery LED emitter: |
|
|
|
|
|
Safety class: |
(Extra Low Voltage, ELV) |
|
|
|
|
Degree of protection |
IP65 |
|
|
|
|
|
|
4 - English
|
|
Powerfix PLS 10 A1 |
|
|
|
|
Luminaire: |
Citizen LED |
|
|
|
|
LED power consumption: |
approx. 8.5 W |
|
|
|
|
Total luminous flux: |
620 lm +/-5% (with cover / glass window) |
|
Colour temperature: |
approx. 5000 K (neutral white) |
|
|
|
|
Light beam aperture: |
approx. 120° |
|
|
|
|
Dimensions (W x H x D): |
approx. 11.4 x 8.6 x 10.5 cm |
|
|
|
|
Weight: |
approx. 1040 g |
|
|
|
|
Wall plug battery charger |
|
|
|
|
|
Manufacturer |
Aurolite Electrical (Panyu Guangzhou) Limited |
|
|
|
|
Model |
YHSAFC1201000W1EU-1 |
|
|
|
|
Input voltage |
100 - 240 VAC, 50/60 Hz |
|
|
|
|
Output voltage |
12 V , 1 A |
|
|
|
|
Car charger cable |
|
|
|
|
|
Manufacturer |
Powerfix |
|
|
|
|
Model |
PLS 10 A1 |
|
|
|
|
Input voltage |
12 V/24 V |
|
|
|
|
Output voltage |
12 V/24 V , 1 A |
|
|
|
|
Fuse |
T 3.15 A H 250 V |
|
|
|
The technical specifications and design can be changed without prior notice.
English - 5
Powerfix PLS 10 A1
Safety instructions
Before you use this battery LED emitter (A) for the first time, please read and comply with these instructions and warnings, even if you are familiar with handling electronic devices! Keep these operating instructions in a safe place for future reference. If you sell the device or give it away, pass on the operating instructions at the same time. The User Manual is part of the device.
CAUTION! This icon alerts you about a potential dangerous situation. Ignoring it can lead to severe injury or even death.
WARNING! This symbol denotes important information for the safe operation of the LED emitter and user safety.
CAUTION! Electrical devices are not suitable for children. Do not allow children to play with electrical devices when not under supervision. Children may not understand that they can be dangerous. Keep the packaging materials out of the reach of children. There is a risk of suffocation.
CAUTION! LED Radiation! Avoid damage to your eyes! Never look into the LED beam. If you suspect you have damaged your eyes, seek medical attention.
CAUTION! If you notice any smoke, unusual noises or strange smells, switch the battery LED emitter off immediately. If this occurs, do not continue to use it and have it checked out by an expert. Never inhale smoke from a possible device fire. If you do inadvertently inhale smoke, seek medical attention. Smoke inhalation can be damaging to your health.
CAUTION! Never use optical instruments such as a magnifying glass to look directly into the beam. This could damage your eyes. If you suspect you have damaged your eyes, seek medical attention.
WARNING! Do not hang anything off the LED emitter and do not place any objects on it. The casing is not designed to support weights. This could damage the battery LED emitter (A).
6 - English

Powerfix PLS 10 A1
WARNING! Use the supplied wall plug battery charger (B) and the supplied 12/24 V car charger cable (C) to charge the buil-in battery of the battery LED emitter (A) and never use it for continuous operation like a power adapter. Never connect the wall plug battery charger (B) or the 12/24 V car charger cable (C) to other devices. Charge the built-in battery of the battery LED emitter (A) with the supplied wall plug battery charger (B) and the supplied 12/24 V car charger cable (C).
Copyright
All the contents of this user manual are protected by copyright and provided to the reader for information only. Copying data and information without the prior explicit written consent of the author is strictly forbidden. This also applies to any commercial use of the contents and information. All texts and diagrams are up-to-date as of the date of printing. Subject to change without notice.
Before you start
Remove the battery LED emitter (A) and the accessories from the packaging.
Inspect the battery LED emitter (A) and the accessories for damage. If the battery LED emitter
(A) is damaged, do not use it.
Mounting
No tools are needed to mount the battery LED emitter (A). The battery LED emitter (A) is delivered in two pieces (emitter with handle and stand). To start, you have to assemble them. To do so, rotate the knurled screw (4) that secures the device for transport and is inserted on the stand (5) counter-clockwise and remove it. Make sure not to lose the washer and the retainer ring placed of the knurled screw (4) threaded pin. Next fold the mounting bracket
(3) downwards. Then insert the knurled screw (4) through the central bore hole of the
English - 7
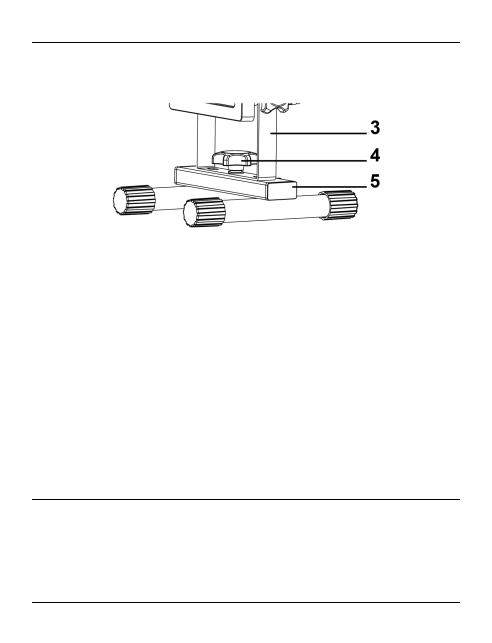
Powerfix PLS 10 A1
mounting bracket (3) from the top into the thread of the stand (5) and rotate it clockwise (see the figure). Tighten the knurled screw (4) so the mounting bracket (3) firmly fixes to the stand (5).
Charging the battery
The DC-IN socket (8) is protected against humidity with a rubber cover (7). To release this rubber cover (7), pull the red latch. Then connect the wall plug battery charger (B) charging plug to the battery LED emitter (A) DC-IN socket (8), and connect the wall plug battery charger (B) to an easy-accessible mains outlet. Before using the device for the first time, fully charge the built-in Li-Ion battery. During charging, the charge indicator (6) lights red. When the built-in Li-Ion battery is fully charged, the charge indicator (6) changes to green. Unplug the wall plug battery charger (B) from the mains outlet and then disconnect the wall plug battery charger (B) plug from the DC-IN socket (8). Close the DC-IN socket (8) with the rubber cover (7). Now the battery LED emitter (A) is ready for use.
Note: If the charge indicator (6) flashes in red while using the battery LED emitter (A), the built-in Li-Ion battery is almost empty. In this case, recharge the battery.
Getting started
You can use the two knurled screws (10) to adjust the vertical angle and therefore the beam of the battery LED emitter (A). Release the knurled screws (10) by rotating them 360 degrees counter-clockwise. Next adjust the vertical angle of the battery LED emitter (A) according to your needs. Then tighten the two knurled screws (10).
8 - English
Powerfix PLS 10 A1
Use the On/Off switch (9) to switch the battery LED emitter (A) on and off. The On/Off switch (9) is protected against humidity with a rubber cover. You can recognize the position of the On/Off switch (9) by looking at this rubber cover. In addition, the switch positions (ON/OFF) are labelled.
12/24 V car charger cable
In addition to the wall plug battery charger (B) you can also charge the built-in Li-Ion battery of your battery LED emitter (A) using the 12/24 V car charger cable (C) supplied. To release this rubber cover (7), pull the red latch. Then connect the wall 12/24 V car charger cable
(C) charging plug to the battery LED emitter (A) DC-IN socket (8) and connect the 12/24 V car charger cable (C) to a suitable 12/24 V vehicle cigarette lighter. The green LED indicator on the 12/24 V car charger cable (C) plug indicates that it is ready for operation. During charging the charge indicator (6) of the battery LED emitter (A) lights red. When the built-in Li-Ion battery is fully charged, the charge indicator (6) changes to green. Unplug the 12/24 V car charger cable (C) from the vehicle cigarette lighter and then disconnect the plug from the 12/24 V car charger cable (C) from the DC-IN socket (8). Close the DC-IN socket (8) with the rubber cover (7). Now the battery LED emitter (A) is ready for use.
English - 9
Powerfix PLS 10 A1
Replacing the fuse
If the 12/24 V car charger cable (C) is connected but the LED indicator of the 12/24 V car charger cable (C) does not light, the fuse might be defective.
WARNING! If you need to replace the fuse, make sure to use a fuse of the same type (see the Technical Specifications).
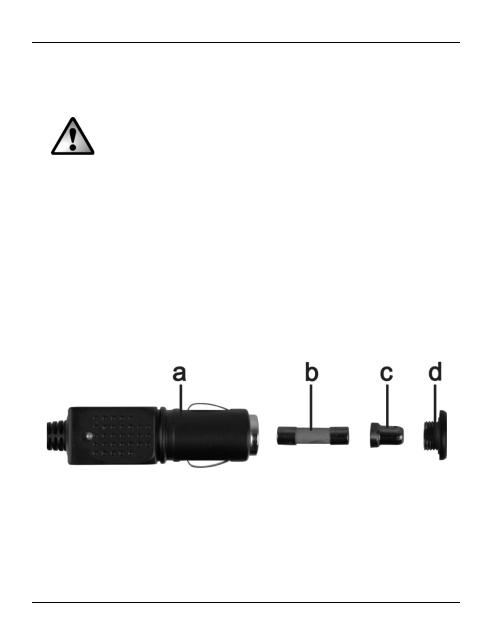
To replace the fuse, proceed as follows:
Rotate the screw cap (d) counter-clockwise and remove it from the cigarette lighter plug housing (a). If necessary, use a pliers.
Replace the fuse (b) with a new fuse of the same type. You can purchase a suitable fuse from any electronics retail outlet.
First insert the fuse (b) into the cigarette lighter plug housing (a).
Insert the metal contact (c) into the screw cap (d).
Next insert the screw cap (d) with the inserted metal contact (c) over the fuse (b) and then screw the cap (d) clockwise onto the cigarette lighter plug housing (a).
10 - English

Powerfix PLS 10 A1
Maintenance / cleaning
Servicing
The battery LED emitter (A) uses a long-life LED. This is not replaceable and requires no maintenance.
The built-in battery pack is a non-standard battery and not available in retail stores. Therefore it is not intended for the customer to replace the battery.
Cleaning
Make sure that no liquid gets into the housing. This could damage the battery LED emitter (A).
To clean the battery LED emitter (A), use a soft, dry cloth. Never use any solvents or cleaners that may damage the plastic housing. For more stubborn dirt, use a slightly damp cloth.
Troubleshooting
Battery LED emitter does not illuminate
Check the position of the On/Off switch (9).
The built-in battery may be discharged. Recharge it.
Battery does not charge
The wall plug battery charger (B) is defective. Check if you can charge it with the 12/24 V car charger cable (C).
12/24 V car charger cable (C) defective. Verify if the green LED indicator on the 12/24 V car charger cable (C) plug is on after inserting it into a powered cigarette lighter. If not, replace the fuse of the 12/24 V car charger cable (C) as described in "Replacing the fuse"
English - 11
Powerfix PLS 10 A1
Environmental regulations and disposal information
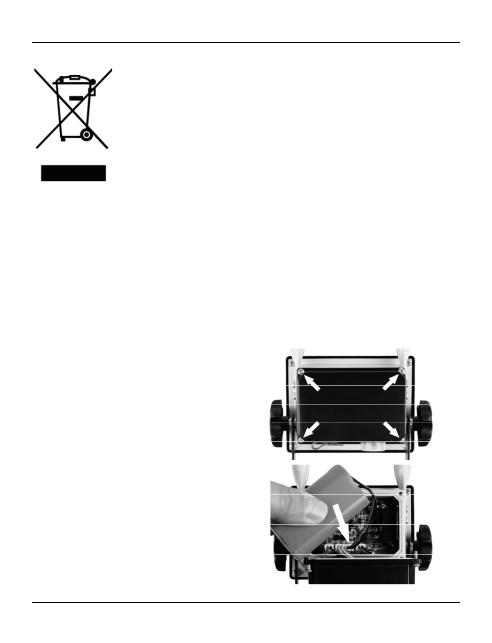
Devices marked with this symbol are subject to the European Directive 2012/19/EU. All electrical and electronic devices must be disposed of separately from household waste at official disposal centres.
Avoid damage to the environment and risks to your personal health by disposing of the device properly. For further information about proper disposal, contact your local government, disposal bodies or the shop where you bought the device.
Dispose of all packaging in an environmentally-friendly manner. Cardboard packaging can be taken to paper recycling centres or public collection points for recycling. Any film or plastic contained in the packaging should be taken to your public collection points for disposal.
Removing the battery
This battery LED emitter (A) contains a built-in battery pack. It must be removed before disposing of the battery LED emitter (A).
To remove it, proceed as follows:
1.Loosen the 4 Philips screws (arrows) on the black cover on the battery LED emitter
(A) back panel.
2.Tilt the black cover over.
3.Disconnect the plug of the battery cable (arrow) and remove the battery.
12 - English

Powerfix PLS 10 A1
Dispose of the battery and the LED emitter separately.
Respect the environment. Old batteries must not be disposed of with domestic waste. They must be handed in at a collection point for waste batteries. Please note that batteries must be disposed of fully discharged at appropriate collection points for old batteries. If disposing of batteries that are not fully discharged, take precautions to prevent short circuits. To prevent any short circuits, cover the battery cable plug with insulating tape.
Conformity notes
This battery LED emitter has been approved for compliance with the basic and other relevant requirements of the EMC Directive 2004/108/EC, the Low-voltage Directive 2006/95/EC and the ERP Directive 2009/125/EC. The corresponding Declaration of Conformity can be found at the end of this User Manual.
English - 13

Powerfix PLS 10 A1
Warranty and Service Information
Warranty of TARGA GmbH
Dear Customer,
This device is sold with three years warranty from the date of purchase. In the event of product defects, you have legal rights towards the seller. These statutory rights are not restricted by our warranty as described below.
Warranty conditions
The warranty period commences upon the date of purchase. Please keep the original receipt in a safe place as it is required as proof of purchase. If any material or manufacturing faults occur within three years of purchase of this product, we will repair or replace the product free of charge as we deem appropriate.
Warranty period and legal warranty rights
The warranty period is not extended in the event of a warranty claim. This also applies to replaced and repaired parts. Any damage or defects discovered upon purchase must be reported immediately when the product has been unpacked. Any repairs required after the warranty period will be subject to charge.
Scope of warranty
The device was carefully manufactured in compliance with stringent quality guidelines and subjected to thorough testing before it left the works. The warranty applies to material and manufacturing faults. This warranty does not cover product components which are subject to normal wear and which can therefore be regarded as wearing parts, or damage to fragile components such as switches, rechargeable batteries or components made of glass. This warranty is void if the product is damaged, incorrectly used or serviced. To ensure correct use of the product, always comply fully with all instructions contained in the user manual. The warnings and recommendations in the user manual regarding correct and incorrect use and handling of the product must always be observed and complied with. The product is solely designed for private use and is not suitable for commercial applications. The warranty is rendered void in the event of incorrect handling and misuse, if it is subjected to force, and also if any person other than our authorised service technicians interfere with the device. No new warranty period commences if the product is repaired or replaced.
14 - English
Powerfix PLS 10 A1
Submitting warranty claims
To ensure speedy handling of your complaint, please note the following:
-Before using your product for the first time, please read the enclosed documentation carefully. Should any problems arise which cannot be solved in this way, please call our hotline.
-Always have your receipt, the product article number as well as the serial number (if available) to hand as proof of purchase.
-If it is not possible to solve the problem on the phone, our hotline support staff will initiate further servicing procedures depending on the fault.
Service |
|
Phone: |
0207 – 36 50 744 |
E-Mail: |
service.GB@targa-online.com |
Phone: |
01 – 242 15 83 |
E-Mail: |
service.IE@targa-online.com |
Phone: |
800 – 62 175 |
E-Mail: |
service.MT@targa-online.com |
Phone: |
800 – 92 496 |
E-Mail: |
service.CY@targa-online.com |
|
|
IAN: 106836 |
|
|
|
Manufacturer
Please note that the following address is not a service address. First contact the service point stated above.
TARGA GmbH
Coesterweg 45
59494 SOEST
GERMANY
English - 15

Powerfix PLS 10 A1 |
|
Vsebina |
|
Uvod ........................................................................................................ |
17 |
Namenska uporaba ................................................................................. |
17 |
Vsebina paketa ........................................................................................ |
17 |
Tehnični podatki ....................................................................................... |
18 |
Varnostna navodila.................................................................................. |
20 |
Avtorske pravice ...................................................................................... |
21 |
Pred začetkom uporabe ........................................................................... |
21 |
Montaža.................................................................................................................................. |
21 |
Polnjenje baterije .................................................................................................................... |
22 |
Začetek uporabe ...................................................................................... |
22 |
Kabel za 12/24 V avtomobilski polnilnik ................................................. |
23 |
Zamenjava varovalke ............................................................................................................. |
24 |
Vzdrževanje/čiščenje ............................................................................... |
25 |
Servisiranje .............................................................................................................................. |
25 |
Čiščenje ................................................................................................................................... |
25 |
Odpravljanje težav .................................................................................. |
25 |
Okoljski predpisi in informacije glede odstranjevanja.............................. |
26 |
Odstranjevanje baterije.......................................................................................................... |
26 |
Opombe o skladnosti ............................................................................... |
27 |
Garancija in servisne informacije.............................................................. |
27 |
16 - Slovenščina
 Loading...