


Philips 65PUS7304, 58PUS7304, 55PUS7304, 50PUS7304, 43PUS7304 User Manual
...Register your product and get support at
7304 series
www.philips.com/TVsupport
User Manual
43PUS7304
50PUS7304
55PUS7304
58PUS7304
65PUS7304
70PUS7304

Contents
1 What's new |
4 |
|
|
|
|
|
1.1 Home and channels |
4 |
|
|
|
||
1.2 Apps and Philips TV Collection |
|
4 |
||||
2 Setting Up |
5 |
|
|
|
|
|
2.1 Read Safety |
5 |
|
|
|
|
|
2.2 TV Stand and Wall Mounting |
|
|
5 |
|||
2.3 Tips on Placement |
5 |
|
|
|
||
2.4 Power Cable |
5 |
|
|
|
|
|
2.5 Antenna Cable |
6 |
|
|
|
|
|
2.6 Satellite Dish |
6 |
|
|
|
|
|
3 Remote Control |
7 |
|
|
|
||
3.1 Key Overview |
7 |
|
|
|
|
|
3.2 Pair Your Remote Control to TV |
8 |
|||||
3.3 Voice Search |
8 |
|
|
|
|
|
3.4 IR Sensor |
8 |
|
|
|
|
|
3.5 Batteries |
8 |
|
|
|
|
|
3.6 Cleaning |
9 |
|
|
|
|
|
4 Switching On and Off |
|
10 |
|
|||
4.1 On or Standby |
10 |
|
|
|
|
|
4.2 Keys on TV |
10 |
|
|
|
|
|
5 Channels |
|
11 |
|
|
|
|
5.1 Install Channels |
11 |
|
|
|
||
5.2 Channel Lists |
11 |
|
|
|
|
|
5.3 Channel List sorting |
11 |
|
|
|
||
5.4 Watching channels |
12 |
|
|
|
||
5.5 Favourite Channels |
14 |
|
|
|
||
5.6 Text / Teletext |
15 |
|
|
|
||
5.7 Interactive TV |
16 |
|
|
|
|
|
6 Channel Installation |
18 |
|
||||
6.1 Satellite Installation |
18 |
|
|
|
||
6.2 Antenna Installation |
21 |
|
|
|
||
6.3 Channel List Copy |
23 |
|
|
|
||
7 Connect Devices |
25 |
|
|
|
||
7.1 About Connections |
25 |
|
|
|
||
7.2 CAM with Smart Card - CI+ |
|
26 |
|
|||
7.3 Home Theatre System - HTS |
|
|
26 |
|||
7.4 Smartphones and Tablets |
|
27 |
|
|||
7.5 Blu-ray Disc Player |
27 |
|
|
|
||
7.6 DVD Player |
27 |
|
|
|
|
|
7.7 Bluetooth |
27 |
|
|
|
|
|
7.8 Headphones |
28 |
|
|
|
|
|
7.9 Game Console |
28 |
|
|
|
||
7.10 USB Hard Drive |
29 |
|
|
|
||
7.11 USB Keyboard |
30 |
|
|
|
||
7.12 USB Flash Drive |
30 |
|
|
|
||
7.13 Photo Camera |
30 |
|
|
|
||
7.14 Camcorder |
31 |
|
|
|
|
|
7.15 Computer |
|
31 |
|
|
|
|
8 Connect your Android TV |
|
32 |
||||
8.1 Network and Internet |
32 |
|
|
|
||
8.2 Google Account |
34 |
|
|
|
||
8.3 Home Screen |
34 |
|
|
|
|
|
8.4 Philips TV Collection App |
|
35 |
|
|||
9 Apps |
36 |
|
|
|
|
|
9.1 About Apps |
36 |
|
|
|
|
|
9.2 Google Play |
36 |
|
|
|
|
|
9.3 Start or Stop an App |
37 |
|
|
|
||
9.4 Lock Apps |
|
37 |
|
|
|
|
9.5 Manage Apps |
38 |
|
9.6 Storage |
38 |
|
10 |
Internet |
|
40 |
|
|
|
|
|
|
10.1 |
Start Internet |
40 |
|
|
|
|
|
||
10.2 Options on Internet |
40 |
|
|
|
|||||
11 Quick Menu |
41 |
|
|
|
|
||||
12 Sources |
|
42 |
|
|
|
|
|
|
|
12.1 Switch to a device |
|
42 |
|
|
|
|
|||
12.2 Options for a TV Input |
42 |
|
|
|
|||||
12.3 Device Name and Type |
42 |
|
|
|
|||||
12.4 Rescan Connections |
42 |
|
|
|
|||||
13 Networks |
|
43 |
|
|
|
|
|
|
|
13.1 Network |
43 |
|
|
|
|
|
|
||
13.2 Bluetooth |
|
43 |
|
|
|
|
|
|
|
14 |
Settings |
|
44 |
|
|
|
|
|
|
14.1 |
Picture |
44 |
|
|
|
|
|
|
|
14.2 Sound |
47 |
|
|
|
|
|
|
|
|
14.3 |
Ambilight Settings |
|
48 |
|
|
|
|
||
14.4 Eco Settings |
50 |
|
|
|
|
|
|
||
14.5 General Settings |
|
50 |
|
|
|
|
|||
14.6 Clock, Region, and Language Settings |
52 |
|
|||||||
14.7 Android Settings |
|
53 |
|
|
|
|
|||
14.8 Universal Access Settings |
53 |
|
|
|
|||||
14.9 Lock Settings |
54 |
|
|
|
|
|
|||
15 Videos, Photos and Music |
55 |
|
|
||||||
15.1 From a Computer or NAS |
55 |
|
|
|
|||||
15.2 Favourites Menu |
|
55 |
|
|
|
|
|||
15.3 Most Popular Menu and Last Played Menu |
55 |
||||||||
15.4 From a USB Connection |
55 |
|
|
|
|||||
15.5 Play your Videos |
|
55 |
|
|
|
|
|||
15.6 View your Photos |
|
56 |
|
|
|
|
|||
15.7 Play your Music |
|
58 |
|
|
|
|
|||
16 TV Guide |
|
59 |
|
|
|
|
|
|
|
16.1 What You Need |
|
59 |
|
|
|
|
|||
16.2 TV Guide Data |
59 |
|
|
|
|
||||
16.3 Using the TV Guide |
|
59 |
|
|
|
||||
17 Recording and Pause TV |
61 |
|
|
||||||
17.1 Recording |
|
61 |
|
|
|
|
|
|
|
17.2 Pause TV |
|
62 |
|
|
|
|
|
|
|
18 Smartphones and Tablets |
64 |
|
|
||||||
18.1 Philips TV Remote App |
64 |
|
|
|
|||||
18.2 Google Cast |
64 |
|
|
|
|
|
|
||
18.3 |
AirPlay |
64 |
|
|
|
|
|
|
|
19 Games |
65 |
|
|
|
|
|
|
||
19.1 What You Need |
|
65 |
|
|
|
|
|||
19.2 Gamepads |
|
65 |
|
|
|
|
|
|
|
19.3 Play a Game |
65 |
|
|
|
|
|
|||
20 Ambilight |
66 |
|
|
|
|
|
|||
20.1 Ambilight Style |
66 |
|
|
|
|
||||
20.2 Ambilight Off |
66 |
|
|
|
|
||||
20.3 Ambilight Settings |
|
66 |
|
|
|
||||
20.4 Lounge Light Mode |
67 |
|
|
|
|||||
21 Top Picks |
|
68 |
|
|
|
|
|
|
|
21.1 About Top Picks |
|
68 |
|
|
|
|
|||
21.2 Now on TV |
|
68 |
|
|
|
|
|
|
|
2
21.3 TV on Demand |
68 |
|
|
||
21.4 Video on Demand |
69 |
|
|
||
22 Netflix |
|
70 |
|
|
|
23 Alexa |
71 |
|
|
|
|
23.1 About Alexa |
71 |
|
|
||
23.2 Using Alexa |
71 |
|
|
||
24 Sunrise Alarm |
72 |
|
|
||
25 Software |
|
73 |
|
|
|
25.1 Update Software |
73 |
|
|
||
25.2 View Software Update History |
73 |
||||
25.3 Software Version |
73 |
|
|
||
25.4 Automatic Software Update |
74 |
||||
25.5 Open Source Software |
74 |
|
|||
25.6 Open Source License |
74 |
|
|||
25.7 Announcements |
74 |
|
|
||
26 Specifications |
75 |
|
|
||
26.1 Environmental |
75 |
|
|
||
26.2 Operating System |
75 |
|
|
||
26.3 Reception |
|
75 |
|
|
|
26.4 Display Type |
75 |
|
|
||
26.5 Display Input Resolution |
75 |
|
|||
26.6Connectivity 76
26.7Sound 76
26.8 Multimedia |
76 |
27 Help and Support |
77 |
|||
27.1 Register your TV |
77 |
|
||
27.2 |
Using Help |
77 |
|
|
27.3 |
Troubleshooting |
77 |
|
|
27.4 |
Online Help |
79 |
|
|
27.5 |
Support and Repair |
|
79 |
|
28 Safety and Care |
80 |
|
|
|
||
28.1 Safety |
80 |
|
|
|
|
|
28.2 Screen Care |
81 |
|
|
|
|
|
29 Terms of Use |
82 |
|
|
|
||
29.1 Terms of Use - TV |
82 |
|
|
|
||
29.2 Terms of Use - Smart TV |
82 |
|
|
|||
29.3 Terms of Use - Philips TV Collection |
82 |
|||||
30 Copyrights |
83 |
|
|
|
|
|
30.1 HDMI |
83 |
|
|
|
|
|
30.2 Dolby Audio |
83 |
|
|
|
|
|
30.3 Dolby Vision and Dolby Atmos |
83 |
|
||||
30.4 DTS-HD (italics) |
|
83 |
|
|
|
|
30.5 Wi-Fi Alliance |
83 |
|
|
|
|
|
30.6 Kensington |
83 |
|
|
|
|
|
30.7 Other Trademarks |
84 |
|
|
|
||
31 Disclaimer regarding services and/or software offered by third parties 85
Index 86
3

1
What's new
1.1
Home and channels
The new Home launcher
Press HOME on your remote control to get your new Android Home screen. From here you can decide what to watch by browsing entertainment options from app and live TV. Your Home has channels to let you discover great contents from your favourite apps. You can also add additional channels or find new apps to get more contents.
“Play Next” channel
You can always know what to watch next from Play Next channel on the Home screen. Start watching from where you left off and get notifications about new episodes in the Play Next channel. Press and hold Select on a movie or TV show to add it directly to the Play Next channel.
Accessing settings from Home
You can access All Settings menu via the icon at the top right corner. You can also find the Frequent settings menu and common menu items in the Philips TV Menu, which can be invoked directly from the remote control.
System bar on Home screen
The System bar on the top of Home screen contains following features.
-Search button: to trigger Google search with voice or text input.
-Input source: to launch the input source list and switch to any of the connected devices.
-Notifications: to provide you the messages about your Smart TV system.
-Settings: to access all setting menu and adjust the TV settings.
-Clock: to indicate the system clock.
1.2
Apps and Philips TV
Collection
Favourite Apps on the first row
You can find more apps in the Apps page which can be opened by clicking the Apps icon at the left end of the Apps row. You can also add more apps as favourite from the Apps page.
Philips TV Collection
All your premium apps are available within the Philips TV Collection app. Launch it using the banner on
the Apps row. The Philips TV Collection app will also contain recommendations for new Apps and more.
4

2
Setting Up
2.1
Read Safety
Read the safety instructions first before you use the
TV.
To read the instructions, in Help, press the colour key Keywords and look up Safety Instructions.
2.2
TV Stand and Wall Mounting
TV Stand
You can find the instructions for mounting the TV stand in the Quick Start Guide that came with the TV. In case you lost this guide, you can download it from www.philips.com.
Use the product type number of the TV to look for the Quick Start Guide to download.
Make sure that the metal screws, to mount the TV to the VESA-compliant bracket, go about 10mm deep inside the threaded bushes of the TV.
Caution
Wall mounting the TV requires special skills and should only be performed by qualified personnel. The TV wall mounting should meet safety standards according to the TVs weight. Also read the safety precautions before positioning the TV.
TP Vision Europe B.V. bears no responsibility for improper mounting or any mounting that results in accident or injury.
2.3
Tips on Placement
•Position the TV where light does not shine directly on the screen.
•Dim lighting conditions in the room for best Ambilight effect.
•The ideal distance to watch TV is 3 times its diagonal screen size. When seated, your eyes should be level with the centre of the screen.
•When wall mounted, position the TV up to 15 cm away from the wall.
Wall Mounting
Your TV is also prepared for a VESA-compliant wall mount bracket (sold separately).
Use the following VESA code when purchasing the wall mount . . .
• 43PUS7304
VESA MIS-F 200x200, M6 (min.: 10mm, max.:15mm)
• 50PUS7304
VESA MIS-F 300x200, M6 (min.: 10mm, max.:18mm)
• 55PUS7304
VESA MIS-F 300x200, M6 (min.: 10mm, max.:18mm)
• 58PUS7304
VESA MIS-F 300x200, M6 (min.: 10mm, max.:14mm)
• 65PUS7304
VESA MIS-F 400x200, M6 (min.: 10mm, max.:18mm)
• 70PUS7304
VESA MIS-F 400x200, M8 (min.: 18mm, max.:23mm)
Preparation
Note:
Please keep the TV away from dust-producing sources such as stoves. It is suggested to clean the dust regularly to avoid getting dust into the TV.
2.4
Power Cable
•Insert the power cable into the POWER connector on the back of the TV.
•Make sure the power cable is securely inserted in the connector.
•Make sure that the power plug, in the wall socket, is accessible at all times.
•When you unplug the power cable, always pull the plug, never pull the cable.
5

Although this TV has a very low standby power consumption, unplug the power cable to save energy if you do not use the TV for a long period of time.
For more information, in Help, press the colour key Keywords and look up Switching On for more information on switching the TV on or off.
2.5
Antenna Cable
Insert the antenna plug firmly into
the Antenna socket at the back of the TV.
You can connect your own antenna or an antenna signal from an antenna distribution system. Use an IEC Coax 75 Ohm RF antenna connector.
Use this antenna connection for DVB-T and DVB-C input signals.
2.6
Satellite Dish
Attach the satellite F-type connector to the satellite connection SAT at the back of the TV.
6
3
Remote Control
3.1
Key Overview
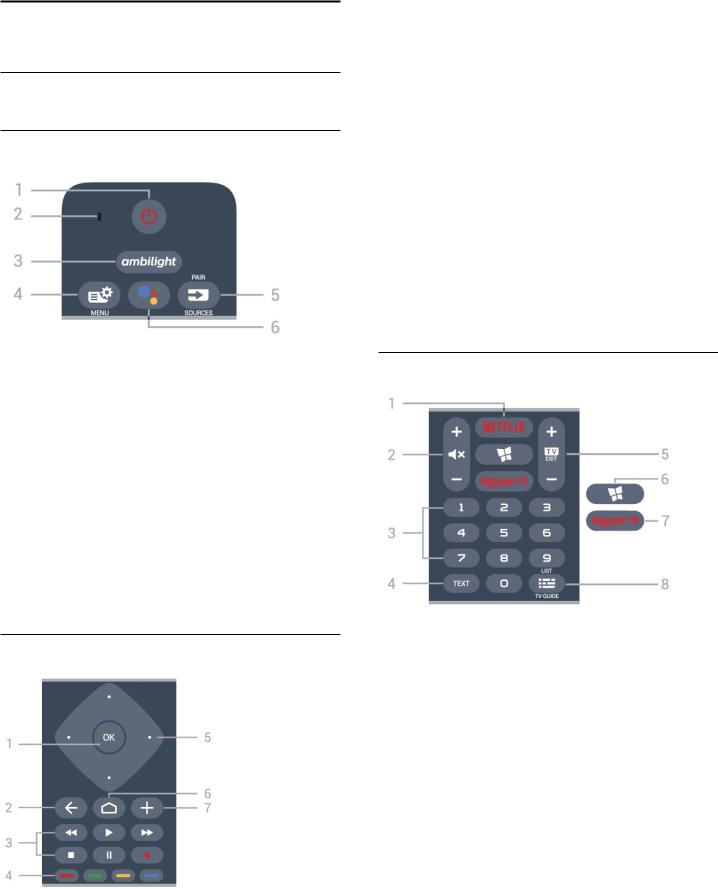
Top
1 - Standby / On
To switch the TV on or back to Standby.
2 - VOICE microphone
3 -
To select one of the Ambilight style.
4 - Quick Menu
To open the Quick Menu with typical TV functions.
5 - SOURCES / PAIR
•To open or close the Sources menu.
•To pair the remote control to the TV.
6 - VOICE
To start speaking your voice search.
Middle
1 - OK key
To confirm a selection or setting. To open the channel list while watching TV.
2 - BACK
To switch back to the previous channel you selected.
To return to previous menu.
To go back to the previous App/Internet page.
3 - Playback and Record
•Play , to playback.
•Pause , to pause playback
•Stop , to stop playback
•Rewind , to rewind
•Fast forward , to go fast forward
•Record , to start recording
4 - Colour keys
Direct selection of options. Blue key , opens Help.
5 - Arrow / navigation keys
To navigate up, down, left or right.
6 - HOME
To open the Home menu.
7 - OPTIONS
To open or close the options menu.
Bottom
1 -
To open the Netflix App directly. With the TV switched on or from standby.
•If you have a Netflix menbership subscription, you can enjoy Netflix on this TV. Your TV must be connected to the Internet.
•To open Netflix, press to open the Netflix App. You can open Netflix immediately from a TV in standby.
www.netflix.com
2 - Mute / Volume
Press in middle to mute the sound or to restore it. Prese + or - to adjust the volume level.
3 - Number keys
To select a channel directly.
4 - TEXT
To open or close Text/Teletext.
5 - - EXIT
Press in middle to switch back to watch TV. To stop
7

an interactive TV application. Prese + or - to switch to the next or previous channel in the channel list. To open the next or previous page in Text/Teletext.
6 - Philips TV Collection
To launch Philips TV Collection App.
7 - Rakuten TV
To open the Rakuten TV App directly.
8 - TV Guide / Channel list
To open or close the TV Guide. Long press to open the channel list.
3.2
Pair Your Remote Control to
TV
This remote control uses both Bluetooth and IR (infrared) to send its commands to the TV.
•You can use this remote control via IR (infrared) for most operations.
•To use advanced operation like voice search, you need to pair (link) the TV with the remote control.
When you started the initial TV installation, the TV invited you to long press the PAIR key, and by doing so, the pairing was done.
Note:
1 - Once the remote control has entered pairing mode successfully, the blue LED indicator ring around the microphone on the front side of the remote control starts blinking.
2 - The remote control must be kept close to the TV (within 1m distance) during pairing in order to ensure success.
3 - If the TV does not launch the voice search field when press VOICE, pairing was unsuccessful.
4 - It is advisable to wait until the set has fully started up and launched all background processes before pairing mode is entered as the toast message containing further instructions may appear too late, thereby negatively impacting the pairing procedure.
Pairing or pairing again
If the pairing with the remote control was lost, you can pair the TV with the remote control again.
You can simply long press
the PAIR key (approximate for 3 seconds) for pairing.
Alternatively, go Settings > Wireless and networks
> Remote control > Pair remote control, then follow the on-screen instructions.
A message appears when the pairing is successful.
Remote Control Software
Settings > Wireless and networks > Remote
control > Current software info
Once the remote control is paired, you can check the current remote control software version.
Settings > Wireless and networks > Remote control > Update remote control software
Check available remote control software for updates.
3.3
Voice Search
You can search for videos, music or anything else on the Internet by simply using your voice. You can speak into the microphone on the remote control.
You need to pair the remote control to the TV before use voice search.
To use Voice...
1 - Press VOICE on remote control, the blue light on the remote control lights up and the search field opens, the microphone is active.
2 - Speak out what you are looking for with clear pronunciation. You can speak for 10 seconds before the microphone switches off. It might take some time for the results to appear.
3 - In the list of search results, you can select the item you want.
3.4
IR Sensor
The TV can receive commands from a remote control that uses IR (infrared) to send commands. If you use such a remote control, always make sure you point the remote control at the infrared sensor on the front of the TV.
Warning
Do not put any objects in front of IR sensor of the TV, it may block the IR signal.
3.5
Batteries
If the TV does not react on a key press on the remote control, the batteries might be empty.
To replace the batteries, open the battery compartment on the front-bottom of the remote control.
1 - Slide the battery door in the direction shown by the arrow.
2 - Replace the old batteries with 2 Alkaline, type
AAA-LR03-1.5V batteries. Make sure the and the
ends of the batteries line up correctly.
8
3 - Reposition the battery door and slide it back until it clicks.
Remove the batteries if you are not using the remote control for a long time.
Safely dispose of your old batteries according to the end of use directions.
For more information, in Help, select Keywords and look up End of use.
3.6
Cleaning
Your remote control is treated with a scratch-resistant coating.
To clean the remote control, use a soft damp cloth. Never use substances such as alcohol, chemicals or household cleaners on the remote control.
9

4
Switching On and
Off
4.1
On or Standby
Make sure the TV is connected to the mains AC power. Connect the supplied power cord to the AC in connector at the back of the TV. The indicator light at the bottom of the TV lights up.
Switch on
Press on the remote control to switch the TV on. Alternatively, press HOME. You can also press the small joystick key on the bottom of the TV
to switch the TV on in case you can't find the remote control or its batteries are empty.
Switch to standby
To switch the TV to standby, press on the remote control. You can also press the small joystick key on the bottom of the TV.
In standby mode, the TV is still connected to the mains power but consumes very little energy.
To switch off the TV completely, disconnect the power plug.
When disconnecting the power plug, always pull the power plug, never the cord. Ensure that you have full access to the power plug, power cord and outlet socket at all times.
4.2
Keys on TV
If you lost the remote control or its batteries are empty, you can still do some basic TV operations.
To open the basic menu…
1 - With the TV switched on, press the joystick key on the bottom of the TV to bring up the basic menu.
2 - Press left or right to select Volume,
Channel or Sources. Select Demo, to start a demo movie.
3 - Press up or down to adjust the volume or tune to the next or previous channel. Press up or down to go through the list of sources, including the tuner selection. Press the joystick key to start the demo movie.
4 - The menu will disappear automatically.
To switch the TV on standby, select and press the joystick key.
10
5
Channels
5.1
Install Channels
For more information, in Help, press the colour key Keywords and look up Channel, Antenna Installation or Channel, Cable Installation.
5.2
Channel Lists
About Channel Lists
After a channel installation, all channels appear on the channel list. Channels are shown with their name and logo if this information is available.
With a channel list selected, press the
arrows (up) or (down) to select a channel, then press OK to watch the selected channel. You only tune to the channels in that list when using
or keys.
Channel icons
After an Automatic Channel Update of the channel list, newly found channels are marked with
a (star).
If you lock a channel, it will be marked with a (lock).
Radio stations
If digital broadcasting is available, digital radio stations are installed during installation. Switch to a radio channel just like you switch to a TV channel. A Cable (DVB-C) channel installation usually places radio stations from channel number 1001 onwards.
This TV can receive digital television standard DVB. TV may not work properly with some operators of digital television, non-compliance with requirements of the standard in full.
Open a Channel List
Next to the list with all channels, you can select a filtered list or you can select one of the favourite lists you created.
To open the current channel list…
1 - |
Press , to switch to TV. |
|
2 - |
Press |
OK to open the current channel list. |
3 - |
Press |
BACK to close the channel list. |
To select one of the channel lists…
1 - |
With a channel list open on screen, |
press OPTIONS. |
|
2 - |
Select Select Channel List and press OK. |
3 - |
In the list menu, select one of the available |
channel lists and press OK.
Alternatively, you can select the list name at the top of the channel list and press OK to open the list menu.
Search for a Channel
You can search for a channel to find it in a long list of channels.
The TV can search for a channel within one of the 2 main channel lists - the Antenna or Cable channel list.
To search for a channel… |
|
||
1 - |
Press . |
|
|
2 - |
Press OK to open the current channel list. |
||
3 - Press OPTIONS. |
|
||
4 - |
Select |
Select Channel List and press OK. |
|
5 - |
Select |
Filter Antenna Channels or |
Filter Cable |
Channels and press OK. |
|
||
6 - |
Select |
Search Channel and press |
OK to open |
a text field.You can use the remote control keyboard (if available) or the on-screen keyboard to enter text.
7 - Enter a number, a name or part of a name and select Apply and press OK. The TV will search for matching channel names in the list you selected.
Search results are listed as a channel list - see the list name at the top. The search results disappear once you select another channel list or close the list with search results.
5.3
Channel List sorting
You can do channel list sorting with all channels. You can set the channel list to show only TV channels or only Radio stations. For Antenna/Cable channels you can set the list to show the Free-to-Air or the Scrambled channels.
To set a filter on a list with all channels…
1 - |
Press . |
|
2 - |
Press |
OK to open the current channel list. |
3 - Press OPTIONS. |
||
4 - |
Select |
Select Channel List and press OK. |
5 - |
Select |
Filter Antenna Channels or Filter Cable |
Channels |
according to the list you want to filter, and |
|
press OK. |
|
|
6 - |
In the |
Options menu, select the filter you want |
and press |
OK to activate. The name of the filter |
|
appears as part of the channel list name on top of the channel list.
11

7 - Press (left) to go back one step or press |
to |
close the menu. |
|
5.4
Watching channels
Tune to a Channel
To start watching TV channels, press . The TV tunes to the channel you last watched.
Switch Channels |
|
To switch channels, press or |
. |
If you know the channel number, type in the number with the number keys. Press OK after you entered the number to switch immediately.
If the information is available from the Internet, the TV shows the current programme name and details followed by the next programme name and details.
Previous channel
To switch back to the previously tuned channel, press BACK.
You can also tune to channels from a Channel List.
Lock a Channel
Lock and Unlock a Channel
To prevent children from watching a channel, you can lock a channel. To watch a locked channel, you must enter the 4 digit Child Lock PIN code first. You cannot lock programmes from connected devices.
To lock a channel… |
|
|
|
1 - |
Press . |
|
|
2 - |
Press OK to open the channel list. If necessary |
||
change the channel list. |
|
||
3 - |
Select the channel you want to lock. |
||
4 - |
Press OPTIONS and select |
Lock |
|
Channel and press |
OK. |
|
|
5 - |
Enter your 4 digit PIN code if the TV asks for it. A |
||
locked channel is marked with a (lock). |
|||
6 - |
Press (left) to go back one step or |
||
press BACK to close the menu. |
|
||
To unlock a channel… |
|
||
1 - |
Press . |
|
|
2 - |
Press OK to open the channel list. If necessary |
||
change the channel list. |
|
||
3 - |
Select the channel you want to unlock. |
||
4 - |
Press OPTIONS and select |
Unlock |
|
Channel and press |
OK. |
|
|
5 - |
Enter your 4 digit PIN code if the TV asks for it. |
||
6 - |
Press (left) to go back one step or |
||
press BACK to close the menu.
If you lock or unlock channels in a channel list, you only have to enter the PIN code just once until you close the channel list.
For more information, in Help, press the colour
key Keywords and look up Child Lock for more information.
Parental Rating
To prevent children from watching a programme not suitable for their age, you can set an age rating.
Digital channels can have their programmes age rated. When the age rating of a programme is equal to or higher than the age you have set as age rating for your child, the programme will be locked. To watch a locked programme, you must enter the Parental Rating code first.
To set an age rating…
1 - Select Settings > Child Lock > Parental
Rating and press OK.
2 - Enter a 4-digit Child lock code. If you did not set a code yet, select Set Code in Child Lock. Enter a 4-digit Child lock code and confirm. Now you can set an age rating.
3 - Back in Parental Rating, select the age and press OK.
4 - Press (left) repeatedly if necessary, to close the menu.
To switch off the parental age rating, select None. However, in some countries you must set an age rating.
For some broadcasters/operators, the TV only locks programmes with a higher rating. The parental age rating is set for all channels.
Channel Options
Open Options
While watching a channel, you can set some options.
Depending on the type of channel you are watching (analogue or digital) or depending on the TV settings you made, some options are available.
To open the options menu…
1 - |
While watching a channel, press OPTIONS. |
2 - |
Press OPTIONS again to close. |
Subtitles
12

Switch On
Digital broadcasts can have subtitles for their programmes.
To show the subtitles…
Press OPTIONS and select Subtitles.
You can switch subtitles On or Off. Alternatively you can select Automatic.
Automatic
If language information is part of the digital broadcast and the broadcasted programme is not in your language (the language set on TV), the TV can show subtitles automatically in one of your preferred subtitle languages. One of these subtitle languages must also be part of the broadcast.
You can select your preferred subtitle languages in Subtitle Language.
Subtitles from Text
If you tune to an analogue channel, you need to make the subtitles available for each channel manually.
1 - |
Switch to a channel and press TEXT to open |
Text. |
|
2 - |
Enter the page number for subtitles, usually 888. |
3 - |
Press TEXT again, to close Text. |
If you select On in the Subtitle menu when watching this analogue channel, subtitles will be shown if available.
To know if a channel is analogue or digital, switch to the channel and open Information in OPTIONS.
Subtitle Language
Preferred Subtitle Languages
A digital broadcast can offer several subtitle languages for a programme. You can set a preferred primary and secondary subtitle language. If subtitles in one of these languages are available, the TV will show the subtitles you selected.
To set the primary and secondary subtitle language…
1 - |
Go to Settings > Region and Language and |
press OK. |
|
2 - |
Select Languages > Primary |
Subtitles or Secondary Subtitles. |
|
3 - |
Select the language you need and press OK. |
4 - |
Press (left) to go back one step or |
press BACK to close the menu.
Select a Subtitle Language
If none of the preferred subtitle languages are available, you can select another subtitle language if available. If no subtitle languages are available, you cannot select this option.
To select a subtitle language when none of your preferred languages are available…
1 - Press OPTIONS.
2 - Select Subtitle Language and select one of the languages as subtitles temporarily.
Audio Language
Preferred Audio Language
A digital broadcast can offer several audio languages (spoken languages) for a programme. You can set a preferred primary and secondary audio language. If audio in one of these languages is available, the TV will switch to the audio language.
To set the primary and secondary audio language…
1 - |
Go to Settings > Region and Language and |
press OK. |
|
2 - |
Select Languages > Primary |
Audio or Secondary Audio. |
|
3 - |
Select the language you need and press OK. |
4 - |
Press (left) to go back one step or |
press BACK to close the menu.
Select an Audio Language
If none of the preferred audio languages are available, you can select another audio language if available. If no audio languages are available, you cannot select this option.
To select an audio language when none of your preferred languages are available…
1 - Press OPTIONS.
2 - Select Audio Language and select one of the languages as audio temporarily.
Common Interface
If you installed a CAM in one of the Common Interface slots, you can view the CAM and operator information or do some CAM related settings.
To view the CAM information…
1 - |
Press SOURCES. |
2 - |
Select the channel type you are using the CAM |
for |
Watch TV. |
3 - |
Press OPTIONS and select Common |
Interface.
13

4 - Select the appropriate Common Interface slot and press (right).
5 - Select the TV operator of the CAM and press OK. The following screens come from the TV operator.
HbbTV on this Channel
If you want to avoid access to HbbTV pages on a specific channel, you can block the HbbTV pages for this channel only.
Switch on HbbTV
Select Settings > General
settings > Advanced > HbbTV settings > HbbTV
> On.
Programme Info
View programme details
To call up the details of the selected programme…
1 - Tune to the channel.
2 - Press OPTIONS, select Programme Info and press OK.
3 - To close this screen, press OK.
On Programme Info, press the colour
key SCHEDULED to enter the scheduled recording list, or repeatedly press (right) to enter the TV Guide.
Mono / Stereo
You can switch the sound of an analogue channel to Mono or Stereo.
To switch to Mono or Stereo…
1 - Tune to an analoge channel.
2 - Press OPTIONS, select Mono/Stereo and
press |
(right). |
|
3 - |
Select Mono or Stereo and press OK. |
|
4 - |
Press (left) to go back one step or |
|
press |
BACK to close the menu. |
|
Reorder Channels
Only in a Favourites List you can change the sequence of channels (reorder).
To change the sequence of channels…
1 - Open the Favourites List you want to reorder.
2 - Press OPTIONS, select Reorder Channels and press OK.
3 - In the Favourites List, select the channel you want to reorder and press OK.
4 - |
With the (up) or |
(down) keys move the |
channel where you want it. |
||
5 - |
Press OK to confirm the new location. |
|
6 - |
You can reorder channels with the same method |
|
until you close the Favourites List with |
||
the |
BACK key. |
|
5.5
Favourite Channels
About Favourite Channels
In a favourite channel list, you can collect the channels you like.
You can create 4 different lists of favourite channels for easy channel zapping. You can name each Favourites List individually. Only in a Favourites List you can reorder channels.
With a Favourites List selected, press the
arrows (up) or (down) to select a channel, then press OK to watch the selected channel. You only tune to the channels in that list when using
or keys.
Create a Favourites List
To create a favourite channels list…
1 - |
Press , to switch to TV. |
|
2 - |
Press |
OK to open the current channel list. |
3 - Press |
OPTIONS. |
|
4 - |
Select Create Favourites List and press OK. |
|
5 - |
In the list at the left, select a channel you want as |
|
a favourite and press OK. Channels come in the list at the right in the order you add them. To undo, select the channel in the list at the left and
press OK again.
6 - If necessary, you can go on selecting and adding channels as favourites.
7 - To finish adding channels, press BACK.
The TV will ask to rename the Favourites List. You can use the on-screen keyboard.
1 - |
Use the on-screen keyboard to delete the |
current name and enter a new name. |
|
2 - |
When done, select Close and press OK. |
The TV will switch to the newly created Favourites List.
You can add a range of channels in one go or start a
Favourites List by duplicating the channel list with all channels and removing the channels you do not want.
The channels in the Favourites List are renumbered.
14

Edit Favourites
To add a consecutive range of channels to a
Favourites List in one go, you can use Edit favourites.
To add a range of channels…
1 - Open the Favourites List where you want to add a range of channels.
2 - Press OPTIONS, select Edit favourites and press OK.
3 - In the list at the left select the first channel of the range you want to add and press OK.
4 - Press (down) to select the last channel of the range you want to add. The channels are marked at the right.
5 - Press OK to add this range of channels and confirm.
You can also start creating a Favourites List from Edit favourites.
Rename a Favourites List
You can only rename a Favourites List.
To rename a Favourites List…
1 - Open the Favourite List you want to rename.
2 - Press OPTIONS, select Rename Favourites List and press OK.
3 - |
Use the on-screen keyboard to delete the current |
name and enter a new name. |
|
4 - |
When done, select Close and press OK. |
5 - |
Press BACK to close the channel list. |
Remove a Favourites List
You can only remove a Favourites List.
To remove a Favourites List…
1 - Open the Favourites List you want to remove.
2 - Press OPTIONS, select Remove Favourites List and press OK.
3 - Confirm to remove the list.
4 - Press BACK to close the channel list.
Reorder Channels
Only in a Favourites List you can change the sequence of channels (reorder).
To change the sequence of channels…
1 - Open the Favourites List you want to reorder.
2 - Press OPTIONS, select Reorder Channels and press OK.
3 - In the Favourites List, select the channel you want to reorder and press OK.
4 - |
With the (up) or |
(down) keys move the |
channel where you want it. |
||
5 - |
Press OK to confirm the new location. |
|
6 - |
You can reorder channels with the same method |
|
until you close the Favourites List with |
||
the |
BACK key. |
|
Favourites List on TV Guide
You can link the TV Guide for your Favourite List.
1 - While watching a TV channel, long press > Select channel List.
2 - Select a Favourites List and press OK.
3 - Press TV GUIDE to open it.
With the TV Guide you can view a list of the current and scheduled TV programmes of your favourite channels. Along with your favourite channels, the first 3 most used channels from the broadcasters’ default list will be appended after your favourite channels for your preview. You need to add these channels into your favourite list to enable its operation (refer to "TV Guide" chapter).
On each page of TV Guide, there is a "Did you know" grid inserted on your favourite channel list. The "Did you know"-channel provides useful tips to improve the way you use your TV.
5.6
Text / Teletext
Text Pages
To open Text/Teletext press TEXT, while you are watching TV channels.
To close Text, press TEXT again.
Select a Text page
To select a page . . .
1 - Enter the page number with the number keys.
2 - Use the arrow keys to navigate.
3 - Press a colour key to select a colour-coded subject at the bottom of the screen.
Text sub-pages
A Text page number can hold several subpages. The subpage numbers are shown on a bar next to the
main page number. |
|
To select a subpage, press or |
. |
T.O.P. Text pages
Some broadcasters offer T.O.P. Text. To open T.O.P. Text pages within Text,
press OPTIONS and select T.O.P. Overview.
Search Text
15

You can select a word and scan Text for all occurences of this word.
1 - |
Open a Text page and press OK. |
2 - |
Select a word or number with the arrow keys. |
3 - |
Press OK again to jump immediately to the next |
occurence of this word or number. |
|
4 - |
Press OK again to jump to the subsequent |
occurence. |
|
5 - |
To stop searching, press (up) until nothing is |
selected.
Text from a connected device
Some devices that receive TV channels can also offer Text.
To open Text from a connected device . . .
1 - Press SOURCES, select the device and press OK.
2 - While watching a channel on the device, press OPTIONS, select Show Device Keys and
select the |
key and press OK. |
|
3 - |
Press |
BACK to hide the device keys. |
4 - |
To close Text, press BACK again. |
|
Digital Text (UK only)
Some digital broadcasters offer dedicated Digital Text or interactive TV on their digital TV channels. This includes normal Text using the number, colour and arrow keys to select and navigate.
To close Digital Text, press BACK.
* The teletext can only be reached when the channels are installed directly on the TV’s internal tuner and the set is on TV mode. If a set-top box is being used, the teletext will be unavailable via TV. In that case, the set-top box’s teletext can be used instead.
Text Options
In Text/Teletext, press OPTIONS to select the following…
• Freeze page / Unfreeze page
To start or stop the automatic rotation of subpages.
• Dual screen / Full screen
To show the TV channel and Text alongside each other.
• T.O.P. overview
To open T.O.P. Text.
• Enlarge / Normal view
To enlarge the Text page for comfortable reading.
• Reveal
To unhide hidden information on a page.
• Cycle subpages
To cycle subpages when these are available.
• Language
To switch the group of characters that Text uses to display correctly.
• Text 2.5
To activate the Text 2.5 for more colours and better
graphics.
Text Setup
Text language
Some digital TV broadcasters have several Text languages available.
To set your primary and secondary Text language . . .
1 - |
Select Settings > Region and language and |
press (right) to enter the menu. |
|
2 - |
Select Language > Primary Text or Secondary |
Text and press OK. |
|
3 - |
Select your preferred Text languages. |
4 - |
Press (left) repeatedly if necessary, to close |
the menu.
Text 2.5
If available, Text 2.5 offers more colours and better graphics. Text 2.5 is activated as a standard factory setting.
To switch off Text 2.5…
1 - Press TEXT.
2 - |
With Text/Teletext open on screen, |
|
press OPTIONS. |
||
3 - |
Select |
Text 2.5 > Off and press OK. |
4 - |
Press |
(left) repeatedly if necessary, to close |
the menu.
5.7
Interactive TV
About iTV
With interactive TV, some digital broadcasters combine their normal TV programme with information or entertainment pages. On some pages, you can respond to a programme or vote, do online shopping or pay for a video-on-demand programme.
HbbTV, MHEG, . . .
Broadcasters use various interactive TV systems : HbbTV (Hybrid Broadcast Broadband TV) or iTV (Interactive TV - MHEG). Interactive TV is sometimes referred to as Digital Text or Red button. But each system is distinct.
Visit the broadcaster's Internet website for more information.
16

What You Need
Interactive TV is only available on digital TV channels. To enjoy the full benefits of Interactive TV, you need a high-speed (broadband) Internet connection to the TV.
HbbTV
If a TV channel offers HbbTV pages, you must first switch on HbbTV in the TV settings to view the pages.
Settings > General
settings > Advanced > HbbTV settings > HbbTV > On.
Use iTV
Open iTV pages
Most channels that offer HbbTV or iTV invite you to press the colour key (red) or OK key to open their interactive programme.
Navigate iTV pages
You can use the arrow and colour keys, the number keys and the BACK key to navigate the iTV pages.
You can use the (Play), (Pause) and (Stop) keys to watch videos within iTV pages.
Digital Text (UK only)
To open Digital Text, press TEXT. To close, press BACK .
Close iTV pages
Most iTV pages inform you which key to use to close. To force an iTV page to close, switch to the next TV channel and press BACK.
17

6
Channel Installation
6.1
Satellite Installation
About Installing Satellites
Up to 4 Satellites
You can install up to 4 satellites (4 LNBs) on this TV. Select the exact number of satellites you wish to install at the start of the installation. This will speed up the installation.
Unicable
You can use a Unicable system to connect the antenna dish to the TV. You can select Unicable for 1 or for 2 satellites at the start of the installation.
MDU - Multi-Dwelling-Unit
The built-in satellite tuners support MDU on the Astra satellites and for Digiturk on the Eutelsat satellite. MDU on Türksat is not supported.
Start the Installation
Make sure your satellite dish is connected correctly and is perfectly aligned before you start the installation.
To start the satellite installation…
1 - Select Settings > Channels > Satellite
Installation and press OK. Enter your PIN code if
necessary. |
|
|
2 - |
Select |
Search for Satellite and press OK. |
3 - |
Select |
Search and press OK. TV will search for |
satellites. |
|
|
4 - |
Select |
Install and press OK. The TV shows the |
current satellite installation setup.
If you want to change this setup, select Settings.
If you don't want to change the setup, select Search. Go to step 5.
5 - In Installation System, select the number of satellites you want to install or select one of the Unicable systems. When you select Unicable, you can choose the User Band Numbers and enter the User Band Frequencies for each tuner. In some countries, you can adjust some expert settings for each LNB in More Settings.
6 - The TV will search for the satellites available on the alignment of your antenna dish. This may take a few minutes. If a satellite is found, its name and reception strength are shown on screen.
7 - When the TV found the satellites you need,
select Install.
8 - If a satellite offers Channel Packages, the TV will show the available packages for that satellite. Select the package you need. Some packages offer
a Quick or Full install for their available channels, select one or the other. The TV will install the satellite channels and radio stations.
9 - To store the satellite setup and installed channels and radio stations, select Finish.
Satellite Installation Settings
The satellite installation settings are preset according your country. These settings determine how the TV searches and installs satellites and its channels. You can always change these settings.
To change the satellite installation settings…
1 - Start the satellite installation.
2 - |
On the screen where you can start searching for |
satellites, select Settings and press OK. |
|
3 - |
Select the number of satellites you want to install |
or select one of the Unicable systems. When you select Unicable, you can choose the User Band Numbers and enter the User Band Frequencies for each tuner.
4 - |
When you're done, select Next and press OK. |
5 - |
On the Settings menu, press the colour |
key |
Done to return to the screen to start |
searching for satellites.
Homing Transponder and LNB
In some countries, you can adjust the expert settings for homing transponder and each LNB. Only use or change these settings when a normal installation fails. If you have non-standard satellite equipment, you can use these settings to overrule the standard settings. Some providers might give you some transponder or LNB valeus which you can enter here.
Satellite CAMs
If you use a CAM – a Conditional Access Module with a smart card – to watch satellite channels, we recommend to do the satellite installation with the CAM inserted in the TV.
Most CAMs are used to descramble channels.
Newest generation CAMs (CI+ 1.3 with Operator Profile), can install all the satellite channels by themselves on your TV. The CAM will invite you to install its satellite(s) and channels. These CAMs not only install and descramble the channels but also handle regular channel updates.
18

Channel Packages
Satellite operators can offer channel packages that bundle free channels (free-to-air) and offer a sorting that suits a country. Some satellites offer subscription packages - a collection of channels you pay for.
If you choose a subscription package, the TV might ask you to select a Quick or Full installation.
Select Quick to install the channels of the package only or select Full to install the package and all other available channels too. We recommend a Quick installation for subscription packages. If you have additional satellites that are not part of your subscription package, we recommend a Full installation. All installed channels are put in the channels list All.
Unicable Setup
The Unicable System
You can use a Single Cable system, MDU or Unicable system* to connect the antenna dish to the TV. A Single Cable system uses one cable to connect the satellite dish to all satellite tuners in its system. A Single Cable system is typically used in apartment buildings. If you use a Unicable system, the TV will ask you to assign a user band number and corresponding frequency during the installation. You can install 1 or 2 satellites with Unicable on this TV.
If you notice some missing channels after a Unicable installation, another installation might have been done at the same moment on the Unicable system. Do the installation again to install the missing channels.
* Note: supports unicable systems EN 50494 only.
User Band Number
In a Unicable system, each connected satellite tuner must be numbered (e.g. 0, 1, 2 or 3 etc.).
You can find the available user bands and their number on the Unicable switchbox. User band is sometimes shortened as UB. There are Unicable switchboxes that offer 4 or 8 user bands. If you select Unicable in the settings, the TV will ask you to assign the unique user band number for each built-in satellite tuners. A satellite tuner cannot have the same user band number as another satellite tuner in the Unicable system.
User Band Frequency
Next to the unique user band number, the built-in satellite receiver needs the frequency of the selected user band number. These frequencies are mostly shown next to the user band number on a Unicable switchbox.
Manual Channel Update
You can always start an channel update yourself.
To start a channel update manually…
1 - |
Select |
Settings > Channels > Satellite |
Installation and press OK. |
||
2 - |
Select |
Search for Channels and press OK. |
3 - |
Select |
Update Channels and press OK. The TV |
will start updating. The update may take a few |
||
minutes. |
|
|
4 - |
Follow the instructions on screen. The update |
|
may take a few minutes. |
||
5 - |
Select |
Finish and press OK. |
Add a Satellite
You can add an additional satellite to your current satellite installation. The installed satellites and their channels remain untouched. Some satellite operators do not allow adding a satellite.
The additional satellite should be seen as an extra, it is not your main satellite subscription or not the main satellite of which you use its channel package.
Typically, you would add a 4th satellite when you have 3 satellites already installed. If you have 4 satellites installed, you might consider removing one first to be able to add a new satellite.
Setup
If you currently have only 1 or 2 satellites installed, the current installation settings might not allow adding an extra satellite. If you need to change the installation settings, you must redo the complete satellite installation. You cannot use Add satellite if a change of settings is needed.
To add a satellite… |
|
|
|
||
1 - |
Select |
Settings > Channels > |
Satellite |
||
Installation and press |
OK. |
|
|
||
2 - |
Select |
Search for satellite and press OK. |
|||
3 - |
Select |
Add Satellite and press |
OK. The current |
||
satellites are shown. |
|
|
|
||
4 - |
Select |
Search and press |
OK. The TV will |
||
search for new satellites. |
|
|
|||
5 - |
If the TV has found one or more satellites, |
||||
select Install and press |
OK. The TV installs the |
||||
channels of the found satellites. |
|
||||
6 - |
Select |
Finish and press |
OK to store the |
||
19

channels and radio stations.
Remove a Satellite
You can remove one or more satellites from your current satellite installation. You remove the satellite and its channels. Some satellite operators do not allow removing a satellite.
To remove satellites… |
|
||
1 - |
Select |
Settings > Channels > Satellite |
|
Installation and press OK. |
|
||
2 - |
Select |
Search for satellite and press |
OK. |
3 - |
Select |
Remove Satellite and press |
OK. The |
current satellites are shown. |
|
||
4 - |
Select a satellite and press OK to mark or |
||
unmark them to remove. |
|
||
5 - |
Press |
(left) repeatedly if necessary, to close |
|
the menu.
Homing Transponder and LNB
In some countries, you can adjust the expert settings for homing transponder and each LNB. Only use or change these settings when a normal installation fails. If you have non-standard satellite equipment, you can use these settings to overrule the standard settings. Some providers might give you some transponder or LNB valeus which you can enter here.
LNB Power
By default, LNB Power is set to Automatic.
22 kHz Tone
By default, the Tone is set to Automatic.
Low LO Frequency / High LO Frequency
The local oscillator frequencies are set to standard values. Adjust the values only in case of exceptional equipment that needs different values.
Manual Installation
Manual Installation is intended for expert users.
You can use Manual Installation to quickly add new channels from a satellite transponder. You need to know the frequency and polarization of the transponder. The TV will install all channels of that transponder. If the transponder was installed before, all its channels - the former and the new ones - are moved to the end of the channel list All.
You cannot use Manual installation if you need to change the number of satellites. If this is needed, you have to do a complete installation with Install Satellites.
To install a transponder… |
|
|
|
||
1 - |
Select Settings > Channels > |
Satellite |
|||
Installation and press |
OK. |
|
|
||
2 - |
Select Manual Installation and press (right) |
||||
to enter the menu. |
|
|
|
|
|
3 - |
If you have more than 1 satellite installed, |
||||
select LNB for which you want to add channels. |
|||||
4 - |
Set the Polarisation you need. If you set |
||||
the |
Symbol Rate Mode to |
Manual, you can enter |
|||
the symbol rate in Symbol Rate manually. |
|||||
5 - |
Press the arrows |
(up) or |
(down) to adjust |
||
the frequency, and select |
Done. |
|
|||
6 - |
Select Search and press |
OK. The signal |
|||
strenght is shown on screen. |
|
|
|||
7 - |
If you want to store the channels of a new |
||||
transponder, select Store and press |
OK. |
||||
8 - |
Press (left) repeatedly if necessary, to close |
||||
the menu.
Problems
The TV cannot find the satellites I want or the TV
installs the same satellite twice
• Make sure that the correct number of satellites is set in Settings at the start of the installation. You can set the TV to search for One, Two or 3/4 satellites.
A dual head LNB cannot find a second satellite
•If the TV finds one satellite but cannot find a second one, turn the dish a few degrees. Align the dish to get the strongest signal on the first satellite. Check the signal strength indicator of the first satellite on screen. With the first satellite set at the strongest signal, select Search again to find the second satellite.
•Make sure the settings are set to Two Satellites.
Changing the installation settings did not solve my
problem
• All settings, satellites and channels are only stored at the end of the installation when you finish.
All satellite channels are gone
• If you use a Unicable system, make sure you assigned two unique user band numbers for both built-in tuners in the Unicable settings. It might be that another satellite receiver in your Unicable system is using the same user band number.
Some satellite channels seem to have disappeared
from the channel list
• If some channels seem to be gone or displaced, the broadcaster might have changed the transponder location of these channels. To restore the channel positions in the channel list, you can try an update of
20
the channel package.
I cannot remove a satellite
• Subscription packages do not allow removing a satellite. To remove the satellite, you have to do a complete installation again and select another package.
Sometimes the reception is poor
•Check if the satellite dish is solidly mounted. Strong winds can move the dish.
•Snow and rain can degrade the reception.
6.2
Antenna Installation
Update Channels
Automatic Channel Update
If you receive digital channels, you can set the TV to automatically update these channels.
Once a day, at 7 AM, the TV updates the channels and stores new channels. New channels are stored in the Channels List and are marked with a . Channels without a signal are removed. The TV must be in standby to automatically update channels. You can switch off Auromatic Channel Update.
To switch off the automatic update…
1 - |
Select |
Settings > Channels > Antenna/Cable |
Installation or Antenna Installation and press OK. |
||
2 - |
Enter your PIN code if necessary. |
|
3 - |
Select Automatic Channel Update and |
|
press OK. |
|
|
4 - |
Select |
Off and press OK. |
5 - |
Press |
(left) to go back one step or |
press BACK to close the menu.
When new channels are found or if channels are updated or removed, a message is shown at TV start up. To avoid this message to appear after every channel update, you can switch it off.
To switch off the message…
1 - |
Select |
Settings > Channels > Antenna/Cable |
Installation or Antenna Installation and press OK. |
||
2 - |
Enter your PIN code if necessary. |
|
3 - |
Select |
Channel Update Message and press OK. |
4 - |
Select |
Off and press OK. |
5 - |
Press |
(left) to go back one step or |
press BACK to close the menu.
In certain countries, the Automatic channel update is done while watching TV or on any moment when the TV is in standby.
Manual Channel Update
You can always start an channel update yourself.
To start a channel update manually…
1 - |
Select |
Settings > Channels > Antenna/Cable |
Installation or Antenna Installation and press OK. |
||
2 - |
Enter your PIN code if necessary. |
|
3 - |
Select |
Search for Channels and press OK. |
4 - |
Select |
Start and press OK. |
5 - |
Select |
Update Digital Channels, |
select Next and press OK. |
||
6 - |
Select |
Start and press OK to update the digital |
channels. This can take a few minutes. |
||
7 - |
Press |
(left) to go back one step or |
press BACK to close the menu.
Reinstall Channels
Reinstall All Channels
You can reinstall all channels and leave all other TV settings untouched.
If a PIN code is set, you will need to enter this code before you can reinstall channels.
To reinstall channels… |
|
|
|
||
1 - |
Select |
Settings > Channels > Antenna/Cable |
|||
Installation or Antenna Installation and press OK. |
|||||
2 - |
Enter your PIN code if necessary. |
|
|
||
3 - |
Select |
Search for Channels and press |
OK. |
||
4 - |
Select |
Start and press |
OK. |
|
|
5 - |
Select |
Reinstall Channels, select |
Next and |
||
press OK. |
|
|
|
|
|
6 - |
Select the country where you are now and |
||||
press OK. |
|
|
|
|
|
7 - |
Select |
Next and press |
OK. |
|
|
8 - |
Select the type of installation you want, |
Antenna |
|||
(DVB-T) or |
Cable (DVB-C) and press |
OK. |
|
||
7 - |
Select |
Next and press |
OK. |
|
|
10 - Select the type of channels you want, |
Digital |
||||
and Analogue Channels or |
Only Digital |
|
|||
Channels and press OK. |
|
|
|
||
7 - |
Select |
Next and press |
OK. |
|
|
12 - |
Select |
Start and press OK to update the |
|||
digital channels. This can take a few minutes. |
|||||
13 - |
Press (left) to go back one step or |
|
|||
press BACK to close the menu. |
|
|
|||
Reinstall TV
You can redo a full TV installation. The TV is completely reinstalled.
To redo a full TV installation…
1 - Select Settings > General Settings > Reinstall TV and press OK.
21

2 - |
Enter your PIN code if necessary. |
3 - |
Select Yes and press OK to confirm. |
4 - The TV will reinstall completely. All settings will be reset and installed channels will be replaced. The installation can take a few minutes.
5 - Press (left) to go back one step or press BACK to close the menu.
DVB Settings
DVB-T or DVB-C Reception
During the channel installation, just before you search for channels, you selected Antenna (DVB-T) or Cable (DVB-C). Antenna DVB-T searches for terrestrial analogue channels and digital DVB-T/T2 channels. Cable DVB-C searches for analogue and digital channels available from a cable DVB-C operator.
DVB-C Channel Installation
For ease of use, all DVB-C settings are set to automatic.
If your DVB-C operator gave you specific DVB-C values, the network ID or network frequency, enter these values when the TV asks for them during installation.
Channel Number Conflicts
In some countries, different TV channels (broadcasters) might have the same channel number. While installing, the TV shows the list with channel number conflicts. You need to select which TV channel you want to install on a channel number with multiple TV channels.
Network Frequency Mode
If you intend to use the fast Quick Scan method in Frequency Scan to search for channels,
select Automatic. The TV will use 1 of the predefined network frequencies (or HC - homing channel) as used by most cable operator in your country.
If you received a specific network frequency value to search for channels, select Manual.
Network Frequency
With the Network Frequency Mode set to Manual, you can enter the network frequency value received from your cable operator here. To enter the value, use the number keys.
Frequency Scan
Select the method of searching for channels. You can select the faster Quick Scan method and use the predefined settings used by most cable operator in your country.
If this results in having no channels installed or if some channels are missing, you can select the extended Full Scan method. This method will take more time to search for and install channels.
Frequency Step Size
The TV searches for channels in steps of 8MHz.
If this results in having no channels installed or if some channels are missing, you can search in smaller steps of 1MHz. Using the 1MHz steps will take more time to search for and install channels.
Digital Channels
If you know your cable operator is not offering digital channels, you can skip searching for digital channels.
Analogue Channels
If you know your cable operator is not offering analogue channels, you can skip searching for analogue channels.
Free / Scrambled
If you have a subscription and a CAM - Conditional Access Module for pay TV services, select Free + Scrambled. If you did not subscribe to pay TV channels or services, you can select Free Channels Only .
For more information, in Help, press the colour key Keywords and look up CAM, Conditional Access Module.
Reception Quality
You can check the quality and signal strength of a digital channel. If you have your own antenna, you can reposition the antenna to try and improve the reception.
To check the reception quality of a digital channel…
1 - |
Tune to the channel. |
2 - |
Select Settings > Channels > Antenna/Cable |
Installation or Antenna Installation and press OK. Enter your PIN code if necessary.
22

3 - |
Select |
Digital: Reception Test and press OK. |
4 - |
Select |
Search and press OK. The digital |
frequency is shown for this channel. |
||
5 - |
Select |
Search again and press OK to check the |
signal quality of this frequency. The test result is
shown on screen. You can reposition the antenna or check the connections to possibly improve the reception.
6 - You can also change the frequency
yourself. Select the frequency number one by one and use the (up) or (down) keys to change
the value. Select Search and press OK to test the reception again.
7 - Press (left) repeatedly if necessary, to close the menu.
Manual Installation
Analogue TV channels can be manually installed, channel by channel.
To install analogue channels manually…
1 - Select Settings > Channels > Antenna/Cable Installation or Antenna Installation and press OK. Enter your PIN code if necessary.
2 - Select Analogue: Manual Installation and press OK.
• System
To set up the TV system, select System.
Select your country or the part of the world where you are now and press OK.
• Search Channel
To find a channel, select Search Channel and
press OK. You can enter a frequency yourself to find a channel or let the TV search for a channel.
Press (right) to select Search and press OK to search for a channel automatically. The found channel is shown on screen and if the reception is poor, press Search again. If you want to store the
channel, select Done and press OK.
• Store
You can store the channel on the current channel number or as a new channel number.
Select Store Current Channel or Store as New Channel and press OK. The new channel number is shown briefly.
You can redo these steps until you have found all available analogue TV channels.
6.3
Channel List Copy
Introduction
Channel List Copy is intended for dealers and expert users.
With Channel List Copy, you can copy the channels installed on one TV onto another Philips TV of the same range. With Channel List Copy, you avoid the time-consuming channel search by uploading a predefined channel list on a TV. Use a USB flash drive of minimum 1 GB.
Conditions
•Both TVs are from the same year range.
•Both TVs have the same hardware type. Check the hardware type on the TV type plate on the back of the TV.
•Both TVs have compatible software versions.
Current channel version
To check the current version of the channel list…
1 - Select Settings > Channels, select Channel List Copy, select Current Version and press OK.
2 - Press OK to close.
Current software version
To check the cuurent version of the TV software…
1 - |
Select Settings > Update Software and |
press (right) to enter the menu. |
|
2 - |
Select Current Software Info and press OK. |
3 - |
The version, release notes and creation date are |
shown. Also, the Netflix ESN Number is shown if |
|
available. |
|
4 - |
Press (left) repeatedly if necessary, to close |
the menu.
Copy a Channel List
To copy a channel list…
1 - Switch on the TV. This TV should have channels
installed.
2 - |
Plug in a USB flash drive. |
|
3 - |
Select Settings > Channels > |
Channel List |
Copy and press OK. |
|
|
4 - |
Select Copy to USB and press |
OK. You might |
be asked to enter the Child Lock PIN code to copy the channel list.
5 - When copying is done, unplug the USB flash drive.
6 - Press (left) repeatedly if necessary, to close the menu.
Now you can upload the copied channel list onto another Philips TV.
23

Channel List Version
Check the current version of the channel list...
1 - Select Settings > Channels and press (right) to enter the menu.
2 - Select Channel List Copy and select Current Version, then press OK.
3 - Press (left) repeatedly if necessary, to close the menu.
Upload a Channel List
To not Installed TVs
Depending on whether your TV is already installed or not, you must use a different method to upload a channel list.
To a TV that is not yet installed
1 - Plug in the power plug to start the installation and select language and country. You can skip the channel search. Finish the installation.
2 - Plug in the USB flash drive that holds the channel list of the other TV.
3 - To start the channel list upload, select Settings
> Channels > Channel List Copy > Copy to TV and press OK. Enter your PIN code if necessary.
4 - The TV notifies you if the channel list is copied to the TV successfully. Unplug the USB flash drive.
To Installed TVs
Depending on whether your TV is already installed or not, you must use a different method to upload a channel list.
To an already installed TV
1 - Verify the country setting of the TV. (To verify this setting, see chapter Reinstall All Channels. Start this procedure until you reach the country setting.
Press BACK to cancel the installation.) If the country is correct continue with step 2.
If the country is not correct, you need to start a reinstallation. See chapter Reinstall All Channels and start the installation. Select the correct country and skip the channels search. Finish the installation. When done, continue with step 2.
2 - Plug in the USB flash drive that holds the channel list of the other TV.
3 - To start the channel list upload, select Settings
> Channels > Channel List Copy > Copy to TV and press OK. Enter your PIN code if necessary.
4 - The TV notifies you if the channel list is copied to the TV successfully. Unplug the USB flash drive.
24
7
Connect Devices
7.1
About Connections
Connectivity Guide
Always connect a device to the TV with the highest quality connection available. Also, use good quality cables to ensure a good transfer of picture and sound.
When you connect a device, the TV recognizes its type and gives each device a correct type name. You can change the type name if you wish. If a correct type name for a device is set, the TV automatically switches to the ideal TV settings when you switch to this device in the Sources menu.
Antenna port
If you have a Set-top box (a digital receiver) or Recorder, connect the antenna cables to run the antenna signal through the Set-top box and/or Recorder first before it enters the TV. In this way, the antenna and the Set-top box can send possible additional channels to the Recorder to record.
HDMI ports
HDMI Quality
An HDMI connection has the best picture and sound quality. One HDMI cable combines video and audio signals. Use an HDMI cable for TV signal.
For best signal quality transfer, use a High speed HDMI cable and do not use an HDMI cable longer than 5 m.
If a device connected with HDMI is not working correctly, check if a different HDMI Ultra HD setting can solve this problem. In Help, press the colour key Keywords and look up HDMI Ultra HD.
Copy protection
HDMI cables support HDCP 2.2 (High-bandwidth Digital Content Protection). HDCP is a copy protection signal that prevents copying content from a DVD disc or Blu-ray Disc. Also referred to as DRM (Digital Rights Management).
HDMI ARC
All of the HDMI connections on the TV have HDMI ARC (Audio Return Channel).
If the device, typically a Home Theatre System (HTS), also has the HDMI ARC connection, connect it to any of the HDMI connections on this TV. With the HDMI ARC connection, you do not need to connect the extra audio cable that sends the sound of the TV picture to the HTS. The HDMI ARC connection combines both signals.
You can use any HDMI connection on this TV to connect the HTS but ARC is only available for 1 device/connection at a time.
HDMI CEC - EasyLink
An HDMI connection has the best picture and sound quality. One HDMI cable combines video and audio signals. Use an HDMI cable for High Definition (HD)
TV signals. For best signal quality transfer, use a High speed HDMI cable and do not use an HDMI cable longer than 5 m.
Connect HDMI CEC-compatible devices to your TV, you can operate them with the TV remote control.
EasyLink HDMI CEC must be switched on on the TV and the connected device.
Switch on EasyLink
Settings > General
settings > EasyLink > EasyLink > On.
Operate HDMI CEC-compatible devices with TV remote control
Settings > General
settings > EasyLink > EasyLink remote control > On.
Note:
25

•EasyLink might not work with devices from other brands.
•The HDMI CEC functionality has different names on different brands. Some examples are: Anynet, Aquos Link, Bravia Theatre Sync, Kuro Link, Simplink and Viera Link. Not all brands are fully compatible with EasyLink. Example HDMI CEC branding names are property of their respective owners.
7.2
CAM with Smart Card - CI+
CI+
This TV is ready for the CI+ Conditional Access .
With CI+ you can watch premium HD programmes, like movies and sports, offered by digital TV operators in your region. These programmes are scrambled by the TV operator and descrambled with a prepaid CI+ module.
Digital TV operators provide a CI+ module (Conditional Access Module - CAM) and an accompanying smart card, when you subscribe to their premium programmes. These programmes have a high level of copy protection.
Contact a digital TV operator for more information on terms & conditions.
Smart Card
Digital TV operators provide a CI+ module (Conditional Access Module - CAM) and an accompanying smart card, when you subscribe to their premium programmes.
Insert the smart card into the CAM module. See the instruction you received from the operator.
To insert the CAM in the TV…
1 - Look on the CAM for the correct method of insertion. Incorrect insertion can damage the CAM and TV.
2 - While looking at the back of the TV, with the front of the CAM facing towards you, gently insert the CAM into the slot COMMON INTERFACE.
3 - Push the CAM in as far as it will go. Leave it in the slot permanently.
When you switch on the TV, it may take a few minutes before the CAM is activated. If a CAM is inserted and subscription fees are paid (subscription methods can differ), you can watch the scrambled channels supported by the CAM smart card.
The CAM and smart card are exclusively for your TV. If you remove the CAM, you will no longer be able to watch the scrambled channels supported by the CAM.
Passwords and PIN codes
For some CAMs, you must enter a PIN code to watch its channels. When you set the PIN code for the CAM, we recommend you to use the same code you are using to unlock the TV.
To set the PIN code for the CAM…
1 - |
Press SOURCES . |
2 - |
Select the channel type you are using the CAM |
for Watch TV. |
|
3 - |
Press OPTIONS and select Common |
Interface. |
|
4 - |
Select the TV operator of the CAM. The following |
screens come from the TV operator. Follow the onscreen instruction to look up the PIN code setting.
7.3
Home Theatre System - HTS
Connect with HDMI ARC
Use an HDMI cable to connect a Home Theatre System (HTS) to the TV. You can connect a Philips Soundbar or an HTS with a built-in disc player.
HDMI ARC
If your Home Theatre System has an HDMI ARC connection, you can use any HDMI connection on the TV to connect. With HDMI ARC, you do not need to connect the extra audio cable. The HDMI ARC
26

connection combines both signals.
All HDMI connections on the TV can offer the Audio Return Channel (ARC) signal. But once you have connected the Home Theatre System, the TV can only send the ARC signal to this HDMI connection.
Audio to video synchronisation (sync)
If the sound does not match the video on screen, you can set a delay on most Home Theatre Systems with a disc player to match the sound with the video.
Connect with HDMI
Use an HDMI cable to connect a Home Theatre System (HTS) to the TV. You can connect a Philips Soundbar or an HTS with a built-in disc player.
If the Home Theatre System has no HDMI ARC connection, add an optical audio cable (Toslink) to send the sound of the TV picture to the Home Theatre System.
Audio to video synchronisation (sync)
If the sound does not match the video on screen, you can set a delay on most Home Theatre Systems with a disc player to match the sound with the video.
Problems with HTS sound
Sound with loud noise
If you watch a video from a plugged in USB flash drive or connected computer, the sound from your Home Theatre System might be distorted. This noise is heard when the audio or video file has DTS sound but the Home Theatre System has no DTS sound processing. You can fix this by setting the Digital Out Format of the TV to Stereo.
Select Settings
> Sound > Advanced > Digital Out Format .
No sound
If you cannot hear the sound from the TV on your Home Theatre System, check if you connected the HDMI cable to an HDMI ARC connection on the Home Theatre System. All HDMI connections on the TV are HDMI ARC connections.
7.4
Smartphones and Tablets
To connect a smartphone or tablet to the TV, you can use a wireless connection. For a wireless connection, on your smartphone or tablet download the Philips TV Remote App from your favourite app store.
7.5
Blu-ray Disc Player
Use a High speed HDMI cable to connect the Bluray Disc player to the TV.
If the Blu-ray Disc player has EasyLink HDMI CEC, you can operate the player with the TV remote control.
In Help, press the colour key Keywords and look up EasyLink HDMI CEC for more information.
7.6
DVD Player
Use an HDMI cable to connect the DVD player to the TV.
If the DVD player is connected with HDMI and has EasyLink CEC, you can operate the player with the TV remote control.
For more information on EasyLink, in Help, press the colour key Keywords and look up EasyLink HDMI CEC.
Y Pb Pr - Component Video is a high quality connection.
The YPbPr connection can be used for High Definition (HD) TV signals.
7.7
Bluetooth
27
 Loading...