


 Loading...
Get support at
http://www.philips.com/support/
https://support.cmnd.pro/
Professional Installation Manual
xxHFL5014/12
xxHFL6014U/12
Status: |
Approved |
Version: |
1.0 |
Date: |
8 July 2019 |
Author: |
Bert De Latter |

Version history:
Version |
Date |
Author |
Changes: |
1.0 |
08/07/2019 |
Bert De Latter |
First version Installation manual 5014/6014 |
|
|
|
|
|
|
|
|
|
|
|
|
|
|
|
|
|
|
|
|
- 1 -

Table of Contents
Version history: ................................................................................................................................... |
- 1 - |
|||
1. |
General information.................................................................................................................... |
- 8 - |
||
|
1.1 |
Notice .................................................................................................................................. |
- 8 - |
|
|
1.2 |
Help and support................................................................................................................. |
- 8 - |
|
|
1.3 |
Definitions, Acronyms and Abbreviations........................................................................... |
- 9 - |
|
|
1.4 |
How to navigate, open menu’s and make selections.......................................................... |
- 9 - |
|
2. Requirements before starting the installation of a TV.............................................................. |
- 10 - |
|||
|
2.1 |
Remote control.................................................................................................................. |
- 10 - |
|
|
2.1.1 |
Master remote control 22AV8573 or 22AV9573A or 22AV9574A............................ |
- 10 - |
|
|
2.1.2 |
Guest remote control 22AV1905A (IR)...................................................................... |
- 10 - |
|
|
2.1.3 |
Accessory remote controls........................................................................................ |
- 11 - |
|
|
2.1.4 |
Setup of the remote controls .................................................................................... |
- 11 - |
|
|
2.1.4.1 How to setup the Master RC 22AV9574A ................................................................. |
- 11 - |
||
|
2.1.4.2 How to set the multi RC for the guest RC 22AV1905A.............................................. |
- 11 - |
||
|
2.1.4.3 How to setup the Healthcare RC ............................................................................... |
- 12 - |
||
|
2.1.4.4 How to setup the Easy RC.......................................................................................... |
- 12 - |
||
|
2.2 |
Professional Settings menu ............................................................................................... |
- 13 - |
|
|
2.3 |
Software upgrade.............................................................................................................. |
- 14 - |
|
|
2.4 |
Clone folder structure ....................................................................................................... |
- 15 - |
|
3. Find out the state of the TV....................................................................................................... |
- 16 - |
|||
|
3.1 |
Virgin mode ....................................................................................................................... |
- 16 - |
|
|
3.2 |
Professional Mode ON/OFF............................................................................................... |
- 16 - |
|
|
3.3 |
CSM (Customer Service Menu) ......................................................................................... |
- 16 - |
|
4. |
Reinstall TV................................................................................................................................ |
- 18 - |
||
|
4.1 |
Reinstall the TV manually .................................................................................................. |
- 18 - |
|
|
4.2 |
Reinstall via a script in the clone file ................................................................................. |
- 19 - |
|
5. |
Virgin installation wizard........................................................................................................... |
- 20 - |
||
|
5.1 |
Instant Initial Cloning (IIC) ................................................................................................. |
- 20 - |
|
|
5.1.1 |
Virgin installation....................................................................................................... |
- 20 - |
|
|
5.1.2 |
Instant initial cloning and software upgrade............................................................. |
- 20 - |
|
|
5.2 |
Settings during virgin installation...................................................................................... |
- 23 - |
|
6. |
Professional Settings ................................................................................................................. |
- 24 - |
||
|
6.1 |
General information.......................................................................................................... |
- 24 - |
|
|
|
|
- 2 - |
|

6.1.1 |
Store settings in the Professional Settings menu...................................................... |
- 24 - |
|
6.1.2 |
Professional session .................................................................................................. |
- 24 - |
|
6.1.3 |
Exit Professional menu after installing apps ............................................................. |
- 24 - |
|
6.2 |
Overview............................................................................................................................ |
- 25 - |
|
6.3 |
Upgrade and Clone............................................................................................................ |
- 25 - |
|
6.4 |
Switch on settings.............................................................................................................. |
- 29 - |
|
6.4.1 |
Channel Settings........................................................................................................ |
- 29 - |
|
6.4.2 |
Feature Settings......................................................................................................... |
- 30 - |
|
6.4.3 |
Sound Settings........................................................................................................... |
- 31 - |
|
6.4.4 |
Picture Settings.......................................................................................................... |
- 31 - |
|
6.4.5 |
Subtitles..................................................................................................................... |
- 32 - |
|
6.4.6 |
Guest Management................................................................................................... |
- 32 - |
|
6.4.7 |
Content Rating........................................................................................................... |
- 32 - |
|
6.4.8 |
Personalise ................................................................................................................ |
- 33 - |
|
6.4.9 |
HotSpot Default Frequency ....................................................................................... |
- 33 - |
|
6.5 |
Identification Settings ....................................................................................................... |
- 33 - |
|
6.5.1 |
RoomID...................................................................................................................... |
- 33 - |
|
6.5.2 |
Premises Name.......................................................................................................... |
- 33 - |
|
6.5.3 |
Premises Geonames ID.............................................................................................. |
- 34 - |
|
6.5.4 |
Device Name.............................................................................................................. |
- 34 - |
|
6.5.5 |
Installer Identification ............................................................................................... |
- 34 - |
|
6.6 |
Guest Management........................................................................................................... |
- 35 - |
|
6.7 |
Dashboard ......................................................................................................................... |
- 35 - |
|
6.8 |
Features............................................................................................................................. |
- 37 - |
|
6.8.1 |
Apps........................................................................................................................... |
- 37 - |
|
6.8.2 |
SmartInfo................................................................................................................... |
- 41 - |
|
6.8.3 |
Sharing....................................................................................................................... |
- 42 - |
|
6.8.4 |
Weather App ............................................................................................................. |
- 43 - |
|
6.8.5 |
Welcome Screen........................................................................................................ |
- 43 - |
|
6.8.6 |
ThemeTV.................................................................................................................... |
- 44 - |
|
6.8.7 |
MyChoice................................................................................................................... |
- 44 - |
|
6.8.8 |
Content Rating........................................................................................................... |
- 44 - |
|
6.8.9 |
Clock .......................................................................................................................... |
- 44 - |
|
6.8.10 |
Scheduler................................................................................................................... |
- 45 - |
|
|
|
- 3 - |
|

6.8.11 |
Banner ....................................................................................................................... |
- 45 - |
|
6.9 |
Channels ............................................................................................................................ |
- 46 - |
|
6.10 |
Sources .............................................................................................................................. |
- 49 - |
|
6.11 |
Date and Time ................................................................................................................... |
- 51 - |
|
6.12 |
Wireless and Networks...................................................................................................... |
- 53 - |
|
6.12.1 |
Network wizard ......................................................................................................... |
- 53 - |
|
6.12.2 |
Network settings ....................................................................................................... |
- 53 - |
|
6.12.3 |
Network Control TV Over IP ...................................................................................... |
- 56 - |
|
6.13 |
Input Control ..................................................................................................................... |
- 58 - |
|
6.14 |
Advanced........................................................................................................................... |
- 60 - |
|
6.15 |
TV Settings......................................................................................................................... |
- 63 - |
|
6.15.1 |
Picture ....................................................................................................................... |
- 63 - |
|
6.15.2 |
Sound......................................................................................................................... |
- 65 - |
|
6.15.3 |
Audio Language Preference ...................................................................................... |
- 66 - |
|
6.15.4 |
Subtitle Language Preference ................................................................................... |
- 67 - |
|
6.15.5 |
Accessibility ............................................................................................................... |
- 67 - |
|
6.16 |
Android Settings ................................................................................................................ |
- 68 - |
|
6.17 |
Reset.................................................................................................................................. |
- 68 - |
|
6.18 |
Extra 19HFL5014T/12 bedside menus............................................................................... |
- 69 - |
|
7. Professional setting wizards...................................................................................................... |
- 70 - |
||
7.1 |
Philips Home Dashboard configuration............................................................................. |
- 70 - |
|
7.2 |
Manage Apps..................................................................................................................... |
- 73 - |
|
7.2.1 |
Manage Apps configuration wizard........................................................................... |
- 73 - |
|
7.2.2 |
Installing Apps using Google Play Store .................................................................... |
- 77 - |
|
7.2.3 |
Managing Apps through the web portal ................................................................... |
- 81 - |
|
7.3 |
Manage Welcome Screen.................................................................................................. |
- 82 - |
|
7.3.1 |
ScreenSaver Configuration........................................................................................ |
- 82 - |
|
7.3.2 |
Welcome Screen Configuration................................................................................. |
- 83 - |
|
7.4 |
Manage ThemeTV ............................................................................................................. |
- 84 - |
|
7.5 |
Manage MyChoice............................................................................................................. |
- 87 - |
|
7.5.1 |
How does it work....................................................................................................... |
- 87 - |
|
7.5.2 |
How to configure MyChoice...................................................................................... |
- 87 - |
|
7.5.3 |
Platform specific........................................................................................................ |
- 89 - |
|
7.5.4 |
MyChoice RC commands........................................................................................... |
- 89 - |
|
|
|
- 4 - |
|

7.5.5 |
MyChoice remote activation ..................................................................................... |
- 89 - |
|
7.6 |
Manage Scheduler............................................................................................................. |
- 91 - |
|
7.7 |
Manage Channels .............................................................................................................. |
- 94 - |
|
7.7.1 |
Rename channels ...................................................................................................... |
- 94 - |
|
7.7.2 |
Hide/Show channels .................................................................................................. |
- 95 - |
|
7.7.3 |
Reorder channels ....................................................................................................... |
- 95 - |
|
7.7.4 |
Blank/Unblank channels ............................................................................................ |
- 95 - |
|
7.7.5 |
Remove channels ....................................................................................................... |
- 96 - |
|
7.7.6 |
Re - number channels .................................................................................................. |
- 96 - |
|
7.8 |
Channel installation wizard ............................................................................................... |
- 97 - |
|
7.8.1 |
Install RF channels ..................................................................................................... |
- 97 - |
|
7.8.2 |
Install OTT channels and TIF Channels .................................................................... |
- 100 - |
|
7.8.3 |
Install IP channels .................................................................................................... |
- 101 - |
|
7.8.4 |
Install media channels ............................................................................................. |
- 101 - |
|
7.9 |
Network installation wizard ............................................................................................ |
- 101 - |
|
8. Guest Menu............................................................................................................................. |
- 103 - |
||
8.1 |
Recommended ................................................................................................................ |
- 103 - |
|
8.2 |
TV Channels ..................................................................................................................... |
- 103 - |
|
8.3 |
Cast |
.................................................................................................................................. |
- 104 - |
8.3.1 .................................................................................. |
What is Chromecast built - in? |
- 104 - |
|
8.3.2 .................................................................................................. |
TV implementation |
- 104 - |
|
8.3.2.1 ..................................................................................... |
Chromecast: Full TV control |
- 104 - |
|
8.3.2.2 .................................................................. |
Chromecast: Installer backend solution |
- 106 - |
|
8.3.3 .......................................................................................................... |
Dependencies |
- 107 - |
|
8.3.4 ...................................................................................................................... |
Impact |
- 108 - |
|
8.4 |
Apps................................................................................................................................. |
- 108 - |
|
8.5 |
Games.............................................................................................................................. |
- 109 - |
|
8.6 |
More ................................................................................................................................ |
- 110 - |
|
8.6.1 .................................................................................................................... |
Settings |
- 110 - |
|
8.6.2 ................................................................................................................... |
Features |
- 111 - |
|
8.6.2.1 .................................................................................................................. |
Set alarm |
- 111 - |
|
8.6.2.2 .............................................................................................................. |
Sleep Timer |
- 111 - |
|
8.6.2.3 ...................................................................................................... |
Internet Hotspot |
- 112 - |
|
8.6.2.4 ................................................................................................................... |
Weather |
- 112 - |
|
|
|
- 5 - |
|

8.6.3 |
Personal................................................................................................................... |
- 113 - |
|
8.7 |
Top icons.......................................................................................................................... |
- 113 - |
|
8.7.1 |
Google account........................................................................................................ |
- 113 - |
|
8.7.2 |
Set alarm.................................................................................................................. |
- 114 - |
|
8.7.3 |
Weather................................................................................................................... |
- 114 - |
|
8.7.4 |
Menu language........................................................................................................ |
- 114 - |
|
8.8 |
PMS (Property Management System)............................................................................. |
- 115 - |
|
8.8.1 |
TV configuration ...................................................................................................... |
- 115 - |
|
8.8.2 |
Clearing personal data............................................................................................. |
- 115 - |
|
8.8.3 |
Greeting guest ......................................................................................................... |
- 116 - |
|
8.8.4 |
Bill ............................................................................................................................ |
- 116 - |
|
8.8.5 |
Messaging................................................................................................................ |
- 116 - |
|
8.8.6 |
Additional options ................................................................................................... |
- 117 - |
|
8.9 |
SmartInfo......................................................................................................................... |
- 118 - |
|
8.9.1 |
SmartInfo Browser................................................................................................... |
- 118 - |
|
8.9.2 |
SmartInfo Application.............................................................................................. |
- 119 - |
|
9. IP TV installation...................................................................................................................... |
- 120 - |
||
9.1 |
Setup................................................................................................................................ |
- 120 - |
|
9.2 |
Settings for installing IPTV............................................................................................... |
- 120 - |
|
9.3 |
Installing IP Channels....................................................................................................... |
- 121 - |
|
9.4 |
IP over RF cable using DOCSIS ......................................................................................... |
- 121 - |
|
10. |
Make TV visible in CMND .................................................................................................... |
- 122 - |
|
10.1 |
Connect the TV via IP....................................................................................................... |
- 122 - |
|
10.1.1 |
Change the TV settings............................................................................................ |
- 122 - |
|
10.1.2 |
Use a DNS server ..................................................................................................... |
- 122 - |
|
10.1.3 |
URL fallback mechanism.......................................................................................... |
- 122 - |
|
10.2 |
Connect the TV via RF...................................................................................................... |
- 123 - |
|
11. |
Custom Dashboard.............................................................................................................. |
- 124 - |
|
11.1 |
Browser based custom dashboard.................................................................................. |
- 124 - |
|
11.2 |
App based custom dashboard......................................................................................... |
- 124 - |
|
12. |
Examples.............................................................................................................................. |
- 125 - |
|
12.1 |
Custom channel logos ..................................................................................................... |
- 125 - |
|
12.1.1 |
How to extract the channel logos ........................................................................... |
- 125 - |
12.1.2 |
How to add custom channel logos |
.......................................................................... - 125 - |
|
|
- 6 - |

12.1.3 Improper scaled channel logo in the Channels overview ....................................... |
- 126 - |
|
12.2 |
ChannelList.xml in the clone file...................................................................................... |
- 126 - |
12.2.1 Add an RF channel in the ChannelList.xml .............................................................. |
- 127 - |
|
12.2.2 Add a media channel in the ChannelList.xml .......................................................... |
- 128 - |
|
12.2.3 Add an IP channel in the ChannelList.xml ............................................................... |
- 129 - |
|
12.3 |
RoomSpecificSettings in the clone file ............................................................................ |
- 129 - |
12.4 |
LocalCustomDashboard in the clone file......................................................................... |
- 130 - |
12.5 |
Add a local app in the TV................................................................................................. |
- 130 - |
12.6 |
Remove a local installed app from TV............................................................................. |
- 130 - |
12.7 |
Capture logs from TV on USB .......................................................................................... |
- 131 - |
- 7 -

1. General information
In this document, you can find information on how to install the Philips Professional TV’s from the xxHFL5014 and xxHFL6014U range. This document is intended for the System Integrator or the responsible technician of the hotel. You will find descriptions on what functions these new platforms support and how to use them.
In this chapter, you can find back some general information that is useful to know before reading the rest of the document.
1.1 Notice
2019 © TP Vision Belgium NV All rights reserved. Specifications are subject to change without notice. Trademarks are the property of Koninklijke Philips Electronics NV or their respective owners. TP Vision Belgium NV reserves the right to change products at any time without being obliged to adjust earlier supplies accordingly.
TP Vision Belgium NV cannot be held responsible neither for any errors in the content of this document nor for any problems as a result of the content in this document. Errors reported will be adapted and published on the Philips support website as soon as possible.
1.2 Help and support
Visit the Philips support website at http://www.philips.com/support/ for:
Leaflets and product documentation
Download a printable PDF version of the user manual
Contact details of the helpdesk
Download the latest available software
Visit the Philips support ticketing system at https://support.cmnd.pro for:
Allowing you to enter any after sales question for which you need support
Easily follow up on any tickets submitted
A knowledge base that will enable you to find answers to questions we receive on regular basis (FAQs)
An NDA section for specific questions that require an NDA to be in place with your company to get the detailed feedback
Visit the CMND website to download and find all info about CMND https://cmnd.io/
- 8 -

1.3 Definitions, Acronyms and Abbreviations
[ ]: |
The values between brackets are referring to a TV menu item or a button on screen |
“ “: |
The values between quotation marks are referring to a remote button |
CDB: |
CustomDashBoard |
DVB-T: |
Digital Video Broadcasting - Terrestrial |
DVB-C: |
Digital Video Broadcasting - Cable |
HTTP: |
Hyper Text Transfer Protocol |
IIC: |
Instant Initial Cloning |
IR: |
Infrared |
JAPIT: |
‘JSON API for TV’ is the API specification to control the Philips TV |
JEDI: |
Java Enterprise Display Interface |
LCN: |
Logical Channel Number |
MB: |
MegaByte |
MHz: |
Megahertz |
OSD: |
On Screen Display |
PTA: |
Philips TV Application |
RC: |
Remote Control |
SI: |
System Integrator |
STBY: |
Standby |
SW: |
Software |
TV: |
Television |
WIXP: |
Web Internet eXPress |
1.4How to navigate, open menu’s and make selections
Navigating in the menu can be done with the “up”, “down”, “left” and “right” arrow buttons on the remote control
Opening a menu can be done with the “OK” button
The “OK” button can also be used to activate buttons that can be seen on the screen like
[Done], [Cancel], [Close], [Yes], [No], …
In many places in the menu, you need to press the “OK” button after you selected an item to confirm your selection. Only navigating to this menu item and go back to the menu will not store your selection
Changing the value of a slider can be done using the “up” and “down” arrow, your selection will be remembered without pressing the “OK” button
- 9 -
2. Requirements before starting the installation of a TV
Before starting the installation, make sure that you have everything you need at hand. You need a USB device and a remote control.
2.1 Remote control
2.1.1Master remote control 22AV8573 or 22AV9573A or 22AV9574A
22AV8573 |
22AV9573A |
22AV9574A |
2.1.2Guest remote control 22AV1905A (IR)
- 10 -
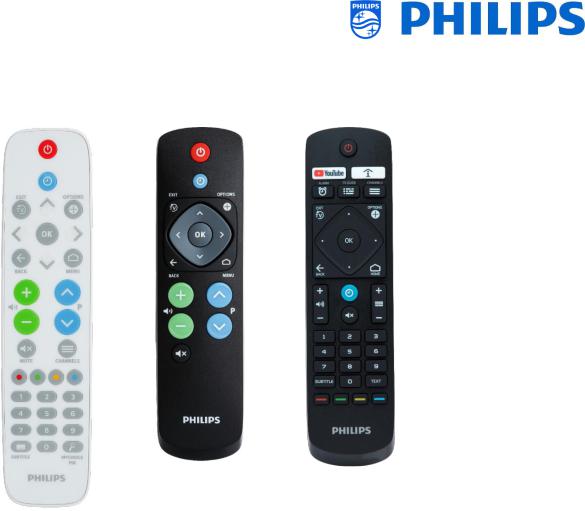
2.1.3Accessory remote controls
22AV1604B |
22AV1601B |
22AV1904A |
Healthcare RC |
Easy RC |
Digit RC |
Note: previous RC’s with digits will NOT work with the 5014/6014 TV series as the code sent by the RC for some keys is different. If your client needs digit keys on a remote, one of above remote controls is to be used and not any other previous RC.
22AV1604A is not the same RC as 22AV1604B while it looks identical. 22AV1601A is not the same RC as 22AV1601B while it looks identically.
2.1.4Setup of the remote controls
2.1.4.1How to setup the Master RC 22AV9574A
Note: The setup of this RC is missing but will be added in the next version of this manual. If you have any question, you can raise a ticket and ask.
2.1.4.2 How to set the multi RC for the guest RC 22AV1905A
You can use the guest RC for multi RC. More details can be found in the ‘Professional settings’ chapter.
You can program this RC by pressing 2 buttons at the same time for 5 seconds.
Below you can find a table how to match the TV settings and the settings as they can be used in the guest RC:
- 11 -

Mode: Buttons combination:
Blue (default) “Home” and “Volume down”
Yellow “Home” and “Channel down”
Red “Back” and “Volume down”
Green “Back” and “Channel down”
0“Home” and “Clock”
1“Home” and “Channels”
2“Home” and “Arrow up”
3“Home” and “TV”
4“Home” and “Arrow left”
5“Home” and “OK”
6“Home” and “Arrow right”
7“Home” and “Back”
8“Home” and “Arrow down”
9“Home” and “Mute”
2.1.4.3How to setup the Healthcare RC
The RC can be used in both RC5 and RC6 mode, meaning that it can be used for all TV’s. By default the RC is in RC6 mode (for 301x/501x/701x TV’s). You can change the RC to RC5 mode (for 28x9 TV’s).
You can change the RC to RC5 mode by pressing 5 seconds “Home” and “Volume up” at the same time.
You can change it back to RC6 mode by pressing 5 seconds “Mute” and ”Channel up” at the same time.
You can also use this RC for multi RC. More details can be found in the ‘Professional settings’ chapter.
You can program this RC in the same way as the guest RC.
2.1.4.4 How to setup the Easy RC
The RC can be used in both RC5 and RC6 mode, meaning that it can be used for all TV’s. By default the RC is in RC6 mode (for 301x/501x/701x TV’s). You can change the RC to RC5 mode (for 28x9 TV’s).
You can change the RC to RC5 mode by pressing 5 seconds “Home” and “Volume up” at the same time.
You can change it back to RC6 mode by pressing 5 seconds “Mute” and ”Channel up” at the same time.
You can also use this RC for multi RC. More details can be found in the ‘Professional settings’ chapter. You can program this RC by pressing 2 buttons at the same time for 5 seconds.
- 12 -

Below you can find a table how to match the TV settings and the settings as they can be used in the guest RC for RC6:
Mode: Buttons combination:
Blue (default) “Home” and “Volume down”
Yellow “Home” and “Channel down”
Red “Back” and “Volume down”
Green “Back” and “Channel down”
0“Home” and “Clock”
1“Home” and “Subtitle”
2“Home” and “Arrow up”
3“Home” and “TV”
4“Home” and “Arrow left”
5“Home” and “OK”
6“Home” and “Arrow right”
7“Home” and “Back”
8“Home” and “Arrow down”
9“Home” and “Mute”
Below you can find a table how to match the TV settings and the settings as they can be used in the guest RC for RC5:
Mode: Buttons combination:
Blue (default) “Home” and “Volume down”
Yellow “Home” and “Channel down”
Red “Back” and “Volume down”
Green “Back” and “Channel down”
Also note that for the easy RC the multi RC setting is stored permanently, so it will remember the setting even if the batteries are removed from the RC.
2.2 Professional Settings menu
To access the [Professional Settings] menu you have 2 possibilities:
Using the master remote control (green), press the “RC 6 setup” key and then press the “Setup-icon” button:
Using the guest remote control, press the following keys sequentially: “3 1 9 7 5 3 mute” or
“mute left right up down ok”
Note: The sequence: “3 1 9 7 5 3 mute” will not show the [Professional Settings] if [High Security] option is enabled, it will only work using the ‘master RC’
- 13 -
2.3 Software upgrade
For the best guest experience, it is highly recommended to use the latest software version available. Go to: http://www.philips.com/support/
Select your country, enter the model number and download the latest software version available
Unzip the software and follow the instructions how to upgrade the software on the TV
The USB flash drive used for software upgrade must be formatted as FAT32 and preferably empty to avoid an accidental upload of a wrong setting or software
Preparation:
oCopy the software (Autorun.upg) on the root of the USB stick (FA32 formatted) and do not change the name
Procedure:
oStart up the TV and wait until it is fully booted up, should take a max of 2min
o Insert the USB stick
o A wizard will automatically appear and start the upgrade to the new SW
o Wait until the process finishes and do not unplug the power cord
oAfter around 2min the update will be done and the USB stick can be extracted
It’s required to first upgrade the TV and afterwards to perform the installation
The latest software version and cloning data can be stored on the same USB drive for a 2 in 1 action: software upgrade and cloning during the instant initial cloning. See chapter ‘Instant Initial Cloning (IIC)’ for more information.
- 14 -
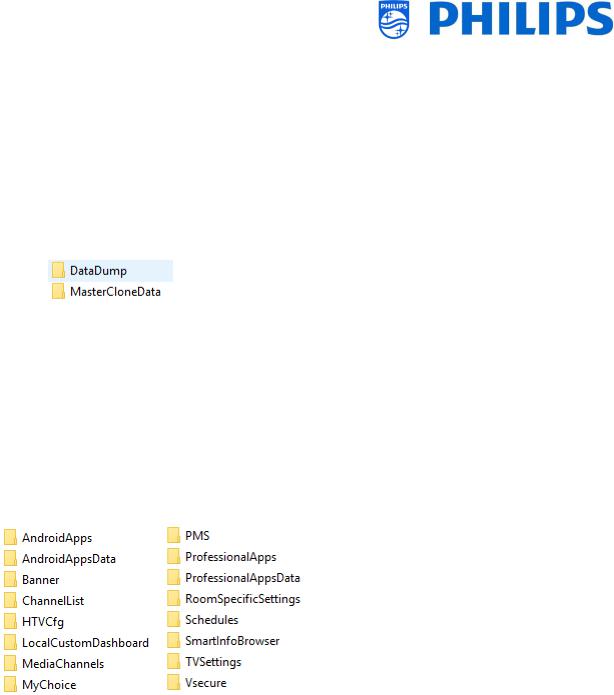
2.4 Clone folder structure
Below you can find the menu structure of a clone file. The content of this will be the same between xxHFL5014 and xxHFL6014 TV’s.
This also means that you can clone the data from xxHFL5014 in xxHFL6014 and vice versa without having to change the folder name.
Following is the folder name used in the root of the USB device containing the clone data:
TPM181HE_CloneData/MasterCloneData/
In the folder ‘TPM181HE_CloneData’, there can be multiple folders (so not only ‘MasterCloneData’):
The MasterCloneData is the main master clone file containing all clone data.
The DataDump contains information for debugging in case of reported problems. It also contains the CSM.txt file containing all details about the TV.
You can also have a folder called “xxxxxCloneData” where xxxxx is the 5 digits of the room number. If the room number matched the roomID set in TV, the TV will used this clone file to program the TV when cloning from USB to TV.
It is advised to use CMND or the TV menu to make changes to the MasterCloneData and not to do this manually.
Just for your information, the menu structure inside the MasterCloneData folder is as follows (some of the folders might not be seen depending on your settings):
If you want to clone some specific part in your TV you can do so by only putting the specific folder in the MasterCloneData folder before cloning it in the TV.
Note: The folder names are case sensitive
- 15 -
3. Find out the state of the TV
It is important to know if a TV is in Virgin mode (out of the box) or installed before. When installing a newly bought TV, it will be in virgin mode.
3.1 Virgin mode
If you can see below screen, you know that the TV is in ‘out of the box’ state and you can install the set by using procedure described in chapter ‘Virgin installation wizard’ of this manual.
3.2 Professional Mode ON/OFF
If your set is not in virgin mode, you can check if the professional settings are ON or OFF. This can be done by going to the professional menu and navigate to [Advanced] [Professional Mode] and turn this option back to [On] in case it would be [Off]. You will need to do a virgin installation after you have enabled Professional Mode by reinstalling the TV.
This TV is only to be used having professional mode set to [On], you are able to turn it [Off] in case your TV is out of warranty and you still want to use it as a consumer TV.
Note: no support will be given in case of [Professional Mode] = [Off].
3.3 CSM (Customer Service Menu)
The CSM contains data about the TV software, serial number and other details. The menu can be accessed using a standard remote control or using the master remote control.
Using a RC with digits: “1 2 3 6 5 4”
Using the guest RC: “Mute Right Left Down Up OK”
Using the master RC “Recall/Info” or “Info/CSM” depending on the model
-16 -
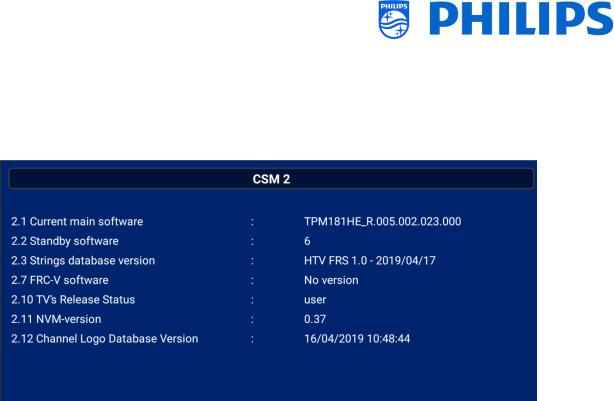
Note: When you enter the CSM menu using the key code a text file (CMS.txt) will be written to your USB memory device if it’s connected to your TV in order to have a copy of the CSM data.
You can navigate between the 9 CMS pages using “Up/Down”.
- 17 -
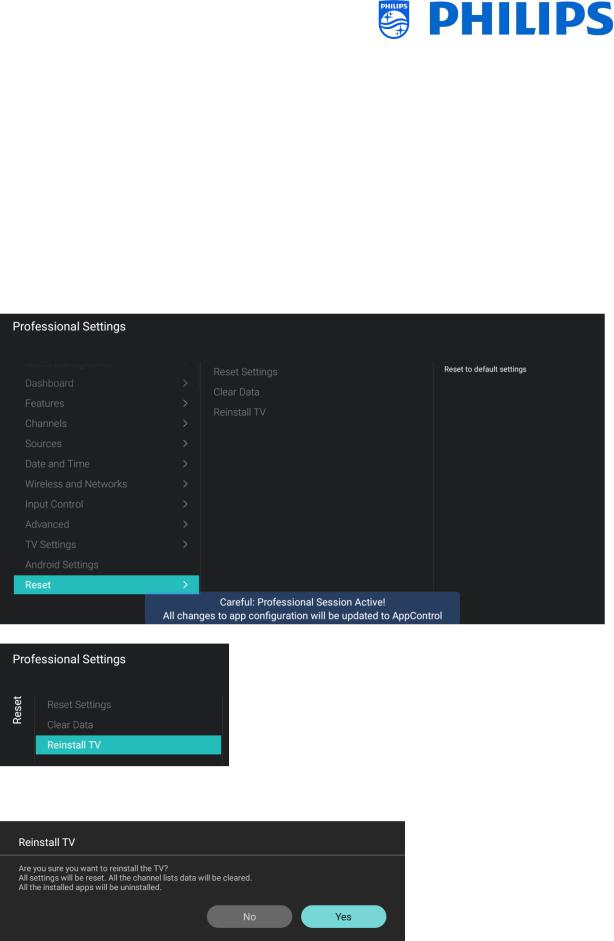
4. Reinstall TV
4.1 Reinstall the TV manually
If you want to start an installation from scratch you can always reinstall the TV. All settings will be reset to the default values and channel list will be cleared.
Note: Some settings like webservice url, roomID, manual date and time, professional mode, professional menu pin lock and logging url will not be reset, If you want these settings to be changed you will need to do this after the reinstallation has finished.
Open the [Professional Settings] menu.
Navigate to the [Reset] menu. Navigate to the [Reinstall TV] menu.
Press the “OK” button on the [Reinstall TV] menu, you should get below screen.
Note: Depending on your country and settings, a PIN code can be requested.
- 18 -

Select [Yes] and press the “OK” button to reinstall the TV. You will see that the TV will apply a reset and restart into IIC mode.
4.2 Reinstall via a script in the clone file
To automatically reinstall the TV, load a new clone file and load new SW you can use this script.
In the ‘MasterCloneData’ folder you can add a folder called ‘Script’. In this folder you have to put a script called ‘Script.xml’.
This xml file has as content below:
<?xml version='1.0' encoding='UTF-8' ?> <Script>
<SchemaVersion MajorVerNo="1" MinorVerNo="0" /> <Activity>
<Action>ReinstallTV</Action> </Activity>
</Script>
If you have this file in the correct location and you Clone USB to TV then in the beginning of the cloning process the TV will give a notification ‘Reinstall TV’ and the TV will be reinstalled.
After the reinstallation the TV will be in IIC mode, if you have new SW on the USB device the TV will be upgraded, after this the new clone file will be loaded to the TV.
- 19 -
5. Virgin installation wizard
Out of the box a new TV will be in virgin mode. This means that you will have to go through the virgin installation wizard to apply the first settings of the TV.
You might need to wake up the TV from standby.
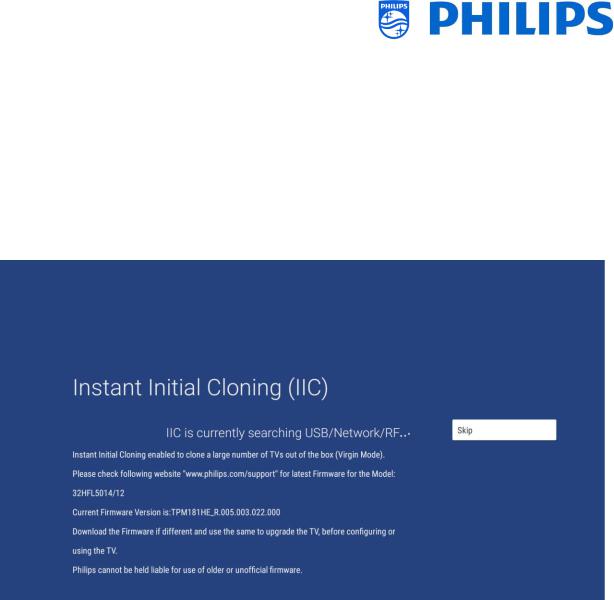
5.1 Instant Initial Cloning (IIC)
5.1.1Virgin installation
When starting up the TV in virgin mode you will see the first screen indicating Instant Initial Cloning (IIC). The TV is now searching on USB, Network and RF for a new clone file containing all new settings for the TV and/or a new software update.
You can also see the model name and SW version of the TV.
If there is no need to load a clone file in this TV (for example if you want to make a new installation to create a master clone file) then you need to press “OK” to activate the skip button.
5.1.2Instant initial cloning and software upgrade
If you want to upgrade the TV software and load a new clone file in the TV via USB you have to do following steps:
Disconnect the TV from the mains power
Insert a USB device with both the new SW (See chapter “Software upgrade”) and the clone file you want to load in the TV
You must see following 2 files in the root of your USB device (remove all other files and folders)
Note: Both folder name and the upg file are case sensitive. If multiple clone files are on a USB device, the “MasterCloneData” will be used for cloning
Connect the mains power to the TV
Wake up the TV from STBY if required
-20 -

The TV will automatically detect the new SW version and the clone file and upgrade both
During this process you will see following (no user interaction needed):
o Detection of the Software and Clone file
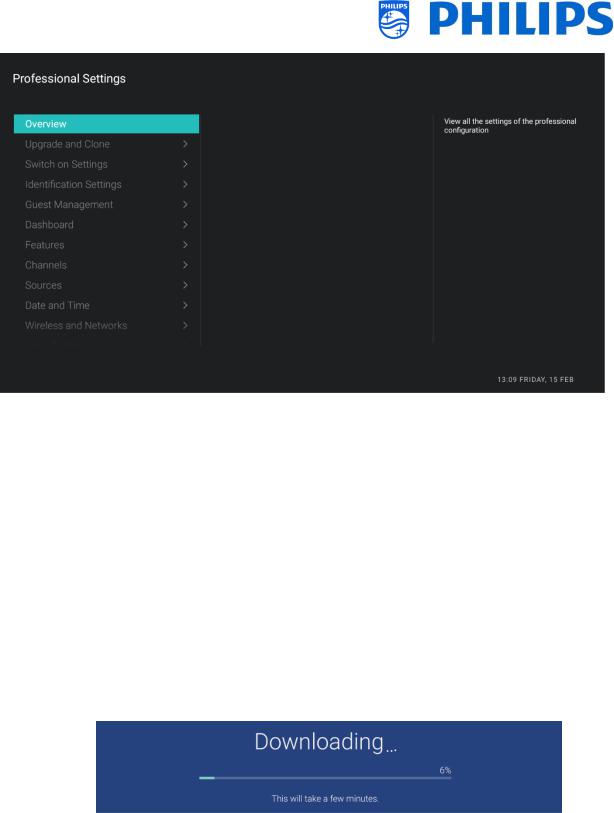
o Downloading the SW from USB to TV will start
oAfter the downloading phase, you will see that the SW upgrade will start. During this process, you will see that android is installing the system update and some other waiting animations.
The SW upgrade can take several minutes.
- 21 -
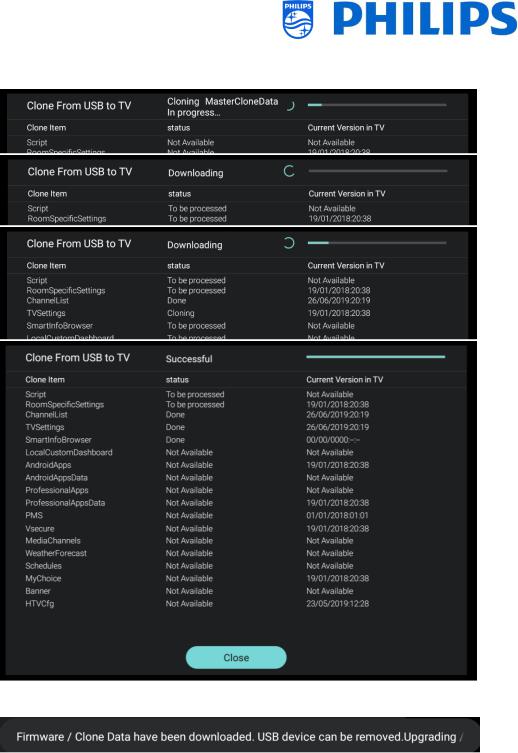
oAfter the software upgrade, the TV will reboot and will go again to the cloning screen where the clone file from the USB stick will be loaded in TV
Note: First you will see “Downloading”; once downloaded you will see a message that you can remove the USB stick:
oIf you don’t press “OK” once processing is done, the TV will go to standby after 30 minutes. You can press “OK” to close the overview screen, the installation is done and you can start using the TV.
If a clone file and/or software is sent out over IP or RF the same process will happen automatically.
- 22 -
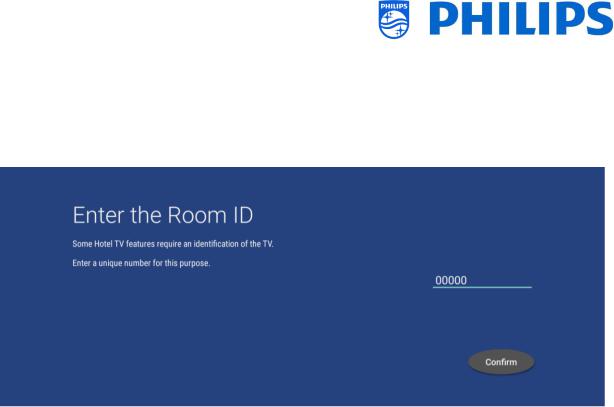
5.2 Settings during virgin installation
When you skip the IIC screen, you will be able to set the room ID. Once set, you will have finished the virgin installation and the professional menu will open allowing you to start creating your master clone file.
- 23 -
6. Professional Settings
6.1 General information
In this chapter, you can find information about all professional settings that can be changed. To start you have to open the [Professional Settings] menu. Using the guest remote control, press the following keys sequentially: “3 1 9 7 5 3 mute” or “mute left right up down ok”.
6.1.1Store settings in the Professional Settings menu
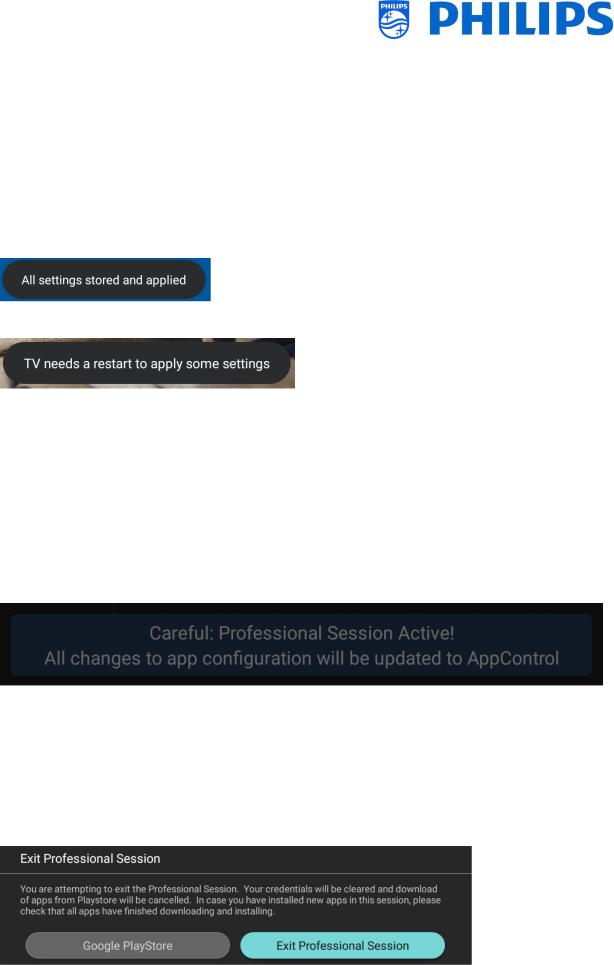
When you exit the professional menu, you will see a message that all your settings are stored and applied. There is no need to reboot the TV.
If a reboot is needed you will see below message. You need to perform a reboot to see the behavior after changing the settings.
6.1.2Professional session
This professional session is a session where the Professionals such as SI or Owner of the Device, can make changes persistent (to TV or Server depending on features and functions).
When you enter the professional menu a “Professional Session” will be active. As long as this session is active, you will see below notification onscreen.
Professional Apps may have professional settings, which can only be accessed via the professional menu. Once the professional app is launched via the professional menu, you can see through this message if you are in professional or guest mode, the below message is displayed. The settings will only be stored if you are in a professional session.
If you do not see this session message, it means you are in Guest mode and all changes done will be reset/cleared/deleted after the TV is put in standby or rebooted.
6.1.3Exit Professional menu after installing apps
You will need to login to the Play Store with a valid google account to install apps (See more details in chapter ‘Manage Apps’). When you exit you will see the below message. You need to ensure downloads and updates are complete, or your installation may not be as expected.
You can check by going to the Play Store again or exit if you are sure all updates have been finished.
- 24 -

6.2 Overview
o Navigate to the [Overview] menu o Open this menu item
o You will get an overview screen with all the settings that are set in the TV, this overview can be used to see the settings without having to navigate to all menu’s separately
o Using the “arrow up/down” buttons you can go to the other overview pages
Note: No value can be changed in these screens
o Pressing “back” will exit this screen again
6.3 Upgrade and Clone
o Navigate to the [Upgrade and Clone] menu
o You will see the screen on the left
Note: Cloning and upgrading over IP or RF will happen automatically after the TV is in standby for 5 minutes if [Auto Upgrade and Clone] in the professional menu is set to [On]. The cloning over IP will happen depending on the polling frequency set in CMND. It can also take longer depending on some other settings
- 25 -
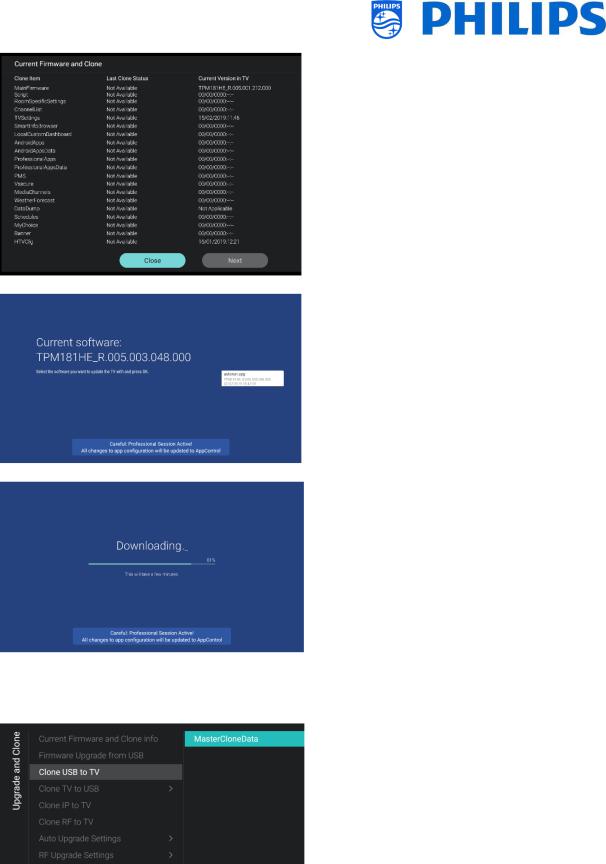
o Select the [Current Firmware and Clone
info] menu
oYou can see the SW version and the dates when the last cloning actions were done
oSelect [Next] and press “OK” to see the second page
o Select [Previous] and press “OK” to see the first page
oSelect [Close] and press “OK” to go back to the previous page
oSelect the [Firmware Upgrade from USB] menu and open it to go to the Software
Update Wizard
o If you are using an “autorun.upg” in the root of your USB the TV will automatically program the SW if it’s newer than the currently installed TV SW
oUsing the Software Update Wizard, you will be able to load new SW in the TV. You will see the “autorun.upg” if it’s on the USB, you will also see a list of SW versions that are available in the ‘upgrades’ folder in the root of the USB device connected to the TV if they are applicable for this
product
o Select the SW you want to install and press “OK”, you will see that the TV starts with the downloading from USB to TV
oOnce the downloading is done, you will see that TV is restarting and installing the system update. This can take several minutes. Once installing is complete, the TV will reboot
o Select the [Clone USB to TV] menu
oUsing this you will be able to clone from the USB device to the TV by selecting the [MasterCloneData] and press “OK” to start the cloning
Note: If you want to have multiple clone files on your USB key, you can add extra folders called “xxxxxCloneData” where xxxxx represent 5 digits in the same location where you see the
“MasterCloneData” and containing the same structure as in your
“MasterCloneData” folder
- 26 -
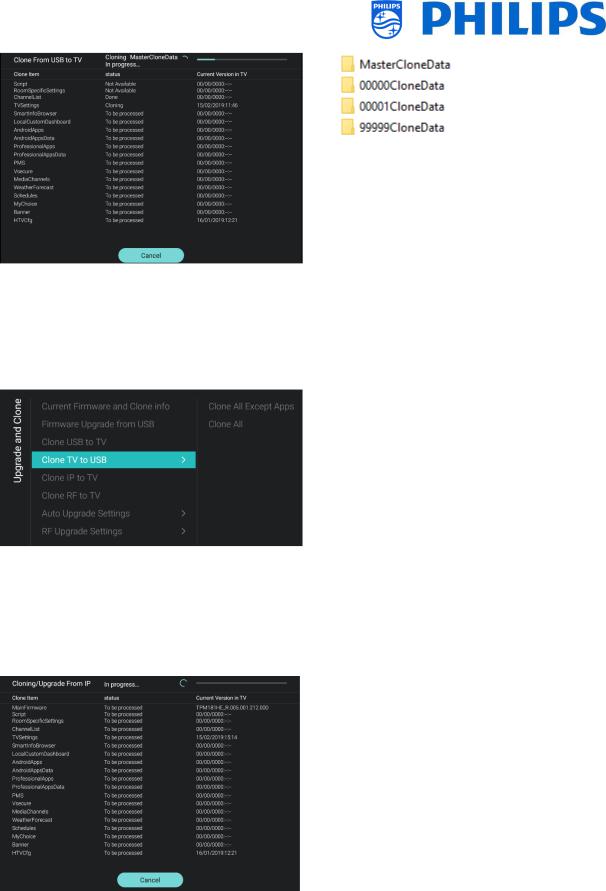
oOn the top of the page you will see a waiting animation while cloning is ongoing, once finished it will change to
Successful
oDuring the cloning process there will be a [Cancel] button available on the bottom of the page, press “OK” to cancel the cloning process
oOnce cloning is complete, [Cancel] will change to [Close], press “OK” to return
back to TV state
oIf no USB stick is inserted you will see USB not found on top of the page
o Select the [Clone TV to USB] menu
oUsing this you will be able to clone from the TV to the USB device
oThere are 2 submenus [Clone All except Apps] and [Clone All]
oWhen opening these menu’s you will have the same screen as shown when selecting the [Clone USB to TV] menu
o[Clone All except Apps] menu will clone everything except the Apps and channel
logos
o[Clone All] menu will clone everything but will take a bit longer
Note: Default channel logos are part of the SW and will not be cloned out
o Select the [Clone IP to TV] menu
o Using this you will be able to clone to the TV over IP, this happens automatically when a clone has been assigned to the TV in CMND. Via this menu you can manually force an upgrade to happen
oOn the top of the page you will see a waiting animation while cloning is
ongoing, once finished it will change to
Done
oDuring the cloning process there will be a [Cancel] button available, press “OK” to
cancel the cloning process
oOnce cloning is complete, [Cancel] will change to [Close], press “OK” to return back to TV state
- 27 -
Note: This menu is only accessible when [On] is selected in the [Wireless and Networks] [Control TV Over IP] [WebServices] [IPUpgradeService] menu
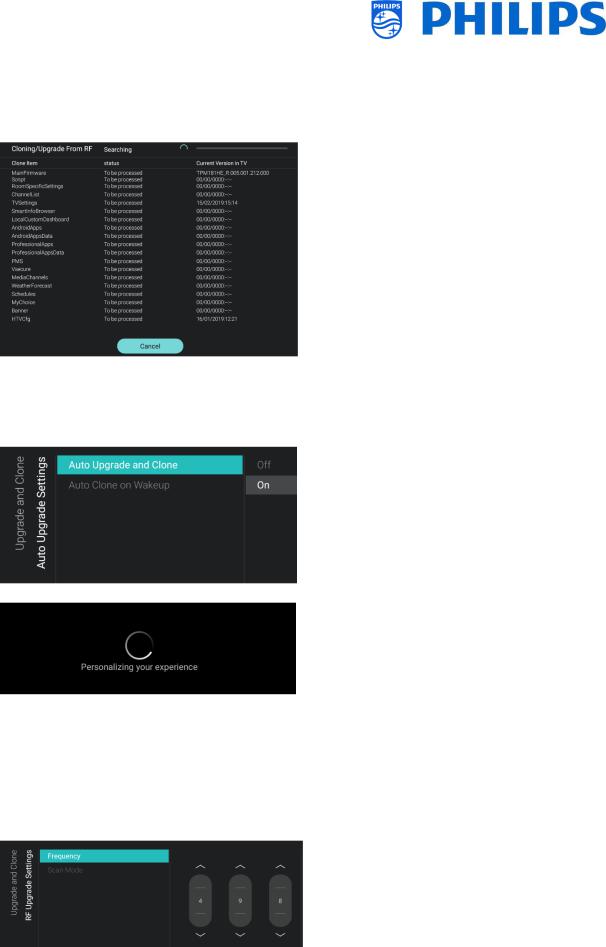
o Select the [Clone RF to TV] menu
o Using this you will be able to clone to the TV over RF, this happens automatically when a clone is being played out on RF by CMND. Via this menu you can manually force an upgrade to happen
oOn the top of the page you will see a waiting animation while cloning is ongoing, once finished it will change to
Done
oDuring the cloning process there will be a [Cancel] button available, press “OK” to
cancel the cloning process
oOnce cloning is complete, [Cancel] will change to [Close], press “OK” to return back to TV state
oNavigate to the [Auto Upgrade Settings] menu
oYou will see below items:
o [Auto Upgrade and Clone]: RF upgrade and Clone upgrade will be enabled automatically at 4 AM if the TV is in standby and 5 minutes after the TV is put in STBY if [On] is selected, no upgrade will happen if [Off] is selected
o [Auto Clone on Wakeup]: Nothing will happen when [Off] but when [On] the TV shall search for a new clone when waking up from standby. You will see a message “Personalizing your experience” when starting up the TV
Note: TVSettings, ChannelList, WeatherForecast, SmartInfoBrowser, MyChoise and PMS data will be cloned on wakeup. Depending on SW updates and feature updates this list might change overtime
o Navigate to the [RF Upgrade Settings] menu
oYou will see below items:
o [Frequency]: The frequency for CMND playout can be modified in this menu
Note: Default this should be set to 498 MHz. When an RF upgrade happens, the TV will first do a scan on the
- 28 -
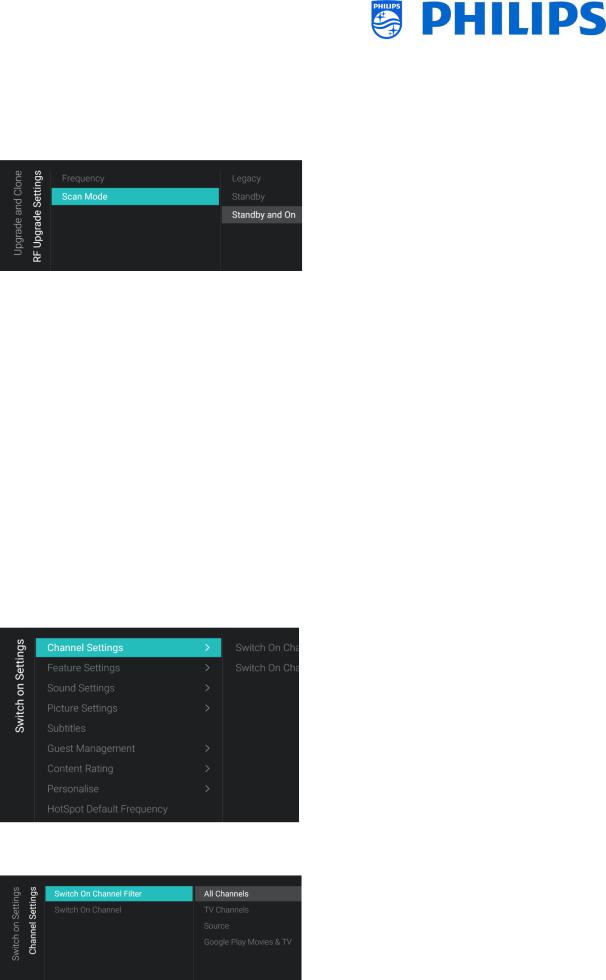
frequency set here. If nothing is found it will scan between 44 MHz and 887 MHz in steps of 8MHz. So if you do a playout on another frequency as set in the TV, the TV will do a fallback scan in order to find it
o [Scan Mode]:Define when the TV shall scan the RF stream for updates
When [Legacy] is selected, then the RF scan for upgrades will happen 5 minutes after the TV is set to STBY, 1PM and at 4AM when the TV is not in use.
When [Standby] is selected, the TV will scan continuously when the TV is in standby
When [Standby and On] is selected, the TV will scan continuously when the TV is in standby and also when in on state
Note: in order to set the [Scan Mode], the TV must be in [Fast] mode. In Green mode, the TV will always follow the [Legacy] scanning
Note: TV will stop the upgrade if TV would be woken up by the guest during the upgrade
6.4 Switch on settings
o Navigate to the [Switch On Settings] menu, you will see the screen on the left
o In this menu you will be able to set all Switch on settings, these are the menu items that a guest can change, the values you set here are the settings applied when the guest wakes up the TV
6.4.1Channel Settings
o Navigate to the [Channel Settings] [Switch On Channel Filter] menu
o You will see a list of channel filters, your selection will be the default selected channel filter when opening the channel list
- 29 -
Loading...