


Philips 47PFL9603, 47PFL9703, 42PFL9803, 37PFL9603, 52PFL9703 User Manual
...Register your product and get support at
www.philips.com/welcome
32PFL9603
32PFL9703
37PFL9603
42PFL9603
42PFL9703
42PFL9803
47PFL9603
47PFL9703
52PFL9703
EN LCD television IT Televisore LCD
________________________________ ________________________________
DE LCD-Fernsehgerät ES Televisor LCD
________________________________ ________________________________
FR Téléviseur LCD PT Televisor LCD
________________________________ ________________________________
NL LCD televisie EL TËÏÂfiÚ·Û˘ LCD
________________________________ ________________________________


Table of contents
1 Important 3
1.1Safety 3
1.2Care of the screen 3
1.3Recycling 3
2 Your TV 4
2.1Television overview 4
2.2Product highlights 5
3 Getting started 5
3.1Position the TV 5
3.2Wall mounting - VESA 6
3.3Remote control batteries 7
3.4Antenna cable 7
3.5Power cable 7
3.6First time installation 7
4 Use your TV 8
4.1Switch on or off - Standby 8
4.2Watch TV 9
4.3Watch channels from a digital receiver 9
4.4Watch connected devices 9
4.5Watch a DVD 10
4.6Select a Teletext page 10
4.7Change Ambilight mode 11
5 Use more of your TV 12
5.1Remote Control 12
5.2LightGuide brightness 15
5.3TV menus 15
5.4Picture and sound settings 16
5.5Ambilight 19
5.6Teletext 20
5.7Create favourite channel lists 21
5.8Electronic Programme Guide 22
5.9Timers and locks 24
5.10Subtitles 25
5.11Watch and play photos, MP3... 25
5.12Listen to digital radio channels 27
5.13Software update 28
6 Channel installation 30
6.1Automatic channel installation 30
6.2Manual channel installation 31
6.3Rearrange stored channels 32
6.4Channel management 32
6.5Digital reception test 33
6.6Factory settings 33
7 Connections (DVD, receiver, ...) 34
7.1 Connections overview 34
7.2About connections 35
7.3Connect your devices with the Connection assistant 36
7.4Connect your devices without the Connection assistant 36
7.5Connection setup 42
7.6Preparing for digital services 43
7.7PC network 44
8Technical data 50
9Troubleshooting 52
10Index 54
UK Digital TV switchover info 56
Remote control setup codes at the end of this book.
Register your product and get support at www.philips.com/welcome.
ENGLISH
Table of contents |
1 |

2008 © Koninklijke Philips Electronics N.V. All rights reserved. Specifications are subject to change without notice. Trademarks are the property of Koninklijke Philips Electronics N.V. or their respective owners.
Philips reserves the right to change products at any time without being obliged to adjust earlier supplies accordingly.
The material in this manual is believed adequate for the intended use of the system. If the product, or its individual modules or procedures, are used for purposes other than those specified herein, confirmation of their validity and suitability must be obtained. Philips warrants that the material itself does not infringe any United States patents. No further warranty is expressed or implied.
Warranty
No components are user-serviceable. Do not open or remove covers and do not insert objects in the ventilation slots or insert objects not suitable for the specific connectors. Repairs may only be done by Philips Service Centres and official repairshops. Failure to do so shall void any warranty, stated or implied.
Any operation expressly prohibited in this manual, any adjustments, or assembly procedures not recommended or authorised in this manual shall void the warranty.
Pixel characteristics
This LCD product has a high number of colour pixels. Although it has effective pixels of 99,999% or more, black dots or bright points of light (red, green or blue) may appear constantly on the screen.This is a structural property of the display (within common industry standards) and is not a malfunction.
Open source software
This television contains open source software. Philips hereby offers to deliver or make available, upon request, for a charge no more than the cost of physically performing source distribution, a complete machinereadable copy of the corresponding source code on a medium customarily used for software interchange.
This offer is valid for a period of 3
years after the date of purchase of this product.
To obtain the source code, write to Philips Innovative Applications N.V. Ass. to the Development Manager Pathoekeweg 11
B-8000 Brugge Belgium
Compliance with EMF
Koninklijke Philips Electronics N.V. manufactures and sells many products targeted at consumers, which, like any electronic apparatus, in general have the ability to emit and receive electromagnetic signals.
One of Philips’ leading Business Principles is to take all necessary health and safety measures for our products, to comply with all applicable legal requirements and to stay well within the EMF standards applicable at the time of producing the products. Philips is committed to develop, produce and market products that cause no adverse health effects. Philips confirms that if its products are handled properly for their intended use, they are safe to use according to scientific evidence available today. Philips plays an active role in the development of international EMF and safety standards, enabling Philips to anticipate further developments in standardisation for early integration in its products.
Mains fuse (UK only)
This TV is fitted with an approved moulded plug. Should it become necessary to replace the mains fuse, this must be replaced with a fuse of the same value as indicated on the plug (example 10A).
1.Remove fuse cover and fuse.
2.The replacement fuse must comply with BS 1362 and have the ASTA approval mark. If the fuse is lost, contact your dealer in order to verify the correct type.
3.Refit the fuse cover.
In order to maintain conformity to the EMC directive, the mains plug on this product must not be detached from the mains cord.
Copyrights
 VESA, FDMI and the VESA Mounting Compliant logo are trademarks of the Video Electronics Standards Association.
 Manufactured under license from Dolby Laboratories. ‘Dolby’, ‘Pro Logic’ and the double D symbol G, are trademarks of Dolby Laboratories.
 Manufactured under license from BBE Sound, Inc. Licensed by BBE, Inc under one or more of the following US patents: 5510752, 5736897. BBE and BBE symbol are registered trademarks of BBE Sound Inc.
Windows Media is either a registered trademark or trademark of Microsoft Corporation in the United States and/or other countries
® Kensington and MicroSaver are registered US trademarks of ACCO World Corporation with issued registrations and pending applications in other countries throughout the world.
DLNA®, the DLNA logo and DNLA Certified™ are trademarks, service marks, or certification marks of the Digital Living Network Alliance.
All other registered and unregistered trademarks are the property of their respective owners.
2

1 Important
Read this user manual before you start to use this product.
Pay attention to this section and closely follow the instructions. The warranty does not apply to damage caused by not taking into account the instructions.
1.1Safety
•To avoid short circuit, do not expose the product to rain or water.
•To avoid a risk of fire or electric shock do not place naked flame sources (e.g. lighted candles) close to the TV.
•Leave a space of at least 10cm (4 inches) all around the TV for ventilation.
•Keep away from radiators or other heat sources.
• Do not install the TV in a confined space such as a book case. Make sure that curtains, cupboards and so on cannot obstruct the air flow through the ventilation slots.
•To prevent damage, do not insert any object into the ventilation slots.
•Make sure the TV cannot fall down. Place the TV on a solid and flat surface and only use the stand provided with the TV.
•To prevent damaging the mains cord, do not place the TV, or anything else, on the cord. Damage the cord may cause a fire or electric shock.
•When mounted on a swivel stand or VESA wall bracket avoid force coming on the mains plugs. Mains plugs that are partly loosened can cause arcing or fire.
•Stationary images
Avoid stationary images as much as possible. If you cannot, reduce screen contrast and brightness to prevent damage to the screen. Stationary images are images that remain on the screen for a long time. Examples of stationary images are: on screen menus, teletext pages, black bars, stock market information,TV channel logos, time displays, and so on.
1.3Recycling
•Take the packaging to your local recycling centre.
•Dispose old batteries safely according local regulations.
•This product is designed and manufactured for material recycling and re-use.
•Do not dispose this product with other household waste. Inform yourself or ask your dealer about local environmentally safe recycling and local regulations. Uncontrolled waste disposal harms the environment and human health.
(EEC 2002/96/EC)
ENGLISH
1.2Care of the screen
•Unplug the TV before cleaning.
•Clean the surface with a soft damp cloth. Do not apply any other substance (chemical or household cleaning agent). This may damage the screen.
•Do not touch, push or rub or strike the screen with anything hard as this may scratch, mar or damage the screen permanently.
•To avoid deformations and colour fading, wipe off water drops as soon as possible.
Important |
3 |
2 Your TV
This section gives you an overview of the controls and functions of this TV.
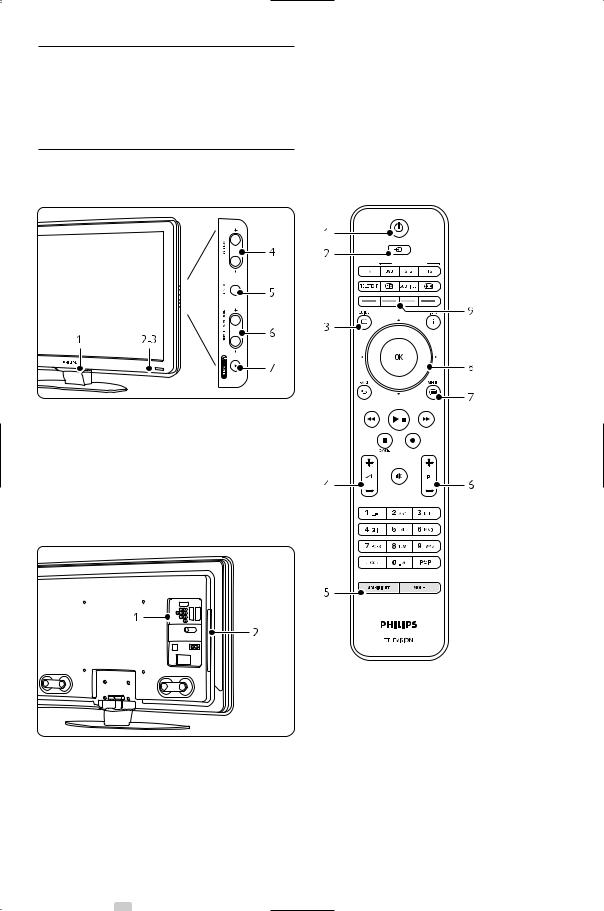
2.1Television overview
Controls
Remote control
SOURCE |
UNIVERSAL MODE |
DEMO
1 |
LightGuide |
2 |
Indicator light |
3 |
Remote control sensor |
4 |
Volume up and down |
5 |
Menu |
6 |
Program/Channel up and down |
7 |
Power switch |
Connectors
|
|
1 |
Switch On or switch to Standby |
|
|
2 |
Watch a connected device - DVD, VCR ... |
|
|
3 |
Programme guide |
|
|
4 |
Volume up + or down - |
|
|
5 |
Ambilight On or Off |
1 |
Back connectors |
6 |
Program/Channel up + and down - |
2 |
Side connectors |
7 |
Menu On or Off |
For more info see section 7 Connections. |
8 |
Navigation and Rotary key |
|
|
|
9 |
Colour keys |
For more info see section 5.1 Remote control overview.
4 |
Your TV |
2.2Product highlights
Your new TV is equipped with some of the most modern audio or video innovations.
Your TV offers the following advantages ...
Full High Definition LCD display
A full HD resolution of 1920x1080p, the highest resolution of HD sources. It offers a brilliant flickerfree progressive scan picture with optimum brightness and superb colours.
Ambilight
For a more relaxed viewing experience and improved perceived picture quality.
Perfect Pixel HD
Offers perfect picture quality from any source.
100Hz Clear LCD (if present)
100Hz Clear LCD gives a superior motion sharpness, better black level,high contrast with a flicker-free, quiet image and a larger viewing angle.
DVB-T and DVB-C integrated tuner
Next to normal analogue TV broadcast your TV receives digital terrestrial and in certain countries also digital cable TV and radio broadcasts.
Electronic Programme Guide - EPG
The EPG shows the scheduled digital TV programmes on screen. The guide can remind you when programmes start, switch the TV on, etc.
HDMI connectors
HDMI connectors for highest quality high definition connectivity.
USB connection / PC network connection
Multimedia connection for instantly view or play your photos or music.
Universal remote control
Your TV remote control is a universal remote control that can operate other devices such as DVD players and recorders, digital receivers (STB) or Home Theatre Systems (HTS) of Philips and many other brands.
MPEG4 broadcast (if available)
A higher quality videostandard offered by HD transmitted broadcasts.
3 Get started
This section helps you with the positioning and the first time installation of the TV.
3.1Position the TV
Carefully read the safety precautions in section 1.1 Safety before you position the TV.
•Large screen TVs are heavy. Carry and handle the TV with at least two persons.
•The ideal distance from which to watch TV is three times its diagonal screen size.
•Position the TV where light does not fall directly on the screen.
•Dim lighting conditions in the room for best Ambilight effect.
•Position the TV 10 to 20cm away from the wall for the best Ambilight effect.
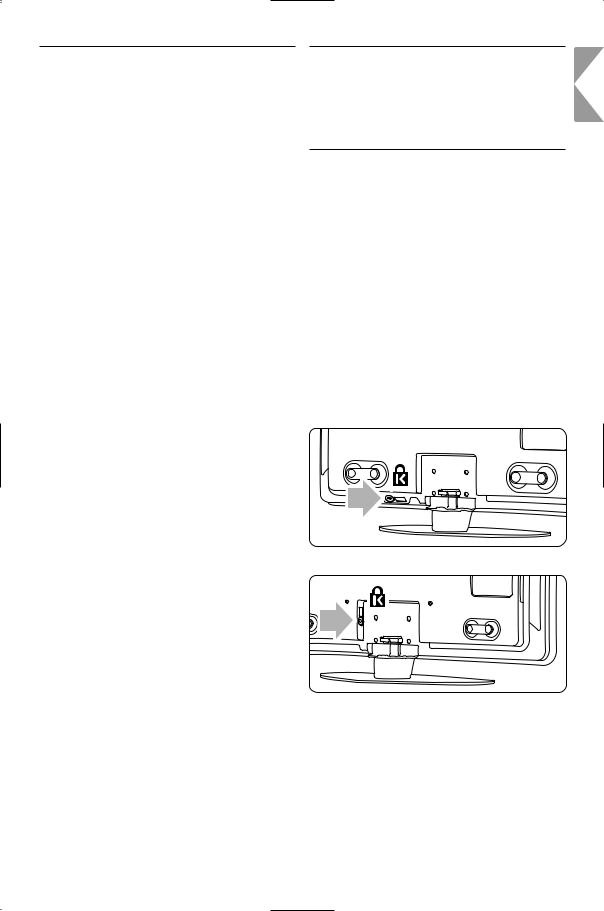
•Your TV is equipped with a Kensington Security Slot at the back of the TV for an anti-theft lock (not supplied).
On 32” and 37” TV models.
On 42”, 47” and 52” TV models.
ENGLISH
Your TV |
5 |

3.2Wall mounting - VESA
) Caution
Consider the TV’s weight when you wall mount it. Improper mounting can result in severe injury or damage. Koninklijke Philips Electronics N.V. bears no responsibility for improper mounting or mounting that results in accident or injury.
Your TV is prepared for VESA compliant wall mounting. This bracket is not included.
You need one of the VESA codes hereunder to purchase the bracket that fits your TV.
32” / 81cm VESA MIS-F 200, 200, 6 37” / 94cm VESA MIS-F 200, 200, 8 42” / 107cm VESA MIS-F 300, 300, 8 47” / 119cm VESA MIS-F 400, 400, 8 52” / 132cm VESA MIS-F 400, 400, 8
Ask your dealer for more info on stands and wallmount brackets.
The VESA fixation points
Locate the four fixation points at the back of the TV.
On a 32” / 81cm TV model.
On other TV screensizes.
Unmount the TV stand
‡Locate the four screws of the TV stand. The 32” / 81cm TV model has two screws.
On a 32” / 81cm TV model.
On other screensizes.
® Unscrew the screws.
Two screws on the 32” / 81cm TV model.
Four screws for other TV screensizes.
ÒLift the TV off the stand.
6 |
Your TV |

3.3Remote control batteries
‡Open the battery cover on the back of the remote control.
®Insert the 3 batteries supplied (Type AAA- LR03-1,5V). Make sure the + and - ends of the batteries line up correctly (inside of case is marked.)
ÒClose the cover.
rNote
Remove the batteries if not using the remote control for an extended period of time.
3.5Power cable
Keep the mains plug at the wall socket accessible at all time.
The TV is never powered off completely and consumes energy unless the mains cord is physically unplugged.
Although this TV has a very low standby power consumption, unplug the mains cord if you do not use the TV for a long time to save energy.
‡Verify that your mains voltage corresponds with the voltage printed on the sticker at the back of
the TV. Do not insert the mains cord if the voltage is different.
® Insert the mains cord tightly.
ENGLISH
3.4 Antenna cable |
On 32” and 37” TV models. |
‡Locate the antenna connection at the back of the TV.
® Insert the antenna cable tightly into the
Antenna x socket.
On 42”, 47” and 52” TV models.
On 42PFL9803,
Your TV |
7 |

4 Use your TV
4.1Turn on or off - Standby
Learn how to operate your TV for daily use.
rNote
The TV may take up to 15 seconds to turn on.
To turn on the TV:
•Press B Power at the right of the TV if the standby indicator is off.
•Press B on the remote control if the standby indicator is on.
The LightGuide flashes during start up and turns on completely when the TV is ready for use.
To switch to standby:
•Press B on the remote control.
The LightGuide turns off and the standby indicator is on.
To turn off:
•Press B Power at the side of the TV.
Both the LightGuide and the standby indicator turn off.
8 |
Use your TV |
4.2Watch TV
4.2.1 Switch channels
‡To switch TV channels:
•Press a number (1 to 999) or press P+ or P- on your remote control.
•Press Program/Channel - or + on the side controls of the TV.
®Press Rto return to the previously viewed TV channel or connected device.
4.3Watch channels from a digital receiver
‡Switch on the digital receiver.
The picture from your receiver automatically appears on the screen.
®Use the remote control of your digital receiver to select TV channels.
If the picture does not appear:
‡ Press the Source v key.
®Press o or œ to select where you connected your digital receiver.
ÒPress OK.
SOURCE
4.2.2 Adjust volume
‡To adjust the volume:
•Press V + or - on the remote control
•Press Volume + or - on the side controls of your TV.
®To mute the sound:
•Press ¬.
•Press ¬ again to restore the sound.
rNote
When you did not connect your devices yet, go to section 7 Connections.
4.4Watch connected devices
‡Switch on the device.
The picture from your device automatically appears on the screen.
If the picture does not appear: ® Press the Source v key.
ÒPress o or œ to select where you connected your device.
† Press OK.
rNote
When you did not connect your devices yet, go to section 7 Connections.
ENGLISH
Use your TV |
9 |

4.5 Watch a DVD |
4.6 Select a Teletext page |
‡ Switch on your DVD player.
® Insert a DVD disc in your player.
The DVD picture automatically appears on the screen.
ÒPress Play πon the DVD player.
If the picture does not appear:
‡ Press the Source v key.
®Press o or œ to select where you connected your DVD player.
ÒPress OK.
Wait a few seconds until the picture appears.
† Press Play π.
Most TV channels broadcast information through Teletext.
To watch Teletext:
‡Press Teletext.
The main index page appears.
®To select a page of your choice:
•Enter the page number with the number keys.
•Press P- or P+ or o or œ or the g key to view the next or the previous page.
•Press a colour key to select one of the colour coded items at the bottom of the screen.
•Press Rto return to the previously viewed page.
ÒPress Teletext again to switch Teletext off.
SOURCE
TELETEXT
rNote
Only for UK: some digital TV channels offer dedicated digital text services (for example BBC1).
For more information on teletext, see section 5.6
Teletext.
10 |
Use your TV |

4.7Change Ambilight mode
You can adjust the speed at which Ambilight responds to the on-screen images.
Adjust the Ambilight mode:
‡ Press Ambilight to switch on.
®Press Mode to adjust Ambilight between a relaxed and a dynamic setting.
The Mode settings are only available if Ambilight colour is set to Active mode in the Ambilight menu. When a fixed colour has been selected the Mode key has no function. See section 5.5 Ambilight.
LoungeLight mode (if available)
When the TV is in standby, you can switch Ambilight on.
‡ Press Ambilight. Wait until Ambilight lights up.
®Press Mode repeatedly to toggle through the available Ambilight effects.
For more information on Ambilight, see section 5.5 Ambilight.
à Tip
Dim lighting conditions in the room for best Ambilight effect.
ENGLISH
Use your TV |
11 |

5 Use more of your TV
This section helps you perform advanced TV operations including how to:
•use the menus
•adjust picture, sound and Ambilight settings
•make use of Teletext
•create favourite channel lists
•make advantage of Electronic Programme Guide
•set locks and timers
•set subtitles and select a subtitle language
•view your photos or play your favourite music from a USB memory device or from your PC or Home network.
5.1Remote control
5.1.1Remote control overview
DEMO |
1 Standby B
To switch the TV on or back to standby.
2Source v
•To switch the Source menu on or off.
•To select a connected device or to return to TV.
3TV
Sets the remote control in TV mode.
4Teletext
To switch teletext on or off.
5Colour keys
•Easy selection of teletext pages.
•Easy selection of tasks.
Demo
To switch the Demo menu on and to get a demonstration of the features of the TV.
6Guide a
To switch on or off the Electronic Programme Guide.
7Navigation and rotary key
To navigate (o, œ, p, π) or turn left or right to go through lists or settings.
8OK
•To display the channel list.
•To activate a setting.
9Back key g
To select the previous programme or the previous TXT page.
To remove the channel list.
10Audio and video keys Ò,π/º,†,‡,®
To operate a DVD player or recorder, Blu-ray Disc player or VCR.
Cancel (only for UK)
To cancel only Digital text or Interactive services.
11Volume V
To adjust the volume.
12Mute ¬
To mute the sound or restore it.
12 |
Use more of your TV |

13Number keys
To select a TV channel.
14Clock
To display the time on screen.
15Ambilight
To switch Ambilight on or off.
16Mode
To adjust the dynamic effect of Ambilight
17Previous channel R
To return to the previously viewed channel
18+P- Channel up or down
To switch to the next or previous channel in the channel list.
19Menu Ï
To switch the menu on or off
20On screen information i
To show channel or programme information if available.
21Dual screen b
To show teletext on the right and the picture on the left of the screen.
22Subtitle
To activate or deactivate the subtitle mode.
23Widescreen Picture format q
To select a picture format.
24DVD STB HTS
To control connected devices.
See section 10 Index to find the section in the manual about a specific remote control key.
5.1.2Universal remote control
Your TV remote control is a universal remote control that can operate other devices such as DVD players and recorders, digital receivers (Settop boxes – STB) or Home Theatre Systems (HTS) of Philips and many other brands.
‡Press DVD, STB or HTS to select a DVD, a cable receiver (STB) or a Home Theatre (HTS) device. The key blinks as long as you are in this control.
 UNIVERSAL MODE
®Use the relevant keys on the TV remote control to operate the device.
If the device does not react or operates incorrectly, you need to set up your remote control for your particular device.
See section 5.1.3 Set to operate a particular device.
ÒPress the TV key to return to normal TV mode. When no key is pressed for 30 seconds the remote control switches back to normal TV.
5.1.3 Set to operate a particular device
You can choose from three ways to programme the remote control for a device of a particular brand. You can:
-use the Universal remote control assistant to help you
-enter a brand's setup code or
-start an auto search.
rNote
Possibly the remote control is not compatible with all types of DVD, cable receivers and Home Theatre Systems.
Method 1: Use the Universal remote control assistant
‡ Turn on your device.
®Press the DVD, STB or HTS universal mode key for 4 seconds to select the universal mode you need or press Menu Ï and select Setup > Installation > Remote control assistant and press π to enter.
-DVD stands for DVD, DVD-R, HDD and Bluray Disc
-STB stands for digital receiver and set-top- boxes (cable, satellite)
-HTS for Home Theatre Systems, Audio/Video systems
The remote control is now in the selected programming mode. Follow the instructions on screen.
rNote
Ensure that the TV and the device are within reach of the remote control.
Method 2: Enter the setup code directly
Instead of using the Universal remote control assistant, you can also enter a setup code directly. Find a list of these codes per brand and device at the end of this manual.
‡Press the DVD, STB or HTS key and OK at the same time for 4 seconds to select the universal mode you need.
®Enter the three-number code for the type and brand of your device. Some brands have several setup codes available and you need to select the known one. You can try them one by one.
ENGLISH
Use more of your TV |
13 |

If you entered a known code, all universal mode keys will blink to confirm the selection. If you entered an unknown code, all universal mode keys will light up for 2 seconds. Repeat Step 2 with a different code.
ÒPoint the remote control at the device, and press B to test if the code is known for your device.
If successful try whether you can operate all functions. If not successful, or if you cannot operate all functions, repeat Step 1 and 2 with one of the other setup codes for your brand.
Method 3:Automatic search of all codes
If you are not successful to find the known brand or code, try an automatic search of all codes. The automatic search can take several minutes.
If after the automatic search no code is successful, it is not possible to operate your particular device with the remote control. In such case, use the device's own remote control.
‡Turn on the device you want the TV remote control to set up for.
®. Point the remote control to the device during the automatic search.
ÒTo select the universal mode you need, press the DVD, STB or HTS key and the OK key at the same time for 4 seconds.
The selected universal mode lights up
constantly.
†Press OK to start the automatic search. Every two seconds, when a new code is sent,
the B key will blink.
Keep pointing the remote control to the device.
ºWhen the device switches off, press OK to stop the search.
◊Press B to switch on your device.
‹Press the remote control keys to try if you can operate all functions. If you cannot operate all functions, press OK again to continue the automatic search for a correct code.
≈If you can operate all functions, press the currently selected universal mode key to confirm and to quit the automatic search.
rNote:
To pause the automatic search, press OK. Press o or œ to search for the codes one by one backward or forward to locate the known code for your device or press OK again to continue the automatic search.
5.1.4Keep the remote control in the chosen universal mode permanently
If you press the DVD, STB or HTS key the remote control can operate other devices. When no key is pressed for 30 seconds the remote control switches back to normal TV.
You can set the remote control to hold a universal mode as long as no other universal mode is pressed. This disables the 30 seconds switch back to normal TV.
‡ Press the TV key.
®Press OK and ¬ at the same time for 4 seconds. The B key lights up for 2 seconds.
From now on the remote control will not switch back to normal TV mode.
To return to the 30 seconds switch back to normal TV mode, follow the same steps 1 and 2.
5.1.5Device functions overview
When the remote control is set for a particular device all keys have the same function except the keys mentioned here.
•DVD player
Menu key = DVD Disc menu P+/- = DVD Next/Previous track
•DVD Recorder
Òkey = DVD-R previous track
†key = DVD-R next track
•DVD recorder with Hard Disc Drive Menu key = DVD-R HDD browser
Òkey = DVD-R HDD previous track
†key = DVD-R HDD next track
•Blu-ray Disc player
a key = BD Content menu Menu key = BD Disc menu
14 |
Use more of your TV |

• Digital or Satellite receiver |
5.3 |
TV menus |
No change of functions. |
|
|
• Home Theatre System |
With the on screen menus you install your TV, |
|
Menu key = HTS Disc menu |
adjust picture, sound and Ambilight settings and |
|
V key = HTS volume |
access features. This section gives an overview of |
|
P+/- = HTS Next/Previous |
the menus and describes how to navigate. |
|
5.1.6 Remote control setup codes |
5.3.1 |
The menu |
See the end of this manual. |
‡ Press Menu Ï to show the TV menu. |
|
|
® Press Menu Ï to quit the TV menu. |
|
ENGLISH
5.2LightGuide brightness
The LightGuide at the front of the TV indicates the start up of the TV.
After start up the LightGuide is lit constantly. You can set the light intensity or let it switch off after start up.
‡Press Menu Ï > Setup > Installation > Preferences > LightGuide brightness.
® Press π to enter the list.
ÒPress o or œ to select the brightness level from 0 (off) to 4.
The TV menu offers the following items:
•Smart settings
Select this item to set the TV to one of the predefined settings. Each setting combines picture, sound and Ambilight.
•Picture
Select this menu item to adjust all picture settings.
•Sound
Select this menu item to adjust all sound settings.
•Ambilight
Select this menu item to adjust all Ambilight settings.
•Settings assistant
Use the Settings assistant to guide you through basic picture, sound and Ambilight settings in an easy way.
•Features
Select this item for other feature settings.
•Setup
Select this item
- for installation and to update the TV software;
-to make use of the Remote control assistant which will help you to setup your remote control to operate other devices;
Use more of your TV |
15 |

- to use the connection assistant which will help |
◊Press o or œ to adjust the setting. |
you to connect your devices to the TV. |
‹Press p to return to the Picture settings or |
|
press Menu Ï to quit the TV menu. |
|
rNote: |
5.3.2 Use of the menu |
|
Learn to use the menus with this example. |
More choices come available when digital channels |
‡ Press Menu Ï. |
are installed and broadcasted. |
The TV menu appears on the screen. |
|
® Press o or œ to select Picture. ÒPress π to enter the picture settings.
Contrast 90
Brightness 47
52
0
4
Noise reduction
† Press œ to select Brightness.
98
Brightness 47
52
0
4
Noise reduction
º Press π to enter the brightness setting.
5.4Picture and Sound settings
The first time you switched on the TV you have selected your preferred settings for picture, sound and Ambilight. The following sections describe how to modify or read just those settings.
5.4.1Smart settings
Sets the TV to one of the predefined settings. Each setting combines picture, sound and Ambilight.
‡ Press Menu Ï and select Smart settings.
® Press π to enter the list.
ÒPress o or œ to select a setting.
† Press OK.
º Press Menu Ï to quit the TV menu. Smart settings: Personal, Vivid, Standard, Movie, Energy saving, Game.
5.4.2Settings assistant
Use the Settings assistant to guide you through basic picture and sound settings in an easy way.
‡Press Menu Ï, select Follow the instructions on screen.
® Select Settings assistant and press π to enter. ÒPress the green key to start the assistant.
†Press p or π to select the left or right side to make your choice.
ºWhen finished, press the green key to store all your settings.
16 |
Use more of your TV |

5.4.3Picture settings
This section describes how to adjust all picture settings individually.
‡ Press Menu Ï.
® Select Picture and press π to enter the list. ÒPress o or œ to select a setting.
TV menu
Smart settings
Picture
Sound
Ambilight
Features
Setup
Active 
Light sensor
Picture format
Auto format mode
•Contrast
Changes the level of bright parts in the picture but keeps the dark parts unchanged.
•Brightness
Changes the level of light of the total picture.
•Colour
Changes the level of saturation.
•Hue
If NTSC is broadcasted, this level compensates the colour variations.
•Sharpness
Changes the level of sharpness of fine details.
•Noise reduction
Filters out and reduces the noise in the picture. Set the level to Minimum, Medium, Maximum or Off.
•Tint
Sets the colours to Normal, Warm (reddish) or Cool (bluish). Select Custom to make a setting of your own in the Custom menu.
•Custom
Press the green key to select each bar to change the value of:
-R-WP red whitepoint
-G-WP green whitepoint
-B-WP blue whitepoint
-R-BL red blacklevel
-G-BL green blacklevel
•Perfect Pixel HD
Controls the advanced settings of the Perfect Pixel HD Engine, resulting in best sharpness, contrast, colour and motion.
Perfect Pixel HD
-HD Natural Motion
Removes motion judder and reproduces smooth movement especially in movies.
-100 Hz Clear LCD (if present)
Gives a superior motion sharpness, better black level, high contrast with a flicker-free, quiet image and a larger viewing angle.
-Advanced sharpness
Enables superior sharpness, especially on lines and contours in the picture.
-Dynamic contrast
Sets the level at which the TV automatically enhances the details in dark, middle and light areas of the picture.
-Dynamic backlight
Sets the level at which power consumption can be reduced by dimming the brightness intensity of the screen.
Choose for the best power consumption or for the picture with the best brightness intensity.
-MPEG artefact reduction
Smooths the digital transitions in the picture.
-Colour enhancement
Makes the colours more vivid and improves the resolution of details in bright colours
•Active control
Corrects all incoming signals in order to provide the best picture possible.
Switches Active control on or off.
•Light sensor
Adjusts the picture and Ambilight settings on the lighting conditions of the room. Switches Light sensor on or off.
•Picture format / Auto format mode
See section 5.4.4 Widescreen picture format.
ENGLISH
Use more of your TV |
17 |

5.4.4 Widescreen picture format
Avoid black bars on the sides or on top and bottom of the picture. Change the picture format to a format that fills the screen.
‡Press q to switch on the Picture format menu.
® Press o or œ to select an available picture format.
ÒPress OK.
†Press o to shift the picture upwards if subtitles are hidden.
à Tip
For minimal distortion, select the Auto format setting.
•Auto format (Not for PC.)
Enlarges the picture automatically to fill the screen. Subtitles remain visible. You can set Auto
format in two different modes.
‡ In the TV menu, select Picture > Auto format mode.
® Select Auto-fill to fill the screen as much as possible. Select Autozoom to keep the original picture format but black
bars may be visible.
•Movie expand 16:9
(Not for HD.)
Scales the format to 16:9.
• Wide screen
Stretches the format to 16:9.
• Unscaled
(Only for HD and PC.) Maximum sharpness. Distortion may appear on borders. Black bars may appear with pictures from your PC.
rNote
Do not forget to name the connection in the Connection menu. See section 7.5.1 Naming your devices.
5.4.5Sound settings
This section describes how to adjust all sound settings.
‡ Press Menu Ï and select Sound. ® Press π to enter the list.
ÒPress o or œ to select a setting.
•Super zoom (Not for HD.) Removes the black bars on the side of 4:3 broadcasts. There is a minimal distortion.
•4:3 (Not for HD.) Shows the classical 4:3 format.
•Movie expand 14:9
(Not for HD.)
Scales the format to 14:9.
Surround mode
Headphone volume
Auto volume level...
Delta volume
Auto surround
•Equalizer
Changes the bass and treble of the sound. Select each bar to change the setting.
•Volume
Changes the volume. When adjusting the volume with V a volume bar appears. If you do not want it to appear go to Menu > Setup > Installation > Preferences and press π to enter the list and select Volume bar off.
18 |
Use more of your TV |
•Volume – Visually impaired (UK only) Changes the volume of the selected Visually
impaired audio language in the Setup, Installation menu. See section 6.1 Automatic installation.
•Balance
Sets the balance of the left and right loudspeakers to fit best your listening position.
•Audio language
A list of audio languages for the current programme may be available when digital channels are installed and broadcasted.
To permanently change the audio language, see section 6 Channel installation.
•Dual I/II
If broadcasted, you can choose between two different languages.
•Mono/stereo
If stereo broadcasting is available, you can select Mono or Stereo per TV channel.
•TV speakers
If you have connected an audio system to your TV, you can switch off the TV speakers.
If your audio system supports Easylink, see section 7.2.2 Easylink.
Select Automatic to have the sound from your TV automatically reproduced by your audio system.
•Surround mode
To select a more spatial sound if broadcasted or if available from a connected device.
•Headphone volume
Changes the volume of the headphone.
You can mute the TV speakers with ¬ on the remote control.
•Auto volume levelling
Reduces sudden volume differences like at the beginning of commercials or when switching from one channel to another.
Select on or off.
•Delta volume
Levels out volume differences between channels
or connected devices.
‡ Switch to the channel or device you want to level out the volume difference.
®Select Delta volume in the Sound menu and change the volume level.
•Auto surround
Switches the TV automatically to the best surround sound mode dependant on the broadcast.
Select on or off.
5.5Ambilight
You can adjust Ambilight settings.
‡ Press Menu Ï and select Ambilight. ® Press π to enter the list.
ÒPress o or œ to select a setting.
•Ambilight
Switches Ambilight on or off.
•Active mode
Adjusts the speed at which Ambilight responds to the on-screen images..
Only available when Active mode has been selected in the Ambilight colour menu. Relaxed sets Ambilight to change soft and smoothly with the images on screen. Dynamic sets Ambilight to change quick and responsive.
•Brightness
Changes the light output of Ambilight.
•Colour
Sets the Ambilight colour to either dynamic behaviour (Active mode) or one of the predefined Ambilight fixed colours. Custom allows fine tuning of a fixed colour.
•Separation
Sets the difference in colour level between the Ambilights at the sides of the TV.
Separation off gives a dynamic but uniform colour Ambilight.
ç Caution
To avoid bad infrared remote control reception, place your devices out of sight of Ambilight.
ENGLISH
Use more of your TV |
19 |
 Loading...