


 Loading...
Programming Manual
Voice Processing System
Model No. KX-TVA50
KX-TVA200
Thank you for purchasing a Panasonic Voice Processing System.
Please read this manual carefully before using this product and save this manual for future use.
KX-TVA50/KX-TVA200: Version 3.0 (Main Software Version 3.11 or later)
Document Version 3.0 2011/10

Introduction
Introduction
About this Manual
This Programming Manual is designed to serve as an overall reference for programming the Panasonic Voice Processing System using KX-TVA Maintenance Console. It explains how to use KX-TVA Maintenance Console, and obtain the most out of system administration.
This manual is divided into the following sections:
Section 1 Programming Instructions
Describes how to install, start, and operate KX-TVA Maintenance Console.
Section 2 KX-TVA Maintenance Console Operating Instructions
Describes in detail each parameter that can be programmed using KX-TVA Maintenance Console.
Index
An alphabetical listing of features and terms, as well as the page numbers of related sections.
About the Other Manuals
Installation Manual
The Voice Processing System Installation Manual provides instructions for installing the VPS hardware, configuring the connected PBX for use with the VPS, and getting started with the KX-TVA Maintenance Console software. Relevant sections from the Installation Manual are listed throughout this manual for your reference.
Feature Manual
The Voice Processing System Feature Manual is an overall reference describing VPS features. It explains what the VPS can do, and how to obtain the most of its many features. Sections from the Feature Manual are listed throughout this manual for your reference.
Manager’s Manual
The Voice Processing System Manager’s Manual describes the programming and maintenance features available to the System Manager and Message Manager. Relevant sections from the Manager’s Manual are listed throughout this manual for your reference.
Subscriber’s Manual
The Voice Processing System Subscriber’s Manual describes how subscribers can access commonly used VPS features and functions with their extensions and mailboxes. Relevant sections from the Subscriber’s Manual are listed throughout this manual for your reference.
Glossary
The Voice Processing System Glossary is an alphabetical listing of features, terms, and abbreviations, as well as their definitions.
Note
•This manual may refer to products not available in your country/area.
•For KX-TD500, KX-TDE series, KX-TDA series, and KX-TAW series PBXs, the term "trunk (CO line)" used in this manual indicates a trunk (CO line) group.
2 |
Programming Manual |
Document Version 3.0 2011/10 |
|
|
|

Introduction
Trademarks
•Microsoft, Windows, and Windows Vista are either registered trademarks or trademarks of Microsoft Corporation in the United States and/or other countries.
•Intel and Pentium are trademarks of Intel Corporation in the United States and other countries.
•All other trademarks identified herein are the property of their respective owners.
•Microsoft product screen shot(s) reprinted with permission from Microsoft Corporation.
Document Version 3.0 2011/10 |
Programming Manual |
3 |
|
|
|

Table of Contents
Table of Contents |
|
|
1 Programming Instructions ...................................................................... |
7 |
|
1.1 |
Introduction to System Administration ........................................................................... |
8 |
1.2 |
KX-TVA Maintenance Console Installation ..................................................................... |
9 |
1.3 |
Starting KX-TVA Maintenance Console ........................................................................ |
11 |
1.4 |
File .................................................................................................................................... |
15 |
1.4.1 |
File—New ....................................................................................................................... |
15 |
1.4.2 |
File—Open... .................................................................................................................. |
15 |
1.4.3 |
File—Close ..................................................................................................................... |
15 |
1.4.4 |
File—Save ...................................................................................................................... |
16 |
1.4.5 |
File—Save As... .............................................................................................................. |
16 |
1.4.6 |
File—Exit ........................................................................................................................ |
16 |
1.5 |
Connect ............................................................................................................................ |
17 |
1.5.1 |
Connect—Connection Profile ......................................................................................... |
17 |
1.5.2 |
Connect—LAN (TCP/IP) (Optional for KX-TVA50) ........................................................ |
17 |
1.5.3 |
Connect—USB ............................................................................................................... |
17 |
1.5.4 |
Connect—Dial-up (Modem) (Optional) ........................................................................... |
17 |
1.5.5 |
Connect—Disconnect ..................................................................................................... |
18 |
1.6 |
Edit ................................................................................................................................... |
19 |
1.6.1 |
Edit—Undo ..................................................................................................................... |
19 |
1.6.2 |
Edit—Cut ........................................................................................................................ |
19 |
1.6.3 |
Edit—Copy ..................................................................................................................... |
19 |
1.6.4 |
Edit—Paste .................................................................................................................... |
19 |
1.6.5 |
Edit—Select All ............................................................................................................... |
19 |
1.6.6 |
Edit—Delete ................................................................................................................... |
20 |
1.7 |
View .................................................................................................................................. |
21 |
1.7.1 |
View—Toolbar ................................................................................................................ |
21 |
1.7.2 |
View—Status Bar ........................................................................................................... |
21 |
1.7.3 |
View—Shortcut Bar ........................................................................................................ |
21 |
1.7.4 |
View—Utility Bar ............................................................................................................. |
21 |
1.7.5 |
View—Menu Bar ............................................................................................................ |
21 |
1.8 |
Go To ................................................................................................................................ |
23 |
1.8.1 |
Go To—Mailbox Settings ............................................................................................... |
23 |
1.8.2 |
Go To—Class Of Service ............................................................................................... |
23 |
1.8.3 |
Go To—PORT/TRUNK Service ..................................................................................... |
23 |
1.8.4 |
Go To—Service Settings ................................................................................................ |
23 |
1.8.5 |
Go To—System Parameters .......................................................................................... |
23 |
1.8.6 |
Go To—H/W Settings ..................................................................................................... |
24 |
1.8.7 |
Go To—Reports ............................................................................................................. |
24 |
1.8.8 |
Go To—System Security ................................................................................................ |
24 |
1.9 |
Utility ................................................................................................................................ |
25 |
1.9.1 |
Utility—Quick Setup ....................................................................................................... |
25 |
1.9.2 |
Utility—System Back Up ................................................................................................ |
26 |
1.9.3 |
Utility—System Prompts Customization ......................................................................... |
28 |
1.9.4 |
Utility—Port Status ......................................................................................................... |
30 |
1.9.5 |
Utility—System Trace ..................................................................................................... |
30 |
1.9.6 |
Utility—System Maintenance ......................................................................................... |
31 |
1.9.7 |
Utility—System Initialize/Restart .................................................................................... |
32 |
1.9.8 |
Utility—Diagnostic .......................................................................................................... |
33 |
1.9.9 |
Utility—Programmer Code ............................................................................................. |
33 |
1.9.10 |
Utility—Screen Customize .............................................................................................. |
33 |
1.9.11 |
Utility—Commands ......................................................................................................... |
34 |
1.9.11.1 Changing the Mailbox No. Length Mode ..................................................................... |
34 |
|
4 |
Programming Manual |
Document Version 3.0 2011/10 |
|
|
|

|
|
Table of Contents |
1.9.11.2 |
Changing the Maximum Length of Mailbox Numbers .................................................. |
34 |
1.9.11.3 |
Two-way Recording Save Mode .................................................................................. |
35 |
1.9.12 |
Utility—Software Version ................................................................................................ |
35 |
1.9.13 |
Utility—LAN Settings ...................................................................................................... |
35 |
1.9.14 |
Utility—Default Parameters ............................................................................................ |
38 |
1.9.15 |
Utility—Profile Setup ...................................................................................................... |
38 |
2 KX-TVA Maintenance Console Operating Instructions ...................... |
41 |
|
2.1 |
Mailbox Settings .............................................................................................................. |
42 |
2.1.1 |
Mailbox Settings Screen ................................................................................................. |
42 |
2.1.2 |
Default Mailbox Template ............................................................................................... |
45 |
2.1.3 |
Mailbox Parameters ....................................................................................................... |
46 |
2.1.4 |
Notification Parameters .................................................................................................. |
54 |
2.1.4.1 |
Notification Schedule ................................................................................................... |
56 |
2.1.4.2 |
Device Notification Timer ............................................................................................. |
59 |
2.1.5 |
External Message Delivery ............................................................................................. |
62 |
2.1.6 |
Auto Forwarding ............................................................................................................. |
64 |
2.1.7 |
Personal Distribution List ................................................................................................ |
66 |
2.1.7.1 |
List No. 1–List No. 4 .................................................................................................... |
66 |
2.1.8 |
Personal Custom Service ............................................................................................... |
68 |
2.1.9 |
Remote Call FWD To CO ............................................................................................... |
71 |
2.1.10 |
Automatic Login .............................................................................................................. |
73 |
2.1.11 |
E-mail Option .................................................................................................................. |
76 |
2.2 |
Class of Service .............................................................................................................. |
79 |
2.2.1 |
Class of Service ............................................................................................................. |
80 |
2.2.2 |
Personal Options ............................................................................................................ |
85 |
2.3 |
PORT/TRUNK Service ..................................................................................................... |
92 |
2.3.1 |
Service Group ................................................................................................................ |
92 |
2.3.1.1 |
Call Service ................................................................................................................. |
94 |
2.4 |
Service Settings .............................................................................................................. |
97 |
2.4.1 |
Caller ID/DID/PIN Call Routing ....................................................................................... |
97 |
2.4.1.1 |
Caller ID No./DID No./PIN No. ................................................................................... |
100 |
2.4.2 |
Holiday Settings ........................................................................................................... |
102 |
2.4.2.1 |
Holiday Service No. ................................................................................................... |
103 |
2.4.3 |
Parameters ................................................................................................................... |
107 |
2.4.3.1 |
Automated Attendant ................................................................................................. |
107 |
2.4.3.2 |
Operator Service No. 1, 2, and 3 ............................................................................... |
109 |
2.4.3.3 |
Rotary Telephone Service ......................................................................................... |
114 |
2.4.3.4 |
Name Entry ................................................................................................................ |
115 |
2.4.3.5 |
Toll Saver .................................................................................................................. |
116 |
2.4.4 |
Custom Service ............................................................................................................ |
117 |
2.4.4.1 |
Custom Service Builder ............................................................................................. |
117 |
2.4.4.2 |
Menu & Transfer ........................................................................................................ |
123 |
2.4.4.3 |
Date Control .............................................................................................................. |
127 |
2.4.4.4 |
Time Control .............................................................................................................. |
128 |
2.4.4.5 |
Day Control ................................................................................................................ |
129 |
2.4.4.6 |
Password ................................................................................................................... |
130 |
2.5 |
System Parameters ....................................................................................................... |
133 |
2.5.1 |
Mailbox Group .............................................................................................................. |
133 |
2.5.2 |
Extension Group ........................................................................................................... |
137 |
2.5.3 |
System Caller Name Announcement ........................................................................... |
140 |
2.5.4 |
Parameters ................................................................................................................... |
143 |
2.5.4.1 |
Time Setting .............................................................................................................. |
144 |
2.5.4.2 |
Prompt Setting ........................................................................................................... |
147 |
2.5.4.3 |
Language 1–5 (KX-TVA200), 1–3 (KX-TVA50) ......................................................... |
148 |
Document Version 3.0 2011/10 |
Programming Manual |
5 |
|
|
|

Table of Contents
2.5.4.4 |
System Guidance ...................................................................................................... |
149 |
2.5.4.5 |
PBX Parameters ........................................................................................................ |
151 |
2.5.4.6 |
Dialling Parameters ................................................................................................... |
161 |
2.5.4.7 |
Message Waiting Notification .................................................................................... |
163 |
2.5.4.8 |
External Message Delivery ........................................................................................ |
166 |
2.5.4.9 |
Intercom Paging Parameters ..................................................................................... |
169 |
2.5.4.10 |
Fax Management ....................................................................................................... |
172 |
2.5.4.11 |
Disconnect Parameters ............................................................................................. |
175 |
2.5.4.12 |
Transfer to Outside .................................................................................................... |
176 |
2.5.4.13 |
Long Distance Call .................................................................................................... |
182 |
2.5.4.14 |
VM Menu ................................................................................................................... |
183 |
2.5.4.15 |
E-mail Integration ...................................................................................................... |
184 |
2.5.4.16 |
Advanced Settings ..................................................................................................... |
186 |
2.6 |
Hardware (H/W) Settings .............................................................................................. |
189 |
2.7 |
Reports ........................................................................................................................... |
192 |
2.7.1 |
Mailbox Information Report .......................................................................................... |
193 |
2.7.2 |
Call Account Report ..................................................................................................... |
196 |
2.7.3 |
Port Usage Report ........................................................................................................ |
197 |
2.7.4 |
HDD Usage Report ...................................................................................................... |
198 |
2.7.5 |
Mailbox Usage Report .................................................................................................. |
199 |
2.7.6 |
Fax Call Report ............................................................................................................ |
200 |
2.7.7 |
Call Handling Statistics Report ..................................................................................... |
201 |
2.7.8 |
Custom Service Report ................................................................................................ |
202 |
2.7.9 |
Message Status Report ................................................................................................ |
203 |
2.7.10 |
Subscriber Setup Report .............................................................................................. |
204 |
2.7.11 |
Security Information Report .......................................................................................... |
205 |
2.7.12 |
Hourly Statistics Report ................................................................................................ |
206 |
2.7.13 |
E-mail Report ............................................................................................................... |
207 |
2.8 |
System Security ............................................................................................................ |
208 |
2.8.1 |
Administrator ................................................................................................................ |
208 |
2.8.2 |
Subscriber .................................................................................................................... |
211 |
2.8.2.1 |
Default Password ...................................................................................................... |
212 |
Index............................................................................................................ |
|
213 |
6 |
Programming Manual |
Document Version 3.0 2011/10 |
|
|
|

Section 1
Programming Instructions
This section describes how to install, start, and operate KX-TVA Maintenance Console.
Document Version 3.0 2011/10 |
Programming Manual |
7 |
|
|
|

1.1 Introduction to System Administration
1.1 Introduction to System Administration
VPS programming can be performed by the System Administrator, System Manager, and Message Manager. The type of programming performed by each is very different. While the System Manager and Message Manager can use their telephones to program the PBX, the System Administrator must use KX-TVA Maintenance Console and a PC.
VPS programming performed by the System Administrator is referred to as "system administration".
–System administration involves creating or changing VPS settings that control the manner in which VPS performs, and is usually done before any other programming. (The system manager can program some of these parameters with a telephone.)
–System administration can be performed by only one person at a time: a second person attempting to program the VPS will be denied access to system administration.
8 |
Programming Manual |
Document Version 3.0 2011/10 |
|
|
|

1.2 KX-TVA Maintenance Console Installation
1.2 KX-TVA Maintenance Console Installation
System programming, diagnosis, and data upload/download can be performed with a PC using the KX-TVA Maintenance Console software.
System Requirements
Required Operating System
Microsoft® Windows® 2000, Windows XP Professional Service Pack 2, Windows Vista® Business Edition, Windows 7 32-bit Professional Edition, or Windows 7 64-bit Professional Edition
Minimum Hardware Requirements for Windows 2000, Windows XP
CPU: 1.2 GHz Intel® Pentium® microprocessor
HDD: 150 MB of available hard disk space
RAM: 256 MB of available RAM
Minimum Hardware Requirements for Windows Vista
CPU: 1.8 GHz Intel Pentium microprocessor
HDD: 150 MB of available hard disk space
RAM: 1 GB of available RAM
Minimum Hardware Requirements for Windows 7 (32-bit)
CPU: 1.8 GHz or faster 32-bit (x86) processor
HDD: 150 MB of available hard disk space
RAM: 1 GB of available RAM
Minimum Hardware Requirements for Windows 7 (64-bit)
CPU: 1.8 GHz or faster 64-bit (x64) processor
HDD: 150 MB of available hard disk space
RAM: 2 GB of available RAM
Password Security
To maintain system security, a password is required to perform system programming. We recommend changing the default password the first time you access the VPS via KX-TVA Maintenance Console. The default password can be changed by running the Quick Setup utility (see 1.9.1 Utility—Quick Setup) or by selecting System Security®Administrator®Password.
Warning to the Administrator regarding the system password
1.To avoid unauthorized access to VPS settings, which could result in fraudulent dialing, do not disclose the password.
2.Please inform the customer of the importance of the password and the possible dangers if it becomes known to others.
3.Please change the password periodically.
4.To prevent unauthorized access, we strongly recommend selecting a long and random password.
5.If the system password is forgotten, you have to reset the VPS to its factory defaults and reprogram it.
Note
•A Programmer Code, if set, is required to start KX-TVA Maintenance Console. You can set or delete the Programmer Code by selecting Utility®Programmer Code. If no code is set, the KX-TVA Maintenance Console can be started and used, but a password is required to connect to the VPS and change VPS settings.
Document Version 3.0 2011/10 |
Programming Manual |
9 |
|
|
|

1.2 KX-TVA Maintenance Console Installation
Installing KX-TVA Maintenance Console
1.Copy the KX-TVA Maintenance Console setup file to a local drive on the PC. (Its icon is shown here, on the left.)
2.Double-click the setup file to run the installer.
3.Follow the on-screen instructions provided by the installation wizard.
4.Click Yes when prompted to copy the USB drivers, specify a location, then click
OK.
5.Click OK after the drivers have been copied to the local drive.
6.Click Finish.
Note
•To install or uninstall the software on a PC running Windows 2000 Professional or Windows XP Professional, you must be logged in as a user that is in either the "Administrators" or "Power Users" group.
•To install or uninstall the software on a PC running Windows Vista Business or Windows 7 Professional, you must be logged in as a user in the "Administrators" group.
•When the VPS is first connected to the PC via USB, a wizard should appear and ask you to select the appropriate USB driver. Browse for and select the KX-TVA USB driver, which is copied to the local drive during installation.
10 |
Programming Manual |
Document Version 3.0 2011/10 |
|
|
|
1.3 Starting KX-TVA Maintenance Console
1.3 Starting KX-TVA Maintenance Console
The instructions listed below explain how to start KX-TVA Maintenance Console. These instructions are for when connecting to the VPS via USB.
Note
•The screenshots shown here are for reference only, and may differ from the screens displayed on your PC.
1.Click the KX-TVA Maintenance Console shortcut icon.
2.Select the appropriate VPS model and click OK.
3.The Enter Programmer Code dialog box is displayed. Enter the installer level programmer code (default: INSTALLER) and click OK.
Note
•A programmer code is required to use the KX-TVA Maintenance Console. The System Administrator can change the programmer codes (see 1.9.9 Utility—Programmer Code).
4.The Set Default Parameters window is displayed the first time you start KX-TVA Maintenance Console. Select the TVA Type, PBX Type, and Integration Mode. Change the default parameters listed in the window if necessary, then click OK.
Document Version 3.0 2011/10 |
Programming Manual |
11 |
|
|
|
1.3Starting KX-TVA Maintenance Console
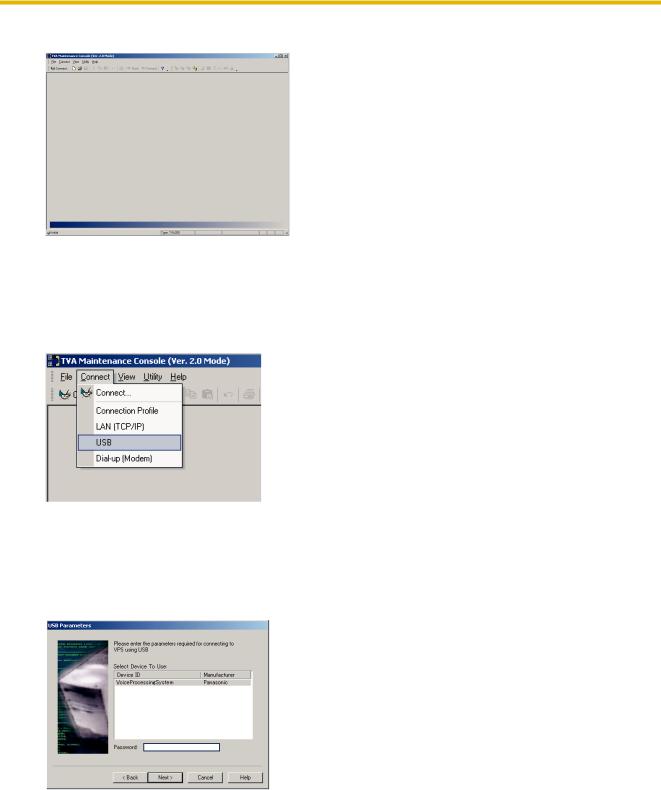
5.The main window is displayed.
6.Click Connect ® USB from the menu bar, or click Connect on the toolbar, select USB in the Connection Mode dialog box and click Next.
Note
•To connect to the VPS via USB, the KX-TVA USB driver must be installed on the PC, as explained in 1.2 KX-TVA Maintenance Console Installation.
7.Enter the installer level password (default: 1234), then click Next.
Note
•The installer level password (also called the administrator password) is required to access the VPS for programming. The System Administrator can change the password (see "Password" in
2.8.1 Administrator).
8. Click Finish when the message Connected! is displayed.
12 |
Programming Manual |
Document Version 3.0 2011/10 |
|
|
|

1.3 Starting KX-TVA Maintenance Console
9.You may now begin programming the VPS. To choose the area you would like to begin programming, click the desired icon in the Shortcuts menu.
Note
•To connect to the VPS via LAN, first connect to the VPS via USB and set the appropriate LAN settings (see 1.9.13 Utility—LAN Settings).
•To connect to the VPS via modem, see 1.5.4 Connect—Dial-up (Modem) (Optional).
•If programming the VPS for the first time, the Quick Setup utility can help you program essential settings quickly and easily. See 1.9.1 Utility—Quick Setup for more information.
•KX-TVA Maintenance Console supports versions 1.0 and 1.1 of the KX-TVA50 and KX-TVA200. The software performs according to the version number of the connected VPS.
•Software features, design, and system requirements are subject to change.
•When connecting the KX-TVA50 with a PC running Windows 7 via USB, if the PC enters Sleep or Hybrid Sleep, the KX-TVA Maintenance Console may not be able to connect to the KX-TVA50 after it wakes from Sleep or Hybrid Sleep. If this occurs, exit the KX-TVA Maintenance Console, and then disconnect and reconnect the USB cable.
Programmer Levels and Passwords
There are two levels of access to the KX-TVA Maintenance Console: Installer and User. Each level has a programmer code, which is required to start KX-TVA Maintenance Console, and a password, which is required to access the VPS using KX-TVA Maintenance Console.
The Installer level provides access to all VPS programming parameters and should only be used by the System Administrator.
Level |
Default |
Default Password |
Restrictions |
|
Programmer Code |
||||
|
|
|
||
|
|
|
|
|
Installer |
INSTALLER*1 |
1234*2 |
No restrictions |
|
|
|
|
|
|
User |
USER*1 |
1234*3 |
Access to screens and parameters can be |
|
|
|
|
restricted*3 |
*1
*2
*3
See 1.9.9 Utility—Programmer Code to change the programmer codes. See 2.8.1 Administrator to change the Installer level password.
See 1.9.10 Utility—Screen Customize to change the User level password and restrict User level access.
Document Version 3.0 2011/10 |
Programming Manual |
13 |
|
|
|

1.3 Starting KX-TVA Maintenance Console
Program Mode
KX-TVA Maintenance Console has three programming modes: Initial, Batch, and Interactive. The current mode is displayed in the lower-left corner of the screen.
Initial Mode
When KX-TVA Maintenance Console is started, it enters Initial mode. From here, you can choose to enter Batch mode or Interactive mode to program the VPS.
Batch Mode
Batch mode allows you to create new system data files and make modifications to system data files saved on your PC without being connected to the VPS. Later, when you connect to the VPS, the system data stored in the PC can be uploaded to the VPS.
To enter Batch mode, select an option from the File menu (see 1.4 File).
Interactive Mode
Interactive mode allows you to directly modify the system data and settings saved in the VPS’s memory from a PC that is connected to the VPS. This mode displays the system data that is currently being used by the VPS. Data can be modified and results displayed in real time.
To enter Interactive mode, select an option from the Connect menu (see 1.5 Connect).
Standard Buttons
There are several standard buttons that are displayed on many screens within KX-TVA Maintenance Console.
Button |
Function |
|
|
OK |
Accepts the settings that were made in the current screen and closes the screen. |
|
|
Apply |
Accepts the settings that were made in the current screen and leaves the screen |
|
open. |
|
|
Cancel |
Ignores any changes made in the current screen and returns to the previous |
|
screen. |
|
|
Help |
Displays the relevant help topic for the current screen. |
|
|
14 |
Programming Manual |
Document Version 3.0 2011/10 |
|
|
|

1.4.3 File—Close
1.4 File
The File menu allows you to create, open or save a data file. If "New" or "Open..." are selected, KX-TVA Maintenance Console automatically enters Batch mode.
1.4.1 File—New
Creates a new system data file, and puts KX-TVA Maintenance Console in Batch mode. All settings are in their initial or default state. To upload the file created here to the VPS, see 1.9.2 Utility—System Back Up.
Note
•Since selecting this option creates a new system data file, uploading this new file to the VPS as is will overwrite any settings that are saved in the VPS’s memory. Use with care.
To create a new system data file
From the File menu, select New.
1.4.2 File—Open...
Opens a system data file saved on the PC, and puts KX-TVA Maintenance Console in Batch mode.
When opening a file created with an older version of KX-TVA Maintenance Console (such as version 1.0), you will be asked whether you want to convert the data for use with the current version or not.
Using the data without converting may result in certain data being loaded to an incorrect destination, and is not recommended.
System data files for unsupported VPS models cannot be opened. Only files saved with KX-TVA Maintenance Console can be opened.
To upload the file modified here to the VPS, see 1.9.2 Utility—System Back Up.
To open a system data file
1.From the File menu, select Open....
The Open dialog box will be displayed.
2.Navigate to the folder containing the system data file you want to open.
3.Select the file.
4.Click Open.
If the file was created with an older version of KX-TVA Maintenance Console, you will be asked if you want to convert the data.
a.Click Convert to convert the data for use with the current version of KX-TVA Maintenance Console. Enter a name for the new converted system data file.
b.Click Start Version 1.x to open the file without converting it (not recommended).
1.4.3 File—Close
Closes currently opened system data files, and enters Initial mode. This menu is only available when using the KX-TVA Maintenance Console in Batch mode.
Document Version 3.0 2011/10 |
Programming Manual |
15 |
|
|
|

1.4.6 File—Exit
To enter Initial mode
•From the File menu, select Close.
If the system data file being modified has not been saved, a warning message will be displayed, giving you the option to save the file.
a.Click Yes to save the file and close system data files to enter Initial mode.
b.Click No to discard the changes and close system data files to enter Initial mode.
1.4.4 File—Save
Overwrites the previously saved system data file with the system data currently being modified. To upload a file to the VPS that was saved here, see 1.9.2 Utility—System Back Up.
To save a system data file
From the File menu, select Save.
If the data has never been saved, the Save dialog box will be displayed. For more details, see 1.4.5 File— Save As....
1.4.5 File—Save As...
Saves the system data file being modified with the name chosen by the user.
To upload a file saved here to the VPS, see 1.9.2 Utility—System Back Up.
To save a system data file with a new name
1.From the File menu, select Save As....
2.Navigate to the folder in which you want to save the file.
3.Enter a file name, or select a file to overwrite.
4.Click Save.
If choosing to overwrite another file, a warning message will be displayed.
a.Click Yes to overwrite.
b.Click No to return to the previous screen.
1.4.6 File—Exit
Closes KX-TVA Maintenance Console.
To exit KX-TVA Maintenance Console
From the File menu, select Exit.
If the system data file being modified has not been saved, a warning message will be displayed, giving you the option to save the file.
a.Click Yes to save the file and exit KX-TVA Maintenance Console.
b.Click No to discard the changes and exit KX-TVA Maintenance Console.
16 |
Programming Manual |
Document Version 3.0 2011/10 |
|
|
|

1.5.4 Connect—Dial-up (Modem) (Optional)
1.5 Connect
The Connect menu allows you to directly program the VPS in Interactive mode. When connecting, you are required to enter the administrator password that corresponds to the programmer code you entered when starting KX-TVA Maintenance Console.
1.5.1 Connect—Connection Profile
If you have saved a Connection Profile (see 1.9.15 Utility—Profile Setup), you can connect to the VPS using the settings saved in the profile.
To connect using a Connection Profile
1.From the Connect menu, select Connection Profile.
2.Select the desired profile from the pull-down menu.
3.Enter the password required to connect to the VPS if it was not stored in the Connection Profile.
4.Click Next.
1.5.2 Connect—LAN (TCP/IP) (Optional for KX-TVA50)
Connects to the VPS through the LAN port of the VPS.
Note
•Before you connect to the VPS via LAN, you must first assign an IP address to the VPS. See 1.9.13 Utility—LAN Settings to assign an IP address.
To connect using a LAN
1.From the Connect menu, select LAN (TCP/IP).
2.Enter the IP address, port number, and password used to connect to the VPS.
3.Click Next, and Finish when the connection is completed.
1.5.3 Connect—USB
Connects to the VPS through the USB port on the VPS.
To connect using USB
1.From the Connect menu, select USB.
2.Enter the password used to connect to the VPS.
3.Click Next, and Finish when the connection is completed.
1.5.4 Connect—Dial-up (Modem) (Optional)
Connects to the VPS through the optional modem.
Document Version 3.0 2011/10 |
Programming Manual |
17 |
|
|
|

1.5.5 Connect—Disconnect
Note
•To access the VPS remotely using this feature, a KX-TVA296 Modem Card must be installed. For more details, see "2.7.5 Modem Card (KX-TVA296)" in the Installation Manual.
The following settings must be entered to match the settings of the modem and/or PC.
Setting |
Values |
Description |
|
|
|
Phone No. |
– |
Enter the telephone number to dial into the VPS. |
|
|
|
Port No. |
– |
Enter the port number used to connect to the VPS. |
|
|
|
Password |
– |
Enter the password used to connect to the VPS. |
|
|
|
To connect using a modem
1.From the Connect menu, select Dial-up (Modem).
2.Enter the administrator password and the settings as required.
3.Click Next, and Finish when the connection is completed.
1.5.5 Connect—Disconnect
Closes the connection between KX-TVA Maintenance Console and the VPS.
To disconnect
1.From the Connect menu, select Disconnect.
2.Click Yes.
18 |
Programming Manual |
Document Version 3.0 2011/10 |
|
|
|

1.6.5 Edit—Select All
1.6 Edit
The Edit menu allows you to easily edit data in KX-TVA Maintenance Console.
1.6.1 Edit—Undo
Returns the last changed setting to its previous value.
To undo
From the Edit menu, select Undo.
1.6.2 Edit—Cut
Cuts the selection and places it in the clipboard.
To cut
1.Select an area of text.
2.From the Edit menu, select Cut.
1.6.3 Edit—Copy
Copies the selection and places it in the clipboard.
To copy
1.Select an area of text.
2.From the Edit menu, select Copy.
1.6.4 Edit—Paste
Inserts the contents of the clipboard.
To paste
1.Place the cursor in the desired location.
2.From the Edit menu, select Paste.
1.6.5 Edit—Select All
Selects the entire document.
To select all
From the Edit menu, select Select All.
Document Version 3.0 2011/10 |
Programming Manual |
19 |
|
|
|

1.6.6 Edit—Delete
1.6.6 Edit—Delete
Deletes selected items.
To delete
1.Select an item to be highlighted.
2.From the Edit menu, select Delete.
20 |
Programming Manual |
Document Version 3.0 2011/10 |
|
|
|
1.7.5 View—Menu Bar
1.7 View
The View menu allows you to hide/show the Toolbar, Status Bar, Shortcut Bar, Utility Bar, and Menu Bar.
1.7.1 View—Toolbar
Selects whether the toolbar, which provides icons allowing easy access to commonly used functions, is displayed or not.
To hide/show the toolbar
From the View menu, select or deselect Toolbar.
1.7.2 View—Status Bar
Selects whether the status bar, which shows the connection status at the bottom of the windows, is displayed or not.
To hide/show the status bar
From the View menu, select or deselect Status Bar.
1.7.3 View—Shortcut Bar
Selects whether the shortcut bar, which provides icons allowing easy access to each setting window, is displayed or not.
To hide/show the shortcut bar
From the View menu, select or deselect Shortcut Bar.
1.7.4 View—Utility Bar
Selects whether the utility bar, which provides icons allowing easy access to each utility command, is displayed or not.
To hide/show the utility bar
From the View menu, select or deselect Utility Bar.
1.7.5 View—Menu Bar
Selects whether the menu bar, which provides access to a variety of menus and commands, is displayed or not.
Document Version 3.0 2011/10 |
Programming Manual |
21 |
|
|
|

1.7.5 View—Menu Bar
To hide/show the menu bar
•Right-click in the toolbar, shortcut bar, or utility bar, and select or deselect Menu Bar.
22 |
Programming Manual |
Document Version 3.0 2011/10 |
|
|
|

1.8.5 Go To—System Parameters
1.8 Go To
The Go To menu allows easy access to each setting window of KX-TVA Maintenance Console.
1.8.1 Go To—Mailbox Settings
Opens the Mailbox Settings screen.
To go to
From the Go To menu, select Mailbox Settings and the desired screen.
1.8.2 Go To—Class Of Service
Opens the Class Of Service screen.
To go to
From the Go To menu, select Class Of Service and the desired screen.
1.8.3 Go To—PORT/TRUNK Service
Opens the PORT/TRUNK Service screen.
To go to
From the Go To menu, select PORT/TRUNK Service.
1.8.4 Go To—Service Settings
Opens the Service Settings screen.
To go to
From the Go To menu, select Service Settings and the desired screen.
1.8.5 Go To—System Parameters
Opens the System Parameters screen.
To go to
From the Go To menu, select System Parameters and the desired screen.
Document Version 3.0 2011/10 |
Programming Manual |
23 |
|
|
|

1.8.8 Go To—System Security
1.8.6 Go To—H/W Settings
Opens the hardware settings screen.
To go to
From the Go To menu, select H/W Settings.
1.8.7 Go To—Reports
Opens the Reports screen.
To go to
From the Go To menu, select Reports and the desired screen.
1.8.8 Go To—System Security
Opens the System Security screen.
To go to
From the Go To menu, select System Security.
24 |
Programming Manual |
Document Version 3.0 2011/10 |
|
|
|

1.9.1 Utility—Quick Setup
1.9 Utility
The Utility menu provides access to the following functions and utilities:
–Quick Setup
–System Back Up
–System Prompts Customization
–Port Status
–System Trace
–System Maintenance
–System Initialize/Restart
–Diagnostic
–Programmer Code
–Screen Customize
–Commands
–Software Version
–LAN Settings
–Default Parameters
–Profile Setup
To select an item from the Utility menu, click Utility in the menu bar, then select the desired function or utility. Certain Utility menu items are also available from the Toolbar (System Back Up, Port Status, Commands, System Trace, and System Initialize/Restart).
1.9.1 Utility—Quick Setup
The Quick Setup utility allows you to set essential VPS parameters quickly and easily. It is particularly useful when connecting to the VPS for the first time or after initializing the VPS. The following settings can be programmed with the Quick Setup utility:
–System Security settings
–PBX Environment settings
–Mailbox settings
–Port/Trunk settings
–Date and Time settings
Note
•Set the desired parameters in each screen then click Next or Back to go to the desired screen.
•The Auto Configuration utility is available from the PBX Environment screen. This utility allows you to automatically create mailboxes for several extensions at once. When you click Next on the PBX Environment screen, Auto Configuration dialog box appears. Click OK to start Auto Configuration, or Cancel to skip Auto Configuration and go to the next setting screen. Auto Configuration is available only in Interactive mode and with Panasonic KX-T series PBXs using APT/DPT integration.
•In the Quick Setup-Finish window, you can change system date and time. You can click Finish to save the parameters, and "Quick Setup Completed" is displayed. Click Yes to save the settings, or No if you want to modify some settings.
Document Version 3.0 2011/10 |
Programming Manual |
25 |
|
|
|

1.9.2 Utility—System Back Up
1.9.2 Utility—System Back Up
The System Back Up utility can be used to backup and restore system data. The Backup History utility can be used to view a record of previous backups.
The following system programming data, system parameters, and voice data can be backed up or restored as individual files.
a.Program
–System Program
–DSP Program
b.System Parameters
c.System Prompts
–Installed Prompt
–Custom Service Menu
–Company Name
–Company Greeting
–System Mailbox Group Voice Label
–System Caller Name
–Prompt Selection
–Hold Announce Menu
–Extension Group Voice Label
d.Mailbox Prompts
–Owner Name
–Personal Greetings
–Personal Caller ID Name
–Interview
–Personal Group List Name
–EMD List Member Name
e.Mailbox Messages
Note
•Mailbox data may not be backed up if the mailbox is in use during the backup process. Additionally, VPS response time may be affected when backing up data. For these reasons, we recommend backing up data when the VPS is offline.
Follow the steps below to use the System Back Up utility:
[Creating a Backup]
1.Click Utility in the menu bar.
2.Select System Back Up and Make Backup....
(You can click the icon in the toolbar instead of step 1 and 2.)
3.Check the desired item(s) to backup.
4.Click Click to edit... next to Mailbox Prompts.
5.Check either All Mailboxes or select the mailboxes you wish to backup.
6.Click OK.
7.Click Click to edit... next to Mailbox Messages.
8.Check either All Mailboxes or select the mailboxes you wish to backup.
9.Click the folder icon.
The Save dialog box appears.
10.Navigate to the folder where to wish to save the system backup file.
11.Click Backup.
26 |
Programming Manual |
Document Version 3.0 2011/10 |
|
|
|

1.9.2 Utility—System Back Up
Note
•The system will prepare the data to be backed up, and the backup will begin about 30 seconds later. The time needed to backup the data will vary depending on the connection method, communication speed, and the amount of data that is being backed up.
•Deleted messages will not be backed up when backing up Mailbox Messages.
[Restoring from Backup Data]
1.Click Utility in the menu bar.
2.Select System Back Up and Restore the backup data....
(You can click the icon in the toolbar instead of step 1 and 2.)
3.Check the desired item to restore.
4.Click the folder icon.
The Open dialog box appears.
5.Navigate to the folder containing the desired backup file and select the file.
6.Click Open, then click Restore.
Note
•For KX-TVA50: The built-in flash memory must have space available to accommodate the restored data. If the backed up data is larger than the space available in the flash memory, the data cannot be restored.
•A backed up message cannot be restored to the subscriber’s mailbox if the mailbox still contains a New/Old/Deleted copy of the same message.
[Scheduled Backups]
You can schedule backups in advance. The KX-TVA Maintenance Console will automatically connect to the VPS and backup the selected data to the PC at the specified times. In order to use this feature you must first create a Connection Profile (see 1.9.15 Utility—Profile Setup). If a Connection Profile used for a scheduled backup is deleted later, the data will not be backed up and an error will appear in the Backup History window.
When a scheduled backup has been set, the KX-TVA Maintenance Console icon ( ) will be displayed in the PC’s task tray. When the scheduled backup is in progress, the icon will flash.
[Creating a Scheduled Backup]
1.Click Utility in the menu bar.
2.Select System Back Up and Scheduled Backup....
3.Click Add to create a new scheduled backup.
4.Enter a description for the backup.
5.Select the profile name of the Connection Profile needed to connect to the VPS in order to make the backup. You can confirm the Connection Profile settings by clicking Details.
6.Set the frequency (daily, weekly, etc.) and time of day when the backup should take place.
7.Check the desired item(s) to backup.
8.Click Click to edit... next to Mailbox Prompts.
9.Check either All Mailboxes or select the mailboxes you wish to backup.
10.Click OK.
11.Click Click to edit... next to Mailbox Messages.
12.Check either All Mailboxes or select the mailboxes you wish to backup.
13.Click the folder icon.
The Save dialog box appears.
14.Navigate to the folder where to wish to save the system backup file.
15.Click OK.
Note
•If multiple scheduled backups overlap (i.e., if a second backup is scheduled to begin and the first scheduled backup has not finished), the second backup will not be executed.
Document Version 3.0 2011/10 |
Programming Manual |
27 |
|
|
|

1.9.3Utility—System Prompts Customization
•If a manual backup is executed and has not finished by the time a scheduled backup is set to begin, the scheduled backup will not be executed.
•Because backup data is saved to the PC, the PC must be running at the time a scheduled backup is set to begin. If the PC is turned off or is in standby mode when a scheduled backup is set to begin, the backup will not be executed.
•If you are connected to the VPS using the KX-TVA Maintenance Console at the time a scheduled backup is set to begin, you will be prompted to disconnect the programming session. If you do not disconnect, the scheduled backup will not be executed. Likewise, if you try to connect to the VPS using the KX-TVA Maintenance Console while a scheduled backup is being executed, you will be prompted to cancel the scheduled backup.
[Editing a Scheduled Backup]
1.Click Utility in the menu bar.
2.Select System Back Up and Scheduled Backup....
3.Select the backup you wish to edit.
4.Click Edit.
5.Edit the settings as desired.
6.Click OK.
[Deleting a Scheduled Backup]
1.Click Utility in the menu bar.
2.Select System Back Up and Scheduled Backup....
3.Select the backup you wish to delete.
4.Click Delete.
5.Click Yes.
6.Click OK.
[Backup History]
1.Click Utility in the menu bar.
2.Select System Back Up and Backup History.
(You can click the icon in the toolbar instead of step 1 and 2.)
The following status of backup history can be checked in the Backup History dialog box:
–Description
–Parameters
–Completion Status (Completed/No Data/Error)
–Date & Time
–Total Elapsed Time (HH:MM:SS)
3.Click Close.
1.9.3 Utility—System Prompts Customization
The System Prompts Customization screen is used to view, play, add, or delete system prompts. The System Administrator can also check the prompt number and text for these prompts. The following categories of system prompts can be customized from the System Prompts Customization screen:
a.System Guidance
b.Custom Service Menus
c.Company Greetings
d.Others
–Company Name
–Language Select Menu
–Hold Announce Menu
28 |
Programming Manual |
Document Version 3.0 2011/10 |
|
|
|

1.9.3 Utility—System Prompts Customization
–Mailbox Group List Label
–Extension Group List Label
–System Caller ID Name
Follow the steps to customize system prompts:
1.Click Utility in the menu bar.
2.Select System Prompts Customization.
3.Select a tab in the System Prompts Customization dialog box.
[Deleting Prompts]
The System Administrator is able to delete the specific system prompt or the installed language used for system prompts.
To delete a specific system prompt:
1.Select the desired prompt number.
2.Click Delete.
3.Click OK.
To delete an installed language for system prompts:
1.Select the desired language, Guidance No.
2.Click Delete.
3.Click OK.
[Recording System Prompts]
1.Select the desired system prompt to record, and click Play/Record.
2.Select "Record from extension" or "Import from recorded file".
When "Record from extension" is selected
1.Specify the extension number of the telephone used for recording, then click Connect.
2.When the specified extension rings, go off-hook.
3.Click  (record),
  (stop), or
  (play) to record or play a system prompt.
4.Click Disconnect.
5.Click OK.
When "Import from recorded file" is selected
1.Click ….
The Open dialog box appears.
2.Navigate to the folder containing the WAV files you wish to import. (WAV files must meet the following specifications: IMA ADPCM codec, 8.000 kHz, 4-bit, mono.)
3.Select the desired WAV file.
4.Click Open to import the file.
5.Click OK.
[Starting and Stopping System Prompt Playback]
1.Select the desired system prompts.
2.Click Play/Record.
3.Click  or
or  .
.
[Restoring Deleted Prompts]
If you have deleted a preinstalled prompt and want to use the prompt again, you can restore it from the included CD-ROM.
1.Select the desired prompt number.
2.Click Restore.
Document Version 3.0 2011/10 |
Programming Manual |
29 |
|
|
|

1.9.5Utility—System Trace
3.When the restore dialog is displayed, click  (browse).
4.Insert the included CD-ROM when prompted.
5.Browse to the desired folder, select the desired prompt, then click Open.
6.Click OK.
1.9.4 Utility—Port Status
The System Administrator can confirm the condition of each port and turn on/off VPS Call Progression Mode.
Follow the steps below to use the Port Status utility:
1.Click Utility in the menu bar.
2.Select Port Status.
(You can click the icon in the toolbar instead of step 1 and 2.)
The Port Status screen includes the Port Activity List which displays each port’s status and number, as well as the current setting of Port Parameters. The screen will be updated every 2 seconds. Each port’s status will be displayed as follows:
–"Ready": The port is ready to be used.
–"Incoming Call": The port is handling an incoming call.
–"Outgoing Call": processing sending service
–"DSP Reset": processing DSP reset disposition
–"PT Connect": processing PT connect disposition
–"Offline": Off Line Mode
–"No Card": Available card is not installed.
[Turning on VPS Call Progression Mode]
1.Select the desired port and click Open Port.
2.Select Selected Ports to turn on the selected port, or select All Ports to turn on the all ports.
[Turning off VPS Call Progression Mode]
1.Select the desired port and click Close Port.
2.Select Selected Ports to turn off the selected port, or select All Ports to turn off the all ports.
3.Click Close.
1.9.5 Utility—System Trace
The System Administrator can monitor VPS activities and log the activities into a separate file. The following data can be logged for each port or all ports:
–DTMF/Dial: DTMF signals sent and received by the VPS.
–Guidance: guidance data that the VPS played.
–Message: the VPS activity on messages such as creating, playing and deleting.
–Process Event: events occurred between the VPS processes such as Application, Call Processor and DSP.
–Caller ID: Caller ID received from the PBX.
–Error: system errors.
–DID: DID number received from the connected PBX.
–PIN: PIN received by the VPS.
There are 2 methods for System Trace.
a.Real Time Trace: monitors the trace data of the selected port. Also, it is possible to log the monitoring data as a file.
b.Internal Trace: logs the trace data of the selected port automatically in the system.
30 |
Programming Manual |
Document Version 3.0 2011/10 |
|
|
|
Loading...