


 Loading...
Installation Manual
Additional Rugged Cordless Handset
Model No. KX-TGTA61
Link2Cell Cordless Telephone with Digital Answering Machine j Rugged Handset
Model No. KX-TGD583
KX-TGD584
KX-TGD585
KX-TGE484
Model shown is TGTA61
Thank you for purchasing a Panasonic product.
This installation manual describes only the steps needed to register and begin using the handset. Please read the base unit’s operating instructions for further details.Please read this installation manual before using the unit and save it for future reference.
For assistance, visit our Web site: http://shop.panasonic.com/support for customers in the U.S.A.
Printed in Malaysia |
PNQX8740YA PP0418KT1088 |

Table of Contents |
|
Installation |
|
Accessory information .................................. |
3 |
For KX-TGD583/KX-TGD584/KX-TGD585 |
|
users ............................................................ |
4 |
For KX-TGE484 users .................................. |
5 |
Important Information |
|
For your safety ............................................. |
6 |
Important safety instructions ........................ |
7 |
Other information ......................................... |
7 |
Getting Started |
|
Setting up ..................................................... |
8 |
Controls ...................................................... |
10 |
Feature differences |
|
Feature differences between your original |
|
handset and KX-TGTA61 ........................... |
12 |
Call block .................................................... |
12 |
Automated call block .................................. |
13 |
Intercom, Transferring calls, Conference |
|
calls ............................................................ |
14 |
Handset noise reduction ............................ |
14 |
Handset equalizer ...................................... |
14 |
Turning auto intercom on/off ...................... |
14 |
Baby monitor .............................................. |
14 |
Alarm (Memo alarm) .................................. |
16 |
Intercom ringer volume/Intercom ringer |
|
tone ............................................................ |
17 |
Changing the handset name ...................... |
17 |
Displaying the handset name ..................... |
17 |
Appendix |
|
FCC and other information ......................... |
18 |
Customer services ..................................... |
19 |
Limited Warranty (ONLY FOR U.S.A.) ....... |
20 |
2

|
|
Installation |
|
|
|
|
|
|
|
|
|
Accessory information |
|
|
|
|
|
Supplied accessories |
|
|
|
|
|
Accessory item/Part number |
Quantity |
|
Charger/PNLC1083ZB |
1 |
|
Rechargeable batteries*1 |
2 |
|
Handset cover*2/PNYNAGTA61BR |
1 |
|
Belt clip*3/PNZMAGTA61BR |
1 |
|
*1 |
See page 3 for replacement battery information. |
|
*2 |
The handset cover comes attached to the handset. |
|
*3 |
The belt clip comes attached to the handset. |
|
Additional/replacement accessories
Please contact your nearest Panasonic dealer for sales information (page 19).
Accessory item |
Model number/Specifications |
Rechargeable |
HHR-4DPA*1 |
batteries |
R To order, please visit http://shop.panasonic.com/support |
|
Battery type: |
|
– Nickel metal hydride (Ni-MH) |
|
– 2 x AAA (R03) size for each handset |
Headset |
KX-TCA93, KX-TCA430 |
*1 Replacement batteries may have a different capacity from that of the supplied batteries.
Other information
RDesign and specifications are subject to change without notice.
RThe illustrations in these instructions may vary slightly from the actual product.
RFor some features, the operations are slightly different from the descriptions in your base unit's operating instructions.
RSome features described in your base unit's operating instructions may not be available.
For assistance, please visit http://shop.panasonic.com/support |
3 |

Installation
For KX-TGD583/KX-TGD584/KX-TGD585 users
For details about the operations, refer to the enclosed base unit’s operating instructions.
Note:
RSome features of KX-TGTA61 are slightly different from the descriptions in the base unit’s operating instructions (page 12).
Model composition
Series |
Model No. |
Base unit |
Handset |
|
|
|
Part No. |
Part No. |
Quantity |
KX-TGD560 series |
KX-TGD583 |
KX-TGD560 |
KX-TGDA51 |
2 |
|
|
|
KX-TGTA61 |
1 |
|
KX-TGD584 |
KX-TGD560 |
KX-TGDA51 |
3 |
|
|
|
KX-TGTA61 |
1 |
|
KX-TGD585 |
KX-TGD560 |
KX-TGDA51 |
4 |
|
|
|
KX-TGTA61 |
1 |
Supplied accessories
Accessory item/Part number |
|
Quantity |
|
|
KX-TGD583 |
KX-TGD584 |
KX-TGD585 |
AC adaptor/PNLV226-0X |
1 |
1 |
1 |
Telephone line cord*1 |
1 |
1 |
1 |
Wall mounting adaptor/PNKL1044Y2 |
1 |
1 |
1 |
Rechargeable batteries*2 |
6 |
8 |
10 |
Handset cover for KX-TGDA51*3/ |
2 |
3 |
4 |
PNYNTGDA50BR |
|
|
|
Charger for KX-TGDA51/PNLC1077LB |
1 |
2 |
3 |
Handset cover for KX-TGTA61*3/ |
1 |
1 |
1 |
PNYNAGTA61BR |
|
|
|
Belt clip for KX-TGTA61*4/PNZMAGTA61BR |
1 |
1 |
1 |
Charger for KX-TGTA61/PNLC1083ZB |
1 |
1 |
1 |
*1 PNJA1186Z (Black cord), PNJA1193Z (Transparent cord) *2 See page 3 for replacement battery information.
*3 The handset cover comes attached to the handset.
*4 The belt clip comes attached to the handset.
4For assistance, please visit http://shop.panasonic.com/support

Installation
For KX-TGE484 users
For details about the operations, refer to the enclosed base unit’s operating instructions.
Note:
RSome features of KX-TGTA61 are slightly different from the descriptions in the base unit’s operating instructions (page 12).
Model composition
Series |
Model No. |
Base unit |
Handset |
|
|
|
Part No. |
Part No. |
Quantity |
KX-TGE470 series |
KX-TGE484 |
KX-TGE470 |
KX-TGEA40 |
3 |
|
|
|
KX-TGTA61 |
1 |
Supplied accessories
Accessory item/Part number |
Quantity |
|
AC adaptor/PNLV226-0X |
1 |
|
Telephone line cord*1 |
1 |
|
Wall mounting adaptor/PNKL1044Y1 |
1 |
|
Rechargeable batteries*2 |
8 |
|
Handset cover for KX-TGEA40*3/PNYNTGEA20SR |
3 |
|
Belt clip for KX-TGEA40/PNKE1312Z1 |
3 |
|
Charger for KX-TGEA40/PNLC4050ZS |
2 |
|
Handset cover for KX-TGTA61*3/PNYNAGTA61BR |
1 |
|
Belt clip for KX-TGTA61*4/PNZMAGTA61BR |
1 |
|
Charger for KX-TGTA61/PNLC1083ZB |
1 |
|
*1 |
PQJA10075Y (Black cord), PQJA10075Z (Transparent cord) |
|
*2 |
See page 3 for replacement battery information. |
|
*3 |
The handset cover comes attached to the handset. |
|
*4 |
The belt clip comes attached to the handset. |
|
For assistance, please visit http://shop.panasonic.com/support |
5 |

Important Information
For your safety
To prevent severe injury and loss of life/ property, read this section carefully before using the product to ensure proper and safe operation of your product.
 WARNING
Power connection
RCompletely insert the AC adaptor/power plug into the power outlet. Failure to do so may cause electric shock and/or excessive heat resulting in a fire.
RRegularly remove any dust, etc. from the AC adaptor/power plug by pulling it from the power outlet, then wiping with a dry cloth. Accumulated dust may cause an insulation defect from moisture, etc. resulting in a fire.
RUnplug the product from power outlets if it emits smoke, an abnormal smell, or makes an unusual noise. These conditions can cause fire or electric shock. Confirm that smoke has stopped emitting and contact us at
http://shop.panasonic.com/support
Installation
RTo prevent the risk of fire or electrical shock, do not expose the product to rain or any type of moisture.
RDo not place or use this product near automatically controlled devices such as automatic doors and fire alarms. Radio waves emitted from this product may cause such devices to malfunction resulting in an accident.
 CAUTION
Installation and location
RThe AC adaptor is used as the main disconnect device. Ensure that the AC outlet is installed near the product and is easily accessible.
Ni-MH rechargeable batteries (supplied)
RWe recommend using the supplied batteries or additional/replacement batteries noted on page 3 for replacement battery information. USE ONLY rechargeable Ni-MH batteries AAA (R03) size.
RDo not mix old and new batteries.
RDo not open or mutilate the batteries. Released electrolyte from the batteries is corrosive and may cause burns or injury to the eyes or skin. The electrolyte is toxic and may be harmful if swallowed.
RExercise care when handling the batteries. Do not allow conductive materials such as rings, bracelets, or keys to touch the batteries, otherwise a short circuit may cause the batteries and/or the conductive material to overheat and cause burns.
RCharge the batteries provided with or identified for use with this product only, in accordance with the instructions and limitations specified in this manual.
ROnly use a compatible base unit (or charger) to charge the batteries. Do not tamper with the base unit (or charger). Failure to follow these instructions may cause the batteries to swell or explode.
Attention:
A nickel metal hydride battery that is recyclable powers the product you have purchased. Please call 1-800-8-BATTERY (1-800-822-8837) for information on how to recycle this battery.
Waterproof handset
The handset is designed to be waterproof. You can use the handset near water (IP 67 Standard).
RDo not open the handset cover with wet hands.
RDo not expose the handset to salt water, ionized water, soapy water, etc.
6For assistance, please visit http://shop.panasonic.com/support
Important Information
RDo not use the handset in high humidity places, such as bathroom.
RSince water in headset jack may cause damage, close the headset jack cover completely when the optional headset is not in use. When the optional headset is connected, do not use the handset with wet hands.
RIf the handset is wet, wipe with a soft dry cloth.
RThe charger is not designed to be waterproof. Do not place near the water. Also do not place the handset on the charger if the handset is wet.
Shock resistance (handset only)
The handset is designed to be shock-resistant, however, it should not be thrown or stepped on.
Important safety instructions
When using your product, basic safety precautions should always be followed to reduce the risk of fire, electric shock, and injury to persons, including the following:
1.Do not use the telephone to report a gas leak in the vicinity of the leak.
2.Use only the power cord and batteries indicated in this manual. Do not dispose of batteries in a fire. They may explode. Check with local codes for possible special disposal instructions.
SAVE THESE INSTRUCTIONS
Other information
ROperating the product near electrical appliances may cause interference. Move away from the electrical appliances.
CAUTION: Risk of explosion if battery is replaced by an incorrect type. Dispose of used batteries according to the instructions.
Routine care
RWipe the outer surface of the product with a soft moist cloth.
RDo not use benzine, thinner, or any abrasive powder.
Notice for product disposal, transfer, or return
RThis product can store your private/ confidential information. To protect your privacy/confidentiality, we recommend that you erase information such as phonebook or caller list entries from the memory before you dispose of, transfer, or return the product.
Notice:
Compliance with TIA-1083 standard
Compatible with |
Hearing Aid T-Coil |
T |
TIA-1083 |
Telephone handsets identified with this logo have reduced noise and interference when used with T-Coil equipped hearing aids and cochlear implants.
For assistance, please visit http://shop.panasonic.com/support |
7 |

Getting Started
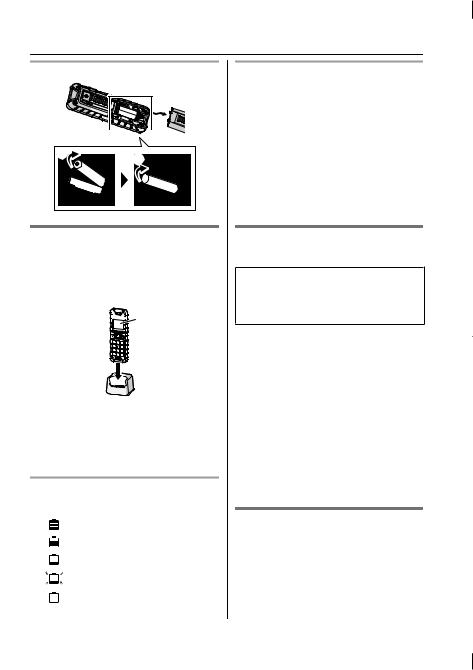
Locking |
Unlocking |
Setting up
Connections/Wall mounting
Connect the AC adaptor to the power outlet.
Drive the screws (1) (not supplied) into the wall, if necessary.
2 27.2 mm (1 1/16 inches)
2
2

1
1
1
Note:
R The AC adaptor must remain connected at |
3 |
|
all times. (It is normal for the adaptor to feel |
||
|
||
warm during use.) |
|
|
R Make sure that the wall and the fixing |
|
|
method are strong enough to support the |
2 |
|
weight of the unit. |
|
Battery installation |
|
|
8 |
Important: |
|
6 |
7 |
R Use the supplied rechargeable batteries. |
|
|
|
|
|
|
|
For replacement, we recommend using the |
|
|
|
Panasonic rechargeable batteries noted on |
1 |
|
5 |
page 3. |
|
|
|
R USE ONLY rechargeable Ni-MH batteries |
|
|
|
AAA (R03) size. |
|
|
|
R Do NOT use alkaline/manganese/Ni-Cd |
|
|
k |
batteries. |
|
|
|
R Confirm correct polarities ( , ). |
|
|
|
R When unlocking (A) or locking (K) the |
|
|
|
battery cover, make sure to align the arrow |
|
|
|
positions. |
|
|
|
Please do not turn more than excessively. |
9 |
|
l |
For KX-TGD583/KX-TGD584/KX-TGD585/ |
|
|
|
KX-TGE484 users: |
|
|
|
R Follow the directions on the display to set |
j |
|
|
up the unit. |
|
|
|
|
|
|
8For assistance, please visit http://shop.panasonic.com/support
Getting Started
Removing the battery
2


Battery charging
Charge for about 7 hours.
RConfirm “Charging” is displayed (1).
RWhen the batteries are fully charged,
“Fully charged” is displayed.


 1
1
Note:
RIf the batteries are fully charged, but the operating time seems to be shorter, clean
the battery ends ( ,
,  ) and the charge contacts with a dry cloth and charge again.
Battery level
Icon |
Battery level |
|
High |
|
|
|
Medium |
|
|
|
Low |
|
|
|
Needs charging. |
|
|
|
Empty |
|
|
Ni-MH battery performance (supplied batteries)
Operation |
Operating time |
In continuous use |
8.5 hours max.*1 |
Not in use (standby) |
4 days max.*1 |
*1 If eco mode is on except when using link to cell function and flash light.
Note:
RActual battery performance depends on usage and ambient environment.
Registering a handset to a base unit
For KX-TGD583/KX-TGD584/KX-TGD585/ KX-TGE484 users:
RThe supplied handset is pre-registered. You do not have to perform the following procedure.
1 Base unit:
Press and hold MLOCATOR/INTERCOMN for about 5 seconds.
R If all registered handsets start ringing, press MLOCATOR/INTERCOMN again to stop, then repeat this step.
2Handset:
Place the handset on the charger, then
wait until a long beep sounds and  is displayed.
Note:
RIf an error tone sounds, or if  is displayed, register the handset according to the base unit’s operating instructions.
Display language
1MMENUN#110
2MbN: Select the desired setting. a MSAVEN a MOFFN
For assistance, please visit http://shop.panasonic.com/support |
9 |
Getting Started
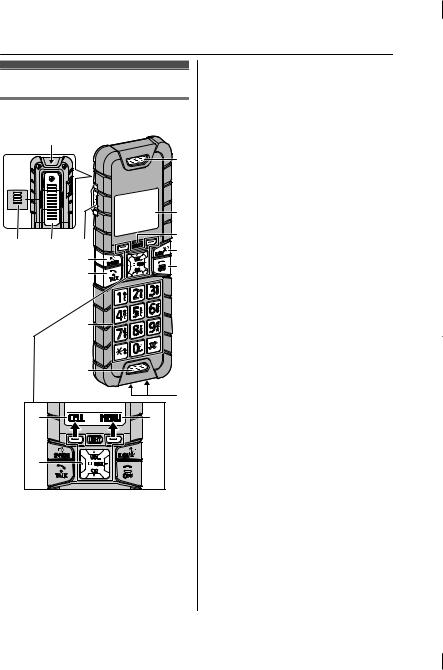
Controls
Handset
A
|
I |
|
J |
|
K |
B C |
D |
|
L |
|
E |
|
M |
|
F |
|
G |
|
H |
|
N |
A |
A |
B |
|
AFlashlight
BSpeaker
R The speaker is located behind the belt clip.
CBelt clip
DHeadset jack
EMZN (SP-PHONE:
Speakerphone)
FMTALKN
GDial keypad
*: Temporary tone dialing
0: (  ) Ringer off
R You can turn the ringer on/off by pressing and holding [0]
(  ) until the unit beeps.
HMicrophone
IReceiver
JDisplay
KMLIGHTN
R Press MLIGHTN to turn the flashlight on/off. The maximum lightning time is about 5 minutes.
LMFLASHNM 
 N(ASSIST)
MMOFFN
NCharge contacts
nControl type
 Soft keys
By pressing a soft key, you can select the feature shown directly above it on the display.
 Navigator key
–MDN, MCN, MFN, or MEN: Scroll through various lists and items.
–VOL. (Volume: MDN or MCN): Adjust the receiver or speaker volume while talking.
–MFN W: View the phonebook entry.
–MEN REDIAL: View the redial list.
–MCN CID (Caller ID): View the caller list.
Note:
RThe preset melodies in this product (“Tone 3” - “Melody 10”) are used with permission of © 2004-2013 Copyrights Vision Inc.
RYou can switch the language for entering characters by the following procedure:
# a MbN: Selecting the desired language. a MOKN
10 |
For assistance, please visit http://shop.panasonic.com/support |
Loading...