

Page 1

Voice Processing System
Programming Manual
KX-TVA50
Model
KX-TVA200
Thank you for purchasing a Panasonic Voice Processing System.
Please read this manual carefully before using this product and save this manual for future use.
KX-TVA50/KX-TVA200: Version 1.0
Page 2

Introduction
About this Manual
This Programming Manual is designed to serve as an overall reference for programming the
Panasonic Voice Processing System using KX-TVA Maintenance Console. It explains how to use KXTVA Maintenance Console, and obtain the most out of system administration.
The Programming Manual is divided into the following sections:
Section 1, Programming Instructions
Describes how to install, start, and operate KX-TVA Maintenance Console.
Section 2, KX-TVA Maintenance Console Operating Instructions
Describes in detail each parameter that can be programmed using KX-TVA Maintenance Console.
Glossary
An alphabetical listing of features, terms, and abbreviations, as well as their definitions.
Index
An alphabetical listing of features and terms, as well as the page numbers of related sections.
About the Other Manuals
The following manuals are available:
Installation Manual
The Voice Processing System Installation Manual provides instructions for installing the VPS
hardware, configuring the connected PBX for use with the VPS, and getting started with the KX-TVA
Maintenance Console software. Relevant sections from the Installation Manual are listed throughout
this manual for your reference.
Feature Manual
The Voice Processing System Feature Manual is an overall reference describing VPS features. It
explains what the VPS can do, and how to obtain the most of its many features. Sections from the
Feature Manual are listed throughout this manual for your reference.
Subscriber's Manual
The Voice Processing System Subscriber's Manual describes how subscribers can access
commonly used VPS features and functions with their extensions and mailboxes. Relevant sections
from the Subscriber's Manual are listed throughout this manual for your reference.
Note
• This manual may refer to products not available in your country/area.
• For KX-TD500, KX-TDA series PBXs, the term "trunk (CO line)" used in this manual indicates a
trunk (CO line) group.
Trademarks
• Microsoft and Windows are either registered trademarks or trademarks of Microsoft Corporation
in the United States and/or other countries.
2 Programming Manual
Page 3

• Intel and Pentium are trademarks or registered trademarks of Intel Corporation or its subsidiaries
in the United States and other countries.
• All other trademarks identified herein are the property of their respective owners.
• Screen shots reprinted with permission from Microsoft Corporation.
Programming Manual 3
Page 4

Table of Contents
1 Programming Instructions.....................................................................7
1.1 Introduction ......................................................................................................................8
1.1.1 System Administration .......................................................................................................8
1.1.2 Password Security..............................................................................................................8
1.2 Installing and Starting KX-TVA Maintenance Console .................................................9
1.2.1 Installing KX-TVA Maintenance Console ...........................................................................9
1.2.2 Starting KX-TVA Maintenance Console ...........................................................................12
1.3 File ...................................................................................................................................15
1.3.1 File—New.........................................................................................................................15
1.3.2 File—Open .......................................................................................................................15
1.3.3 File—Close.......................................................................................................................16
1.3.4 File—Save........................................................................................................................16
1.3.5 File—Save As...................................................................................................................16
1.3.6 File—Exit..........................................................................................................................16
1.4 Connect........................................................................................................................... 18
1.4.1 Connect—USB.................................................................................................................18
1.4.2 Connect—LAN (Optional for KX-TVA50)..........................................................................18
1.4.3 Connect—Modem (optional) ............................................................................................18
1.4.4 Connect—Disconnect ......................................................................................................19
1.5 Edit ..................................................................................................................................20
1.5.1 Edit—Undo.......................................................................................................................20
1.5.2 Edit—Cut..........................................................................................................................20
1.5.3 Edit—Copy .......................................................................................................................20
1.5.4 Edit—Paste ......................................................................................................................20
1.5.5 Edit—Select All ................................................................................................................20
1.5.6 Edit—Delete .....................................................................................................................21
1.6 View .................................................................................................................................22
1.6.1 View—Tool Bar.................................................................................................................22
1.6.2 View—Status Bar .............................................................................................................22
1.6.3 View—Shortcut Bar..........................................................................................................22
1.6.4 View—Utility Bar ..............................................................................................................22
1.7 Go To ...............................................................................................................................23
1.7.1 Go To—Mailbox Settings..................................................................................................23
1.7.2 Go To—Class Of Service .................................................................................................23
1.7.3 Go To—PORT/TRUNK Service........................................................................................23
1.7.4 Go To—Service Settings..................................................................................................23
1.7.5 Go To—System Parameters.............................................................................................23
1.7.6 Go To—H/W Settings .......................................................................................................24
1.7.7 Go To—Reports ...............................................................................................................24
1.7.8 Go To—System Security..................................................................................................24
1.8 Utility ...............................................................................................................................25
1.8.1 Utility—Quick Setup .........................................................................................................25
1.8.2 Utility—System Back Up ..................................................................................................26
1.8.3 Utility—System Prompts Customization...........................................................................27
1.8.4 Utility—Port Status ...........................................................................................................29
1.8.5 Utility—System Trace .......................................................................................................29
1.8.6 Utility—System Maintenance ...........................................................................................30
4 Programming Manual
Page 5

1.8.7 Utility—System Initialize/Restart ...................................................................................... 31
1.8.8 Utility—Diagnostic............................................................................................................32
1.8.9 Utility—Programmer Code ............................................................................................... 32
1.8.10 Utility—Software Version.................................................................................................. 33
1.8.11 Utility—LAN Settings........................................................................................................33
1.8.12 Utility—Default Parameters.............................................................................................. 34
2 KX-TVA Maintenance Console Operating Instructions..................... 35
2.1 Mailbox Settings ............................................................................................................ 36
2.1.1 Mailbox Settings Screen .................................................................................................. 37
2.1.2 Default Mailbox Template.................................................................................................40
2.1.3 Mailbox Parameters .........................................................................................................42
2.1.4 Notification Parameters.................................................................................................... 50
2.1.5 External Message Delivery .............................................................................................. 58
2.1.6 Auto Forwarding............................................................................................................... 60
2.1.7 Personal Distribution List ................................................................................................. 62
2.1.8 Personal Custom Service ................................................................................................ 64
2.1.9 Remote Call FWD to CO.................................................................................................. 67
2.1.10 Automatic Log-in.............................................................................................................. 69
2.1.11 E-mail Option ................................................................................................................... 72
2.2 Class of Service ............................................................................................................. 75
2.2.1 Class of Service ............................................................................................................... 76
2.2.2 Personal Options.............................................................................................................. 81
2.3 Port/Trunk Service ......................................................................................................... 88
2.3.1 Service Group .................................................................................................................. 89
2.4 Service Settings ............................................................................................................. 94
2.4.1 Caller ID/DID/PIN Call Routing ........................................................................................ 95
2.4.2 Holiday Settings ............................................................................................................... 98
2.4.3 Parameters..................................................................................................................... 103
2.4.4 Custom Service ............................................................................................................. 113
2.5 System Parameters......................................................................................................128
2.5.1 Mailbox Group................................................................................................................128
2.5.2 Extension Group ............................................................................................................ 132
2.5.3 System Caller Name Announcement.............................................................................136
2.5.4 Parameters..................................................................................................................... 139
2.6 Hardware (H/W) Settings ............................................................................................. 188
2.6.1 Global Parameters ......................................................................................................... 188
2.7 Reports ......................................................................................................................... 192
2.7.1 Mailbox Information Report............................................................................................194
2.7.2 Call Account Report ....................................................................................................... 198
2.7.3 Port Usage Report ......................................................................................................... 199
2.7.4 HDD (Memory) Usage Report ....................................................................................... 200
2.7.5 Mailbox Usage Report ................................................................................................... 201
2.7.6 Fax Call Report .............................................................................................................. 202
2.7.7 Call Handling Statistic Report ........................................................................................ 203
2.7.8 Custom Service Report..................................................................................................205
2.7.9 Message Status Report ................................................................................................. 206
2.7.10 Subscriber Setup Report ............................................................................................... 207
2.7.11 Security Information Report ........................................................................................... 208
2.7.12 Hourly Statistics Report ................................................................................................. 209
2.7.13 E-mail Report ................................................................................................................. 210
Programming Manual 5
Page 6

2.8 System Security ...........................................................................................................211
2.8.1 Administrator ..................................................................................................................211
2.8.2 Subscriber ......................................................................................................................214
Glossary .................................................................................................... 217
Index .......................................................................................................... 231
6 Programming Manual
Page 7

Section 1
Programming Instructions
This section describes how to install, start, and operate KXTVA Maintenance Console.
Programming Manual 7
Page 8

1.1 Introduction
1.1 Introduction
1.1.1 System Administration
VPS programming can be performed by the System Administrator, System Manager, and Message
Manager. The type of programming performed by each is very different. While the System Manager
and Message Manager can use their telephones to program the PBX, the System Administrator must
use KX-TVA Maintenance Console and a PC.
VPS programming performed by the System Administrator is referred to as "system administration".
– System administration involves creating or changing VPS settings that control the manner
in which VPS performs, and is usually done before any other programming. (The system
manager can program some of these parameters with a telephone.)
– System administration can be performed by only one person at a time: a second person
attempting to program the VPS will be denied access to system administration.
1.1.2 Password Security
To maintain system security, a password is required to perform system programming. When KX-TVA
Maintenance Console is started for the first time, the Quick Setup needs to be set. Then, you will be
asked to set the system password before the setup. To avoid unauthorized access and possible
fraudulent dialing, do not disclose the password.
Warning to the Administrator regarding the system password
1. Please inform the customer of the importance of the password and the possible dangers if
it becomes known to others.
2. To avoid unauthorized access and possible fraudulent dialing, maintain the secrecy of the
password.
3. Please change the password periodically.
4. To prevent unauthorized access, we strongly recommend selecting a long and random
password.
5. If the system password is forgotten, you have to reset the VPS to its factory defaults and
reprogram it.
8 Programming Manual
Page 9

1.2 Installing and Starting KX-TVA Maintenance Console
1.2 Installing and Starting KX-TVA Maintenance
Console
1.2.1 Installing KX-TVA Maintenance Console
System programming, diagnosis, and data upload/download can be performed with a PC using the
KX-TVA Maintenance Console software.
This section briefly describes how to install and start KX-TVA Maintenance Console on a PC that is
connected to the VPS via USB.
System Requirements
Required Operating System
•Microsoft Windows 98 SE, Windows Me, Windows 2000, or Windows XP
Minimum Hardware Requirements
• CPU: 133 MHz Intel Pentium microprocessor
• HDD: 300 MB of available hard disk space
• RAM: 64 MB of free RAM (128 MB recommended)
® ®
® ®
Software Installation
1. Copy the KX-TVA Maintenance Console setup file to a local drive on the PC.
(Its icon is shown here, on the left.)
2. Double-click the setup file to run the installer.
3. Follow the on-screen instructions provided by the installation wizard.
4. Click Finish.
5. Click OK.
Note
• To install or uninstall the software on a PC running Windows 2000 Professional or Windows
XP Professional, you must be logged in as a user which is in either the "Administrators" or
"Power Users" group.
• When the VPS is first connected to the PC via USB, a wizard should appear and ask you to
select the appropriate USB driver. Browse for and select the KX-TVA USB driver, which is
copied to the local drive during installation.
Updating other Panasonic Drivers
CAUTION
Installing the USB driver may prevent the USB driver for KX-TDA series or PC Console/Phone
Software from functioning correctly. In this case, update the USB drivers as necessary from the
following folders on the included CD-ROM:
KX-TDA Series: CD-ROM Drive:\TDA_USB Driver\TDA_USB Driver
PC Console/Phone Software: CD-ROM Drive:\TDA_USB Driver\T7601_USB Driver
Note
• Before installing or uninstalling the driver, be sure to close any open applications.
Programming Manual 9
Page 10

1.2 Installing and Starting KX-TVA Maintenance Console
Windows 98SE
1. Connect the PC to the PBX with a USB cable.
The Add New Hardware Wizard will appear.
2. Click Next.
3. Select Search for the best driver for your device. [Recommended], then click Next.
4. Select Specify a location, then click Browse.
5. Specify the folder containing the USB driver, CD-ROM Drive:\USB driver\Win98, then click OK.
6. Click Next.
7. Click Next.
8. Click Finish.
Note
• If a dialog box appears asking you to restart your PC, restart the PC.
Windows Me
1. Connect the PC to the PBX with a USB cable.
The Add New Hardware Wizard will appear.
2. Select Specify the location of the driver [Advanced], then click Next.
3. Select Search for the best driver for your device. [Recommended].
4. Select Specify a location, then click Browse.
5. Specify the folder containing the USB driver, CD-ROM Drive:\USB driver\WinMe, then click OK.
6. Click Next.
7. Click Next.
8. Click Finish.
Note
• If a dialog box appears asking you to restart your PC, restart the PC.
Windows 2000
1. Connect the PC to the PBX with a USB cable.
The Found New Hardware Wizard will appear.
2. Click Next.
3. Select Search for a suitable driver for my device. [Recommended], then click Next.
4. Select Specify a location, then click Next.
5. Click Browse, and specify the folder containing the USB driver, CD-ROM Drive:\USB
driver\Win2000, then click Open.
6. Click OK.
7. Click Next.
8. Click Finish.
Windows XP
1. Connect the PC to the PBX with a USB cable.
The Found New Hardware Wizard will appear.
2. Select Install from a list or specific location [Advanced], then click Next.
10 Programming Manual
Page 11

1.2 Installing and Starting KX-TVA Maintenance Console
3. Select Search for the best driver in these locations.
4. Select Include this location in the search:, then click Browse.
5. Specify the folder containing the USB driver, CD-ROM Drive:\USB driver\WinXP, then click OK.
6. Click Next.
7. Click Continue Anyway.
8. Click Finish.
Programming Manual 11
Page 12
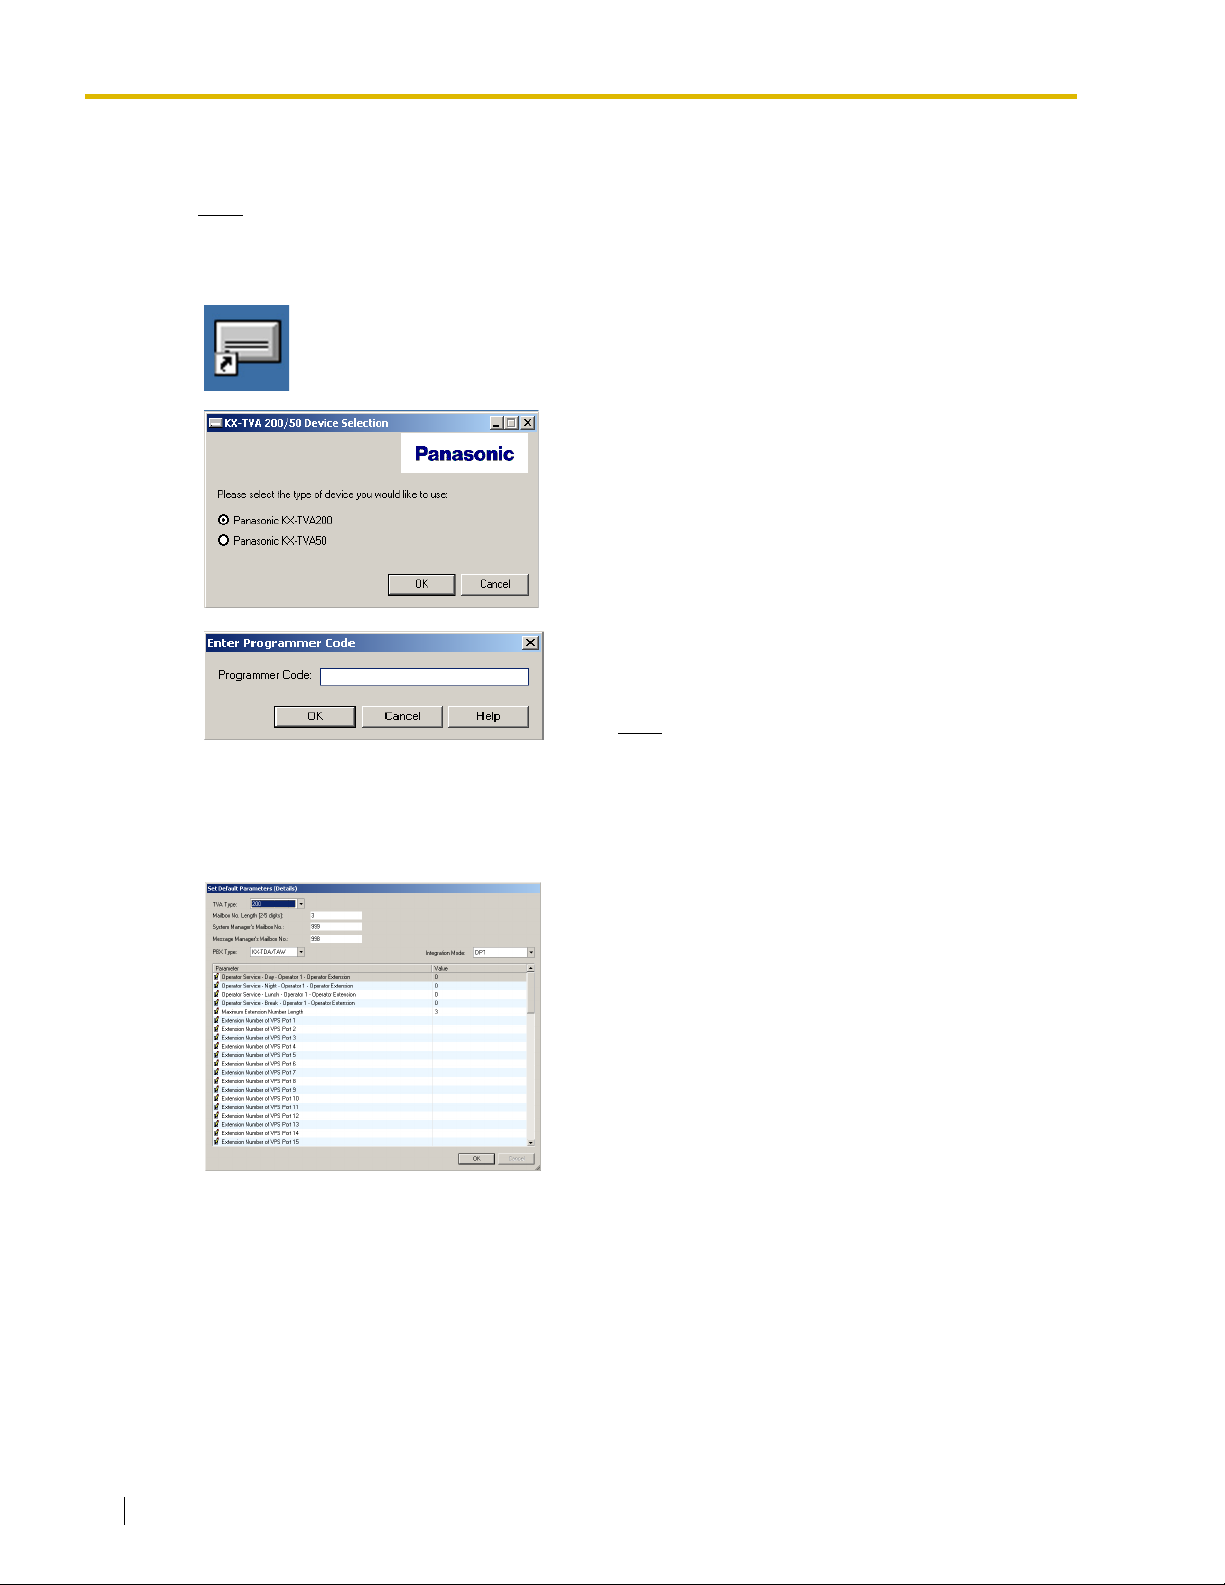
1.2 Installing and Starting KX-TVA Maintenance Console
1.2.2 Starting KX-TVA Maintenance Console
Note
• The screenshots shown here are for reference only, and may differ from the screens
displayed on your PC.
1. Click the KX-TVA Maintenance Console shortcut
icon. Its icon is shown here, on the left.
2. Select the appropriate VPS model.
3. The Enter Programmer Code dialog box is
displayed. Enter the programmer code (default:
1234) and click OK.
Note
• The programmer code is required to use
the KX-TVA Maintenance Console. The
System Administrator can change the
programmer code (see
Programmer Code).
4. The Set Default Parameters window is displayed the
first you start KX-TVA Maintenance Console. Select
the TVA Type, PBX Type, and Integration Mode.
Change the default parameters listed in the window
if necessary, then click OK.
1.8.9 Utility—
12 Programming Manual
Page 13
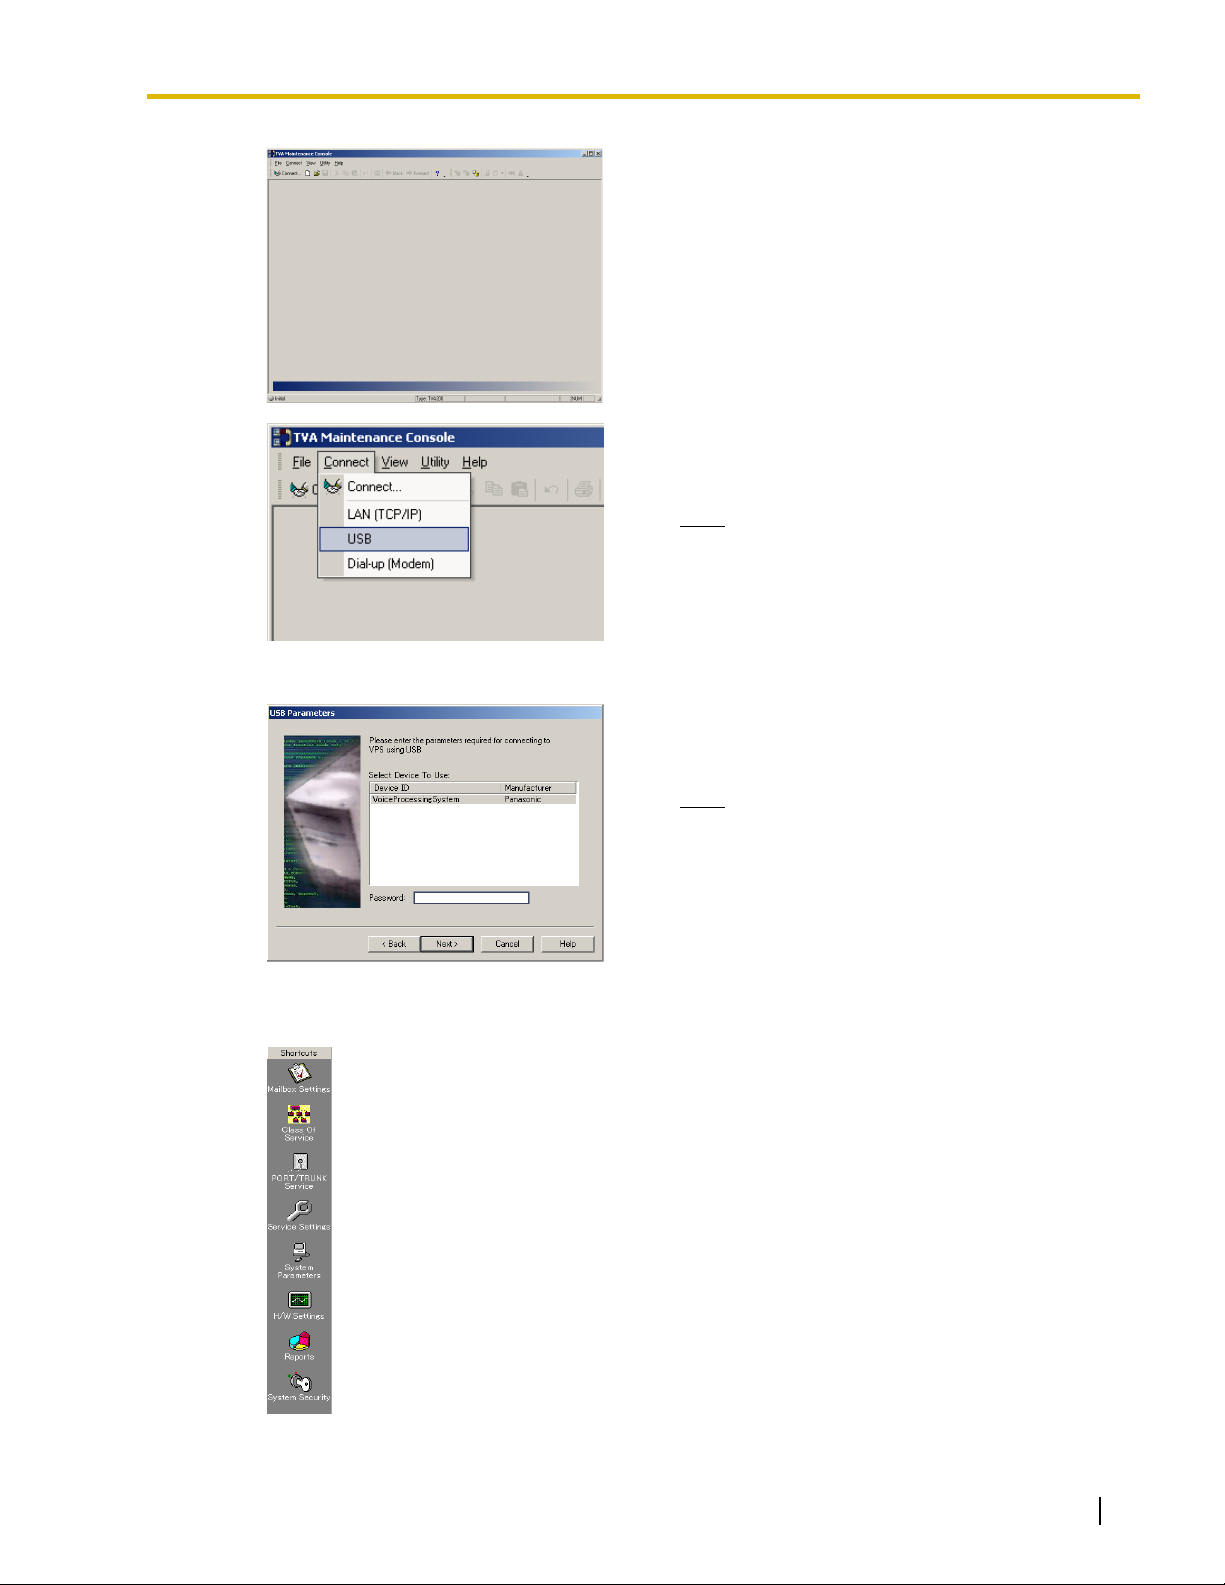
1.2 Installing and Starting KX-TVA Maintenance Console
5. The main window is displayed.
6. Click Connect → USB from the menu bar, or click
Connect on the shortcut bar, select USB in the
Connection Mode dialog box and click Next.
Note
• To connect to the VPS via USB, the KXTVA USB driver must be installed on the
PC, as explained above in "Installing KXTVA Maintenance Console".
7. Select the VPS as the desired USB device, enter the
administrator password (default: 1234), then click
Next.
Note
• The administrator password is required to
access the VPS. The System
Administrator can change the password
(see
Password in 2.8.1 Administrator).
8. Click Finish when the message Connected! is
displayed.
9. You may now begin programming the VPS. To
choose the area you would like to begin
programming, click the desired icon in the Shortcuts
menu.
Programming Manual 13
Page 14

1.2 Installing and Starting KX-TVA Maintenance Console
Note
• If starting KX-TVA Maintenance Console for the first time, use the Quick Setup utility to set
the administrator's password and other basic parameters (see
• Software features, design, and system requirements are subject to change.
Program Mode
When KX-TVA Maintenance Console is started, it enters Initial mode. From here, you can choose to
enter Batch mode or Interactive mode to program the VPS.
a) Batch mode
Batch mode allows you to create new system data files and make modifications to system data
files saved on your PC without being connected to the VPS. Later, when you connect to the VPS,
the system data stored in the PC can be uploaded to the VPS.
To enter Batch mode, select an option from the File menu (see "1.3 File").
b) Interactive mode
Interactive mode allows you to directly modify the system data and settings saved in the VPS's
memory from a PC that is connected to the VPS. This mode displays the system data that is
currently being used by the VPS. Data can be modified and results displayed in real time. To
enter Interactive mode, select an option from the Connect menu (see "
Standard Buttons
There are several standard buttons that are displayed on many screens within KX-TVA Maintenance
Console.
The standard buttons are as follows:
1.8.1 Utility—Quick Setup).
1.4 Connect").
Button Function
OK Accepts the settings that were made in the current screen and
closes the screen.
Apply Accepts the settings that were made in the current screen and
leaves the screen open.
Cancel Ignores any changes made in the current screen and returns to
the previous screen.
Help Displays the relevant help topic for the current screen.
14 Programming Manual
Page 15

1.3 File
The File menu allows you to create, open or save a data file. If "New" or "Open" are selected, KX-TVA
Maintenance Console automatically enters Batch mode.
1.3.1 File—New
Creates a new system data file, and puts KX-TVA Maintenance Console in Batch mode. All settings
are in their initial or default state. To upload the file created here to the VPS, see "
System Back Up".
Note
• Since selecting this option creates a new system data file, uploading this new file to the VPS
as is will overwrite any settings that are saved in the VPS's memory. Use with care.
To create a new system data file
1. From the File menu, select New.
1.3 File
1.8.2 Utility—
1.3.2 File—Open
Opens a system data file saved on the PC, and puts KX-TVA Maintenance Console in Batch mode.
Using the data without converting may result in certain data being loaded to an incorrect destination,
and is not recommended.
System data files for unsupported VPS models cannot be opened. Only files saved with KX-TVA
Maintenance Console can be opened.
To upload the file modified here to the VPS, see "1.8.2 Utility—System Back Up".
To open a system data file
1. From the File menu, select Open.
The Open dialog box will be displayed.
2. Navigate to the folder containing the system data file you want to open.
3. Select the file.
4. Click Open.
a) Click Ye s to convert the data for use with the current version of KX-TVA Maintenance
Console.
Enter a name for the new converted system data file.
b) Click No to open the file without converting it (not recommended).
Programming Manual 15
Page 16

1.3 File
1.3.3 File—Close
Closes currently opened system data files, and enters "Initial mode". This menu is only available
when using the KX-TVA Maintenance Console in "Batch mode".
To Enter Initial mode
• From the File menu, select Close.
If the system data file being modified has not been saved, a warning message will be displayed,
giving you the option to save the file.
a) Click Ye s to save the file and close system data files to enter the Initial Mode.
b) Click No to discard the changes and close system data files to enter the Initial Mode.
1.3.4 File—Save
Overwrites the previously saved system data file with the system data currently being modified.
To upload a file saved here to the VPS, see "1.8.2 Utility—System Back Up".
To save a system data file
• From the File menu, select Save.
If the data has never been saved, the Save dialog box will be displayed. For more details, see
"
1.3.5 File—Save As".
1.3.5 File—Save As
Saves the system data file being modified with the name chosen by the user.
To upload a file saved here to the VPS, see "1.8.2 Utility—System Back Up".
To save a system data file with a new name
1. From the File menu, select Save As.
2. Navigate to the folder in which you want to save the file.
3. Enter a file name, or select a file to overwrite.
4. Click Save.
If choosing to overwrite another file, a warning message will be displayed.
a) Click Ye s to overwrite.
b) Click No to return to the previous screen.
1.3.6 File—Exit
Closes KX-TVA Maintenance Console.
To exit KX-TVA Maintenance Console
• From the File menu, select Exit.
If the system data file being modified has not been saved, a warning message will be displayed,
giving you the option to save the file.
16 Programming Manual
Page 17

a) Click Ye s to save the file and exit KX-TVA Maintenance Console.
b) Click No to discard the changes and exit KX-TVA Maintenance Console.
1.3 File
Programming Manual 17
Page 18

1.4 Connect
1.4 Connect
The Connect menu allows you to directly program the VPS in Interactive mode. When connecting,
you are required to enter the password corresponding to the administrator password entered when
starting KX-TVA Maintenance Console.
1.4.1 Connect—USB
Connects to the VPS through the USB port on the VPS.
To connect using USB
1. From the Connect menu, select USB.
2. Enter the administrator password used to log on to KX-TVA Maintenance Console.
3. Click Next, and Finish when the connection is completed.
1.4.2 Connect—LAN (Optional for KX-TVA50)
Connects to the VPS through the LAN port of the VPS.
Note
• Before you connect to the VPS via LAN, you must first assign an IP address to the VPS. See
"
1.8.11 Utility—LAN Settings" to assign an IP address.
To connect using a LAN
1. From the Connect menu, select LAN (TCP/IP).
2. Enter the administrator password used to log on to KX-TVA Maintenance Console and IP
Address assigned to the VPS.
3. Click Next, and Finish when the connection is completed.
1.4.3 Connect—Modem (optional)
Connects to the VPS through the modem.
Note
• To access the VPS remotely using this feature, a remote modem card must be installed. For
more details, see "2.7.5 Modem Card (KX-TVA296)" in Installation Manual.
• To connect to the VPS using a PC with an external modem, you need to upgrade the KX-
TVA Maintenance Console software on the PC connected to the VPS.
The following settings must be entered to match the settings of the modem and/or PC.
Setting Val ues Description
Phone No. – Enter the phone number to dial into the VPS.
Por t No. – Specify the number of ports.
18 Programming Manual
Page 19

Setting Values Description
Password – Enter the password used to log on to KX-
To connect using a modem
1. From the Connect menu, select Dial-up (Modem).
2. Enter the administrator password and the settings as required.
3. Click Next, and Finish when the connection is completed.
1.4.4 Connect—Disconnect
Closes the connection between KX-TVA Maintenance Console and the VPS.
To disconnect
1. From the Connect menu, select Disconnect.
2. Click Yes.
1.4 Connect
TVA Maintenance Console.
Programming Manual 19
Page 20

1.5 Edit
1.5 Edit
The Edit menu allows you to easily edit data in KX-TVA Maintenance Console.
1.5.1 Edit—Undo
Returns the last changed setting to its previous value.
To undo
• From the Edit menu, select Undo.
1.5.2 Edit—Cut
Cuts the selection and places it in the clipboard.
To cut
• Select an area of text.
• From the Edit menu, select Cut.
1.5.3 Edit—Copy
Copies the selection and places it in the clipboard.
To copy
• Select an area of text.
• From the Edit menu, select Copy.
1.5.4 Edit—Paste
Inserts the contents of the clipboard.
To paste
• Place the cursor in the desired location.
• From the Edit menu, select Paste.
1.5.5 Edit—Select All
Selects the entire document.
To select all
• From the Edit menu, select Select All.
20 Programming Manual
Page 21

1.5.6 Edit—Delete
Deletes selected items.
To delete
• Select an item to be highlighted.
• From the Edit menu, select Delete.
1.5 Edit
Programming Manual 21
Page 22

1.6 View
1.6 View
The View menu allows you to hide/show the Tool Bar, Status Bar, Shortcut Bar, and Utility Bar.
1.6.1 View—Tool Bar
Selects whether the tool bar, which provides icons allowing easy access to commonly used functions,
is displayed or not.
To hide/show the tool bar
• From the View menu, select or deselect Tool Bar.
1.6.2 View—Status Bar
Selects whether the status bar, which shows the connection status at the bottom of the windows, is
displayed or not.
To hide/show the status bar
• From the View menu, select or deselect Status Bar.
1.6.3 View—Shortcut Bar
Selects whether the shortcut bar, which provides icons allowing easy access to each setting window,
is displayed or not.
To hide/show the shortcut bar
• From the View menu, select or deselect Shortcut Bar.
1.6.4 View—Utility Bar
Selects whether the utility bar, which provides icons allowing easy access to each utility command,
is displayed or not.
To hide/show the utility bar
• From the View menu, select or deselect Utility Bar.
22 Programming Manual
Page 23

1.7 Go To
The Go to menu allows easy access to each setting window of KX-TVA Maintenance Console.
1.7.1 Go To—Mailbox Settings
Opens the Mailbox Settings screen.
To go to
• From the Go To menu, select Mailbox Settings and a sub-section.
1.7.2 Go To—Class Of Service
Opens the Class Of Service screen.
To go to
• From the Go To menu, select Class Of Service and a sub-section.
1.7 Go To
1.7.3 Go To—PORT/TRUNK Service
Opens the PORT/TRUNK Service screen.
To go to
• From the Go To menu, select PORT/TRUNK Service.
1.7.4 Go To—Service Settings
Opens the Service Settings Service screen.
To go to
• From the Go To menu, select Service Settings and a sub-section.
1.7.5 Go To—System Parameters
Opens the System Parameters screen.
To go to
• From the Go To menu, select System Parameters and a sub-section.
Programming Manual 23
Page 24

1.7 Go To
1.7.6 Go To—H/W Settings
Opens the H/W Settings screen.
To go to
• From the Go To menu, select H/W Settings.
1.7.7 Go To—Reports
Opens the Reports screen.
To go to
• From the Go To menu, select Reports and a sub-section.
1.7.8 Go To—System Security
Opens the System Security screen.
To go to
• From the Go To menu, select System Security.
24 Programming Manual
Page 25

1.8 Utility
The Utility menu provides access to the following functions and utilities:
– Quick Setup
– System Back Up
– System Prompts Customization
– Port Status
– System Trace
– System Maintenance
– System Initialize/Restart
– Diagnostic
– Programmer Code
– Software Version
– LAN Settings
– Default Parameters
1.8 Utility
To select an item from the Utility menu, click Utility in the menu bar, then select the desired function
or utility.
Certain Utility menu items are also available from the Tool Bar (System Back Up, Port Status, System
Trace, and System Initialize/Restart).
1.8.1 Utility—Quick Setup
The Quick Setup utility allows you to set essential VPS parameters quickly and easily. It is particularly
useful when connecting to the VPS for the first time or after initializing the VPS. The following settings
can be programmed with the Quick Setup utility:
– System Security
– PBX Environment
– Mailbox Edit
– Port/Trunk Setting
– Time Setting
Note
• Set the desired parameters in each screen then click Next or Back to go to the desired
screen.
• The Auto Configuration utility is available from the PBX Environment screen. This utility
allows you to automatically create mailboxes for several extensions at once. When you click
Next on the PBX Environment screen, Auto Configuration dialog box appears. Click OK
to start Auto configuration, or Cancel to skip Auto Configuration and go to the next setting
screen. Auto Configuration is available only in Interactive Mode and with Panasonic KX-T
series PBXs using APT/DPT integration.
• In the Quick Setup-Finish window, you can change system date and time. You can click
Finish to save the parameters, and "Quick Setup Completed" dialog box appears. Click YES
to save the settings, or NO if you want to modify some settings.
Programming Manual 25
Page 26

1.8 Utility
1.8.2 Utility—System Back Up
The following system programming data, system parameters, and voice data can be backed up or
restored as individual files.
The Backup History utility can be used to view a record of previous backups.
a) Program
– System Program
– DSP Program
b) System Parameters
c) System Prompts
– Installed Prompt
–Custom Service Menu
– Company Name
– Company Greeting
– System Mailbox Group Voice Label
– System Caller Name
– Prompt Selection
– Hold Announce Menu
– Extension Group Voice Label
d) Mailbox Prompts
–Owner Name
– Personal Greetings
– Personal Caller ID Name
– Interview
– Personal Group List Name
– EMD List Member Name
e) Mailbox Messages
Follow the steps below to use the System Back Up utility:
[Creation of Backup]
1. Click Utility in the menu bar.
2. Select System Back Up and Make Backup….
(You can click the icon in the tool bar instead of step 1 and 2.)
3. Check the desired item(s) to backup.
4. Click "Folder" icon.
The Save dialog box appears.
5. Navigate to the folder where to wish to save the system backup file.
6. Click Click to edit... next to Mailbox Prompts.
7. Check either All Mailboxes or select the mailboxes you wish to backup.
8. Click OK.
9. Click Click to edit... next to Mailbox Messages.
10. Check either All Mailboxes or select the mailboxes you wish to backup.
11. Click OK.
26 Programming Manual
Page 27

Note
• The system will prepare the data to be backed up, and the backup will begin about 30
seconds later. The time needed to backup the data will vary depending on the connection
method, communication speed, and the amount of data that is being backed up.
• Deleted messages will not be backed up by the backup of the Mailbox Messages.
[Restoration of Backup Data]
1. Click Utility in the menu bar.
2. Select System Back Up and Restore the backup data.
(You can click the icon in the tool bar instead of step 1 and 2.)
3. Check the desired item to restore.
4. Click "Folder" icon.
The Open dialog box appears.
5. Navigate to the folder containing the desired backup file and select the file.
6. Click Open, then click Restore.
Note
• For KX-TVA50: The built-in flash memory must have space available to accommodate the
restored data. If the backed up data is larger than the space available in the flash memory,
the data cannot be restored.
[Backup History]
1. Click Utility in the menu bar.
2. Select System Back Up and Backup History.
(You can click the icon in the tool bar instead of step 1 and 2.)
The following status of backup history can be checked in the Backup History dialog box:
– Description
– Parameters
– Completion Status (Completed/No Data/Error)
– Date & Time
– Total Elapsed Time (MM:SS)
3. Click Close.
1.8 Utility
1.8.3 Utility—System Prompts Customization
The System Prompts Customization screen is used to view, play, add, or delete system prompts. The
System Administrator can also check the prompt number and text for these prompts. The following
categories of system prompts can be customized from the System Prompts Customization screen:
a) System Guidance
b) Custom Service Menus
c) Company Greetings
d) Others
–Company Name
– Language Select Menu
– Hold Announce Menu
– Mailbox Group List Label
– Extension Group List Label
Programming Manual 27
Page 28
1.8 Utility
– System Caller ID Name
Follow the steps to customize System Prompts:
1. Click Utility in the menu bar.
2. Select System Prompts Customization.
3. Select a tab in the System Prompts Customization dialog box.
[Deletion]
The System Administrator is able to delete the specific System Prompt or the installed language used
for System Prompts.
To delete the specific system prompt:
1. Select the desired prompt number.
2. Click Delete.
3. Click OK.
To delete the installed language for system prompt:
1. Select the desired language, Guidance No.
2. Click Delete.
3. Click OK.
[Record of System Prompt]
1. Select the desired System Prompt to record, and click Play/Record.
2. Select "Record from extension" or "Import from recorded file".
When "Record from extension" is selected
1. Specify the extension number of the telephone used for recording, then click Connect.
2. When the specified extension rings, go off-hook.
3. Click (record), (stop), or (play) to record or play a
system prompt.
4. Click Disconnect.
5. Click OK.
When "Import from recorded file" is selected
1. Click ….
The Open dialog box appears.
2. Navigate to the folder containing the WAV files you wish to import. (WAV files must meet the
following specifications: IMA ADPCM codec, 8.000 kHz, 4-bit, mono.)
3. Select the desired WAV file.
4. Click Open to import the file.
5. Click OK.
[Start/Stop Playback of System Prompt]
1. Select the desired system prompts.
2. Click Play/Record.
3. Click Play or Stop.
28 Programming Manual
Page 29

1.8.4 Utility—Port Status
The System Administrator can confirm the condition of each port and turn on/off VPS Call
Progression Mode.
Follow the steps below to use the Port Status utility:
1. Click Utility in the menu bar.
2. Select Port Status.
(You can click the icon in the tool bar instead of step 1 and 2.)
The Port Status screen includes the Port Activity List which displays each port's status and
number, as well as the current setting of Port Parameters. The screen will be updated every 2
seconds. Each port's status will be displayed as follows:
– "Ready": The port is ready to be used.
– "Incoming Call": The port is handling an incoming call.
– "Outgoing Call": processing sending service
– "DSP Reset": processing DSP reset disposition
– "PT Connect": processing PT connect disposition
– "Offline": Off Line Mode
– "No Card": Available card is not installed.
[Turning on VPS Call Progression Mode]
1. Select the desired port and click Open Port.
2. Select Selected Ports to turn on the selected port, or select All Ports to turn on the all ports.
[Turning off VPS Call Progression Mode]
1. Select the desired port and click Close Port.
2. Select Selected Ports to turn off the selected port, or select All Ports to turn off the all ports.
3. Click Close.
1.8 Utility
1.8.5 Utility—System Trace
The System Administrator can monitor VPS activities and log the activities into a separate file. The
following data can be logged for each port or all ports:
– DTMF/Dial: DTMF signals sent and received by the VPS.
– Guidance: guidance data that the VPS played.
– Message: the VPS activity on messages such as creating, playing and deleting.
– Process Event: events occurred between the VPS processes such as Application, Call
Processor and DSP.
– Caller ID: Caller ID received from the PBX.
– Error: system errors.
– DID: DID number received from the connected PBX.
– PIN: PIN received by the VPS.
There are 2 methods for System Trace.
a) Real Time Trace: monitors the trace data of the selected port. Also, it is possible to log the
monitoring data as a file.
Programming Manual 29
Page 30

1.8 Utility
b) Internal Trace: logs the trace data of the selected port automatically in the system.
Follow the steps below to monitor or log the system trace data.
1. Click Utility in the menu bar.
2. Select System Trace.
(You can click the icon in the tool bar instead of step 1 and 2.)
Real Time Trace
1. Select Real Time Trace.
2. Check Enable/Disable Trace Data.
3. Check the data and port you wish to monitor.
4. Click …, navigate the folder to save the monitored data as a file.
5. Click Apply.
Note
• During the "Real Time Trace", following features cannot be used:
– Other features in the Utility menu
– Recording features on a PC connected to the VPS (for Mailbox Group, Extension
Group, System Caller Name, and Custom Service)
Internal Trace
1. Select Internal Trace.
2. Select Setting, Display, or Trace Clear.
– Setting: Disables or enables the Internal Trace feature, and specifies the data and port
you wish to log.
– Display: Displays the trace data.
– Trace Clear: Clears saved trace data.
1.8.6 Utility—System Maintenance
The System Administrator can maintain the VPS using System Maintenance.
Follow the steps below for System Maintenance:
1. Click Utility in the menu bar.
2. Select System Maintenance.
3. Edit parameters in the System Maintenance dialog box.
4. Click OK.
System Maintenance Mode
Specifies whether to enable or disable System Maintenance Mode.
Default
Enable
Value Range
Disable, Enable
30 Programming Manual
Page 31

System Maintenance Start Time
Specifies the System Maintenance start time.
Default
01:00
Value Range
HH:MM (HH: Hour, MM: Minute)
HDD Auto Stand-by Mode
Specifies whether to enable or disable HDD Auto Stand-by Mode.
Default
Enable
Value Range
Disable, Enable
1.8 Utility
HDD Auto Stand-by Delay Time
Specifies the length of time that the VPS waits before activating HDD Auto Stand-by Mode. If the time
period expires without the access to HDD, the VPS will function HDD Auto Stand-by Mode.
Default
15 min
Value Range
0 min–21 min, 30 min/60 min
1.8.7 Utility—System Initialize/Restart
The System Initialize/Restart is used to restart the VPS. There are 2 methods as follows:
a) Initialize System: clears all voice data except the installed system guidance, and returns all
system parameters to their default settings. The System Administrator has to specify the
following parameters before initializing the system:
– Mailbox No. Length
– System Manager's Mailbox No.
– Message Manager's Mailbox No.
b) Restart System: restarts the system. The VPS is not initialized.
Follow the steps below to initialize or restart the VPS:
1. Click Utility in the menu bar.
2. Select System Initialize/Restart.
Initialize System
Programming Manual 31
Page 32

1.8 Utility
1. Select "Initialize System".
(You can click the icon in the tool bar instead of step 1 and 2.)
2. Specify "Mailbox No. Length (2–5 digits)", "System Manager's Mailbox No." and "Message
Manager's Mailbox No."
3. Click Next.
4. If there are active ports, the System Administrator will be asked to either to continue or to
cancel.
Select OK to continue, or Cancel to close the ports.
5. Click OK.
Restart System
1. Select "Restart System".
(You can click the icon in the tool bar instead of step 1 and 2.)
2. If there are active ports, the System Administrator will be asked to either to continue or to
cancel.
Select OK to continue, or Cancel to close the ports.
3. Click OK.
1.8.8 Utility—Diagnostic
Diagnostic is used to diagnose the following hardware of VPS.
– Codec/DSP Voice Path: diagnoses whether the voice path between Codec and DSP
functions properly.
– Play/Record Voice Path: diagnoses whether the voice path in the playing/recording unit
functions properly.
Follow the steps below for System Diagnostic:
1. Click Utility in the menu bar.
2. Select Diagnostic.
3. If there are active ports, the System Administrator will be asked to either to continue or to cancel.
Select OK to continue, or Cancel to close the ports.
4. Select Codec/DSP Voice Path or Play/Record Voice Path.
5. Diagnosis starts.
1.8.9 Utility—Programmer Code
The System Administrator can change the programmer code that is needed to use KX-TVA
Maintenance Console.
Follow the steps below to change the programmer code:
1. Click Utility in the menu bar.
2. Select Programmer Code.
3. If the programmer code is already set, enter the old programmer code in Enter old programmer
code:.
4. Enter a new programmer code in Enter new programmer code:.
32 Programming Manual
Page 33

5. Enter the new programmer code in Confirm new programmer code:.
6. Click OK.
1.8.10 Utility—Software Version
Software Version is used to display the version of main software and DSP software for reference.
Follow the steps below to display the software version:
1. Click Utility in the menu bar.
2. Select Software Version.
3. Click OK.
1.8.11 Utility—LAN Settings
The System Administrator can set the IP address and Port Number for the VPS. To program the VPS
over LAN connection or to use E-mail Integration features, the VPS must first be connected to the
LAN and programmed accordingly.
1.8 Utility
Follow the steps below for LAN Settings:
1. Click Utility in the menu bar.
2. Select LAN Settings.
3. Edit parameters in the LAN Settings dialog box.
4. Click OK.
Note
• The port number setting can usually be left unchanged.
• Consult the LAN administrator for the appropriate settings.
• The VPS must be restarted after these settings are changed in order for them to take effect.
IP Address
Specifies the IP Address for VPS.
Default
192.168.1.11
Subnet Mask
Specifies the Subnet Mask for IP Address.
Default
255.255.255.0
Programming Manual 33
Page 34

1.8 Utility
Default Gateway
Specifies the IP Address for Default Gateway.
Default
192.168.1.1
Port No.
Specifies the Port No. for VPS.
Default
10000
Value Range
1–65535
1.8.12 Utility—Default Parameters
Specifies TVA Type, Mailbox No. Length, System Manager's Mailbox No., Message Manager's
Mailbox No., PBX Type, Integration Mode, and some parameters as the default settings.
Follow the steps below for Default Parameters:
1. Click Utility in the menu bar.
2. Select Default Parameters.
Set Default
1. Select "Set Default".
2. Specify TVA Type, PBX Type, Integration Mode, and set parameters.
3. Click OK.
Load Default: Loads the parameters programmed in "Set default" to the VPS.
1. Select "Load Default".
34 Programming Manual
Page 35

Section 2
KX-TVA Maintenance Console Operating
Instructions
This section describes how to program the VPS using the KXTVA Maintenance Console software.
Programming Manual 35
Page 36

2.1 Mailbox Settings
2.1 Mailbox Settings
A maximum of 62 (KX-TVA50) or 1022 (KX-TVA200) subscriber mailboxes can be created. Although
the System Manager can use a telephone to create or edit mailboxes, the System Administrator can
create several mailboxes at once using KX-TVA Maintenance Console.
Mailbox parameters are divided into the following categories:
– Mailbox Parameters
– Notification Parameters
– External Message Delivery settings
– Auto Forwarding settings
– Personal Distribution Lists
– Personal Custom Services
– Remote Call FWD to CO settings
– Automatic Log-in settings
– E-mail Option
Click each tab at the bottom of Mailbox Settings screen to specify the desired parameters.
36 Programming Manual
Page 37
2.1.1 Mailbox Settings Screen
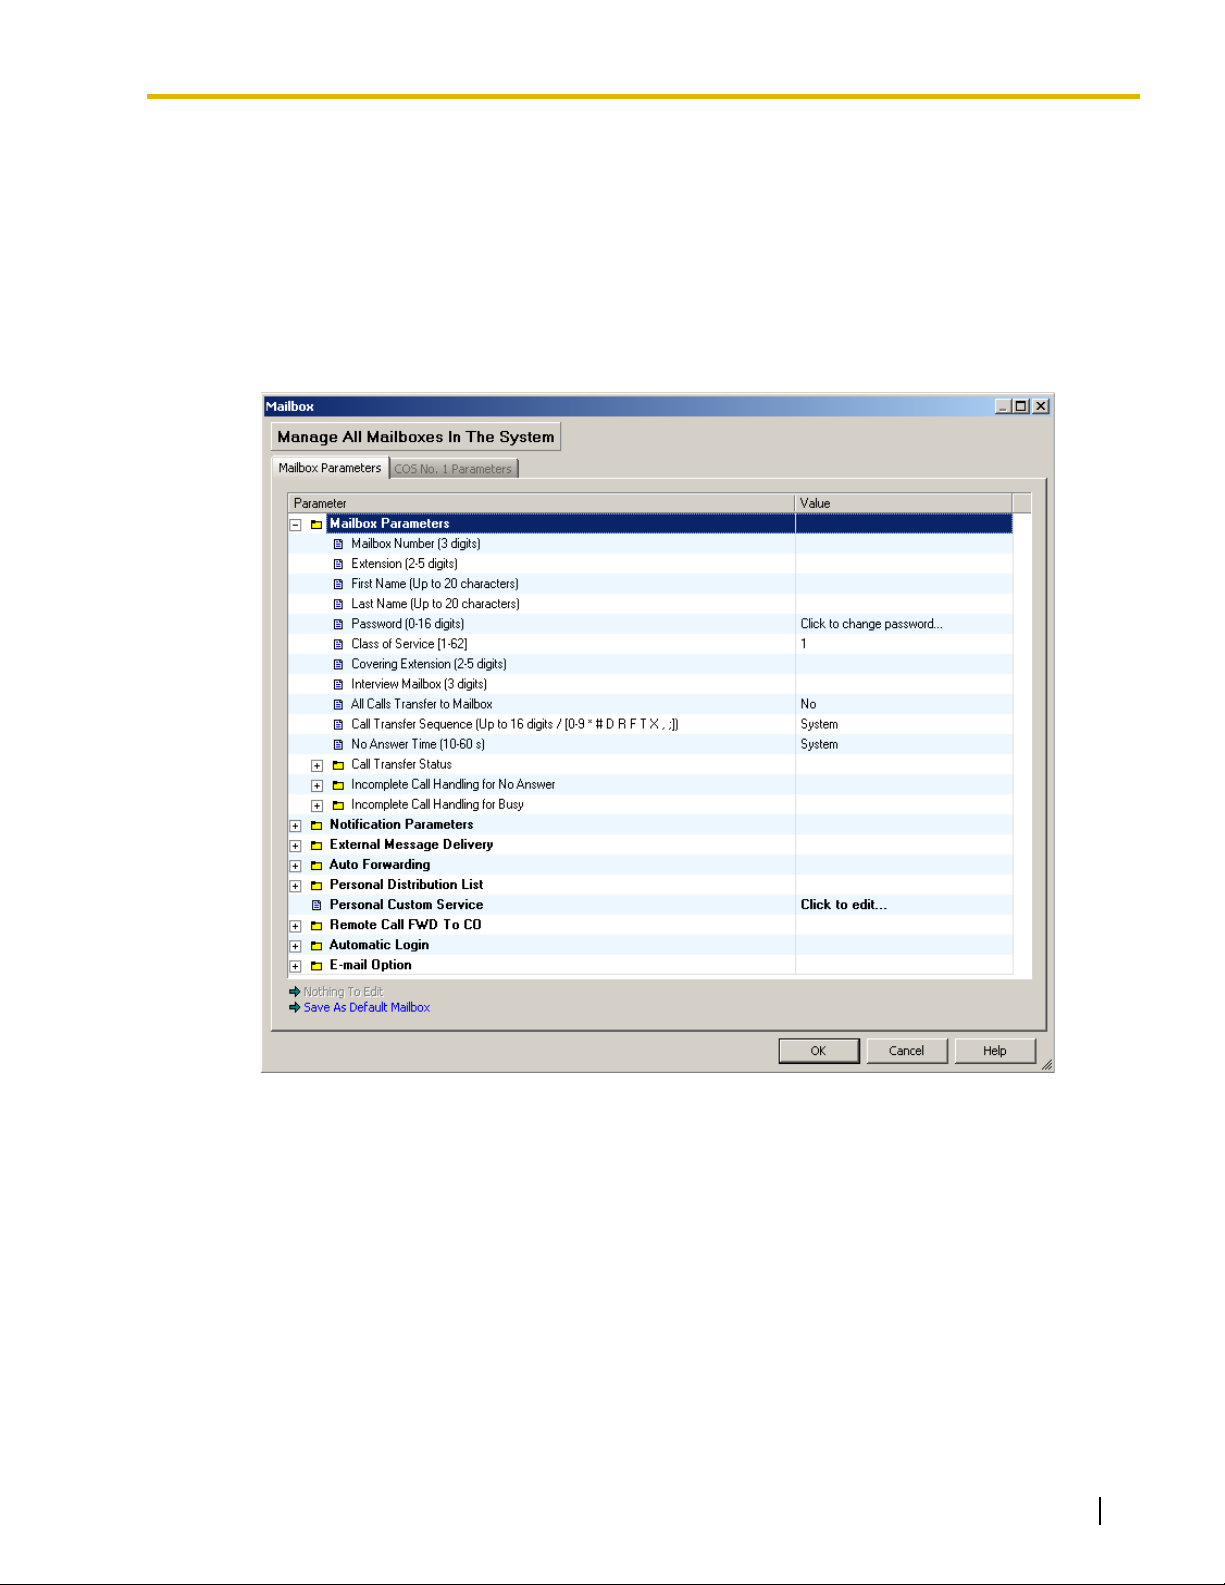
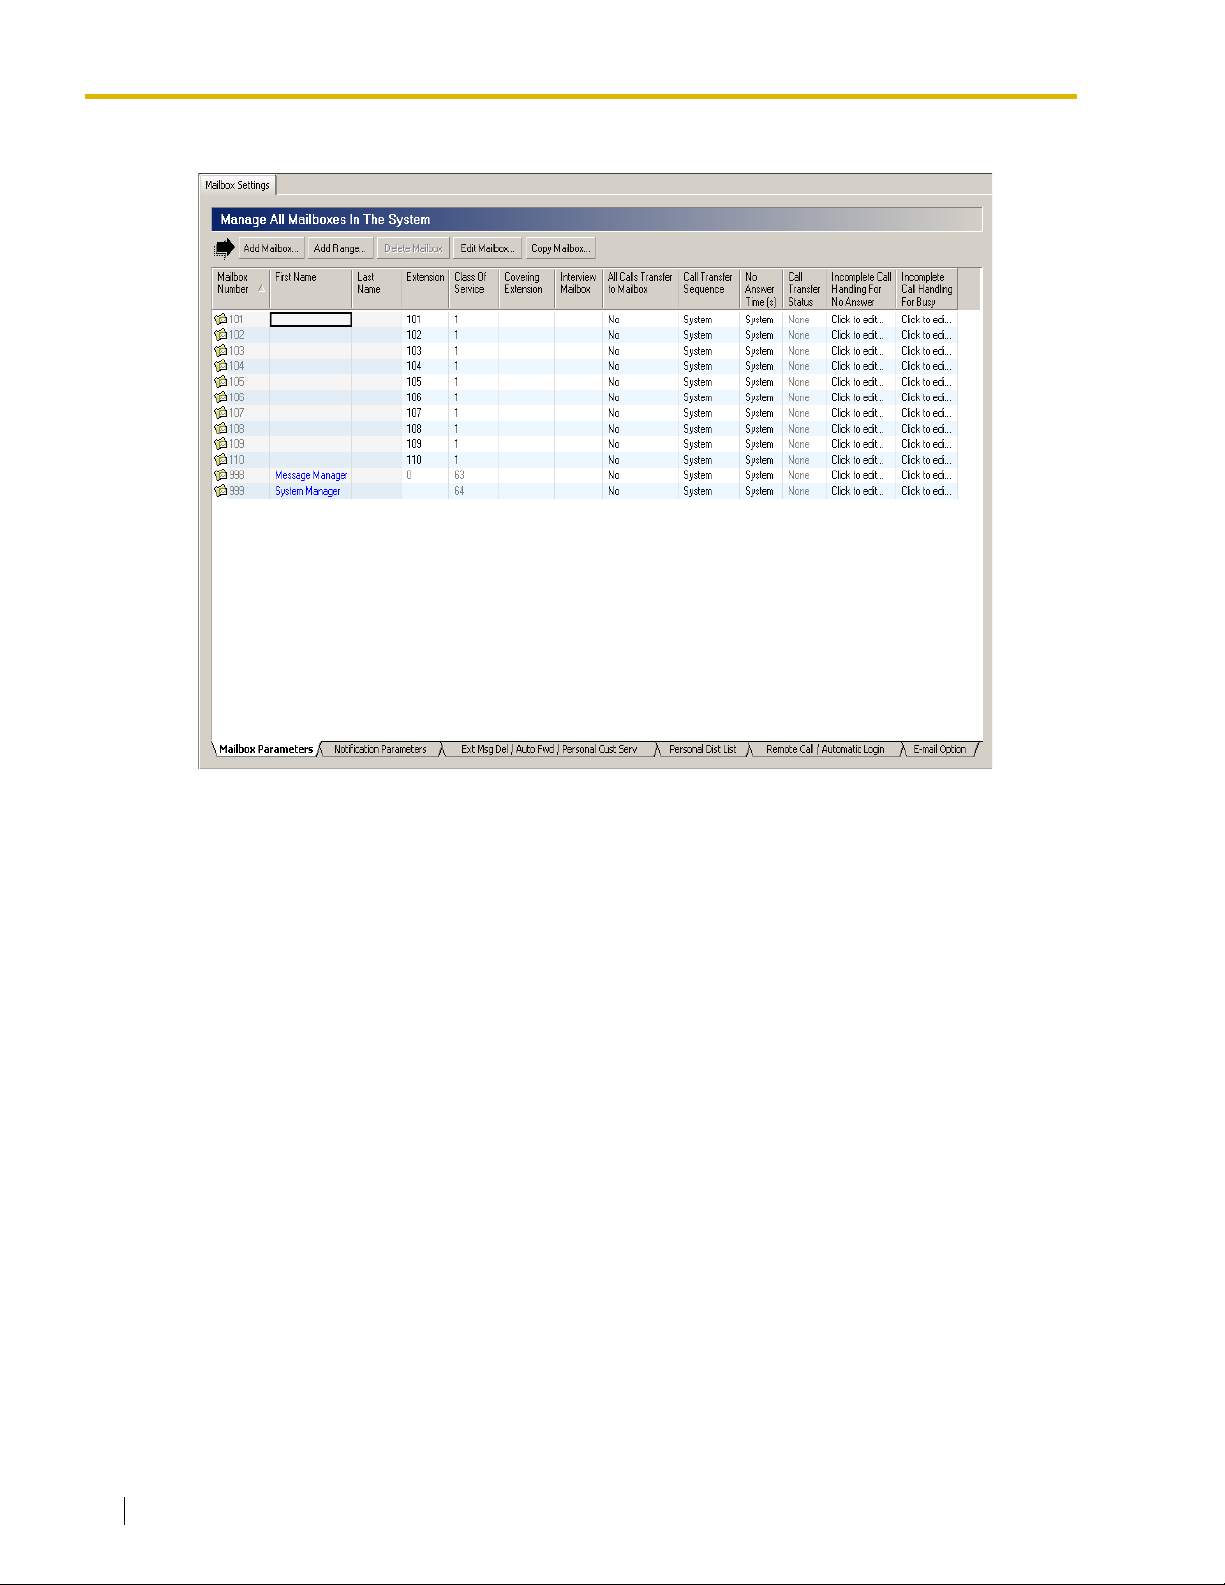
This screen allows the System Administrator to visually browse and edit all mailboxes in the VPS.
There are 2 types of screen: Edit Mailbox and the list of mailboxes.
Edit Mailbox Screen
When you click Mailbox Settings, Edit Mailbox Screen (mailbox setting window for the existing
mailbox with the lowest number, or Mailbox 998 when there's no mailbox) is opened. From this
screen, you can edit mailbox settings.
2.1 Mailbox Settings
When you click Manage All Mailboxes In The System, or click OK in the "Mailbox" dialog box, the
list of all mailboxes is displayed.
[Editing a Mailbox]
Editing the currently opened mailbox setting
1. Edit each Parameter in the Mailbox dialog box.
(Click Save as Default Mailbox to use edited mailbox as the default mailbox settings
for subsequently created mailboxes.)
2. Click OK.
To open the desired mailbox to edit
1. Click Manage All Mailboxes In The System, or click OK in the "Mailbox" dialog box.
2. Select the desired mailbox, then click Edit Mailbox....
Programming Manual 37
Page 38
2.1 Mailbox Settings
List of all mailboxes
This screen provides a list of all mailboxes. From this screen you can add new mailboxes, edit
mailboxes, delete existing mailboxes, and copy mailbox settings to other mailboxes. Mailboxes can
be sorted in ascending or descending order by parameter (mailbox number, first name, last name,
etc.) by clicking the parameter name.
When you click Add Mailbox... or Edit Mailbox, Edit Mailbox screen is displayed.
[Adding a Mailbox]
1. Click Add Mailbox....
2. Edit Parameters in the Mailbox dialog box.
(Click Save As Default Mailbox to use added mailbox as the default mailbox settings for
subsequently created mailboxes.)
3. Click OK.
[Editing a Mailbox]
1. Select the desired mailbox, then click Edit Mailbox..., or you can also double-click the cell
on the screen to edit the specified parameter.
2. Edit each parameter.
[Deleting a Mailbox]
1. Select a mailbox you want to delete.
2. Click Delete Mailbox.
3. Click Yes.
[Copying a Mailbox Setting to other mailboxes]
1. Click the desired mailbox to copy, and press Copy Mailbox....
2. Copy Mailbox dialog box is displayed. Check the items to copy, and select the destination
mailbox number. (Ctrl/Shift Key is available to choose several mailbox numbers.)
38 Programming Manual
Page 39

3. Click Copy.
2.1 Mailbox Settings
Programming Manual 39
Page 40
2.1 Mailbox Settings
2.1.2 Default Mailbox Template
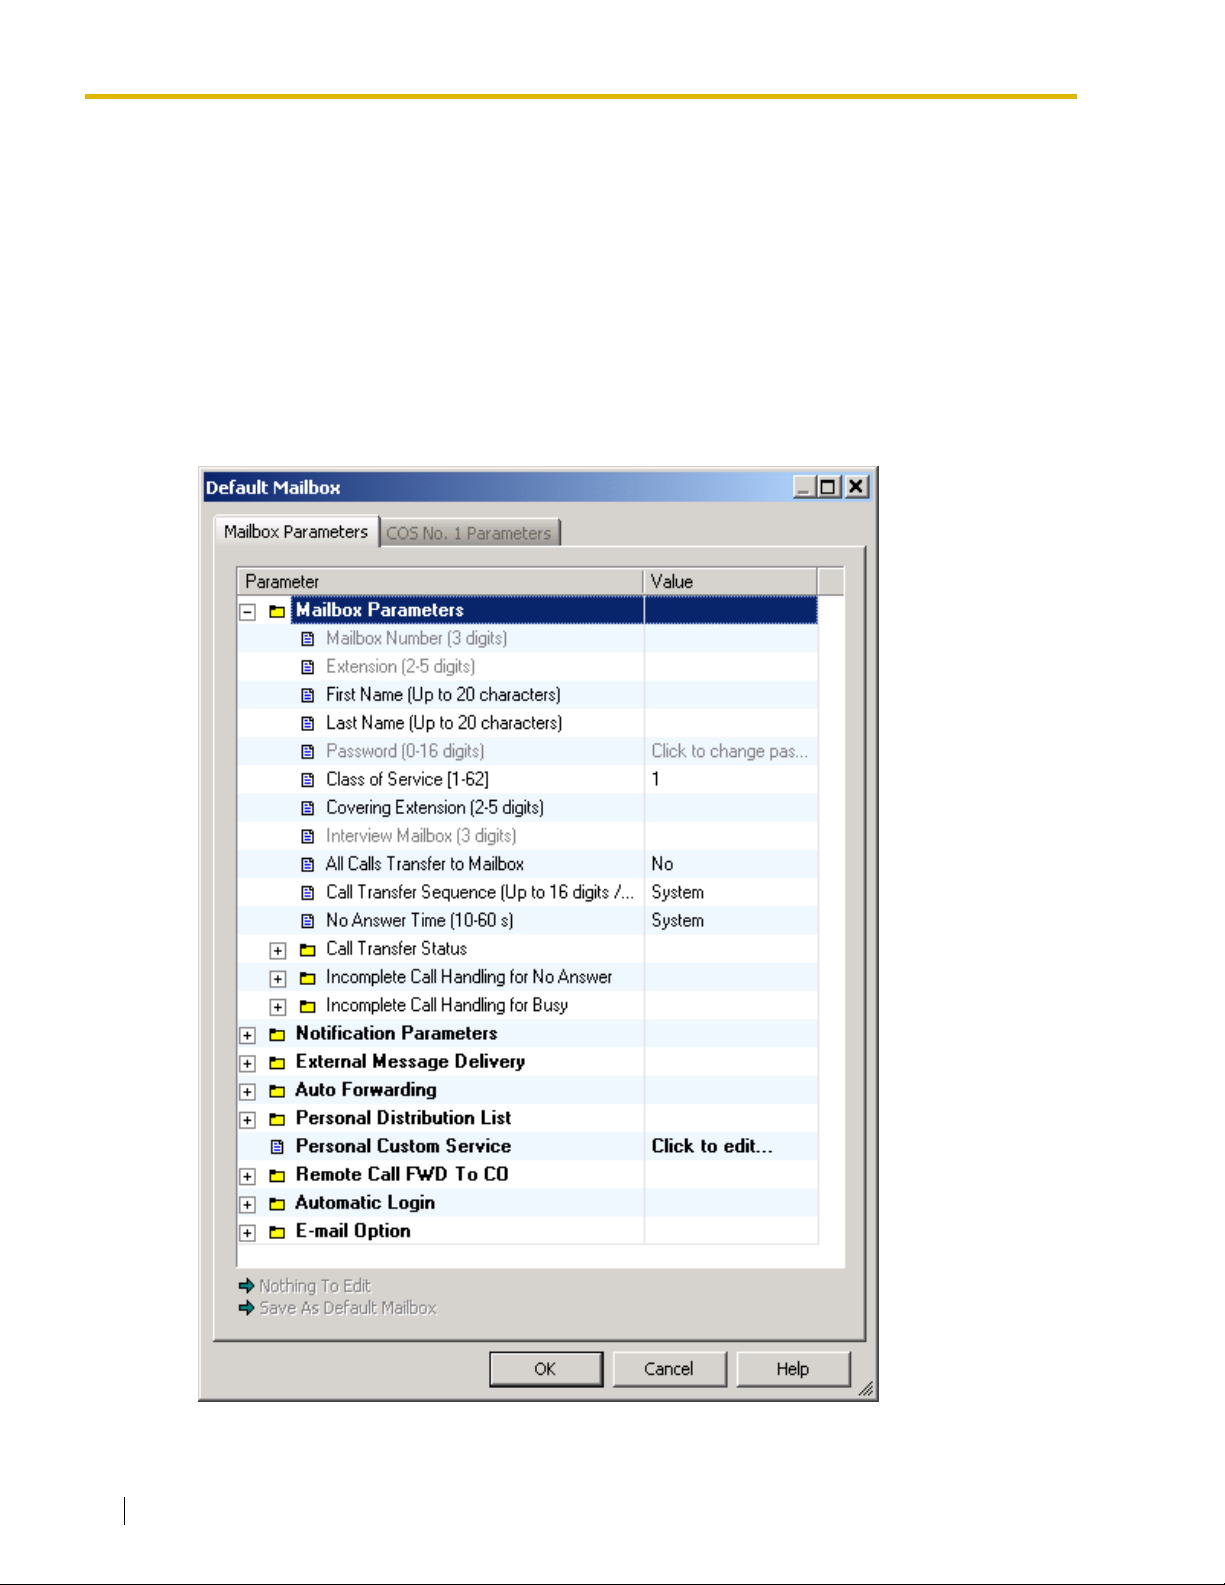
The default mailbox template is applied to new mailboxes when they are created with the Add
Range... button. This allows you to create similar mailboxes easily, with one command.
Follow the steps below to edit the default mailbox:
1. Click Add Range….
2. Specify a range of mailbox (From:/To:).
(Check "Use the same number for Mailbox and Extension" as your needs.)
3. Enter the number of mailboxes to create in the "Number of Mailboxes".
4. Click Edit Default Mailbox….
5. Edit parameters in the Default Mailbox dialog box.
6. Click OK to return to the Add Range Of Mailboxes dialog box.
40 Programming Manual
Page 41

7. Click OK.
Feature Manual References
2.4.3 Default Mailbox Template
2.1 Mailbox Settings
Programming Manual 41
Page 42
2.1 Mailbox Settings
2.1.3 Mailbox Parameters
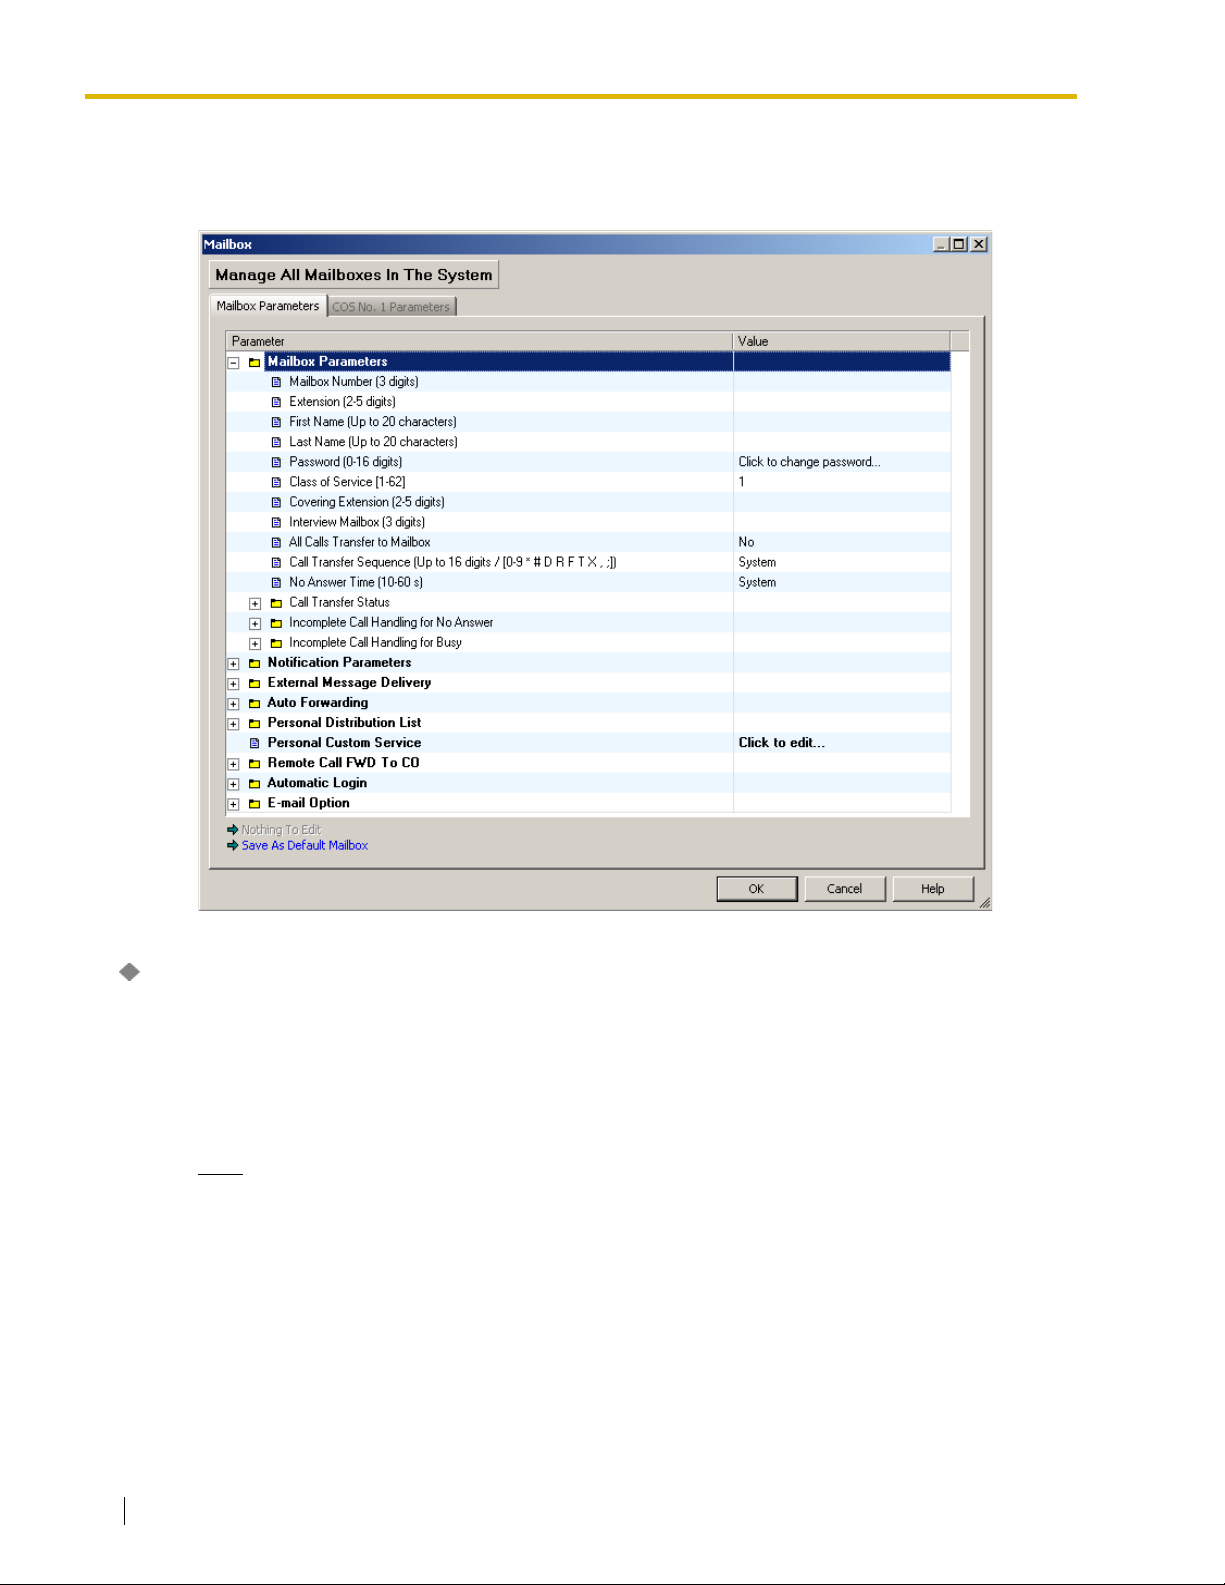
Each mailbox can be edited based upon the needs of the subscriber.
Mailbox Number
Specifies the subscriber's mailbox number. Mailbox number length is set by using the Set Default
Parameters utility or when Initialize System is selected. Mailbox numbers cannot begin with "0". If the
length of the mailbox number has been defined as 4 digits, for example, the valid range for all mailbox
numbers would be 1000 through 9997 (9998 and 9999 would be reserved for the Message Manager
and the System Manager). The length of the mailbox number cannot be changed through the
Mailbox Setting screen once it has been specified.
Note
• Mailbox number is only set when adding mailbox: when editing mailbox, you cannot change
Default
None
Value Range
2–5 digits
42 Programming Manual
the assigned mailbox number.
Page 43

Feature Manual References
2.3.16 Mailbox
Extension
Specifies the extension number of the mailbox's subscriber.
Any valid extension number including an Extension Group List number can be assigned.
Note
• If an Extension Group List number is assigned to a mailbox, all group members are able to
share the information stored in the mailbox.
Default
None
Value Range
2–5 digits
Feature Manual References
2.3.16 Mailbox
2.1 Mailbox Settings
First Name
Specifies the first name of the subscriber.
If there are non-alphabetical characters in the first 4 letters of the first name, the mailbox is not
included in the directory.
Default
None
Value Range
Max. 20 characters ("\", "^", "`" and "˜" cannot be used.)
Programming Manual References
"Directory Listing" in 2.2.2 Personal Options
Feature Manual References
2.2.18 Dialing by Name
Last Name
Specifies the last name of the subscriber.
If there are non-alphabetical characters in the first 4 letters of the last name, the mailbox is not
included in the directory.
Default
None
Programming Manual 43
Page 44
2.1 Mailbox Settings
Value Range
Max. 20 characters ("\", "^", "`" and "˜" cannot be used.)
Programming Manual References
"Directory Listing" in 2.2.2 Personal Options
Feature Manual References
2.2.18 Dialing by Name
Password
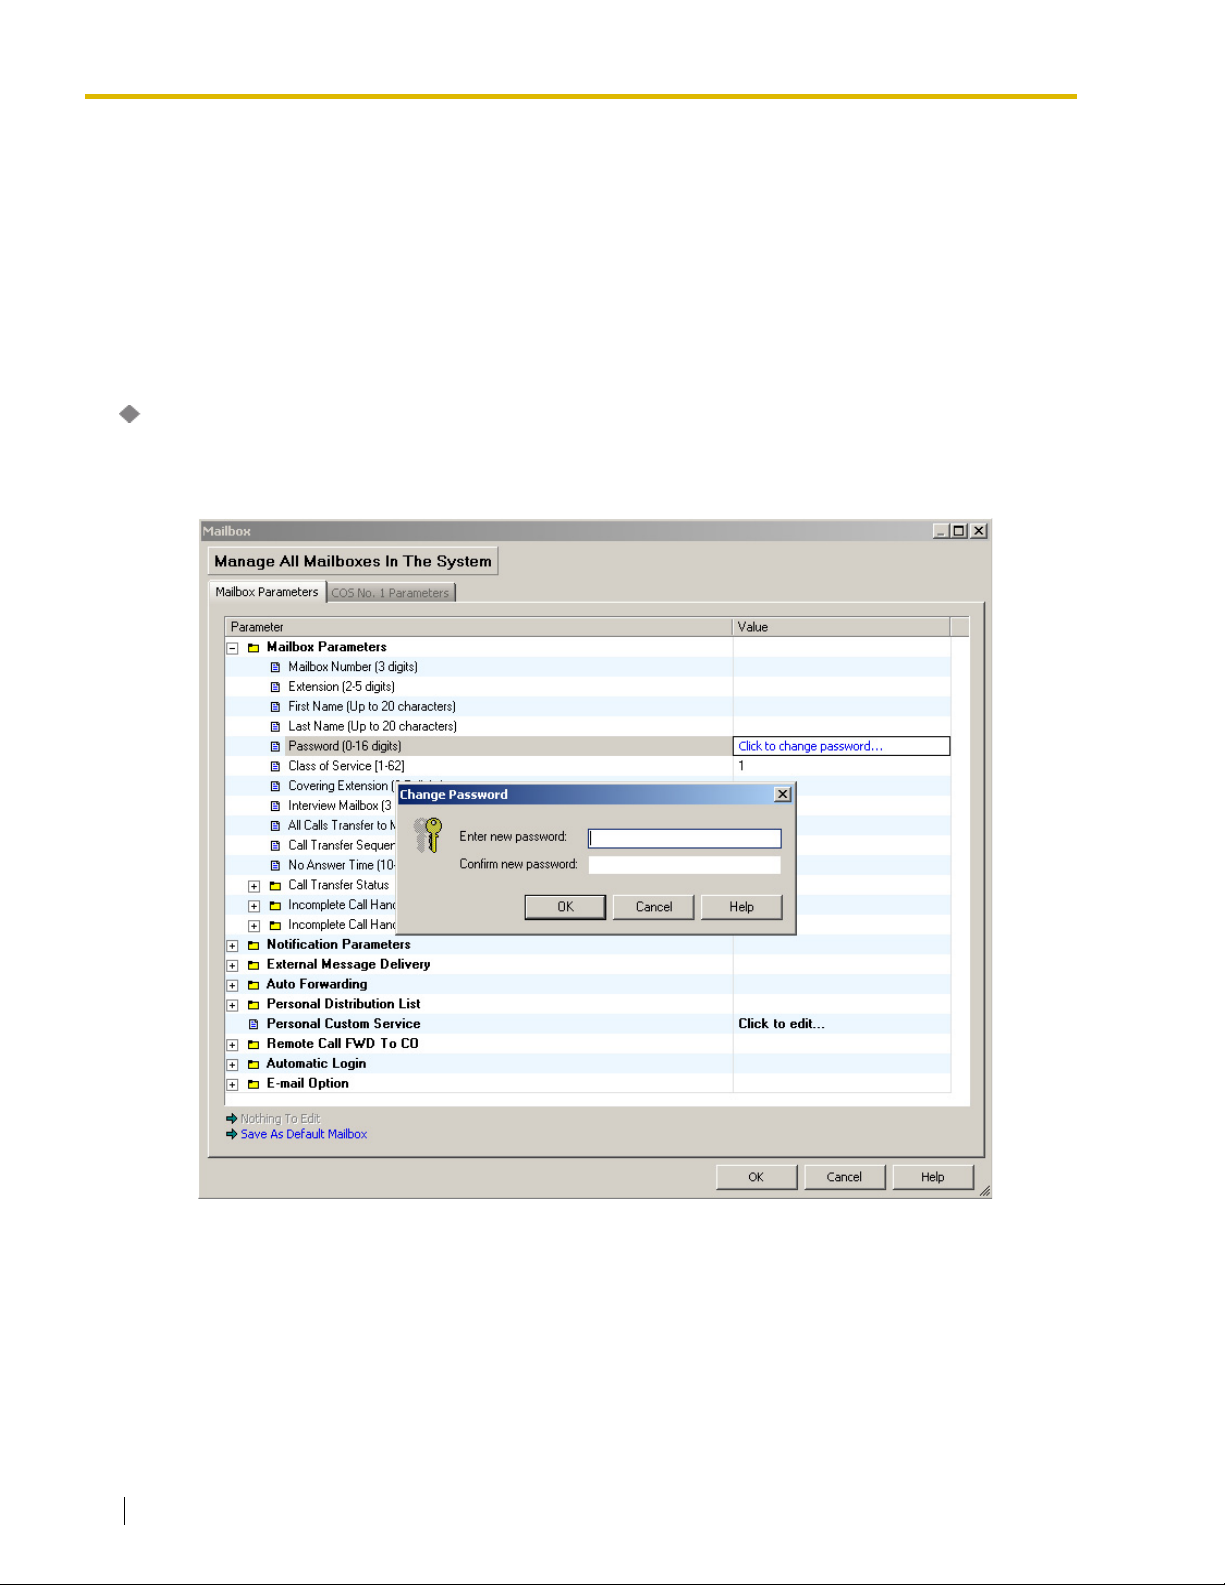
Specifies the password needed to access the mailbox. If a default password is programmed by the
System Administrator, that password will be assigned automatically when creating all mailboxes. The
System Administrator can change and delete the password.
Follow the steps below to edit Password:
1. Click "Click to change password...".
2. Set the new password, or delete the current password.
To set the new password:
To delete the current password:
44 Programming Manual
a) Enter the new password, then confirm the new password by re-entering it.
b) Click OK, then click OK to close the Mailbox Parameters window.
a) Click OK without entering a password.
Page 45

b) Click Yes when the warning is displayed, then click OK to close the Mailbox
Parameters window.
Note
• Each subscriber can change his or her mailbox password.
Default
None
Value Range
Max. 16 digits
Programming Manual References
2.8.2 Subscriber
Subscriber's Manual References
2.4 Changing or Deleting Your Password
Class of Service
Determines the set of services available to the subscriber.
2.1 Mailbox Settings
Note
• We recommend that parameters for each COS number be defined before assigning a Class
of Service (COS) to each mailbox or creating new mailboxes.
• COS No. 63 and 64 are assigned by default to the Message Manager and to the System
Manager, respectively. No other mailboxes can be assigned to COS No. 63 and 64.
Default
1
Value Range
COS No. 1–62
Programming Manual References
2.2 Class of Service
Feature Manual References
2.2.12 Class of Service (COS)
Covering Extension
Forwards calls to a second extension when the first extension's subscriber is not available to take the
call. The Covering Extension is one of the Incomplete Call Handling options that can be enabled or
disabled by the subscriber. The caller can also be transferred the Covering Extension by pressing [0]
while a Personal Greeting is being played, or while leaving a message.
Note
• Extension Group Lists or Logical Extensions (extensions whose calls are set to always be
directed their mailboxes) cannot be assigned as covering extensions.
Programming Manual 45
Page 46

2.1 Mailbox Settings
Default
None
Value Range
2–5 digits
Feature Manual References
2.2.15 Covering Extension
Subscriber's Manual References
5.3 Assigning Your Covering Extension
Interview Mailbox
Assigns an interview mailbox to the subscriber's mailbox. In order for it to function properly, the
interview mailbox number must not be the same number as an existing mailbox and an existing
mailbox group.
Note
• Each caller's replies to an interview session are saved as one message.
Default
None
Value Range
2–5 digits
Feature Manual References
2.2.26 Interview Service
Subscriber's Manual References
5.4 Interview Mailbox
All Calls Transfer to Mailbox
If this parameter is set to "Yes", the extension is considered to be a "Logical Extension" and therefore
calls directed to the extension via Automated Attendant service are automatically forwarded to the
extension mailbox. The extension does not ring when a call is received.
Note
• When this feature has been set to "Yes", the mailbox subscriber's extension does not
necessarily need to exist as an extension of the PBX.
Default
No
Value Range
No, Yes
46 Programming Manual
Page 47

2.1 Mailbox Settings
Feature Manual References
2.2.3 Automated Attendant
Call Transfer Sequence
Specifies the Call Transfer Sequence used by the mailbox. Allows each mailbox to be assigned its
own Call Transfer Sequence (Personal Transfer Sequence).
Note
• When "System" is selected, the VPS follows the "Extension Transfer Sequence"
preprogrammed for the VPS in the "System Parameters→Parameters→PBX
Parameters→PBX Environment".
• This sequence has higher priority than "Alternate Extension Transfer Sequence" in 2.5.4
Parameters.
Default
System
Value Range
System
Max. 16 characters consisting of 0–9, , # and special codes:
D: Disconnecting
F: Hook Flash
R: Ringback Tone Detection
T: Dial Tone Detection
, : Dial Pause (default 1 s)
; : Dial Pause (default 3 s)
X: Extension Dialing
0–9, , #: Dial Code
Programming Manual References
"Extension Transfer Sequence" in 2.5.4 Parameters
Feature Manual References
2.3.5 Call Transfer Status
No Answer Time
Specifies the length of time that the VPS waits before handling unanswered calls to the extension.
Note
• When "System" is selected, the VPS follows the "Call Transfer No Answer Time"
preprogrammed for the VPS in the "System Parameters→ Parameters→ Dialing
Parameters".
Default
System
Programming Manual 47
Page 48

2.1 Mailbox Settings
Value Range
System, 10 s – 60 s
Programming Manual References
"Call Transfer No Answer Time" in 2.5.4 Parameters
Call Transfer Status
Determines how the VPS handles a call when it reaches the subscriber's extension.
Note
• This setting can be changed by subscribers.
Default
None
Value Range
Select:
None: rings the subscriber's extension
Call blocking: connects the caller to the Incomplete Call Handling Service without ringing the
subscriber's extension.
Call screening: the caller is prompted to record his or her name. The VPS then calls the
subscriber and plays back the caller name. The subscriber can choose whether to answer the
call.
Intercom paging: pages the subscriber by intercom.
Calling a beeper: notifies the subscriber via a beeper.
Transfer to mailbox: transfers the caller to the mailbox.
Transfer to specified custom service menu: transfers the caller to the specified Custom Service.
Transfer to specified telephone number: transfers the caller to the specified telephone number.
Feature Manual References
2.3.5 Call Transfer Status
Subscriber's Manual References
5.1 Call Transfer
Incomplete Call Handling for No Answer
Specifies how the VPS handles a call when there is no answer.
Note
• This setting can be changed by subscribers.
• More than one option can be selected.
Default
Leave a message/Transfer to operator/Return to top menu
48 Programming Manual
Page 49

Value Range
Leave a message: allows the caller to record a message.
Transfer to a covering extension: transfers the caller to a covering extension.
Page the mailbox owner by Intercom Paging: pages the subscriber by intercom.
Notify the mailbox owner via a beeper: notifies the subscriber via a beeper.
Transfer to operator: transfers the caller to an operator.
Return to top menu: lets the caller return to top menu and try another extension.
Transfer to specified Custom Service menu: transfers the caller to the specified Custom
Service.
Feature Manual References
2.3.14 Incomplete Call Handling Service
Subscriber's Manual References
5.2 Incomplete Call Handling
Incomplete Call Handling for Busy
Specifies how the VPS handles a call when the extension is busy.
2.1 Mailbox Settings
Note
• This setting can be changed by subscribers.
• More than one option can be selected.
Default
Leave a message/Transfer to operator/Return to top menu
Value Range
Leave a message: allows the caller to record a message.
Transfer to a covering extension: transfers the caller to a covering extension.
Page the mailbox owner by Intercom Paging: pages the subscriber by intercom.
Notify the mailbox owner via a beeper: notifies the subscriber via a beeper.
Transfer to operator: transfers the caller to an operator.
Return to top menu: lets the caller return to top menu and try another extension.
Transfer to specified Custom Service menu: transfers the caller to the specified Custom
Service.
Feature Manual References
2.3.14 Incomplete Call Handling Service
Subscriber's Manual References
5.2 Incomplete Call Handling
Programming Manual 49
Page 50
2.1 Mailbox Settings
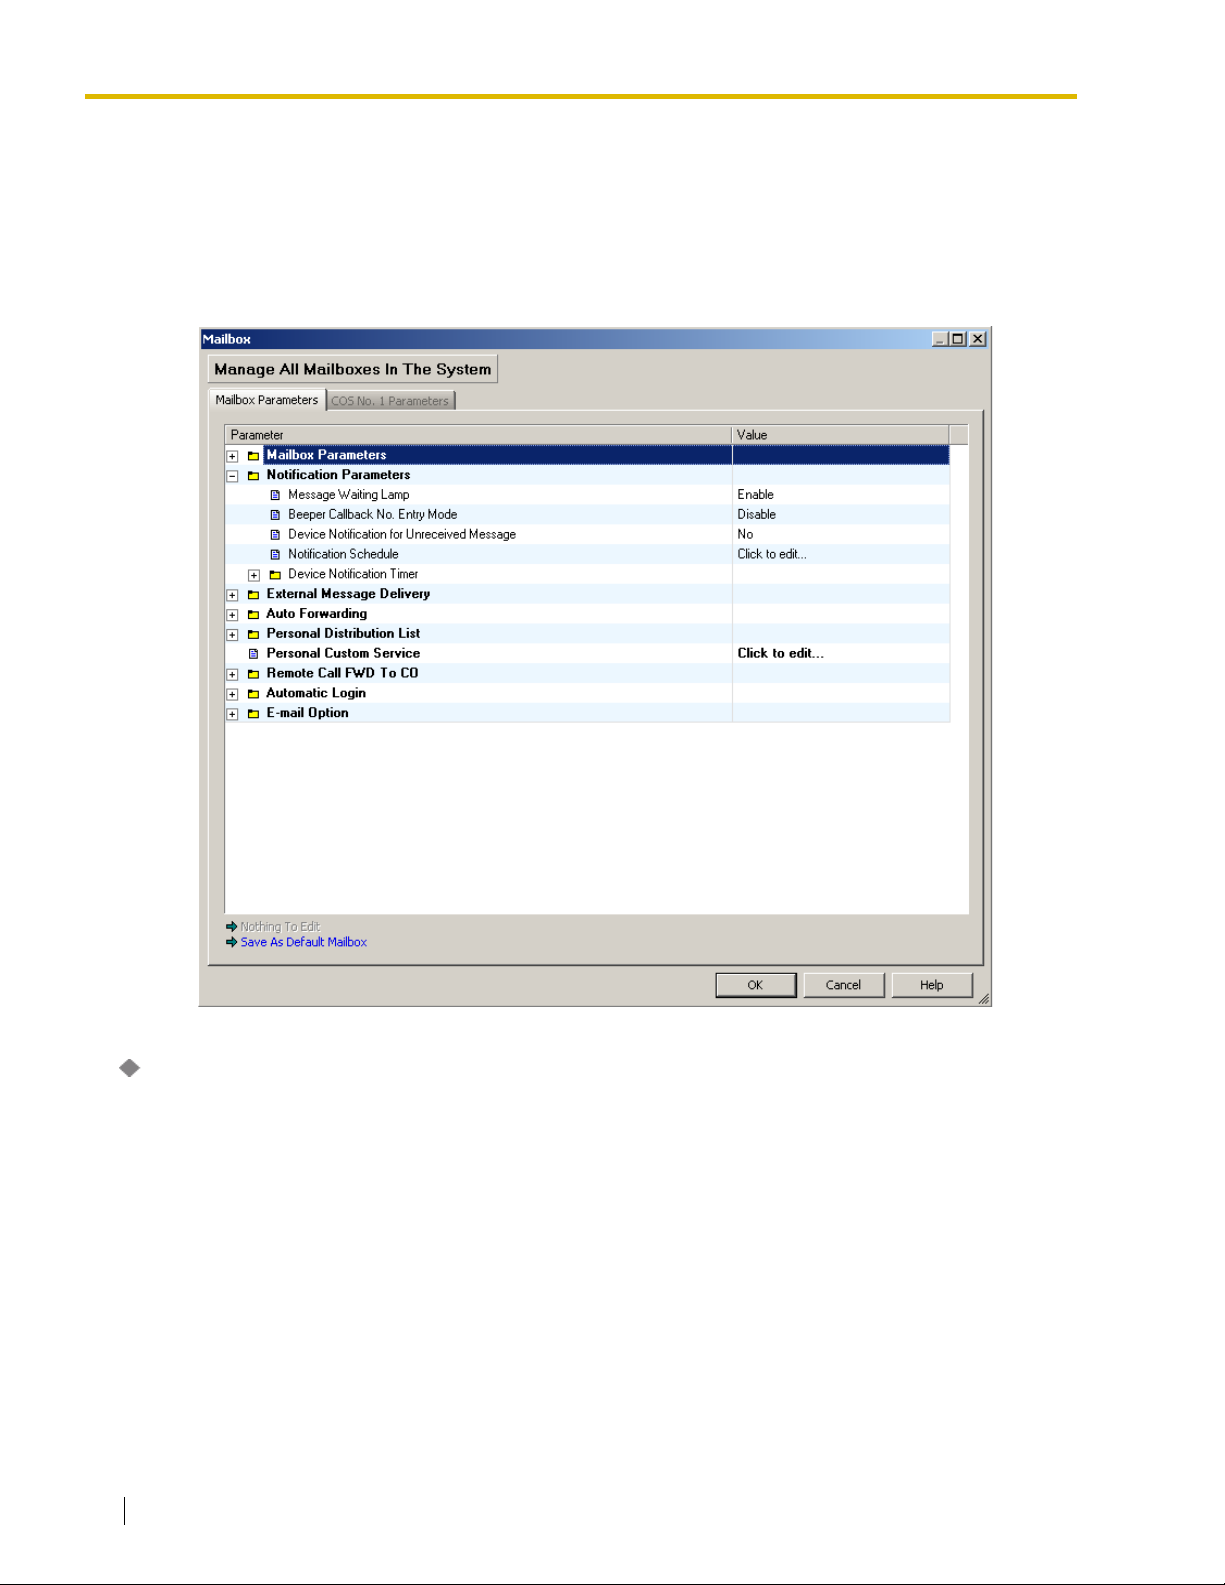
2.1.4 Notification Parameters
The VPS is able to notify a subscriber when a new message is recorded in his or her mailbox. There
are 2 methods that the VPS can use for Message Waiting Notification: (1) by lighting the Message
Waiting Lamp on the subscriber's extension telephone and (2) by calling a preprogrammed device
(i.e., external telephone or beeper). A maximum of 3 devices (Device 1,2,3) can be programmed per
mailbox.
Message Waiting Lamp
If set to "Enable", the Message Waiting Lamp of the subscriber's telephone turns on when a new
message is recorded.
Default
Enable
Value Range
Disable, Enable
Feature Manual References
2.2.32 Message Waiting Notification—Lamp
50 Programming Manual
Page 51

2.1 Mailbox Settings
Beeper Callback No. Entry Mode
This feature allows a caller to dial his or her own telephone number, which the VPS then sends to the
subscriber's beeper.
Note
• To use this feature, the callback number entry code "X" must be programmed along with the
subscriber's beeper number. If the caller does not enter a callback number, or if this feature
is set to "Disable", the "System Callback No." (set in "System Parameters→
Parameters→Message Waiting Notification") will be displayed on the beeper's display
instead. In either of these cases, if a caller's telephone number is received through the
telephone company's Caller ID service, the VPS will send the caller's number to the beeper
instead of the "System Callback No.".
Default
Disable
Value Range
Caller Select: After recording a message, the caller is asked whether or not he or she wishes to enter
a callback number.
Without: Without recording a message, the caller is asked to enter a callback number.
Before: Before recording a message, the VPS asks the caller to enter a callback number.
After: After recording a message, the VPS asks the caller to enter a callback number.
Disable: Disables the Callback Number Entry feature. Either the caller's telephone number received
by through the telephone company's Caller ID service or the "System Callback No." will be sent to the
beeper.
Programming Manual References
"System Callback No." in 2.5.4 Parameters
Feature Manual References
2.3.8 Calling a Beeper
Device Notification for Unreceived Message
This parameter determines what happens if Message Waiting Notification—Device begins but is
interrupted for some reason (i.e., the subscriber hangs up without listening to all new messages, the
subscriber's cell phone disconnects while listening to messages, etc.).
If this parameter is set to "Yes", the VPS will try to call the lowest numbered device again.
If this parameter is set to "No", the VPS will call the lowest numbered device only after another new
message is recorded in the mailbox.
Default
No
Value Range
No, Yes
Feature Manual References
2.2.31 Message Waiting Notification—Device
Programming Manual 51
Page 52
2.1 Mailbox Settings
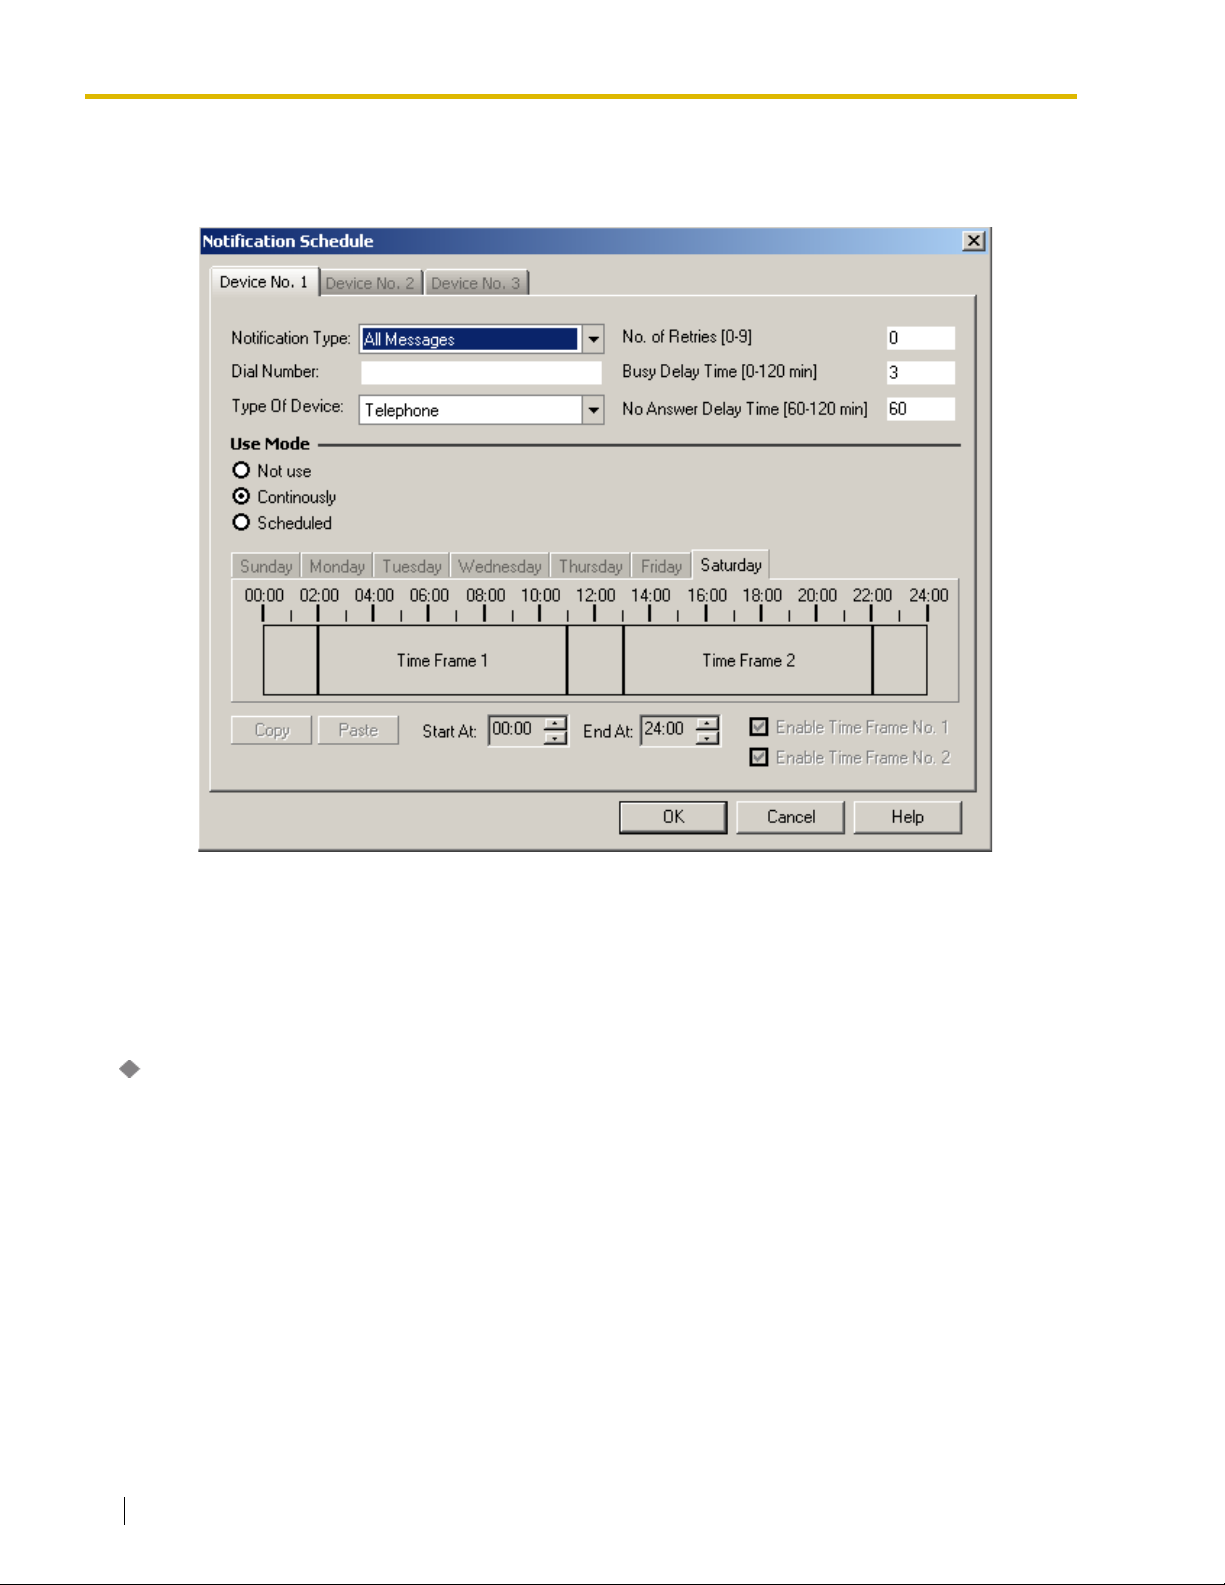
Notification Schedule
Specifies the Message Waiting Notification schedule for each device. The following parameters can
be specified per device.
Follow the steps below to edit Notification Schedule:
1. Click Click to edit….
2. Select a device (Device No. 1, Device No. 2, Device No. 3) tab.
3. Edit parameters.
4. Click OK.
Notification Type
Specifies the type of message for which notification is sent. Notification can be sent for all messages,
or urgent messages only.
Default
All Messages
Value Range
All Messages, Only Urgent Messages
Feature Manual References
2.2.31 Message Waiting Notification—Device
52 Programming Manual
Page 53

2.1 Mailbox Settings
Dial Number
Assigns a telephone or beeper number to Device 1, 2, or 3. The subscriber can also specify the
number to be dialed by entering it from his or her telephone, allowing the subscriber to set this feature
on a case by case basis.
Note
• The callback number entry code "X" must be included in the number to be called if the
"Beeper Callback No. Entry Mode" is set to any values other than "Disable" (see "
Callback No. Entry Mode") and "Type of Device" is set to "Beeper". The proper "Dial Pauses"
must be inserted before the callback entry code.
• When the VPS calls a trunk (CO line) via a PRI (ISDN Primary Rate Access Interface) card
of a Panasonic PBX, please be sure to add "#" after the telephone number (1112223333 in
the example here):
Example: 9P1112223333#PP123PP456PPX# (P: Dial Pause)
Default
None
Value Range
Max. 32 digits consisting of 0–9, , # and special codes:
, : Dial Pause (default 1 s)
; : Dial Pause (default 3 s)
T: Dial Tone Detection
X: Callback Number Entry Code
0–9, , #: Dial Codes
Beeper
Feature Manual References
2.2.31 Message Waiting Notification—Device
Type of Device
Specifies the type of device telephone or beeper that will receive message notification. The
subscriber can also specify the type of device from his or her telephone.
Default
Telephone
Value Range
Telephone, Beeper
Feature Manual References
2.2.31 Message Waiting Notification—Device
No. of Retries
Specifies the number of times the VPS will try to send notification if the device is busy or if there is no
answer.
Programming Manual 53
Page 54

2.1 Mailbox Settings
Default
0
Value Range
0-9 times
Note
• The value range varies depending upon country/area.
Feature Manual References
2.2.31 Message Waiting Notification—Device
Busy Delay Time
Specifies the time (in minutes) the VPS waits before retrying message notification when the called
device is busy.
Default
3 min
Value Range
0 min–120 min
Note
• The value range varies depending upon country/area.
Feature Manual References
2.2.31 Message Waiting Notification—Device
No Answer Delay Time
Specifies the time (in minutes) the VPS waits before retrying message notification when the called
device does not answer.
Default
60 min
Value Range
60 min–120 min
Note
• The value range varies depending upon country/area.
Feature Manual References
2.2.31 Message Waiting Notification—Device
54 Programming Manual
Page 55

2.1 Mailbox Settings
Use Mode
Specifies if and how each device is used for message notification. The subscriber can also specify
the use mode from his or her telephone.
Default
Continuously
Value Range
Not Use: The selected device is not used for message notification.
Continuously: The device is called whenever a message is recorded in the mailbox. If "Notification
Type" is set to "Only Urgent Messages" , the device is called whenever an urgent message is
recorded in the mailbox.
Scheduled: The selected device is called only during the selected times.
Feature Manual References
2.2.31 Message Waiting Notification—Device
Time Frame 1, 2 (MON–SUN)
Specifies the schedule (time frame) of Message Waiting Notification by the selected device for each
day of the week when "Scheduled" is set in "Use Mode". Notification will be sent for messages
received during the time frame set here. For messages received during times outside of the time
frame, notification will be sent at the beginning of the next time frame.
Follow the steps below to edit Time Frame:
1. Click a day (Sunday – Saturday) tab.
2. Click "Time Frame 1" or "Time Frame 2".
3. Enter the start and end times in the "Start At:" and "End At:" fields, or drag the edges of the time
frame to mark the start and end times.
To copy the schedule of one day to another day
1. Select a time frame in the desired "copy from" day.
2. Click Copy.
3. Select a time frame in the desired "copy to" day.
4. Click Paste.
4. Click OK.
Default
Time Frame 1: 02:00-11:00
Time Frame 2: 13:00-22:00
Value Range
00:00–23:59
Feature Manual References
2.2.31 Message Waiting Notification—Device
Programming Manual 55
Page 56

2.1 Mailbox Settings
Device Notification Timer
Specifies the delay time for Message Waiting Notification per device.
Device Start Delay Time
Specifies the length of time the VPS waits after a new message is received before sending message
waiting notification.
Default
0 min
Value Range
0 min–120 min
Feature Manual References
2.2.31 Message Waiting Notification—Device
Device Interval Time between Device 1 and Next Device
Specifies how long the PBX waits after sending Message Waiting Notification to Device 1 before
sending notification to the next device.
Default
0 min
Value Range
0 min–120 min
Feature Manual References
2.2.31 Message Waiting Notification—Device
Device Interval Time between Device 2 and Next Device
Specifies how long the PBX waits after sending Message Waiting Notification to Device 2 before
sending notification to the next device.
Default
0 min
Value Range
0 min–120 min
Feature Manual References
2.2.31 Message Waiting Notification—Device
56 Programming Manual
Page 57

2.1 Mailbox Settings
Device Interval Time between Device 3 and Next Device
Specifies how long the PBX waits after sending Message Waiting Notification to Device 3 before
sending notification to the next device.
Default
0 min
Value Range
0 min–120 min
Feature Manual References
2.2.31 Message Waiting Notification—Device
Programming Manual 57
Page 58
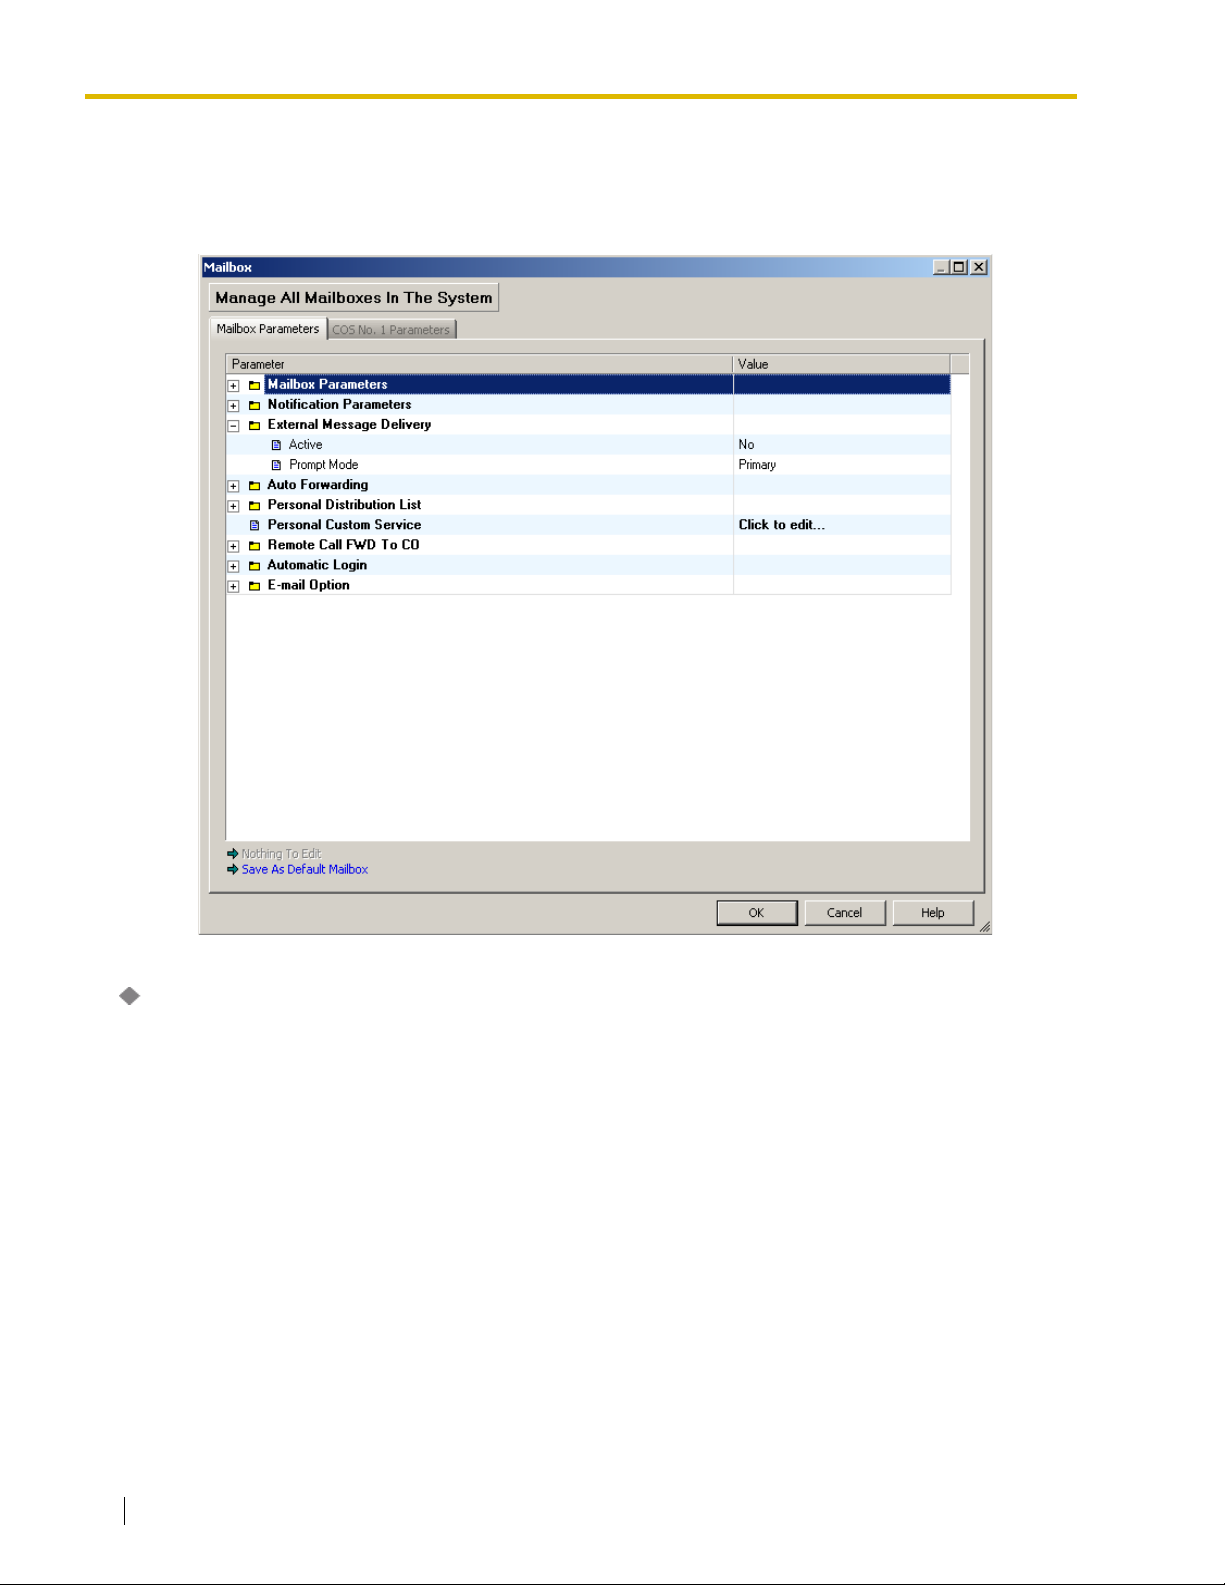
2.1 Mailbox Settings
2.1.5 External Message Delivery
Allows a subscriber to send a message to several subscribers and non-subscribers (including outside
parties) immediately or at a specified time.
Active
If set to "Yes", subscribers are able to utilize the External Message Delivery feature.
Default
No
Value Range
No, Yes
Feature Manual References
2.3.11 External Message Delivery Service
Subscriber's Manual References
5.7 External Message Delivery Lists
58 Programming Manual
Page 59

2.1 Mailbox Settings
Prompt Mode
When an external message is delivered, the receiver will be greeted by the VPS in the specified
language (prompt). If set to "Primary", the default language will be used, then, If set to "Selective",
the receiver has a choice of prompts. See related explanation in "Incoming Call Service Prompt" in
2.3.1 Service Group.
Note
• If set to "Selective" and the receiver uses a rotary telephone, the no-entry selection is
specified by "Prompt for Rotary Callers" in
Default
Primary
Value Range
Primary, Selective, Selection from all installed languages (KX-TVA50: 3 languages, KX-TVA200: 10
languages)
Programming Manual References
"Incoming Call Service Prompt" in 2.3.1 Service Group
2.3.1 Service Group.
Feature Manual References
2.2.44 System Prompts
Programming Manual 59
Page 60
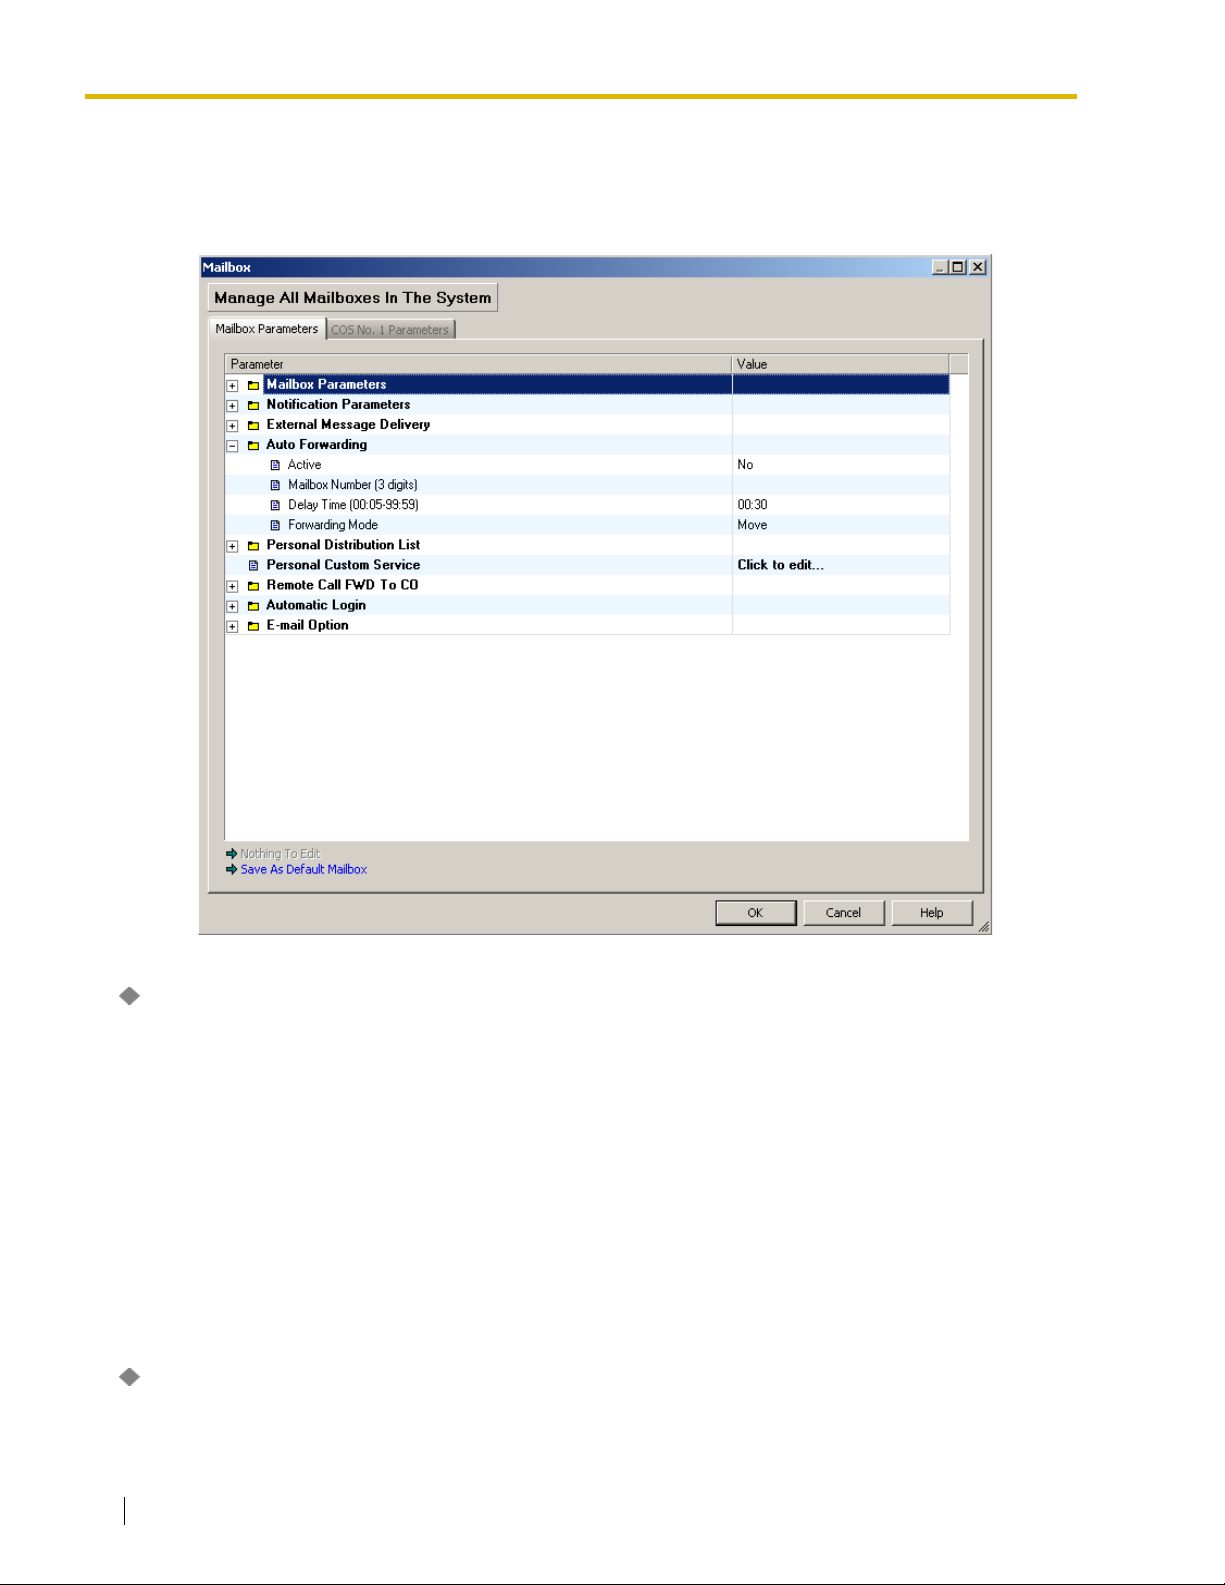
2.1 Mailbox Settings
2.1.6 Auto Forwarding
Moves or copies unplayed messages from one mailbox to another, after a specified period of time.
This service is only available to subscribers (you cannot auto forward messages to a Mailbox Group).
Active
If set to "Yes", the VPS automatically forwards messages that have not been played for a specified
length of time to another mailbox.
Default
No
Value Range
No, Yes
Feature Manual References
2.2.2 Auto Forwarding
Mailbox Number
Specifies the mailbox to which the messages will be forwarded.
60 Programming Manual
Page 61

2.1 Mailbox Settings
Note
• A Mailbox Group number cannot be specified as a destination.
Default
None
Value Range
2–5 digits
Feature Manual References
2.2.2 Auto Forwarding
Delay Time
Specifies the length of time in hours and minutes that the VPS waits before forwarding unplayed
messages. The maximum delay time is 99 h, 59 min.
Note
• The delay time must be shorter than the New Message Retention Time, or else messages
will be deleted before being forwarded.
Default
00:30
Value Range
00:05–99:59
Feature Manual References
2.2.2 Auto Forwarding
Forwarding Mode
Specifies if forwarded messages are to be retained in the original mailbox. When set to "Copy", copies
of the messages are retained in the original mailbox after forwarding. When set to "Move", messages
are forwarded to the receiving mailbox and are not retained in the original mailbox.
Default
Move
Value Range
Copy, Move
Feature Manual References
2.2.2 Auto Forwarding
Programming Manual 61
Page 62
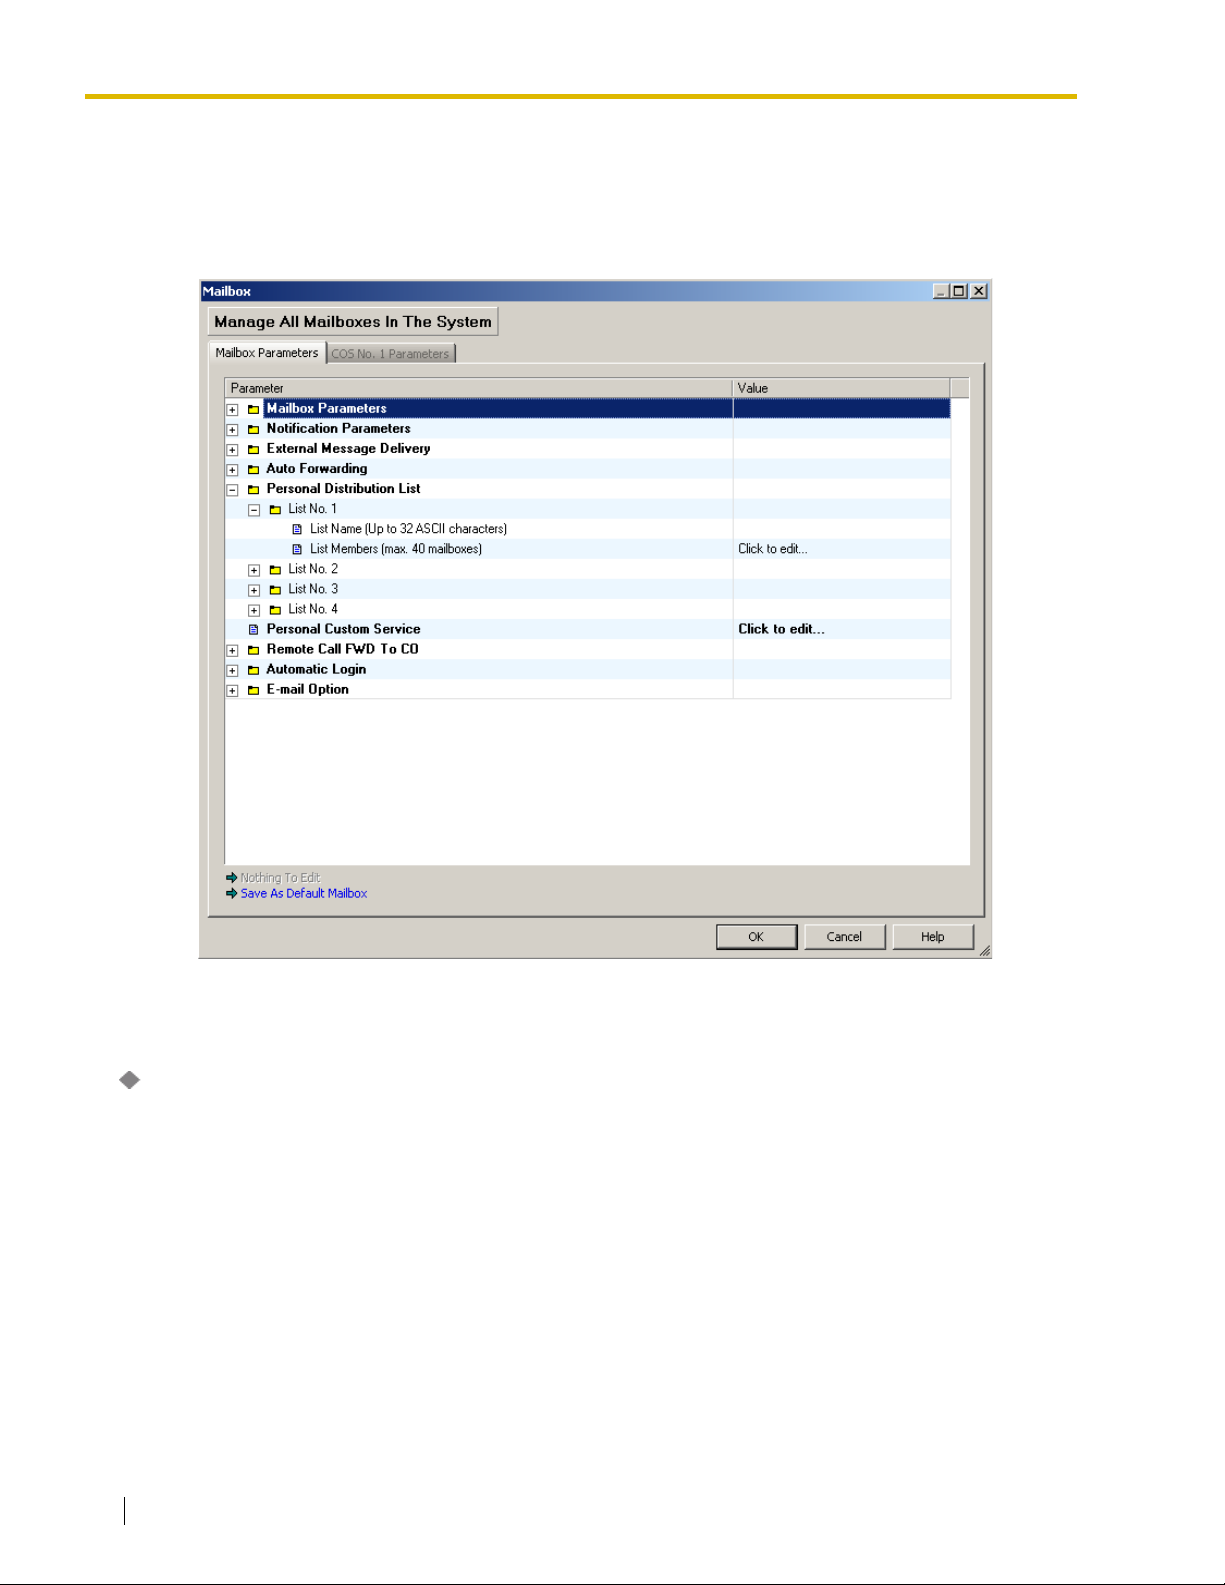
2.1 Mailbox Settings
2.1.7 Personal Distribution List
Personal Distribution Lists are used to send the same messages to several mailboxes in a single
operation. A maximum of 4 lists can be maintained with each list containing a maximum of 40
mailboxes.
List No. 1–List No. 4
List Name
Specifies a list name.
Default
None
Value Range
Max. 32 characters
Feature Manual References
2.3.12 Group Distribution List—Personal
62 Programming Manual
Page 63

List Members
Specifies the mailbox numbers that belong to the list.
Follow the steps below to edit List Members:
1. Click Click to edit….
[Addition]
1. Enter a mailbox number in Quick Search Mailbox: or select the mailbox number in the
Subscribers to add table.
2. Click Add>>.
[Deletion]
1. Enter a mailbox number in Quick Search Mailbox: or select the mailbox number in the
Distribution table.
2. Click Delete<<.
[Searching]
1. Click Search Subscribers….
2. Enter the Mailbox No., Extension No., First Name, or Last Name of the desired subscriber.
3. Click OK.
Default
None
2.1 Mailbox Settings
Value Range
Max. 40 mailboxes
Feature Manual References
2.3.12 Group Distribution List—Personal
Subscriber's Manual References
5.6 Personal Group Distribution Lists
Programming Manual 63
Page 64
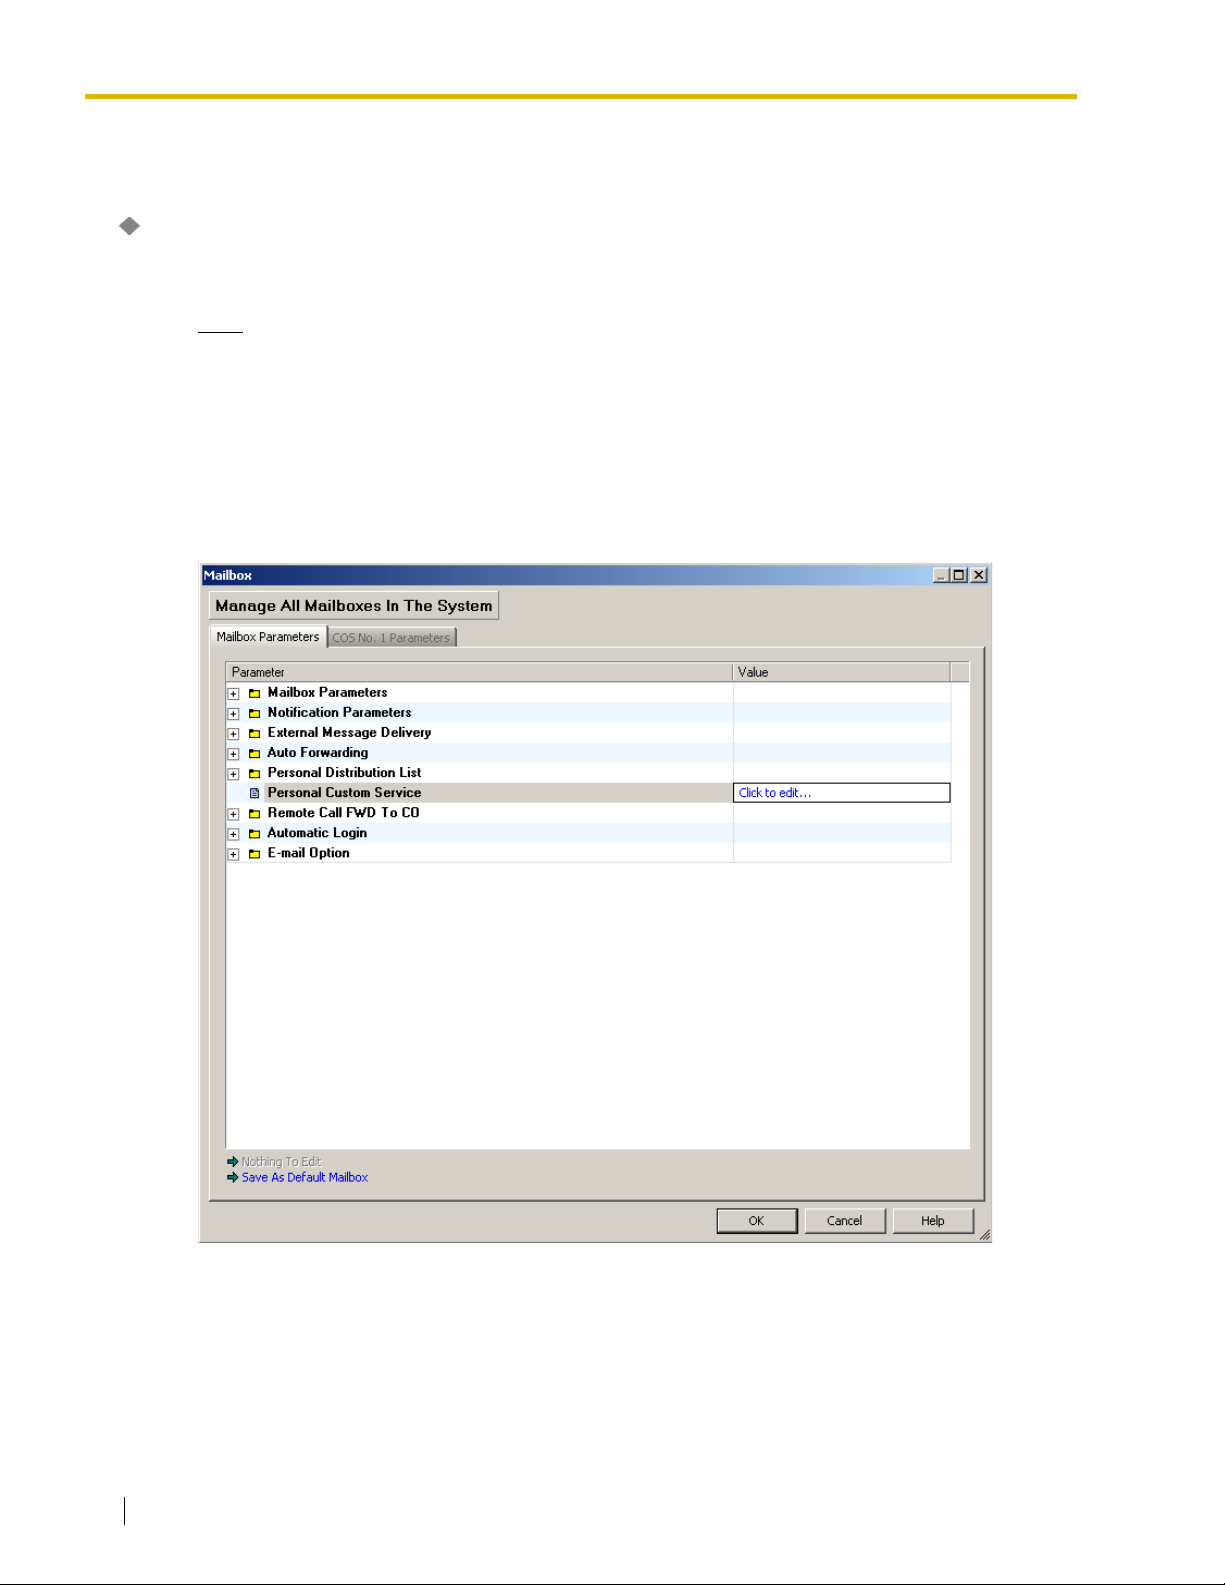
2.1 Mailbox Settings
2.1.8 Personal Custom Service
Personal Custom Service
Specifies the Personal Custom Service. The System Administrator can assign an operation to each
key.
Note
• These settings can be changed by subscribers.
• Make sure to add a Trunk (CO Line) Access number when you store an outside telephone
number.
• When the VPS calls a trunk (CO line) via a PRI (ISDN Primary Rate Access Interface) card
of a Panasonic PBX, please be sure to add "#" after the telephone number (1112223333 in
the example here):
Example: 9P1112223333#PP123PP456PPX# (P: Dial Pause)
Follow the steps below to edit Personal Custom Service:
1. Click Click to Edit….
64 Programming Manual
Page 65
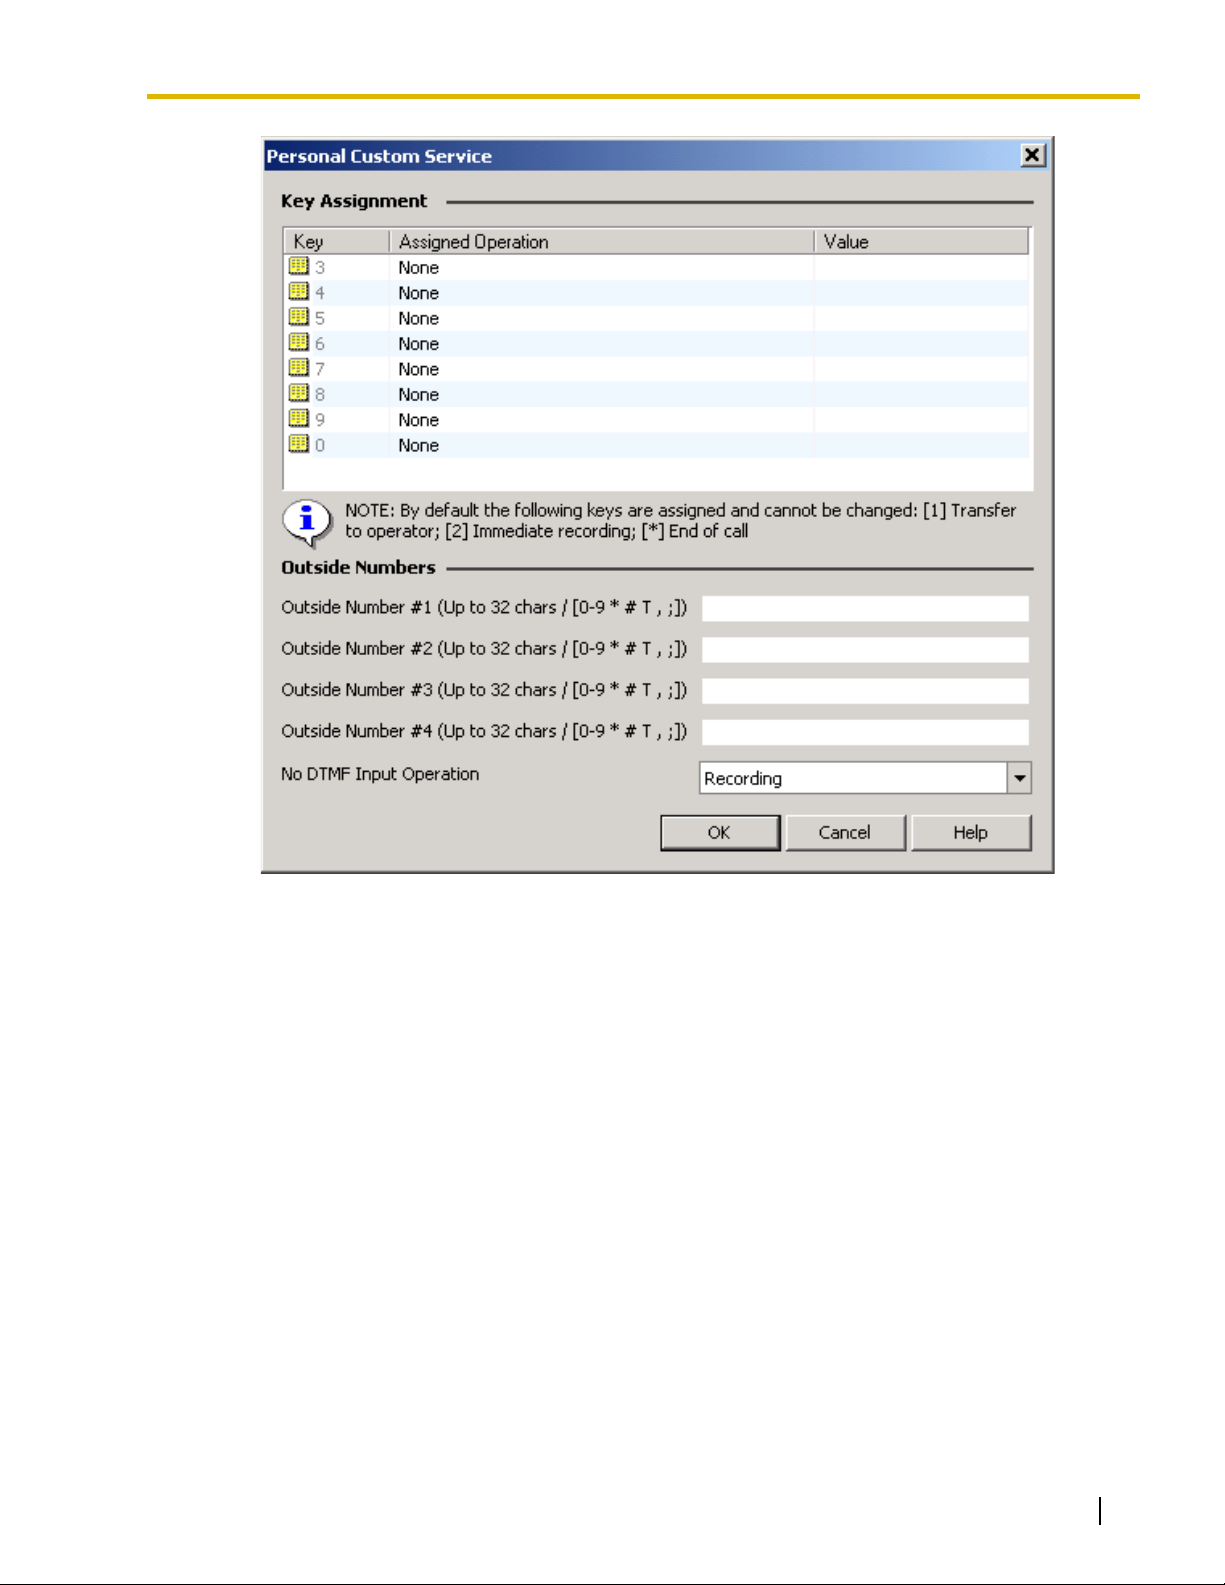
2.1 Mailbox Settings
Key Assignment
1. Select the desired key.
2. Assign the operation in Assigned Operation and enter the setting in Value according to the
operation.
Outside Numbers
1. Enter outside numbers to be transferred.
2. Select "Recording", "Disconnect (All Day)", or "Disconnect (Only After Hours)" for No DTMF
Input Operation.
2. Click OK.
Default
<Key Assignment>
0: None
3–9: None
<Outside Numbers>
Outside Number #1–#4: None
No DTMF Input Operation: Message Recording
Programming Manual 65
Page 66

2.1 Mailbox Settings
Value Range
<Key Assignment>
Key: 3–9, 0
Assigned Operation:
Transfer to specified mailbox: Allow the caller to leave messages in a specified mailbox.
Transfer to specified extension: Transfers the caller to a specified extension.
Transfer to Voice Mail Service: Allows the caller to access Voice Mail Service.
Transfer to Automated Attendant Service: Allows the caller to access Automated Attendant
Service.
Transfer to specified Custom Service menu: Transfers the caller to the Custom Service
specified here.
Transfer to operator: Connects the caller to an operator.
Transfer to outside (specified number): Transfers the caller to a specified outside telephone
number. Enter the PBX Trunk (CO Line) Access Number such as 9.
Page the party: Pages the subscriber.
Repeat greeting: Repeats the greeting.
None: No operation assigned
<Outside Numbers>
Outside Number #1–#4: Max. 32 digits consisting of 0–9, , #, and special codes
T: Dial Tone Detection
, : Dial Pause (default 1 s)
; : Dial Pause (default 3 s)
0–9, , #: Dial Code
No DTMF Input Operation: Recording, Disconnect (All Day), Disconnect (Only After Hours)
Feature Manual References
2.3.20 Personal Custom Service
Subscriber's Manual References
5.17 Personal Custom Service
66 Programming Manual
Page 67
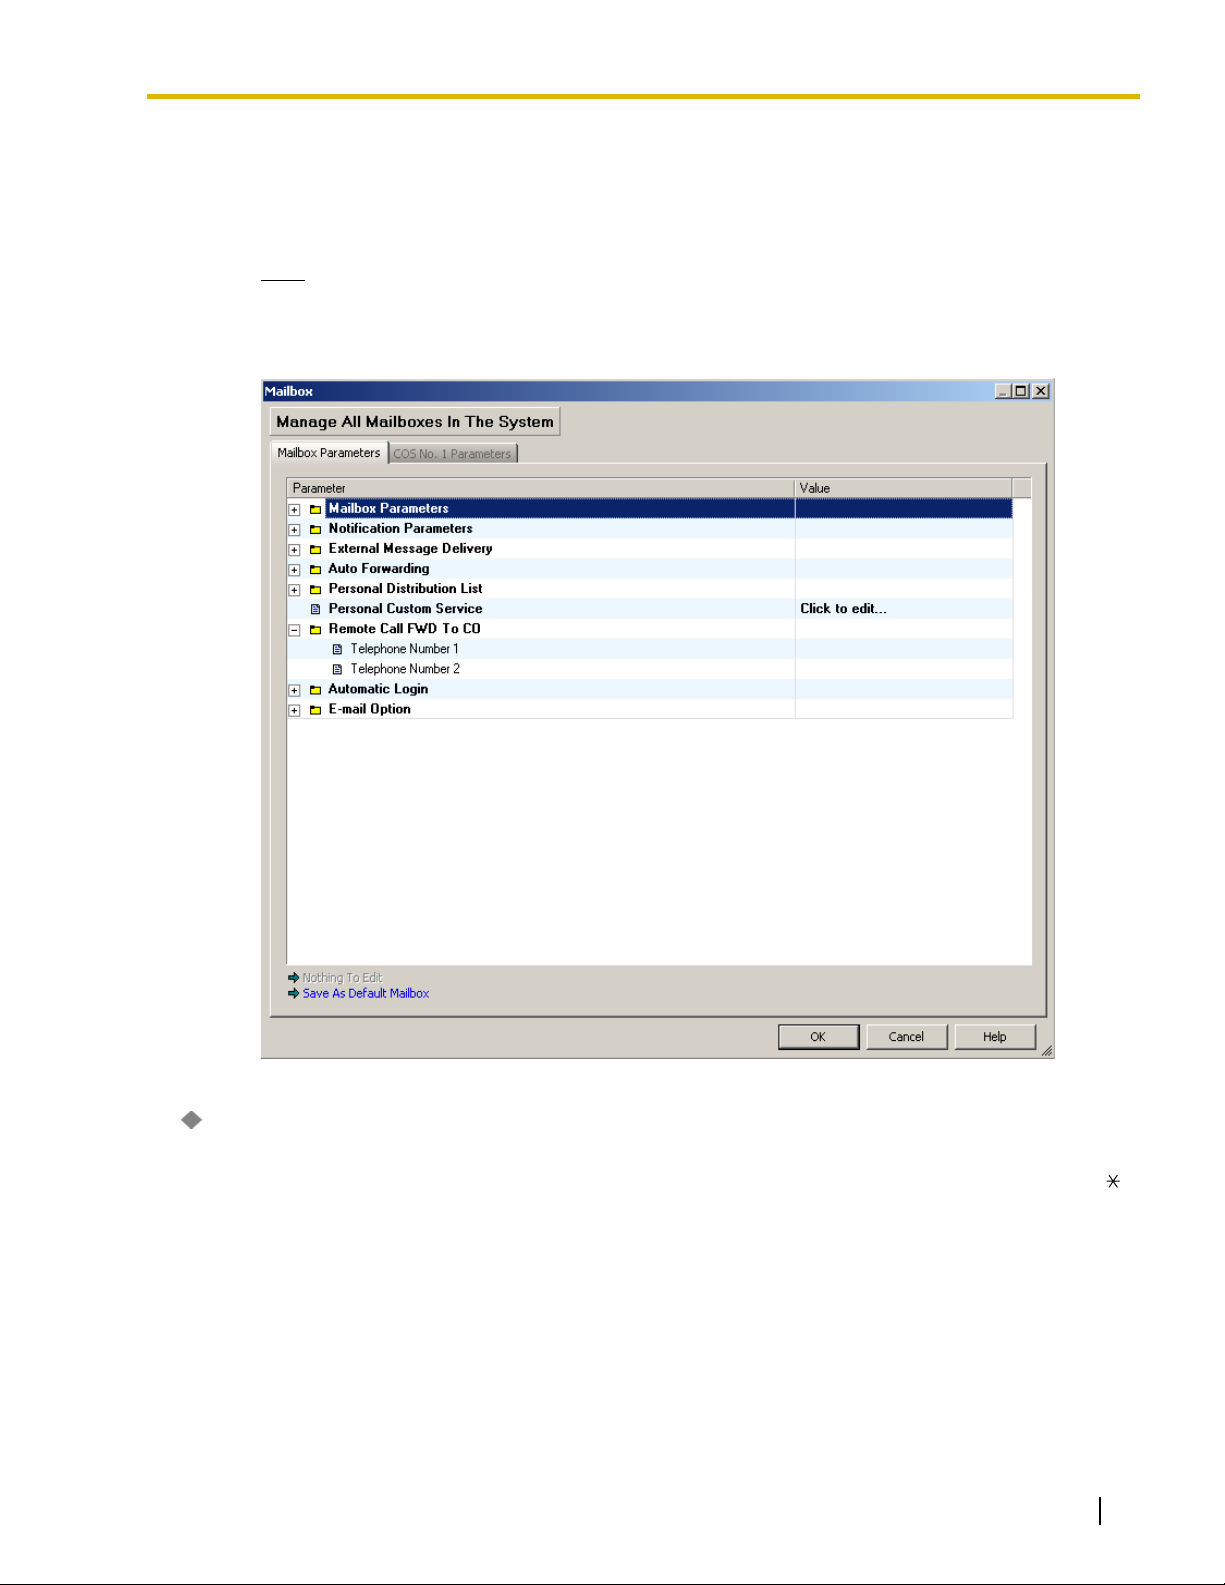
2.1.9 Remote Call FWD to CO
Specifies the telephone numbers of destinations to which callers are forwarded when the subscriber
sets "Remote Call Forwarding to a Trunk". 2 telephone numbers can be specified per mailbox.
Note
• Class of Service programming determines if the subscriber is able to use this feature.
• The Remote Call FWD to CO is only available when the VPS is connected to a Panasonic
KX-T series PBX using DPT Integration.
2.1 Mailbox Settings
Telephone Number 1, 2
Specifies the telephone numbers of destinations to which callers are forwarded when the subscriber
sets "Remote Call Forwarding to a Trunk". Telephone numbers can contain the digits "0-9" and "
These telephone numbers should begin with a Trunk (CO Line) Access number.
Default
None
Value Range
Max. 24 digits (With the KX-TD500 and KX-TDA/KX-TAW series)
Max. 16 digits (With other KX-T series PBXs)
Programming Manual 67
".
Page 68

2.1 Mailbox Settings
Programming Manual References
"Remote Call Forward to CO" in 2.2.2 Personal Options
Feature Manual References
2.3.27 Remote Call Forwarding Set (DPT Integration Only)
Subscriber's Manual References
5.14 Remote Call Forwarding
68 Programming Manual
Page 69
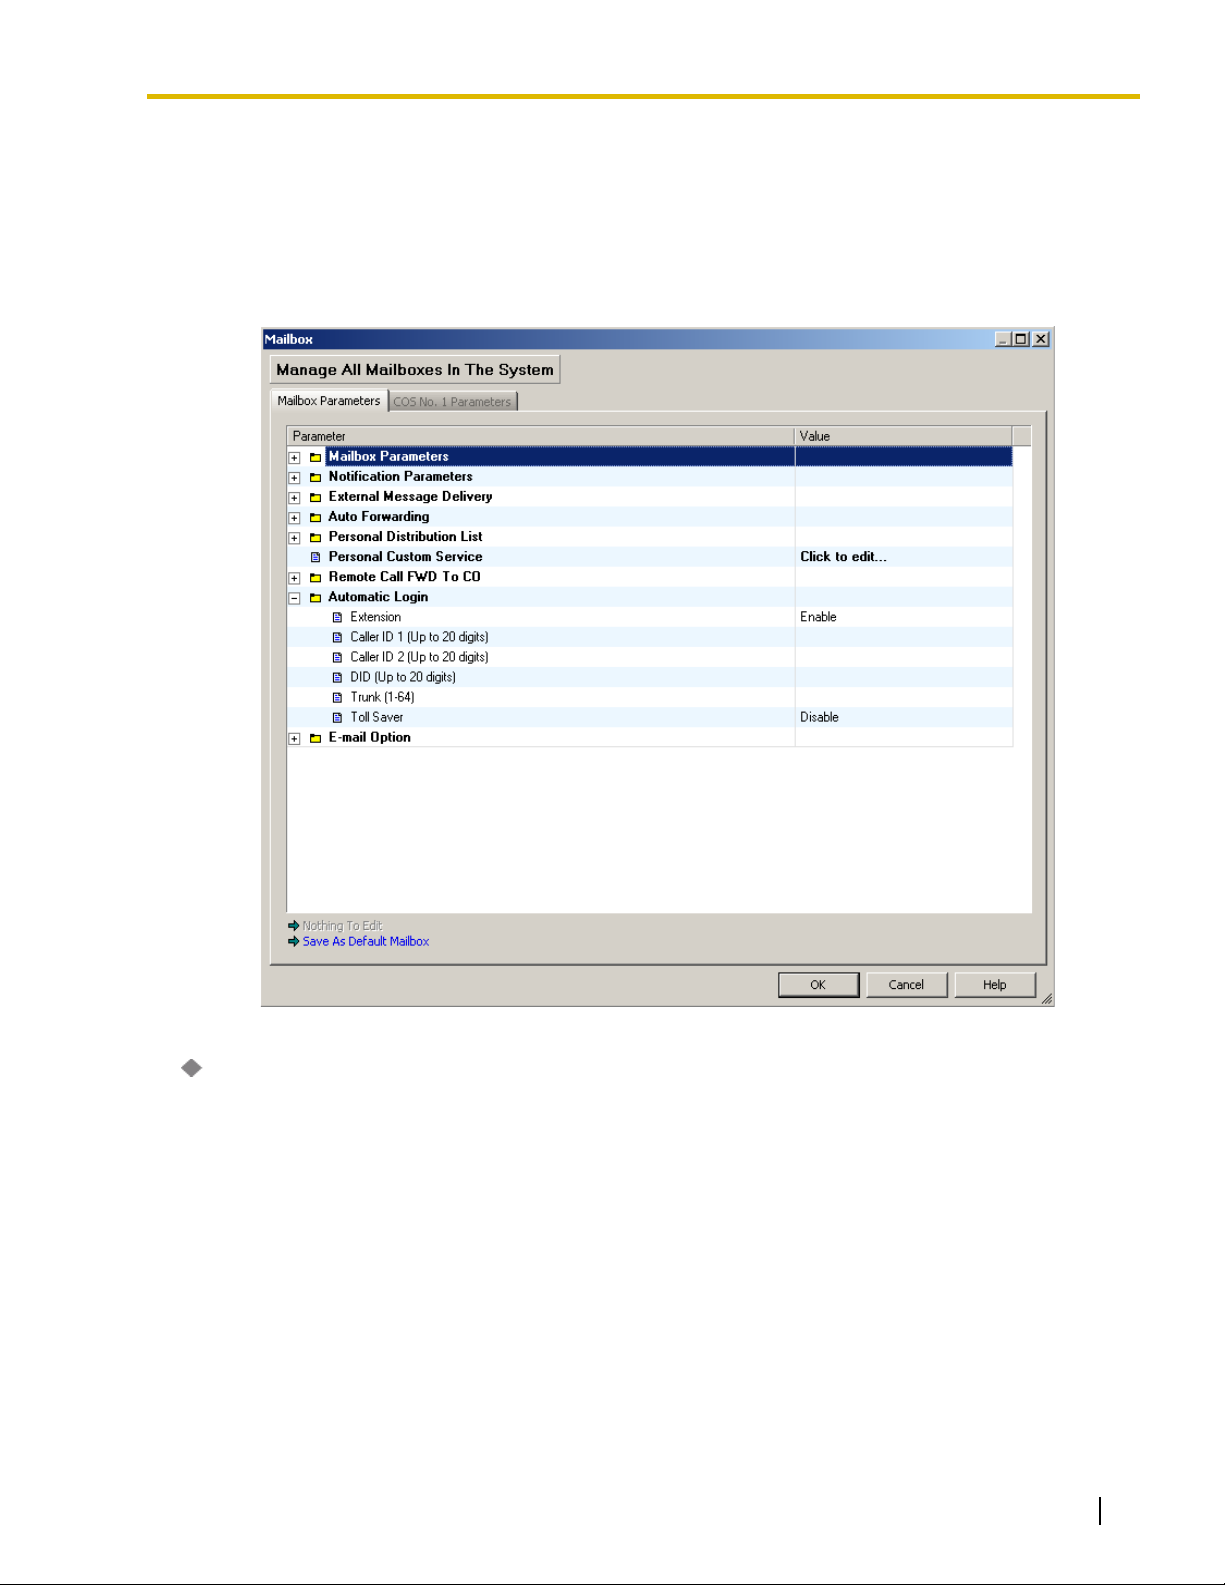
2.1.10 Automatic Log-in
Allows subscribers to access their mailbox directly without entering the mailbox number. Subscribers
can automatically log in either from their extensions, or from outside phones by dialing a
preprogrammed Caller ID number, DID number, or by dialing a telephone number specified to a
preprogrammed trunk (CO line). When logging in from outside phones, the Toll Saver feature is also
available.
2.1 Mailbox Settings
Extension
If set to "Enable", subscribers are able to access their mailbox directly without entering the mailbox
number.
Default
Enable
Value Range
Disable, Enable
Feature Manual References
2.3.2 Automatic Log-in (APT/DPT Integration Only)
Programming Manual 69
Page 70

2.1 Mailbox Settings
Caller ID 1, 2
Specifies the telephone number from which the subscriber can automatically be logged in from. When
Caller ID information is received that matches one of these numbers, the caller (subscriber) is
automatically logged in to the mailbox. Note that this telephone number must be unique for each
mailbox.
Default
None
Value Range
Max. 20 digits
Feature Manual References
2.3.2 Automatic Log-in (APT/DPT Integration Only)
Subscriber's Manual References
5.16 Assigning Your Telephone Numbers for Remote Automatic Log-in and Toll Saver
DID
Specifies the DID number for Automatic Log-in. When the VPS receives this DID number from the
PBX, the caller (subscriber) is automatically logged in to the mailbox. Note that this number must be
unique for each mailbox.
Note
• Automatic Log-in via DID number is only available when the VPS is connected to one of the
following PBXs using DPT Integration.
– KX-TD816 (P311Q or higher)
– KX-TD1232 (P211Q or higher)
– KX-TD500 (V4M or higher)
– KX-TDA series* (MPR Version 1.1 or higher)
* except KX-TDA50
Default
None
Value Range
Max. 20 digits
Feature Manual References
2.3.2 Automatic Log-in (APT/DPT Integration Only)
Subscriber's Manual References
5.16 Assigning Your Telephone Numbers for Remote Automatic Log-in and Toll Saver
70 Programming Manual
Page 71

2.1 Mailbox Settings
Trunk
Specifies the trunk (CO line) number for Automatic Log-in. When the VPS receives a call on this trunk
(CO line), the caller (subscriber) is automatically logged in to the mailbox. Note that this number must
be unique for each mailbox.
Default
None
Value Range
1–64
Feature Manual References
2.3.2 Automatic Log-in (APT/DPT Integration Only)
Toll Saver
Allows a subscriber to check his or her mailbox from preprogrammed Caller ID numbers specified for
Automatic Log-in, by dialing a preprogrammed DID Number specified for Automatic Log-in, or the
telephone number assigned to the trunk (CO line) specified for Automatic Log-in without incurring
telephone charges.
Default
Disable
Value Range
Disable: Disables the Toll Saver feature.
DID: Toll Saver functions when the VPS receives the preprogrammed DID number from the PBX.
Caller ID: Toll Saver functions when Caller ID information is received that matches one of the
preprogrammed numbers (Caller ID 1 or 2)
Trunk: Toll Saver functions when the VPS receives a call on the preprogrammed trunk (CO line).
Feature Manual References
2.3.2 Automatic Log-in (APT/DPT Integration Only)
Programming Manual 71
Page 72
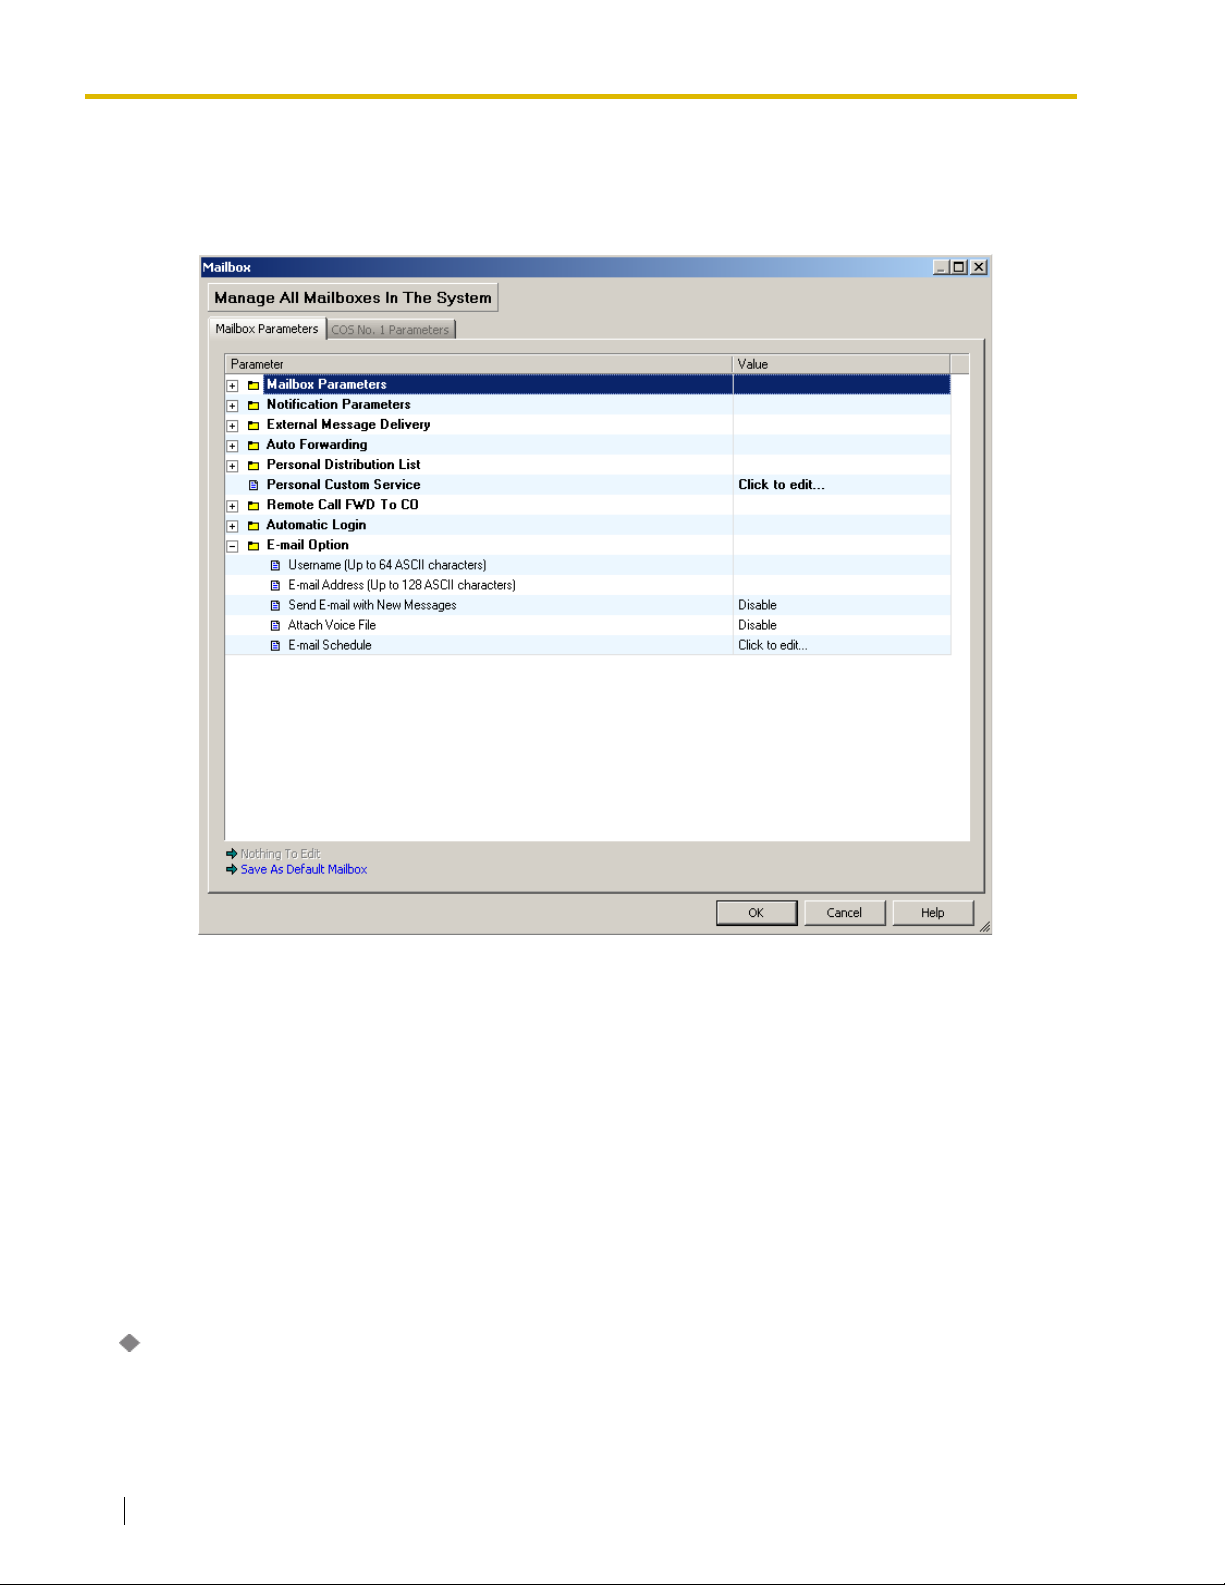
2.1 Mailbox Settings
2.1.11 E-mail Option
Enables subscribers to receive Message Waiting Notifications by e-mail when they receive new
messages.
Follow the steps below to edit E-mail Option:
1. Click Add Mailbox... or select a mailbox and click Edit Mailbox....
2. Enter the user name for the subscriber's e-mail account next to Username.
3. Enter the subscriber's e-mail address next to E-mail Address. Up to 3 addresses can be set by
inserting a comma between each address.
4. Set Send E-mail with New Messages to Enable to allow the subscriber to receive e-mail
notifications.
5. Set Attach Voice File to Enable to allow the subscriber to receive voice messages as e-mail file
attachments.
6. Click Click to edit… next to E-mail Schedule to determine when e-mail messages are sent, and
make the appropriate settings.
7. Click OK when finished.
Username
Specifies a subscriber's user name for e-mail option.
72 Programming Manual
Page 73

2.1 Mailbox Settings
Default
None
Value Range
Max. 64 characters
Feature Manual References
2.2.20 E-mail Integration
E-mail Address
Specifies the subscriber's e-mail address. Up to 3 addresses can be set (with a comma inserted
between addresses).
Default
None
Value Range
Max. 128 characters
Feature Manual References
2.2.20 E-mail Integration
Send E-mail with New Messages
If set to "Enable", the subscriber is able to receive notification by e-mail.
Default
Disable
Value Range
Disable, Enable
Feature Manual References
2.2.20 E-mail Integration
Attach Voice File
If set to "Enable", the subscriber is able to receive voice messages by e-mail (messages are sent as
file attachments).
Default
Disable
Value Range
Disable, Enable
Programming Manual 73
Page 74
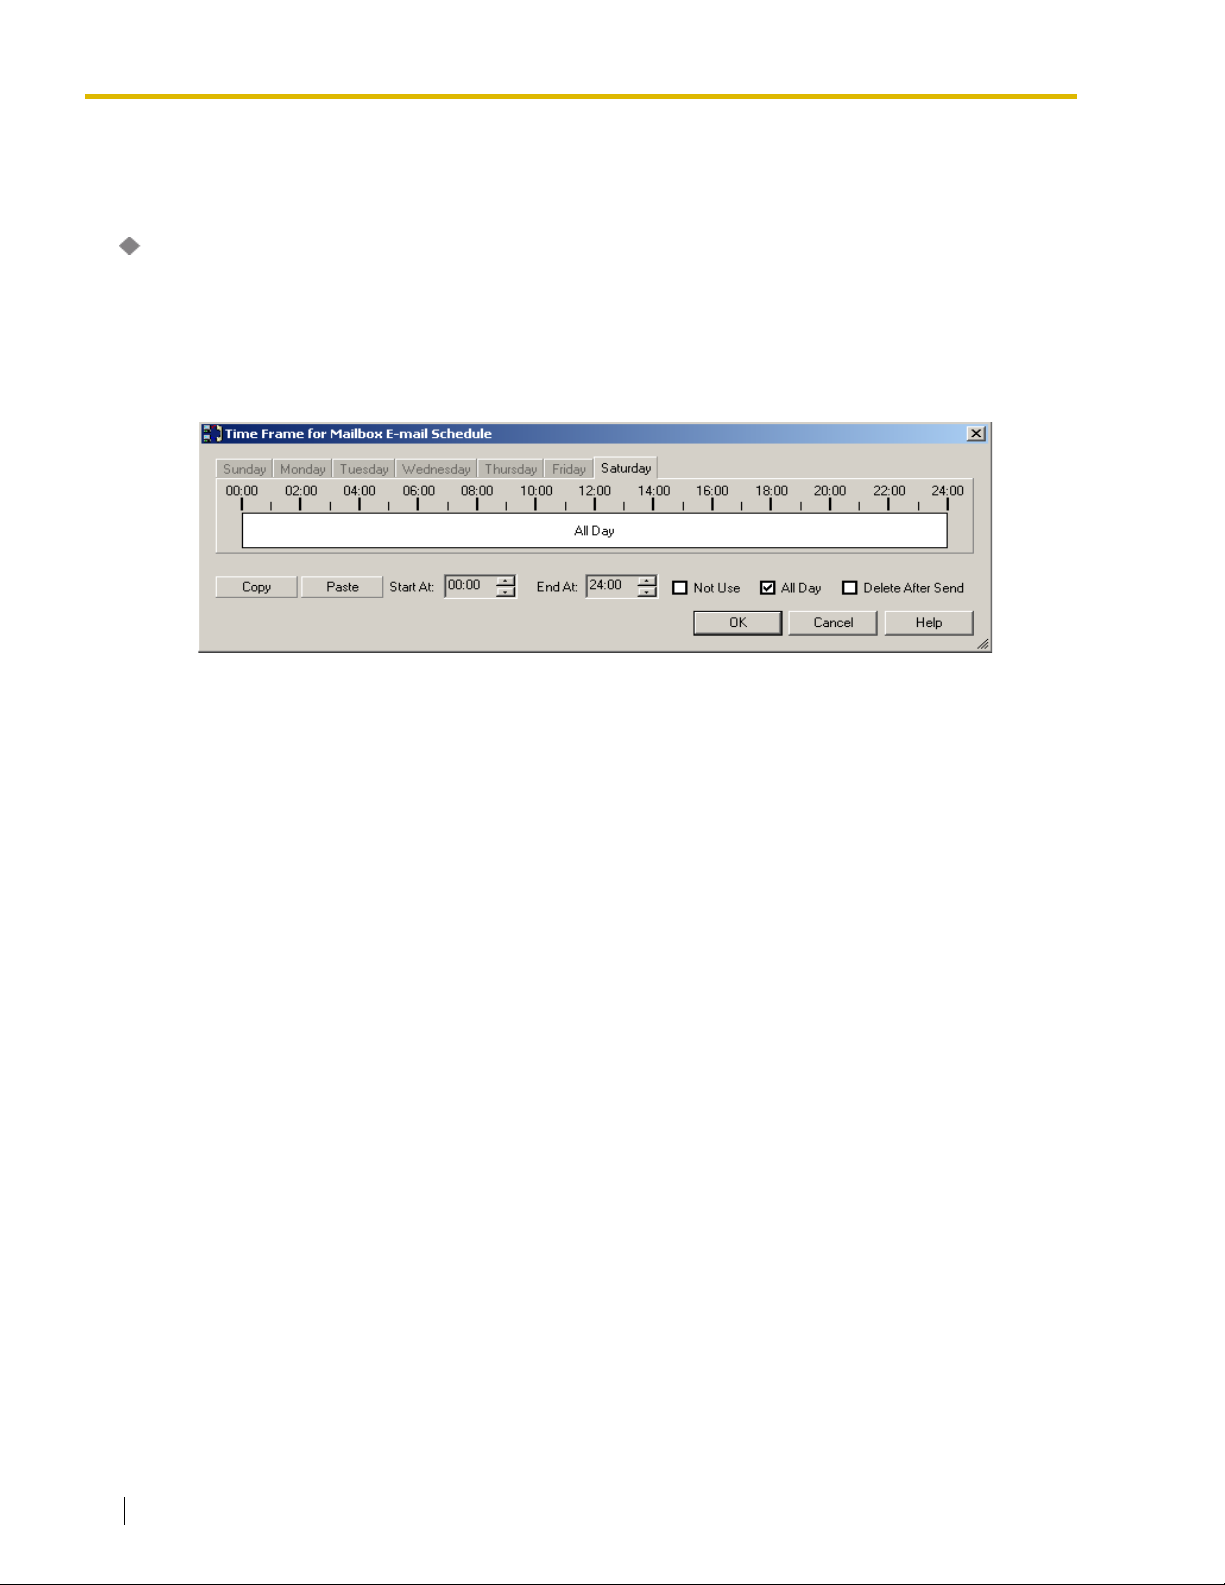
2.1 Mailbox Settings
Feature Manual References
2.2.20 E-mail Integration
E-mail Schedule
Specifies the schedule (time frame) of Message Waiting Notification by e-mail for each day of the
week, and specifies whether to delete the original message in a mailbox after the message attached
to an e-mail is sent. Notification will be sent for messages received during the time frame set here.
For messages received during times outside of the time frame, notification will be sent at the
beginning of the next time frame.
You can also set Notification schedule to "All Day" or "No Use".
Follow the steps below to edit Time Frame:
1. Click a day (Sunday – Saturday) tab.
2. Uncheck "All Day" or "No Use" if checked.
3. Click "Time Frame".
4. Enter the start and end times in the "Start At:" and "End At:" fields, or drag the edges of the time
frame to mark the start and end times.
To copy the schedule of one day to another day
1. Select a time frame in the desired "copy from" day.
2. Click Copy.
3. Select a time frame in the desired "copy to" day.
4. Click Paste.
5. Check "Delete After Send" if needed.
6. Click OK.
Default
All Day
Value Range
00:00–23:59
Feature Manual References
2.2.20 E-mail Integration
74 Programming Manual
Page 75
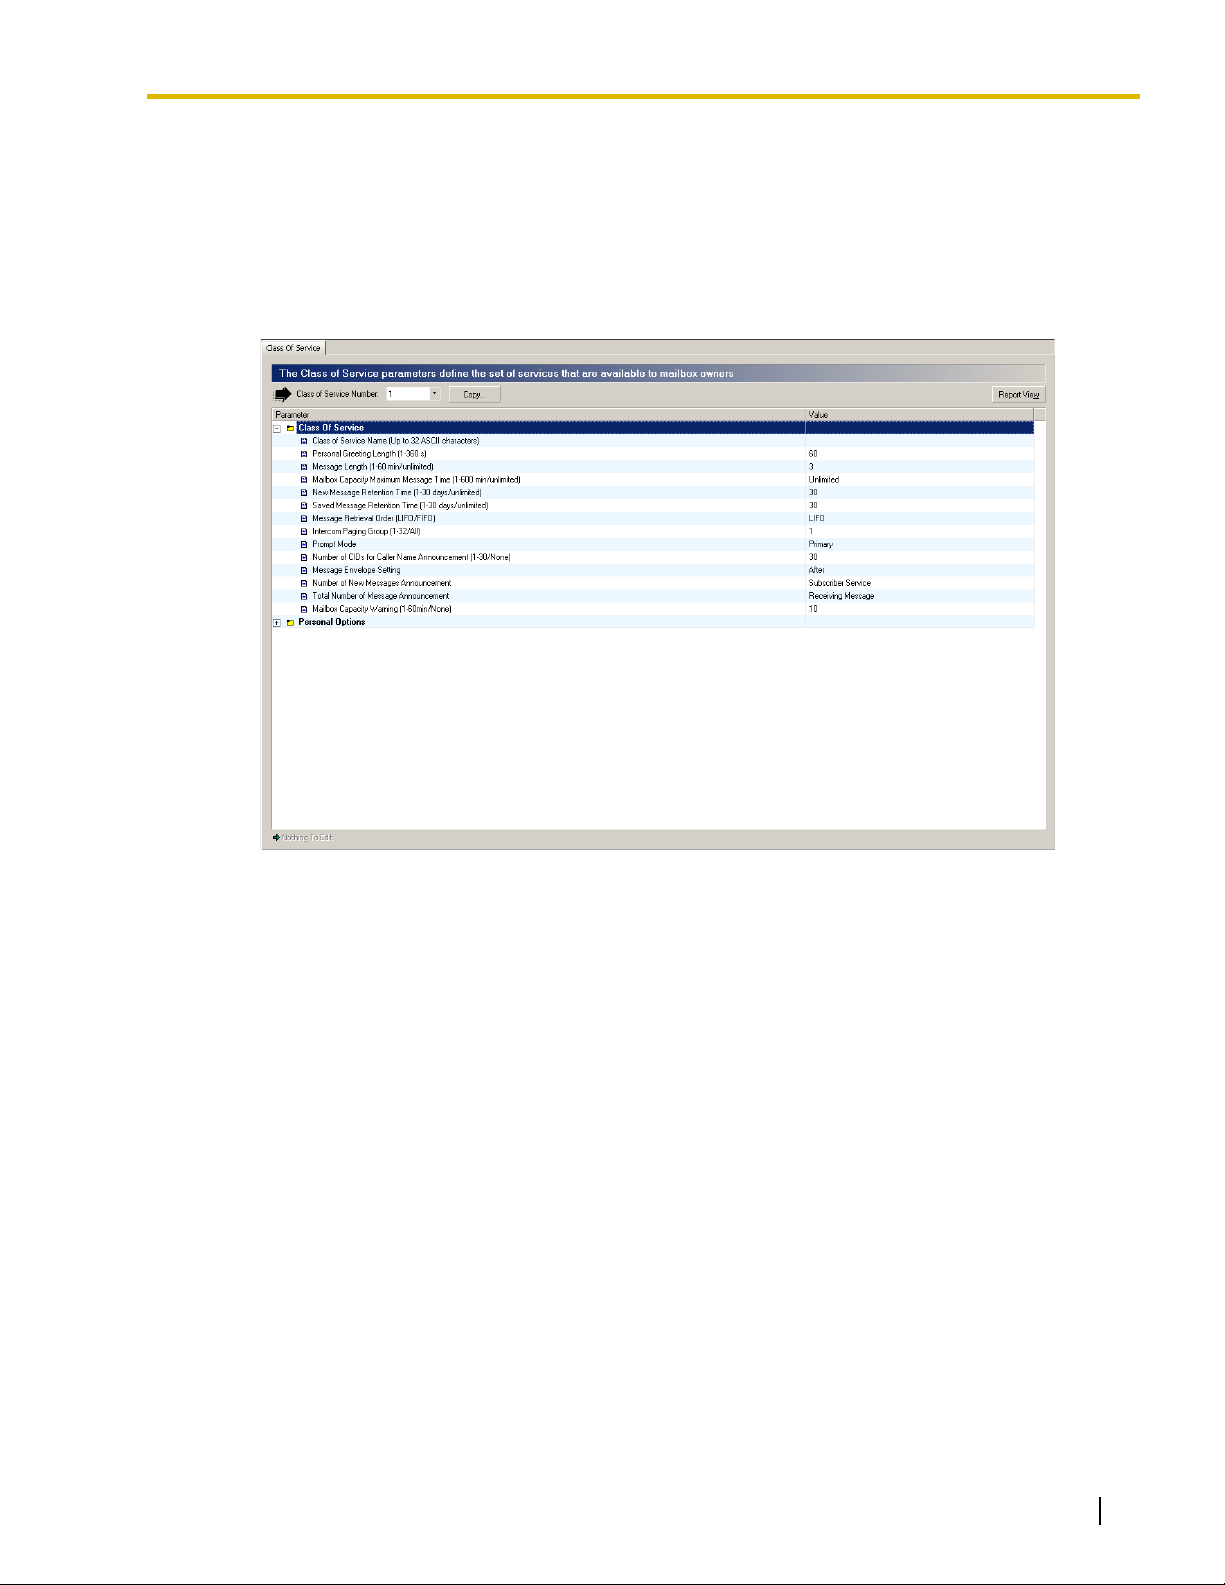
2.2 Class of Service
Each mailbox is assigned a Class of Service (COS) that determines the set of services that are
available to its subscriber. There are 64 classes. Mailboxes can be assigned to their own or to the
same COS as needed. COS No. 63 and 64 are assigned by default to the Message Manager and to
the System Manager, respectively. No other mailboxes can be assigned to COS No. 63 and 64.
Follow the steps below to edit Class of Service:
2.2 Class of Service
[Edit]
1. Select the desired COS No. from COS No..
2. Edit each parameter in the dialog box.
3. Click OK.
[Copy]
1. Select the desired COS No. to copy, and press Copy.
2. Copy Class of Service window is displayed. Check the items to copy, and select the
destination COS number. (Ctrl/Shift key is available to choose several mailbox COS
numbers.)
3. Click OK.
[Report View]
1. Select the desired COS No..
2. Click Report View.
Programming Manual 75
Page 76
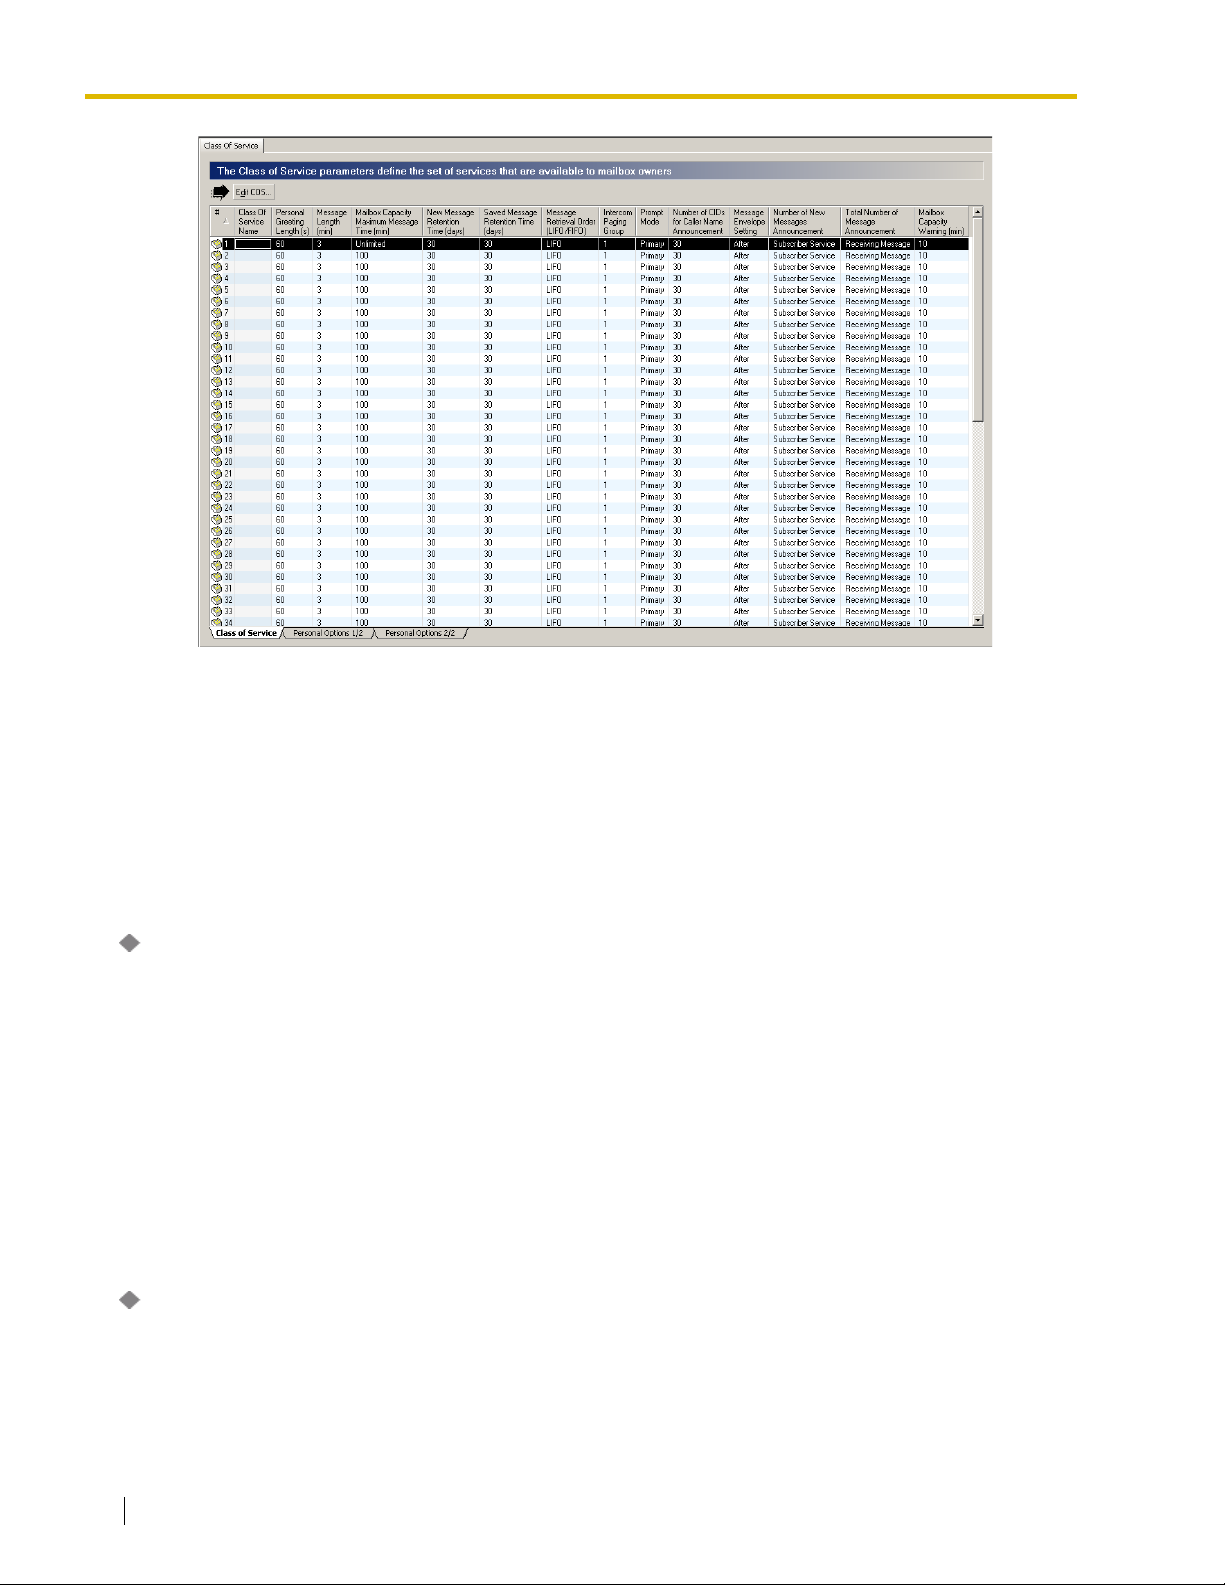
2.2 Class of Service
Displays parameters for all COS settings. Classes of Service can be sorted in ascending or
descending order by parameter by clicking the parameter name.
From this screen, you cannot edit any parameters: to edit each setting, click the desired COS
No., then press Edit COS.
2.2.1 Class of Service
Specifies the parameters for each Class of Service.
Class of Service Name
Specifies the Class of Service's name.
Default
None
Value Range
Max. 32 characters
Feature Manual References
2.2.12 Class of Service (COS)
Personal Greeting Length
Defines the maximum length (in seconds) of the Personal Greeting.
Default
60 s
76 Programming Manual
Page 77

2.2 Class of Service
Value Range
1 s–360 s
Feature Manual References
2.3.22 Personal Greetings
Message Length
Defines the maximum recording time for messages. If set to "Unlimited", the maximum recording time
is 60 minutes, and the maximum recording time for two-way conversations (Two-way Record and Twoway Transfer) is unlimited.
Default
COS 1-62: 3 min
COS 63-64: 10 min (KX-TVA50), 60 min (KX-TVA200)
Value Range
1 min–60min, Unlimited
Feature Manual References
2.3.32 Two-way Record (APT/DPT Integration Only)
2.3.33 Two-way Transfer (APT/DPT Integration Only)
Subscriber's Manual References
5.13 Recording Your Conversations
Mailbox Capacity Maximum Message Time
Specifies the total number of available minutes for storing messages (both new and saved) in each
mailbox.
Default
COS 1-62: 10 min (KX-TVA50), 100 min (KX-TVA200)
COS 63-64: 120 min (KX-TVA50), 600 min (KX-TVA200)
Value Range
For KX-TVA50: 1 min–120 min, Unlimited
For KX-TVA200: 1 min–600 min, Unlimited
New Message Retention Time
Defines the number of days that a new message will remain in the mailbox. The storage period begins
the day after the message reception. If "Unlimited" is selected, the saved message will remain in the
mailbox until erased by the subscriber.
Default
30 days
Programming Manual 77
Page 78

2.2 Class of Service
Value Range
1–30 days, Unlimited
Saved Message Retention Time
Defines the number of days that a played message will remain in the mailbox. The timing is
"refreshed" whenever the message is played back. If "Unlimited" is selected, the saved message will
remain in the mailbox until erased by the subscriber.
Default
30 days
Value Range
1–30 days, Unlimited
Message Retrieval Order
Specifies the order in which messages will be retrieved (played back for listening).
Default
LIFO
Value Range
LIFO: Messages are retrieved starting with the most recent (Last In First Out).
FIFO: Messages are retrieved starting with the oldest (First In First Out).
Intercom Paging Group
Specifies the Intercom Paging group number available to the subscriber.
Note
• The Intercom Paging feature is only available when the VPS is connected to a Panasonic
KX-T series PBX using APT/DPT Integration.
• "Intercom paging Parameters" can be edited by clicking Edit System Parameters/
Parameters/Intercom Paging Parameters at the bottom of COS Parameters window.
Default
1
Value Range
1–32, All
Feature Manual References
2.2.25 Intercom Paging (APT/DPT Integration Only)
Prompt Mode
Specifies the language used for system prompts played for the subscriber during Subscriber Service.
If set to "Primary", the default language which is selected from all installed languages will be used.
78 Programming Manual
Page 79

2.2 Class of Service
Note
• If a certain prompt is not recorded in the language selected by the subscriber, the English
version of that prompt will be used.
Default
Primary
Value Range
Primary, Guidance No. (KX-TVA50: No. 1-3, KX-TVA200: No. 1-10)
Feature Manual References
2.2.33 Multilingual Service
2.2.44 System Prompts
Number of CIDs for Caller Name Announcement
Specifies the maximum number of Caller IDs which subscribers can assign for the Personal Caller
Name Announcement.
Default
30
Value Range
None, 1–30
Feature Manual References
2.2.10 Caller Name Announcement—Personal (APT/DPT Integration Only)
Subscriber's Manual References
5.11 Personal Caller Name Announcement
Message Envelope Setting
Specifies when message envelopes (message date and time, name of the person who recorded or
transferred the message, telephone number of the caller) are announced.
Note
• If you want to skip this information, press [6] while listening to it.
Default
After
Value Range
Before: The VPS announces Message Envelope before playing the recorded message.
After: The VPS announces Message Envelope after playing the recorded message.
Require: The VPS announces Message Envelope when it is required by DTMF command.
Programming Manual 79
Page 80

2.2 Class of Service
Number of New Messages Announcement
Specifies the position of the Number of New Messages Announcement.
Default
Subscriber Service
Value Range
None: Not announced
Subscriber Service: The VPS announces the number of new messages at the beginning of
Subscriber Service (i.e., after the subscriber has logged in to his or her mailbox).
Receiving Messages: The VPS announces the number of new messages after the subscriber has
selected to listen to messages while accessing his or her mailbox.
Total Number of Message Announcement
Specifies the position of the Total Number of Messages Announcement.
Note
• When the same position is set for the Number of New Messages Announcement and the
Total Number of Message Announcement, the VPS announces the number of new
messages then the total number of messages.
Default
Receiving Messages
Value Range
None: Not announced
Subscriber Service: The VPS announces the number of new messages at the beginning of
Subscriber Service.
Receiving Messages: The VPS announces the number of new messages at the beginning of
Receive Message Service.
Mailbox Capacity Warning
Specifies if and when the VPS alerts subscribers when recording time for their mailboxes is running
low. If set to "None", the warning will not be announced. All other settings indicate the remaining
recording time capacity threshold for when the announcement is heard.
Default
10 min
Value Range
None, 1–60 min
Feature Manual References
2.3.17 Mailbox Capacity Warning
Subscriber's Manual References
5.21 Mailbox Capacity Warning
80 Programming Manual
Page 81
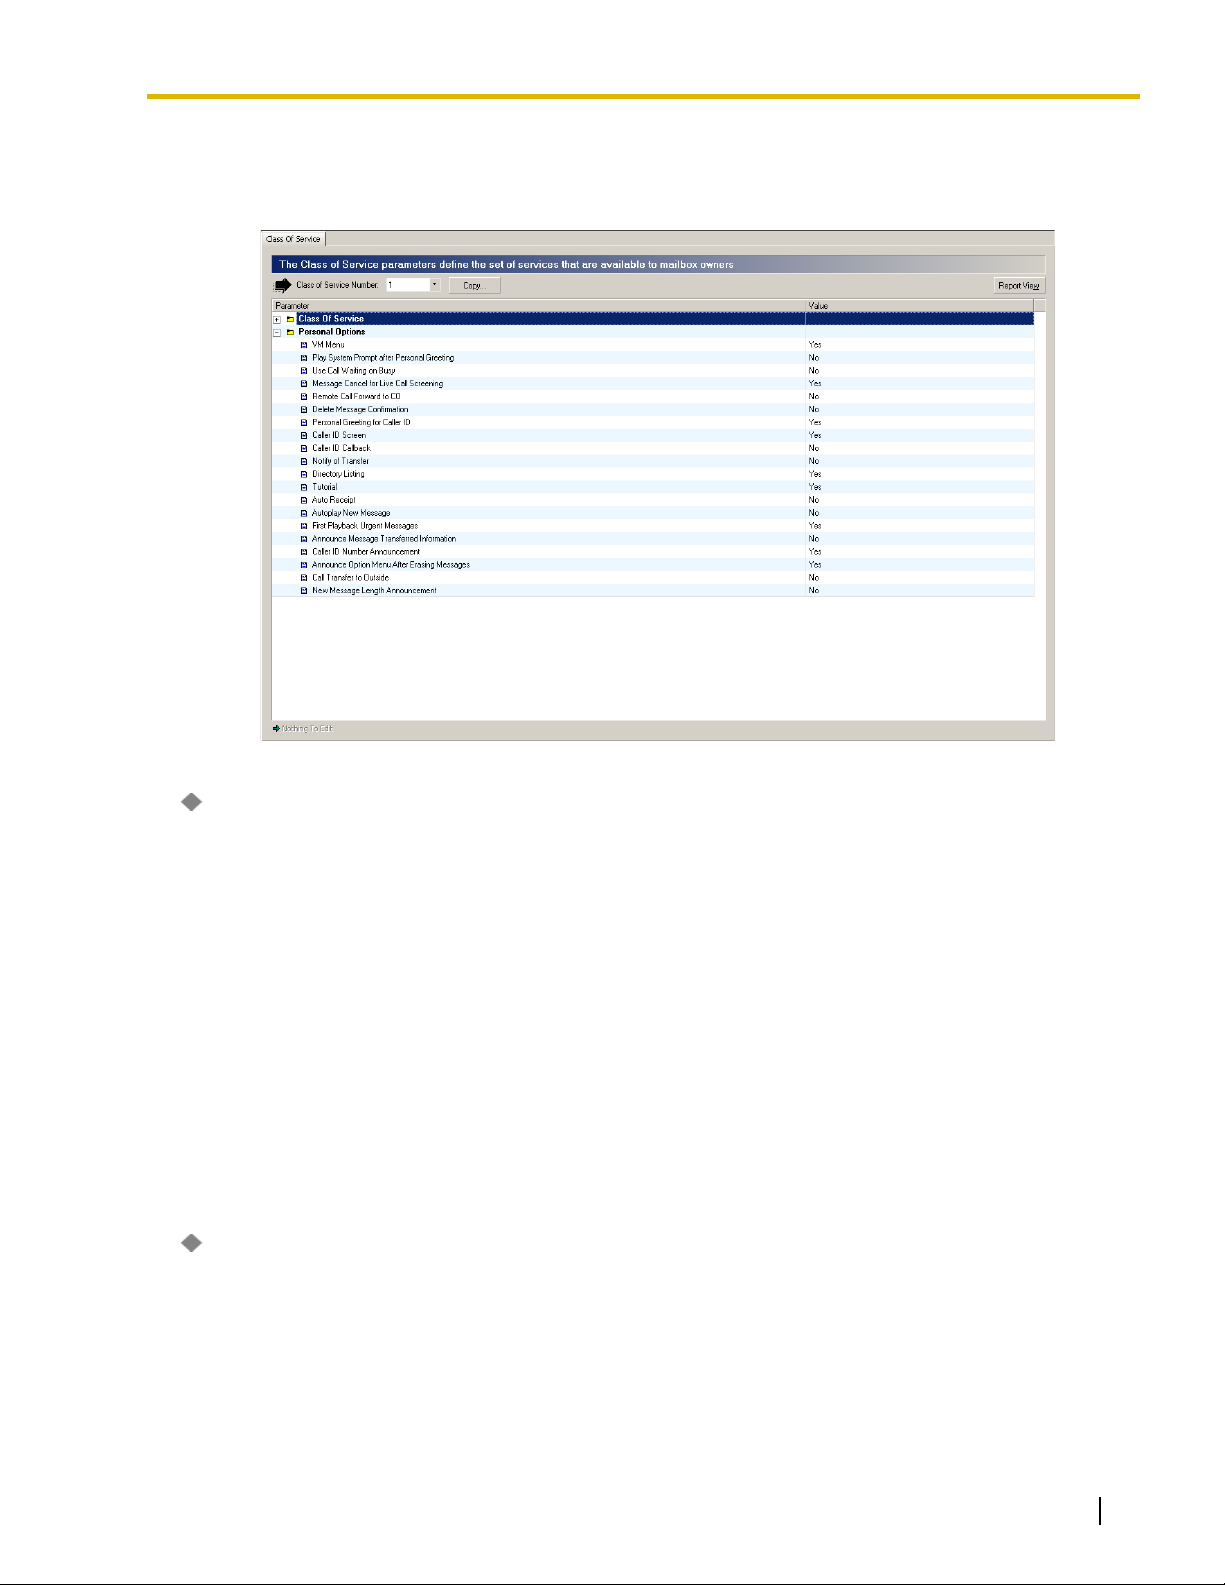
2.2.2 Personal Options
The following parameters determine the utilization of features in each mailbox based on the COS.
2.2 Class of Service
VM Menu
If set to "Yes", the subscriber can use the VM Menu feature.
Default
Ye s
Value Range
No, Yes
Feature Manual References
2.3.36 VM Menu (DPT Integration Only)
Subscriber's Manual References
1.1 Introduction to the VPS
Play System Prompt after Personal Greeting
If set to "Yes", directions for recording a message are given to the caller immediately after the
personal greeting has been played.
Default
No
Programming Manual 81
Page 82

2.2 Class of Service
Value Range
No, Yes
Use Call Waiting on Busy
If set to "Yes", the VPS signals the subscriber when he or she is on a call and another call is received.
Note
• "Call Waiting Sequence" can be edited by clicking Edit System Parameters/Parameters/
Default
No
Value Range
No, Yes
Message Cancel for Live Call Screening
If set to "Yes", the caller's message will be deleted when the subscriber answers a call via Live Call
Screening while the caller is leaving a message.
Call Waiting Sequence at the bottom of the dialog box.
Note
• The Live Call Screening feature is only available when the VPS is connected to a Panasonic
KX-T series PBX using APT/DPT Integration.
Default
Ye s
Value Range
No, Yes
Feature Manual References
2.3.15 Live Call Screening (APT/DPT Integration Only)
Subscriber's Manual References
5.12 Live Call Screening (LCS)
Remote Call Forward to CO
If set to "Yes", the subscriber can use the Remote Call Forwarding feature. This feature allows the
subscriber to program his or her extension remotely to forward calls to an outside telephone number.
This telephone number can be "Telephone No. 1" or "Telephone No. 2" (in
CO), or any other telephone number.
2.1.9 Remote Call FWD to
Note
• The Remote Call FWD to CO feature is only available when the VPS is connected to a
• The FWD to CO feature may be prohibited by the PBX; PBX programming may also be
82 Programming Manual
Panasonic KX-T series PBX using DPT Integration.
necessary to enable this feature for the COS of the extensions who will use this feature.
Page 83

2.2 Class of Service
Default
No
Value Range
No, Yes
Programming Manual References
2.1.9 Remote Call FWD to CO
Feature Manual References
2.3.27 Remote Call Forwarding Set (DPT Integration Only)
Subscriber's Manual References
5.14 Remote Call Forwarding
Delete Message Confirmation
If set to "Yes", the VPS requests confirmation from the subscriber before erasing a message in the
mailbox. If set to "No", the message is erased immediately.
Default
No
Value Range
No, Yes
Feature Manual References
2.3.9 Delete Message Confirmation
Personal Greeting for Caller ID
If set to "Yes", subscribers can record personal greetings that are played for specific callers only
(Personal Greeting for Caller ID).
Default
Ye s
Value Range
No, Yes
Feature Manual References
2.3.21 Personal Greeting for Caller ID (APT/DPT Integration Only)
Subscriber's Manual References
5.10 Personal Greeting for Caller ID
Programming Manual 83
Page 84

2.2 Class of Service
Caller ID Screen
If set to "Yes", subscribers can hear the prerecorded names of callers when they receive calls (Caller
ID Screening).
Default
Ye s
Value Range
No, Yes
Feature Manual References
2.2.9 Caller ID Screening (APT/DPT Integration Only)
Caller ID Callback
If set to "Yes", the subscriber can call the caller back while listening to the caller's message (Caller ID
Callback).
Default
No
Value Range
No, Yes
Feature Manual References
2.3.7 Caller ID Callback (APT/DPT Integration Only)
Notify of Transfer
If set to "Yes", subscribers will hear "You have a call." when they answer transferred calls.
Default
No
Value Range
No, Yes
Directory Listing
If set to "Yes", the subscriber's name and extension number will be listed in the directory (Dialing by
Name).
Default
Ye s
Value Range
No, Yes
84 Programming Manual
Page 85

2.2 Class of Service
Feature Manual References
2.2.18 Dialing by Name
Tuto ri al
If set to "Yes", subscribers are guided to set the following basic mailbox settings when they access
their mailboxes for the first time:
– Password
–Owner's Name
– No Answer Greeting
Default
Ye s
Value Range
No, Yes
Feature Manual References
2.3.28 Subscriber Tutorial
Subscriber's Manual References
2.2 Subscriber Tutorial (Easy Mailbox Configuration)
Auto Receipt
If set to "Yes", the subscriber can request to receive confirmation when his or her message has been
listened to by the message recipient.
Default
No
Value Range
No, Yes
Feature Manual References
2.3.1 Auto Receipt
Autoplay New Message
If set to "Yes", the VPS plays new messages automatically when the subscriber logs into his or her
mailbox.
Default
No
Value Range
No, Yes
Programming Manual 85
Page 86

2.2 Class of Service
Feature Manual References
2.3.3 Autoplay New Message
First Playback Urgent Messages
If set to "Yes", the VPS plays urgent messages before regular messages.
Default
Ye s
Value Range
No, Yes
Feature Manual References
2.3.35 Urgent Message
Announce Message Transferred Information
If set to "Yes", the VPS plays the information of transferred messages to a subscriber before playing
the messages.
Default
Ye s
Value Range
No, Yes
Caller ID Number Announcement
Specifies whether or not the VPS announces the Caller ID number when the subscriber plays a
message left by a caller whose name has not been recorded for the Caller Name Announcement
feature. If the name has been recorded, it will be announced regardless of this setting.
Default
Ye s
Value Range
No, Yes
Announce Option Menu After Erasing Messages
If set to "Yes", the VPS plays the option menu after erasing a message. If set to "No", the VPS plays
the next message automatically without playing the option menu.
Default
Ye s
86 Programming Manual
Page 87

2.2 Class of Service
Value Range
No, Yes
Call Transfer to Outside
If set to "Yes", the VPS allows calls to be transferred to a trunk (CO line) via the following features:
Caller ID Callback, Call Transfer Service, and Personal Custom Service.
Default
No
Value Range
No, Yes
Feature Manual References
2.2.7 Call Transfer to Outside
New Message Length Announcement
If set to "Yes", the VPS announces the total length of new messages when the number of new
messages is announced.
Default
No
Value Range
No, Yes
Programming Manual 87
Page 88

2.3 Port/Trunk Service
2.3 Port/Trunk Service
When a call is received from an outside party, the following call services can determine how the call
is handled:
– Automatic Log-in (Toll Saver)
– Holiday Service
– Caller ID Call Routing
– DID Call Routing
–Trunk Service
–Port Service
The service with the highest priority will handle the call. The order of priority is:
Automatic Log-in (Toll Saver) > Holiday Service > Caller ID Call Routing > DID Call Routing > Trunk
Service > Port Service.
88 Programming Manual
Page 89
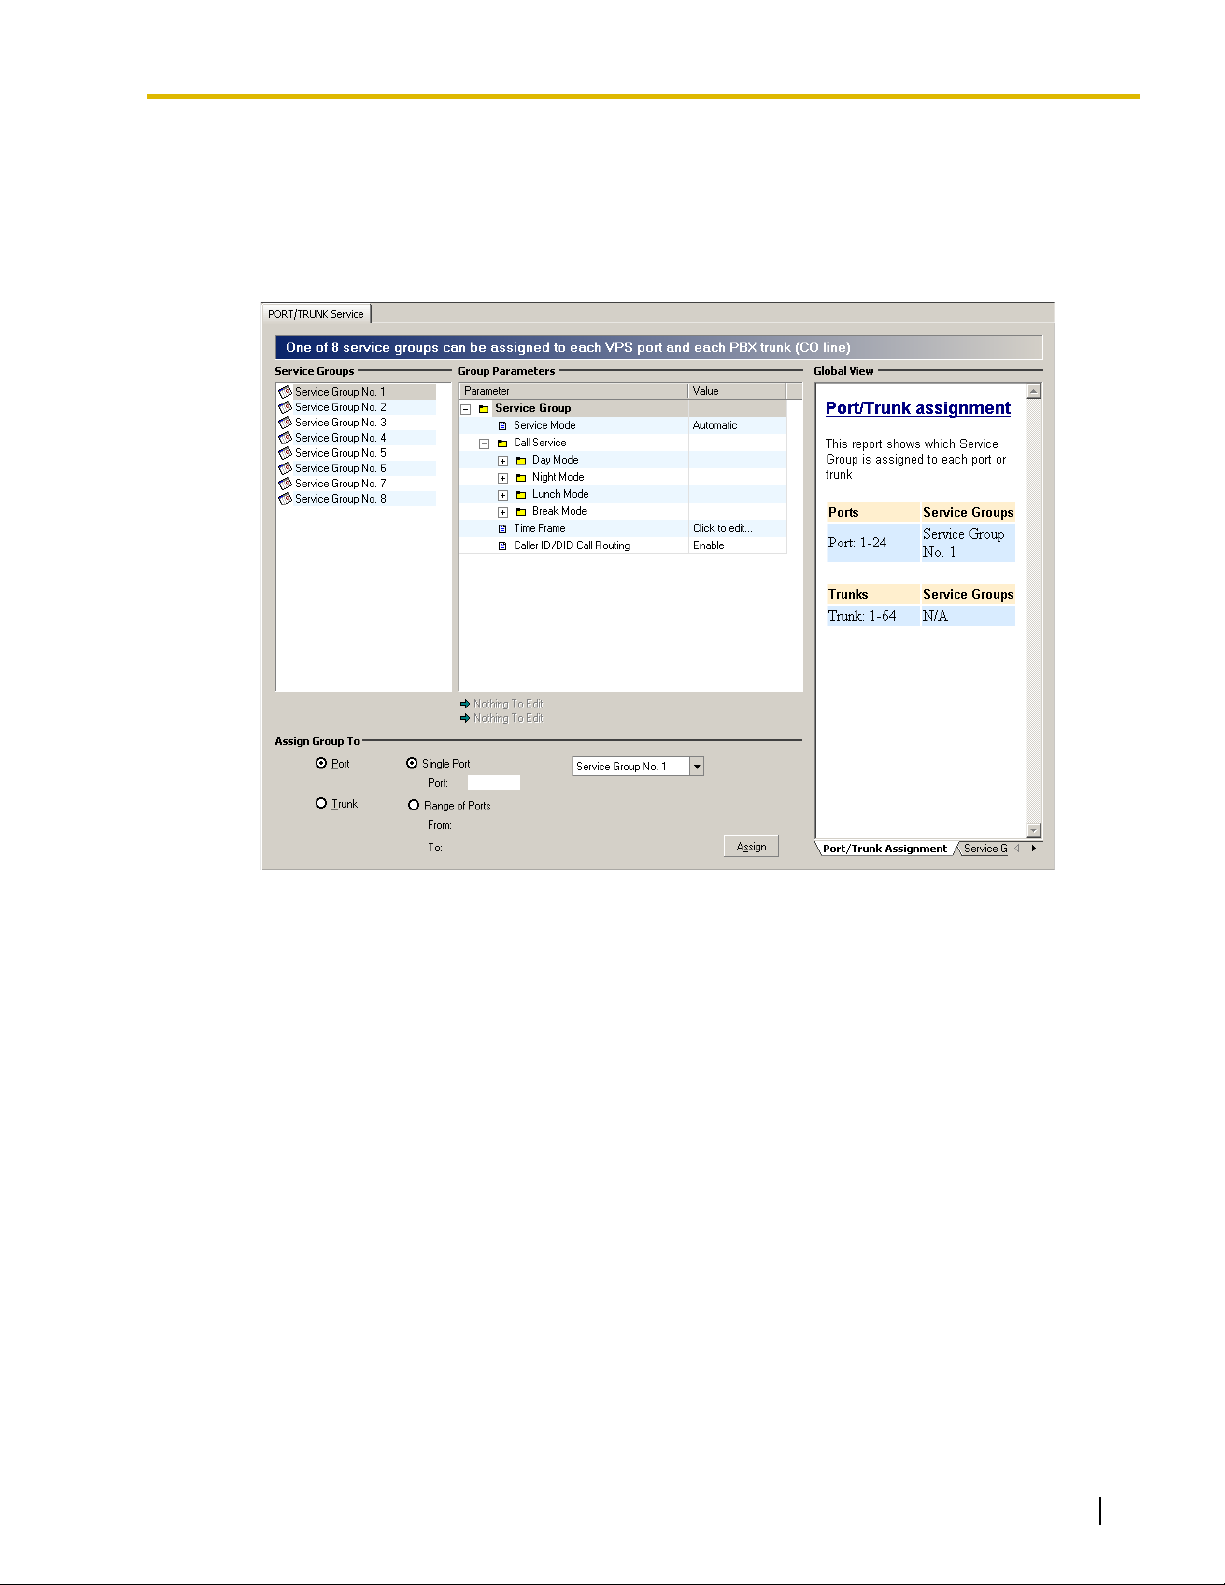
2.3.1 Service Group
A Service Group Is a group of parameters that determine how incoming calls will be handled by the
VPS. 8 different Service Groups can be configured; one Service Group can be assigned to each VPS
port and PBX trunk (CO line), and each Service Group can be applied to more than one trunk (CO
line) group or port as needed.
2.3 Port/Trunk Service
Follow the steps below to configure each Service Group:
[Parameters Edit]
1. Select the desired Service Group Number (1–8) in Service Groups table.
2. Edit each parameter in Group Parameters table.
[Assignment of Service Group]
1. Select a Service Group Number (1–8) in Assign Group To.
To assign to a single port or a range of ports
1. Click Port.
2. Check Single Port or Range of Ports.
3. Specify the desired port number or a range of port numbers (From:/To:).
To assign to a single trunk (CO line) or a range of trunks (CO lines)
1. Click Tru n k.
2. Check Single Trunk or Range of Trunks.
3. Specify the desired trunk number or a range of trunk numbers (From:/To:).
2. Click Assign.
[Default Port/Trunk assignment]
Port 1-24 (KX-TVA200), 1-6 (KX-TVA50): Service Group No. 1
Trunk 1-64: None
Programming Manual 89
Page 90

2.3 Port/Trunk Service
Service Mode
Assigns one of 6 Service Modes to the Service Group.
Note
• Once the Service Mode has been changed, it is retained unless the System Manager or
• PBX Control Mode is only available when the VPS is connected to a Panasonic KX-T series
• In Automatic Mode, services have this order of priority:
• In Manual Modes (Day, Night, Lunch, or Break), services have this order of priority:
Default
Automatic
System Administrator changes it again, even after the power is turned off.
PBX using APT/DPT Integration. If PBX Control Mode is selected but cannot be used, the
VPS will operate in Automatic Mode.
Automatic Log-in (Toll Saver) > Holiday Service > Caller ID Call Routing > DID Call Routing
> Trunk Service > Port Service
Automatic Log-in (Toll Saver) > Caller ID Call Routing > DID Call Routing > Trunk Service >
Por t Service
(Holiday Service is disregarded.)
Value Range
Automatic: The current Call Service used by the Service Group is determined by the settings made
for the current time mode (day, night, lunch, break).
Manual Day: The Call Service programmed for day mode is used, regardless of the current time
mode.
Manual Night: The Call Service programmed for night mode is used, regardless of the current time
mode.
Manual Lunch: The Call Service programmed for lunch mode is used, regardless of the current time
mode.
Manual Break: The Call Service programmed for break mode is used, regardless of the current time
mode.
PBX Control: The current Call Service used by the Service Group is determined by the settings
made for the current time mode (day, night, lunch, break). The VPS will change time modes according
to when the PBX changes time modes (APT/DPT Integration only).
Feature Manual References
2.4.6 Service Mode
Call Service
Call Service For Day, Night, Lunch, and Break
A call service is a group of parameters that determine how calls are handled throughout the day. Each
Service Group (therefore each port and trunk [CO line]) can have a different call service for each time
mode (day, night, lunch, break). One of 4 incoming call services (Voice Mail, Automated Attendant,
Interview, or Custom Service) can be assigned to each call service.
90 Programming Manual
Page 91

2.3 Port/Trunk Service
Company Greeting No.
Specifies the company greeting to be heard by callers. The System Greeting is "Good Morning/
Afternoon/Evening. Welcome to the Voice Processing System". Each call service can have its own
setting.
Default
None
Value Range
None, 1–32, System
Feature Manual References
2.2.13 Company Greeting
Incoming Call Service
Specifies the incoming call service used to handle calls.
Note
• When you select Interview Service, an Interview Mailbox number should also be specified.
• When you select Custom Service, a Custom Service number should also be specified.
• The System Manager can change the "Incoming Call Service" after logging in to his or her
mailbox (see 6.6 Changing the Company Greeting and Incoming Call Service Setting in
Subscriber's Manual).
Default
Auto. Atten.
Value Range
Voice Mail, Auto. Atten., Interview, Custom
Feature Manual References
2.2.6 Call Services
2.2.39 Port Service
2.2.46 Trunk Service (Universal Port) (APT/DPT Integration Only)
Subscriber's Manual References
6.6 Changing the Company Greeting and Incoming Call Service Setting
Incoming Call Service Prompt
Specifies the language of system prompts used by this call service. If set to "Primary", the default
language which is selected from all installed languages will be used. When set to "Selective", the
caller can select the language of his or her choice, provided the System Administrator or the Message
Manager has recorded the Multilingual Selection Menu. To specify Prompt Selection Number, see
"
Prompt Setting" in 2.5.4 Parameters.
Programming Manual 91
Page 92

2.3 Port/Trunk Service
Note
• If "Selective" is specified, you will need to select a prompt available for rotary callers. See
"Prompt for Rotary Callers" below.
Default
Primary
Value Range
Primary, Selective, Guidance No. (KX-TVA50: No. 1-3, KX-TVA200: 1-10)
Programming Manual References
"Prompt Setting" in 2.5 System Parameters
Feature Manual References
2.2.44 System Prompts
Prompt for Rotary Callers
Specifies which language a rotary caller or an External Delivery Message receiver hears when he or
she cannot enter any digits (Prompt Selection Number) after the Multilingual Selection Menu has
been played. If set to "Primary", the default language which is selected from all installed languages
will be used.
Note
• "Prompt for Rotary Callers" is only available when "Incoming Call Service Prompt" is set to
"Selective".
Default
Primary
Value Range
Primary, Selective, Guidance No. (KX-TVA50: No. 1-3, KX-TVA200: No. 1-10)
Feature Manual References
2.2.44 System Prompts
Delayed Answer Time
Specifies whether the port or trunk (CO line) answers immediately (0) or with delay (1 s – 60 s).
Default
0 s
Value Range
0 s–60 s
92 Programming Manual
Page 93

2.3 Port/Trunk Service
Time Frame
Specifies the start and end times for each time mode for each day of the week. Each day of the week
can have 1 lunch mode, up to 2 night modes (1 at the beginning and end of the day) and up to 3 break
modes. Lunch and break modes cannot be inserted into a night mode.
Follow the steps below to edit Time Frame:
1. Click Click to Edit….
2. Select a time mode, then enter the start and end times in the "Start At:" and "End At:" fields or
drag the edges of the time mode to mark the start and end times.
To copy the time mode schedule of one day to another day
1. Select a time mode in the desired "copy from" day, and click Copy.
2. Select a time mode in the desired "copy to" day, then click Paste.
To insert a break or lunch mode
1. Right-click the desired time mode.
2. Select "Insert Break" or "Insert Lunch".
3. Click OK.
Note
• This setting is only available when "Automatic" is selected in "Service Mode".
Default
Day: 09:00-17:00, Lunch/Break: None
Value Range
00:00–23:59
Feature Manual References
2.2.45 Time Service
Caller ID/DID Call Routing
Enables or disables the Caller ID/DID Call Routing feature.
Default
Enable
Value Range
Disable, Enable
Feature Manual References
2.2.8 Caller ID Call Routing (APT/DPT Integration Only)
2.2.19 DID Call Routing (DPT Integration Only)
Programming Manual 93
Page 94

2.4 Service Settings
2.4 Service Settings
Service settings are divided into the following screens:
– Caller ID/DID/PIN Call Routing
– Holiday Settings
– Parameters
–Custom Service
Click each tab at the bottom of Service Settings screen to edit the parameters.
There are 2 methods to edit the parameters for "Caller ID/DID/PIN Call Routing" and "Holiday
Settings":
a) Double-click a cell in the table of the screen, and edit the selected parameter.
b) Click the desired Caller ID/DID/PIN number or Holiday Service number, then, click Edit… and
edit each parameter in the Edit Parameters dialog box.
Each parameter setting can be sorted in either ascending or descending order by clicking the header
in "Caller ID/DID/PIN Call Routing" table and "Holiday Settings" table.
94 Programming Manual
Page 95
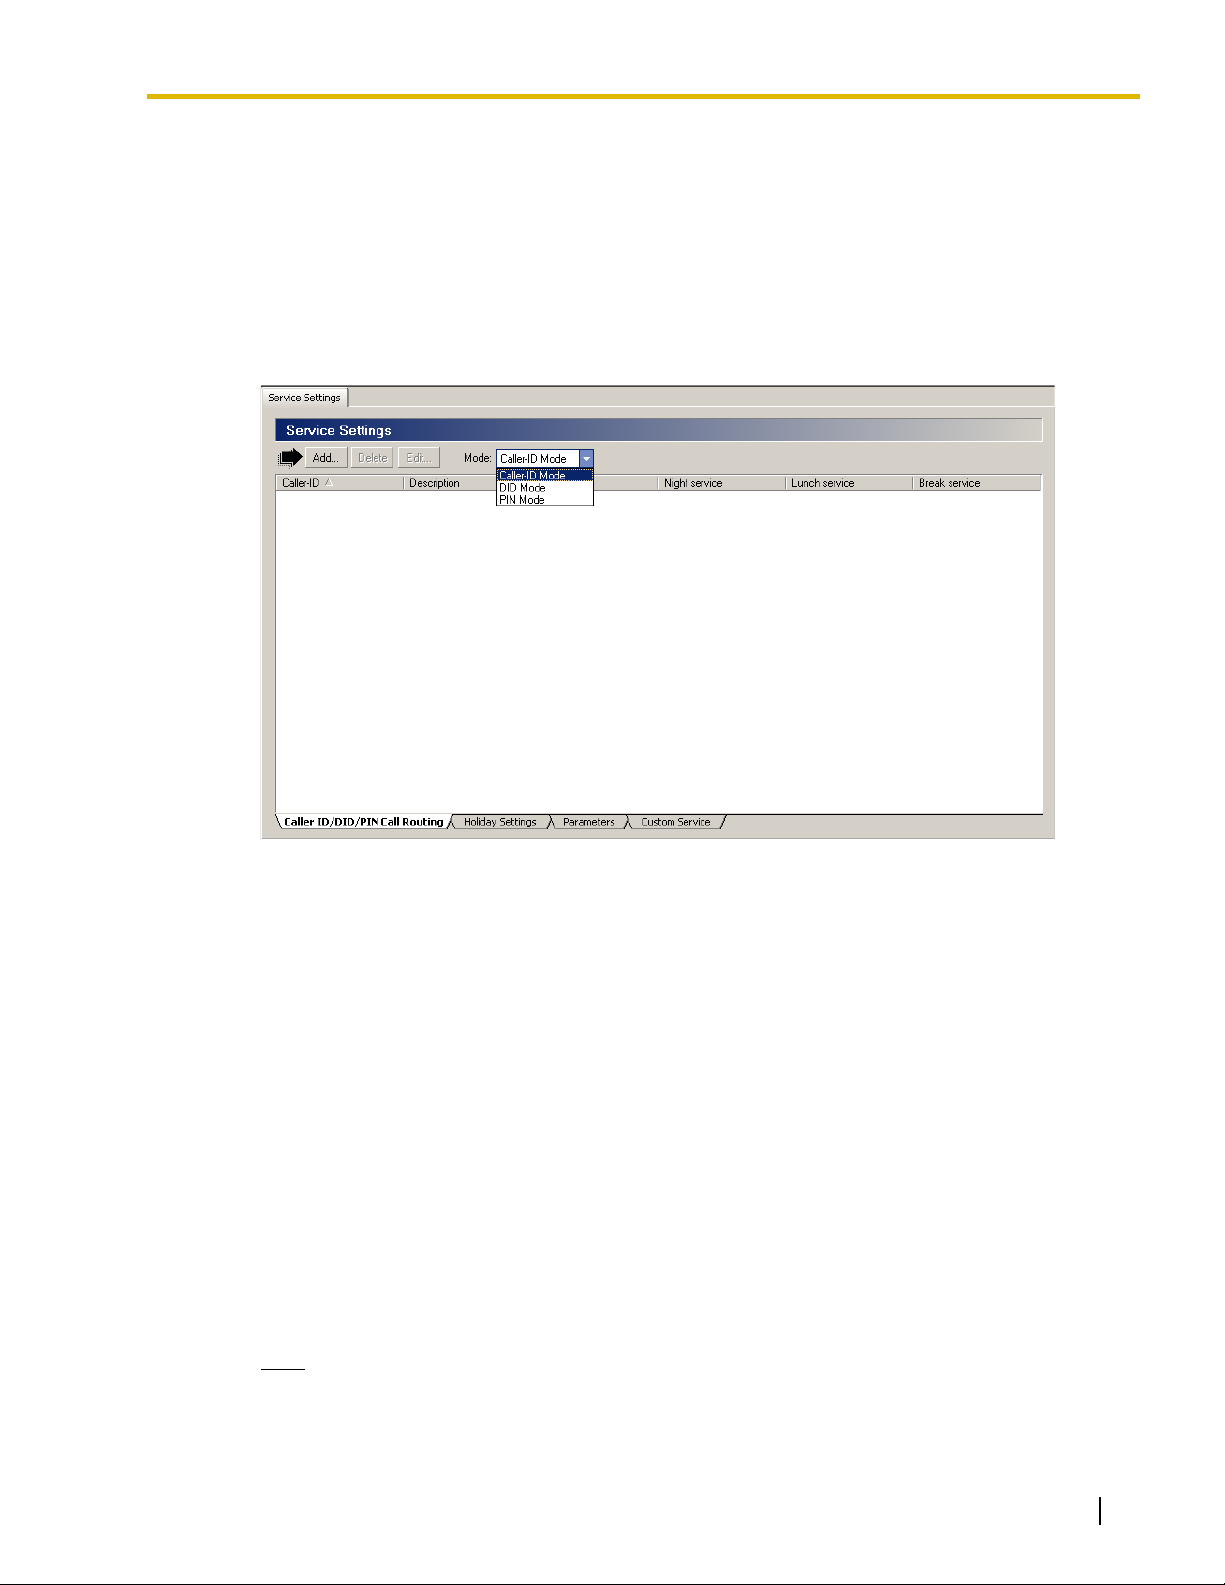
2.4.1 Caller ID/DID/PIN Call Routing
A maximum of 200 Caller ID/DID/PIN numbers can be assigned so that callers are automatically
forwarded to a preprogrammed destination. A different destination can be set for each time mode
(day, night, lunch, break). PIN Call Routing is only available when the "Call Transfer Anytime" of a
Custom Service is set to "PIN".
The service with the highest priority will handle the call. The order of priority is:
Holiday Service > Caller ID Call Routing > DID Call Routing > Trunk Service > Port Service.
2.4 Service Settings
Follow the steps below to edit Caller ID/DID/PIN Call Routing screen:
1. Select the desired mode (Caller-ID Mode, DID Mode, PIN Mode) in Mode:.
[Addition]
1. Click Add….
2. Edit parameters in the Edit Parameters dialog box.
3. Click OK.
[Deletion]
1. Select the desired Caller ID/DID/PIN number.
2. Click Delete.
3. Click Yes .
[Edit]
1. Select the desired Caller ID/DID/PIN number.
2. Click Edit….
3. Edit parameters in the Edit Parameters dialog box.
4. Click OK.
Note
• DID setting is only available when the VPS is connected to one of the following PBXs using
DPT Integration.
Programming Manual 95
Page 96

2.4 Service Settings
– KX-TD816 (P311Q or higher)
– KX-TD1232 (P211Q or higher)
– KX-TD500 (V4M or higher)
– KX-TDA series* (MPR Version 1.1 or higher)
* except KX-TDA50
Caller ID/DID/PIN Number
Caller ID/DID/PIN Number
Specifies Caller ID/DID/PIN numbers so that callers are automatically forwarded to a preprogrammed
destination. For Caller ID/DID numbers, "
to route all calls from Area Code 201, enter "201 ". Also, "Private" or "Out of Area" callers
can be specified by entering "P" for "Private" and "O" for "Out of Area" callers.
Default
None
Value Range
" substitutes for any number ( = wild card). For example,
Max. 20 digits consisting of 0–9, (P and O for Caller ID number only)
Feature Manual References
2.2.8 Caller ID Call Routing (APT/DPT Integration Only)
2.2.19 DID Call Routing (DPT Integration Only)
2.2.37 PIN Call Routing
Description
Specifies a name and/or description of the Caller ID/DID/PIN number.
Note
• When no data is specified in this parameter, the caller's name will be automatically entered
here if the caller's name is received from the telephone company.
Default
None
Value Range
Max. 20 characters
Feature Manual References
2.2.8 Caller ID Call Routing (APT/DPT Integration Only)
2.2.19 DID Call Routing (DPT Integration Only)
2.2.37 PIN Call Routing
96 Programming Manual
Page 97

2.4 Service Settings
Call Transfer for Day, Night, Lunch, and Break service
Specifies the destination to which the call from an assigned Caller ID/DID/PIN number is
automatically forwarded. A destination can be set for each time mode. To disable the setting, select
"None". A Mailbox Group number can be entered here instead of a mailbox number.
Default
None
Value Range
None: disables this feature.
Custom: forwards callers to the specified Custom Service menu.
Extn: forwards callers to the specified extension.
Mbx: forwards callers to the specified mailbox.
Feature Manual References
2.2.8 Caller ID Call Routing (APT/DPT Integration Only)
2.2.19 DID Call Routing (DPT Integration Only)
2.2.37 PIN Call Routing
Programming Manual 97
Page 98
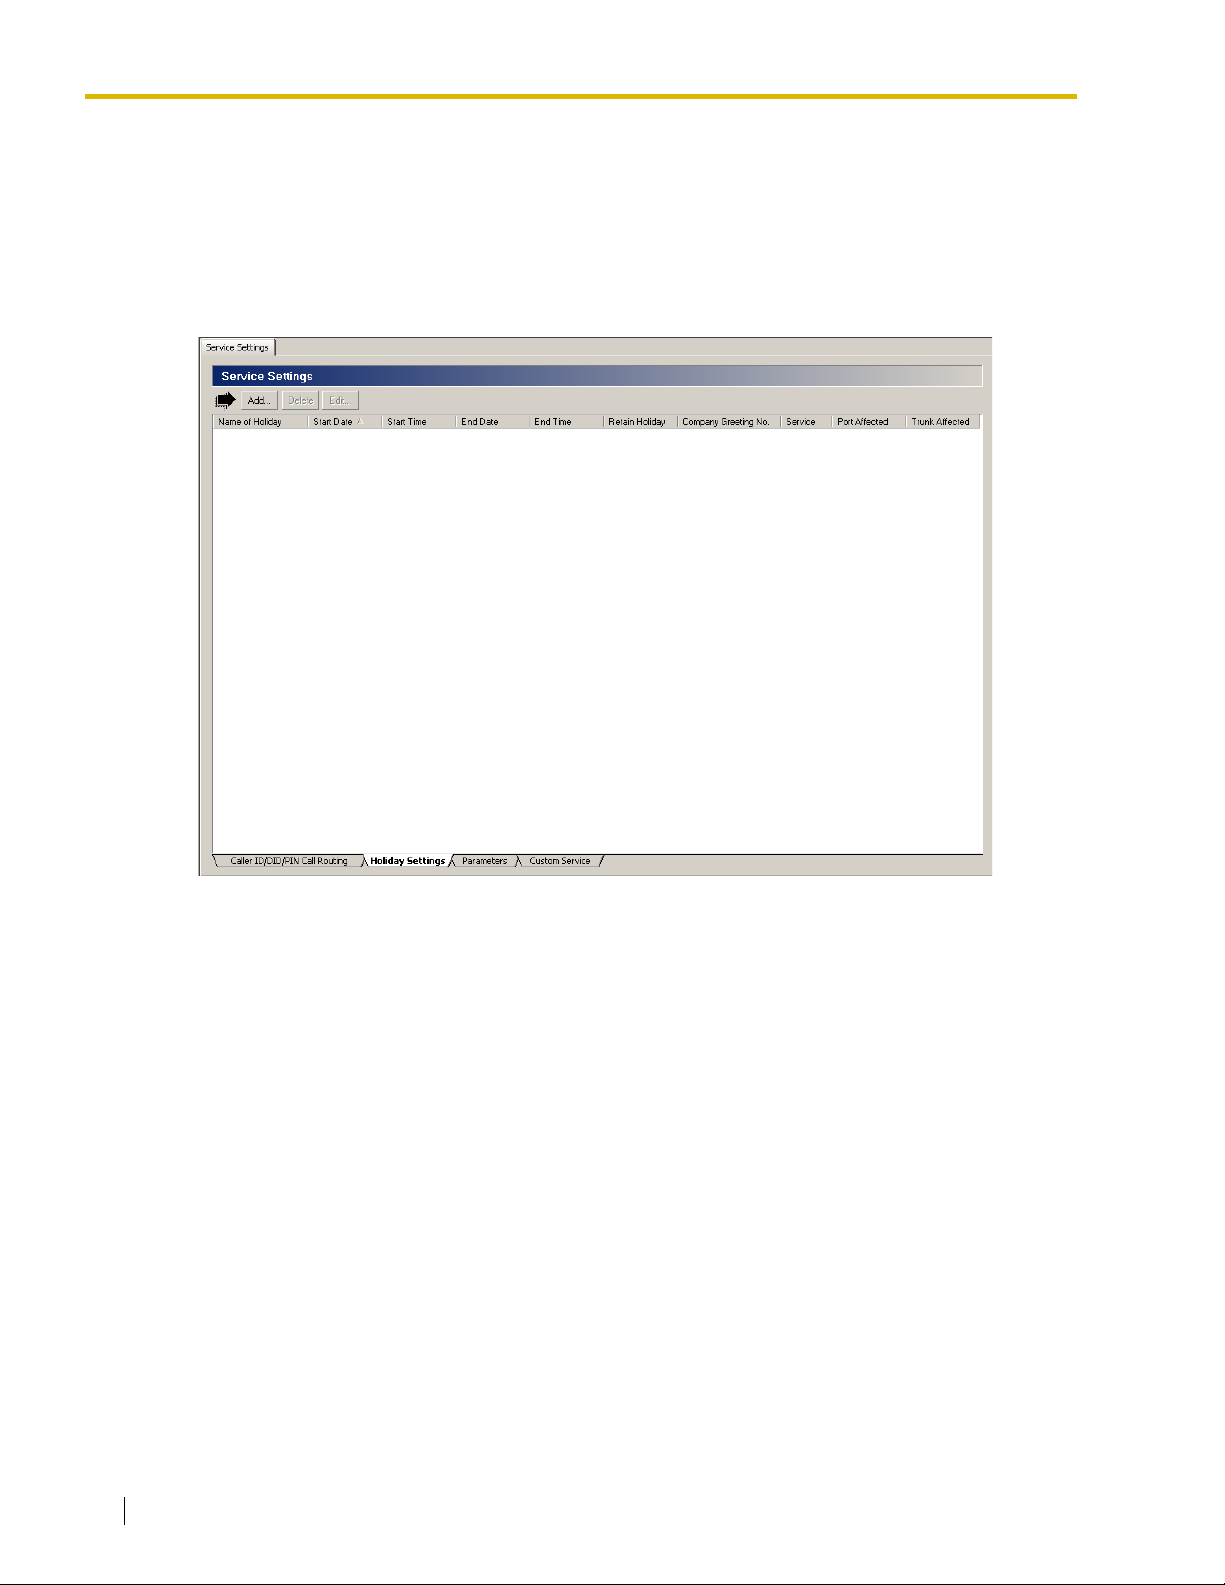
2.4 Service Settings
2.4.2 Holiday Settings
You can program a maximum of 20 Holiday Services. On days specified as holidays, the holiday
settings have priority over Service Group settings and Caller ID/DID/PIN Call Routing.
The service with the highest priority will handle the call. The order of priority is:
Holiday Service > Caller ID Call Routing > DID Call Routing > Trunk Service > Port Service
Follow the steps below to edit Holiday Settings screen:
[Addition]
1. Click Add….
2. Edit parameters in the Edit Parameters dialog box.
3. Click OK.
[Deletion]
1. Select the desired Holiday Service number.
2. Click Delete.
3. Click Yes .
[Edit]
1. Select the desired Holiday Service number.
2. Click Edit….
98 Programming Manual
Page 99
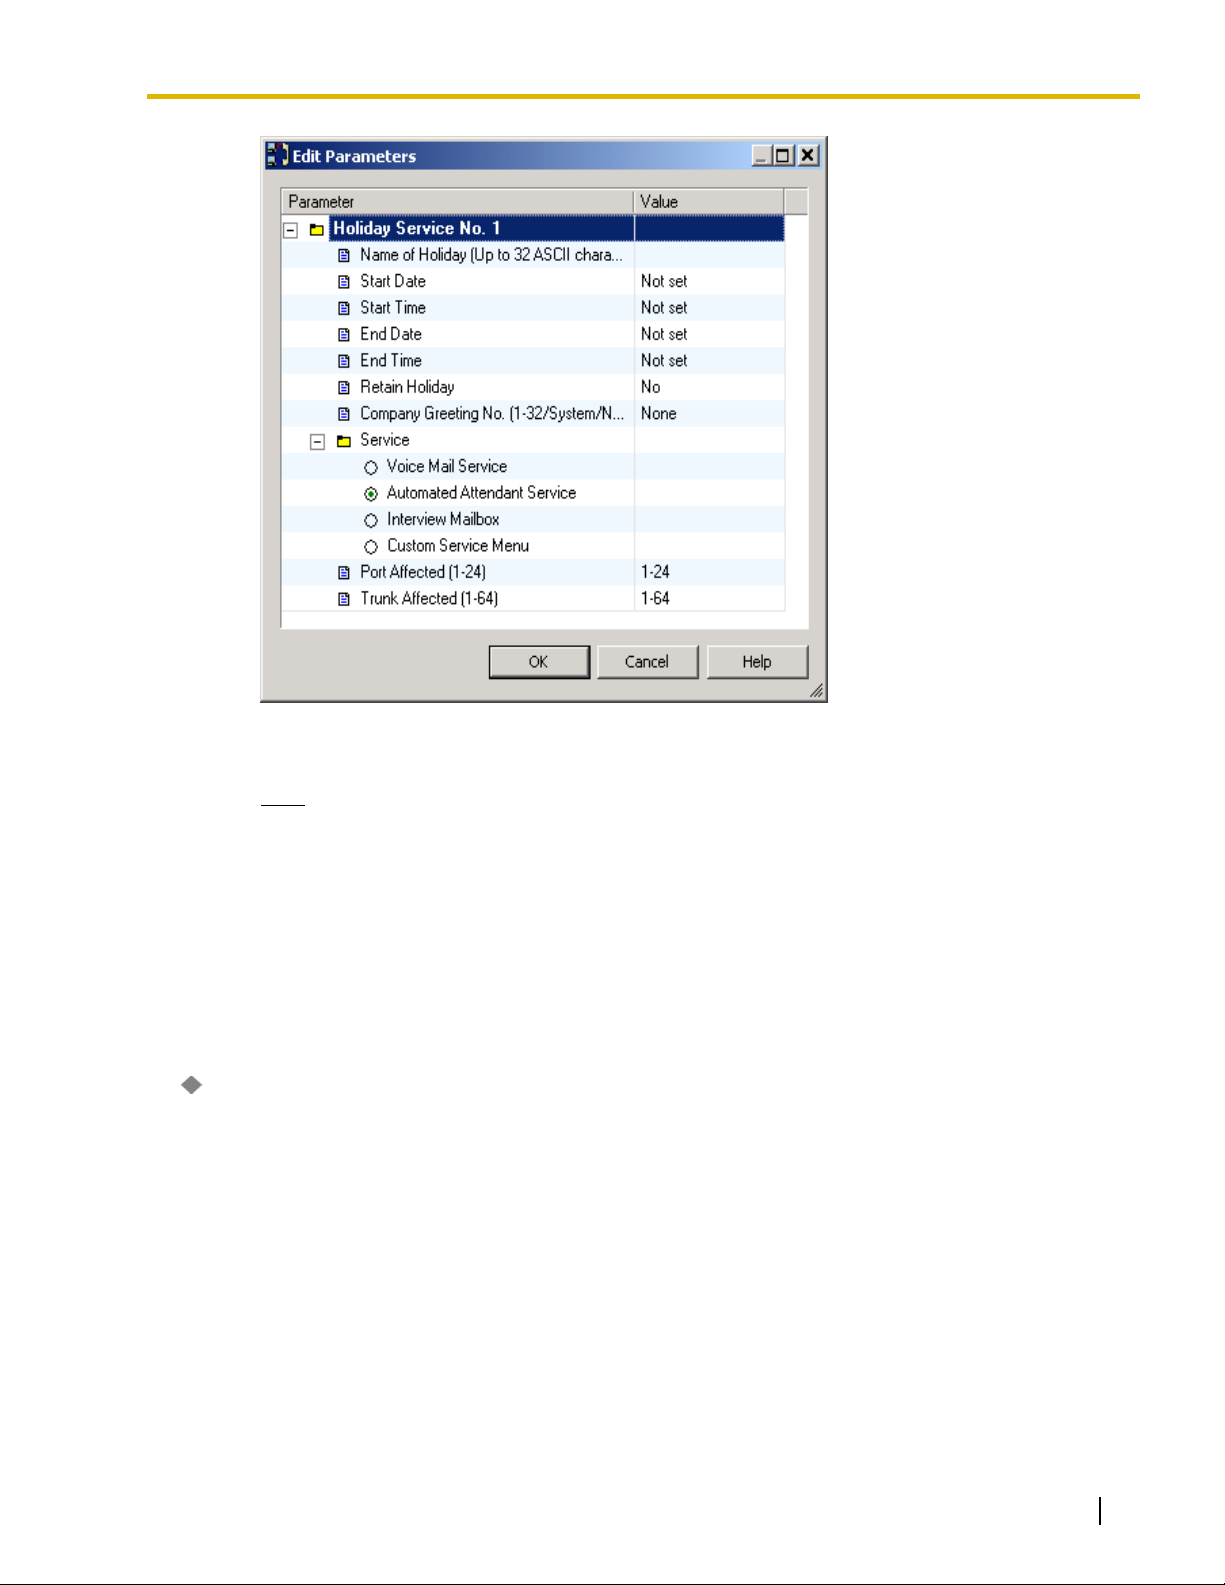
2.4 Service Settings
3. Edit parameters in the Edit Parameters dialog box.
4. Click OK.
Note
• Holidays cannot overlap. For example, if you have set Dec. 22nd to Jan. 6th as a holiday,
you cannot set Jan. 1st as a holiday.
• To provide a special message to callers on a holiday (for example, "Today is New Year's Day
and our office is closed. If you wish to record a message, please press 1 now".), you can
create a Custom Service menu. Use this setting to direct calls to this Custom Service on
Jan. 1st. Use foreign languages where appropriate.
Holiday Service No.
Name of Holiday
Specify a name or description for the holiday.
Default
None
Value Range
Max. 32 characters
Feature Manual References
2.2.24 Holiday Service
Programming Manual 99
Page 100

2.4 Service Settings
Start Date
Specifies the start date of the holiday.
Default
None
Value Range
MM/DD (MM: Month, DD: Day)
Feature Manual References
2.2.24 Holiday Service
Start Time
Specifies the start time of the holiday.
Default
None
Value Range
HH:MM (HH: Hour, MM: Minute)
Feature Manual References
2.2.24 Holiday Service
End Date
Specifies the end date of the holiday.
Note
• When the start date and time are specified and the end date and time are "Not Set", the
Holiday will be automatically ended at "00:00".
Default
None
Value Range
MM/DD (MM: Month, DD: Day)
Feature Manual References
2.2.24 Holiday Service
End Time
Specifies the end time of the holiday.
Note
• When the start date and time are specified and the end date and time are "Not Set", the
100 Programming Manual
Holiday will be automatically ended at "00:00".
 Loading...