


KXTG7733S
Table of contents
 Loading...
Panasonic KXTG7733S, KXTG7742S, KX-TG7645M, KX-TG7731S, KX-TG7732S User Manual
...
Operating Instructions
Model shown is KX-TG7731.
Link-to-Cell Cellular Convergence Solution
Model No. KX-TG7731
KX-TG7732
KX-TG7733
KX-TG254SK
KX-TG7741
KX-TG7742
KX-TG7743
KX-TG7745
Before initial use, see “Getting Started”
on page 11.
Thank you for purchasing a Panasonic product.
Please read these operating instructions before using the unit and save them for
future reference.
Consulte “Guía Rápida Española”, página 73.
For assistance, visit our Web site: http://www.panasonic.com/help for customers
in the U.S.A. or Puerto Rico.
Please register your product: http://www.panasonic.com/prodreg

Table of Contents
Introduction
Model composition .......................................3
Accessory information ..................................4
Important Information
For your safety .............................................7
Important safety instructions ........................8
For best performance ...................................8
Other information .........................................9
Specifications .............................................10
Getting Started
Setting up ...................................................11
Note when setting up .................................12
Intelligent eco mode ...................................13
Controls ......................................................13
Belt clip .......................................................
Display/Indicators .......................................15
Initial settings .............................................17
Link to Cell
Link to cell feature ......................................18
Registering a cellular phone .......................18
Link to cell settings .....................................19
Making/Answering Calls Using
the Handset
Making cellular calls ...................................22
Making landline calls ..................................22
Answering calls ..........................................23
Useful features during a call .......................23
Making/Answering Calls Using
the Base Unit
Making cellular calls ...................................27
Making landline calls ..................................27
Answering calls ..........................................27
Useful features during a call .......................28
Shared Phonebook
Shared phonebook .....................................30
Programming
Programmable settings ..............................33
Special programming .................................40
Registering a unit .......................................42
Caller ID Service
Using Caller ID service ...............................43
2
Caller list ....................................................44
Using Bluetooth Devices
Copying phonebook from a cellular phone
(phonebook transfer) ..................................46
Using a Bluetooth wireless headset (optional)
for landline calls .........................................47
Answering System for Landline
Answering system for landline ...................49
Turning the answering system on/
off ...............................................................49
Greeting message ......................................50
Listening to messages using the base
unit .............................................................50
Listening to messages using the
handset ......................................................50
15
Remote operation .......................................
Answering system settings .........................53
Voice Mail Service for Landline
Voice mail service for landline ....................55
Intercom/Locator
Intercom .....................................................57
Handset locator ..........................................57
Transferring calls, conference calls ............58
Useful Information
Wall mounting ............................................59
Error messages ..........................................61
Troubleshooting .........................................62
FCC and other information .........................70
Guía Rápida Española
Guía Rápida Española ...............................73
Appendix
Customer services .....................................82
Warranty (For United States and Puerto
Rico) ...........................................................83
Index
Index...........................................................85
51
Introduction
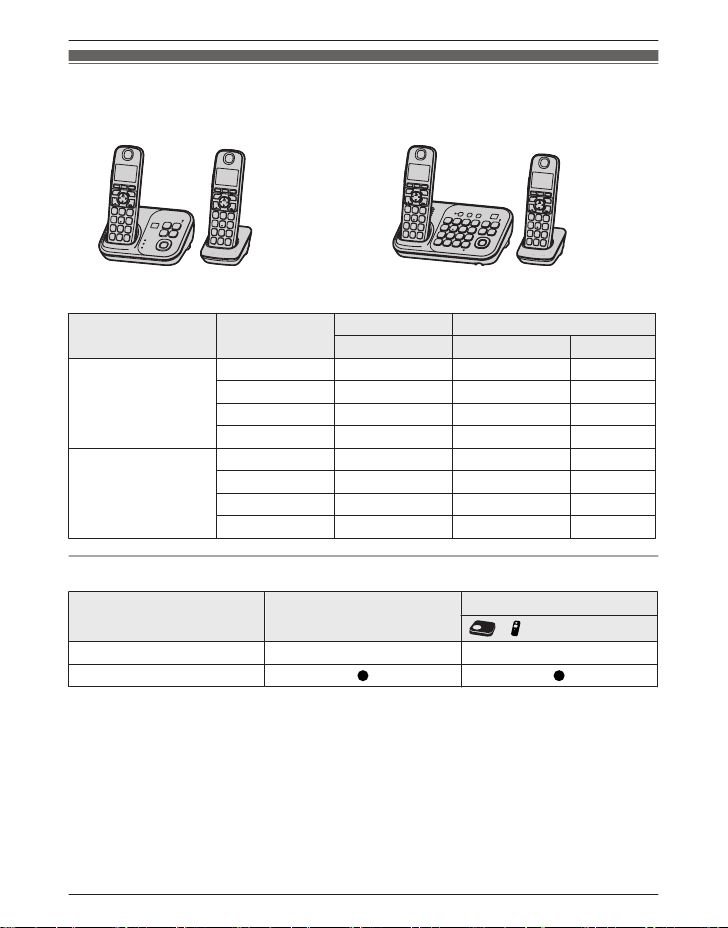
Model composition
n KX-TG7731 series n KX-TG7741 series
odel shown is KX-TG7732. R Model shown is KX-TG7742.
R M
Series Model No.
KX-TG7731 series KX-TG7731 KX-TG7731 KX-TGA470 1
KX-TG7732 KX-TG7731 KX-TGA470 2
KX-TG7733 KX-TG7731 KX-TGA470 3
KX-TG254SK KX-TG7731 KX-TGA470 4
KX-TG7741 series KX-TG7741 KX-TG7741 KX-TGA470 1
KX-TG7742 KX-TG7741 KX-TGA470 2
KX-TG7743 KX-TG7741 KX-TGA470 3
KX-TG7745 KX-TG7741 KX-TGA470 5
Feature differences
Series Base unit keypad/sp-phone
KX-TG7731 series – –
KX-TG7741 series
*1 Single handset models: Intercom calls can be made between handsets by purchasing and
egistering one or more optional handsets (page 5).
r
*2 Intercom calls can be made between the base unit and handset.
Base unit Handset
Part No. Part No. Quantity
*1
Intercom
*2
«
For assistance, please visit http://www.panasonic.com/help
3
Introduction
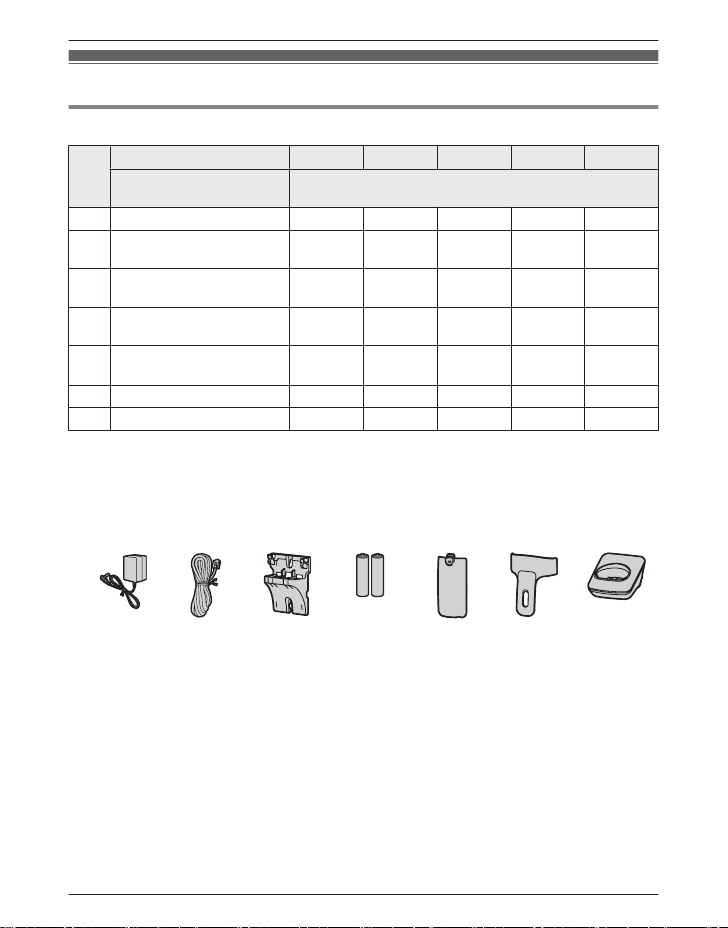
Accessory information
Supplied accessories
1
Supplied handset qty.
No.
Accessory item/
rder number
O
*
1 unit
Accessory quantity
A AC adaptor/PNLV226Z 1 2 3 4 5
B Telephone line cord/
QJA10075Z
P
C Wall mounting adaptor/
NKL1001Y1
P
D Rechargeable batteries/
HR-4DPA
H
6
E
Handset cover
PNYNTGA470BR
*
/
1 1 1 1 1
1 1 1 1 1
2 4 6 8 10
1 2 3 4 5
F Belt clip/PNKE1132Z1 1 2 3 4 5
G Charger/PNLC1029ZS – 1 2 3 4
*1 KX-TG7731/KX-TG7741
*
2 KX-TG7732/KX-TG7742
*3 KX-TG7733/KX-TG7743
*4 KX-TG254SK
*5 KX-TG7745
*6 The handset cover comes attached to the handset.
A
B C D E F G
2 units
2
*
3 units
3
*
4 units
4
*
5 units
5
*
4
For assistance, please visit http://www.panasonic.com/help
Introduction
Additional/replacement accessories
Please contact your nearest Panasonic dealer for sales information (page 82).
Accessory item Order number
1
Rechargeable
atteries
b
Headset KX-TCA60, KX-TCA93, KX-TCA400, KX-TCA430
T-adaptor KX-J66
Range extender
*1 Replacement batteries may have a different capacity from that of the supplied batteries.
*
2 By installing this unit, you can extend the range of your phone system to include areas
where reception was previously not available. This product can be purchased online. Please
visit our Web site:
http://www.panasonic.com/RangeExtender
HHR-4DPA
R To order, please call 1-800-332-5368 or visit
Battery type:
–
– 2 x AAA (R03) size for each handset
KX-TGA405
*
http://www.panasonic.com/batterystore
Nickel metal hydride (Ni-MH)
2
*
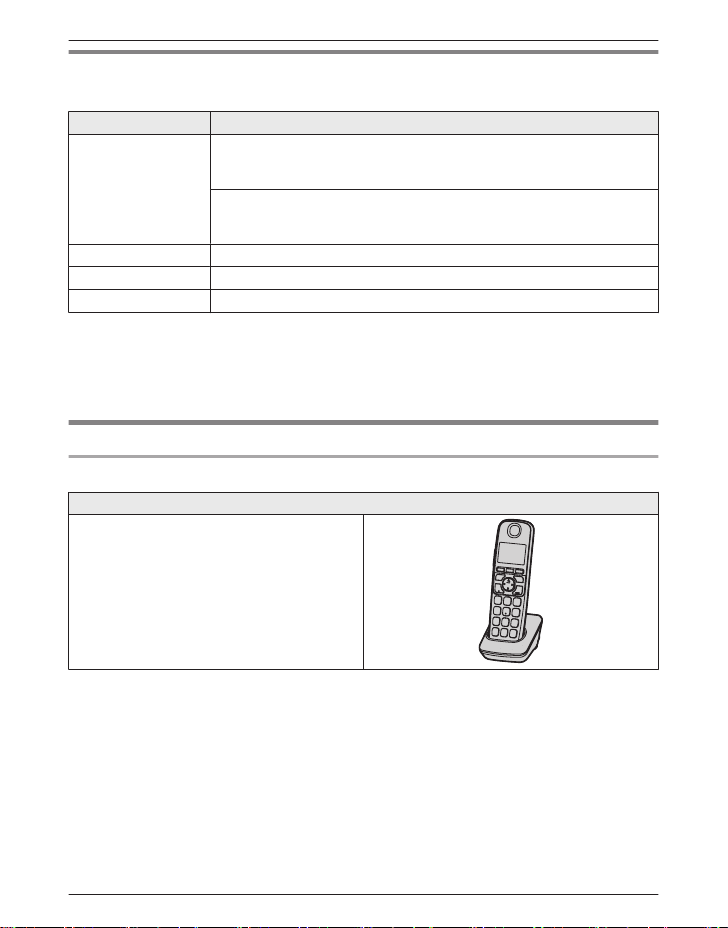
Expanding your phone system
Optional handset feature overview
Handset (optional): KX-TGA470
You can expand your phone system by
egistering optional handsets (6 max.) to a
r
single base unit.
R Optional handsets may be a different color
from that of the supplied handsets.
For assistance, please visit http://www.panasonic.com/help
5
Introduction
Bluetooth® devices
You can expand your phone system by registering the following units to a single base unit.
1
*
1
*
: 1 max.
: 2 max.
Your Bluetooth cellular phone
(for cellular calls: page 18)
Your Bluetooth headset
(for a wireless hands-free conversation: page 47)
*1 Your cellular phone and headset must be Bluetooth wireless technology compatible. For
ore details and the list of compatible cellular phones, please visit our Web site:
m
http://www.panasonic.com/link2cell
6
For assistance, please visit http://www.panasonic.com/help

For your safety
T
o prevent severe injury and loss of life/
property, read this section carefully before
using the product to ensure proper and safe
operation of your product.
WARNING
Power connection
se only the power source marked on the
R U
product.
R Do not overload power outlets and
extension cords. This can result in the risk
of fire or electric shock.
R Completely insert the AC adaptor/power
plug into the power outlet. Failure to do so
may cause electric shock and/or excessive
heat resulting in a fire.
R Regularly remove any dust, etc. from the
AC adaptor/power plug by pulling it from
the power outlet, then wiping with a dry
cloth. Accumulated dust may cause an
insulation defect from moisture, etc.
resulting in a fire.
R Unplug the product from power outlets if it
emits smoke, an abnormal smell, or makes
an unusual noise. These conditions can
cause fire or electric shock. Confirm that
smoke has stopped emitting and contact
the Panasonic Call Center at
1-800-211-PANA (1-800-211-7262).
R Unplug from power outlets and never touch
the inside of the product if its casing has
been broken open.
R Never touch the plug with wet hands.
Danger of electric shock exists.
Installation
o prevent the risk of fire or electrical
R T
shock, do not expose the product to rain or
any type of moisture.
R Do not place or use this product near
automatically controlled devices such as
automatic doors and fire alarms. Radio
waves emitted from this product may cause
such devices to malfunction resulting in an
accident.
For assistance, please visit http://www.panasonic.com/help
Important Information
R D
o not allow the AC adaptor or telephone
line cord to be excessively pulled, bent or
placed under heavy objects.
Operating safeguards
nplug the product from power outlets
R U
before cleaning. Do not use liquid or
aerosol cleaners.
R Do not disassemble the product.
R Do not spill liquids (detergents, cleansers,
etc.) onto the telephone line cord plug, or
allow it to become wet at all. This may
cause a fire. If the telephone line cord plug
becomes wet, immediately pull it from the
telephone wall jack, and do not use.
Medical
onsult the manufacturer of any personal
R C
medical devices, such as pacemakers or
hearing aids, to determine if they are
adequately shielded from external RF
(radio frequency) energy. (The product
operates in the frequency range of
1.92 GHz to 1.93 GHz, and the RF
transmission power is 115 mW (max.).)
R Do not use the product in health care
facilities if any regulations posted in the
area instruct you not to do so. Hospitals or
health care facilities may be using
equipment that could be sensitive to
external RF energy.
CAUTION
Installation and location
R N
ever install telephone wiring during an
electrical storm.
R Never install telephone line jacks in wet
locations unless the jack is specifically
designed for wet locations.
R Never touch uninsulated telephone wires or
terminals unless the telephone line has
been disconnected at the network interface.
R Use caution when installing or modifying
telephone lines.
R The AC adaptor is used as the main
disconnect device. Ensure that the AC
outlet is installed near the product and is
easily accessible.
R This product is unable to make calls when:
7

Important Information
– the handset batteries need recharging or
h
ave failed.
– there is a power failure.
Battery
e recommend using the batteries noted
R W
on page 5. USE ONLY rechargeable
Ni-MH batteries AAA (R03) size.
R Do not mix old and new batteries.
R Do not open or mutilate the batteries.
Released electrolyte from the batteries is
corrosive and may cause burns or injury to
the eyes or skin. The electrolyte is toxic and
may be harmful if swallowed.
R Exercise care when handling the batteries.
Do not allow conductive materials such as
rings, bracelets, or keys to touch the
batteries, otherwise a short circuit may
cause the batteries and/or the conductive
material to overheat and cause burns.
R Charge the batteries provided with or
identified for use with this product only, in
accordance with the instructions and
limitations specified in this manual.
R Only use a compatible base unit (or
charger) to charge the batteries. Do not
tamper with the base unit (or charger).
Failure to follow these instructions may
cause the batteries to swell or explode.
Attention:
A nickel metal hydride battery that is
r
ecyclable powers the product you have
purchased.
Please call 1-800-8-BATTERY
(1-800-822-8837) for information on how to
recycle this battery.
Important safety
i
nstructions
When using your product, basic safety
precautions should always be followed to
reduce the risk of fire, electric shock, and
injury to persons, including the following:
1. Do not use this product near water for
example, near a bathtub, washbowl,
kitchen sink, or laundry tub, in a wet
basement or near a swimming pool.
2. Avoid using a telephone (other than a
cordless type) during an electrical storm.
There may be a remote risk of electric
shock from lightning.
3. Do not use the telephone to report a gas
leak in the vicinity of the leak.
4. Use only the power cord and batteries
indicated in this manual. Do not dispose of
batteries in a fire. They may explode.
Check with local codes for possible special
disposal instructions.
SAVE THESE INSTRUCTIONS
For best performance
Base unit location/avoiding noise
T
he base unit and other compatible Panasonic
units use radio waves to communicate with
each other.
R For maximum coverage and noise-free
communications, place your base unit:
– at a convenient, high, and central
location with no obstructions between
the handset and base unit in an indoor
environment.
– away from electronic appliances such as
TVs, radios, personal computers,
wireless devices, or other phones.
– facing away from radio frequency
transmitters, such as external antennas
of mobile phone cell stations. (Avoid
putting the base unit on a bay window or
near a window.)
R Coverage and voice quality depends on the
local environmental conditions.
8
For assistance, please visit http://www.panasonic.com/help
R I
f the reception for a base unit location is
not satisfactory, move the base unit to
another location for better reception.
Environment
eep the product away from electrical noise
R K
generating devices, such as fluorescent
lamps and motors.
R The product should be kept free from
excessive smoke, dust, high temperature,
and vibration.
R The product should not be exposed to
direct sunlight.
R Do not place heavy objects on top of the
product.
R When you leave the product unused for a
long period of time, unplug the product from
the power outlet.
R The product should be kept away from heat
sources such as heaters, kitchen stoves,
etc. It should not be placed in rooms where
the temperature is less than 0 °C (32 °F) or
greater than 40 °C (104 °F). Damp
basements should also be avoided.
R The maximum calling distance may be
shortened when the product is used in the
following places: Near obstacles such as
hills, tunnels, underground, near metal
objects such as wire fences, etc.
R Operating the product near electrical
appliances may cause interference. Move
away from the electrical appliances.
Routine care
ipe the outer surface of the product
R W
with a soft moist cloth.
R Do not use benzine, thinner, or any
abrasive powder.
Other information
C
AUTION: Risk of explosion if battery is
replaced by an incorrect type. Dispose of used
batteries according to the instructions.
Important Information
Notice for product disposal, transfer,
r return
o
R This product can store your private/
confidential information. To protect your
privacy/confidentiality, we recommend that
you erase information such as phonebook
or caller list entries from the memory before
you dispose of, transfer, or return the
product.
Notice
ENERGY STAR
A
s an ENERGY STAR® Partner, Panasonic
has determined that this product meets the
ENERGY STAR guidelines for energy
efficiency. ENERGY STAR is a U.S.
registered mark.
For assistance, please visit http://www.panasonic.com/help
9

Important Information
Specifications
R S
tandard:
DECT 6.0 (Digital Enhanced Cordless
Telecommunications 6.0)
Bluetooth wireless technology 2.0
R Frequency range:
1.92 GHz to 1.93 GHz (DECT)
2.402 GHz to 2.48 GHz (Bluetooth)
R RF transmission power:
115 mW (max.)
R Power source:
120 V AC, 60 Hz
R Power consumption:
Base unit:
Standby: Approx. 1.2 W
Maximum: Approx. 4.5 W
Charger:
Standby: Approx. 0.1 W
Maximum: Approx. 2.0 W
R Operating conditions:
0 °C – 40 °C (32 °F – 104 °F), 20 % – 80 %
relative air humidity (dry)
Note:
R Design and specifications are subject to
change without notice.
R The illustrations in these instructions may
vary slightly from the actual product.
10
For assistance, please visit http://www.panasonic.com/help
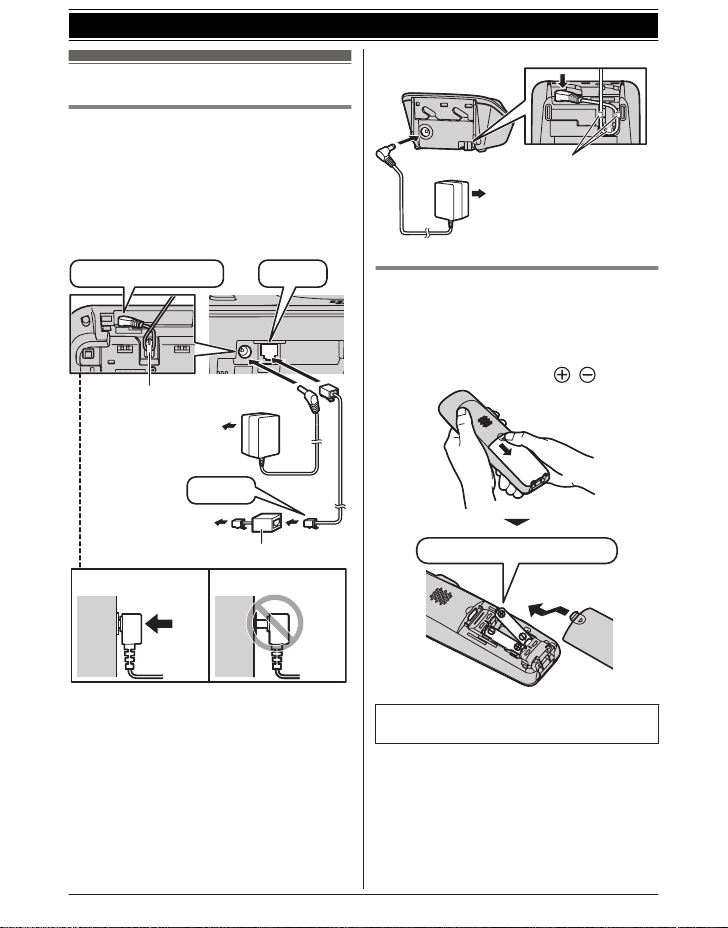
Setting up
Correct
Incorrect
To power outlet
Press plug firmly.
Hook
“Click”
To single-line
telephone jack
(RJ11C)
DSL/ADSL filter*
“Click”
To power outlet
Hooks
Rechargeable Ni-MH ONLY
Connections
R U
se only the supplied Panasonic AC
adaptor PNLV226.
R If you do not connect the telephone line
cord and use only cellular lines, set the
cellular line only mode to use this unit more
conveniently (page 20).
n Base unit
Getting Started
n C
harger
Battery installation
R U
SE ONLY Ni-MH batteries AAA (R03)
size.
R Do NOT use Alkaline/Manganese/Ni-Cd
batteries.
R Confirm correct polarities (
, ).
*DSL/ADSL filter (not supplied) is required if
ou have DSL/ADSL service.
y
For assistance, please visit http://www.panasonic.com/help
R W
hen the date and time setting is
displayed, see page 17.
11
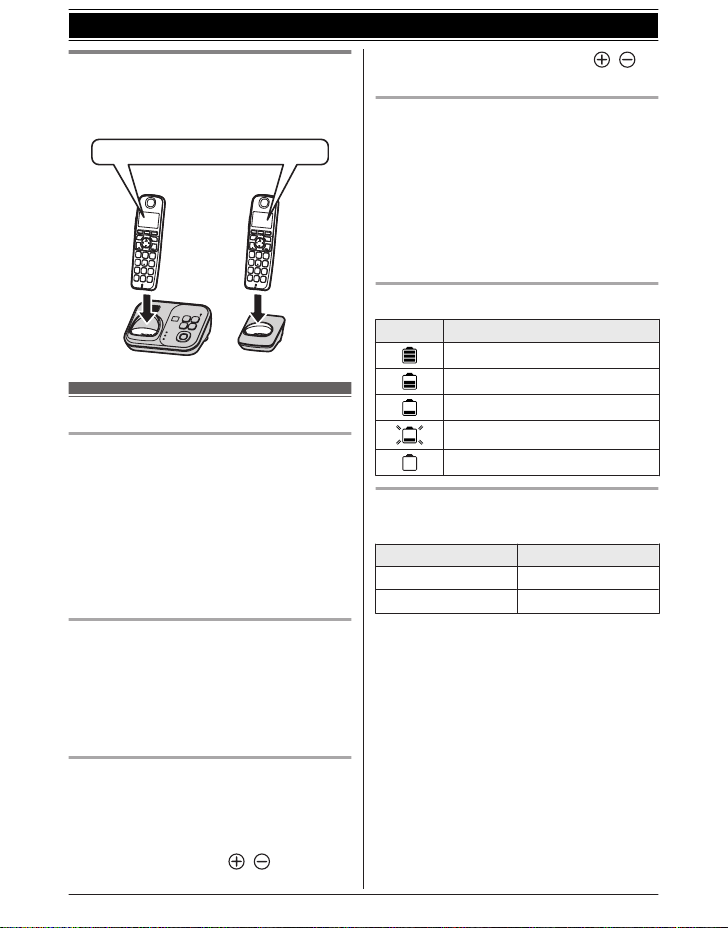
Confirm “Charging” is displayed.
Getting Started
Battery charging
Charge for about 7 hours.
R When the batteries are fully charged,
“Fully charged” is displayed.
Note when setting up
Note for connections
he AC adaptor must remain connected at
R T
all times. (It is normal for the adaptor to feel
warm during use.)
R The AC adaptor should be connected to a
vertically oriented or floor-mounted AC
outlet. Do not connect the AC adaptor to a
ceiling-mounted AC outlet, as the weight of
the adaptor may cause it to become
disconnected.
During a power failure
R The unit will not work during a power
failure. We recommend connecting a
corded-type telephone (without AC adaptor)
to the same telephone line or to the same
telephone line jack using a Panasonic
T-adaptor (page 5).
Note for battery installation
R U
se the supplied rechargeable batteries.
For replacement, we recommend using the
Panasonic rechargeable batteries noted on
page 5, 8.
R Wipe the battery ends (
c
loth.
12
For assistance, please visit http://www.panasonic.com/help
, ) with a dry
R A
void touching the battery ends (
t
he unit contacts.
, ) or
Note for battery charging
R I
t is normal for the handset to feel warm
during charging.
R Clean the charge contacts of the handset,
base unit, and charger with a soft and dry
cloth once a month. Before cleaning the
unit, disconnect from power outlets and any
telephone line cords. Clean more often if
the unit is exposed to grease, dust, or high
humidity.
Battery level
Icon Battery level
High
Medium
Low
Needs charging.
Empty
Panasonic Ni-MH battery
erformance (supplied batteries)
p
Operation Operating time
1
In continuous use
Not in use (standby)
*1 If Eco mode is on.
ote:
N
R Actual battery performance depends on
usage and ambient environment.
R Even after the batteries are fully charged,
the handset can be left on the base unit or
charger without any ill effect on the
batteries.
R The battery level may not be displayed
correctly after you replace the batteries. In
this case, place the handset on the base
unit or charger and let it charge for at least
7 hours.
13 hours max.
11 days max.
*
1
*
A BEDC
FGHIJ K L
Getting Started
Intelligent eco mode
T
his feature automatically reduces handset
power consumption by suppressing handset
transmission power when the handset is close
to the base unit.
R When this feature is activated,
d
isplayed. However, during a cellular call,
is not displayed even though this
f
eature is activated.
R Eco mode is turned off when the clarity
booster is activated (page 24).
is
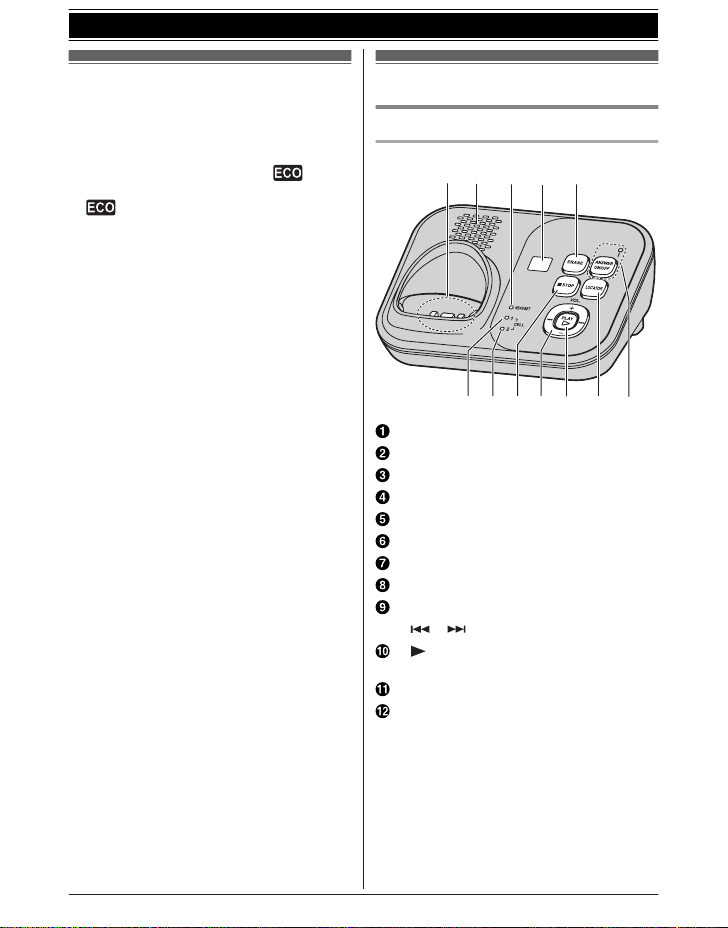
Controls
Base unit
KX-TG7731 series (page 3)
n
Charge contacts
Speaker
HEADSET indicator
Message counter
RASEN
ME
CELL 1 indicator
CELL 2 indicator
(STOP)
MnN
kN (VOL.: Volume up/down)
MjN/M
M
M N
Message indicator
ML
MA
ANSWER ON/OFF indicator
(Repeat/Skip)
N/M N
(PLAY)
OCATORN
NSWER ON/OFFN
For assistance, please visit http://www.panasonic.com/help
13
J
K
A
B
C
E
F
D
G
H
I
L
PO
M
Q
N
R
A
B
A
D
E
I
J
K
L
H
M
B
C
F
G
Getting Started
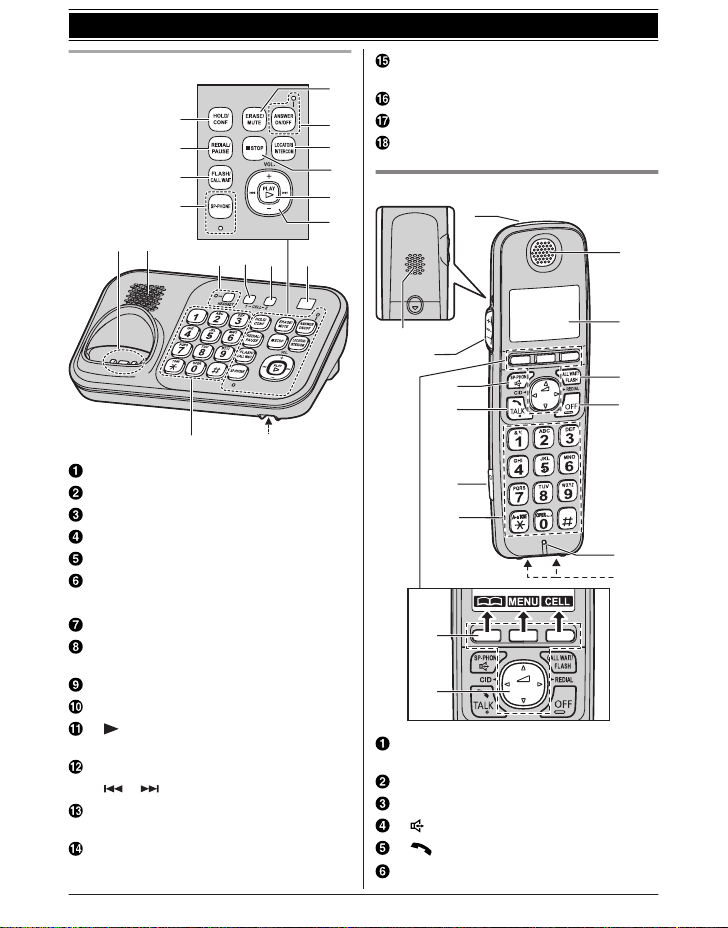
KX-TG7741 series (page 3)
n
MC
ELL 2N
CELL 2 indicator
Message counter
Dial keypad (*:
Microphone
Handset
TONE)
Charge contacts
Speaker
OLDN MCONFN (Conference)
MH
EDIALN MPAUSEN
MR
LASHN MCALL WAITN
MF
P-PHONEN (Speakerphone)
MS
SP-PHONE indicator
RASEN MMUTEN
ME
NSWER ON/OFFN
MA
ANSWER ON/OFF indicator
OCATORN MINTERCOMN
ML
(STOP)
MnN
14
(PLAY)
M N
Message indicator
kN (VOL.: Volume up/down)
MjN/M
M
N/M N
EADSETN
MH
HEADSET indicator
ELL 1N
MC
CELL 1 indicator
(Repeat/Skip)
For assistance, please visit http://www.panasonic.com/help
Ringer indicator
essage indicator
M
Speaker
kN (VOL.: Volume up/down)
MjN/M
SP-PHONE: Speakerphone)
M N (
M N (TALK)
Headset jack
Dial keypad (*:
1
Receiver
Display
MC
ALL WAITN MFLASHN
MO
FFN
Microphone
Charge contacts
n C
ontrol type
S
oft keys
The handset features 3 soft keys. By
pressing a soft key, you can select the
feature shown directly above it on the
display.
N
avigator key
– MDN, MCN, MFN, or MEN: Scroll through
various lists and items.
(Volume: MDN
–
receiver or speaker volume while
talking.
– MFN CID (Caller ID): View the caller list.
– MEN REDIAL: View the redial list.
TONE)
or MCN): Adjust the
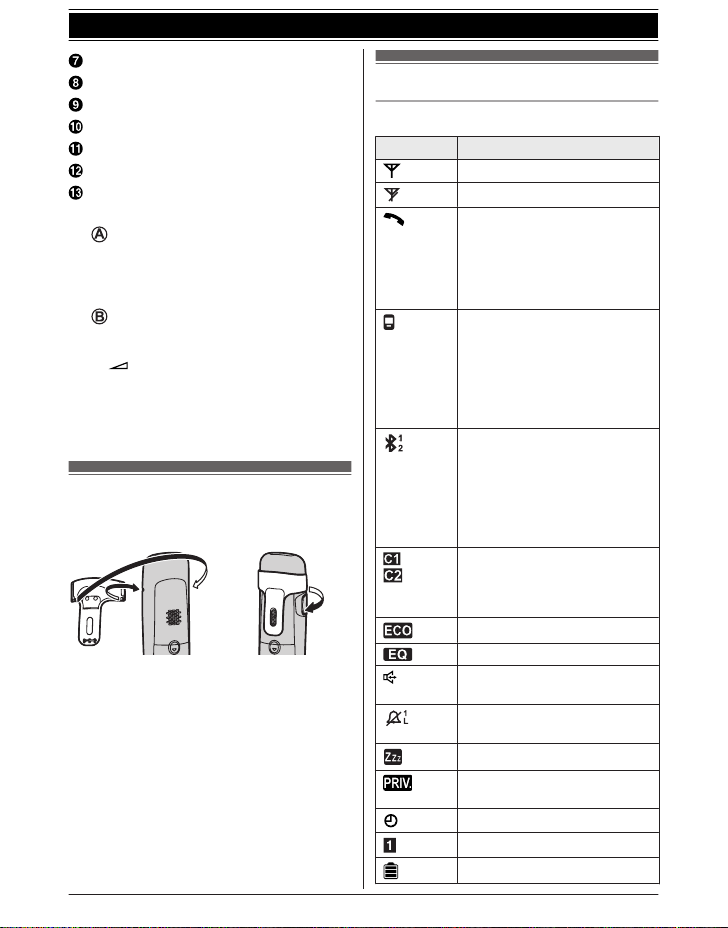
Belt clip
o attach n To remove
n T
Getting Started
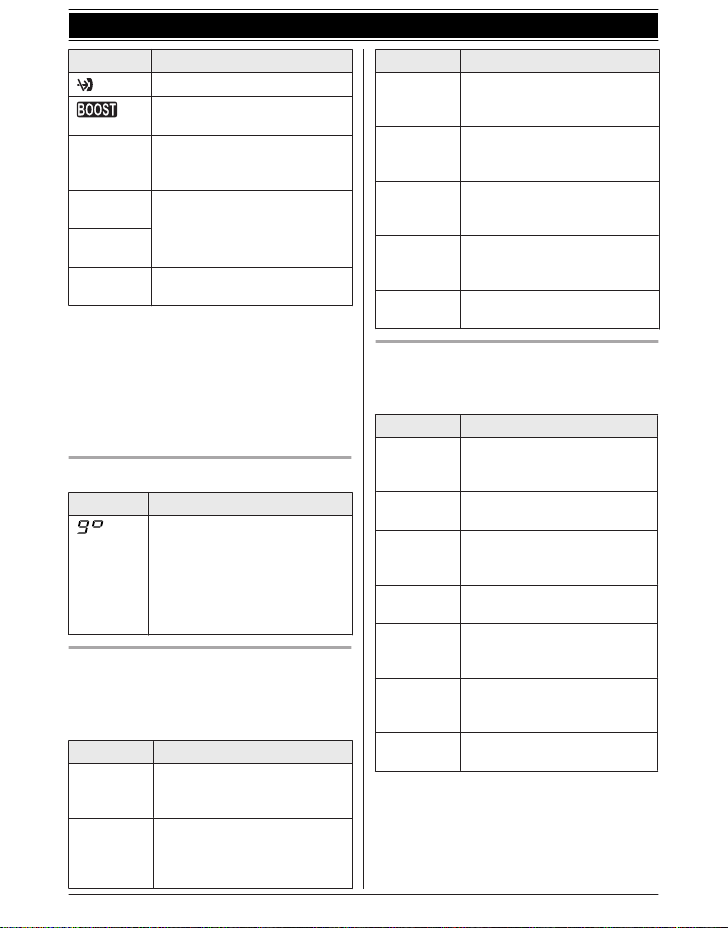
Display/Indicators
Handset display items
Item Meaning
Within base unit range
Out of base unit range
The landline is in use.
hen flashing:
R W
The call is put on hold.
R When flashing rapidly: An
incoming call is now being
received.
A cellular line is in use.
hen flashing:
R W
The cellular call is put on
hold.
R When flashing rapidly:
A cellular call is being
received.
A cellular phone is
c
onnected.*1 Ready to make/
receive cellular calls.
R When turned off:
A cellular phone is not
connected to the base unit
(page 20).
– The cellular line is selected
or the ringer setting.
f
– A cellular call is being
received on that line.
Eco mode is on.
Equalizer is set. (page 24)
Speakerphone is on.
(
page 22)
Ringer volume is off.
(page 35, 37)
Silent mode is on. (page 40)
Call sharing mode is off.
page 38)
(
Alarm is on. (page 40)
Handset number
Battery level
*
2
(page 13)
3
*
For assistance, please visit http://www.panasonic.com/help
15
Getting Started
Item Meaning
Blocked call (page 41)
2
Clarity booster is on.
(page 24)
In use
Cell1 in
se
u
Cell2 in
se
u
Line in
se
u
*1 Corresponding cellular line(s) is indicated
n
*2 During a cellular call, the item is not
displayed even though the feature is
activated.
*3 Corresponding lines (1, 2: cellular line, L:
landline) are indicated next to the item. If
all lines are turned off, no line is indicated.
Answering system is being
sed by another handset or
u
the base unit.
Someone is using the cellular
line.
Someone is using the landline.
ext to the item.
*
Base unit display item
Item Meaning
reeting only” is selected
“G
as the caller’s recording time.
In this case, the answering
system answers calls with a
greeting message and caller
messages are not recorded.
(page 53)
CELL 1/CELL 2 indicators on the
b
ase unit
The CELL 1/CELL 2 indicators show each
cellular line status.
Status Meaning
Green
(
On)
Green
Flashing)
(
16
A cellular phone is connected.
Ready to make/receive
cellular calls.
– The cellular line is in use.
– Phonebook entries are
being copied from a
cellular phone (page 46).
For assistance, please visit http://www.panasonic.com/help
Status Meaning
Green
(
Flashing
rapidly)
Amber
On)
(
Amber
Flashing
(
rapidly)
Red
Flashing)
(
Light off A cellular phone is not
A cellular call is being
received.
A cellular phone is not
connected to the base unit
(page 20).
The base unit is searching for
the registered cellular phone.
– The base unit is registering
a cellular phone.
– A cellular call is put on hold.
egistered to the base unit.
r
HEADSET indicator on the base unit
T
he HEADSET indicator shows the Bluetooth
headset status.
Status Meaning
Green
(
On)
Green
Flashing)
(
Green
Flashing
(
rapidly)
Amber
On)
(
Amber
Flashing
(
rapidly)
Red
Flashing)
(
Light off A Bluetooth headset is not
A Bluetooth headset is
connected to the base unit.
Ready to use it.
A Bluetooth headset is in use.
A landline call is being
received.
The Bluetooth headset is not
connected to the base unit.
The base unit is searching for
the registered Bluetooth
headset.
– The base unit is registering
a headset.
– Mute is turned on.
egistered to the base unit.
r
Getting Started
Initial settings
n D
irect command code:
Programmable settings can be accessed
by pressing MMENUN, # and then the
corresponding code on the dial keypad
(page 33).
Example: Press MMENUN#101.
n Symbol meaning:
Symbol Meaning
Example:
“Off”
MbN:
Date and time
mportant:
I
R When you install the batteries for the first
time, the handset may prompt you to set
date and time. First press MSELECTN, then
proceed to step 2.
1 MMENUN#101
2 Enter the current month, date, and year
by selecting 2 digits for each.
Example: July 15, 2012
07 15 12
3 MOKN
4 Enter the current hour and minute
(12-hour clock format) by selecting 2
digits for each.
Example: 9:30
09 30
5 MAM/PMN: Select “AM” or “PM”.
6 MSAVEN a MOFFN
Note:
R When English is selected as the display
language, 12-hour clock format is used.
When Spanish is selected, 24-hour clock
format is used.
R The date and time may be incorrect after a
power failure. In this case, set the date and
time again.
Press MCN or MDN to select
the words in quotations.
Display language
You can select either “English” or
“Español” as the display language. The
default setting is “English”.
1 MMENUN#110
2 MbN: Select the desired setting. a
MSAVEN
3 MOFFN
Voice guidance language
Y
ou can select either “English” or
“Español” as the voice guidance language
of the answering system. The default setting is
“English”.
1 MMENUN#112
2 MbN: Select the desired setting. a
MSAVEN
3 MOFFN
Dialing mode
If you cannot make calls, change this setting
according to your telephone line service. The
default setting is “Tone”.
“Tone”: For tone dial service.
“Pulse”: For rotary/pulse dial service.
1 MMENUN#120
2 MbN: Select the desired setting.
3 MSAVEN a MOFFN
For assistance, please visit http://www.panasonic.com/help
17

Link to Cell
Link to cell feature
T
o use this feature, you must first register and
connect your cellular phones to the base unit
(page 18).
Your cellular phones must have Bluetooth
wireless technology that is compatible with this
product.
This feature allows you to:
– make or answer cellular calls using your
home phone (handset or base unit) with
better reception.
– maximize the benefits of cellular services
(such as free night and weekend calls, or
cellular to cellular call plans) by utilizing
unused peak minutes with your home
phone.
– conserve the battery power of your cellular
phone while the unit is on a cellular call.
(We recommend charging your cellular
phone during the cellular call as your
cellular phone battery is being consumed.)
Important:
R Up to 2 cellular phones can be registered.
However, only one Bluetooth device
(cellular phone or headset) can be
connected to the base unit at a time.
R Locate your cellular phone near the base
unit. If the cellular phone is too close to the
base unit during a cellular call, you may
hear noise. For best performance, we
recommend placing the cellular phone
between 0.6 m to 3 m (2 feet to 10 feet)
away from the base unit.
Trademarks
R The Bluetooth® word mark and logos are
owned by the Bluetooth SIG, Inc. and any
use of such marks by Panasonic
Corporation is under license. All other
trademarks identified herein are the
property of their respective owners.
Registering a cellular
p
hone
Important:
R For more details and the list of compatible
cellular phones, please visit our Web site:
18
For assistance, please visit http://www.panasonic.com/help
http://www.panasonic.com/link2cell
R B
efore registering a Bluetooth enabled
cellular phone to the base unit:
– we recommend you change the PIN
(page 21).
– make sure that no Bluetooth device such
as a Bluetooth headset is connected to
your cellular phone.
1 Handset:
MMENUN
For CELL 1: #6241
For CELL 2: #6242
R After the CELL 1 or CELL 2 indicator
on the base unit starts flashing red, the
rest of the procedure must be
completed within 5 minutes.
2 Your cellular phone:
While the CELL 1 or CELL 2 indicator is
flashing red, follow the instructions of your
cellular phone to enter the registration
mode.
R Depending on your cellular phone, it
may ask you to enter the base unit PIN
(default: “0000”).
3 Handset:
Wait until a long beep sounds.
R It may take more than 10 seconds to
complete registration.
R When the CELL 1 or CELL 2 indicator
lights green, the cellular phone is
connected to the base unit. You are
ready to make cellular calls.
4 To select which unit receives calls for the
cellular line, press MOKN then continue
from step 3, “Selecting which unit
receives cellular calls”, page 19.
R If not required, go to step 5.
5 MOFFN
Note:
R Make sure that your cellular phone is set to
connect to this product automatically. Refer
to your cellular phone’s operating
instructions.
R Make sure you cancel your cellular phone’s
current registration if you want to register it
to the other line (page 21).

Link to cell settings
Selecting which unit receives
c
ellular calls
You can select which unit rings and receives
calls for a cellular line. When “All” is
selected, all handsets and the base unit ring.
1 MMENUN
2 For CELL 1: #6271
For CELL 2: #6272
3 MbN: Select the desired handset or “All”.
4 MSAVEN a MOFFN
Note:
R When you select a specific handset to
receive calls for a cellular line:
– other handsets cannot answer the calls.
– the base unit can answer the calls even
though it does not ring. However, you
can make the base unit ring by adjusting
the base unit ringer volume (page 35).
(KX-TG7741 series: page 3)
R When you change the setting to “All”, the
base unit ringer volume also returns to the
lowest level even if the ringer volume has
been changed.
Ring as cell mode
nce this feature is turned on, the handset
O
and base unit ring using the same ringer tone
as your cellular phone.
The following settings are available:
– “Off”: Turn this feature off to use the
ringer tones of the handset and base unit.
Caller information is announced depending
on the Talking Caller ID setting (page 37).
– “On (with Talking CID)”
(default): The handset and base unit use
your cellular phone’s ringer tone. Caller
information is announced even if the
Talking Caller ID is turned off.
– “On (without Talking CID)”: The
handset and base unit use your cellular
phone’s ringer tone. Caller information is
not announced even if the Talking Caller ID
is turned on.
For assistance, please visit http://www.panasonic.com/help
Link to Cell
Important:
R T
o use this feature, your cellular phone
must support Bluetooth in-band ringtone.
Refer to your cellular phone’s operating
instructions.
1 MMENUN
2 For CELL 1: #6141
For CELL 2: #6142
3 MbN: Select the desired setting.
4 MSAVEN a MOFFN
Note:
R The units use the preset ringer tones
(page 37) instead of your cellular phone’s
ringer tone when a cellular call is being
received if:
– your cellular phone is in silent mode
(depending on your cellular phone).
– the base unit is in use.
– 2 handsets are sharing a landline call.
R If your cellular phone is in silent mode with
“On (with Talking CID)” set, the unit
announces caller information even when
Talking Caller ID is turned off (page 37).
To use the handset ringer tone
nstead of your cellular phone’s
i
ringer tone
Select “Off” in step 3, “Ring as cell mode”,
page 19.
To change the handset ringer tone for a
cellular line, see page 35.
Auto connection to the cellular
hone
p
After registration, your cellular phone is
connected to the base unit. If you move the
cellular phone out of base unit range, the
cellular phone is disconnected from the base
unit. This feature allows the base unit to try to
reconnect the cellular phone at regular
intervals when it returns within base unit
range. You can set the interval. The default
setting is “1 min”.
19
Link to Cell
Important:
R W
hen you are using a cellular line or a
Bluetooth headset, the base unit loses its
connection from other Bluetooth devices
(cellular phone or headset). To
automatically resume the connection to
cellular phones, leave the auto connection
on.
R Some cellular phones lose connection after
usage, please check the specification of
your cellular phone for more details.
1 MMENUN#632
2 MbN: Select the desired setting.
3 MSAVEN a MOFFN
Note:
R Some cellular phone may ask you if you
accept the connection requirement from the
base unit. In that case, select “Off” in step
2. Check the specification of your cellular
phone.
Connecting/disconnecting the
ellular phone manually
c
When you make or answer calls with your
cellular phone, we recommend disconnecting
it from the base unit, otherwise received audio
may not be heard on your cellular phone.
You can also manually reconnect the cellular
phone to the base unit without waiting for the
auto connection feature to resume the
connection.
1 MMENUN
2 To connect/disconnect:
For CELL 1: #6251
For CELL 2: #6252
R A long beep sounds.
3 MOFFN
Cellular line only mode (If you do
ot use the landline)
n
If you do not use the landline, we recommend
setting the unit to the cellular line only mode.
1 MMENUN#157
o turn on:
2 T
MbN: “On” a MSELECTN a
MbN: “Yes” a MSELECTN
To turn off:
MbN: “Off” a MSELECTN
Note:
R Once you set this mode, you can use the
following buttons to make cellular calls:
– for the handset, press MN or M
nstead of MCELLN (page 22).
i
– for the base unit, press MSP-PHONEN
instead of the line button (MCELL 1N or
MCELL 2N) set for the cellular line
selection (page 20, 27).
(KX-TG7741 series: page 3)
R Once you set this mode, the following
features cannot be used:
– Landline features (page 38)
– Answering system (page 49)
Messages cannot be received.
– Voice mail features (page 55)
R After this mode is turned on or off, the base
unit reboots.
– Bluetooth connections from cellular
phones or headset are disconnected. If
the auto connection is turned on
(page 19), the cellular phones are
reconnected.
–
will be displayed on the handset
m
omentarily. The handset can be used
is displayed.
once
N
When you use the landline again
efore connecting the telephone line to the
B
base unit, select “Off” in step 2, “Cellular line
only mode (If you do not use the landline)”,
page 20.
Cellular line selection
This feature determines which cellular line is
selected to make cellular calls when:
– you press MCELLN on the handset.
– you press M N
while the cellular line only mode is turned
on.
– you press MSP-PHONEN on the base unit
while the cellular line only mode is turned
on. (KX-TG7741 series: page 3)
or MN on the handset
20
For assistance, please visit http://www.panasonic.com/help

The following settings are available:
– “M
anual” (handset only: default): You can
select the desired cellular line when making
a call.
– “Cellular phone 1” (base unit default): CELL
1 is selected.
– “Cellular phone 2”: CELL 2 is selected.
1 MMENUN
2 For handset: #634
For base unit*1: #*634
3 MbN: Select the desired setting.
4 MSAVEN a MOFFN
*1 KX-TG7741 series: page 3
Storing your area code (for
d
ialing only a 7-digit phone
number to make a local call)
You need to add your area code when making
cellular calls to a phone number in your area.
Once you store your area code, it is
automatically added to the beginning of the
7-digit phone number when making cellular
calls.
1 MMENUN#633
2 Enter the 3-digit area code.
R To correct a digit, press MCLEARN.
3 MSAVEN a MOFFN
Changing the Bluetooth PIN
Personal Identification Number)
(
The PIN is used to register cellular phones to
the base unit. The default PIN is “0000”. To
prevent unauthorized access to this product,
we recommend that you change the PIN, and
keep it confidential.
Important:
R Please make note of your new PIN. The
unit does not reveal the PIN to you. If you
forget your PIN, see page 68.
1 MMENUN#619
2 Enter the new 4-digit PIN. a MOKN
3 Enter the new 4-digit PIN again. a
MSAVEN
Link to Cell
FFN
4 MO
Changing the PIN for the second time
F
ollow step 1, “Changing the Bluetooth PIN
(Personal Identification Number)”, page 21.
Enter the current 4-digit PIN, then continue
from step 2.
Deregistering Bluetooth devices
A
handset can cancel the registration of
another Bluetooth device (cellular phone or
headset) that is stored to the base unit.
1 MMENUN#134
2 MbN: Select the desired device. a
MSELECTN
indicates a cellular phone, and
R
indicates a headset.
3 MbN:
“Yes” a MSELECTN
R When the cellular phone is
deregistered, the CELL 1 or CELL 2
indicator is turned off.
R When the headset is deregistered, the
HEADSET indicator is turned off.
4 MOFFN
For assistance, please visit http://www.panasonic.com/help
21
Making/Answering Calls Using the Handset
– a specific line is set to make cellular
Making cellular calls
I
mportant:
R Only 1 cellular line can be used at a time.
R Before making calls, confirm that the CELL
1 or CELL 2 indicator lights green (page 16).
1 Lift the handset and dial the phone
number.
R To correct a digit, press MCLEARN.
2 MCELLN
R The unit starts dialing when:
– only 1 cellular phone is registered.
– a specific line is set to make cellular
calls (page 20).
Go to step 4.
3 MbN: Select the desired cellular phone. a
MSELECTN
4 When you finish talking, press MOFFN or
place the handset on the base unit or
charger.
Note:
R To switch to the speaker, press M
To switch back to the receiver, press M N/
M
N.
Adjusting the receiver or speaker
olume
v
Press MjN or MkN repeatedly while talking.
Note:
R There are 5 volume levels (1 to 5) for the
receiver. When you change the receiver
volume to level 5 (maximum level), the
volume returns to level 4 (default) after you
hang up.
Making a cellular call using the redial
ist
l
The last 5 phone numbers dialed are stored in
the redial list (each 48 digits max.).
1 MEN REDIAL
2 MbN: Select the desired phone number.
3 MCELLN
R The unit starts dialing when:
– only 1 cellular phone is registered.
22
For assistance, please visit http://www.panasonic.com/help
N.
4 MbN: Select the desired cellular phone. a
MSELECTN
Erasing a number in the redial list
1 M N
2 MbN: Select the desired phone number.
a MERASEN
3 MbN: “Yes” a MSELECTN
4 MOFFN
Making landline calls
ift the handset and dial the phone
1 L
number.
R To correct a digit, press MCLEARN.
2 M
3 W
hen you finish talking, press MOFFN or
place the handset on the base unit or
charger.
Using the speakerphone
1 Dial the phone number and press M N.
R S
2 When you finish talking, press MOFFN.
Note:
R For best performance, use the
speakerphone in a quiet environment.
R To switch back to the receiver, press M
M N.
Making a call using the redial list
1 MEN
2 MbN: Select the desired phone number.
3 M
Pause (for PBX/long distance service
u
sers)
A pause is sometimes required when making
calls using a PBX or long distance service.
When storing a calling card access number
alls (page 20).
c
REDIAL
N
peak alternately with the other party.
REDIAL
N
N/
Making/Answering Calls Using the Handset
and/or PIN in the phonebook, a pause is also
n
eeded (page 32).
Example: If you need to dial the line access
number “9” when making outside calls with a
PBX:
1 9 a MPAUSEN
2 Dial the phone number. a M
N
ote:
R A 3.5 second pause is inserted each time
MPAUSEN is pressed.
N
Select the desired volume.
2 MbN:
3 MSAVEN a MOFFN
Temporary handset ringer off
hile the handset is ringing for a call, you can
W
turn the ringer off temporarily by pressing M
Useful features during a
c
all
N.
Answering calls
hen a call is being received, the ringer
W
indicator flashes rapidly.
1 Lift the handset and press M
when the unit rings.
R To answer a cellular call, you can also
press MCELLN.
R You can also answer the call by
pressing any dial key from 0 to 9,
*, or #. (Any key answer feature)
2 When you finish talking, press MOFFN or
place the handset on the base unit or
charger.
Auto talk
Y
ou can answer calls simply by lifting the
handset off the base unit or charger. You do
not need to press MN. To turn this feature
on, see page 38.
Adjusting the handset ringer volume
n W
hile the handset is ringing for an
incoming call:
Press MjN or MkN repeatedly to select the
desired volume.
n Programming the volume beforehand:
1 To change the cellular line ringer
volume:
For CELL 1: MMENUN#6281
For CELL 2: MMENUN#6282
To change the landline ringer
volume:
MMENUN#160
N or M N
Hold
T
his feature allows you to put an outside call
on hold.
1 Press MMENUN during an outside call.
2 MbN: “Hold” a MSELECTN
3 To release hold on the cellular line:
Press MCELLN.
R Another handset user can take the call:
MCELLN*1 a MSELECTN
*1
The call is taken when:
– only 1 cellular phone is
registered.
– the line is set to make cellular
R The base unit user can take the call by
To release hold on the landline:
Press M
R A
R T
Note:
R If a call is kept on hold for more than 9
minutes, an alarm tone starts to sound and
the ringer indicator flashes rapidly. After 1
additional minute on hold, the call is
disconnected.
R If another phone is connected to the same
line, you can also take the call by lifting its
handset.
calls (page 20).
pressing MCELL 1N or MCELL 2N.
(KX-TG7741 series: page 3)
N.
nother handset user can take the call
by pressing M
he base unit user can take the call by
pressing MSP-PHONEN.
(KX-TG7741 series: page 3)
N.
For assistance, please visit http://www.panasonic.com/help
23
Making/Answering Calls Using the Handset
Mute
While mute is turned on, you can hear the
other party, but the other party cannot hear
you.
1 Press MMUTEN during conversation.
R MMUTEN flashes.
2 To return to the conversation, press
MMUTEN again.
Note:
R MMUTEN is a soft key visible on the handset
display during a call.
Flash for landline calls
MF
LASHN allows you to use the special
features of your host PBX such as transferring
an extension call, or accessing optional
telephone services.
Note:
R To change the flash time, see page 38.
For call waiting or Call Waiting
aller ID service users
C
To use call waiting or Call Waiting Caller ID,
you must first subscribe with your service
provider/telephone company.
This feature allows you to receive calls while
you are already talking on the phone. If you
receive a call while on the phone, you will hear
a call waiting tone.
If you subscribe to both Caller ID and Call
Waiting with Caller ID services, the 2nd
caller’s information is displayed after you hear
the call waiting tone on the handset.
1 Press MCALL WAITN to answer the 2nd
call.
2 To switch between calls, press MCALL
WAITN.
Note:
R Please contact your service provider/
telephone company for details and
availability of this service in your area.
Temporary tone dialing for
landline calls (for rotary/pulse
service users)
You can temporarily switch the dialing mode
to tone when you need to access touch-tone
services (for example, answering services,
telephone banking services, etc.).
Press * (TONE) before entering access
numbers which require tone dialing.
Handset clarity booster
his feature can improve sound clarity when
T
the handset is used in an area where there
may be interference. During an outside call,
this feature is turned on automatically when
necessary.
R When this feature is turned on,
d
isplayed. However, during a cellular call,
is not displayed even though the
f
eature is activated.
is
Handset equalizer
This feature clarifies the voice of the person
you are talking to, producing a more
natural-sounding voice that is easier to hear
and understand.
1 Press MMENUN while talking.
2 MbN: “Equalizer” a MSELECTN
3 MbN: Select the desired setting.
4 Press MOKN to exit.
Note:
R When this feature is activated, is
d
isplayed while talking.
R Depending on the condition and quality of
your telephone line, this feature may
emphasize existing line noise. If it becomes
difficult to hear, turn this feature off.
R This feature is not available while using the
speakerphone.
Call share
ou can join an existing outside call.
Y
24
For assistance, please visit http://www.panasonic.com/help

Making/Answering Calls Using the Handset
n W
hile another unit is on a cellular call:
1 To join the conversation, press
MCELLN.
R You can join the conversation
when:
– only 1 cellular phone is
registered.
– the line is set to make cellular
calls (page 20).
2 MbN: Select the desired cellular phone.
a MSELECTN
n While another unit is on a landline call:
To join the conversation, press M
N
ote:
R A maximum of 3 parties (including 1 outside
party) can join a conversation using 2
extensions. (3-way conference)
R To prevent other users from joining your
conversations with outside callers, turn call
sharing mode off (page 38).
N.
uring a conversation using a cellular
1 D
phone, press MCELLN.
R The call is transferred to the handset
when:
– only 1 cellular phone is registered.
– the line is set to make cellular calls
(page 20).
2 MbN: Select the desired cellular phone. a
MSELECTN
R The call is transferred to the handset.
Using the other line during a
c
onversation
You can handle a cellular call and a landline
call at the same time. When another call is
being received during a conversation, the
interrupt tone sounds (page 37), and the 2nd
caller’s information is displayed if you
subscribe to Caller ID (page 43). You can
answer the 2nd call while holding the 1st call.
Transferring a cellular call
etween the handset and a
b
cellular phone
Transferring a cellular call from the
h
andset to a cellular phone
1 Press MMENUN during a cellular call.
2 MbN: “Transfer to cell” a
MSELECTN
R The cellular call is transferred to the
cellular phone.
Note:
R Depending on your cellular phone type, you
may need to set the cellular phone to be
ready to talk before transferring. For
example, if your cellular phone has a top
cover, open it beforehand.
Transferring a cellular call from a
ellular phone to the handset
c
During a conversation using a cellular phone,
the call cannot be transferred to the handset
by the cellular phone. Perform the following
with the handset.
For assistance, please visit http://www.panasonic.com/help
Making/answering a cellular call
d
uring a conversation on the landline
1 Press MMENUN during a landline call.
2 MbN: “Hold” a MSELECTN
3 To make a 2nd call:
Dial the phone number. a MCELLN*1 a
MbN: Select the desired cellular phone. a
MSELECTN
*1
The unit starts dialing when:
– only 1 cellular phone is registered.
– a specific line is set to make
cellular calls (page 20).
To answer a 2nd call:
MCELLN
R To hold the 2nd call: MMENUN a MbN:
“Hold” a MSELECTN
4 To hang up the 2nd call and return to the
1st call (landline call), press MOFFN, then
press M
Making/answering a landline call
d
uring a conversation on a cellular line
N.
1 Press MMENUN during a cellular call.
25

Making/Answering Calls Using the Handset
“Hold” a MSELECTN
2 MbN:
3 To make a 2nd call:
Dial the phone number. a M
o answer a 2nd call:
T
M
N
o hold the 2nd call: MMENUN a MbN:
R T
“Hold” a MSELECTN
N
4 To hang up the 2nd call and return to the
1st call (cellular call), press MOFFN, then
press MCELLN.
26
For assistance, please visit http://www.panasonic.com/help

Making/Answering Calls Using the Base Unit
Making cellular calls
Available for:
X-TG7741 series (page 3)
K
1 P
ress MCELL 1N or MCELL 2N.
2 Dial the phone number.
3 When the other party answers, speak into
the microphone.
R Speak alternately with the other party.
4 When you finish talking, press
MSP-PHONEN.
Note:
R For best performance, use the
speakerphone in a quiet environment.
R While on a call, you can switch from the
base unit to the handset:
With the call sharing mode on (page 29),
press MCELLN on the handset. a MbN:
Select the desired cellular phone. a
MSELECTN a Press MSP-PHONEN on the
base unit.
– When only 1 cellular phone is registered
or the line is set to make cellular calls
(page 20), press MCELLN on the
handset, then press MSP-PHONEN on
the base unit.
If the handset is on the base unit, simply lift
it.
Adjusting the speaker volume
P
ress MjN or MkN repeatedly while talking.
hen you finish talking, press
4 W
MSP-PHONEN.
Note:
R While on a call, you can switch from the
base unit to the handset:
Press M
MSP-PHONEN on the base unit with the call
sharing mode on (page 29).
If the handset is on the base unit, simply lift
it.
on the handset, then press
N
Redialing the last number dialed
P-PHONEN a MREDIALN
MS
Pause (for PBX/long distance service
sers)
u
A pause is sometimes required when making
calls using a PBX or long distance service.
When storing a calling card access number
and/or PIN in the phonebook, a pause is also
needed (page 32).
Example: If you need to dial the line access
number “9” when making outside calls with a
PBX:
1 MSP-PHONEN
2 9 a MPAUSEN
3 Dial the phone number.
Note:
R A 3.5 second pause is inserted each time
MPAUSEN is pressed.
Redialing the last number dialed
1 P
ress MCELL 1N or MCELL 2N.
2 MREDIALN
Making landline calls
P-PHONEN
1 MS
2 Dial the phone number.
3 When the other party answers, speak into
the microphone.
For assistance, please visit http://www.panasonic.com/help
Answering calls
W
hen a call is being received, the SP-PHONE
indicator flashes rapidly.
When a cellular call is being received, the
CELL 1 or CELL 2 indicator and SP-PHONE
indicator flash rapidly.
1 Press MSP-PHONEN when the unit rings.
R You can also answer the cellular call
by pressing MCELL 1N or MCELL 2N.
2 Speak into the microphone.
3 When you finish talking, press
MSP-PHONEN.
27
Loading...