

Page 1
Introducción/Indicaciones de seguridad
Cómoda
Introducción
Familiarícese con el producto antes del montaje y de la primera
puesta en marcha. Lea para ello detenidamente las siguientes
el producto únicamente como está descrito y para las aplicaciones indicadas.
Conserve adecuadamente estas instrucciones. Adjunte igualmente toda la
documentación en caso de entregar el producto a terceros.
El producto está diseñado para almacenar objetos ligeros. Está indicado únicamente para su uso en espacios interiores secos y para fines particulares.
No se permite un empleo distinto al indicado previamente ni una modificación
del producto esto puede ocasionar lesiones y/o daños en el producto. El
fabricante no asume responsabilidad alguna por daños provocados debido
al uso indebido del producto. El producto no está concebido para el uso
comercial.
1
2
3
4
5
6
7
8
9
10
11
12
13
14
15
16
17
18
19
20
21
22
23
24
25
26
27
28
29
30
31
32
33
34
35
36
37
Advertencia: al desempaquetar tenga cuidado de no tirar material de
montaje accidentalmente.
instrucciones de montaje y las indicaciones de seguridad. Utilice
Uso conforme a lo prescrito
Descripción de las piezas
Tablero superior
Lateral (izquierdo)
Elemento central
Lateral (derecho)
Tablero inferior
Pared trasera
Balda
Puerta (grande)
Puerta (pequeña)
Parte trasera del cajón
Lateral izquierdo del cajón
Lateral derecho del cajón
Suelo del cajón
Parte delantera del cajón
Tornillo de estrella (aprox. ø 5 x 35 mm)
Taco de madera (aprox. ø 8 x 30 mm)
Taco roscado (aprox. ø 6 x 39 mm)
Tornillo de estrella (aprox. ø 3,5 x 12 mm)
Guía de metal
Tornillo de estrella (aprox. ø 4 x 13 mm)
Bisagra de cazoleta
Soporte para balda (aprox. ø 8 x 13,5 mm)
Codo excéntrico (aprox. ø 15 x 12 mm)
Estabilizador para la pared trasera
Tornillo de cabeza con hexágono interior (aprox. ø 7 x 50 mm)
Gancho roscado
Taco
Caperuza de protección
Anillo de plástico
Tirador
Tornillo de estrella (aprox. ø 4 x 20 mm)
Pie
Tornillo de estrella (aprox. ø 4 x 25 mm)
Llave de hexágono interior
Taco roscado (aprox. ø 6 x 25 mm)
Codo excéntrico (aprox. ø 10 x 10 mm)
Tornillo de estrella (aprox. ø 4 x 20 mm)
Volumen de suministro
Controle inmediatamente después del desembalaje que el volumen de suministro esté completo, así como el buen estado del producto y de todas las
piezas. No proceda al montaje del producto si el volumen de suministro no
se encuentra completo.
1 x Tablero superior
1 x Lateral (izquierdo)
1 x Elemento central
1 x Lateral (derecho)
1 x Tablero inferior
2 x Pared trasera
2 x Balda
1 x Puerta (grande)
1 x Puerta (pequeña)
2 x Parte trasera del cajón
2 x Lateral izquierdo del cajón
2 x Lateral derecho del cajón
2 x Suelo del cajón
2 x Parte delantera del cajón
8 x Tornillo de estrella (aprox. ø 5 x 35 mm)
12 x Taco de madera (aprox. ø 8 x 30 mm)
6 x Taco roscado (aprox. ø 6 x 39 mm)
38 x Tornillo de estrella (aprox. ø 3,5 x 12 mm)
4 x Guía de metal
4 x Tornillo de estrella (aprox. ø 4 x 13 mm)
4 x Bisagra de cazoleta
8 x Soporte para balda (aprox. ø 8 x 13,5 mm)
6 x Codo excéntrico (aprox. ø 15 x 12 mm)
8 x Estabilizador para la pared trasera
6 x Tornillo de cabeza con hexágono interior (aprox. ø 7 x 50 mm)
2 x Gancho roscado
2 x Taco
14 x Caperuza de protección
6 x Anillo de plástico
4 x Tirador
8 x Tornillo de estrella (aprox. ø 4 x 20 mm)
5 x Pie
5 x Tornillo de estrella (aprox. ø 4 x 25 mm)
1 x Llave de hexágono interior
8 x Taco roscado (aprox. ø 6 x 25 mm)
8 x Codo excéntrico (aprox. ø 10 x 10 mm)
6 x Tornillo de estrella (aprox. ø 4 x 20 mm)
1 x Instrucciones de montaje
Datos técnicos
Dimensiones: aprox. 70 x 80 x 39 cm
(alto x largo x ancho)
Capacidad de carga máx.: 50 kg
Material: Tablones con láminas con recubrimiento de
melamina
Indicaciones de seguridad
¡GUARDAR TODAS LAS ADVERTENCIAS E INDICACIONES DE
SEGURIDAD POR SI LAS NECESITA EN UN FUTURO!
de asfixia. Mantenga el producto fuera del alcance de los niños. ¡Este
artículo no es un juguete!
¡PRECAUCIÓN! ¡RIESGO DE LESIONES! Asegúrese de que todas
las piezas están montadas correctamente y de la forma debida. Si realiza
un montaje incorrecto, se corre el riesgo de sufrir lesiones. Las piezas
dañadas pueden influir en la seguridad y el funcionamiento.
Asegúrese de que el producto sea colocado sobre una base firme y a
nivel del suelo.
¡ADVERTENCIA!
¡PELIGRO DE MUERTE O ACCI-
DENTE PARA BEBÉS Y NIÑOS! No deje nunca a los
niños sin vigilancia con el material de embalaje. Existe peligro
3ES
61417_liv_Kommode_Content_LB5.indd 3 03.01.11 11:27
Page 2
Indicaciones de seguridad/Montaje/Limpieza y cuidado/ Eliminación
Es necesario un montaje en la pared ya que de lo contrario el producto
se puede volcar.
¡PRECAUCIÓN! ¡No deje a los niños sin supervisión! Este producto
no es ningún juguete ni ningún aparato para escalar. Asegúrese de que
ninguna persona y, en particular, ningún niño, se suba por encima del
producto ni se apoye en él, dado que la fijación podría soltarse de la
pared, provocando la caída y el vuelco del producto. La consecuencia
podrán ser lesiones y/o daños en el producto.
El peso tiene que repartirse por el producto para que no se vuelque.
Compruebe la estabilidad del producto antes de utilizarlo.
No cargue el producto con más de 50 kg. De otro modo,
existe riesgo de lesiones y/ o daños en el producto.
50 kg
¡PELIGRO DE DESCARGA ELÉCTRICA! ¡RIESGO DE
DAÑOS MATERIALES! ¡RIESGO DE LESIONES!
Asegúrese de no tocar conductos de agua, gas o corriente
cuando perfore la pared. En caso necesario, realice una comprobación
con un buscador de línea antes de perforar la pared.
Compruebe la estabilidad del producto antes de utilizarlo.
No eleve el producto y no lo mueva si está cargado.
¡Evite daños materiales!
Compruebe antes del montaje que la pared elegida para fijar el producto
es apropiada. En caso necesario, infórmese en tiendas especializadas.
Infórmese acerca del material de montaje apropiado para la pared antes
de fijar el producto. Antes del montaje en la pared infórmese sobre el
material de montaje apropiado para la pared.
Comience siempre a cargar desde el cajón inferior hasta el superior.
Coloque siempre las cosas más pesadas en el cajón inferior.
Limpieza y cuidado
Utilice un paño ligeramente húmedo y sin pelusas para la limpieza.
No utilice en ningún caso productos de limpieza abrasivos o corrosivos.
De lo contrario, el producto podría dañarse.
Eliminación
El embalaje se compone de materiales que respetan el medio
ambiente que podrá desechar en los puntos locales de reciclaje.
Puede averiguar las opciones para eliminar el producto fuera de uso en la
administración de su municipio o ciudad.
Denominación del producto:
Cómoda
Modelo N°: Z29549
Versión: 01 /2011
Montaje
Nota: Monte el producto sobre una superficie suficientemente grande y
resistente a los arañazos. En caso necesario, coloque por debajo una alfombra
o similar para evitar que se dañe el producto.
Nota: Para llevar a cabo el montaje, necesitará un taladro con una broca
del 8 y un destornillador de estrella.
Nota: Para este producto es necesario montaje en la pared. Asegúrese de
colocar el material de montaje a la altura correcta. De otro modo, el producto
no se puede montar correctamente.
Monte el producto como se muestra en las ilustraciones de A a F.
Figura G (Montaje en la pared):
Una vez montado completamente el producto (fig. A - F) hay que medir
la altura de los agujeros en el tablero superior
.
1
Marcar en la pared los agujeros a taladrar con un lápiz o similar.
¡ADVERTENCIA!
¡PELIGRO DE MUERTE! Asegúrese de no tocar
conductos de agua, gas o corriente cuando perfore la pared. Según el
caso, realice una comprobación con un buscador de línea antes de perforar la pared.
¡PRECAUCIÓN! ¡RIESGO DE LESIONES! Consulte el manual de
instrucciones de su taladro.
Hacer los agujeros con una broca de ø 8mm e introducir los tacos
27
en los taladros.
Introducir los ganchos
roscándolos en los tacos 27, prestando aten-
26
ción a que, al finalizar, los ganchos queden señalando hacia arriba.
Por debajo del tablero superior
rados. En estos agujeros se fija la cómoda a los ganchos
se encuentran dos agujeros ya perfo-
1
.
26
Nota: Compruebe regularmente el estado de todos los puntos de unión y
apriete los tornillos de forma periódica.
4ES
61417_liv_Kommode_Content_LB5.indd 4 03.01.11 11:27
Page 3
Introduzione/Avvertenze di sicurezza
Comò
Introduzione
Familiarizzarsi con il prodotto prima di eseguire il montaggio e di
utilizzarlo per la prima volta. Leggete le seguenti istruzioni di
taggio e le avvertenze di sicurezza. Utilizzate questo prodotto
solo come descritto e per gli ambiti d‘uso indicati. Conservate bene queste
istruzioni. Consegnate altrettanto tutte le documentazioni su questo prodotto
quando lo date a terzi.
Utilizzo determinato
Il prodotto è concepito per la conservazione di oggetti leggeri. E’ adatto
esclusivamente per l’uso in locali interni asciutti per l’uso privato. Un altro utilizzo a quello prima descritto o una modifica del prodotto non è lecito e può
causare lesioni e/ o danni al prodotto stesso. Il produttore non risponde a
danni causati da un utilizzo non determinato del prodotto. Il prodotto non è
determinato per l‘uso professionale.
Descrizione dei pezzi
1
lastra superiore
2
lastra laterale (a sinistra)
3
parete centrale
4
lastra laterale (a destra)
5
lastra inferiore
6
pareti posteriori
7
ripiani
8
porta (grande)
9
porta (piccola)
10
pareti posteriori per cassetto
11
lastre laterali per cassetto a sinistra
12
lastre laterali per cassetto a destra
13
fondi per cassetto
14
pareti anteriori per cassetto
15
viti Phillips (ø 5 x 35 mm circa)
16
tasselli (ø 8 x 30 mm circa)
17
tasselli per avvitamento (ø 6 x 39 mm circa)
18
viti Phillips (ø 3,5 x 12 mm circa)
19
guide di scorrimento metalliche
20
viti Phillips (ø 4 x 13 mm circa)
21
cerniere
22
supporti per ripiani (ø 8 x 13,5 mm circa)
23
connettori eccentrici (ø 15 x 12 mm circa)
24
stabilizzatori per parete posteriore
25
viti a esagono incassato (ø 7 x 50 mm circa)
26
ganci a vite
27
tasselli
28
cappucci
29
anelli di plastica
30
impugnature
31
viti Phillips (ø 4 x 20 mm circa)
32
piedini
33
viti Phillips (ø 4 x 25 mm circa)
34
chiave a brugola
35
tasselli per avvitamento (ø 6 x 25 x mm circa)
36
connettori eccentrici (ø 10 x 10 mm circa)
37
viti Phillips (ø 4 x 20 mm circa)
Volume della fornitura
Avviso: Quando disimballa il prodotto, faccia attenzione a non gettare per
errore il materiale di montaggio.
mon-
Controllate il prodotto subito dopo averlo scartato e verificate che il volume
della fornitura sia completo e le condizione del prodotto e di tutti gli altri pezzi
siano impeccabili. Non montare il prodotto prima di assicurarsi che il volume
di fornitura non sia completo.
1 x lastra superiore
1 x lastra laterale (a sinistra)
1 x parete centrale
1 x lastra laterale (a destra)
1 x lastra inferiore
2 x pareti posteriori
2 x ripiani
1 x porta (grande)
1 x porta (piccola)
2 x pareti posteriori per cassetto
2 x lastre laterali per cassetto a sinistra
2 x lastre laterali per cassetto a destra
2 x fondi per cassetto
2 x pareti anteriori per cassetto
8 x viti Phillips (ø 5 x 35 mm circa)
12 x tasselli (ø 8 x 30 mm circa)
6 x tasselli per avvitamento (ø 6 x 39 mm circa)
38 x viti Phillips (ø 3,5 x 12 mm circa)
4 x guide di scorrimento metalliche
4 x viti Phillips (ø 4 x 13 mm circa)
4 x cerniere
8 x supporti per ripiani (ø 8 x 13,5 mm circa)
6 x connettori eccentrici (ø 15 x 12 mm circa)
8 x stabilizzatori per parete posteriore
6 x viti a esagono incassato (ø 7 x 50 mm circa)
2 x ganci a vite
2 x tasselli
14 x cappucci
6 x anelli di plastica
4 x impugnature
8 x viti Phillips (ø 4 x 20 mm circa)
5 x piedini
5 x viti Phillips (ø 4 x 25 mm circa)
1 x chiave a brugola
8 x tasselli per avvitamento (ø 6 x 25 x mm circa)
8 x connettori eccentrici (ø 10 x 10 mm circa)
6 x viti Phillips (ø 4 x 20 mm circa)
1 x libretto di istruzioni di montaggio
Dati tecnici
Dimensioni: ca. 70 x 80 x 39 cm (L x A x P)
Carico massimo sostenibile: 50 kg
Materiale: compensato rivestito di film verniciato con
melamina
Avvertenze di sicurezza
CONSERVARE LE INDICAZIONI DI SICUREZZA E LE ISTRUZIONI PER
EVENTUALI NECESSITÀ FUTURE!
ATTENZIONE!
DENTI PER BAMBINI E INFANTI! Non lasciare mai i
bambini incustoditi con il materiale per imballaggio. Sussiste
pericolo di soffocamento. Tenere lontano dalla portata dei bambini.
Questo articolo non è un giocattolo!
ATTENZIONE! PERICOLO DI LESIONE! Assicurarsi che tutti i com-
ponenti siano intatti e siano montati correttamente. In caso di montaggio
non corretto sussiste il pericolo di lesioni. Eventuali componenti danneggiati possono influire negativamente sulla sicurezza e sulla funzionalità
del prodotto.
Assicurarsi che il prodotto venga posto su un piano uniforme e stabile.
PERICOLO DI MORTE E DI INCI-
5IT/MT
61417_liv_Kommode_Content_LB5.indd 5 03.01.11 11:27
Page 4
Avvertenze di sicurezza/Montaggio/Pulizia e manutenzione/ Smaltimento
E‘ necessario il montaggio alla parete visto che il prodotto altrimenti
potrebbe ribaltarsi.
ATTENZIONE! Non lasciare i bambini incustoditi! Il prodotto non deve
essere utilizzato per arrampicarsi o per giocare! Assicurarsi che nessuno,
in modo particolare nessun bambino, si arrampichi sul prodotto o si appoggi su di esso. Il fissaggio per pareti potrebbe staccarsi dalla parete
e il prodotto potrebbe rovesciarsi. Ciò potrebbe provocare lesioni a
persone e/o danni a cose.
Il prodotto deve essere caricato in modo eguale e in modo tale da non
farlo ribaltare. Prima dell’uso verifichi la stabilità del prodotto.
Non caricare il prodotto con un peso superiore a 50 kg. In
caso contrario sussiste un pericolo di lesioni e/ o di danni al
50 kg
prodotto.
PERICOLO DI SCARICA ELETTRICA! PERICOLO DI
DANNO MATERIALE! PERICOLO DI FERIRSI! Si assicuri di non entrare in contatto con i condotti elettrici, del gas o
dell’acqua, quando esegue fori nella parete. Controlli eventualmente con il
rilevatore dei condotti i punti adatti prima di eseguire i fori all’interno della
parete.
Prima dell’uso verifichi la stabilità del prodotto.
Non alzi il prodotto e non lo muova quando è carico.
Evitare di danneggiare il prodotto!
Prima di eseguire il montaggio alla parete, verifichi, se la parete scelta è
adatta per il fissaggio del prodotto. In caso si informi anche presso un
rivenditore specializzato.
Prima di eseguire i montaggio alla parete, si informi riguardo al materiale
adatto alla Sua parete. Per il montaggio alla parete abbiamo allegato
del materiale di montaggio che è adatto per un tipo di muratura usuale
e resistente.
Innanzitutto carichi sempre i cassetti inferiori per passare poi al cassetto
più in alto. Riponga sempre gli oggetti più pesanti nei cassetti inferiori.
Pulizia e manutenzione
Per il lavaggio e la pulizia, utilizzare un panno leggermente inumidito e
privo di pelucchi.
Non utilizzare mai detergenti corrosivi. In caso contrario, si possono
determinare danneggiamenti al prodotto.
Smaltimento
L’imballaggio è costituito di materiali ecologici che si possono
smaltire nei punti di raccolta per riciclaggio locali.
Informazioni sulle possibilità di smaltimento del prodotto consumato sono
reperibili dall‘amministrazione comunale o cittadina.
Definizione del prodotto:
Comò
No. del modello: Z29549
Versione: 01/2011
Montaggio
Avviso: Monti il prodotto su un pavimento sufficientemente grande e
resistente ai graffi. Metta eventualmente una coperta o simili al di sotto del
prodotto per evitare danneggiamenti al prodotto.
Avviso: Per eseguire il montaggio necessita un trapano con una punta da
8 e un cacciavite con intaglio a croce.
Avviso: Per questo prodotto si richiede un montaggio a parete. Faccia
attenzione a collocare il materiale di montaggio ad un’altezza corretta.
Altrimenti il prodotto potrebbe essere montato in modo scorretto.
Monti il prodotto secondo quanto riportato nelle immagini A fino ad F.
Immagine G (montaggio a parete):
Successivamente al montaggio completo del prodotto (vedi figg. da A a
F) misurare l’altezza dei fori nella lastra superiore
.
1
Contrassegnare sulla parete il punto dove eseguire i fori con una matita
o altro.
ATTENZIONE!
PERICOLO DI MORTE! Quando si eseguono fora-
ture nella parete, assicurarsi di non entrare in contatto con condutture
elettriche, idriche o del gas. Prima di eseguire forature o spaccature nella
parete verificarne eventualmente la presenza con un dispositivo di rilevazione di condutture.
ATTENZIONE! PERICOLO DI LESIONE! Consultare le istruzioni
d’uso del Vostro trapano.
Eseguire i fori con una punta per trapano da 8 mm e inserire i tasselli
27
nei fori eseguiti.
Avvitare i ganci a vite
nei tasselli 27. Fare attenzione a che alla fine i
26
ganci siano rivolti verso l‘altro.
Sotto la lastra superiore
Agganciare la cassettiera ai ganci a vite
si trovano due fori.
1
.
26
Avviso: Controlli regolarmente l’integrità di tutti i punti di collegamento e
fissi regolarmente le viti.
6 IT/MT
61417_liv_Kommode_Content_LB5.indd 6 03.01.11 11:27
Page 5
Introdução/Indicações de segurança
Móvel de apoio
Introdução
Familiarize-se com o produto antes da sua montagem e primeira
utilização. Leia para isso este manual de instruções e as indicações
é descrita e de acordo com as finalidades indicadas. Mantenha este Manual
bem guardado. Se transmitir o artigo a terceiros, entregue também os respectivos documentos.
O produto destina-se à arrumação de objectos leves. É adequado apenas
para a utilização em espaços interiores secos e para uso privado. Não é permitida
nenhuma outra utilização que não a anteriormente descrita ou qualquer alteração, podendo isso originar ferimentos e/ ou danos no artigo. O fabricante
não assume nenhuma responsabilidade pelos danos resultantes de uma utilização inadequada. Este artigo não é indicado para uma utilização comercial.
1
2
3
4
5
6
7
8
9
10
11
12
13
14
15
16
17
18
19
20
21
22
23
24
25
26
27
28
29
30
31
32
33
34
35
36
37
Indicação: Tenha em atenção ao desempacotar, para não deitar fora
inadvertidamente material de montagem.
de segurança atentamente. Utilize o artigo apenas da forma que
Utilização adequada
Descrição das peças
Base
Lateral (esquerda)
Divisória
Lateral (direita)
Chão
Costas
Chão de encastrar
Porta (grande)
Porta (pequena)
Fundo da gaveta
Lateral da gaveta esquerda
Lateral da gaveta direita
Chão da gaveta
Frente da gaveta
Parafuso de cruz (ca. ø 5 x 35 mm)
Bucha de madeira (ca. ø 8 x 30 mm)
Bucha de aparafusar (ca. ø 6 x 39 mm)
Parafuso de cruz (ca. ø 3,5 x 12 mm)
Calhas de metal
Parafuso de cruz (ca. ø 4 x 13 mm)
Dobradiça
Suporte de prateleira amovível (ca. ø 8 x 13,5 mm)
Entalhe (ca. ø 15 x 12 mm)
Estabilizador das costas
Parafuso sextavado interior (ca. ø 7 x 50 mm)
Pitão roscado
Bucha
Cobertura
Anilha plástica
Puxador
Parafuso de cruz (ca. ø 4 x 20 mm)
Pé
Parafuso de cruz (ca. ø 4 x 25 mm)
Chave sextavada interior
Bucha de aparafusar (ca. ø 6 x 25 mm)
Perno (ca. ø 10 x 10 mm)
Parafuso de cruz (ca. ø 4 x 20 mm)
Material fornecido
Verifique o material fornecido ao desembalá-lo, para averiguar se este se encontra completo e se o artigo e todas as peças se encontram em bom estado.
Nunca monte o artigo se o material fornecido não estiver completo.
1 x Base
1 x Lateral (esquerda)
1 x Divisória
1 x Lateral (direita)
1 x Chão
2 x Costas
2 x Chão de encastrar
1 x Porta (grande)
1 x Porta (pequena)
2 x Fundo da gaveta
2 x Lateral da gaveta esquerda
2 x Lateral da gaveta direita
2 x Chão da gaveta
2 x Frente da gaveta
8 x Parafuso de cruz (ca. ø 5 x 35 mm)
12 x Bucha de madeira (ca. ø 8 x 30 mm)
6 x Bucha de aparafusar (ca. ø 6 x 39 mm)
38 x Parafuso de cruz (ca. ø 3,5 x 12 mm)
4 x Calhas de metal
4 x Parafuso de cruz (ca. ø 4 x 13 mm)
4 x Dobradiça
8 x Suporte de prateleira amovível (ca. ø 8 x 13,5 mm)
6 x Entalhe (ca. ø 15 x 12 mm)
8 x Estabilizador das costas
6 x Parafuso sextavado interior (ca. ø 7 x 50 mm)
2 x Pitão roscado
2 x Bucha
14 x Cobertura
6 x Anilha plástica
4 x Puxador
8 x Parafuso de cruz (ca. ø 4 x 20 mm)
5x Pé
5 x Parafuso de cruz (ca. ø 4 x 25 mm)
1 x Chave sextavada interior
8 x Bucha de aparafusar (ca. ø 6 x 25 mm)
8 x Perno (ca. ø 10 x 10 mm)
6 x Parafuso de cruz (ca. ø 4 x 20 mm)
1 x Instruções de montagem
Dados técnicos
Dimensões: aprox. 70 x 80 x 39 cm (L x A x P)
Capacidade máx. de carga: 50 kg
Material: aglomerado com revestimento de película de
melamina
Indicações de segurança
GUARDE TODAS AS INDICAÇÕES DE SEGURANÇA E INSTRUÇÕES
PARA FUTURA CONSULTA!
AVISO!
CRIANÇAS E BEBÉS! Nunca deixe as crianças sem vigilân-
cia com o material da embalagem. Existe perigo de asfixia.
Mantenha fora do alcance das crianças. Este produto não é um brinquedo!
CUIDADO! PERIGO DE FERIMENTOS! Certifique-se de que todas as
peças se encontram em boas condições e estão correctamente montadas.
Uma montagem incorrecta representa perigo de ferimentos. As peças
danificadas podem ter influência sobre a segurança e o funcionamento.
Certifique-se de que a mesa se encontra sobre uma superfície firme e
plana.
É necessária uma montagem na parede, pois, caso contrário, o produto
poderia cair.
PERIGO DE MORTE E DE ACIDENTE PARA
7PT
61417_liv_Kommode_Content_LB5.indd 7 03.01.11 11:27
Page 6

Indicações de segurança/Montagem/Limpeza e conservação/Eliminação
CUIDADO! Não deixe as crianças sem vigilância! O produto não é
um dispositivo para trepar nem um brinquedo! Certifique-se de que as
pessoas, em especial as crianças, não trepam ao produto, nem se
encostam ao produto. O suporte da parede pode ser arrancado da
parede e o produto pode cair. Em consequência, podem resultar lesões
e/ou danos.
A distribuição do peso no produto deve ser uniforme, de modo a evitar
que este vire. Antes de utilizar o produto verifique a sua estabilidade.
Não carregue o produto com mais de 50 kg. Caso contrário,
existe perigo de ferimentos e/ ou danificação do produto.
50 kg
PERIGO DE CHOQUE ELÉCTRICO! PERIGO DE
DANOS MATERIAIS! PERIGO DE FERIMENTOS!
Certifique-se de que não perfura cabos eléctricos, condutas
de gás ou tubos de água ao furar a parede. Se necessário, verifique-a
previamente com um detector de cabos.
Antes de utilizar o produto, verifique a sua estabilidade.
Não levante o produto, nem o mova quando este estiver carregado.
Evite os danos materiais!
Antes da montagem na parede, verifique se a parede é indicada para a
fixação do produto. Se necessário, informe-se numa loja especializada.
Antes da montagem na parede, informe-se sobre o material de montagem
adequado ao seu caso. O material por nós fornecido, para montagem
na parede, é indicado para paredes convencionais e estáveis.
Coloque sempre primeiro as gavetas inferiores e vá subindo até à gaveta
superior. Armazene sempre os objectos mais pesados nas gavetas inferiores.
Limpeza e conservação
Para a limpeza, utilize um pano ligeiramente humedecido e que não
liberte pêlos.
Não utilize de forma alguma produtos de limpeza abrasivos ou corrosivos.
Caso contrário, poderá danificar o produto.
Eliminação
A embalagem é composta por materiais recicláveis, que pode
eliminar nos pontos de reciclagem locais.
As possibilidades de reciclagem dos artigos utilizados poderão ser averiguadas na sua Junta de Freguesia ou Câmara Municipal.
Informação do produto:
Móvel de apoio
Modelo nr.°: Z29549
Versão: 01/ 2011
Montagem
Indicação: Monte o produto sobre uma base suficientemente grande e
resistente a riscos. Se necessário, coloque uma cobertura sob o produto, de
modo a evitar a sua danificação.
Indicação: Para a montagem, necessita de um berbequim com uma broca
de 8 e uma chave de parafusos de estrela.
Indicação: Este produto necessita de ser fixado à parede. Verifique se colocou o material de montagem na altura correcta. Caso contrário, o produto
não pode ser montado correctamente.
Monte o produto de acordo com as figuras de A a F.
Figura G (montagem na parede):
Meça, após a montagem completa do produto (fig. A - F), a altura dos
buracos no fundo
.
1
Marque os buracos para furar na parede com a ajuda, por exemplo, de
um lápis.
AVISO!
PERIGO DE MORTE! Certifique-se de que não perfura os
cabos eléctricos ou condutas de gás ou de água. Se necessário, verifique
com um detector de cabos antes de perfurar uma parede.
CUIDADO! PERIGO DE FERIMENTOS! Consulte o manual de
instruções do seu berbequim.
Faça os buracos com uma broca de 8 mm e insira a bucha
nos
27
buracos.
Aperte os pitões roscados
na bucha 27. Tenha atenção para que
26
depois de apertados os pitões roscados apontem para cima.
Debaixo do topo
Pendure o armário nos pitões roscados
encontram-se dois buracos previamente feitos.
1
.
26
Indicação: Verifique regularmente a integridade de todos os pontos de
ligação e aperte os parafusos com frequência.
8PT
61417_liv_Kommode_Content_LB5.indd 8 03.01.11 11:27
Page 7

Introduction/Safety advice
Cabinet
Introduction
Before assembling and using the product for the first time, take time
to familiarise yourself with the product first. Read the following
the product as described and for the designated areas of application. Please
keep these instructions in a safe place. If you hand this product on to a third
party, you must also pass on all documents relating to the product.
This article is designed for the storage of small objects. The product is intended
for private indoor use only. Any use other than previously mentioned or any
product modification is prohibited and can lead to injuries and/or product
damage. The manufacturer is not liable for any damages caused by any use
other than for the intended purpose. The product is not intended for commercial
use.
1
2
3
4
5
6
7
8
9
10
11
12
13
14
15
16
17
18
19
20
21
22
23
24
25
26
27
28
29
30
31
32
33
34
35
36
37
Note: Take care when unpacking that you do not inadvertently throw away
any assembly material.
assembly instructions and safety instructions carefully. Only use
Proper Use
Description of Parts
Top panel
Side panel (left)
Dividing panel
Side panel (right)
Base panel
Back panel
Shelf
Door (large)
Door (small)
Back panel for drawer
Side panel for drawer (left)
Side panel for drawer (right)
Base panel for drawer
Front panel for drawer
Phillips screw (approx. ø 5 x 35 mm)
Wooden dowel (approx. ø 8 x 30 mm)
Cam pin (approx. ø 6 x 39 mm)
Phillips screw (approx. ø 3.5 x 12 mm)
Metal runner
Phillips screw (approx. ø 4 x 13 mm)
Concealed hinges
Shelf support (approx. ø 8 x 13.5 mm)
Cam connector (approx. ø 15 x 12 mm)
Back panel stabilisers
Hexagonal socket head screw (approx. ø 7 x 50 mm)
Screw hook
Dowel
Cap
Plastic washer
Handle
Phillips screw (approx. ø 4 x 20 mm)
Foot
Phillips screw (approx. ø 4 x 25 mm)
Allen key
Cam pin (approx. ø 6 x 25 mm)
Cam connector (approx. ø 10 x 10 mm)
Phillips screw (approx. ø 4 x 20 mm)
Supply Scope
Immediately after unpacking, check that the delivery is complete and that the
product and all its parts are in perfect condition. Do not under any circumstances assemble the product if the delivery is incomplete.
1 x Top panel
1 x Side panel (left)
1 x Dividing panel
1 x Side panel (right)
1 x Base panel
2 x Back panels
2 x Removable shelves
1 x Door (large)
1 x Door (small)
2 x Back panels for drawer
2 x Side panels for drawer (left)
2 x Side panels for drawer (right)
2 x Base panels for drawer
2 x Front panels for drawer
8 x Phillips screws (approx. ø 5 x 35 mm)
12 x Wooden dowels (approx. ø 8 x 30 mm)
6 x Cam pins (approx. ø 6 x 39 mm)
38 x Phillips screws (approx. ø 3.5 x 12 mm)
4 x Metal runners
4 x Phillips screws (approx. ø 4 x 13 mm)
4 x Concealed hinges
8 x Shelf supports (approx. ø 8 x 13.5 mm)
6 x Cam connectors (approx. ø 15 x 12 mm)
8 x Back panel stabilisers
6 x Hexagonal socket head screws (approx. ø 7 x 50 mm)
2 x Screw hooks
2 x Dowels
14 x Caps
6 x Plastic washers
4 x Handles
8 x Phillips screws (approx. ø 4 x 20 mm)
5x Feet
5 x Phillips screws (approx. ø 4 x 25 mm)
1 x Allen key
8 x Cam pins (approx. ø 6 x 25 mm)
8 x Cam connectors (approx. ø 10 x 10 mm)
6 x Phillips screws (approx. ø 4 x 20 mm)
1 x Assembly instructions
Technical data
Dimensions: approx. 70 x 80 x 39 cm (W x H x D)
Max. load capacity: 50 kg
Material: melamine-faced chipboard
Safety advice
KEEP ALL THE SAFETY ADVICE AND INSTRUCTIONS IN A SAFE PLACE
FOR FUTURE REFERENCE!
CAUTION! RISK OF INJURY! Make sure that all parts are undamaged
and assembled correctly. Improper assembly carries a risk of injury.
Damaged parts may affect the safety and function of the product.
Make sure that this product is standing on a solid, level surface.
Wall mounting is necessary otherwise the product may tip over.
CAUTION! Do not leave children unsupervised! The product is not a
climbing frame or a toy! Make sure that nobody, especially a child, climbs
on or leans against the product. The wall fastenings could be torn out of
the wall and the product could tip over, resulting in injury or damage.
Distribute weight upon this products‘ surface evenly so that it cannot overturn.
WARNING!
RISK OF LOSS OFLIFE OR ACCIDENT
TO INFANTS AND CHILDREN! Never leave children un-
supervised with the packaging materials. Danger of suffocation.
9GB/MT
61417_liv_Kommode_Content_LB5.indd 9 03.01.11 11:27
Page 8

Safety advice/Assembly/Cleaning and Care/Disposal
are drilling into the wall. If necessary, check the wall using a suitable
Check that the product is stable before using it.
Do not lift the product and do not move it when it is loaded.
Check before fastening the product to the wall whether the wall is suitable
Examine the wall before installation and choose suitable installation
First load the lowest drawer and then work your way up to the top drawer.
Note: Assemble the product on a scratch-resistant floor that is sufficiently
large. You may have to put a blanket or the like down in order to avoid
damaging the product.
Note: To assemble the product, you will need a drill with a drill bit 8 mm in
diameter and a Phillips screwdriver.
Note: This product requires wall mounting. Make sure that you position the
mounting material at the right height. Otherwise you will not be able to mount
the product correctly.
Do not load more than 50 kg onto the product. Otherwise
there is a risk of injury and/or damage to the product.
50 kg
DANGER OF ELECTRIC SHOCK! DANGER OF DAM-
AGE TO PROPERTY! DANGER OF INJURY! Ensure that
you do not strike electrical cables, gas or water pipes when you
detector before you drill.
To avoid damaging your property
for the product to be fastened to it. If necessary, seek the advice of a
suitable specialist.
fixings. We have supplied fixings suitable for an ordinary solid masonry
wall.
Always store heavier articles in the lowest drawers.
Assembly
Disposal
The packaging is made entirely of recyclable materials, which you
may dispose of at local recycling facilities.
Contact your local refuse disposal authority for more details of how to dispose
of your worn-out product.
Product description:
Cabinet
Model No.: Z29549
Version: 01 /2011
Assemble the product in accordance with Figs. A to F.
Figure G (wall mounting):
Measure the height of the holes in the top panel
1
after the product
has been completely assembled (Figs. A - F).
Using a pencil or similar instrument, mark the positions of the drilled
holes on the wall.
WARNING!
RISK OF FATAL INJURY! Please ensure that you
do not drill into any electrical wiring, gas or water pipes in the wall. If
necessary, carry out checks with a wire, pipe and stud detector before
you drill into a wall.
CAUTION! DANGER OF INJURY! Refer to the operating instructions
for your electric drill.
Drill the holes with a size 8mm drill bit and insert the dowels
27
into the
drilled holes.
Screw the screw hooks
26
into the dowels 27. Make sure that the hooks
point upwards at the end of this process.
There are two predrilled holes on the underside of the top
Use these holes to hook the cabinet on to the screw hooks
1
.
26
.
Note: Regularly check the stability of all connections and retighten the
screws.
Cleaning and Care
Use a slightly dampened, non-fluffing cloth to clean the product.
Do not under any circumstances use corrosive or abrasive cleaning
agents. These may damage the product.
10 GB/MT
61417_liv_Kommode_Content_LB5.indd 10 03.01.11 11:27
Page 9

Sicherheit/BedienungEinleitung/Sicherheitshinweise
Kommode
Einleitung
Machen Sie sich vor der Montage und der ersten Inbetriebnahme
mit dem Produkt vertraut. Lesen Sie hierzu aufmerksam die nach-
Sie das Produkt nur wie beschrieben und für die angegebenen Einsatzbereiche.
Bewahren Sie diese Anleitung gut auf. Händigen Sie alle Unterlagen bei
Weitergabe des Produkts an Dritte ebenfalls mit aus.
Das Produkt ist zur Lagerung von leichten Gegenständen bestimmt. Es ist ausschließlich für den privaten Gebrauch in Innenräumen geeignet. Eine andere
Verwendung als zuvor beschrieben oder eine Veränderung des Produkts ist
nicht zulässig und kann zu Verletzungen und/ oder Beschädigungen des Produkts führen. Für aus bestimmungswidriger Verwendung entstandene Schäden
übernimmt der Hersteller keine Haftung. Das Produkt ist nicht für den gewerblichen Einsatz bestimmt.
1
2
3
4
5
6
7
8
9
10
11
12
13
14
15
16
17
18
19
20
21
22
23
24
25
26
27
28
29
30
31
32
33
34
35
36
37
folgende Montageanleitung und die Sicherheitshinweise. Benutzen
Bestimmungsgemäße Verwendung
Teilebeschreibung
Oberboden
Seite (links)
Mittelwand
Seite (rechts)
Unterboden
Rückwand
Einlegeboden
Tür (groß)
Tür (klein)
Schubladen-Hinterstück
Schubladenseite links
Schubladenseite rechts
Schubladenboden
Schubladen-Vorderstück
Kreuzschlitzschraube (ca. ø 5 x 35 mm)
Holz-Dübel (ca. ø 8 x 30 mm)
Einschraubdübel (ca. ø 6 x 39 mm)
Kreuzschlitzschraube (ca. ø 3,5 x 12 mm)
Metallzugschiene
Kreuzschlitzschraube (ca. ø 4 x 13 mm)
Topfscharnier
Bodenträger (ca. ø 8 x 13,5 mm)
Exzenterverbinder (ca. ø 15 x 12 mm)
Rückwandstabilisator
Innensechskantschraube (ca. ø 7 x 50 mm)
Schraubhaken
Dübel
Abdeckkappe
Kunststoffring
Griff
Kreuzschlitzschraube (ca. ø 4 x 20 mm)
Fuß
Kreuzschlitzschraube (ca. ø 4 x 25 mm)
Innensechskantschlüssel
Einschraubdübel (ca. ø 6 x 25 mm)
Exzenterverbinder (ca. ø 10 x 10 mm)
Kreuzschlitzschraube (ca. ø 4 x 20 mm)
Lieferumfang
Hinweis: Achten Sie beim Auspacken darauf, dass Sie nicht versehentlich
Montagematerial wegwerfen.
Kontrollieren Sie unmittelbar nach dem Auspacken den Lieferumfang auf Vollständigkeit sowie den einwandfreien Zustand des Produkts und aller Teile. Montieren Sie das Produkt keinesfalls, wenn der Lieferumfang nicht vollständig ist.
1 x Oberboden
1 x Seite (links)
1 x Mittelwand
1 x Seite (rechts)
1 x Unterboden
2 x Rückwand
2 x Einlegeboden
1 x Tür (groß)
1 x Tür (klein)
2 x Schubladen-Hinterstück
2 x Schubladenseite links
2 x Schubladenseite rechts
2 x Schubladenboden
2 x Schubladen-Vorderstück
8 x Kreuzschlitzschraube (ca. ø 5 x 35 mm)
12 x Holz-Dübel (ca. ø 8 x 30 mm)
6 x Einschraubdübel (ca. ø 6 x 39 mm)
38 x Kreuzschlitzschraube (ca. ø 3,5 x 12 mm)
4 x Metallzugschiene
4 x Kreuzschlitzschraube (ca. ø 4 x 13 mm)
4 x Topfscharnier
8 x Bodenträger (ca. ø 8 x 13,5 mm)
6 x Exzenterverbinder (ca. ø 15 x 12 mm)
8 x Rückwandstabilisator
6 x Innensechskantschraube (ca. ø 7 x 50 mm)
2 x Schraubhaken
2 x Dübel
14 x Abdeckkappe
6 x Kunststoffring
4 x Griff
8 x Kreuzschlitzschraube (ca. ø 4 x 20 mm)
5x Fuß
5 x Kreuzschlitzschraube (ca. ø 4 x 25 mm)
1 x Innensechskantschlüssel
8 x Einschraubdübel (ca. ø 6 x 25 mm)
8 x Exzenterverbinder (ca. ø 10 x 10 mm)
6 x Kreuzschlitzschraube (ca. ø 4 x 20 mm)
1 x Montageanleitung
Technische Daten
Maße: ca. 70 x 80 x 39 cm (B x H x T)
Max. Belastbarkeit: 50 kg
Material: Spanplatte mit melaminbestrichener Folie
Sicherheitshinweise
BEWAHREN SIE ALLE SICHERHEITSHINWEISE UND ANWEISUNGEN
FÜR DIE ZUKUNFT AUF!
WARNUNG!
FÜR KLEINKINDER UND KINDER! Lassen Sie Kinder
niemals unbeaufsichtigt mit dem Verpackungsmaterial. Es be-
steht Erstickungsgefahr. Das Produkt ist kein Spielzeug.
VORSICHT! VERLETZUNGSGEFAHR! Stellen Sie sicher, dass alle
Teile unbeschädigt und sachgerecht montiert sind. Bei unsachgemäßer
Montage besteht Verletzungsgefahr. Beschädigte Teile können die
Sicherheit und Funktion beeinflussen.
LEBENS- UND UNFALLGEFAHREN
11DE/AT/CH
61417_liv_Kommode_Content_LB5.indd 11 03.01.11 11:27
Page 10

Sicherheitshinweise/Montage/Reinigung und Pflege/Entsorgung
Stellen Sie sicher, dass das Produkt auf einem festen, ebenerdigen Unter-
grund steht.
Eine Wandmontage ist notwendig, da das Produkt sonst umkippen kann.
VORSICHT! Lassen Sie Kinder nicht unbeaufsichtigt! Das Produkt ist kein
Kletter- oder Spielgerät! Stellen Sie sicher, dass Personen, insbesondere
Kinder, nicht auf das Produkt klettern bzw. sich nicht am Produkt anlehnen.
Die Wandbefestigung könnte aus der Wand reißen und das Produkt könnte
umkippen. Verletzungen und/ oder Beschädigungen können die Folgen
sein.
Das Produkt ist gleichmäßig und so zu belasten, dass es nicht umkippen
kann. Überprüfen Sie vor der Benutzung die Stabilität des Produkts.
Belasten Sie das Produkt nicht über 50 kg. Andernfalls drohen
Verletzungsgefahr und/oder Beschädigungen des Produkts.
50 kg
STROMSCHLAGGEFAHR! GEFAHR EINES SACH-
SCHADENS! VERLETZUNGSGEFAHR! Vergewissern Sie
sich, dass Sie nicht auf Strom-, Gas- oder Wasserleitungen
stoßen, wenn Sie in die Wand bohren. Prüfen Sie ggf. mit einem Leitungs-
sucher, bevor Sie in eine Wand bohren.
Überprüfen Sie vor der Benutzung die Stabilität des Produkts.
Heben Sie das Produkt nicht an und bewegen Sie es nicht, wenn es
beladen ist.
Vermeiden Sie Sachbeschädigungen!
Überprüfen Sie vor der Wandmontage, ob die gewählte Wand zum
Befestigen des Produkts geeignet ist. Erkundigen Sie sich ggf. bei einem
Fachmann.
Informieren Sie sich vor der Wandmontage über das geeignete Montage-
material für Ihre Wand. Für die Wandmontage haben wir Montagematerial
beigelegt, das für übliches, festes Mauerwerk geeignet ist.
Beladen Sie immer zuerst die untersten Schubladen und arbeiten Sie sich
bis zur obersten Schublade vor. Lagern Sie schwerere Dinge immer in den
untersten Schubladen.
Reinigung und Pflege
Verwenden Sie zur Reinigung ein leicht angefeuchtetes, fusselfreies Tuch.
Verwenden Sie keinesfalls ätzende oder scheuernde Reinigungsmittel.
Andernfalls kann die Oberfläche des Produkts beschädigt werden.
Entsorgung
Die Verpackung besteht aus umweltfreundlichen Materialien, die
Sie über die örtlichen Recyclingstellen entsorgen können.
Möglichkeiten zur Entsorgung des ausgedienten Produktes erfahren Sie bei
Ihrer Gemeinde- oder Stadtverwaltung.
Produktbezeichnung:
Kommode
Modell-Nr.: Z29549
Version: 01 /2011
Montage
Hinweis: Montieren Sie das Produkt auf einem ausreichend großen, kratz-
festen Untergrund. Legen Sie ggf. eine Decke o.ä. unter, um Beschädigungen
am Produkt zu vermeiden.
Hinweis: Für die Montage benötigen Sie eine Bohrmaschine mit einem 8er
Bohrer und einen Kreuzschlitzschraubendreher.
Hinweis: Für dieses Produkt ist eine Wandmontage notwendig. Achten Sie
darauf, dass Sie das Montagematerial in der richtigen Höhe platzieren. Andernfalls kann das Produkt nicht korrekt montiert werden.
Montieren Sie das Produkt gemäß den Abbildungen A bis F.
Abbildung G (Wandmontage):
Messen Sie nach der vollständigen Montage des Produkts (Abb. A - F)
die Höhe der Löcher in der Oberboden
1
aus.
Markieren Sie die Bohrlöcher mittels Bleistift o.ä. an der Wand.
WARNUNG!
LEBENSGEFAHR! Vergewissern Sie sich, dass Sie nicht
auf Strom-, Gas- oder Wasserleitungen stoßen, wenn Sie in die Wand
bohren. Prüfen Sie ggf. mit einem Leitungssucher, bevor Sie in eine Wand
bohren.
VORSICHT! VERLETZUNGSGEFAHR! Ziehen Sie die Bedienungs-
anleitung Ihrer Bohrmaschine hinzu.
Bohren Sie die Bohrlöcher mit einem 8 mm Bohrer und stecken Sie den
27
Dübel
Drehen Sie die Schraubhaken
in die Bohrlöcher.
26
in die Dübel 27 ein. Achten Sie darauf,
dass die Haken zum Schluss nach oben zeigen.
Unterhalb der Deckenplatte
Haken Sie die Kommode damit an den Schraubhaken
1
befinden sich zwei vorgebohrte Löcher.
26
ein.
Hinweis: Kontrollieren Sie regelmäßig die Unversehrtheit aller Verbindungsstellen und ziehen Sie regelmäßig die Schrauben nach.
12 DE/AT/CH
61417_liv_Kommode_Content_LB5.indd 12 03.01.11 11:27
Page 11

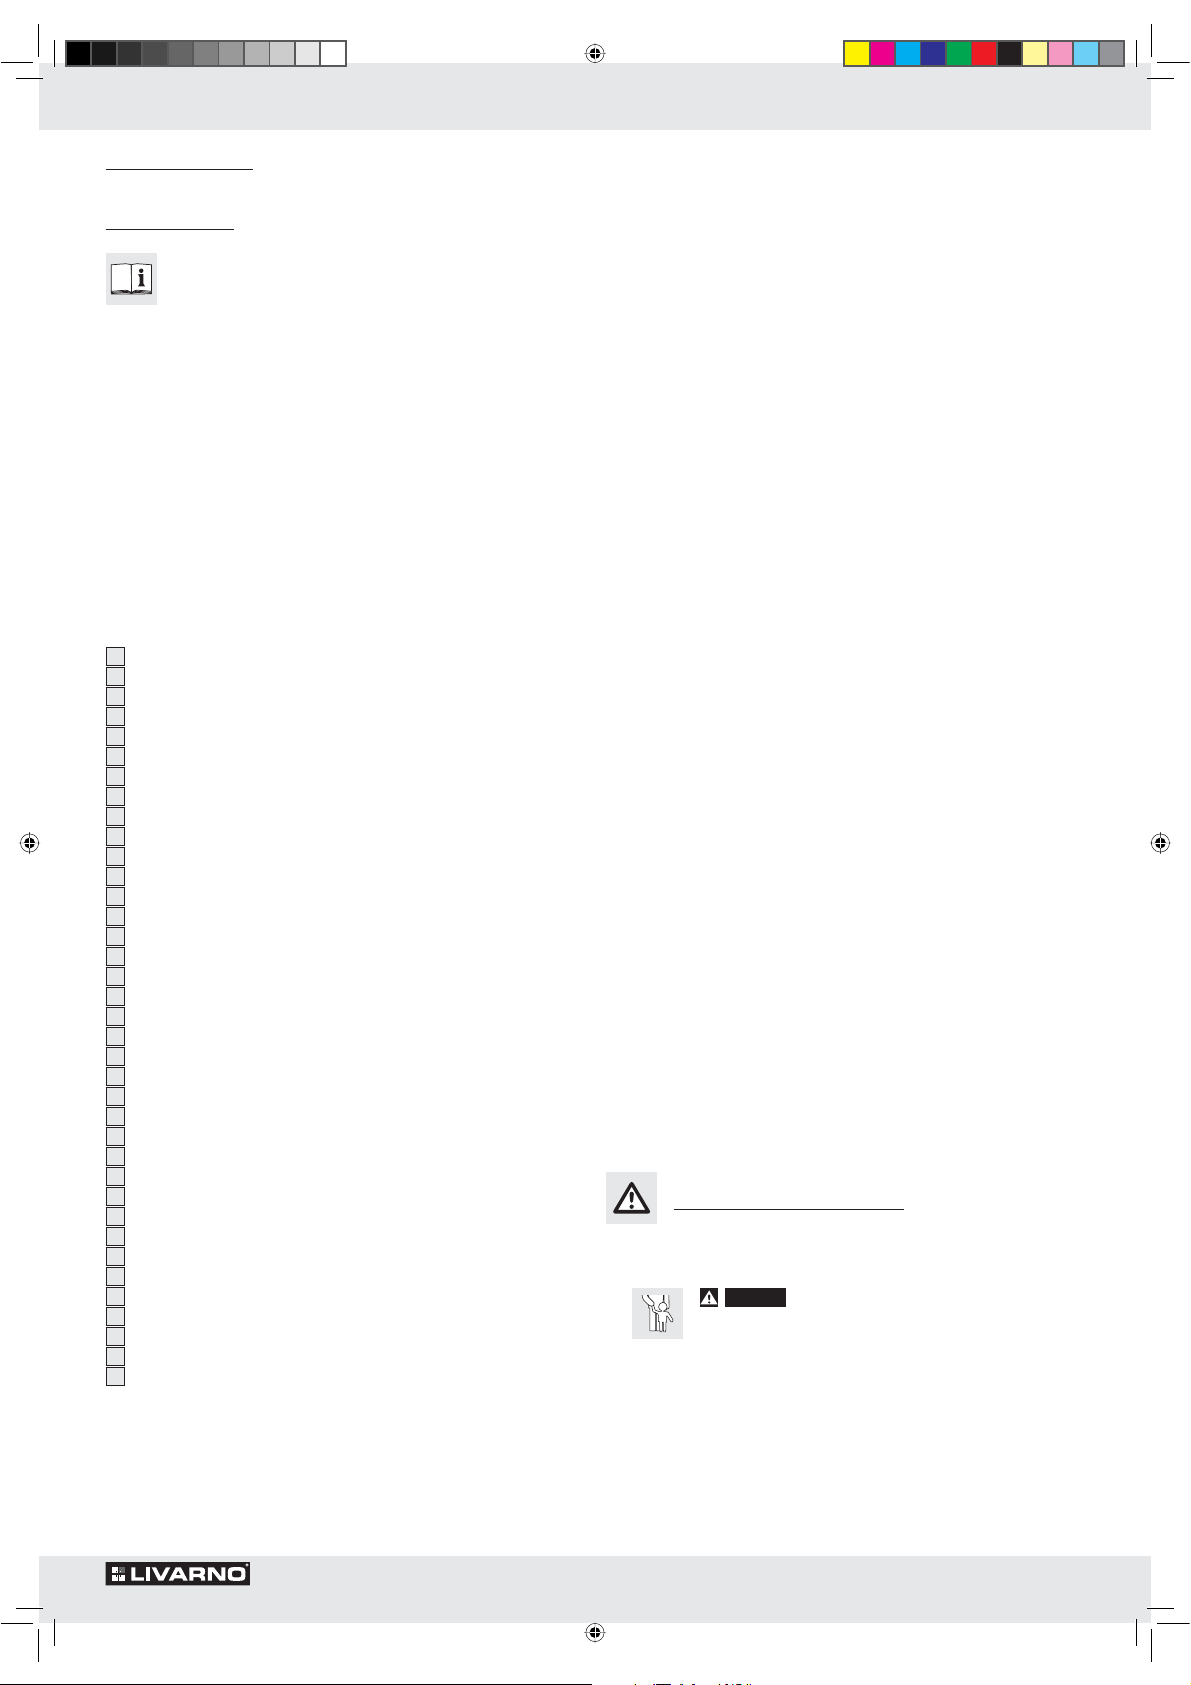
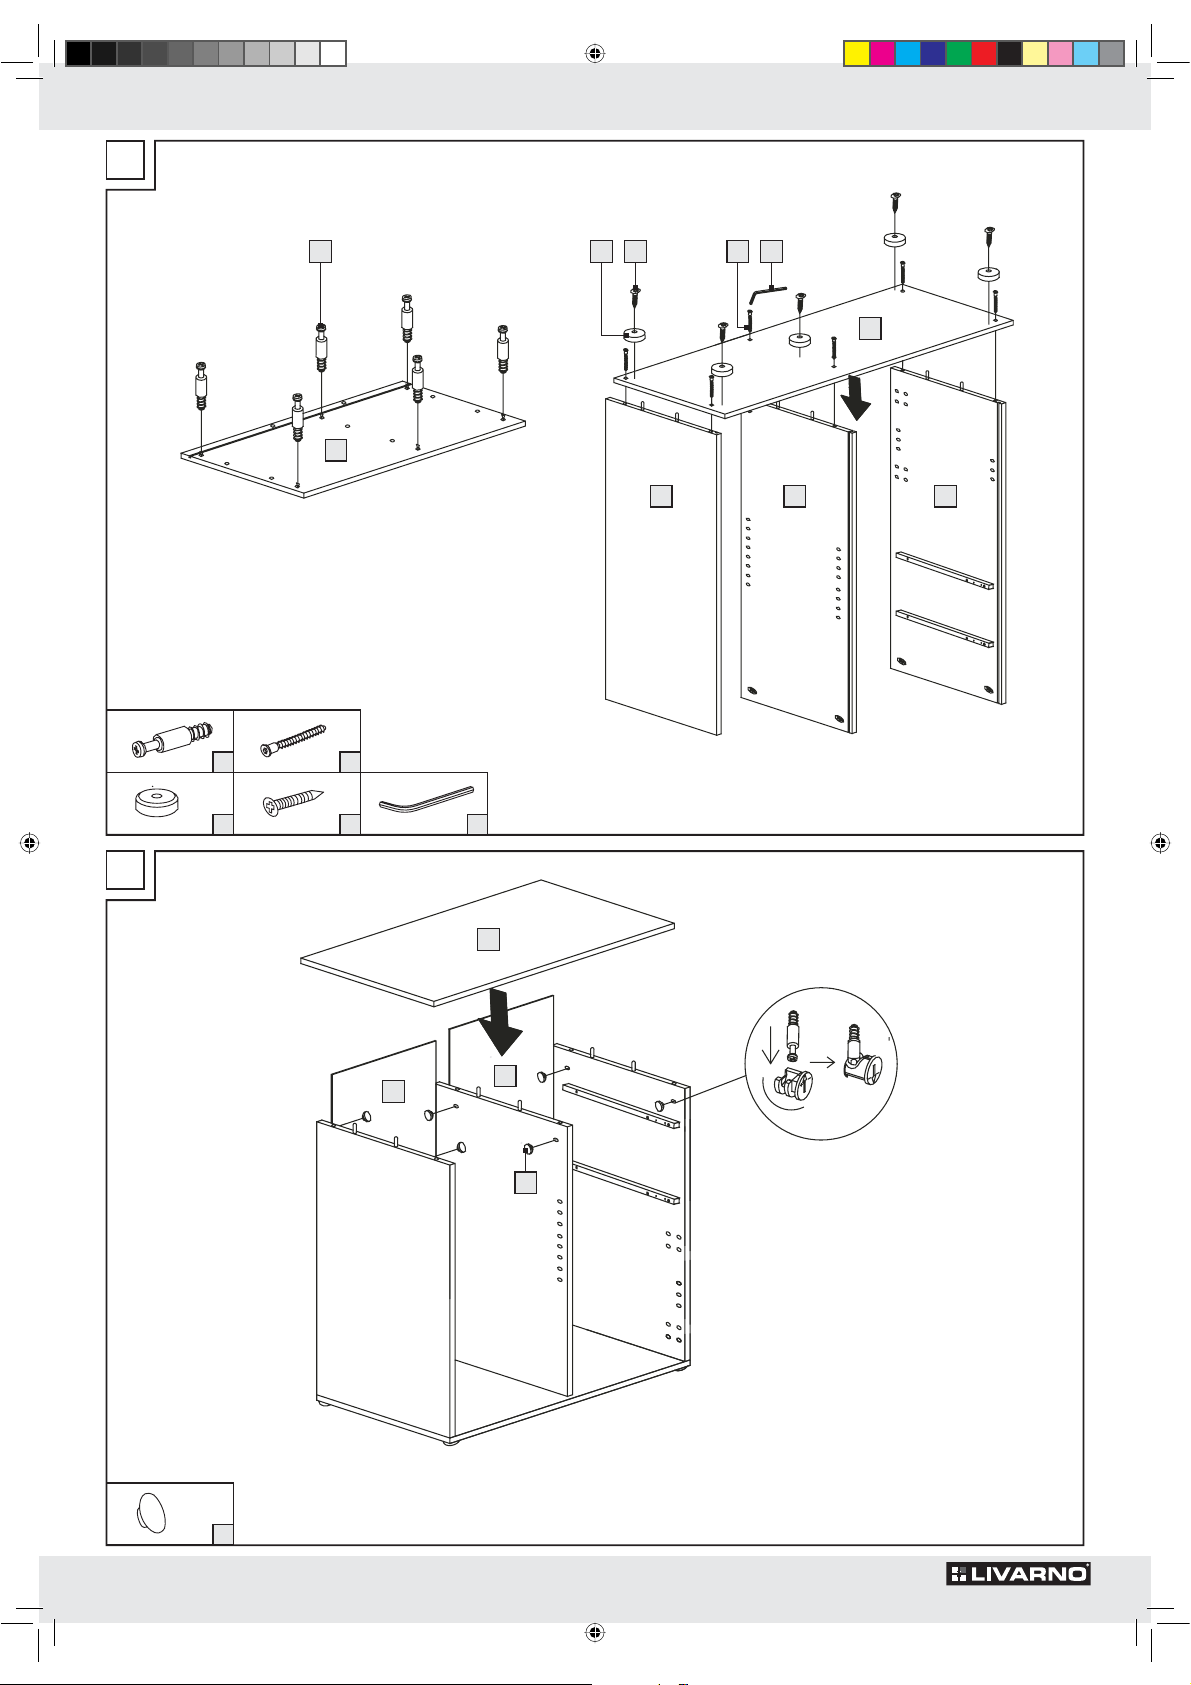
2
ø8mm
Necesita · Vi servono · Necessita de · You need · Sie benötigen:
x1
1
x1
5
x2 x1 x2
7 8 10
x1
9
x1 x1 x1 x2
2 3 4 6
x2 x2 x2
11 12 13
x2
14
x8
15
approx./ca.
ø 5 x 35 mm
x6
23
approx./ca.
ø 15 x 12 mm
x8
31
approx./ca.
ø 4 x 20 mm
61417_liv_Kommode_Content_LB5.indd 13 03.01.11 11:27
x12
16
approx./ca.
ø 6 x 39 mm
x8
24
x5 x8
32 35
x6
17
x6
25
approx./ca.
ø 7 x 50 mm
x5 x8 x6
33 36 37
approx./ca.
ø 4 x 25 mm
x38
18
approx./ca.
ø 3,5 x 12 mm
x2
26
34
x1
19
27
approx./ca.
ø 6 x 25 mm
x4
x2
20
approx./ca.
ø 4 x 13 mm
28
approx./ca.
ø 10 x 10 mm
x4
x14
21
29
x4
x6
approx./ca.
ø 4 x 20 mm
22
30
x8
x4
13
Page 12

1
6
6
4
3
2
7
7
9
8
5
14
12
11
13
10
14
61417_liv_Kommode_Content_LB5.indd 14 03.01.11 11:27
Page 13

A
16
3 3
18 19
18
23
31
37
21
16
2 4
30
23
16
29
19
37
18 31 30
21
8 9
18
12x
16
4x
19
61417_liv_Kommode_Content_LB5.indd 15 03.01.11 11:27
14x
4x
18
21
6x
23
6x
29
2x
30
4x
31
6x
37
15
Page 14
B
17 3332 3425
5
1
2 3 4
C
6x
5x
17
32
6x
5x
25
33
1x
34
1
6
6
28
6x
28
16
61417_liv_Kommode_Content_LB5.indd 16 03.01.11 11:27
Page 15

D
24
18
2418
E
8x
18
18
8x
24
18
7
8
7
9
22 22
16x
18
61417_liv_Kommode_Content_LB5.indd 17 03.01.11 11:27
8x
22
17
Page 16

F
20 30
14
35
31
G
8x
15
4x
20
8x
28
2x
30
12
4x
31
10
13
8x
35
11
15
36
28
8x
36
27 26
2x
26
18
2x
27
61417_liv_Kommode_Content_LB5.indd 18 03.01.11 11:27
 Loading...