


 Loading...
®
POD® HD300 & POD® HD400
Advanced Guide
An in-depth exploration of the features & functionality of POD HD300 & POD HD400
Electrophonic Limited Edition
Table of Contents
Setup Details........................................................................... |
1•1 |
Setup Options................................................................................................. |
1•1 |
Pedal Calibration............................................................................................ |
1•4 |
Factory Restore............................................................................................... |
1•5 |
Features & Functionality |
....................................................... 2•1 |
Tuner Mode.................................................................................................... |
2•1 |
Smart FX......................................................................................................... |
2•2 |
Noise Gate...................................................................................................... |
2•3 |
Volume............................................................................................................ |
2•3 |
FX Loop (POD HD400 Only)........................................................................ |
2•4 |
Tap Tempo...................................................................................................... |
2•4 |
Pedal Control.................................................................................................. |
2•4 |
L6 LINK™...................................................................................................... |
2•5 |
Output Mode Options.................................................................................... |
2•5 |
POD HD Edit Software.................................................................................. |
2•7 |
Working with Presets |
............................................................ 3•1 |
Accessing Presets............................................................................................ |
3•1 |
Saving Presets................................................................................................. |
3•3 |
Edit Mode................................................................................ |
4•1 |
Accessing Edit Mode...................................................................................... |
4•1 |
SETUP Menu................................................................................................. |
4•2 |
AMP Menu..................................................................................................... |
4•2 |
FX1, FX2 & FX3 Menus................................................................................. |
4•2 |
REVERB Menu............................................................................................... |
4•3 |
GATE Menu................................................................................................... |
4•3 |
WAH Menu.................................................................................................... |
4•4 |
VOL Menu...................................................................................................... |
4•4 |
FX Loop Menu (POD HD400 Only)............................................................. |
4•5 |
MIDI DUMP................................................................................................... |
4•7 |
Amp, Cab & Mic Models |
......................................................... 5•1 |
Parameter Details............................................................................................ |
5•1 |
AMP Edit Mode............................................................................................. |
5•2 |
Manual Mode.................................................................................................. |
5•7 |
FX Only Mode................................................................................................ |
5•7 |
AutoFX SETUP Parameter............................................................................ |
5•8 |
Amp/Preamp Models...................................................................................... |
5•8 |
Cab Models................................................................................................... |
5•10 |
FX Models............................................................................... |
6•1 |
FX1 Models - Reference Table........................................................................ |
6•1 |
Common FX1, FX2 & FX3 Parameters.......................................................... |
6•3 |
New FX1 Models (Flash v.2.0)....................................................................... |
6•4 |
FX1 GAIN Swoosh Models - Parameters....................................................... |
6•5 |
FX1 VARIOUS Swoosh Models - Parameters............................................... |
6•5 |
FX1 PITCH Swoosh Models - Parameters..................................................... |
6•7 |
FX2 Models - Reference Table...................................................................... |
6•11 |
Common FX2 Parameters............................................................................. |
6•12 |
Common FILTER Swoosh Parameters......................................................... |
6•13 |
FX3 Models - Reference Table...................................................................... |
6•14 |
Common FX3 Parameters............................................................................. |
6•15 |
Reverb Models - Reference Table................................................................. |
6•16 |
Common Reverb Parameters........................................................................ |
6•17 |
Wah Models.................................................................................................. |
6•18 |
Using the Looper.................................................................... |
7•1 |
Looper Controls.............................................................................................. |
7•1 |
USB Audio............................................................................... |
8•1 |
The Line 6 USB Audio Driver....................................................................... |
8•1 |
The Line 6 Audio-MIDI Devices Panel......................................................... |
8•3 |
Mac® - Line 6 Audio-MIDI Devices............................................................. |
8•4 |
Windows® - Line 6 Audio-MIDI Devices..................................................... |
8•9 |
Appendix A: Line 6 Monkey™.............................................. |
A•1 |
Launch Line 6 Monkey.................................................................................. |
A•1 |
Login Account............................................................................................... |
A•1 |
Grab Those Updates...................................................................................... |
A•2 |
Appendix B: MIDI................................................................... |
B•1 |
MIDI SysEx Functionality.............................................................................. |
B•1 |
MIDI Dump - Backing Up Presets.................................................................. |
B•2 |
Restoring Presets............................................................................................. |
B•2 |
Line 6, POD, DT50, DT25, Vetta, CustomTone, Variax, L6 LINK and Line 6 Monkey are trademarks of Line 6, Inc. All other product names, trademarks and artists’ names are the property of their respective owners, which are in no way associated or affiliated with Line 6. Product names, images, and artists’ names are used solely to identify the products whose tones and sounds were studied during the Line 6 sound model development for this product. The use of these products, trademarks, images, and artists’ names does not imply any cooperation or endorsement.
Copyright © 2012 Line 6, Inc.

Setup Details
Setup Details
In this chapter, we’ll cover the options found within the POD® HD300 & POD® HD400 1•1 Setup screen, calibrating your device’s on-board pedal, and performing a Factory Reset.
This Guide covers POD HD300 & HD400 devices with Flash Memory version 2.0 (or later)
installed. It is highly recommended to use Line 6 Monkey™ to install the latest available Flash Memory version & all available updates - See “Appendix A: Line 6 Monkey™” on page
A•1. Details throughout this Guide pertain to both POD HD300 & HD400, unless otherwise noted.
Setup Options
The Setup screen is where you configure system settings for POD HD. Most options can be left as-is after you’ve set them initially. They’ll be recalled each time you power-up and are
“global” (the settings persist regardless of the current Preset). To access the Setup options, press the PRESETS knob, and use the Nav. Disc Left/Right arrow buttons to navigate to the SETUP menu:
Use Left/Right to navigate to SETUP menu
Use Up/Down to select the next/previous SETUP parameter
Press knob to enter EDIT mode
Rotate the knob to change the setting for the selected parameter

Setup Details
Output Mode - Live Options
1•2
Use the OUTPUT MODE switch on the back of your POD HD device to configure the type of signal fed to your outputs for Live mode (see “Output Mode Options” on page
2•5). Choose the setting that best matches your intended use.
•ComboFrt: For connecting into the front input of a typical combo amp (this is the default setting).
•ComboAmp: For connecting to the power amp of a combo amp.
•StackFrt: For connecting into the front input of a typical amp head.
•StackAmp: For connecting to the power amp of an amp head.
AutoFX
•AutoFX - Disabled: Selecting an Amp Model via the Amp knob does not alter any current FX models or settings.
•AutoFX - AmpSetFX: When an Amp Model is selected from the Amp knob, FX models & settings are automatically changed to the assigned default values for the selected Amp Model.
USB Monitor Level
When utilizing POD HD as a USB audio device with your computer, this option controls the volume of your processed guitar tone output for monitoring. See “USB Audio” on page 8•1 for more information.
Setup Details
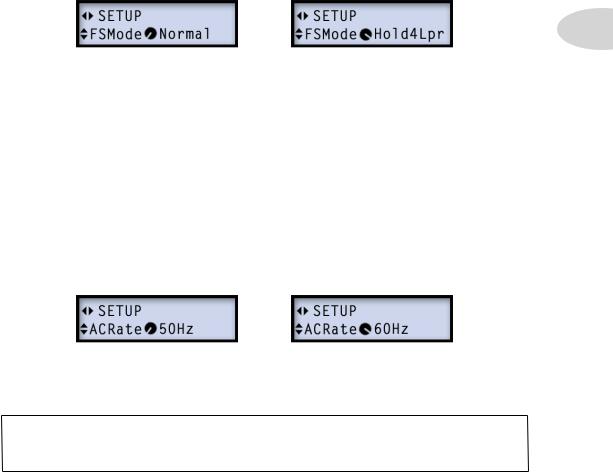
Footswitch Mode
1•3
We’ve offered two types of behaviors for how the MODE footswitch accesses the “Preset,” “Pedal” and “Looper” footswitch modes. (Please also see your POD HD Pilot’s Guide for more about the MODE footswitch.)
•Normal: Sets the “Normal” behavior, where each click of the MODE footswitch incrementally selects one of the three modes: Preset Mode (green LED), Pedal Mode (amber LED) and Looper Mode (red LED).
•Hold4Lpr: Sets an alternative “Hold for Looper” behavior, where clicking the MODE footswitch incrementally selects between only the Preset or Pedal Footswitch Modes. To enter Looper Mode, press and hold the MODE footswitch. To exit Looper Mode, simply click MODE again.
AC Rate
All POD HD Amp Models include simulation of AC hum typical of the AC Vacuum Tube Heater component, which is an important part of the tonality of a tube amplifier. Set the AC Rate to match that of the USA (60 Hz) or UK (50 Hz) frequency for authenticity.
Note: This setting may be subtle depending on the current Amp Model settings and more apparent when synchronizing this setting with the AC rate of any tube amplifier that POD HD is plugged into.

Setup Details
TapTempo Light
1•4
•TpLite - AlwaysOn: The TAP light on the device will flash constantly, showing the current tempo setting.
•TpLite - Flash 8: The TAP light will flash only 8 times, immediately after a new
Tempo value is set, and then remain unlit.
FirmwareVersion
Your device’s current firmware-flash memory version is displayed here. This is an informational screen only.
Pedal Calibration
Note: If you’ve just performed a Factory Restore on your device (see below), that process included Pedal Calibration and it is not necessary to perform the following steps again. However, you can use these instructions to perform just the Pedal Calibration process at any time.
Before you put the POD HD pedal to use, it is recommended that you calibrate it to optimize its functionality. Begin with POD HD powered off. Hold down the D footswitch while powering the unit on, until you see the LCD display the following:
Please skip ahead to step 5 of the Factory Restore section on page 1•5 and follow the remaining steps to complete the Pedal Calibration.

Setup Details
Factory Restore
To restore POD HD to all its original factory settings, first back up any Presets you’d like |
1•5 |
to keep (“POD HD Edit Software” on page 2•7), then follow these steps: |
NOTE: This process also performs a Pedal Calibration, and it is necessary that you complete
ALL the steps listed here when dong a Factory Restore. However, if you want to perform only a Pedal Calibration, please see “Pedal Calibration” on page 1•4.
1.Begin with POD HD powered off. Hold down the A footswitch while powering the unit on, until you see the LCD display the following:
2.Press the PRESETS knob, then press it again to proceed once you see the following prompt:
3.Watch the LCD screen and you’ll see it display the progress %. Do not touch any controls on the device during this process.
4.Once it reaches 100%, you are prompted to start the Pedal Calibration process. Press the D footswitch to proceed.
5.You are next prompted to press and hold the pedal’s “toe” switch:

Setup Details
1•6
6. Press the pedal firmly all the way forward to click the toe switch and hold this position for a few seconds until you see the next prompt.
7. As instructed, move the pedal to the minimum “heel” position and press the D switch.
8. Move the pedal to the maximum forward position (but do not click the toe switch) and press D.
9. At this point, the pedal is calibrated but not saved. If calibrated correctly, moving the pedal will display values from 0-127 on the LCD screen.
7. Press D switch once again to save if all is correct to perform the save.
Please wait while your device re-initializes itself and the Presets screen is displayed. The process is now complete!
Features & Functionality
Features & Functionality
It is recommended that you first review the Pilot’s Handbook included with your device for the basics on hardware controls, inputs & outputs. In this chapter, we’ll dive deeper into the major features & functionality offered on POD® HD300 & POD® HD400.
2•1
Tuner Mode
The Tuner is available whenever the MODE footswitch is set to “Pedal On/Off” or “Presets” Mode. To enter Tuner mode, press and hold the TAP button.* The volume is muted while in Tuner mode, so you won’t hear any signal from your device.
* Note: Holding the TAP button when in “Looper” Mode triggers the “Clear Loop” function. Please see “Using the Looper” on page 7•1 for more info.
Pluck an individual string on your guitar. When right-pointing arrows appear, your note is flat; when left-pointing arrows appear, your note is sharp. The fewer the arrows, the closer you are to the reference note. When two asterisks appear, your string is in tune.
Flat |
In Tune |
Sharp |
Press the TAP switch, or any other footswitch, to exit Tuner Mode.

Features & Functionality
Smart FX
2•2
The FX1, FX2 & FX3 knobs are what we refer to as the “Smart FX” controls, in reference to their clever design. Spin one of these 3 knobs to quickly and easily load one of the currently assigned FX Models and useful, pre-configured settings for it. Turning an FX knob all the way counter-clockwise disables the effect.
Each Smart FX knob includes 3 “Swoosh” categories, as indicated by the labeling around the knob. Each Swoosh offers one assigned effect, which you’ll see displayed on the LCD screen as you rotate the FX knob. You can further customize any FX Model, as covered in the following section.
For details on all FX models available within each FX Swoosh category, please see “FX Models” on page 6•1.
Customizing FX
•Use the “Smart” feature - Simply turn the FX knob and the LCD screen will momentarily display the current FX model name within the FX knob’s Swoosh category, as well as a bar to indicate the “intensity” of its settings.
•Change the FX Model - As covered above, each Swoosh category initially loads a default model. But you can choose from among several models within each Swoosh. Turn the PRESETS knob while the above momentary FX screen is displayed to select your desired effect. Your new selection will be stored in the FX Swoosh location per saved Preset. You’ll see the FX knob - Swoosh’s LED change color to green (if the
2nd model is selected) or amber (if the 3rd or later model is selected) to remind you that the Swoosh’s model has been “customized.”

Features & Functionality
•Edit the FX Model’s Parameters - Dive deeper and access numerous parameters for any effect model by pushing the PRESETS knob to enter Edit Mode - see “Edit Mode” on page 4•1.
2•3
• To retain your customized FX settings, save your Preset before calling up a new one.
Noise Gate
POD HD includes two handy tools for reducing unwanted noise: Noise Gate and Noise Reduction. These tools and their settings can be accessed in the Edit Mode options - see “GATE Menu” on page 4•3. The Gate settings are saved individually with each Preset.
Volume
The Volume effect in POD HD can be controlled with the on-board pedal, as well as positioned “Pre” or “Post” of your Amp model! Just move the pedal forward and click the “toe switch” to toggle the pedal’s assignment between the WAH and VOL effect. These options are saved per Preset. Settings for the Volume effect are accessed in the Edit Mode - see “VOL Menu” on page 4•4.

Features & Functionality
FX Loop (POD HD400 Only)
The FX Loop built into POD HD400 can be controlled with several options, including
“Pre” or “Post” positioning and level control. These options are accessed in the Edit Mode - see “FX Loop Menu (POD HD400 Only)” on page 4•5.
2•4
TapTempo
Tap Tempo is the term we use to refer to the “system” tempo value that is accessed via the TAP footswitch on your POD HD device. Stomp rhythmically on the TAP footswitch to set your Tap Tempo. This Tempo is saved per Preset.
You’ll see the LED on the TAP switch blink to indicate your current Tap Tempo.
FX2 and FX3 model sets each offer a global Tap Control setting which configures these effects’ modulation speed and delay time to sync to the Tap Tempo. See the “Common Parameters” descriptions for FX2 on page 6•12 and FX3 on page 6•15 for details.
Pedal Control
The on-board Expression Pedal (and an additional Pedal 2 for POD HD400 devices) can be assigned to the Volume, Wah or FX1 Pitch Glide FX. For most Presets, the pedal is pre-configured to control a Wah model for WAH mode and the Volume model for the VOL mode. Clicking the Pedal’s “toe switch” toggles between these two functions, and the device’s WAH or VOL
LED illuminates to indicate the current mode.
Pitch Glide
Either of these WAH or VOL modes can alternatively be assigned to control the Pitch Glide model. This pedal assignment setting is found among the model’s Edit Mode settings - see “Pitch Glide” on page 6•8. Pedal assignment for any of these 3 FX is saved individually with each Preset. When controlling the Pitch Glide effect, you’ll see both the WAH and VOL LEDs illuminated.

Features & Functionality
Pedal 2 (POD HD400 Only)
Optionally, you can connect an additional Expression Pedal (such as the Line |
|
6 EX-1) to the PEDAL 2 jack on the back of POD HD400. Once connected, |
|
the WAH mode is automatically assigned to the on-board Pedal, and the VOL |
|
assigned to Pedal 2. You’ll see both the WAH and VOL LEDs lit to indicate this |
|
state. Note that you can still assign either the WAH or VOL mode to the Pitch |
2•5 |
Glide effect, and it will be controlled by the individual, assigned pedal. |
|
L6 LINK™
A revolutionary new feature included with all POD HD devices is L6 LINK, which provides the ability to send your tones to Line 6 DT50™ and DT25™ tube amplifiers, as well as to remotely control these DT Series amplifiers’ functions. The L6 LINK connection on the back of POD HD utilizes a single, standard XLR cable to connect directly with a DT Series amplifier. For details on L6 LINK, please see the additional documentation available at http://line6.com/software/manuals/.
The L6 LINK jack
Output Mode Options
The OUTPUT MODE switch on the back panel of your device allows you to change the type of audio signal that is fed to the analog BALANCED, UNBALANCED OUTPUT* and PHONES jacks, as well as to the USB Record Send and the L6 LINK™ output.
The OUTPUT MODE switch

Features & Functionality
The MASTER VOLUME knob on the back of your device controls the overall level of these outputs. Here are some pointers for the use of the Output Mode options.
*Note: The hardware LINE<>AMP switch located between the UNBALANCED OUTPUT jacks allows you to optimize the signal level sent from these sets of outputs.
2•6
•LIVE Mode: In this mode, the analog outputs are fed a signal which includes your selected Amp and specially voiced “Live” Cab version (without a Mic model), which is well suited for direct input to an external guitar amp. When in LIVE Mode, there are also additional options found in the SETUP menu to allow you to choose the type of amp you are connecting to (see “Output Mode Options” on page 2•5).
TIP: This LIVE Mode is the recommended setting to use when connecting your analog outputs
to an external tube amp, or if using L6 LINK™ to connect to a Line 6 DT Series amp (also see
“Amp Model Type” on page 5•3).
•STUDIO Mode: In this mode, the outputs are fed the complete processed signal, which includes your selected Amp, Cab, Mic and FX models. This is the best choice when routing the analog outputs into recording or P.A. gear, or if using the USB connection for recording into DAW software.
•DUAL Mode (POD HD300): This option offers more performance flexibility, routing the LIVE Mode signal to the left BALANCED & UNBALANCED outputs and a great sounding mic’d amp tone to the right BALANCED & UNBALANCED outputs. This allows you to send a mono signal tailored for a guitar amp, while simultaneously routing a mono mic’d cab signal to a mixer or recorder!
•DUAL Mode (POD HD400): This option offers more performance flexibility, routing the LIVE Mode signal to the left & right UNBALANCED outputs, and routing a great sounding mic’d amp tone to the left & right BALANCED outputs. This allows you to send the LIVE signal to a guitar amp, while simultaneously routing a mic’d cab signal to a mixer or recorder!

Features & Functionality
POD HD Edit Software
Be sure to visit line6.com/software to download Line 6 POD HD300 Edit or POD HD400 Edit - the free patch editor/librarian software for Mac® and Windows® computers. Using POD HD Edit you can easily create, audition, customize, backup/restore, and save an unlimited number of Tone Presets for your device!
2•7
The POD HD400 Edit application

Working with Presets
Working with Presets
POD® HD300 & POD® HD400 include the ability to store up to 128 Presets within the device’s internal memory. These Presets are found within the 01A to 32D Bank and
Channel locations. In this chapter we’ll cover accessing and saving Presets. For details on editing the many Tone parameters saved within Presets, please refer to “Edit Mode” on page 4•1.
Accessing Presets |
3•1 |
POD HD300/HD400 includes 32 Preset Banks (1 through 32), each containing 4 Channel locations (A,B, C & D). Each location is capable of storing one Preset. There are two ways to access the Presets on the device: using the Preset Select controls or using the Bank & Channel footswitches.
Preset Select Controls
Use the 4-way Nav. Disc button, and PRESETS knob to navigate and load Presets.
Currently loaded Preset indicator LED
Up/Down selects the next/previous Bank
Left/Right have no function for the Preset Select screen
Rotate knob to select and load the next/previous Preset
The amber LED indicator and the top row of the LCD screen shows the current Preset location Bank/Channel. Use the Nav. Disc functions to increment through Presets one Bank at a time.
The lower row on the screen displays the name of the current Preset - use the Presets knob to scroll through Preset Channels incrementally.

Working with Presets
Bank & Channel Footswitches
Place the POD HD footswitches into Preset Mode for hands-free Preset selection by pressing the MODE switch until the lower (green) LED is lit (also see “Footswitch Mode” on page 1•3). This configures the 4 footswitches to the right to function as A, B, C & D
Channel switches.
3•2
The green LEDs indicate Preset Mode |
The lit A,B,C,D footswitch indicates |
|
the selected Channel |
Press the A, B, C or D switch to instantly recall its Channel location within the currently selected Bank. For example, if the LED displays 12A, then Bank 12 is the current Bank, and switches A, B, C and D will load Presets 12A, 12B, 12C and 12D, respectively. Bank switching differs for POD HD300 and POD HD400 devices:
POD HD300 Bank Select: Press the A and B switches simultaneously for Bank Up, or the B and C switches for Bank Down.
Press A+B for Bank Up |
Press B+C for Bank Down |
POD HD400 Bank Select: Press  for Bank Up, or
  for Bank Down.
Bank Up
 Bank Down
Working with Presets
For either POD HD300 or HD400, using these Bank switches will “queue” the selected
Bank - no new Preset is loaded until you press the desired A, B, C or D Channel switch.
Saving Presets
To save your current tone as a Preset, press the SAVE button and you’ll see it start flashing red, then use the following functions.
Up/Down selects the next/previous location as the destination
Left/Right selects one of the 14 text characters - the selected character flashes
Rotate knob to edit |
3•3 |
selected text character. |
Press to select next character group
Press SAVE button to
 initiate and complete
Preset Save
•The top row of the LCD screen shows the Preset’s current location, followed by the destination Channel location where the Preset will be saved. In the above example, our current 06A Preset is set to be saved in location 01B.
•To save your Preset to a new location, use the  Nav. Disc buttons to choose the new Channel location. You’ll also see the amber LED display flashing, indicating the destination Channel location.
•If you want to overwrite the Preset within the current location, simply keep the Channel location the same.
•Use the  Nav. Disc buttons to select each character of the Preset name displayed in the lower row of the LCD screen. Turn the PRESETS knob to change the selected character to enter your own custom Preset name.
•Press the flashing SAVE button once again to perform the save. Or, if you change your mind about saving, press the TAP switch instead of the SAVE button to abort the process.
Be sure to also check out the free Line 6 POD HD300/HD400 Edit software. It can be used to
create, customize & manage an unlimited library of Presets right on your Mac® or Windows® computer! See “POD HD Edit Software” on page 2•7.

Edit Mode
Edit Mode
Within this chapter, we’ll cover the Edit Mode within POD® HD400, which provides access to all the editable Tone parameters that are saved within a Preset, as well as several “global” settings and system functions.
Accessing Edit Mode
To enter Edit Mode, press the PRESETS knob, then use Nav. Disc and PRESETS knob to call up and adjust the many parameters:
Use Left/Right to navigate the menus of editable parameters
Use Up/Down to select the next/previous parameter within the current menu
Push the PRESETS |
4•1 |
knob to enter or exit Edit Mode
Rotate the knob to change the setting for the selected parameter
TIP: You can also access Edit Mode directly for the last-accessed FX model type. For example, turn the REVERB knob to adjust it, then immediately push the PRESETS knob to call up the Reverb Edit Mode menu.
Fine/CoarseTuning
When turning the PRESETS knob to adjust numerical parameter values (such as %, ms, dB type values), this typically adjusts the value incrementally by single integer amounts (1%, 2%, 3%, etc.) But if you push the PRESETS knob while turning, this provides a “coarse” adjustment, jumping in larger increments, for faster edits!
To follow, we’ve listed information about each of the menus found within Edit Mode. You will also be directed to the other chapters of this document where additional details are provided for individual parameters.
Edit Mode
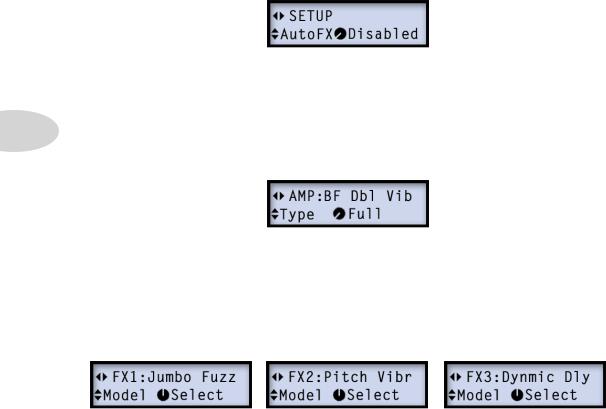
SETUP Menu
The parameters in this menu allow configuration of your POD HD hardware. Please also see “Setup Details” on page 1•1.
|
The Edit Mode - SETUP menu |
|
AMP Menu |
4•2 |
The AMP menu offers several parameters that affect the Amp/Preamp models, as well as |
|
the ability to select a different Speaker Cabinet or Mic Model for the current Amp. Please |
see “AMP Edit Mode” on page 5•2.
The Edit Mode - AMP menu
FX1, FX2 & FX3 Menus
These three FX menus offer access to all editable parameters for each model within the FX categories. Use the Model - Select option to choose the desired model, and you’ll then be able to access its individual parameters. Please see “FX Models” on page 6•1 .
The Edit Mode - FX1, FX2 & FX3 menus

Edit Mode
REVERB Menu
The REVERB menu offers access to all editable parameters for each Reverb model. Use the Model - Select option to choose the desired model, and you’ll then be able to access its individual parameters. Please see “Reverb Models - Reference Table” on page 6•16.
The Edit Mode - Reverb menu
GATE Menu
The GATE menu offers access to all editable parameters for the Noise Reduction and Noise |
4•3 |
Gate. These tools can be used together or separately on any Preset to reduce unwanted |
|
buzz & hum from your input signal. All settings made here are stored per Preset.
Mode
•Off - Disables both the Noise Reduction and Noise Gate.
•Gate - Enables only the Noise Gate.
•NR - Enables only the Noise Reduction.
•Gate+NR - Enables both the Noise Reduction and Noise Gate.
Threshold
Sets the Gate Threshold. Lower values make the Gate kick in at quieter levels, higher values make it kick in at louder levels.
Loading...