


®
®
In-Depth Reference Manual
An in-depth exploration of the technologies and pulsing tonal pleasures of Pocket POD.
www.line6.com/manuals
Rev A
The serial number can be found in the battery compartment of your Pocket POD. It’s the number that begins with “(21)”. Please note it here for future reference:
SERIAL NO:
WARNING: To reduce the risk of fire or electric shock, do not expose this appliance to rain or moisture.
CAUTION: To reduce the risk of fire or electric shock, do not remove screws. No user-serviceable parts inside. Refer servicing to qualified service personnel.
NOTICE: This equipment has been tested and found to comply with the limits for a Class B digital device pursuant to Part 15 of FCC Rules. Operation is subject to the following two conditions: (1) This device may not cause harmful interference, and (2) this device must accept any interference received, including interference that may cause undesired operation.
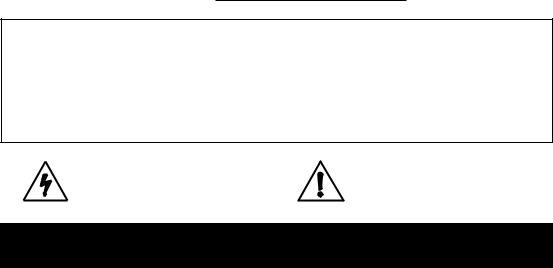
The lightning symbol within a triangle means “electrical caution!” It indicates the presence of information about operating voltage and potential risks of electrical shock.
The exclamation point within a triangle means “caution!” Please read the information next to all caution signs.
You should read these Important Safety Instructions
Keep these instructions in a safe place
Before using your Pocket POD, carefully read the applicable items of these operating instructions and safety suggestions:
1.Obey all warnings in the Pocket POD manual.
2.Only use non-rechargeable alkaline batteries or the Line 6 model DC-1 power supply.
3.For maximum battery life, always unplug the guitar cable when not in use for extended periods of time.
4.Do not place near heat sources, such as radiators, heat registers, or appliances which produce heat.
5.Guard against objects or liquids entering the enclosure. Do not place the unit near water.
6.Do not step on cords. Do not place items on top of cords so that they are pinched or leaned on. Pay particular attention to the cord at the plug end and the point where it connects to the unit.
7.Do not perform service operations beyond those described in this Reference Manual. In the following circumstances, repairs should be performed only by qualified service personnel:
•liquid is spilled into the unit
•an object falls into the unit
•the unit does not operate normally or changes in performance in a significant way
•the unit is dropped or the enclosure is damaged
8.Clean only with a damp cloth.
9.Prolonged listening at high volume levels may cause irreparable hearing loss and/or damage. Always be sure to practice “safe listening.”
Pocket POD In-Depth Reference Manual © 2007, Line 6, Inc.
Please Note:
Line 6 and POD are trademarks of Line 6, Inc. All product names, trademarks, and artist names are the property of their respective owners, which are in no way associated or affiliated with Line 6.Product names, images, and artist names are used solely to identify the products whose tones and sounds were studied during Line 6’s sound model development.The use of these products, trademarks, images and names does not imply any cooperation or endorsement.
Table of Contents
Controls & Connections........................................................ |
1•1 |
Presets & Tuner....................................................................... |
2•1 |
Recalling Presets............................................................................................. |
2•1 |
Saving Presets................................................................................................. |
2•2 |
Tuner............................................................................................................... |
2•3 |
Tuner Reference Frequency............................................................................ |
2•3 |
Tuner Pass-Through Volume.......................................................................... |
2•3 |
Tuner Sensitivity............................................................................................. |
2•3 |
Complete Factory Reset.................................................................................. |
2•4 |
Modeled Amps & Cabs........................................................... |
3•1 |
Which Amps and Cabs Are Modeled?........................................................... |
3•1 |
Cabinet Models............................................................................................. |
3•11 |
Cabinet Tuning Mode.................................................................................. |
3•12 |
Effects...................................................................................... |
4•1 |
Single Effects................................................................................................... |
4•1 |
Combined Effects............................................................................................ |
4•3 |
Noise Gate...................................................................................................... |
4•4 |
Effects Knob and Tap Button Summary......................................................... |
4•5 |
Appendix A:Amp and Cabinet Models................................ |
A•1 |
Controls & Connections
Controls & Connections
1•1
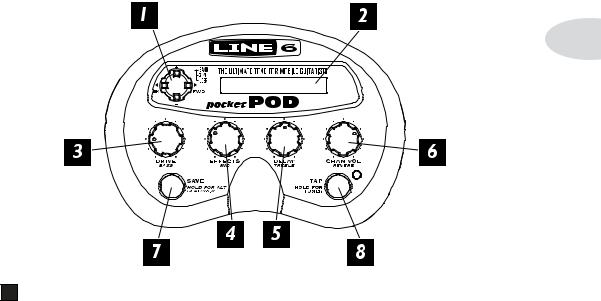
1 4-way Navigation Button – This button is your gateway to many of the fabulous features in your Pocket POD. By pressing on the top, bottom, and sides of the button, you’ll be able to navigate Up, Down, Left, and Right to access the following functions:
Presets – There are over 300 amazing-sounding presets in Pocket POD. Many of them have been dialed in by some great artists. Use the 4-way Button to browse the various categories of tones to find the ones that inspire you to rock out. See Chapter 2 for more details.
MasterVolume – To adjust the overall volume of Pocket POD, hold down the Save and Tap buttons and press the Up or Down button.
Amp Models – There are 32 Amp Models in Pocket POD. Hold down the Save button and press the Up or Down button to choose one. See Chapter 3 for more info.
Effect Models – There are 15 Effect Models to choose from in Pocket POD. Hold down the Save button and press the Left or Right button to find the one that’s right for you. See Chapter 4 for more details.

Controls & Connections
|
|
|
GateThreshold – To adjust the threshold of the built-in Noise Gate, hold down the |
|
|
|
Save and Tap buttons and press the Left or Right button. See chapter 4 for more |
|
|
|
info. |
1•2 |
|
|
Display – This is where Pocket POD will tell you what’s going on. You’ll see things |
|
2 |
||
|
|
like preset categories, preset names, control settings, Amp and Effect Model names, tuner |
|
|
|
readings, etc. |
|
|
|
|
Drive – This knob controls how hard you’re driving the input of a chosen Amp |
|
|
3 |
|
|
|
Model, and just like the input volume control on a non-master volume guitar amp, higher |
|
|
|
settings give you more “dirt.” |
|
|
|
You can access the Bass tone control by holding down the Save button and turning |
|
|
|
the Drive knob. When you change Amp Models, the response and interactivity of this |
|
|
|
control changes. For example, when you select Black Panel, the tone controls operate like |
|
|
|
the original amp that Model was based on*, the Fender® Deluxe Reverb®. This also goes |
|
|
|
for the Mid and Treble tone controls described below. |
|
|
|
|
Effects – This knob varies the effect you’ve chosen. Turn it up and the effect will |
|
|
4 |
|
|
|
go |
deeper, louder, faster, longer or just plain more. To turn off the selected effect, turn this |
|
|
knob all the way down. The speed of the effect (delay, tremolo, chorus, flanger, rotary |
|
|
|
speaker simulation) is set by the Tap button (described below). If you choose the Bypass |
|
|
|
effect, the Effects knob will, of course, not change anything. |
|
|
|
Hold down the Save button and turn the Effects knob to access the Mid tone control. |
|
|
|
|
Delay – If you’ve chosen the Delay effect or a combo effect with delay, this knob |
|
|
5 |
|
|
|
sets |
the mix level of the Delay; left for min and right for max. If you’re running a non-delay |
|
|
effect, turning this knob automatically loads the corresponding combo effect, then sets the |
|
|
|
mix level of the Delay. This knob doesn’t do anything when you choose the Rotary effect. |
|
|
|
See Chapter 4 for more info. |
|
|
|
Hold down the Save button and turn the Delay knob to access the Treble tone |
|
|
|
control. |
|
|
|
|
ChanVol – This knob controls the relative volume level of the “channel” you are |
|
|
6 |
|
|
|
playing through. Use this to balance levels between the sounds you store in the different |
|
|
|
Pocket POD memory locations. In general, you want to set the Chan Vol as high as |
|
|
|
||
|
* All product names are trademarks of their respective owners, which are in no way associated or affiliated with Line 6. |
||
|
These product names, descriptions and images are provided for the sole purpose of identifying the specific products that were |
||
|
studied during Line 6’s sound model development. FENDER® and DELUXE REVERB® are registered trademarks of |
||
|
Fender Musical Instruments Corporation. |
||

Controls & Connections
possible to ensure you’re getting the best signal-to-noise ratio.
Hold down the Save button and turn the Chan Vol knob to set the Reverb level. See Chapter 4 for more info.
7 Save/Hold for Alt Features – When you want to store your own tweaked- 1•3 up sounds into one of the 124 User Preset locations, press this button. More info on how
to save can be found in Chapter 2.
This button also acts as a “shift” key – press and hold while turning a knob or pressing the 4-way Button to access its secondary functions. Or, you can press this button for 2 seconds to lock the “shift” feature. This allows you to have direct control of the secondary functions without holding the Save button. If you’ve locked the “shift” feature, pressing the Tap button releases the lock and returns the unit to normal operation.
8 Tap/Hold ForTuner – Tap this button a couple of times and the effect speed will match the speed you tapped. The light will blink at the current effect rate.
Press and hold this button for more than 2 seconds to activate the tuner. Press again to exit tuner mode. See Chapter 2 for details.
9 CD/MP3 In – This is the 1/8-inch stereo input where you plug the output of your CD or MP3 player into Pocket POD so you can jam along to your favorite tunes. To balance the music with your guitar you’ll need to adjust the output volume on your CD player or MP3 player.
10 Amp Out – This is a mono 1/4-inch output that is perfect for connecting your Pocket POD to a guitar amp.

Controls & Connections
11 Direct Output/Phones – OK, this should be easy. This is a stereo 1/8-inch output for headphones, a P.A. or recording device.
12 DC Input – You can power Pocket POD here using the optional Line 6 DC-1 1•4 external power supply. The optional DC-1 provides 9.6 volts DC, 200 mA and has center-
negative polarity.
13 Guitar In – Dude, plug in here. You should use only a standard, 1/4-inch mono guitar cable.
You’ll notice that there is no power switch on Pocket POD. This is it! When you plug in, Pocket POD will automatically power-up. To extend the life of your batteries, it’s a good idea to unplug your guitar cable when you’re not using it for a long time.
14 USB – You can connect Pocket POD to your Macintosh or Windows computer via the included USB cable and it’ll automatically show up as a MIDI device. No drivers are needed!
The USB connection also acts as a power switch – as long as you have batteries installed or the DC-1 power supply connected, Pocket POD will come to life when you connect it to your computer via USB. However, keep in mind that the USB connection does NOT power or recharge your Pocket POD, so for maximum battery life, make sure and disconnect the USB cable when you’re not using it for a long time.
For tweak heads, the Vyzex Pocket POD editor/librarian software is available as a free download from www.line6.com/software. The program runs on Macintosh and Windows computers, and can turn your computer into a Pocket POD command station. It let’s you take “full control”, and do everything that can be done from your Pocket

Controls & Connections
POD’s front panel, plus a bunch of other cool stuff like saving and swapping sounds on the computer, as well as accessing many additional parameters that lurk deep within the heart of Pocket POD.
You’ll also want to visit www.line6.com/monkey to get Line 6 Monkey, the free |
1•5 |
intelligent software update utility that makes it easy to get the latest firmware updates for your Pocket POD. Use it to set up a Line 6 account and register your Pocket POD purchase (you can also use the enclosed, postage-paid card for registration if you don’t have Internet access). Registering is important because it ensures that you’re dialed in for warranty service and makes it possible for us to contact you if new firmware versions or other cool enhancements are offered – cutting edge technology and such! Once you’ve got Line 6 Monkey, run it and follow Monkey’s lead to get any available updates for your Pocket POD.
15 Battery Compartment – Pocket POD can run off (4) AAA batteries. To install them, slide off the battery door, insert the batteries in the orientation shown, then slide the battery door back on. Make sure you only use non-rechargeable alkaline batteries and dispose of them properly when they run out of juice.
A note about battery life. During normal use, Pocket POD will give you 4-6 hours of continuous use when running off good-quality AAA batteries. Battery life is directly related to the amount of effect processing you’re using at any given time. In particular, Reverb tends to be the most power-hungry effect. If you want to get the longest battery

Controls & Connections
life possible, turn the Reverb knob to its minimum position to turn off the Reverb. Of course, only you can decide whether battery life is more important than great tone!
16 Belt Clip – Use this handy clip to attach Pocket POD to your belt, guitar strap 1•6 or anything else that makes it convenient for you to take great tone with you. Ever wonder what those small front pockets on your jeans are good for? They’re the perfect place to clip
your Pocket POD when you’re on the go!
 Loading...