


 Loading...
®
HX EDIT
PILOT’S GUIDE 
A guide to the features and functionality of the Line 6 HX Edit application
Rev. S (v3.11) |
www.line6.com/manuals |
© 2021 Yamaha Guitar Group, Inc. All rights reserved. |
Contents
Workflow |
2 |
Working in the Editor |
|
What’s in it for Me? |
2 |
Naming & Saving the Preset |
|
Marketplace |
2 |
Configuring & Managing Snapshots |
|
Workflow Overview |
2 |
Undo / Redo |
|
Computer Connectivity |
2 |
Editing the Tap Tempo |
|
Multi-Device, Multi-Window Support |
3 |
Creating & Restoring Complete Device Backups |
|
Preset Compatibility |
4 |
Extracting Files from a Backup |
|
The Signal Flow Window |
|||
Preset Compatibility with Helix Native Plugin |
4 |
||
Preset Translation |
4 |
Moving Blocks & Arranging the Signal Flow |
|
Feature Compatibility |
7 |
Split Path Options |
|
GUI Overview |
9 |
Cutting, Copying, Pasting, and Clearing Blocks |
|
Drag and Drop Blocks |
|||
Resizing the Application Window |
9 |
Adding a Block to Favorites |
|
Application Menus |
10 |
Configuring a Model’s User Defaults |
|
Preferences, Help & Account Options |
12 |
The Edit Tab |
|
Presets Panel |
13 |
||
Selecting Models |
|||
Premium Marketplace Presets |
13 |
Editing Model Parameters |
|
Selecting, Loading & Saving Presets |
13 |
Editing Input, Output, Split & Mixer Blocks |
|
Importing and Exporting Preset Files |
14 |
L6 LINK - Powercab Plus and DT 25/50 Amp |
|
Renaming, Reordering, Copying, and Pasting Presets14 |
Options |
||
|
|||
Importing and Exporting Setlists |
14 |
The Bypass/Controller Assign Tab |
|
Importing and Exporting Bundles |
15 |
Editing an Existing Assignment |
|
IRs Panel |
16 |
||
Creating a Bypass Assignment |
|||
What are Impulse Responses? |
16 |
Creating a Controller Assignment |
|
|
|||
Importing and Exporting IRs |
16 |
The Command Center Window |
|
Renaming, Loading, Copying, and Clearing IRs |
17 |
Creating a Command Center Assignment |
|
Favorites Panel |
20 |
||
HX Preset, Snapshot, and Looper Commands |
|||
Adding Blocks as Favorites |
20 |
Customizing a Footswitch Label |
|
Customizing a Footswitch LED Color |
|||
To Insert a Favorite into your Current Preset |
21 |
||
|
|||
Managing Favorites |
21 |
|
|
Importing and Exporting Favorites |
22 |
|
|
© 2021 Yamaha Guitar Group, Inc. All rights reserved.
23 |
Global EQ Window |
48 |
|
24 |
Adjusting Global EQ Parameters |
48 |
|
24 |
Preferences and About Box |
49 |
|
25 |
|||
26 |
The Preferences Window |
49 |
|
27 |
The About/Legal Box and Help Options |
50 |
|
28 |
Marketplace & Account Options |
52 |
|
29 |
|||
Marketplace |
52 |
||
30 |
|||
The My Account Menu Options |
52 |
||
30 |
Sign In / Sign Out |
53 |
|
31 |
Authorize / Deauthorize Your Computer |
54 |
|
32 |
Model Lists |
55 |
|
33 |
|||
33 |
Effects Models |
55 |
|
34 |
Amp Models |
61 |
|
Speaker Cabinet Models |
63 |
||
34 |
|||
Microphone Models |
64 |
||
35 |
Keyboard Shortcuts |
66 |
|
36 |
|||
37 |
Command Center, Global EQ & Preferences Window |
74 |
|
Shortcuts |
|||
38 |
Additional Mouse Behaviors |
77 |
|
Updater & Additional Resources |
78 |
||
38 |
|||
39 |
HX Edit and Device Firmware Updater |
78 |
|
41 |
|||
Using the Line 6 Updater App |
81 |
||
44 |
Additional Resources |
82 |
|
|
|
44
46
47
47
Line 6, the Line 6 logo, Ampeg, Powercab, Helix, HX Stomp, and HX Effects are trademarks or registered trademarks of Yamaha Guitar Group, Inc. in the U.S. and/or other jurisdictions. Apple, Mac and macOS are trademarks of Apple, Inc. registered in the U.S. and other countries. Apple is not responsible for the operation of this product or its compliance with safety and regulatory standards. Windows is a registered trademark of Microsoft Corporation in the United States and/or other countries.

Workflow
Welcome to the HX Edit Pilot’s Guide. This guide contains details of the HX Edit v.3.11 application’s features and functionality with Line 6® Helix® devices (Helix®, Helix® Rack, and Helix® LT), as well as with HX devices (HX Stomp™, HX Stomp XL, and HX Effects™). All behaviors are the same on Mac and PC computers unless otherwise noted. It is recommended that you also read the Owner’s Manual for details on using your particular device.
What’s in it for Me?
HX Edit is a simple, but powerful, editor, preset librarian, and IR manager application. It allows you to easily customize, backup, and manage your tone presets and setlists, as well as manage the Impulse Responses on your Line 6 Helix or HX device.
HX Edit version 3.11 is the editor/librarian software for use with all Helix or HX devices that are running firmware version 3.10 (or later).* For best performance, it is recommended to use the latest available versions for your HX Edit application, drivers, and device firmware (as well as for the Helix Native software, if you’re using it). If for any reason you wish to use an earlier firmware in your device, or an earlier HX Edit software version, you’ll need to be sure the release versions of the firmware and software match for full functionality.
*IMPORTANT! Your Helix or HX device must be running a firmware version no earlier than 3.00 to be able to use it with HX Edit version 3.11 (the latest
available firmware and HX Edit version are recommended).
If you’re currently using HX Edit v3.01, simply connect your Helix or HX Device to your computer with an active Internet connection and launch HX Edit. Its integrated Updater will find and walk you through installing the latest HX Edit and device firmware versions in minutes—see “Updater & Additional Resources” on page 79.
 NOTE: Each Helix or HX device model offers a different set of inputs, outputs, and
  signal flow capabilities. Throughout the following chapters, we’ve indicated HX Edit app functionality that is specific to your Helix or HX device type.
Marketplace
Be sure to visit the Line 6 Marketplace online shop, where you’ll find 3rd-party add-on assets that further enhance the functionality of your Helix and HX devices, as well as Helix Native plugin! As of this writing, professionally crafted presets and IRs are available—check back often on Marketplace for product news and announcements. An Internet connection is required for the computer on which you’ll be using the HX Edit apptoauthorizeitfortheuseofMarketplacepremiumassets.Pleasesee“Marketplace & Account Options” on page 53.
Workflow Overview
Once the HX Edit app is launched, it automatically syncs all presets and IRs from your Helix or HX device’s internal memory. You’ll see your device’s presets & IRs displayed in the Librarian panels at the left. This allows you to export presets and IRs to create a virtually unlimited library on your computer, and then import them onto your device at any time. These Librarian panels also allow you to easily rename and reorder your presets and IRs, and the Create & Restore Backup feature makes it simple to create full backups that can be restored to your Helix or HX hardware in minutes.
You will also see your currently loaded preset’s contents displayed in the Editor panels on the right. This allows you to load & fully customize your presets, configure bypass & controller assignments, and create & edit snapshots. While connected, communication betweentheapplicationandyourconnecteddevice’sinternalmemoryisinstantaneous. Changes you make to any parameters in the Signal Flow or Inspector Windows, as well as any changes to presets, setlists, and IRs within the Librarian, are immediately reflected on the device, and vice-versa.
|
16B Dream Rig Duet |
|
|
|
EXP 1 EXP 2 |
|
|
|
|
|
VOLUME |
PHONES |
|
PRESET |
|
|
|
|
|
|
|
Delay Harmony Delay |
|
|
|
|
|
|
Time Feedback Key |
Scale Mix |
Level |
|
|
|
BANK |
Scream 808 |
Mystery Filter |
Ubiquitous Vibe |
Harmony Delay |
MODE |
|
BANK |
16A |
16B |
16C |
16D |
TAP |
|
None More Black |
Dream Rig Duet |
Jimi, Not Jimmy |
DAW Remote |
|
||
This interactive communication allows you to tweak your presets and setlists in realtime, without the need to send/receive or manually sync to the device.
WARNING: Be careful when overwriting presets or IRs—these changes cannot be reverted! You can use theCreate & Restore Backups feature to back up your Helix or HX device’s contents before making changes. See “Creating & Restoring
Complete Device Backups”.
Computer Connectivity
To put the HX Edit application to work, connect your Helix or HX device to your computer’s USB 2 (or higher) port.
 NOTE: If on Windows®, be sure to have the latest Line 6 drivers installed for your
 device. No driver installation is necessary on Mac computers.
It is highly recommended to install all included drivers when running the latest Windows HX Edit application installer—all drivers are already selected to be installed by default. The latest HX Edit applications installer is available at line6.com/software/.
 2
2 

Exit any other Line 6 applications that may be running. With your Helix device powered on, launch HX Edit.
•Mac: Go to Applications > Line 6 > HX Edit
•Windows: Go to the Start button menu > All Apps (or Programs) > Line 6 > HX Edit
Upon launch, the application will detect Helix hardware and automatically retrieve and display its onboard presets, IRs, and Favorites. This may take a moment to download all of the preset information.
Multi-Device, Multi-Window Support
The HX Edit application supports the use of multiple-connected Helix/HX devices simultaneously, where each device displays its own full application window. The separate windows can be resized and/or positioned on your screen independently, making it easy to reference and edit presets and settings, as well as copy presets and IRs between the multiple USB-connected devices. Please also see “GUI Overview” on page 9.
TIP: You can also use the Copy and Paste commands or drag and drop to copy a  block and its current settings from one HX Edit device window to another!
To access the separate application windows for each connected device, simply go to the HX Edit Devices menu, select the desired device to display, and bring its HX Edit window to the foreground—a checkmark at the left of a device here indicates the device window that is currently in the foreground. If any of your devices become disconnected, its entry within this menu displays “Not connected” to indicate this.
Each device’s HX Edit window also includes its own Command Center and Global EQ floating windows as well (for devices that include these features)—see “The Command Center Window” on page 45 and “Global EQ Window” on page 49.
 NOTE: On macOS computers, closing all open device windows does not exit the
 HX Edit application. As is common with multi-window supporting macOS apps, you’ll need to use the Quit HX Edit command from the main HX Edit menu (or
better, just train yourself to use the Cmd+Q shortcut).
The Devices menu, showing two connected devices, and the Helix Floor window in the foreground
You’llseeanindicatoratthebottomofeachapplicationwindowdisplayingitsconnected Helix/HX device type—or a warning that no device is detected.
Device indicator at bottom of the HX Edit main window
 3
3 

Preset Compatibility
This guide covers version 3.11 of the HX Edit application. The easiest way to ensure the best performance and compatibility between HX Edit and your Helix or HX device is to make sure to have the latest updates. The HX Edit application will automatically check for, and walk you through installing, the latest firmware update for your connected Helix or HX device (see “Updater & Additional Resources” on page 79). An active Internet connection is required.
Helix preset files are transferable between Helix devices (Helix, Helix Rack and Helix LT), as well as with the Helix® Native plugin software.* Additionally, HX Edit and Helix Native both include Preset Translation functionality, and Helix Native further includes selectable Hardware Compatibility modes. As covered throughout this chapter, these features allow many presets to be shared between any Helix and HX type devices, and with Helix Native.
*IMPORTANT! As of firmware version 3.00, the preset file structure has been changed to accommodate the new features and functionality on all Helix and HXdevices.PresetssavedorexportedfromanyHelixorHXdevicerunningaprevious
(version 2.xx) firmware are still fully compatible with HX Edit 3.xx and your Helix or HX device with v3.xx firmware. However, presets saved or exported from Helix and HX deviceswithv3.xxfirmwareorHelixNativev3.xx(orlaterversions)arenot compatible with earlier versions. We highly recommend backing up and keeping copies of all your v2.xx-created presets before updating to firmware v3.xx.
TIP: It is also possible to Copy and Paste, or drag and drop individual blocks, along  with their current settings, between Helix Native and HX Edit, as well as between multiple HX Edit device windows—see “Block Copy and Paste” on page 7.
Preset Compatibility with Helix Native Plugin
All your Helix and HX device presets, setlists, and bundles are compatible between the HX Edit app (v3.00 or later) and Helix Native plugin (v3.00 or later), by way of the Helix Native Hardware Compatibility mode (HC mode) functionality. As noted above, presets exported or saved with Helix/HX device firmware and Helix Native v3.xx are not compatible with earlier versions.
Once a preset (or setlist or bundle) is exported from your device using HX Edit, upon import, Helix Native determines the device type from which it was created and automatically changes the plugin’s HC mode to match the device, thus fully supporting the complete tone. Likewise, presets exported from Helix Native plugin’s matching HC mode are fully compatible with your Helix or HX device.
Helix Native also offers Preset Translation functionality (also offered in HX Edit—see the next section). When loading a preset into Helix Native as the current tone (such as by dragging a preset from the HX Edit Presets Library or a computer folder directly into the Helix Native Signal Flow), a prompt is offered to either change the plugin’s HC mode to match the preset’s source format, or to attempt to translate to match the current plugin HC mode.
This preset compatibility is the foundation of the Line 6 “Studio to Stage” concept, allowing you to load, edit and transfer your tones between HX Edit and Helix Native plugin! Note that Helix Native plugin maintains its own Preset & IR libraries, independent of the presets and IRs that reside within your Helix hardware. For more information, please see the Helix Native Pilot’s Guide.
TIP: If you also own Helix Native plugin, be sure to reference the “Helix  compatible” version number (found in the Helix Native software’s About box) to determine the recommended Helix/HX device firmware version you should use for maximum preset compatibility. It is highly recommended to always use the latest available device firmware and HX Edit and Helix Native software.
Since the different Helix device types include different physical inputs and outputs, some variances exist among settings, as well as for their support of block types & controllers, which may affect the sharing of presets between devices, or between HX Edit and Helix Native plugin. The following sections in this chapter provide details about sharing presets and settings.
Preset Translation
When importing a preset into the HX Edit Presets Library, the application automatically detects the source device from which it was created (Helix, HX Effects, HX Stomp, or HX Stomp XL).
 NOTE: As covered in the previous section, if the preset attempting to be imported
  was exported from Helix Native, the Hardware Compatibility mode of the preset
determines its source device type format.
If the HX Edit app window’s currently connected device is different that the preset’s source device, the app will attempt to translate the preset to the current device format. If translation is successful, the preset is imported into the current device’s library.
Presets cannot be translated if created with a source device (or Helix Native HX mode) which includes features or capabilities that exceed those of the current device (e.g., greater signal path count, exceeds maximum block count or type, etc.) If the preset cannot be translated, an error window lets you know the preset is not compatible and why, and import is cancelled. For example, if attempting to import a Helix exported preset which includes an Amp model into an HX Effects device (HX Effects includes no support for Amp models), translation is not possible and the following error is displayed.
Error message displayed when a preset cannot be translated on import
 4
4 

Feature Comparison Table
The following table shows the primary feature differences that affect preset translation between the Helix and HX hardware types. Additionally, Helix Native offers a HC mode Off option. When this Off mode setting is in us in Helix Native, the preset has fewer restrictions for block types and DSP limits. Therefore, presets exported from this Off mode can exceed the capabilities of any Helix or HX device. You can consult this table to determine if a preset from one source device (or Helix Native HC mode) will be able to be translated to other devices. See the Preset Translation Compatibility table for more info.
HC MODE / DEVICE FEATURE COMPARISON
Feature |
|
|
HC Mode or Device Type: |
|
|
Off |
Helix |
HX Stomp XL |
HX Stomp |
HX Effects |
|
|
(Helix Native only) |
||||
|
|
|
|
|
Included |
Full set of v3.10 Helix |
Full set of v3.10 Helix |
Full set of v3.10 Helix |
Full set of v3.10 Helix |
Full set of v3.10 Helix |
|
Models* |
models |
models |
models |
models, except 6 |
models, except Amps |
|
Switch Looper |
& Cabs |
|||||
|
|
|
|
|||
Blocks Per Path Capacity |
16 |
16 |
8 |
8 |
9 |
|
|
|
|
|
|
|
|
|
|
2 Amps, 2 Cabs, |
2 Amps, 2 Cabs, |
2 Amps, 2 Cabs, |
2 Amps, 2 Cabs, |
|
Max. Block Type Per Path |
None |
2 IRs (1,024 sample) or |
2 IRs (1,024 sample) or |
2 IRs (1,024 sample) or |
2 IRs (1,024 sample) or |
|
1 IR (2,048 sample), |
1 IR (2,048 sample), |
1 IR (2,048 sample), |
1 IR (2,048 sample), |
|||
|
|
1 Poly Pitch effect* |
1 Poly Pitch effect* |
1 Poly Pitch effect* |
1 Poly Pitch effect* |
|
Max. DSP Limit |
None |
Same as Helix device |
Same as |
Same as |
Same as |
|
HX Stomp XL device |
HX Stomp device |
HX Effects device |
||||
|
|
|
||||
Snapshots |
8 |
8 |
4 |
3 |
4 |
|
Per Preset |
||||||
|
8 Setlists for up to |
8 Setlists for up to |
|
|
|
|
Preset Library |
1,024 Presets. |
1,024 Presets. |
1 Setlist for up to 128 |
1 Setlist for up to 126 |
1 Setlist for up to 128 |
|
(independent per HC mode) |
4 Presets per Bank |
4 Presets per Bank |
Presets. |
Presets. |
Presets. |
|
|
Bundle support |
Bundle support |
4 Presets per Bank |
3 Presets per Bank |
4 Presets per Bank |
|
|
included |
included |
|
|
|
|
IRs Library |
Holds up to 128 each |
Holds up to 128 each |
Holds up to 128 each |
Holds up to 128 each |
Holds up to 128 each |
|
Favorites Library |
User IRs & |
User IRs & |
User IRs & |
User IRs & |
User IRs & |
|
(shared between HC modes) |
Favorites |
Favorites |
Favorites |
Favorites |
Favorites |
* Poly Pitch type effects are those that utilize polyphonic pitch processing: Delay - Poly Sustain, Modulation - Poly Detune, and Pitch/Synth - Poly Pitch, Poly Wham, Poly Capo, and 12-String.
 NOTE: Likewise, if importing multiple presets at once, a setlist, or a bundle, where one or more presets are not able to be translated to the current device, the non-translatable
 presets display an error window and are not imported, while the eligible presets are successfully translated and imported.
Input and output block options and controller support also differ among the Helix and HX device types (e.g., HX devices include no Variax input or EXP 3 pedal options as Helix devices do). These non-compatible features do not prevent preset translation. Typically, non-compatible input and output block settings are translated to the common Main In or Main Out, and non-supported controller assignments are removed from the preset.
 5
5 

Preset Translation Compatibility Table
The following table provides an overview of the preset translation capabilities from each source device (or each source Helix Native HC mode).
PRESET TRANSLATION COMPATIBILITY
Created With: |
|
|
Can Be Translated To: |
|
|
HC Mode Off |
Helix |
HX Stomp XL |
HX Stomp |
HX Effects |
|
|
(Helix Native) |
(Floor, Rack, LT) |
|||
|
|
|
|
||
|
|
|
If does not exceed HX |
If does not exceed HX |
If does not exceed HX |
Helix Native |
|
If does not exceed Helix |
Stomp XL Block and Path |
Stomp Block and Path |
Effects Block type and |
HC mode = Off |
block count and DSP |
count, and DSP limits. |
count and DSP limits. |
Path count, and DSP limits. |
|
limits |
Snapshots greater than 4 |
Snapshots greater than 3 |
Snapshots greater than 4 |
||
|
|
|
are discarded. |
are discarded. |
are discarded. |
Helix |
|
|
If does not exceed HX |
If does not exceed HX |
If does not exceed HX |
(Rack, Floor, LT) |
|
|
Stomp XL Block and Path |
Stomp Block and Path |
Effects Block type and |
or |
count, and DSP limits. |
count and DSP limits. |
Path count, and DSP limits. |
||
Helix Native |
Snapshots greater than 4 |
Snapshots greater than 3 |
Snapshots greater than 4 |
||
HC mode = Helix |
|
|
are discarded. |
are discarded. |
are discarded. |
HX Stomp XL |
|
|
|
|
If does not exceed HX |
or |
|
|
|
||
Helix Native |
Snapshots greater than 3 |
Effects Block type and |
|||
HC mode = HX Stomp XL |
|
|
|
are discarded. |
Path count and DSP limits. |
HX Stomp |
|
|
|
|
If does not exceed HX |
or |
|
|
|
|
|
Helix Native |
Effects Block type and |
||||
HC mode = HX Stomp |
|
|
|
|
Path count and DSP limits. |
|
|
|
|
|
|
HX Effects |
|
|
|
|
|
or |
|
|
|
|
|
Helix Native |
Snapshots greater than 3 |
||||
HC mode = HX Effects |
|
|
|
are discarded. |
|
 6
6 

Feature Compatibility
Thefollowingsectionsprovidedetailsonthecompatibilityofthemajorfeaturesbetween device types, and between HX Edit and Helix Native.
HX Edit Backup Files
The HX Edit application includes a feature that creates Helix Backup (.hxb) files to restore a Helix or HX device’s presets, IRs, and global settings (see page 27). Helix Backup files are specific to each device type and, therefore, cannot be opened or utilized in HX Edit when a different source device is connected.
Helix Native plugin does not currently include this backup functionality and, therefore, does not support creating or opening Helix Backup .hxb files.
Block Copy and Paste
Using the Copy Block and Paste Block commands, you can copy and paste any block type between any presets within HX Edit, as well as between multiple HX Edit windows (with any Helix or HX device connected) and any instance of the Helix Native plugin. It is also possible to drag and drop any processing block to move it within the current preset, or to copy it into any other HX Edit device window. Restrictions apply when copying, pasting, and moving some block types, depending on the source Helix/ HX device (or source Helix Native HC mode) and the destination. Please see “Cutting, Copying, Pasting, and Clearing Blocks” on page 32.
Snapshot Copy and Paste
The current Snapshot, along with all its settings, can be copied and pasted using the Copy Snapshot and Paste Snapshot commands either within the current HX Edit preset or within the current Helix Native preset. Also, see “Configuring & Managing
Snapshots” on page 24.
Command Center Copy and Paste
Within the Command Center window, once a command assignment is created for any footswitch, EXP Pedal, or other controller, you can use the Command Center’sCopy and Paste command options to copy assignments between controllers, as well as between controllers within other HX Edit presets within the current HX Edit device window.*
Helix Native plugin does not include the Command Center, therefore, it is not possible to copy Command Center assignments between HX Edit and Helix Native. See “The Command Center Window” on page 45.
*TIP: As of firmware version 3.0, HX Stomp devices include the Command Center  feature too!
Input & Output Block Settings
When Importing a Helix/HX hardware-exported Preset into HX Edit with a different device type connected - During preset translation, the Input and Output block settings are changed to “Multi” or “Main” if the connected device does not support the original options (also see “Preset Translation” on page 4).
When Importing a Helix Native-exported Preset into Helix/HX Hardware - All input and output blocks that were set to “Host” will default to the “Multi” setting within the Helix devices, and to the “Main” setting in HX devices. Any input block set to “None” will remain as set to “None” within the hardware.
When Importing a Helix/HX hardware-exported Preset into Helix Native Plugin - All input and output blocks that were set to physical inputs and outputs (other than “None”) will default to the “Host” setting within the plugin. Any input block set to “None” will remain set to “None” within the plugin.
Hardware Blocks (Send, Return, FX Loop & Looper)
When Importing a Helix Hardware-exported Preset into Helix Native - These hardware block types are only functional within Helix/HX devices. Within Helix Native, these blocks offer no routing functionality, and their parameters are not editable.
Impulse Responses
Impulse Response (IR) files are able to be utilized within IR blocks of all Helix and HX devices, as well as by the Helix Native plugin in any HC mode. If you are to be sharing Helix presets between Helix Native plugin and Helix or HX devices, it is a good idea to build and maintain your IR libraries similarly on each to allow the same IR files to be utilized for your presets that include them—see page 16.
 NOTE: IRs, including those from the Line 6 Marketplace online shop and 3rd party
 vendors, are supported by all Helix and HX devices, as well as byHelixNativeplugin. Any of your IRs can be imported and exported, as well as dragged and dropped,
between HX Edit and Helix Native IR library windows.
Favorites
Favorites that you’ve created on your Helix or HX device, as well as Favorites files (.fav) exported from HX Edit, are compatible with any Helix or HX device and Helix Native plugin—wherever as the specific model type is supported. See page 20.
 7
7 

Controller Assignments
Controller assignment types vary between Helix and HX devices, for example, a Helix Floor preset may include an EXP 3 controller assignment, which Helix LT and HX devices do not include. Therefore, if a preset is imported and translated to a different device in HX Edit, non-supported assignments are discarded.
The Helix Native plugin does not utilize any hardware-based Bypass, Controller, or Command Center Assignments that may exist within HX Edit-exported presets. Any such assignments remain intact within your presets, but are essentially ignored by Helix Native.* Snapshot and MIDI In type assignments, however, are supported in both Helix hardware and Helix Native plugin.) Helix Native plugin includes its own functionality to create plugin parameter - Automation Controller type assignments, which are similarly ignored when Helix Native presets are imported into the HX Edit application.
*TIP: Helix Native includes a Preferences option to show or hide existing  hardware-based assignments within its Assignments tab.
MIDI In Bypass & Controller Assignments
Using HX Edit, you can create MIDI In Bypass Assignments to remotely toggle the bypass state of most block types, and MIDI In Controller Assignments to remotely control most Helix parameters, via external MIDI controller devices or MIDI software. MIDI In assignments saved within HX Edit-exported presets are supported when imported into other Helix/HX devices, as well as in Helix Native plugin. See “Creating a Bypass Assignment” on page 40.
DSP Limit
In order to maintain preset compatibility with Helix and HX devices, each HC mode within the Helix Native plugin incorporates DSP limits on its presets, matching the limits of the respective hardware devices (also see the following Preset Spillover section). The exception to this rule is when the “Off” HC mode setting is in use in Helix Native. This mode effectively removes the DSP limits on presets, as well as several other restrictions. For this reason, presets exported from the Helix Native - HC Off mode may not be translatable in HX Edit for any device. See “Preset Compatibility with Helix Native Plugin” on page 4.
Preset Spillover Mode
Helix Floor, Rack, and LT devices include the Preset Spillover Mode (accessible in the device’s Global Settings > Preferences) which, when activated, dedicates 50% of its DSP to providing full “spillover” for the decay of delay and reverb tails, as well as a smooth transition across a preset change. To achieve this processing, the device limits its signal flow to Path 1 (with Path 2 visibly removed). Therefore, if the connected Helix device has Preset Spillover Mode active, when loading any Helix preset, only its Path 1 blocks and settings are visibly loaded and audible (as shown in the following HX Edit image), and any existing bypass or controller assignments for path 2 blocks are nonfunctional.
The Signal Flow shows one main path when Preset Spillover Mode is active
Note that a preset’s existing Path 2 blocks remain part of the preset, even if the preset is saved while Spillover is active, so you’ll see them appear on Path 2 for the preset when Spillover is turned Off. Considering this behavior, the best practice is to start with empty New Presets when you have Preset Spillover On and utilize them for the Spillover mode only, and you’ll not need to concern yourself with Path 2 blocks or settings!
 NOTE: When in Spillover mode, you’ll need to ensure that your preset’s Path 1Aand
 Path 1B Output blocks are set to physical Helix outputs (i.e., the imported preset may have a Path 1 Output block set to Path 2A, which will result in no audible output).
Please see your Helix Owner’s Manual for details.
Marketplace Assets
Premium presets and IRs purchased from the online Marketplace are compatible with Helix devices and Helix Native plugin. Marketplace also includes presets and bundles specifically for HX devices as well. The import of premium Marketplace assets requires online license Authorization. Please see “Marketplace & Account Options” on page 53.
 NOTE: Version 1.70 of Helix Native and 2.70 ofHXEditanddevicefirmware(orlater
 versions) are required for full support and use of premium Marketplace presets and
IRs.
 8
8 

GUI Overview
HX Edit has a very intuitive, easy-to-use interface. The main application window automatically detects your specific Helix or HX device type and displays all its options within the main application window.
TIP: As covered in “Multi-Device, Multi-Window Support” on page 3, if you have more than one device connected, a separate application window is available
for each device.
Within the application window, the navigation is divided into three main sections:
The Librarian Window - For managing presets, Impulse Responses (IRs), and
Favorites.
The Signal Flow Window - Where you can add and move amp, effects & mix blocks, and customize your complete signal path routing.
The Inspector Window - Where you can choose from the huge selection of models, edit their parameters, create bypass & controller assignments, and more.
Presets |
IRs |
Favorites |
Show/Hide |
Signal Flow |
Undo/Redo |
Tempo |
|||||
Tab |
Tab |
Tab |
Librarian |
Window |
Buttons |
Controls |
|||||
|
|
|
|
|
|
|
|
|
|
|
|
|
|
|
|
|
|
|
|
|
|
|
|
| <![if ! IE]> <![endif]>LIBRARIAN |
|
<![if ! IE]> <![endif]>EDITOR |
|
|
|
|
|
|
|
|
|
|
|
|
|
|
Bypass/Controller |
My Account/Preferences Edit Tab |
Inspector |
||||
Menu |
Window |
Assign Tab |
|||
The HX Edit main GUI (Helix Floor device)
HX Device Owners: With an HX device connected, its application window displays the single signal flow, just as on your HX hardware screen. As covered in this chapter for Helix devices, you can utilize the application’s
signal flow to bypass, move, clear, copy & paste blocks, create split paths, and more.
The HX Edit signal flow—with an HX Stomp XL or HX Stomp connected
The HX Edit signal flow—with an HX Effects connected
TIP: The Command Center, for creating MIDI control assignments andGlobal EQ  (Helix, HX Stomp XL, and HX Stomp only) are available as separate windows from the application’s Window menu.
Resizing the Application Window
The HX Edit main application window is resizable, allowing you to adjust it to best fit your screen size and workflow. Simply click and drag any corner or edge of the window to adjust to the preferred size, or click the “Maximize” button at the top of the window to use it in full-screen mode. If you have multiple devices connected, each device’s application window is independently resizable.
It is also possible to show or hide the Presets/IRs/Favorites Librarian panel, by clicking on the toggle button at the top left of the Signal Flow window (or via the Window menu’s
Show/Hide Librarian command).
The Librarian window Show/Hide toggle button
 9
9 
Application Menus
At the top of your computer screen (Mac) or top of the application window (Windows), you’llfindthefamiliarapplicationmenubarforthecurrentdevice.Notethattheavailable commands differ within the File and Edit menus depending on the application window, tabbed panel, and/or specific control that currently has “focus.” The window focus is indicated by a blue outline appearing around the Librarian, Signal Flow, or Inspector windows.* To change focus, simply click within the desired window, or use the TAB key. To follow are descriptions of the included application menu commands for Mac and Windows. See “Keyboard Shortcuts” on page 67 for additional information.
 *NOTE: It is possible that the Librarian’s Presets or IRs tab currently has focus, but
  ifyou’ve“hidden”theLibrarianpanel,youwillnotseeitsblueoutlinefocusindicator.
UsingtheTAB keywilladvancethefocustotheotherwindows,evenwhentheLibrarian is hidden.
 NOTE: On Mac computers, HX Edit has one common, main application menu at the top
  of your screen. If you have multiple Helix devices connected and multiple app windows open, available menu commands & keyboard shortcuts act only upon the current “foreground” application window. (Choose the desired device within the Devices menu to bring its
application window to bring it to the foreground.)
HX Edit (Mac only)
•About HX Edit - Launches the About box screen, which displays the versions of the HX Edit software and connected Helix device firmware, as well as legal information.
•Check for Updates - Launches the built-in updater to check for an install any available software and device firmware updates—see “Updater & Additional Resources” on page 79.
•Preferences - Launches the Preferences window, where you can select application and hardware settings—see “Preferences and About Box” on page 50. You can also launch the Preferences window by clicking on the “gear icon” button or device indicator at the bottom of the application window.
•Quit HX Edit - Exits the application for all connected devices.
File
When a preset within the Presets tab currently has focus (or, when the Presets tab is displayedandfocusiswithinanyotherwindow),thefollowingcommandsareselectable:
•Save Preset - Saves changes for the currently loaded preset to the device’s Preset Library.
•Save Preset As - Displays the Save As window, allowing you to choose the desired Setlist and Preset Library location where to save the current tone. Note that choosing an occupied preset location will overwrite the existing preset within the location on your device.
•Import Preset - Imports any .hlx preset file (or files) from your computer, replacing the currently selected library preset(s).
•Export Preset - Exports the currently selected preset (or presets) and saves each to your computer as a .hlx file.
•Import Setlist - (Helix devices only) Imports any .hls setlist file from your computer, replacing the current setlist on your Helix.
•Export Setlist - (Helix devices only) Exports the current setlist and saves it to your computer as a .hls setlist file.
•Import Bundle - (Helix devices only) Imports any .hlb bundle file from your computer, replacing all setlists and presets within the Helix.
•Export Bundle - (Helix devices only) Exports all the current setlists and their presets from your Helix and saves them to your computer as a .hlb bundle file.
When an IR slot within the IRs tab currently has focus, the additional following commands are available:
•Import Impulse -ImportsanImpulseResponsefile(orfiles)fromyourcomputer, replacing the currently selected library Impulse(s).
•Export Impulse - Exports the currently selected Impulse (or IRs) and saves each to your computer.
When a Favorites slot within the Favorites tab currently has focus, the following commands are available:
•Import Favorite - Imports a Favorite file (or files) from your computer.
•Export Favorite - Exports the currently selected Favorite (or Favorites) and saves each to your computer.
TIP: Please see “Presets Panel”, “IRs Panel”, and “Favorites Panel” for details on these menu command behaviors.
The following, additional File menu commands are available regardless of window focus:
•Create Backup - Launches the Create a Helix Backup window, where you can export a full backup of your device’s Presets, IRs, Global Settings, Favorites, and User Defaults—see page 27.
•Restore From Backup - Launches the Restore From Backup window, where you can restore your device’s Presets, IRs, Global Settings, Favorites, and User Defaults from a previously created backup—see page 27.
•Extract Files From Backup - Launches the Extract Files From Backup window, where you can choose one of your saved Helix Backup files, and choose to extract the Favorites, IRs, and/or Presets from the backup—see page 28.
•Preferences - (Windows only) Launches the Preferences window, where you can access application and hardware settings—see page 50. You can also launch the Preferences window from the “gear icon” button or the connected device indicator at the bottom of the application window.
•Quit - (Windows only) Exits the application.
 10
10 

Edit
Regardless of tab focus:
•Undo - Reverses the last supported edit action.
•Redo - Reverses the last performed Undo action.
 TIP: Please see “Undo / Redo” on page 25 for details.
When the Presets tab has focus:
•Copy Preset - Copies the selected Preset(s) to the clipboard.
•Paste Preset - Pastes the last-copied preset(s), replacing the preset(s) within the selected preset library location(s).
•Select All Presets - Selects all Presets within the current Setlist.
•Rename Preset - Renames the currently loaded preset.
When the IRs tab has focus:
•Copy IR - Copies the selected IR(s) to the clipboard.
•Paste IR - Pastes the last-copied IR(s), replacing the IR(s) within the selected IR library location(s).
•Clear IR - Deletes the selected IR(s) from the IRs library.
•Select All IRs - Selects all IRs within the IRs library.
•Rename IR - Renames the currently selected IR.
When the Favorites tab has focus:
•Copy Favorite - Copies the selected Favorite(s) to the clipboard.
•Paste Favorite - Pastes the last-copied Favorite(s) and displays a prompt to copy as new or replace the selected Favorite.
•Clear Favorite - Deletes the selected Favorite(s) from the library.
•Rename Favorite - Renames the currently selected Favorite.
When the Signal Flow window has focus:
•Cut Block - Copies the currently selected block and its settings to the clipboard and removes the block from the Signal Flow.
•Copy Block - Copies the currently selected block and its settings to the clipboard.
•Paste Block - Pastes the last-copied block’s model and its settings to the selected block location. When an existing block is selected as the paste location, this replaces the existing block.
•Paste Block Before - When an existing block is currently selected, pastes the last-copiedblock’smodelanditssettingstothelocationbeforetheselectedblock.
•Paste Block After - When an existing block is currently selected, pastes the last-copied block’s model and its settings to the location after the selected block.
•Clear Block - Deletes the selected block.
•Rename Preset - Renames the currently loaded preset.
When the Command Center window has focus:*
•Cut Command - Copies the currently selected (instant, footswitch, EXP pedal, or Variax knob) controller’s command settings to the clipboard and clears the command settings from the controller.
•Copy Command - Copies the currently selected controller’s command settings to the clipboard.
•Paste Command - Pastes the last-copied controller’s command settings to the selected controller.
•Clear Command - Deletes the selected controller’s command settings.
 *NOTE: When working in “The Command Center Window” you can access
 these Edit commands as follows:
Mac - These commands are available within the main application’s Edit menu at the top of your screen when the Command Center window has focus.
Windows - The Command Center window itself includes an Edit menu with these commands.
TIP: Copy Block and Paste Block, as well as drag and drop of processing  blocks, can be also used between multiple HX Edit windows, and back and forth with Helix Native plugin! See “Cutting, Copying, Pasting, and Clearing
Blocks” on page 32 for details.
Snapshots
•Copy Snapshot - Copies the currently loaded preset’s snapshot to the clipboard.
•Paste Snapshot - Pastes the last-copied snapshot contents, replacing the currently loaded snapshot’s contents.
•Rename Snapshot -Allowsyoutoeditthetitleofthecurrentlyloadedsnapshot (Helix and HX Effects devices only).
•Snapshots - Any of the current preset’s snapshots can be selected directly here. (Note that Helix devices offer 8 snapshots, HX Stomp XL and HX Effects offer 4, and HX Stomp offers 3.)
 *NOTE: When working in “The Command Center Window” you can access
 the Snapshots commands as follows:
Mac - These commands are available within the main application’s Snapshots menu at the top of your screen when the Command Center window has focus.
Windows - The Command Center window itself includes a Snapshots menu with these commands.
TIP: Please see “Configuring & Managing Snapshots” on page 24 for details.
 11
11 
Window
•Show / Hide Librarian - Toggles the Presets/IRs/Favorites librarian panel between shown and hidden for the current device window.
•Command Center - Displays the Command Center window (Helix and HX Effects devices only)—see page 45.
•Global EQ - (Helix devices only) Displays the Global EQ window—see page 49.
•Close - Closes the Command Center, Global EQ, or main application window (whichever has focus). Note that the main HX Edit window can be re-opened using the Devices menu commands.
Help
•HX Edit Online Help - Takes you to the Line6.com Support site where you can find the helpful info on HX Edit and Helix & HX devices.
•HX Edit Application Pilot’s Guide - Launches the PDF you are reading now.
•Check for Updates - (Windows - this command is found within the Apple menu on Mac) Launches the built-in updater to check for an install any available softwareanddevicefirmwareupdates—see“Updater & Additional Resources” on page 79.
•About HX Edit - (Windows only) Launches the About box, which includes the software version and legal credits.
Devices
Displays a selectable option for each connected Helix or HX device’s individual HX Edit application window. Choosing a device within the menu will bring its HX Edit forward, if it is currently not in the foreground, and re-displays the window if it is currently minimized or closed. A checkmark appears to the left of the device window that is in the foreground. See “Multi-Device, Multi-Window Support” on page 3.
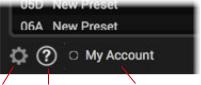
Preferences, Help & Account Options
At the bottom left of the application window, click on the menu buttons to access the app’s Preferences, Help & About Box, (see page 50) and My Account options (see page 53)
Preferences Help/About Account Options
 12
12 

Presets Panel
The Librarian’s Presets tabbed panel provides functionality for importing, exporting, and managing presets & setlists.
Presets Tab
Setlist Commands Setlist Menu
Preset Commands Loaded Preset
Selected Preset
The Presets panel
You’ll find the same commands for copying, pasting, renaming, importing, and exporting within the application’s File & Edit menus. These commands are also accessible via
“Keyboard Shortcuts”.
TIP: Helix device presets, setlists, and bundles can also be imported and utilized  within other Helix devices and the Helix Native plugin! Please see “Preset
Compatibility” on page 4 for more info.
HX Device Owners: All functionality described in this chapter is the same for use with all Helix and HX devices unless otherwise noted.
Premium Marketplace Presets
Ifyou’vepurchasedanddownloadedpremiumHelixorHXpresetsfromtheMarketplace, you must be Signed In to your Line 6 account within HX Edit and have your computer Authorized to allow HX Edit to initially Import or Export these presets (as well as for any setlists or bundles that include premium presets).*
 *NOTE: Once you’ve initially imported your Marketplace assets to sync their
 licenseswithyouraccount,youdon’tneedtohaveHXEditactivelySignedIntouse them—and it is not necessary to even be connected to the Internet once your computer has been Authorized, except to Deauthorize the computer. Please see
“Authorize / Deauthorize Your Computer” on page 55.
Premium Marketplace presets are otherwise able to be utilized just like any other Helix presets. When imported, these premium Marketplace presets are indicated by guitar pick “badges” to their right within the Presets panel.
Premium Marketplace presets are indicated with golden guitar pick badges
Selecting, Loading & Saving Presets
It is important to note there is a difference between the selected and loaded preset within the Presets panel.
To Select a Preset - Click once on a preset location in the Presets panel and you’ll see it become highlighted in gray. This indicates the preset is selected, meaning that a preset command (Copy, Paste, Import, etc.) will act upon this preset (even if a different preset is the one currently loaded within the Signal Flow).
To Load a Preset - Double-click on any preset (or click once to select it and then hit your Enter/Return key) and you’ll see the preset highlighted and with ambercolored text, indicating it as the preset currently in use. If no other preset is currently selected (highlighted in gray), menu commands will act upon this loaded preset, since it is effectively also the selected preset.
To Save a Preset - Once a preset is loaded from the Presets Library and edited, you’ll most likely want to save the preset to retain your changes.* To save the Preset to your device’s library, choose the Save or Save As option from the app’s File menu, or click the Preset Save button that appears at the top of the
Signal Flow panel (see “Naming & Saving the Preset” on page 24). See the next section for the option to Export a preset to save it to your computer.
*TIP: Before editing a preset you may wish to first copy it to another location in the  Presets panel, or export it, to be sure you have an original version of the preset before making changes.
 13
13 

Importing and Exporting Preset Files
Presets are able to be exported to your computer as individual (.hlx) files, allowing you to create a limitless collection of tones that can be imported back onto your device’s internal preset library at any time.
To Import a Preset File - It is recommended to select an empty “New Preset” location within the Presets panel and select the Import Preset command. A brief dialog will inform you that importing will overwrite any preset information in the selected location. Click Yes to continue. A system window will display a file browser for selecting the preset you wish to import. Once imported, the preset will reside on your Helix or HX device’s internal memory, within the selected preset location.
To Export a Preset File - Select the preset by single-clicking on it in the Librarian - Presets panel and select the Export Preset command. This creates a copy
of the preset in its last-saved state from your Helix or HX device’s memory and saves it to your computer. The familiar “save” window is presented, in which you can edit the filename and choose a destination folder.
TIP: If you happen to own both a Helix (or Helix Native plugin)and HX device, it is  recommended to export your HX devices’ presets into their own, individual directories to avoid mixing them up with Helix and Helix Native plugin preset files.
Note that presets are exported in the format of the specific device you are using, which determines its behaviors for use with HX Edit preset translation and Helix Native’s Hardware Compatibility modes—see “Preset Compatibility” on page 4.
Renaming, Reordering, Copying, and Pasting Presets
These functions allow you to customize your presets within the Presets panel. Choose Rename, Copy, or Paste from the row of preset command buttons or application’s Edit menu and it will act upon the selected (highlighted) preset. You can also right-click on a preset in the list to open a context menu with these same commands. For most commands, it is also possible to multi-select a number of presets by using Shift+Click to select a contiguous set of presets, or Cmd+Click (Mac) or Ctrl+Click (Windows) to select a non-contiguous set.
TIPS: There is no command to “delete” a preset, but you can right-click on a block  within the signal flow and use theClear All Blocks command.
 NOTE: Copy/Paste of presets and IRs between HX Edit and Helix Native, or
  between multiple HX Edit device app windowsisnotcurrentlysupported.However, you can use drag and drop for these actions! See the next section.
Drag and Drop Presets
It is possible to drag and drop any preset (or multi-selected presets) directly from the Presets panel to perform the following actions.
•Import - Drag a .hlx preset file from any computer folder and drop directly onto a Presets panel slot to import it into the device’s Presets Library.* This import action replaces and overwrites the slot’s existing preset.
•Import and Load - Dragging a preset from a computer folder and dropping it directly into the currently loaded preset’s slot within the Presets Library, or dropping it directly into the Signal Flow window, will both Import the preset and load it as the new current tone, replacing the previous tone. (Note that if you drag and drop a preset into a slot that is not that of the currently loaded preset, this will import the preset into the library, but not also load it.)*
 *NOTE: If you import a preset that was created with a different source Helix/HX
 device (or created with a different Helix Native HC mode) than currently in use, HX Edit will attempt to translate the preset for the current device. (See“Preset
Translation” on page 4.)
•Export - Drag one or multiple presets from the Presets panel and drop into any folder on your computer to export a copy of the .hlx preset file(s) there.
•Reorder - Drag vertically to another location within the Presets panel to reorder the presets within the setlist as desired. When the preset is dropped into the new location slot, the surrounding presets are shifted upward or downward accordingly.
•Copy Between Two Devices - If you have multiple devices connected, it is possible to drag and drop presets between the multiple HX Edit device app windows’ Presets panels, or directly into the Signal Flow, assuming the presets can be translated between the device types. (See “Preset Compatibility” on page 4.)
•Copy To/From Helix Native Plugin - (Helix devices only) Drag a preset from the plugin’s Presets panel and drop directly into the Presets panel of the HX Edit app to import and load the preset on your Helix device, replacing and overwriting the previously loaded preset. Likewise, you can also drag and drop presets from HX Edit into Helix Native plugin (see “Preset Compatibility” on page 4).
Importing and Exporting Setlists
The Presets panel allows you to instantly save the currently loaded setlist, including all its saved presets, to a Helix setlist file (.hls). This is very handy for making a backup of all presets within a setlist, so that a group of presets can easily be loaded back into your Helix in a single action.
HX Device Owners: A Setlist for your HX device consists of all presets withinthedevice’spresetlibrary.SimilartothestepsdescribedhereforHelix devices, you can use the HX Edit Import Setlist and Export Setlist
commands, found within the app’s File menu.
 14
14 

To Import a Setlist - Select the Import Setlist command. This will prompt you to ensure that you wish to replace the currently selected setlist and the presets therein. Continue through the Open window to select the setlist you wish to load onto your connected device.*
 *NOTE: If you import a setlist that was created with a different source Helix/HX
 device (or created with a different Helix Native HC mode) than currently in use, HX Edit will attempt to translate its presets for the current device. (See“Preset
Translation” on page 4.)
To Export a Setlist - Select the Export Setlist command to display the Save As dialog.
Changing Setlists
(Helix devices only*) To change the active setlist shown in the Presets panel, click on the Setlist menu and choose from among your device’s setlists. The currently-selected setlist will be indicated with an “open folder” icon in this menu.
*HX Device Owners: With an HX device in use, there is no Setlist menu, since these devices’ Presets Libraries include only one setlist. However, you can use the Import Setlist option to replace the current setlist with
one saved on your computer.
Renaming Setlists
To rename the current setlist, right-click on the setlist name within the Setlist menu and type in your desired title.
HX Device Owners: The single Setlist on yourHX device displays no name on the hardware or within HX Edit. However, you can edit the Setlist’s filename when Exporting the file to your computer.
Importing and Exporting Bundles
A Bundle file (.hlb) includes all 8 setlists’ contents of your Helix device, including all their presets and saved settings, wrapped up in a tidy package.* This makes it easy to export to create and store a backup of your Helix device’s complete Preset library, and easily restore your device’s Presets library to your device (or to the
Helix Native plugin) by importing the bundle.
 NOTE: Bundle files do not contain any of the Helix device’s Global Settings or
  Impulse Response (IR) files. To include all these Helix items, use the Create & Restore Backups feature—see page 27.
*HX Device Owners: HX devices do not support Bundle files, therefore, you will see no available Bundle options.
The Import Bundle and Export Bundle options are found in the application’s
Preferences > Presets/IRs tab (see “Preferences and About Box” on page 50).
Bundle options within the Preferences window (for Helix devices)
To Import a Bundle - Click the Import Bundle button and a prompt is displayed to replace all setlists and presets within your Preset library. Continue through the File – Open window to select the bundle you wish to import. Note that it is possible to optionally import any bundle that was exported from the Helix Native plugin or any Helix device.
To Export a Bundle - Click the Export Bundle button to create a copy of all presets and their last-saved settings that exist in all setlists as a Helix bundle (.hlb) file.
 NOTE: (Helix devices) On the next power-up after importing multiple presets, or
 importing any setlist or bundle, you may see your device perform an additional “Rebuilding Presets” process during boot up. This process is normal and optimizes
preset loading times on the hardware.
TIP: Wanting to restore the Factory Presets & settings for your device? You can do  so by performing a Factory Restore—please see your Helix or HX device’sOwner’s Manual for details (and remember to use HX Edit tofirst do a backup of your current presets!)
TIP: Visit the line6.com/customtone site to share your tones and download from  the huge online library of artist and user presets!
 15
15 
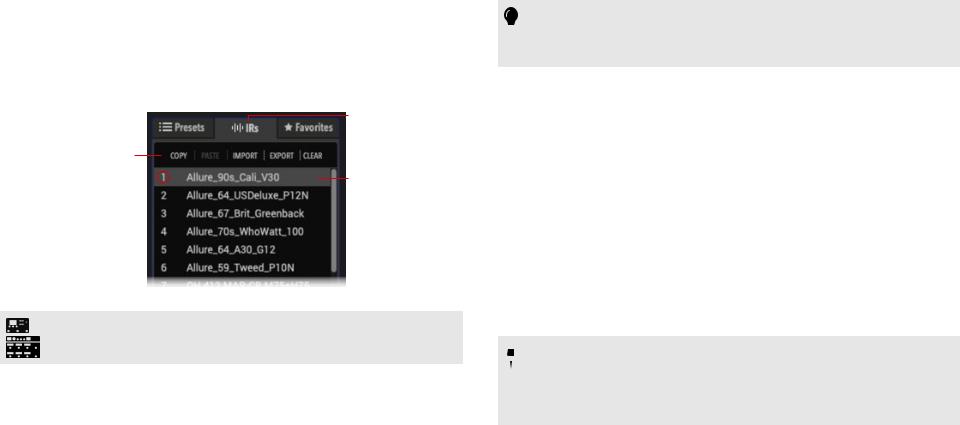
IRs Panel
The Librarian’s IRs panel provides a list of all Impulse Response files (along with respective ID numbers in the left column) that currently reside on your Helix or HX device. Initially, this IRs panel is empty, awaiting your import of Impulse Response files.
IRs Tab
IR Commands
Selected IR
IR Index Numbers 
The IRs panel
HX Device Owners: IR files can be used by all Helix and HX devices. All functionalitydescribedinthischapteristhesameforusewithalldevicesunless otherwise noted.
What are Impulse Responses?
Impulse Responses (or “IRs”) that can be used in Helix & HX devices are audio files that are the result of capturing the sound of a test tone (frequency sweep) through a guitar or bass amp speaker cabinet, which has been de-convolved with the original tone signal. This represents the frequency response of the miked cabinet itself and can be used to simulate the way it alters the sound. This is similar to a convolution reverb, but with much shorter decay.
Add an IR block to your preset as an alternative to using one of the Cab blocks to provide speaker cabinet simulation. Several companies now offer large selections of professionally recorded IR files that can be used in Helix devices, or you can even do some research on how to record and create your own. Feel free to jump on your favorite guitar gear forums and join the ongoing, sometimes heated, discussions about the best and most realistic IRs, and methods to create them.
You can also find some IRs that were created using this convolution process to capture the properties of acoustic guitar bodies, guitar pickups, and other sources. These IRs can certainly be used in the Helix IR blocks as well, to allow even deeper tone sculpting!
TIP: Line 6 offers a free pack of IRs from Allure. You can grab them now athttp://  line6.com/allure/.
You can also find a great selection of IRs, specifically created for Helix products, on the Marketplace—see page 53.
IR Formats and Restrictions
For all Helix and HX devices, as well as Helix Native plugin, the following IR file types are supported.
•Helix Impulse Response (.hir) - This is the proprietary Line 6 IR file format. All IRs purchased through the Marketplace are of this file type. (Please also see
“Marketplace & Account Options” on page 53.)
•WAV (.wav) - Most IR producers and vendors typically offer IRs within the .wav format. It is possible to import a mono or stereo .wav file IR, regardless of its bit depth, length, or sample rate frequency. While this is very convenient, please be careful to import only .wav files that were created specifically for use as IRs, not just any audio .wav file, or you may experience unexpected sonic results.
Importing and Exporting IRs
To access the IRs stored on your Helix or HX device, click on the IRs tab. From here you will be presented with a list of up to 128 IRs and their index numbers.
 NOTE: Premium Helix IRs purchased from Marketplace are also imported &
  exported using the following steps. It is required that you have Authorized your computer and that you are Signed In to your Line 6 account in HX Edit to initially Import or Export them. Once imported into HX Edit, no active Internet connection is necessary to utilize your Marketplace IRs. Please see“Marketplace & Account Options” on page
53 for details.
To Import an IR, select the desired index location in the application’s IRs panel and select Import. Select the desired IR .hir or .wav file you wish to load onto your device. It is also possible to select multiple IR files and all will be imported in one action.
 16
16 

When premium Marketplace IRs (.hir files) are imported, they are indicated by a golden guitar pick “badge” to their right within the IRs panel.
Premium Marketplace IRs are indicated with a golden guitar pick badge
To Export an IR, click Export to display the Save As dialog.
You can also drag and drop to and from the IRs panel to export and import IRs—see the following section.
TIP: Use the File menu’s Create Backup & Restore From Backup options to  create a backup of your IRs panel’s contents, and restore from the backup, at any
time—see “Creating & Restoring Complete Device Backups”.
Renaming, Loading, Copying, and Clearing IRs
Several actions can be performed by clicking the commands above the IRs list view, which will act upon the selected (highlighted) IR. You can also right-click to choose these options from the context menu (or use the app’s “Keyboard Shortcuts”).
 NOTE: Copy and Paste of presets and IRs between HX Edit and Helix Native, or
  between multiple HX Edit device app windows, is not currently supported. However, you can use drag and drop for these actions! See the next section.
Drag and Drop IRs
There are several drag and drop options that allow you to import and export single or multiple IR files between your computer’s directories and HX Edit, as well as load IRs into your current tone.
•Import - Drag one or more IR files from your computer folder directly into the IRs panel. When multiple files are being dragged in, they are imported starting with the selected IR index slot.
•Export - Select one or more IR index locations and drag from the IRs list view directly to your computer to export the IR files to the selected hard drive folder.
 NOTE: When exporting IRs from the HX Edit IR panel, any Marketplace
  purchased IR is saved to your computer as a Helix IR (.hir) type file. The .hir files are proprietary to Line 6 products and licensed to you via the Line 6 account on which you purchased them. Any IR that was originally imported as a .wav file is exported as a .wav file.
•Copy - It is also possible to drag and drop IRs within the IRs list view to create a copy of the IR in a new index location.*
 *NOTE: There are no options offered to move or reorder IRs in a single
 operation. Use the Copy, Paste, and Clear functions to rearrange IR within the
IRs list as needed.
•Copy Between Helix / HX Devices - If you have multiple devices connected, it is possible to drag and drop IRs between the multiple HX Edit device app windows’ IRs panels to copy them between devices.
•Copy To/From Helix Native Plugin - With an instance of the Helix Native plugin open, drop IRs from the HX Edit application’s IRs panel directly into the IRs panel of the Helix Native. It is also possible to drag IRs from Helix Native directly into the IRs panel of HX Edit to import copies of the same IRs.
•Load into Current Tone - Once you’ve imported one or more IRs into the IRs Library, you can drag any IR from the Library window and drop it directly into the desired position within the Signal Path in the Edit window to create an IR block loaded with the IR file. See the next section.
 17
17 

Loading an IR in an IR Block
When you insert an IR block within your preset’s Signal Flow from the Model Menu, it initially defaults to referencing the IR that resides within the #1 IR index location (if you have not yet imported any IR file into the referenced index location, the
“empty” IR block has no effect on the signal).
To follow are a few methods for loading an IR into an IR block, which determines the IR file that is associated with the IR block (also see “IR File Reference” on page 18 for additional behaviors).
Use the Edit tab’s IR Select slider - Select the IR block within the Signal Flow, then, in the Edit tab, use the IR Select parameter slider (or its menu at the right) to select the IR index number (1-128) that includes the desired IR.
Choosing an IR by its Library (1-128) index number within the Edit tab
Double-click in Library - Select the IR block within the Signal Path and then double-click on the preferred IR within the IRs Library list to load into the IR block—replacing any currently referenced IR. Note that no action is performed if you do not have an IR block selected.
Drag and drop - As mentioned in the preceding section, you can also add an IR block already loaded with an IR by dragging the desired IR from the IRs Library panel and dropping it directly into an empty location within your Signal Path. (Drag and drop from the IR Library always adds a 1024 Sample type IR block.)
You can use the other IR block parameter sliders in the Edit tab to further shape the IR’s tone and level—see “Editing Model Parameters” on page 36. Once done selecting an IR and its parameter options, be sure to save the preset to retain your IR block settings.
TIP: Optionally, you can create a Snapshot assignment (see page 44) on the IR  Select parameter, which then allows you to change the IR within the block as desired, per snapshot!
Whenever you load a preset that includes one or more IR blocks that reference an empty IR index location, a pop-up is displayed to alert you. For example, the alert shown below is telling you that the preset includes two IR blocks, on Paths 1A and 1B, which cannot locate their originally associated IR files. The “Position” denotes the block position of each IR block from left to right on the path, starting with “0” for the left position. Please see the next section for more related IR behaviors.
Missing associated IR(s) alert pop-up
IR File Reference
Once an IR block is configured to utilize an IR index slot that includes an imported IR (.wav or .hir) file, and the preset then saved (using HX Edit and device firmware version 2.90 or later), the preset creates a “reference signature” to the imported IR from its file name. Likewise, if you save your IR block as a Favorite (see page 20), or set the IR block’s current settings as the User Model Defaults (see page 34), the IR bock also creates a reference to the specific IR file within your IR library. Therefore, if you happen to change the order of your IRs within the IR library list, your preset (or IR Favorite or IR User Model Default) will still intelligently reference the originally associated IR file, even if it now resides in a different IR Library index location. The following behaviors apply:
•If you Clear or Replace the IR file within the IR index slot for which the preset’s IR block is configured to use, upon the load of the preset/IR Favorite/User Model Default IR, the IR block will first attempt to locate another instance of the missing, associated IR file within the IRs Library and automatically utilize it and its residing index slot.
•If the configured IR index slot is currently empty, you’ll be alerted that the IR block’s associated IR file cannot be found (see the previous section). The IR block continues to utilize the same (now empty) IR index slot. You’ll want to configure the IR block to utilize an occupied IR index slot (or import an IR into the currently referenced slot) and re-save the preset (or recreate a new Favorite or User Model Default for the IR block).
•If the original IR file is cleared from the Library and the IR index slot now includes a different IR file, you’ll be alerted that the associated IR cannot be found, and the IR block utilizes this new IR file within the configured index slot. You’ll need to save the preset (or recreate a new Favorite for the IR block) with this reference to the new IR file, or configure the IR block to use a different, occupied IR slot, to avoid seeing the alert pop-up on future loads of the preset/Favorite.
 18
18 

•Once an IR block is configured with an IR Library index selection, and the preset then saved (or the IR Favorite or IR User Model Default then created), the IR file retains this reference signature when exported from the library—thus, even if you import the exported IR file again into any index slot within your IRs Library, the IR block will still be able to locate and utilize it.*
Yes, the above rules all sound a bit complicated. But in typical use, all this really means is that if you happen to import your IRs into different IR library slots than where they used to be, your saved preset, IR Favorite, or IR Model User Default will not lose its IR file reference!
 *NOTE: The IR file reference functionality is also incorporated in the Helix Native
  plugin. Therefore, presets and IR Favorites exported from Helix Native v3.0 will exhibit the same behaviors and attempt to locate their referenced IR .wav files from withintheHXEditIRlibraryuponloading.Likewise,presetsandIRFavoritesexported from HX Edit will attempt to locate their IR blocks’ referenced IR .wav files when loaded within Helix Native. The moral of the story here is simply to import the same IR .wav files into both HX Edit and Helix Native if you plan on sharing your crafted presets and/or Favorites between them, and the proper IRs will automatically be
utilized from your IR library, regardless the IR slots where they reside.
 NOTE: We highly recommend using theCreate Backup feature in HX Edit to make
  it easy to restore your complete preset and IR libraries (seepage 27). Immediately after performing a Restore From Backup, it is also best to power your device off and on again and allow all presets to “rebuild,” for best preset performance and IR file
reference functionality.
 19
19 
Favorites Panel
The Librarian’s Favorites panel provides a list of all blocks you’ve added to your Helix/ HX device’s library as Favorites. This functionality allows you to customize any Helix/HX amp,cab,IR,effects,send/return/fxloop,orlooperblock’ssettings,andthenoptionally name and store it within the Favorites library of your device, where it is easily accessed for adding to presets. Additionally, you can export your Favorites to your computer as (.fav) files, allowing you to create a massive collection, import into other Helix/HX devices, and share with others!
TIP: The Helix Native plugin also offers the same Favorites functionality—which  means you can freely import, export, and even drag and drop your Favorites between HX Edit and Helix Native!
Initially, this Favorites panel is empty, awaiting your creation or import of up to 128 Favorites. Once added, Favorites appear within the panel as shown below and can be renamed, copied, exported, reordered, and cleared as desired—see “Managing Favorites” on page 21.
Favorites tab
Favorites commands
View By menu
Selected Favorite
The Favorites panel
Adding Blocks as Favorites
Once you’ve dialed in a processing block exactly the way you like it, you can save it as a Favorite so the block can be accessed very quickly when building presets, complete with your stored parameter settings, bypass state, and existing bypass assignment.* Input, Output, Split, and Merge block types are not available to be saved as Favorites.
 *NOTE: For HX Effects devices, existing bypass assignments are not saved with
 Favorites.
There are several ways to add a block to your Favorites library:
1.Add or select any amp, cab, IR, effects, send/return/fx loop, or looper block in the Signal Flow and tweak its parameters and block bypass state as desired.
 NOTE: If you don’t want a Favorite to be recalled with a stored bypass
  assignment, add the block to Favorites before you create an assignment (or remove any existing bypass assignment before proceeding). Controller and
snapshot type assignments are not stored as part of Favorites.
2.With your block still selected within the Signal Flow, click on the “star” button at the top right of the Inspector’s Edit Tab.
3.Alternatively, right-click on the block within the signal flow and choose Save As Favorite.
4.The Save As Favorite window appears.
 20
20 
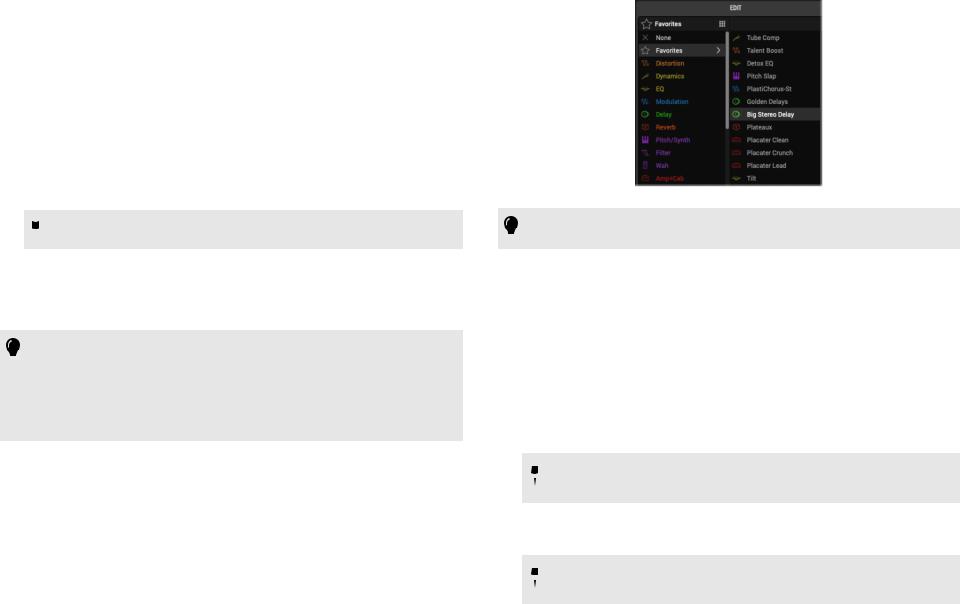
At the top of the Save As Favorites window, you can choose to either Add as a
New Favorite or Replace an Existing Favorite. To Add as a new Favorite, choose this option.
•Type in a custom name for your Favorite, if desired.
•If your Favorites panel’s View By sorting option is set for Device List (which displays Favorites in the same order as you see on your Helix/HX device), you will see the “Choose where to add in favorites list” text in the Save As Favorites window, as shown in the preceding image. Optionally, click in a different, desired position where you would like your new Favorite saved.
•ClickSave to add the new Favorite, or Cancel to exit without adding the Favorite.
To Replace an existing Favorite, choose this option at the top of the window. Note that if the block you selected is already an existing Favorite, this option will be selected as the default, with the existing Favorite highlighted in the list below.
•You can optionally edit the name of the Favorite you are replacing.
•Click Save to add the new Favorite, or Cancel to exit without adding the Favorite.
 NOTE: If you replace and overwrite an existing Favorite that is already in use
  within your presets, the presets remain unchanged.
5.You’ll see the Favorite now added to the Favorites lists within both the Library panel’s Favorites tab and the Edit tab - Model menu’s Favorites category.
Within the Model menu’s Favorites list, you can also right-click any Favorite and choose to Rename or Clear—see “Adding a Block to Favorites” on page 34.
TIPS: YoucanalsoimportFavorites(.fav)filesintoyourFavoriteslibrary,ascovered  in the following sections.
WhenyouaddanIRblockasaFavorite,theIRfileyouhaveitsettouseisautomatically recalled, even if moved to a different IR slot in the IR Library (see“IR File Reference” on page 18).
The contents of your Favorites library are included when you a create a backup (see
“Creating & Restoring Complete Device Backups” on page 27).
To Insert a Favorite into your Current Preset
Double-click on the desired Favorite within the Favorites panel to insert it into the currently-selected block location within the Signal Flow. Note that if an existing processing block is currently selected, this replaces that block with the Favorite. Or, you can alternatively drag from the Favorites panel directly into an empty block location within the signal flow (also see “Drag and Drop Favorites” on page 22).
You can also choose a Favorite from the Edit tab - Model menu - Favorites category, much like choosing any other category’s model, to add it to your tone.
Once a Favorite is inserted into your preset, you can optionally edit its settings further, add bypass, controller, and snapshot assignments, and move, copy, paste, or clear it just as you can with any other block. Note that the same preset rules apply to Favorites as they do for blocks of the same model type (e.g., a maximum block number and type limits, DSP limit, etc.).
The Model Menu - Favorites Category
TIP: You can also right-click on any Favorite within the Model menu - Favorites  category list to Rename, Clear, or change the View By sort order.
Managing Favorites
The row of commands at the top of the Favorites panel allows you to Import, and
Export (see the next section), Copy, Paste, or Clear the selected Favorite(s) within the panel. You can also access these commands via the application’s Edit menu or via right-click on any Favorite. Note that the following commands are not available for Undo/Redo.
•To Copy and Paste - Select one or multiple Favorites within the panel and choose the Copy command. Select the Favorite within the panel above which you want to position the copied Favorite(s), and choose the Paste command.
•To Clear - Select one or multiple Favorites within the panel and choose the Clear command to delete them from the Favorites library.
 NOTE: Clearing any Favorite from the Favorites panel does not remove
  instances of the Favorite block that is in use within any preset—your presets
simply retain the block and its existing settings.
•To Rename - Select the Favorite within the panel and choose the Rename command to type in your own custom name. It can be extremely helpful to name your Favorites descriptively!
 NOTE: The name of the Favorite within the Favorites panel/model menu is also
  the name that is displayed on your device’s footswitch scribble strip if you have
a bypass assignment created for the block.
 21
21 

•To Reorder - When the View By option is set to Device List, it is possible to drag Favorites within the panel to reorder them (also see the next bullet point).
Click on one or multiple Favorites and drag up/down within the panel. A blue line appears while dragging to indicate the target “drop” location.
•To Change the List Sorting - Choose the preferred View By option from the menu to change the sorting order. This View By option can also be changed by right-clicking within the Model menu - Favorites category list, or within the
“Preferences - View Tab”. The View By options are:
•Device List - The same order as displayed on your device’s Favorites list. Note that when this option is in use, you can reorder Favorites in the panel or on your device, and the lists remain in sync.
•Category - By the model’s original Model menu Category (Distortion, Modulation, Amp+Cab, etc.)
•Name (A-Z) - Ordered alphabetically by the Favorites’ names.
Importing and Exporting Favorites
Any of the Favorites within the panel can be exported as Favorite (.fav) files to your computer. These files can then be imported into HX Edit for any Helix or HX device.
To Import a Favorite
1.There are a few ways to access the Import Favorites command:
-Click the Import command at the top of the Favorites panel
-Choose Import from the application’s File menu
-Right-click on any Favorite within the Favorites panel and choose Import
Then browse to the folder on your computer containing your .fav files, and choose the file(s) to import.
 TIP: You can also import via drag and drop—see the following section.
2.If the panel’s View By menu is set to the Device List option, the Import Favorites window appears, where you can choose to insert the imported file(s) as new
Favorites (the default option), or you can choose to Replace the currently selected Favorite(s) within the list. Click OK to import.
 NOTE: ItispossibletoImportthesame.favfilemorethanoncewithintheFavorites
  panel. The best practice is to avoid creating duplicate Favorites, and use unique and descriptive names for your Favorites within your library!
To Export a Favorite
1.Click to select the desired Favorite(s) within the Favorites panel.
2.There are a few ways to access the Export Favorites command:
-Click the Export command at the top of the Favorites panel
-Choose Export from the application’s File menu
-Right-click on any Favorite within the Favorites panel and choose Export
3.Browse to or create a folder on your computer where you wish to save your .fav files.
TIPS: You can also import via drag and drop—see the following section.
 Once a Favorite is inserted into the signal flow, you can copy the block and paste it into the current, or another preset. You can also paste it into another HX
Edit device’s window, or into Helix Native (in which case it is pasted as a regular, non-Favorite block type, but with all settings intact).
It’s a good idea to create a single “Favorites” folder on your computer, especially if you own more than one Helix/HX device and/or Helix Native, and export all your Favorites there to make them easy to find!
Drag and Drop Favorites
You can also drag Favorites to perform the following tasks:
•Drag from the Favorites panel directly into the Signal Flow to insert the Favorite block into your current preset.
•Drag one or multiple Favorites (.fav) files from your computer directly into HX Edit to import them. Drop directly into the Favorites panel, on top of an existing
Favorite within the list to import the Favorite(s). The Import Favorite window appears where you can choose to import before the Favorite you dropped onto, or to replace it.
•Drag from the HX Edit - Favorites panel to your computer to export as Favorites file(s).
•If you have multiple Helix or HX devices connected, drag from one HX Edit window’s Favorites panel into the other HX Edit Favorites panel to import it there.
•Drag either direction between the HX Edit and Helix Native plugin Favorites panels to import Favorites.
•Drag from another device’s HX Edit (or the Helix Native) - Favorites panel directly into the HX Edit Signal Flow to add the block to your current tone. Note that this adds the block along with its settings as a standard block type (not as a Favorite) into the preset—no new Favorite is imported into the library of the receiving device.
 22
22 
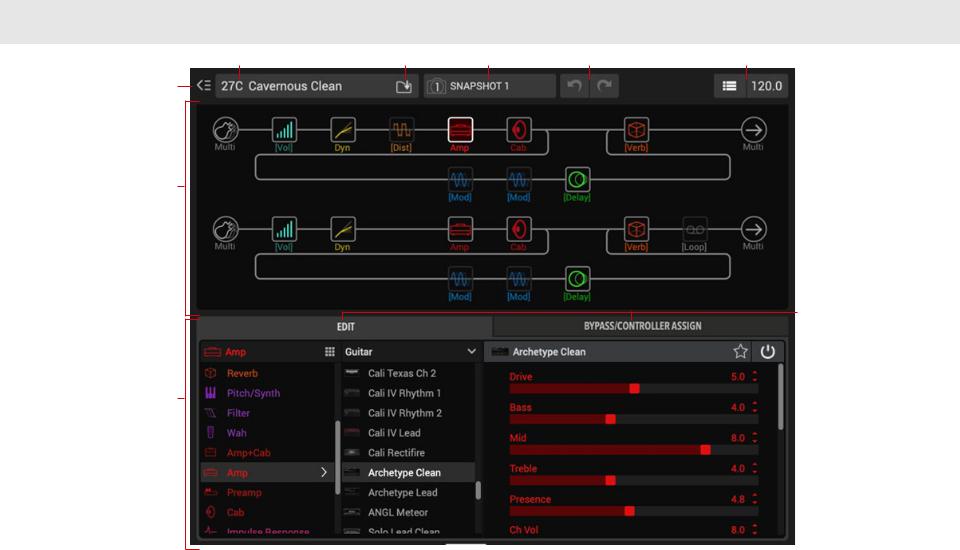
Working in the Editor
The Editor portion of the HX Edit user interface consists of the Signal Flow and Inspector windows. The Signal Flow window is where you’ll see the signal paths for your currentlyloaded preset, appearing much like the Home screen of your Helix, or Signal Flow screen of your HX device. The lower Inspector window contains 2 tabbed panels, Edit & Bypass/ Controller Assign, where you can select models, tweak parameters, configure controllers, and more. Regardless of which of these tabs you have selected, the current preset’sName Field, Save, Snapshots, Undo, &Tempo optionsarealwaysavailableatthetopofthewindow.Additionally,therearededicatedwindowsfortheCommand Center forMIDIassignments (see page 45), and the Global EQ (Helix, HX Stomp XL, and HX Stomp only—see page 49), accessible from the application’s Window menu. If you have not already done so, be sure to read through the in-depth information in your device’s Owner’s Manual to get an understanding of the features we’ll be covering in the following sections.

 HX Device Owners: HX Edit application functionality described within this chapter is the same with Helix or HX devices, except where noted.
Preset Name Field |
Preset Save Button |
Snapshots Menu Undo / Redo Buttons |
Tempo Controls |
Librarian Show/Hide
Button
Signal Flow Window
Edit & Bypass
Controller Assign Tabs
Inspector Window
 23
23 

Naming & Saving the Preset
The Preset Name field at the top of the Editor displays the title of the currently loaded preset. Double-click on the text here to optionally rename the preset. Whenever you see your preset’s title appearing in the italicized text at the top of the Signal Flow window, it indicates that the preset has been edited from its last-saved state.
The Preset Save button at the top of the Editor launches the Save To Library window, where you can optionally re-title the preset in the Name field, and then choose the desired Setlist and Preset location to save the currently-loaded tone, overwriting the preset that resides within the selected location. (The currently loaded preset is selected by default, so you can overwrite it simply by clicking the OK button.)
The Preset Save To Library window
Alternatively, you can choose the Preset Save or Preset Save As command from the
HX Edit – File menu. As covered in “Presets Panel” on page 13, there are also the Librarian window options, Copy and Export, to create & store copies of your presets.
Configuring & Managing Snapshots
Your device offers the ability to configure the 8 snapshots within a Helix preset (or 3 snapshots of HX Stomp preset, or 4 snapshots of an HX Stomp XL or HX Effects preset), allowing you to recall a customized set of options for your current blocks instantly, without the brief lag time associated with changing presets! A snapshot is capable of storing the bypass state of any amp or effects block, up to 64 assigned parameter values, tempo settings, and more (please see your device’s Owner’s Manual for specifics).
There are two ways to select a snapshot within HX Edit: by clicking on the Snapshots menu at the top of the Edit window, or by using the commands within the application’s Snapshots menu. To edit its settings, select the numbered snapshot you want as your destination, then configure the desired tone options for this snapshot.*
The Edit window’s Snapshots menu |
The menu bar’s Snapshots menu |
 *NOTE: You can use your device’s Global Settings > Preferences > Snapshot
 Edits to choose between Recall (automatically stores your changes to the current snapshot) versus Discard (does not store changes to the current snapshot).
The camera icon within the Edit window’s Snapshots menu is displayed in red when the hardware’s option is set toDiscard.
Once your desired destination snapshot has been selected, use the following steps to configure your settings.
To Store a Block’s Bypass State Per Snapshot - Click on the Bypass button above any block within the Signal Flow and set your desired bypass state for the block (or you can toggle the block’s Bypass button within the Edit tab). Any amp or effects block’s Bypass state will, by default, be remembered and recalled per
Snapshot.
If you prefer to exclude a block from being controlled by Snapshots, select the block and set the Snapshot Bypass option from the block’s right-click menu to “off” (so that no checkmark appears at the left of the menu option). Or, you can right-click on the block’s Bypass button within the top right of the Edit tab and access the Snapshot Bypass command from its menu. Choosing the Snapshot Bypass option from the menu again (so that the checkmark appears at the left of the menu command), returns the block to the default Snapshot behavior.
Edit tab - Block Bypass button right-click menu
Block right-click menu
The Snapshot Bypass option
 24
24 

To Store a Parameter’s Values Per Snapshot - Select the desired block within the Signal Flow, then right-click directly on the desired parameter’s slider within the Edit tab and choose the Snapshots controller option. This creates the snapshot assignment for the parameter.
You can then simply load a snapshot and adjust the snapshot-assigned parameter to the desired value. Repeat this step for each snapshot as desired, and the parameter values are stored and recalled with each snapshot. We cover more about configuring controller options in “The Bypass/Controller Assign Tab” on page 39.
To Store a Command Center Messages and Command Values Per Snapshot
The Value parameters of any instant MIDI CC, Bank/Prog, and MMC message, plus the state (Dim or Lit) of any CC Toggle and Ext Amp messages are always stored and recalled when selecting a snapshot. Therefore, there is no need to manually set any of these parameters to a snapshot assignment within the Command Center—see page 45.
Attention Helix Native Plugin Users: Snapshot settings are compatible within  presets between Helix, Helix Rack & Helix LT devices, and the Helix Native plugin!
Copying, Pasting, Renaming & Customizing Snapshots
The Copy and Paste Snapshot commands are available within the app’s main menu. Or, right-click on the Edit window’s Snapshots menu to access these commands as well as the snapshot Rename and LED color customization options. These snapshot name and LED color options affect the scribble strip names (or names in Performance View on Helix LT) and footswitch LED colors when the footswitches are in Snapshot
Select mode.
The context menu for the Snapshots menu name field
To Copy & Paste a Snapshot - It is possible to copy all the settings of one snapshot and paste them to another snapshot within the same preset. Select and load the snapshot you wish to copy and select Copy. Then select and load the snapshot you wish to overwrite and choose Paste to paste the clipboard contents, replacing the currently loaded snapshot.
 NOTE: The action of pasting a copied snapshot is not tracked by the HX Edit
  Undo / Redo feature (also see next section).
To Rename a Snapshot - Right-click the desired snapshot from the Snapshots menu and select Rename Snapshot. Type in your new name, then press Enter/ Return on your keyboard.
To Customize a Snapshot’s LED Color - When your device is set to Snapshot footswitch mode, each footswitch LED defaults to a red color. If you prefer to customize the LED color for the current Snapshot, choose the desired color from the right-click menu. Or choose Auto to restore the default behavior, or Off for no LED.
 NOTE: Remember that you’ll need to Save before switching to another preset to
  retain your edited snapshot settings& customizationswithin the current preset! The snapshot that is in use when you save your preset is the one that is recalled when the
preset is loaded again.
Undo / Redo
The HX Edit application supports Undo and Redo for most editing actions within the Signal Flow and Edit tab of the current preset, whether the edits are made within HX Edit or directly on the connected Helix/HX hardware, accessible via the Undo and Redo buttons at the top of the main window (or from the Edit menu).* The Undo / Redo history is tracked individually per device window (if you happen to have more than one Helix/HX device connected). Your Undo / Redo history is retained until you load a different preset, exit the application, or disconnect or power off your connected Helix or HX device.
 *NOTE: See “Software Edits vs. Hardware Edits” on page 26 for additional
  behavior details.
The Undo and Redo buttons
Undo is available for most actions performed within the Signal Flow and Edit tab in HX Edit, including:
•Parameter changes
•Snapshot selection
•Block model changes
•Signal path changes (block bypass states, adding/cutting, clearing blocks, changing path structure, etc.)
•Hardware edits and edit actions performed via external controller and MIDI CC & PC messages (see “Software Edits vs. Hardware Edits” on page 26)
 25
25 
Loading...