


FLOOR
POD
CLASSIC POD TONE ON THE FLOOR
Pilot’s Guide
Manuel de pilotage
Pilotenhandbuch
Pilotenhandboek
Manual del Piloto
40-00-0094 |
Electrophonic Limited Edition available @ www.line6.com |
Rev A |
All product names referred to in this manual are trademarks of their respective owners, which are in no way associated or affiliated with Line 6. These trademarks of other manufacturers are used solely to identify the products of those manufacturers whose tones and sounds were studied during Line 6’s sound model development.

You should read these Important Safety Instructions.
Keep these instructions in a safe place.
Before using your Floor POD, carefully read the applicable items of these operating instructions and the safety suggestions.
1.Obey all warnings on the amp and in the Floor POD Manual.
2.Connect only to AC power outlets rated 100-120V or 200-240V 47-63Hz (depending on voltage range of the unit; refer to back panel).
3.Do not perform service operations beyond those described in the Floor POD Manual. Service is required when the apparatus has been damaged in any way, such as:
•power-supply cord or plug is damaged
•liquid has been spilled or objects have fallen into the apparatus
•the unit has been exposed to rain or moisture
•the unit does not operate normally or changes in performance in a significant way
•the unit is dropped or the enclosure is damaged.
4.The bottom of the metal chassis can get hot during operation. Do not touch during operation or shortly after.
5.Do not place near heat sources, such as radiators, heat registers, or appliances which produce heat. Keep the rear of the unit at least three inches from walls or other items that might block heat radiation.
6.Do not block any of the ventilation openings or use in an enclosed space.
7.Guard against objects or liquids entering the enclosure. Do not use or place unit near water.
8.Do not step on power cords. Do not place items on top of power cords so that they are pinched or leaned on. Pay particular attention to the cord at the plug end and the point where it connects to the amp.
9.Unplug the amp when not in use for extended periods of time. Unplug the amp during lightning storms.
10.Clean only with a damp cloth.
11.Do not defeat the safety purpose of the grounding type plug. A grounding type plug has two blades and a third grounding prong. The third prong is provided for your safety. When the provided plug does not fit into your outlet, consult an electrician for replacement of the obsolete outlet.
12.Only use attachments/accessories specified by the manufacturer.
13.Prolonged listening at high volume levels may cause irreparable hearing loss and/or damage. Always be sure to practice “safe listening.”

Line 6, Floor POD, Spider III, FBV, FBV Shortboard, FBV Express, FBV2 and Vetta are trademarks of Line 6, Inc. All other product names, trademarks, and artists’ names are the property of their respective owners, which are in no way associated or affiliated with Line 6. Product names, images, and artists’ names are used solely to identify the products whose tones and sounds were studied during Line 6’s sound model development for this product. The use of these products, trademarks, images, and artists’ names does not imply any cooperation or endorsement.
CAUTION: This equipment has been tested and found to comply with the limits for a Class B digital device pursuant to Part 15 of FCC Rules. Operation is subject to the following two conditions: (1) This device may not cause harmful interference, and (2) this device must accept any interference received, including interference that may cause undesired operation.
WARNING: To reduce the risk of fire or electric shock, do not expose this appliance to rain or moisture.
CAUTION: To reduce the risk of fire or electric shock, do not remove screws. No user-serviceable parts inside. Refer servicing to qualified service personnel.
The exclamation point within a triangle means “caution!” Please read the information next to all caution signs.
The lightning symbol within a triangle means “electrical caution!” It indicates the presence of information about operating voltage and potential risks of electrical shock.
This symbol within a triangle means “caution! hot surface!” It is placed in areas that may become to hot to touch when device is in operation.
Floor POD Pilot’s Guide © 2006, Line 6, Inc.
L
|
|
|
|
|
|
|
|
|
|
|
8 |
|
|
|
9 |
|
|
|
|
|
|
|
|
|
|
|
|
|
|
|
|
|
|
|
|
|
|
|
7 |
|
|
|
|
|
|
|
|
|
NES |
|
|
|
|
|
|
|
|
|
|
|
|
|
|
|
|
|
|
|
|
|
|
|
|
|
|
|
|
|
|
|
ER |
PHO |
|
|
|
|
|
|
|
|
|
|
|
|
|
ST |
E |
|
|
||
|
|
|
|
|
|
|
|
|
|
|
MA |
|
|
|
|
|
|
|
|
|
|
|
|
|
|
|
P |
|
UM |
|
|
||
|
|
|
|
|
|
|
|
|
|
OL |
|
|
|
|
||
|
|
|
|
|
|
|
|
|
AM |
V |
|
|
|
|
|
|
6 |
|
|
|
A |
|
T/ |
E |
|
|
|
|
|
|
|||
|
|
|
C |
|
|
|
|
|
|
|
||||||
|
|
|
|
|
|
|
E |
|
OD |
|
|
|
|
|
|
|
|
|
|
|
|
IR |
.M |
|
|
|
|
|
|
|
|||
|
|
|
|
|
D |
|
R |
|
|
|
|
|
|
|
|
|
|
|
|
|
|
|
.I. |
|
|
|
|
|
|
|
|
|
|
|
|
|
|
|
T |
|
|
|
|
|
|
|
|
|
|
|
|
|
|
|
H T |
|
|
|
|
|
|
|
|
|
|
|
|
|
|
|
|
IG U |
|
|
|
|
|
|
|
|
|
|
|
|
|
|
|
|
|
P |
|
|
|
|
|
|
|
|
|
|
|
|
|
|
|
R T |
|
|
|
|
|
|
|
|
|
|
|
|
|
|
|
|
U |
|
|
|
|
|
|
|
|
|
|
|
|
|
|
|
|
O |
|
|
|
|
|
|
|
|
3 |
|
|
|
|
|
|
|
|
|
|
|
|
|
|
|
|
0 |
10 |
||
|
|
|
|
|
|
|
|
|
|
|
|
|
|
|
||
|
T |
T |
|
|
|
|
0 |
|
|
|
10 |
|
|
|
TREBLE |
|
E F PU |
|
|
|
|
|
|
|
|
|
|
/ PRESENCE |
|||||
O U |
T |
2 |
|
|
|
|
|
BASS |
|
|
|
|
|
|||
|
|
|
|
|
|
|
|
|
|
|
||||||
|
|
|
|
|
|
|
|
/ MID |
|
|
|
|
|
|
||
|
|
0 |
|
10 |
|
|
|
|
|
|
|
|
|
SAVE |
|
|
|
|
|
DRIVE |
|
|
|
|
|
|
|
|
|
|
|||
|
|
|
|
|
|
|
|
|
|
|
|
|
|
|||
|
|
/ COMPRESSOR |
|
|
|
|
|
13 |
|
|
|
|||||
|
|
|
|
|
|
|
|
|
|
|
|
|
|
|||
|
|
|
|
|
|
|
|
|
|
|
|
|
|
|
HOLD FOR |
|
|
|
|
|
|
|
|
|
|
|
|
|
|
|
ALT FEATURES |
|
|
|
|
CLASSIC |
|
|
HI GAIN |
|
|
|
|
|
|
|
||||
10 |
11 |
POWER |
CD |
|
/MP3 |
|
PHASER |
|
FLANGE/ |
|
CHORUS |
|
MOD |
15 |
TAP |
|
|
|
14 |
|
HOLD FOR |
|
TUNER |
CLASS A |
TREADPLATE |
FLOOR |
|
1 |
|
POD |
CLEAN |
INSANE |
|
AMP MODEL |
|
CLASSIC POD TONE ON THE FLOOR |
12 |
|
|
I |
|
|
NP |
|
|
UT |
|
|
SWEEP |
|
|
ECHO |
|
|
TREM |
|
|
4 |
|
|
DELAY |
|
REVERB |
|
|
|
DELAY/VERB |
||
|
|
18 |
|
|
PRESS TOE |
|
|
FOR WAH |
5 |
|
17 |
0 |
10 |
|
CHAN VOL |
|
|
/ NOISE GATE |
HOLD FOR |
|
|
|
|
|
|
FX ON/OFF |
/DIST |
/MOD |
BYP/DLY |

 16
16 

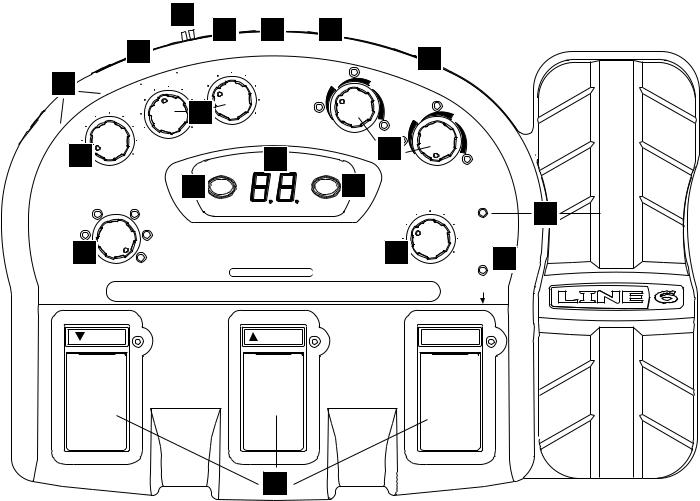
Controls
1.Amp Model
Spin this knob to select one of 12 models of classic or modern amps. Each time you select a new model, Floor POD automatically calls up great-sounding amp controls so you can start playing right away. Turn the Amp Model knob all the way down (counter-clockwise) to turn all amp models off.
2. Drive / Compressor
Drive is like the volume or gain control on other ampsit controls how much distortion or overdrive you get in your sound. Press and hold the SAVE button while turning the Drive knob to control the Compressor. Try cranking it all the way up for a punchy sound with lots of sustain.
3.Tone Controls
The Tone Control knobs work just like they do on other amps. The Tone Controls are customized for each amp model to match the behavior of the original amp that was modeled. Press and hold the SAVE button and turn the Bass and Treble knobs to control Mid and Presence.
4. Smart Control FX
Spin one of these knobs to get great FX, fast and easy:
The Mod knob selects Flanger/Chorus, Phaser or Tremolo effects, with a range of settings – from subtle to overpowering – for each effect. The LED shows the active effect. Simply stop turning the knob when you hear something cool!
The Delay/Verb knob selects Delay, Sweep Echo, or Reverb and gives you a wide selection of settings. The LED shows the active effect and flashes the delay time for delays. Tap the Tap button to change the delay time.
5. Chan Vol / Noise Gate
Channel Volume lets you balance the relative volumes of different preset amp-and-effect setups that you store in your Floor POD's channels. Press and hold the SAVE button while turning the Chan Vol knob to control the Noise Gate, which helps cut down on hiss and noise when you're not playing.
6. Left and Right Outputs
This one's easy. Use the Left Output for a mono output to your amp or recording device. Use both Left and Right for your stereo output to either two amplifiers or a stereo input on your recording device.
7. Direct/Amp A.I.R. Mode Switch
Set this switch to Direct when connecting Floor POD directly into recording equipment, a mixing board, etc. Set it to Amp when plugging Floor POD into the front of your guitar amp. Or, break the rules, don’t take our advice and trust your ears by using whichever setting you think sounds best for your situation!
8. Master Volume
This knob controls the overall level of the Left and Right Output as well as the level of the Phones. This control is not saved with preset amp-and-effect setups.
9. Phones
Use this output to listen in stereo with headphones, or as a direct out for recording. Make sure you turn the Master Volume down all the way and then slowly turn it up to adjust the level of your headphones. This jack was designed for 1/8-inch phones you'd connect to an MP3 player, but 1/4-inch phones will also work with an adapter.
10. Power Jack
Please only use the Line 6 power supply that came with your Floor POD. Using a different power supply could damage the unit.
11. CD/MP3
Plug the output of your CD or MP3 player into this jack so you can jam along to your favorite tunes. To balance the music with your guitar you’ll need to adjust the output volume on your CD player or MP3 player.
12. Input
Dude, plug your guitar in here.
13. Save / Hold for Alternate Features
Press this button to save a Channel Memory (preset amp-and-effects setup) you’ve created or edited. You can save 64 different Channel Memories in your Floor POD. Press and hold this button to adjust the alternate features for some knobs: Compressor, Mid, Presence, and Noise Gate.
14.Tap / Hold for Tuner
Tapping this button sets the tempo for delays, which allows you to sync the delay time to the tempo of the song. Press and hold this button to access the chromatic Tuner.
15. Channel Memories (Display)
Displays the current Channel Memory (preset amp- and-effects setup). Floor POD has 64 Channel Memories to choose from.
16. Footswitches
There are two footswitch modes; Channel Memory and FX On/Off. To toggle between modes press and hold the BYP footswitch for 1 second.
•Channel Memory Mode: The  and
and  footswitches allow you to select a preset Channel Memory. Scroll through Channel Memories by pressing and holding one of these footswitches. The BYP (bypass) footswitch does just that, bypassing all amp models and effects - including the pedal.
•FX On/Off Mode: This mode allows you to turn effects on and off within a preset. The DIST footswitch turns a gain boost on and off, while MOD and DLY turn the Modulation and Delay/Reverb effects on and off respectively.
17. FX On/Off LED
This is only lit when you’re in FX On/Off mode. If it is NOT lit, you know you’re in Channel Memory mode.
18. Pedal
To toggle the pedal between Volume and Wah control, press the pedal fully forward to click the toe-switch. The Wah LED is lit when Wah effect is on. If it is NOT lit, your pedal is controlling Volume.

Amp Models
All amp models in Floor POD are from Line 6's original and award winning POD 2.0, which has been used on countless recordings.
Clean
Red LED – Line 6 Clean, a Line 6 original. To create this one we matched the crisp top end of
a solid state amp with a rich, satisfying tube amp style bottom.
Green LED – Black Panel #2 based on* a 1965 Blackface Fender® Twin Reverb®.
The Twin has a lot of tonal flexibility and is at home in a great many different situations, from classic surf to Ted Nugent. Dial up the reverb, switch on the tremolo, and look out for bikinis.
Class A
Red LED – Brit Class A based on* a Vox® AC 30. Much of the unique character of the Vox® sound
can be attributed to the fact that Class A amps overdrive in a very different way than most other amps. This is the essential element of the sound of Radiohead, Queen, U2, REM, the Beatles and more.
Green LED – Boutique #3 based on* a Budda Twinmaster head.
The Budda philosophy is all about power tube distortion and simplicity is key.
Classic
Red LED – Brit Classic based on* a 1968 Marshall® Plexi.
Hendrix used Marshalls of this era and 10 years later Van Halen’s first few records owed their “brown sound” to a 100 watt Plexi. This amp continues to be one of the most recorded amplifiers in rock history as bands rediscover its power. Green Day used it on the “P-90” record.
Green LED – Fuzz Box based on* the Arbiter® Fuzz Face.
OK, so it’s not technically an amp, but this model
is what a Fuzz Face would sound like if played through a PA stack.
* All product names are trademarks of their respective owners, which are in no way associated or affiliated with Line 6. These product names, descriptions, and images are provided for the sole purpose of identifying the specific products that were studied during Line 6’s sound model development. FENDER® and Twin Reverb® are registered trademarks of Fender Musical Instruments Corporation. Vox® is a registered trademark of Vox R&D Limited. MARSHALL® is a registered trademark of Marshall Amplification PLC. ARBITER® is a registered trademark of Arbiter Group Plc.
Hi Gain
Red LED – Brit Hi Gain based on* the Marshall® JCM800.
This amp has recently enjoyed a bit of a revival as many metal guitarist rediscover its unique tone. Guitarists such as Zakk Wylde and Slash have long appreciated its punch and clear harmonics.
Green LED – Line 6 Crunch #2, a Line 6 original.
This is our version of a hotrodded 50 watt tube head with better EQ. The EQ is post distortion, so it’s more expressive than the average 50 watt tube head. The perfect tone for playing Foo Fighters or Blink 182.
Treadplate
Red LED – Treadplate based on* a 1994 Mesa/Boogie® Dual Rectifier® Tremoverb.
Use this amp model to get that tight, high gain sound used by bands like Metallica. The tone controls are post-distortion and interact with each other and with Drive.
Green LED – Treadplate #2 based on* a 1995 Mesa/Boogie® Dual Rectifier® head.
Essential to the 7-string metal guitarist of the 90’s,
this sound continues to be heard on countless recordings. The tone controls have even more influence at high gain settings, so you can scoop the mids and increase the bottom end. Dial it up and pound out some Limp Bizkit, Korn, Godsmack, or Fall Out Boy.
Insane
Red LED – Line 6 Insane, a Line 6 original.
This model is the most famous Line 6 original tone. You get ridiculous, rich tube drive to shame the distortion of pretty much any amp on the planet while still retaining tonal definition. Crank up the Drive control and take no prisoners.
Green LED – Modern Hi Gain based on* the Soldano X88R.
The Soldano sound is intensely overdriven and the
EQ is after the preamp distortion, which allows for more flexibility. This sound came to light in the late 80’s with guitarists such as Joe Satriani, and is as cool today as it was back then.
* All product names are trademarks of their respective owners, which are in no way associated or affiliated with Line 6. These product names, descriptions, and images are provided for the sole purpose of identifying the specific products that were studied during Line 6’s sound model development. MARSHALL® is a registered trademark of Marshall Amplification PLC. ARBITER® is a registered trademark of Arbiter Group Plc. MESA/BOOGIE® and RECTIFIER® are registered trademarks of Mesa/Boogie, Ltd.
Saving Presets
You can edit any of Floor POD’s preset Channel Memories or create one of your own and store it to whatever location you want. You’ll notice that when you adjust or change something in a preset the SAVE LED is lit solid. To save your sound, follow these steps:
• Press the SAVE button
•The SAVE light will now flash. Use the arrow up/down footswitches to select the preset location
you want to store the new preset in.
•Press SAVE a second time and you’ll notice the preset number will blink off and on confirming you
have saved.
•All user controls are saved in their current state.
Creating Presets
To create a preset from scratch, start with presets 6164, they’re the default presets with no amp model or effects on. Select an amp model, turn on some effects, and adjust the sound to your liking. Once you’re done, follow the steps above for saving.
Tuner
Press and hold the TAP button for 2 seconds to enter tuner mode – note that while in tuner mode the output of Floor POD is muted. You can press any button or footswitch to exit tuner mode.
Play a note on your guitar and Floor POD will show you its pitch by displaying the note name in the display. All notes are displayed as naturals or flats, so you’ll see Ab instead of G# (and so on).
The LEDs around the Amp Model knob tell you if the note is sharp or flat. Red lights on the left hand side of the knob tell you the note you're playing is flat. Red lights on the right tell you the note is sharp. The string is in tune when both Classic and Hi Gain LEDs turn green.
Performing a factory reset:
To reset your Floor POD and restore factory default settings – including original preset sounds – hold down the MOD and DELAY footswitches while plugging the power in. Once “01” shows up in the display, unplug
the power. You're done!
Calibrating theWah/Vol pedal:
To calibrate the pedal on your Floor POD, unplug the power, press and hold the toe-switch on the Vol/Wah pedal, and connect the power while that switch is pressed. Once “PC” appears in the display, press and hold the DIST footswitch until a number flashes in the display. Move the pedal from toe-down to heeldown position and back up to the toe-down position, clicking the toe-switch. Wait 5 seconds, then unplug the power. You're there!

Amp Model Quick Reference
Amp Model Knob |
Red |
Green |
|
|
|
Clean |
Line 6 Clean |
Black Panel #2 |
|
|
|
Class A |
Brit Class A |
Boutique #3 |
|
|
|
Hi Gain |
Brit Classic |
Fuzz Box |
|
|
|
Treadplate |
Treadplate |
Treadplate #2 |
|
|
|
Insane |
Line 6 Insane |
Modern Hi Gain |
|
|
|
Alternate Features Quick Reference Chart
The Drive, Bass, Treble, and Channel Volume all have alternate features detailed in the chart below. To access them simply press and hold the SAVE button while turning one of the knobs.
Knob |
Alternate Feature |
|
|
Drive |
Compressor: adjusts threshold |
|
|
Bass |
Mid: adjusts the midrange EQ |
|
|
Treble |
Presence: adjusts the Presence EQ |
|
|
Chan Volume |
Noise Gate: adjusts threshold |
|
|
FLOOR
POD
CLASSIC POD TONE ON THE FLOOR
Manuel de pilotage
40-00-0094 |
Electrophonic Limited Edition available @ www.line6.com |
Rev A |
Tous les noms de produits mentionnés ici sont des marques commerciales appartenant à leurs détenteurs respectifs. Ils ne sont nullement associés ni affiliés à Line 6. Les marques commerciales de fabricants tiers servent exclusivement à décrire certains de leurs produits dont les sons et timbres ont été étudiés par Line 6 pour le développement de ses modèles sonores.

Lisez attentivement ces informations importantes liées à la sécurité. Conservez ce manuel dans un lieu sûr pour toute référence ultérieure.
Avant d’utiliser votre Floor POD, lisez attentivement les consignes d’utilisation et de sécurité ci-dessous.
1.Respectez tous les avertissements imprimés sur le produit et dans le Manuel du Floor POD.
2.Branchez l’appareil à une prise de courant de 100~120V ou de 200~240V, 47~63Hz (selon la tension d’utilisation de l’appareil; voyez son panneau arrière).
3.N’effectuez aucune opération d’entretien autre que celles préconisées dans le Manuel du Floor POD. Faites réparer ce produit s’il a subi un dommage, notamment:
•si le cordon d’alimentation ou sa fiche est endommagé
•si du liquide a été renversé ou des objets sont tombés dans l’appareil
•si l’appareil a été exposé à la pluie ou à l’humidité
•si l’appareil ne fonctionne pas normalement ou ses performances baissent de manière significative
•si ce produit est tombé ou si son boîtier est endommagé.
4.Le fond du châssis métallique peut chauffer durant le fonctionnement. Evitez de le toucher durant ou juste après le fonctionnement.
5.Evitez les emplacements situés à proximité de sources de chaleur comme des radiateurs, des poêles ou tout autre appareil produisant de la chaleur. L’arrière de l’appareil doit être à une distance d’au moins 10cm de murs ou d’autres obstacles pouvant obstruer la ventilation.
6.N’obstruez pas les orifices de ventilation et évitez les endroits clos.
7.Veillez à ne jamais laisser d’objet ni de liquide pénétrer dans le boîtier de l’appareil. Evitez les endroits à proximité d’eau.
8.Ne marchez pas sur le cordon d’alimentation. Évitez de coincer le cordon d’alimentation sous des objets lourds. Faites particulièrement attention au cordon au niveau de la prise secteur et du point de connexion au produit.
9.Débranchez le produit du secteur si vous ne comptez pas l’utiliser durant un bon moment. Débranchez aussi l’appareil en cas d’orage.
10.Utilisez exclusivement un chiffon mouillé pour le nettoyage.
11.Ne perdez pas le bénéfice de fiche avec borne de terre. Une telle fiche est équipée de deux bornes d’alimentation et d’une borne de terre. Cette troisième borne est là pour votre sécurité. Si la fiche n’entre pas dans votre prise secteur, faites remplacer cette prise obsolète par une prise respectant les normes de sécurité.
12.Utilisez exclusivement les fixations/accessoires préconisés par le fabricant.
13.Une écoute prolongée à volume élevé peut provoquer une perte d’audition et/ou des dommages irréversibles de l’ouïe. Consommez toujours les décibels avec modération.

Line 6, Floor POD, Spider III, FBV, FBV Shortboard, FBV Express, FBV2 et Vetta sont des marques commerciales de Line 6, Inc. Tous les autres noms de produits, marques déposées et noms d’artistes sont la propriété de leurs détenteurs respectifs et ne sont nullement associés ou affiliés à Line 6. Ces noms et images servent exclusivement à décrire certains sons modélisés par Line 6 d’après les sons célèbres de ces produits ou artistes. L’utilisation de ces produits, images, marques déposées et noms d’artistes n’implique aucune coopération ni sponsorisation.
PRUDENCE: Ce produit a fait l’objet de tests et a été déclaré conforme aux normes des appareils numériques de classe B, conformément à la partie 15 des réglementations FCC. Son fonctionnement est soumis aux deux conditions suivantes: (1) L’appareil ne peut pas causer d’interférences nocives et (2) doit accepter toute interférence reçue, même des interférences susceptibles d’entraîner un fonctionnement indésirable.
AVERTISSEMENT: Pour éviter tout risque d’incendie ou d’électrocution, n’exposez jamais ce produit à la pluie ni à l’humidité.
PRUDENCE: Pour réduire les risques d’incendie et d’électrocution, ne retirez jamais aucune vis. Ce produit ne contient aucune pièce pouvant être réparée par l’utilisateur. Confiez toute réparation à un technicien qualifié.
Le point d’exclamation dans un triangle signifie “Prudence!”. Lisez toujours les informations précédées de ce symbole.
Le symbole d’éclair dans un triangle signifie “danger d’électrocution!”. Il attire votre attention sur des informations relatives à la tension de fonctionnement et à des risques d’électrocution.
Ce symbole inscrit dans un triangle signifie “Attention! Surface chaude!”. Il est présent aux endroits susceptibles de chauffer fortement pendant l’utilisation et qu’il faut donc éviter de toucher.
Manuel de pilotage du Floor POD ©2006, Line 6, Inc.

L
|
|
|
|
|
|
|
|
|
|
|
8 |
|
|
|
9 |
|
|
|
|
|
|
|
|
|
|
|
|
|
|
|
|
|
|
|
|
|
|
|
7 |
|
|
|
|
|
|
|
|
|
NES |
|
|
|
|
|
|
|
|
|
|
|
|
|
|
|
|
|
|
|
|
|
|
|
|
|
|
|
|
|
|
|
ER |
PHO |
|
|
|
|
|
|
|
|
|
|
|
|
|
ST |
E |
|
|
||
|
|
|
|
|
|
|
|
|
|
|
MA |
|
|
|
|
|
|
|
|
|
|
|
|
|
|
|
P |
|
UM |
|
|
||
|
|
|
|
|
|
|
|
|
|
OL |
|
|
|
|
||
|
|
|
|
|
|
|
|
|
AM |
V |
|
|
|
|
|
|
6 |
|
|
|
A |
|
T/ |
E |
|
|
|
|
|
|
|||
|
|
|
C |
|
|
|
|
|
|
|
||||||
|
|
|
|
|
|
|
E |
|
OD |
|
|
|
|
|
|
|
|
|
|
|
|
IR |
.M |
|
|
|
|
|
|
|
|||
|
|
|
|
|
D |
|
R |
|
|
|
|
|
|
|
|
|
|
|
|
|
|
|
.I. |
|
|
|
|
|
|
|
|
|
|
|
|
|
|
|
T |
|
|
|
|
|
|
|
|
|
|
|
|
|
|
|
H T |
|
|
|
|
|
|
|
|
|
|
|
|
|
|
|
|
IG U |
|
|
|
|
|
|
|
|
|
|
|
|
|
|
|
|
|
P |
|
|
|
|
|
|
|
|
|
|
|
|
|
|
|
R T |
|
|
|
|
|
|
|
|
|
|
|
|
|
|
|
|
U |
|
|
|
|
|
|
|
|
|
|
|
|
|
|
|
|
O |
|
|
|
|
|
|
|
|
3 |
|
|
|
|
|
|
|
|
|
|
|
|
|
|
|
|
0 |
10 |
||
|
|
|
|
|
|
|
|
|
|
|
|
|
|
|
||
|
T |
T |
|
|
|
|
0 |
|
|
|
10 |
|
|
|
TREBLE |
|
E F PU |
|
|
|
|
|
|
|
|
|
|
/ PRESENCE |
|||||
O U |
T |
2 |
|
|
|
|
|
BASS |
|
|
|
|
|
|||
|
|
|
|
|
|
|
|
|
|
|
||||||
|
|
|
|
|
|
|
|
/ MID |
|
|
|
|
|
|
||
|
|
0 |
|
10 |
|
|
|
|
|
|
|
|
|
SAVE |
|
|
|
|
|
DRIVE |
|
|
|
|
|
|
|
|
|
|
|||
|
|
|
|
|
|
|
|
|
|
|
|
|
|
|||
|
|
/ COMPRESSOR |
|
|
|
|
|
13 |
|
|
|
|||||
|
|
|
|
|
|
|
|
|
|
|
|
|
|
|||
|
|
|
|
|
|
|
|
|
|
|
|
|
|
|
HOLD FOR |
|
|
|
|
|
|
|
|
|
|
|
|
|
|
|
ALT FEATURES |
|
|
|
|
CLASSIC |
|
|
HI GAIN |
|
|
|
|
|
|
|
||||
10 |
11 |
POWER |
CD |
|
/MP3 |
|
PHASER |
|
FLANGE/ |
|
CHORUS |
|
MOD |
15 |
TAP |
|
|
|
14 |
|
HOLD FOR |
|
TUNER |
CLASS A |
TREADPLATE |
FLOOR |
|
1 |
|
POD |
CLEAN |
INSANE |
|
AMP MODEL |
|
CLASSIC POD TONE ON THE FLOOR |
12 |
|
|
I |
|
|
NP |
|
|
UT |
|
|
SWEEP |
|
|
ECHO |
|
|
TREM |
|
|
4 |
|
|
DELAY |
|
REVERB |
|
|
|
DELAY/VERB |
||
|
|
18 |
|
|
PRESS TOE |
|
|
FOR WAH |
5 |
|
17 |
0 |
10 |
|
CHAN VOL |
|
|
/ NOISE GATE |
HOLD FOR |
|
|
|
|
|
|
FX ON/OFF |
/DIST |
/MOD |
BYP/DLY |

 16
16 

Commandes
1.Amp Model
Tournez cette commande pour sélectionner un des 12 modèles d’amplis classiques ou modernes. Chaque fois que vous sélectionnez un nouveau modèle, le Floor POD active un superbe modèle d’ampli: il ne vous reste qu’à jouer. Tournez la commande AMP MODEL à fond vers la gauche (dans le sens inverse des aiguilles d’une montre) pour couper tous les modèles d’ampli.
2. Drive/Compressor
DRIVE a le même effet que la commande de volume ou de gain sur d’autres amplis et détermine le niveau de distorsion envoyé au son. Maintenez le bouton SAVE enfoncé en tournant la commande DRIVE pour régler le compresseur. Un réglage maximum produit un son au punch incroyable et du sustain à n’en plus finir.
3. Commandes de timbre
Les commandes de timbre fonctionnent comme sur les autres amplis. Ces commandes se comportent différemment avec chaque modèle d’ampli car elles reproduisent le comportement de l’ampli original modélisé. Maintenez le bouton SAVE enfoncé et tournez les commandes BASS et TREBLE pour régler le médium et la présence.
4. Smart Control FX
Actionnez ces commandes pour accéder rapidement et facilement à d’indispensables effets.
La commande MOD sert à choisir les effets Chorus/Flanger, Phaser ou Tremolo. L’intensité va, pour chaque effet, du subtil au renversant. Le témoin de l’effet actif s’allume. Lâchez tout quand vous aimez ce que vous entendez.
La commande DELAY/VERB permet de sélectionner les effets Delay, Sweep Echo ou Reverb et offre une large plage de réglages. Le témoin de l’effet actif clignote selon le temps de retard choisi pour le delay. Appuyez plusieurs fois sur le bouton TAP pour modifier le temps de retard.
5. Chan Vol/Noise Gate
La commande CHAN VOL permet de réaliser une balance entre les niveaux des sons (combinaisons d’amplis et d’effets) mémorisés dans le Floor POD. Maintenez le bouton SAVE enfoncé et actionnez la commande CHAN VOL pour régler le Noise Gate et couper les bruits et sifflements quand vous ne jouez pas.
6. LEFT et RIGHT OUTPUT
Sorties gauche et droite. Utilisez la sortie LEFT OUTPUT pour envoyer un signal mono à l’ampli ou un enregistreur. Utilisez les sorties LEFT et RIGHT pour envoyer un signal stéréo à deux amplis ou à un enregistreur.
 Loading...