


 Loading...
®
PILOT'S GUIDE 
A guide to the features and functionality of the Line 6 Helix Native plug-in
Rev. H (v1.71) |
www.line6.com/manuals |
© 2018 Yamaha Guitar Group, Inc. All rights reserved. |
Contents |
|
Impulses Panel |
|
|
|
||
|
|
What are Impulse Responses? |
|
|
|
Importing and Exporting Impulse Responses |
|
Welcome to Helix Native Plug-in |
3 |
Copying, Pasting, Renaming & Clearing IRs |
|
Working in the Plug-in Editor |
|||
Requirements and Installation |
3 |
||
Navigating with the Next/Previous Preset Buttons |
|||
Purchasing the Software License |
5 |
||
Authorizing your Computer |
5 |
Using the Preset File Menu |
|
Workflow |
7 |
Editing the Tempo |
|
Working with Snapshots |
|||
About Plug-ins |
7 |
||
The Snapshots Menu |
|||
What’s in it for Me? |
7 |
||
Marketplace |
7 |
Snapshots > Block Bypass |
|
Quick Start |
8 |
Snapshots > Parameter Control |
|
The Signal Flow Window |
|||
Live Input Monitoring Through Helix Native Plug-in |
10 |
||
Master Input & Output Level Controls |
|||
Optimizing the Input Level |
10 |
||
GUI Overview |
11 |
Adding, Clearing & Bypassing Blocks |
|
Customizing the Helix Native Plug-in Window |
11 |
Cutting, Copying & Pasting Blocks |
|
My Account Menu |
11 |
Drag and Drop Blocks |
|
Preset Compatibility with Helix Devices 12 |
Block Order and Stereo Imaging |
||
Moving Blocks & Arranging the Signal Flow |
|||
HX Edit Application |
12 |
Signal Routing Examples |
|
Input & Output Block Settings |
12 |
The Edit Tab |
|
Send, Return, FX Loop & Looper Blocks |
13 |
Selecting Models |
|
Impulse Responses |
13 |
||
Hardware Controller Assignments |
13 |
Availability of Models within the Model Browser |
|
Computer Processing Management |
14 |
Editing Model Parameters |
|
Presets Panel |
15 |
Note Sync |
|
Editing Input, Output, Split & Merge Blocks |
|||
Helix Native Factory Presets |
15 |
Editing Send, Return, FX Loop & Looper Blocks |
|
Premium Marketplace Presets |
15 |
The Automation/Controller Assign Tab |
|
Loading Presets |
16 |
About Plug-in Parameter Automation |
|
Importing and Exporting Helix Preset Files |
16 |
||
Renaming, Reordering, Copying and Pasting Presets |
17 |
Controller Assignment for Automation |
|
Importing and Exporting Setlists |
17 |
Editing Options for an Existing Automation Controller |
|
Importing and Exporting Helix Bundles |
18 |
Assignment |
|
Removing or Replacing an Existing Automation |
|||
|
|
||
|
|
Controller Assignment |
|
MIDI Bypass & Controller Assignment
Global Reserved MIDI CCs
19 |
Preferences |
44 |
|
19 |
The Preferences Window |
44 |
|
19 |
Marketplace & Account Options |
46 |
|
20 |
|||
21 |
Marketplace |
46 |
|
The My Account Menu Options |
47 |
||
21 |
Account Sign In / Sign Out |
47 |
|
22 |
Authorize / Deauthorize your Computer |
48 |
|
22 |
Model Lists |
49 |
|
24 |
|||
Effects Models |
49 |
||
24 |
Amp Models |
54 |
|
24 |
Speaker Cabinet Models |
56 |
|
25 |
Microphone Models |
57 |
|
27 |
Additional Resources |
59 |
27
27
28
29
29
29
30
33
33
33
34
34
35
35
36
36
36
38
39
41
42
© 2018 Yamaha Guitar Group, Inc. All rights reserved.
Line 6, the Line 6 logo, Helix, HX Stomp, HX Effects, M13, M9, M5, DL4, DM4, MM4, FM4, Ampeg, SVT, and Portaflex aretrademarksorregisteredtrademarksofYamahaGuitarGroup,
Inc. in the U.S. and/or other jurisdictions. Apple, Mac, OS X, macOS, and Logic Pro are trademarks of Apple, Inc., registered in the U.S. and other countries. Windows is a registered trademark of Microsoft Corporation in the United States and/or other countries. Cubase and VST are registered trademarks of Steinberg Media Technologies GmbH. Avid and Pro
Tools are registered trademarks of Avid Technology, Inc.

Welcome to Helix Native Plug-in
Thank you for purchasing the Line 6® Helix® Native software, one of the most powerful and flexible native multi-processing audio plug-ins ever created. Not just for guitarists, the Helix Native plug-in is also ideal for producers and engineers, sound designers, film/TV/game composers, electronic musicians, and anyone else seeking to craft new and exciting sounds and special effects. This guide covers the features & functionality of Helix Native plug-in v1.71.
The Helix Native plug-in truly is the same set of astounding amps, cabs & effects as included within the ground-breaking Line 6 Helix® hardware multi-effects units, and shares the same simple user interface and workflow as the Line 6 HX Edit editor application for Helix family devices.* Due to this design, all presets you create in Helix Native plug-in are compatible and transferable to Helix hardware units via the HX Edit application, so you can take your presets from studio to the stage—and back again! We hope it helps drive your search for tonal bliss and spawns years of creativity.
The Helix Native plug-in
 *NOTE: Presets are not compatible between the Line 6 HX devices (HX Stomp™
  and HX Effects™) and Helix Native plug-in - please see “Preset Compatibility with Helix Devices” on page 12.
Requirements and Installation
Ready to jump in? The latest Helix Native installer for Mac & Windows® computers can be downloaded anytime from line6.com/software. Once installed, a free 15-day trial is available, allowing you to fully try the software on your system. After 15 days, you are required to purchase and authorize the Helix Native plug-in to continue using it on your system. Please check the requirements below to make sure your computer and DAW software meet the minimum requirements.
System Requirements
To follow are the requirements to install and use the Helix Native software on your DAW computer system. Note that Helix Native is a 64-bit plug-in and, therefore, requires that your host DAW application supports 64-bit plug-ins.
Mac Computers:
•Mac OS X 10.10 and 10.11, and macOS 10.12 and later
• 64-bit AAX Native, Audio Units (AU), VST® (VST2 or VST3) host DAW software
•Supported sample rates: 44.1kHz, 48kHz, 88.2kHz, and 96kHz
Windows Computers:
•Windows 7 SP1, Windows 8.1, and Windows 10 (64-bit versions only)
•64-bit AAX Native, VST (VST2 or VST3) host DAW software
•Supported sample rates: 44.1kHz, 48kHz, 88.2kHz, and 96kHz
Minimum Hardware Requirements
•Dual-Core 2.0GHz processor or faster
•4GB of RAM
•100MB of free disk space
•Internet connection required for license authorization, use of trial version, and for the initial license synchronization of Marketplace premium assets. (The use of premium presets and Impulse Responses purchased from Marketplace requires Helix Native version 1.70, or later)
 3
3 

Installing the Helix Native Plug-in
The first step is to sign in to your Line 6 User Account. If you don't already have one, just go ahead and create one now at line6.com/account - it's free! Then follow the steps below.
 NOTE: An Internet connection is required for the computer on which you want to
  install and run the Helix Native trial version, as well as for license authorization & deauthorization. License authorization on your computer is required for the use of Helix Native plug-in and for the import & export of purchased Marketplace premium assets. See page 5.
 NOTE: The use of premium presets and IRs from the Line 6 Marketplace requires
  Helix Native version 1.70 (or later). Once Helix Native 1.70 has been installed, it is necessary to uninstall Helix Native before installing any earlier Helix Native version (see “Removing Helix Native Plug-in” on page 6).
1.Once signed in, you can head directly to the Line 6 Online Store and purchase your Helix Native license (see “Purchasing the Software License” on page 5), or proceed to the next step to install the Helix Native software on your computer and optionally choose the 15-day free trial.
2.Proceed to the line6.com/software page and download the Helix Native installer for your Mac or Windows system.
The Line 6 website's software downloads page
3.Once the download completes, exit your host DAW and all other applications, then run the installer and follow its steps to complete the installation. If desired, you can customize the installation to install only the format(s) you require (AAX, AU, VST3 or VST2) for your particular host DAW application.*
Mac - Custom install options |
Windows - Custom install options |
(click the Customize button to access options) |
|
 *NOTE: If your host DAW application supports VST3, it is recommended that
 you do not also install the older VST2 format (VST2 is not selected by default). The VST2 format is offered for users that have host DAW applications that do not yet support VST3 plug-ins.
On Windows installation, if you do choose to install VST2, you'll be prompted to enter a custom install location. Please take note of the VST2 install location you choose since your host DAW may require that you manually define this VST2 directory within its Preferences to allow its VST2 scan to find it.
4.Once the installation is complete, simply launch your host DAW application and it will typically scan and find the Line 6 Helix Native plug-in and list it within its audio plug-in insert menus.
5.Insert the Helix Native plug-in on a track in your DAW project (see “Quick Start” on page 8 for help, if needed). You'll initially see the license authorization screen.
•If You Have Already Purchased a Helix Native License - You'll be prompted to authorize the computer for this license - please skip ahead to “Authorizing your Computer” on page 5.
•If You Have Not Yet Purchased a Helix Native License - You can either choose to purchase now (see next section), or start a 15-day free trial. Once the trial expires, it is necessary to purchase and then authorize the computer with which you will be using Helix Native, or the plug-in will no longer be functional.
Helix Native plug-in's purchase & trial mode options
 NOTE: Once you've started the free trial version, you'll see your remaining trial
  time displayed at the bottom right of the plug-in window.
Trial status indicator
You can purchase a Helix Native license online at any time during or after your trial period by simply clicking on this trial status indicator, or going directly to the Line 6 Online Store at https://shop.line6.com/.
 4
4 
Purchasing the Software License
The Helix Native license is available for purchase from the Line 6 Store.* Just add Helix Native to your shopping cart, checkout, and the license will be immediately deposited into your Line 6 User Account. Alternatively, you can first download and install the Helix Native software and then choose to purchase or run it as a free trial first (see “Installing the Helix Native Plug-in” on page 4). Once you've purchased the Helix Native license, you then use the plug-in's Authorization screen to authorize your computer to run Helix Native, as covered in the following section.
 *NOTE: By the time you read this, Helix Native may also be available from other
  music retailers. If purchased from one of these vendors, your purchased Helix Native license will be automatically deposited into your Line 6 account as part of the process.
 NOTE: If you are the registered owner of a Line 6 Helix, Helix Rack, Helix LT
  device, or POD Farm software, you may qualify for a substantial discount on the purchase of Helix Native! Please see the purchase options on the Line 6 Store.
Authorizing your Computer
Before you can use Helix Native, your computer on which you will be running the plugin must be authorized for your purchased Helix Native license. Authorization is accomplished within the plug-in's built-in Authorization screen, via an Internet connection directly from your DAW computer. Once you've installed the Helix Native software, launch your host DAW application, insert an instance of the Helix Native plug-in on a track and launch the plug-in window. (Please see “Quick Start” on page 8 for help on how to insert Helix Native plug-in within a host DAW.)
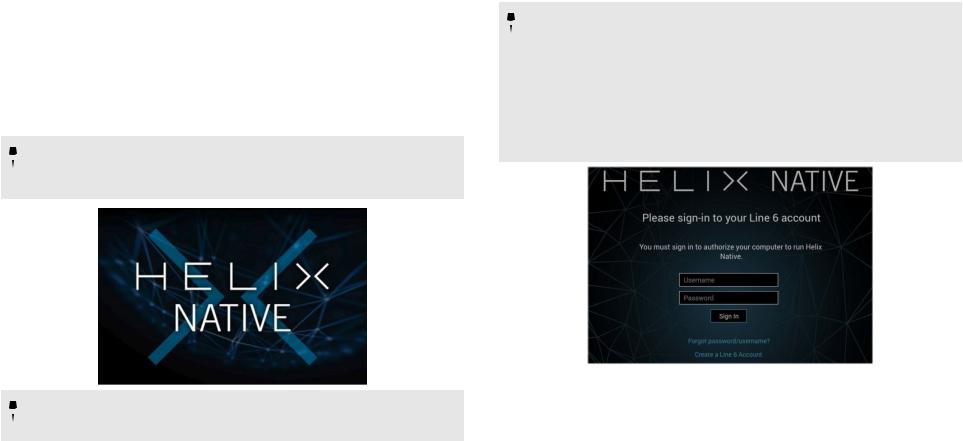
1.Sign in - Once launched, the Helix Native Authorization screen is displayed, prompting you to sign in using your Line 6 User Account username and password. (Note that your username is typically the name you created when creating the account and not your email address!)
 NOTE: Once a Helix Native license is purchased and your computer is success-
  fully authorized, you will no longer be prompted to sign in on each use. Being actively signed in is then only necessary to deauthorize and authorize your computer, and for the initial synchronization of licenses for newly purchased Marketplace assets.
Your computer must be in the “authorized” state to be able to import and export and utilize any premium assets purchased from the online Marketplace for use within Helix Native. If you plan on purchasing Marketplace premium assets, it is easiest just to remain signed in and authorized within Helix Native - this allows all your assets fully functional, and their licenses to remain synced. Please also see
“Marketplace & Account Options” on page 46.
The initial Helix Native Authorization - Sign In Screen
•If You Have an Existing Line 6 Account but Forgot Your Login - Click the
Forgot password/username? option and follow the steps to reset your login credentials.
•If You Don't Yet Have a Line 6 Account - Click the Create a Line 6 Account link to create one. Or you can do that right now by going here - it's free!
2.Enter your username and password and click Sign In to proceed.
•If You Have Already Purchased a Helix Native License with this Line 6 Account - Upon signing in, select the Authorize Computer option and you should see confirmation that your computer is now successfully authorized.*
You can now start using Helix Native!
•If You Have Not Yet Purchased a Helix Native License - You'll be informed that no license was found on your Line 6 account, and you'll have the option to buy it now, or start a free trial.
 5
5 

Helix Native plug-in's purchase & trial mode options
 *NOTE: Be sure to Sign In using the same Line 6 Account you used when making
  the Helix Native license purchase!
•To Purchase a Helix Native License - Click the Buy Helix Native button and follow the steps on the secure Line 6 Online Store. Once complete, a Helix Native license will be deposited into your Line 6 account. Your purchased license will be found and Helix Native plug-in will authorize on your computer.
•To Use Helix Native in Trial Mode - Click the Start Free Trial button and you'll be able to use the Helix Native plug-in without restriction on this computer for 15 days (an active Internet connection is required for the Trial Mode). You may be prompted to sign in for each session when using Helix Native in trial mode. After the trial period expires, Helix Native will no longer be functional unless you choose to purchase the Helix Native license.
 NOTE: Once you've started the free trial version, you'll see your trial time
  remaining at the bottom right of the plug-in window. Click directly on this indicator if you wish to purchase your Helix Native license.
Deauthorizing - Moving to Another Computer
Once you have purchased the plug-in license and authorized your computer (or if using the free trial version), if you wish to run Helix Native plug-on a different computer, it may be necessary that you first deauthorize your current computer.*
To deauthorize, click on the My Account menu at the lower left of the plug-in window to Sign In to your Line 6 account, then choose Deauthorize Computer from this menu. (Also see page 48).
Selecting Deauthorize Computer from the My Account menu
 *NOTE: Line 6 permits you to have your purchased or trial mode Helix Native
  license authorized on a maximum of 4 of your own computers concurrently. To move the license to a different computer, it is necessary to deauthorize on at least one of these systems to free up an authorization to be used on another computer. For further assistance, please contact Line 6 Support.
Removing Helix Native Plug-in
Should you ever desire to remove Helix Native from your computer system, first quit your host DAW application, then follow the instructions below.
 NOTE: Before removing Helix Native, it is highly recommended to export your
  presets (see “Importing and Exporting Helix Preset Files”) and IRs (see “Importing and Exporting Impulse Responses”) to make sure you have backups of them.
Mac
To uninstall each plug-in format, move the following files to the Trash:
•AU plug-in: /Library/Audio/Plug-Ins/Components/Helix Native.component
•VST2 plug-in: /Library/Audio/Plug-Ins/VST/Line 6/Helix Native.vst
•VST3 plug-in: /Library/Audio/Plug-Ins/VST/Line 6/Helix Native.vst3
•AAX plug-in: /Library/Application Support/Avid/Audio/Plug-Ins/Line 6/Helix Native.aaxplugin (or, you can optionally drag the Helix Native.aaxplugin file into the /Plug-Ins (Unused) folder)
Windows
To uninstall all plug-in formats:
•Choose Start > Control Panel (or, on Windows 10, choose Settings)
•Click Programs and Features (or, on Windows 10, choose System > Apps & Features)
•Select Line 6 Helix Native Uninstaller from the list of installed applications
•Click Uninstall and follow the on-screen instructions to remove Helix Native
IMPORTANT! After removing Helix Native version 1.70 (or later), if you plan on installing a Helix Native version earlier than 1.70, you will need to clear your Preset and IR Libraries by using the Clear Preset Library and Clear IR Library options within the Preferences window of the next-installed Helix Native plug-in (see page 44).
 6
6 

Workflow
This guide contains details of the Helix Native plug-in's features and functionality. All behaviors are the same on Mac and Windows (and for all plug-in formats - AAX, AU,
VST3 & VST2) unless otherwise noted. For the most part, the many host DAW applications on the market work very similarly in respect to how you insert and utilize effects plug-ins. However, each host may have some unique features and settings you'll want to take advantage of, so be sure to read through your host DAW application's user documentation as well.
About Plug-ins
There are many types of “plug-ins” in the world of software. Plug-ins are relatively small applications that can only run when loaded inside a compatible “host” software application, extending the capabilities of the host. In the world of DAW (Digital Audio Workstation) applications, audio plug-ins provide signal processing for your audio tracks and/or live audio input.
A helpful analogy for audio plug-ins is to think of them as effects pedals. Effects pedals change the tone of your instrument before the signal reaches your amplifier. As with pedals, rack effects units, or any other conventional piece of outboard gear, plug-ins provide familiar knobs, sliders & buttons for tweaking their parameters. Plug-ins process your track signal similarly, but since they run in real-time in your DAW host software, they are non-destructive, allowing you to continue tweaking their settings all the way up until you do your final DAW project mix-down!
What’s in it for Me?
Helix Native is much more than a one-trick audio processing plug-in. It allows you to combine a multitude of amps, speaker cabs and effects in practically any signal routing fashion you can imagine. Its integrated preset librarian and IR manager also allow you to easily customize, backup and manage your built-in library of tones. All is managed within its simple, but powerful, user interface. Also note that Helix Native is not just for guitar! The many included amp, preamp, delay, modulation, reverb, compressor, distortion and other effects can be utilized on any types of recordings, for traditional or other-worldly results.
If you own a Line 6 Helix® multi-effects device, then you effectively already know how to use Helix Native plug-in! Helix Native utilizes a similar user interface as the current Line 6 HX Edit* editor application, therefore, tone creation and preset management tasks are essentially the same. In fact, you can import Helix hardware-created presets and use them within Helix Native - and vice-versa!
 *NOTE: HX Edit is the newest editor application for Helix family devices that are
  running firmware v2.20 or later, and it replaces the previous Helix application, which is the recommended editor application to be used for Helix family devices running firmware earlier than v2.20. For best performance, and to take advantage of all the newest features & functionality, it is recommended that you always use the latest available version of both the HX Edit application and Helix device firmware. Please also see “Preset Compatibility with Helix Devices” on page 12.
For those new to the Helix products family, although Helix Native plug-in may appear complex at first glance, it is designed in such a way that once you learn a few basic concepts, you'll be able to construct both simple and complex tones at nearly the speed of thought, with very little deep diving required. It's a great idea to try the included Factory & Template presets as a starting point, which you can customize as desired to start building your own Helix tone collection.
 NOTE: For even more details about individual Helix family models and capabili-
 ties, please also read through the Helix hardware and software Owner's Manuals
- available from line6.com/support/manuals.
Marketplace
Now open for business is the new Marketplace online shop, where you'll find 3rd-party add-on assets that even further enhance the functionality of your Helix Native plug-in (and Helix device, if you own one). Available now are professionally crafted presets and IRs that can be instantly purchased and added to your Helix Native libraries. An Internet connection is required for the computer where you'll be using Helix Native to initially sync and authorize the licenses for the use of Marketplace premium assets. Please see
“Marketplace & Account Options” on page 46.
 7
7 

Quick Start
OK, we know you're eager to jump right in and give Helix Native a try on your tracks! To follow are steps for adding an instance of Helix Native plug-in within a host DAW application's audio track to get you up and running.
You will find Helix Native within your host DAW application's plug-in insert menus along with all other audio effects plug-ins. The initial steps in any host DAW application are as follows.
1.Create a Session or Project at a supported sample rate (44.1kHz, 48kHz, 88.2kHz or 96kHz)
2.Create at least one audio track. Depending on your host DAW application, it may offer options for “mono” or “stereo” type audio tracks, or just one common audio track type that can record or import mono or stereo audio, depending upon the hardware input type you choose for the track. Either way, Helix Native plug-in can be added into the effects insert of your audio track.
3.Either record some unprocessed “dry” electric guitar into the audio track, or import an existing recorded audio file into the track so you have something for playback.
4.Now you can proceed to insert an instance of Helix Native on this track by selecting it from the host DAW track's effects insert menu. To follow we've provided examples on several popular host DAW applications.
Steinberg Cubase®
The Cubase application is offered for both for Mac & PC. It supports the VST3 plug-in format.
1.Select your audio track within the Cubase project. Within the track's Inspector at the left of the track (or within the Cubase Mixer window's channel strip for this track), click on one of the slot's menus in the Inserts section.
Inserting Helix Native plug-in on a Cubase Pro 9 audio track
2.In the Effects menu, choose Helix Native. Note that Cubase offers both mono and stereo track types - you can simply choose the Helix Native plug-in and it will conform to your Cubase track's input & output routing configuration.
3.You will then see the Helix Native plug-in appear in the Effects Insert window. Be sure to turn your monitoring system to a low level, then double-click a factory preset from the plug-in's Presets tab and hit Play to hear the results.
Cockos Reaper
Reaper is a full-featured host DAW available for both Mac and PC.
1.Select your audio track within your Reaper project. Within the track header at the left (or within the Reaper Mixer window's channel strip for this track), click on the FX track effects insert menu button.
Inserting Helix Native plug-in on a Reaper 5 audio track
2.In the FX window, choose the plug-in format type. On Mac, Reaper supports both the AU (Audio Units) and VST3 plug-in formats, so you can choose either. On PC, choose VST3. Select Line 6: Helix Native and click OK.
3.You will then see the Helix Native plug-in appear in the FX window. Be sure to turn your monitoring system to a low level, then double click a Factory preset from the plug-in's Presets tab and hit Play to hear the results.
 NOTE: Some Mac host DAW applications allow you to use instances of plug-ins
 of different format types (for example, in Reaper you can insert both VST and
AU type instances of Helix Native within the same project simultaneously). For some actions, such as changes within the Helix Native Preset or IR Libraries and
Preference options, changed settings will not take effect immediately across currently open Helix Native plug-in instances of different format types until you close and re-open the plug-in windows.
 8
8 

Apple Logic Pro |
Avid® Pro Tools® |
Logic Pro is an extremely popular host DAW for Mac. It supports the Apple Audio Units (AU) plug-in format.
1.Select your audio track within the Logic Pro project. Within the track's Inspector channel strip (or within the Logic Pro Mixer window's channel strip for this track), click on the Audio FX track effects insert menu.
The Pro Tools host DAW application for is available for Mac & Windows. It supports the Avid AAX plug-in format.
1.Select your audio track within your Pro Tools project. Within the track header at the left of the track (or within the Pro Tools Mixer window's channel strip for this track), click on one of the slot's menus in the Inserts section.
Inserting Helix Native plug-in on a Logic Pro X audio track
2.In the FX window, choose the Audio Units (AU) plug-in format type and select
Line 6 > Helix Native. Note that Logic Pro offers both mono and stereo track types, therefore, you'll have different sub-options depending on your track's type:
Inserting Helix Native plug-in on a Pro Tools mono audio track
2.In the plug-in menu, choose Helix Native. Note that Pro Tools offers both mono and stereo track types, therefore, you'll have different sub-options depending on your track's type:
•If inserting on a mono track (as shown above) - You'll have the option to choose either mono (the plug-in's output is summed to mono) or mono/ stereo (the plug-in's output is stereo, assuming the track is routed to a stereo output).
•If inserting on a stereo track - Only a stereo option is offered here, which provides stereo in/out processing. (Note that Pro Tools does offer a dual mono option for some plug-ins, but this is not supported by Helix Native plug-in.)
•If inserting on a mono track - You'll have the option to choose either Mono 3. You will then see the Helix Native plug-in appear in the Effects Insert window. Be
(the plug-in's output is summed to mono) or Mono->Stereo (the plug-in's sure to turn your monitoring system to a low level, then double-click a Factory output is stereo). preset from the plug-in's Presets tab and hit Play to hear the results.
•If inserting on a stereo track - It is recommended to select the Stereo option here, which provides stereo in/out processing. The Dual Mono option inserts two mono instances of the plug-in (each accessed via the L and R buttons at the top of the plug-in window). Each mono instance processes the left and right audio channels of the stereo track discretely, but this can quickly utilize a great deal of CPU power, so we don't recommend using it.
3.You will then see Helix Native appear within the plug-in window. Be sure to turn your monitoring system to a low level, then double click a Factory preset from the plug-in's Presets tab and hit Play to hear the results.
 TIP: Most host DAWs also allow you to insert plug-ins on Send, Bus or Aux track
 types. Host DAWs differ slightly in their naming and features of these track types, but their main purpose is to allow you to insert a single instance of your plug-in and then route the output of any number of audio tracks into it to process them using the same effect. This is the preferred way of processing multiple tracks since, obviously, one instance of your plug-in utilizes less CPU power as compared to inserting individual instances on each audio track! Please refer to your host DAW's documentation for details.
Once you insert an instance of Helix Native and load a preset, the preset's contents are displayed within the Signal Flow Window, with model menus, parameters and automation control options available within the tabs of the Inspector Window.
 9
9 
This allows you to load & customize any of the provided Factory presets, create your own presets, configure automation controller assignments, manage presets & Impulse
Responses, as well as backup all your tones to your computer. Even better, all your saved creations can be transferred between Helix Native plug-in and the HX Edit application, allowing them to also be used on a Helix hardware device as well (see “Preset Compatibility with Helix Devices” on page 12 for details).
Live Input Monitoring Through Helix Native Plug-in
Another great benefit of audio effects plug-ins is the ability to monitor your input signal through the plug-in inserted on the track. This allows you to dial in the desired tone, such as a customized set of amp, cab & effects within the instance of Helix Native, and then hear your guitar (or other track input signal) processed by it in real-time. Once you hit record, only your “dry” D.I. guitar signal is actually recorded into the track, which provides the huge benefit of being able to completely change the plug-in settings at any time, right up until you do a final mix-down of the DAW project!
Live Input Monitoring is a function of your host DAW application, and is typically accomplished by the following steps. Each host DAW is slightly different, so be sure to consult your DAW application's documentation for details.
1.Configure your audio track's input options to receive input from whatever physical input your guitar (or desired instrument) is plugged into.
2.Insert Helix Native on the track, as described in the previous section.
3.Set the track's Record Arm button to “on” so that the track receives audio input.
4.Activate the track's “Input Monitoring” feature - this is typically a button found near the Record Arm button. This feature allows the live track input to be fed through the DAW track and all plug-ins inserted on the track.
Record Arm Input Monitor
An audio track in Cubase configured with Record Arm & Input Monitoring active
 NOTE: When utilizing your DAW track's “Input Monitoring” feature, you'll want to be sure to disable any “Direct Monitoring” signal on your audio interface (many interfaces offer an optional function that routes your input signal directly to its outputs, without going through the DAW software). This way you'll hear only the input signal fed through the Helix Native plug-in. See your audio interface's documentation for details.
5.Now when you strum your guitar, you should hear your signal through the track with the Helix Native processing applied. You can hit the Record button and try a pass at recording your performance. Upon playback you can then experiment with tweaking the Helix Native settings even further!
About Latency
Since this input signal is being fed round-trip - into your audio interface, through the DAW software and back out your audio interface's outputs - it is subject to some amount of “latency.” Latency is the time between when you pluck a note on your guitar and hear the resulting audio output through your monitoring system. Latency is a function of your audio interface, host DAW software and the recording capabilities of your computer system. You can generally get the lowest latency by reducing your buffer size options for your audio interface driver within in your host DAW software's Preferences - please see your DAW software’s documentation for details.
Optimizing the Input Level
The level of the input signal entering the Helix Native plug-in can affect the overall gain and saturation of your tones, therefore, it is essential to “gain stage” accordingly. It is important to note that most Helix Native Amp & Effect models are designed to receive
“Instrument” level input signals, much like plugging an electric guitar directly into the same type of amp or effects pedal we modeled them after. To follow are several tips for achieving the optimal signal level.
 NOTE: Please also see “Master Input & Output Level Controls” on page 27.
•For the most accurate results when recording “dry” electric guitar (or bass), we recommend that you use an audio interface with a “Hi-Z” or “Instrument” input.
•For monitoring your input signal level (or the playback level of any clips within your track), reference the Master Input Level meter within the plug-in.
Optimal Input |
|
|
|
|
Master Input |
|
|
|
|
Level Slider |
|
|
|
||||
Range Indicator |
|
|
|
|
|
|
|
|
|
|
|
Multi-color
Input Meter
The Master Input Level controls
•The Optimal Input Range Indicator provides a guideline for where you should keep your input level, between -36 dB to -12 dB.
•The Multi-color Input Meter also provides guidance - basically, strive for keeping your input level in the green and yellow, and avoid the blue (signal is too low) and red (signal is too high).
 10
10 

•If your audio interface offers input level adjustment, it is typically best to adjust it there to keep the recording level entering the plug-in within this optimal range. If needed, you can adjust the plug-in Master Input Level Slider to fine-tune the level. The Master Input and Output Level sliders are global per plug-in instance and, therefore, their values are not saved per preset.
•Guitars with active pickups may have a hotter output than traditional passive pickups. If your guitar utilizes active or especially high output pickups, set your audio interface or preamp's input “pad” to on, if available.
•Clipping, as indicated when the red Clip Indicator lights up, should always be avoided on both the plug-in's input and output meters.
Clip Indicator
The Input meter showing a clipped input level
GUI Overview
The Helix Native plug-in has a very simple, easy-to-use interface which functions as both a Librarian for your Helix Preset and Impulse Response files and as an Editor to create and customize your tones.
|
Presets |
Impulses |
Show/Hide |
|
|
Signal Flow |
|||||||||||
|
|
Tab |
Tab |
|
Librarian |
|
|
Window |
|||||||||
LIBRARIAN |
|
|
|
|
|
|
|
|
|
|
|
|
|
|
|
|
EDITOR |
|
|
|
|
|
|
|
|
|
|
|
|
|
|
|
|
||
|
|
|
|
|
|
|
|
|
|
|
|
|
|
|
|
||
|
|
|
|
|
|
|
|
|
|
|
|
|
|
|
|
|
|
|
|
|
|
|
|
|
|
|
|
|
|
|
|
|
|
|
|
|
|
|
|
|
|
|
|
|
Edit |
Inspector |
Automation/Controller |
||||||
|
|
|
|
|
|
|
|
|
Tab |
Window |
Assign Tab |
||||||
Navigation within the plug-in's user interface is divided into three main windows:
The Librarian Window - For managing presets and impulse response (IR) files - see “Presets Panel” on page 15 and “Impulses Panel” on page 19.
The Signal Flow Window - Where you can add and move amps & effects blocks, and customize your complete signal path routing - see “The Signal Flow Window” on page 27.
The Inspector Window - Where you can choose from the huge selection of models, edit their parameters, and create and manage parameter automation control - see the Inspector Window chapters on page 33 and page 36.
Customizing the Helix Native Plug-in Window
Resize the Plug-in Window - The plug-in's window is resizable to allow you adjust the window size that best suits your screen and workflow. Simply click and drag using the “grab handle” at the bottom right of the plug-in window to reduce or increase the window size independently for any instance of the Helix Native.
Drag the “grab handle” on the bottom right of the plug-in window for resizing
Show or Hide the Librarian Panel - It is also possible to show or hide the Presets/ Impulses Librarian panel independently for each instance of the plug-in, by clicking on the toggle button at the top left of the Signal Flow window.
The Librarian Panel's Show/Hide Button
My Account Menu
At the bottom left of the plug-in window, click on the “My Account” menu to access the plug-in Preferences, Marketplace and account options - please see page 44.
 11
11 

Preset Compatibility with Helix Devices
Helix preset, setlist and bundle files are compatible and transferable between the Helix
Native and Helix family devices (Helix, Helix Rack and Helix LT).* Presets, setlists and bundles are imported to, and exported from, these Helix hardware devices on your computer by the use of the HX Edit editor/librarian software. This compatibility is the foundation of the Line 6 “Studio to Stage” concept, allowing you to load and transfer your tones between Helix Native plug-in and Helix hardware!
 *NOTE: Presets and setlists exported from Line 6 HX type (HX Stomp or HX
  Effects) devices are not compatible with the Helix Native plug-in or Helix devices. Likewise, presets and setlists exported from Helix Native or Helix devices are not able to be imported into HX type devices. However, it is possible to Copy and Paste or drag and drop individual blocks, along with their current settings, between HX Edit with an HX device and Helix Native. See the following “Block Copy and Paste” section.
 TIP: If you own a Helix device, be sure to check the “Helix compatible” version
 number (found in the Helix Native Preferences' About box - see page 45) to determine the recommended Helix firmware version you should use for maximum preset compatibility.
Presets, setlists and bundles can simply be imported into the Helix Native or the HX Edit app using their Import functions, as covered in the following sections. It is also possible to drag and drop presets directly between the applications' Preset panels. Once imported into the HX Edit application, presets are immediately loaded onto your connected Helix device, replacing the presets within the device's internal memory. When importing presets into the Helix Native Presets Library, they are then available for all instances of the plug-in.
 NOTE: As with all plug-ins, the specific settings you last used within your existing
  plug-in instances are retained as part of your host DAW project and not affected unless you manually load a different preset into the plug-in's Signal Flow. Instances of the Helix Native plug-in that already exist in previous host DAW projects will also reference the current plug-in Presets Library lists when you load the DAW project again.
Due to the obvious differences of Helix hardware devices having numerous physical inputs and outputs, there are some settings, block type & controller support variances when sharing presets between the Helix Native and Helix hardware. These differences are detailed in the following sections.
HX Edit Application
Line 6 HX Edit is the editor/librarian software for use with Helix hardware devices that are running firmware version 2.20 or later. For best performance, it is recommended to use the latest version of both the HX Edit application and Helix firmware. If you own a Helix that is still running a firmware earlier than v2.20, you'll need to update the Helix device's firmware to the v2.20 firmware or later, or use the previous Helix application with your Helix device.
For optimal preset compatibility between Helix Native plug-in and Helix hardware, you should always be sure to use matching versions of the Helix Native, Helix firmware, and the HX Edit (or Helix) application. The easiest (and recommended) way to be sure your presets are compatible is to update to all the latest versions available for Helix Native,
Helix firmware and HX Edit. All Line 6 software is available for download fromline6.com/ software.
HX Edit Backup Files
The HX Edit application includes a feature that creates Helix Backup (.hxb) files that can be utilized to restore a Helix device's presets, IRs and global settings. Helix Native does not currently include this feature and, therefore, does not support creating or opening
HX Edit Helix Backup files.
Block Copy and Paste
Using the Copy and Paste Block commands, you can copy/paste any individual block between presets within any instance of Helix Native, as well as between Helix Native and HX Edit (with any Helix or HX type device connected). It is also possible to drag and drop any processing block to move it within the current preset, or to copy it into any other Helix Native plug-in or HX Edit device window. Restrictions apply when copying and pasting some block types, depending on the Helix hardware in use and the paste destination - please see “Cutting, Copying & Pasting Blocks” on page 28.
Marketplace Assets
All premium presets and IRs purchased from the online Line 6 Marketplace that are offered for Helix (Floor, Rack and LT) devices are fully compatible with Helix Native plug-in (version Helix Native 1.70 and later is required). Please see “Marketplace & Account Options” on page 46.
Input & Output Block Settings
When Importing a Helix Hardware-exported Preset into Helix Native - All Input and Output blocks currently set to physical Inputs and Outputs (other than “None”) will default to the “Host” setting within the plug-in.
When Importing a Helix Native-exported Preset into Helix Hardware - All Input and Output blocks currently set to “Host” will default to the “Multi” setting within the Helix hardware. Any Input block set to “None” will remain as set to “None” within the hardware.
 12
12 

Send, Return, FX Loop & Looper Blocks
When Importing a Helix Hardware-exported Preset into Helix Native - These block types are only functional within Helix hardware and, therefore, their parameters are not editable. These blocks have no routing functionality within Helix Native.
 NOTE: If an existing Send, Return or FX Loop block is toggled as “active” via its
 Bypass switch, it can reduce or fully mute the path's audio signal, depending on the block's Mix or Dry Thru parameter settings. To ensure these block types are not affecting the plug-in's signal path, simply toggle the block to bypassed.
If you load a preset that happens to include any of these types of blocks, you'll see them appear within the Signal Flow with an indicator to remind you they are “unsupported” within the plug-in.*
An FX Loop (Snd/Rtn) and Looper (Loop) block within a Helix hardware-exported preset
 *NOTE: Within the Preferences - General window, you can enable the option for
 Helix Native to automatically strip out all unsupported block types from presets whenever importing Helix presets, setlists or bundles (see page 44). However, regardless of this Preference setting, it is still possible to Paste one of these unsupported blocks into Helix Native from the HX Edit app, if it remains as the most recently copied item in your clipboard.
When you select one of these unsupported blocks within the Signal Flow, you'll see a reminder within the Edit tab to alert you it is non-functional, and see that its parameters are not editable (dimmed). However, these blocks and their original settings remain fully functional if and when the preset is exported from Helix Native and imported back into HX Edit.
An “unsupported” block's parameters within the Helix Native Edit tab
 NOTE: Note that it is not possible to add Send, Return, FX Loop or Looper type
  blocks to your tone from the Helix Native model menu - the Send/Return and Looper menu categories of the Edit tab's Model Browser remain non-selectable.
Impulse Responses
Impulse Response (IR) files are able to be utilized within IR blocks of Helix Native just as they are within Helix devices. You can simply import IRs using the Impulses panel to build your Library of IRs that are available to Helix Native. Helix hardware retains its own separate IR Library (managed by using the HX Edit application).
If you are to be sharing Helix presets between Helix Native and Helix devices, it is a good idea to build and maintain your IR Libraries similarly on each to allow the same IR files to be utilized for your presets that include them. Please see “Impulses Panel” on page 19 for details.
Hardware Controller Assignments
Helix Floor, Rack & LT devices and the HX Edit editor application offer the ability to create several types of “controller assignments” to provide remote control of Helix parameters via Helix footswitches, expression pedals and external MIDI gear. These controller assignments are saved and retained within Helix hardware-exported presets. If you happen to open a preset within Helix Native that includes them, you'll see these controller assignments represented by their parameter values displayed in white and in brackets.
Helix hardware assignment indicator
Indicator that a parameter includes a controller assignment
Helix hardware controller assignments offer no functionality within Helix Native plug-in, and any parameter itself that includes an assignment remains adjustable and functional within Helix Native. MIDI controller assignments created within HX Edit are supported and functional within Helix Native. These controller assignments also continue to be retained in the preset, even once exported from Helix Native, allowing them to still function if imported back into a Helix device again. Please see the Helix Owner's Manuals.
 TIP: Note that, within Helix Native, you can utilize your host DAW application pa-
  rameter automation functionality to control the bypass of blocks and parameter values in real-time! Please see page 36.
Snapshots & Snapshot Assignments
Snapshots & snapshot assignments created and saved within a Helix device's preset are compatible when the preset is loaded in the Helix Native plug-in, and vice-versa.
However, there are a few specific functions that can exist within Helix hardware-created presets that Helix Native does not support, as described below.
•Helix hardware Command Center message data (see previous section).
•Line 6 Variax instrument tunings and other Variax parameter settings.
 13
13 

These types of data within snapshots are essentially ignored by Helix Native, with all other supported Snapshot settings recalled just as on Helix hardware. Both supported and non-supported snapshot data are retained within your Helix Native-exported presets when loaded on Helix hardware again. Please also see “Working with Snapshots” on page 24.
 NOTE: The current Snapshot, along with all its settings, can be copied and pasted
  using the Copy Snapshot and Paste Snapshot commands either within the current Helix Native preset or within the current HX Edit preset, but not between the Helix Native plug-in HX Edit app and. Also see “Copying, Pasting & Renaming Snapshots” on page 26.
Bypass Assignments
A common practice within Helix devices is to configure “bypass assignments” where the bypass parameter of blocks are then toggled Off/On via the device's footswitches, or optionally by expression pedals or external MIDI commands. Currently, MIDI bypass assignments are supported in Helix Native (see next section), but not other types of bypass assignments that can be created within Helix hardware. If you happen to change the bypass state of block that includes a Helix hardware bypass assignment and export the preset, you will overwrite the saved state of the assignment when the preset is imported back into a Helix device.
Controller Assignments
Helix device users can create “controller assignments” to map the control of parameters (such as a wah or volume, a delay's Mix parameter, etc.) to a Helix expression pedal, footswitch, or external MIDI controller device. Currently, MIDI In controller assignments are supported in Helix Native plug-in (see next section), but not other types of controller assignments that can be created within Helix hardware.* If you edit a parameter that includes a Helix hardware controller assignment, and then export the preset from Helix Native, your last-used parameter value is the same value the parameter will default to upon import within a Helix device.
 *NOTE: When importing a preset into Helix Native which includes HX Edit-saved
  hardware controller assignments, you'll see the assigned parameter sliders within Helix Native display their values in white brackets indicating the assignments. Even though these hardware controller assignments are not supported within Helix Native, they are preserved with the preset (as well as with the respective, individual blocks for copy/paste). Therefore, these assignments will still be intact if you import the preset back into HX Edit.
MIDI In Bypass & Controller Assignments
Helix device users can create MIDI In bypass assignments to remotely toggle the bypass of most block types, and create MIDI In controller assignments to remotely control most Helix parameters, via external MIDI controller devices or MIDI software. These MIDI In assignments are also supported by Helix Native. Likewise, MIDI In bypass and controller assignments created in Helix Native presets are also supported when the preset is imported into Helix devices via the HX Edit application. See page 41.
Command Center Assignments
The Command Center in Helix devices provides the ability to assign the transmission of MIDI/CV/Amp switching and other commands to Helix hardware switches and expression pedals. Helix Native does not support the transmission of these types of commands and, therefore, essentially just ignores any Command Center assignments that may exist within an imported Helix preset. Existing Command Center data is retained when exporting a preset from Helix Native.
Automation Controller Assignments
Since parameter automation is a functionality specific to DAW hosts and software plugins, all automation controller assignments saved within a Helix Native-exported preset will be ignored when the preset is loaded on Helix hardware devices. However, these assignments are retained if and when the preset is exported from a Helix device. See
“Controller Assignment for Automation” on page 36.
Customized Hardware Footswitch Labels and LED Colors
Helix devices include the ability to customize the labels displayed on their “scribble strips” (on Helix floor and Helix Control devices) and on-screen footswitch labels (on
Helix LT devices), as well as to customize the color displayed for their footswitch LED lights. This data is stored within a Helix hardware-exported preset, but is not utilized by the plug-in, nor altered when importing or exporting the preset with Helix Native.
 TIP: Remember, you can create an unlimited collection of backups of your presets,
  setlists and bundles from both Helix Native plug-in and the HX Edit application using their Export functions. It is good advice to follow the golden rule, “backup early and often” so that you always have copies of your favorite Helix tones!
Computer Processing Management
In order to maintain preset compatibility with Helix family devices, Helix Native incorporates similar processing management as the DSP management system utilized on Helix hardware. That is, Path 1 and Path 2 within an instance of the plug-in each have a maximum computer processing limit. Once this limit is approached on either path, the Edit tab's Model Browser options become dimmed if the specific models require an amount of processing power that would surpass maximum limit. (Please see “Availability of Models within the Model Browser” on page 33.) This way, any preset created and exported from the Helix Native is ensured to be able to be imported and utilized on Helix hardware devices.
 TIP: Note that if you just can't manage to cram in all the effects you want in an
  instance of the Helix Native plug-in, you can always insert an additional instance of the plug-in! Please also see “Tips to Optimize Processing Power Usage” on page 32.
 14
14 

Presets Panel
The Librarian's Presets Panel provides functionality for loading, importing & exporting Helix presets & setlists to manage the plug-in's Presets Library. The contents of the Presets Library is stored commonly for Helix Native, and changes you make to this
Library affect what presets appear within all instances of the Helix Native plug-in on the computer.
Presets Tab
Setlist Commands
Setlist Menu
Preset Commands
Last Loaded Preset
Selected Preset
The Presets panel
Presets Tab - Click on this tab to display and place focus on the Presets panel.
Preset Commands - Click on any command in this row to perform its action on the currently selected Preset(s).
Last Loaded Preset - When you double-click on any preset in the panel, it loads it into the Signal Flow as the current tone in use by the plug-in. The white vertical line at the left of the preset slot indicates that this is the last preset that was loaded.
 NOTE: It is important to note that, once a preset is loaded as the current tone,
 changes to the current tone does not affect the preset within the Presets Library panel unless you specifically Save the tone to the Preset Library - see
“Using the Preset File Menu” on page 22.
Selected Preset - Click once on any preset in the panel to select it, and you'll see it appear highlighted, as shown above. The selected preset is the one that is acted upon when choosing any Preset Command. Note that when you load a preset, it remains the selected preset until you click on any other preset within the panel. It is also possible to select multiple presets to perform actions on them simultaneously, as covered in the following sections.
Setlist Commands - Click on any command in this row to perform the selected action on the current Setlist.
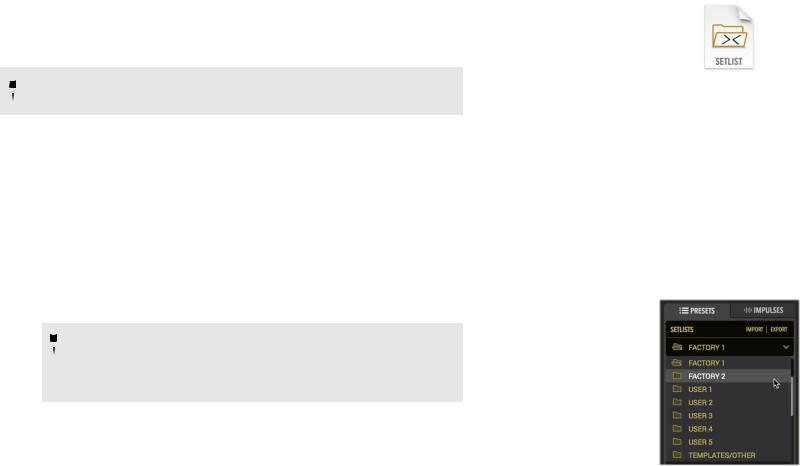
Setlist Menu - Click here to display one of the 8 Setlists of the Presets Library. right-click directly on the current Setlist's name here to rename it.
 NOTE: It is also possible to import and export all setlists, including all your presets
  and their last-saved settings by using the Bundle options found in the Preferences window. Please see “General Screen” on page 44.
Helix Native Factory Presets
The very first time you insert an instance of the Helix Native plug-in after installation, you'll see a pop-up notice informing you that the set of Factory Presets will be automatically imported. You'll then see the first two setlists, titled FACTORY 1 and FACTORY 2, and the last setlist, titled TEMPLATES/OTHER, all of which become populated with numerous Factory Presets to provide an easy start for your own sonic creations!
Most presets within the FACTORY 1 & 2 setlists are intended for guitar, and you'll also see quite a few intended for bass (cleverly titled starting with “BAS”). If you're wanting to utilize Helix Native for processing vocals, or for discrete left/right channel input and output effects for a stereo Aux or Bus track within your DAW project, look in the TEMPLATES/OTHER setlist for the “VOX” and “AUX” titled presets. Please also be sure to read through “The Signal Flow Window” on page 27 to see the many capabilities for mono, stereo, serial and parallel signal routing.
 TIP: If you want a clean start, we've also provided the options Clear Preset Li-
 brary (to clear out all data from all your plug-in's current Library presets) and Restore Factory Setlists (to restore the original Helix Native Factory Setlists) - see
“General Screen” on page 44.
Premium Marketplace Presets
If you've purchased and downloaded premium presets from the Marketplace online shop, you must initially have Helix Native signed in, and your computer authorized, to allow the import or export of these presets (as well as for import and export of any setlists or bundles that include premium presets).*
 NOTE: The authorization required for your Helix Native license also covers the use
 of any Marketplace premium assets on this computer - both within Helix Native (version 1.70, or later) and the Line 6 HX Edit (version 2.70, or later) application. Please
see “Authorizing your Computer” on page 5.
 15
15 

Premium Marketplace presets are otherwise able to be utilized just like any other Helix presets. When imported, these premium Marketplace presets are indicated by a golden guitar pick “badge” to their right within the Presets panel. Please also see “Marketplace & Account Options” on page 46.
Premium Marketplace presets are indicated with a golden guitar pick badge
Loading Presets
Double-click on the desired preset from the Presets panel list to load it into the Signal Flow window as the current tone, with all blocks' parameters accessible within the Edit tab. You can also use the Next/Previous preset buttons at the top of the Signal Flow window (see “Navigating with the Next/Previous Preset Buttons” on page 21).
Alternatively, if you wish to load a preset that exists as a saved Helix preset (.hlx) file on your computer, you can do one of the following:
•Use the preset Import command button and select the desired preset from your computer to import it into the plug-in's Preset Library, then double-click the imported preset within the Presets list to load it as the current tone.
•Use the Open from Disk option from the menu at the top of the Signal Flow window. This loads the preset directly into the plug-in's Signal Flow as the current tone (without importing it into the Preset Library).
 NOTE: Use the Save To Disk or Save To Library command within the file menu
  at the top of the signal flow if you wish to retain any changes you've made to the current tone to create it as a preset that can be utilized by other Helix Native instances. Please see “Using the Preset File Menu” on page 22.
The Default Preset
Whatever preset resides within location 01A of the first Setlist becomes the designated Default Preset. You'll see that this preset is the one automatically loaded into the Signal Flow every time you create a new instance of the plug-in. This allows you to set any preset you like as the Default Preset for Helix Native - by simply importing or saving it to this Preset Library location!
All settings that you customize and save to this library Default Preset are recalled when loaded, including automation assignments, routing configuration, block bypass states, etc.
Importing and Exporting Helix Preset Files
Helix presets are able to be exported from the Presets Library to be copied and saved to your computer as individual (.hlx) files, allowing you to create a limitless collection of tones that can be imported back into your Presets Library at any time.
To Import a Helix Preset File - Click once to select the desired preset location within the Presets panel and click the Import preset command.* A brief dialog will warn you that importing will overwrite any preset information in the selected Library location. Click Yes to continue. A system window will display a file browser for selecting the preset you wish to import. The imported preset will then remain available within the built-in Presets Library for all instances of the plug-in.
 NOTE: Importing a preset into the Preset Library does not also automatically
 load the preset into the Signal Flow of the plug-in. If you wish to load the imported preset as the current tone, double-click on the preset within the library location.
To Export a Helix Preset - Click once to select the desired preset within the Presets panel, then click the preset Export command. This creates a copy of the preset from the Helix Native plug-in's Presets Library and saves it to your computer as a Helix preset (.hlx) file. The familiar Mac or Windows computer's Save As window is presented, in which you can edit the filename and choose a destination folder. By default, all .hlx files are exported to:
•Mac - /Documents/Line 6/Tones/Helix folder
•PC - \My Documents\Line 6\Tones\Helix folder
 *NOTE: Clicking once on a preset within the Presets panel selects the Library
  preset, not to be confused with loading the preset into the Signal Flow as the current tone (double-clicking on a preset loads the preset). The preset that is selected (highlighted) within the Presets panel allows you to then execute commands upon it (Export, Reorder, Copy, etc. - see next section).
 TIP: Using the Preset panel's Export command makes a copy of the selected library
  preset in its last-saved state and saves it to your hard drive. If you wish to save the tone currently in use within the plug-in's Signal Flow, with all edited settings intact, use the File menu - Save options (see “Using the Preset File Menu” on page 22).
 16
16 
Renaming, Reordering, Copying and Pasting Presets
These functions allow you to customize your presets within the Presets panel. Choose Rename, Copy or Paste from the row of Preset command buttons and it will act upon the selected (highlighted) preset location. Or, optionally right-click on an individual preset location within the panel to open a context menu with these same commands. For most commands, it is also possible to multi-select a number of presets by using Shift+click to select a contiguous set of presets, or Cmd+click (Mac) or Ctrl+click (Windows) to select a non-contiguous set.
 NOTE: Copy and Paste of presets and IRs between Helix Native and HX Edit is not
  currently supported. However, you can use drag and drop for these actions! See the next section.
Drag and Drop Presets
Drag and drop any preset (or multi-selected presets) directly to or from the plug-in's Presets panel to perform the following actions.
•Export - Drag any preset from the plug-in's Presets panel into any folder on your computer to export a copy of the .hlx Helix preset file and save it there.
•Import - Drag any saved .hlx Helix preset file from your computer's hard drive and drop it directly into a slot within the plug-in's Presets panel to import it into the Presets Library. (Note that this does not automatically load the preset as the current tone in the plug-in - Double-click the preset slot you imported into to load the preset.)
•Load - Drag any saved .hlx Helix preset file from your computer's hard drive and drop it within the plug-in's Signal Flow window to load it.
 NOTE: This “Load” action loads the preset as the one used within this
  instance of the plug-in, but it does not import the preset into the plug-in's Presets Library. Optionally, you can add this loaded preset by using the File > Save to Library option within the Signal Flow window - see “Using the Preset File Menu” on page 22.
•Reorder - Drag any preset up or down and drop it into another location within the Presets panel to reorder the presets within the current setlist. When the preset is dropped in the new location, the surrounding presets are shifted upward or downward accordingly.
•Transfer to or from Helix Hardware (for Helix/HX Edit application owners) - With a Helix device connected, you can drag a preset directly from Helix Native plug-in's Presets panel and drop directly into the Presets panel of the HX Edit application to import the preset into your Helix device. Likewise, you can drag a preset from the HX Edit app into Helix Native to import your device's library presets into the plug-in (also see “Preset Compatibility with Helix Devices” on page 12).
Importing and Exporting Setlists
The Presets panel allows you to Export to save a copy of the currently loaded setlist, including all its presets, to a Helix setlist file (.hls). This is very handy for making a backup of all presets within a setlist, so that a group of presets can easily be imported back into the plug-in's Library in a single action.
To Import a Setlist - Click Import Setlist. This will prompt you to ensure that you wish to replace the currently selected setlist and its presets within the plug-in's Presets Library. Continue through the “Open” window to select the setlist you wish to import.
To Export a Setlist - Click the Export Setlist command to save a copy the current setlist as a Helix setlist file on your hard drive. By default, setlists are exported to:
•Mac - /Documents/Line 6/Tones/Helix/Setlists folder
•PC - \My Documents\Line 6\Tones\Helix\Setlists folder
Changing Setlists
To change the active setlist shown within the Presets panel, click on the Setlist menu and choose from among the 8 setlists stored within the plug-in's Library. The currentlyselected setlist will be indicated with an “open folder” icon in the menu.
Choosing a new setlist from the setlist menu
 17
17 
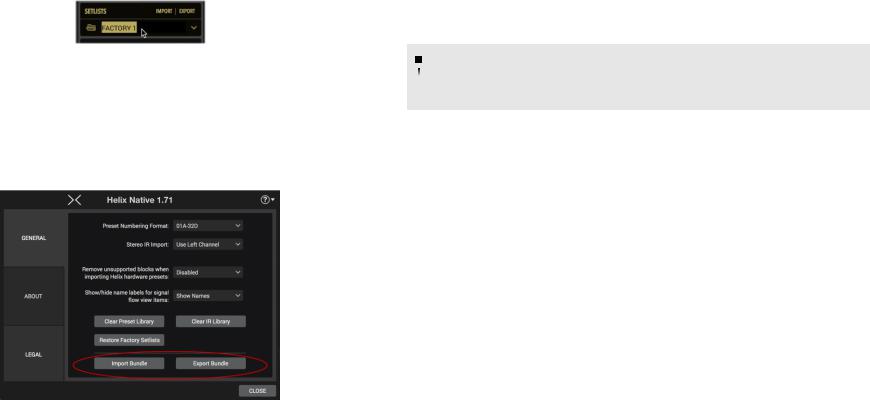
Renaming Setlists
To rename the current setlist, right-click on the current setlist's name within the Setlist menu and enter your new title.
Renaming the current setlist
Importing and Exporting Helix Bundles
A Helix bundle file (.hlb) includes all 8 setlists that make up the plug-in's current Library, including all presets and saved settings, all wrapped up in a single, tidy package. This makes it easy to store a backup of your complete Presets Library - and easily restore your Helix Native Library by importing the bundle. The options for importing and exporting a Bundle are found within the Preferences window (also see page 44).
Use the buttons in the Preferences window for Importing and Exporting Helix Bundles
To Import a Bundle - Click the Import Bundle button found in the Preferences > General window. This will prompt you to ensure that you wish to replace all setlists and presets within your Presets Library with those from the selected bundle file. Continue through the “Open” window to select the bundle you wish to import.
To Export a Bundle - Click the Export Bundle button found in the Preferences > General window to create a copy of the plug-in's complete Presets Library as a Helix bundle (.hlb) file, stored on your computer. By default, all bundle files are exported to:
•Mac - /Documents/Line 6/Tones/Helix/Bundles folder
•PC - \My Documents\Line 6\Tones\Helix\Bundles folder
 NOTE: Bundle files do not contain any of the Impulse Response (IR) files that
  you may have imported into the Impulses Library. You can separately export IRs from within the Impulses Panel - see “Importing and Exporting Impulse Responses” on page 19.
 18
18 
Loading...