


®
Spider Jam
Advanced Guide
An in-depth guide to the features and functionality of the Spider Jam.
Electrophonic Limited Edition
Please Note:
Line 6 and Spider Jam are trademarks of Line 6,Inc. All other product names, trademarks and artists’ names are the property of their respective owners, which are in no way associated or affiliated with Line 6. Product names, images, and artists’ names are used solely to identify the products whose tones and sounds were studied during Line 6’s sound model development for this product. The use of these products, trademarks, images, and artists’ names does not imply any cooperation or endorsement.
Spider Jam Advanced Guide © 2008 Line 6, Inc.
Table of Contents
Updated Features................................................................... |
1•1 |
SD Browser..................................................................................................... |
1•1 |
Playback Levels, Input Levels......................................................................... |
1•2 |
Menu Items..................................................................................................... |
1•3 |
Jam Control Mode.......................................................................................... |
1•4 |
SD Card Details...................................................................... |
2•1 |
Format Card.................................................................................................... |
2•1 |
Transfer Recording To Card........................................................................... |
2•2 |
Transfer Recording From Card....................................................................... |
2•2 |
Save Rec Mix As WAV To Card.................................................................... |
2•3 |
Import WAV File From Card.......................................................................... |
2•3 |
Transfer All To Card....................................................................................... |
2•4 |
Transfer All From Card................................................................................... |
2•4 |
Firmware Version, Firmware Upgrade............................................................ |
2•5 |
Time Stretch &Varispeed..................................................... |
3•1 |
Time Stretch/Pitch Shift ............................................................................... |
3•1 |
Pitch/Tempo Preview...................................................................................... |
3•2 |
Varispeed......................................................................................................... |
3•2 |
Recording Restrictions................................................................................... |
3•3 |
Workflow................................................................................. |
4•1 |
Recording, Saving........................................................................................... |
4•1 |
Jam Files, WAV Files....................................................................................... |
4•2 |
Loops............................................................................................................... |
4•3 |
Appendix : FAQ...................................................................... |
A•1 |
Questions & Answers.................................................................................... |
A•1 |
Updated Features
Updated Features
Welcome to the Spider Jam Advanced Guide. This guide contains in-depth details of Spider Jam’s features and functionality which were not covered in the Pilot’s Handbook. With the release of v2.07 firmware (required for SD card features), you can now:
•Play, record, save, do mixdowns and import WAV files from SD card (up to 2 GB).
•Change tempo and pitch independently using Time Stretch/Pitch Shift.
•Select and load recordings via FBV with extended Jam Control features.
SD Browser
When an SD card is inserted in the Spider Jam’s SD card slot, press the SONG button |
1•1 |
||||||||||
and you’ll see 4 main tabs displayed in the LCD. In addition to the Songs, Drums and |
|
||||||||||
Recordings tabs, we’ve added an SD tab, which gives you access to the SD Browser. |
|
||||||||||
|
|
|
|
|
|
|
|
|
|
SD |
|
SONGS |
DRUMS |
RECORDINGS |
|
||||||||
|
|
|
|
|
|
|
|
|
|||
|
|
Turn Wheel To |
|
|
|||||||
|
|
|
|
|
|
|
|
|
|||
|
|
|
|
|
Browse SD |
|
|
||||
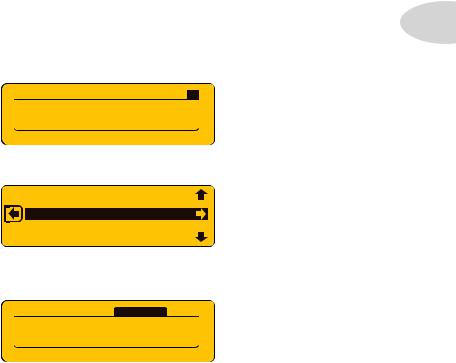
• To browse the files you have saved on your SD card, select SD and turn the wheel.
HARMGTRS
DRUMMIX1
REC#3NEW
GTRLOOP2
BASSFIG1
•You’ll see a list of all your SD card’s recordings and WAV files. To load any file into Spider Jam’s playback buffer, select it by turning the wheel and pressing the R Arrow
button.
SONGS DRUMS  RECORDINGS
 SD
SD
REC#3NEW
LOOP: 00:11:23 |
FREE: 32:15:44 |
•Once you start using an SD card, we recommend you always save to SD card instead of internal memory. If you have previously saved recordings in internal memory, we recommend you transfer them to SD card also, then delete them from internal memory. This keeps internal memory free for maximum recording time, and makes it easy to back up all your files: pop the SD card into your PC and make copies there.
Updated Features
Playback Levels
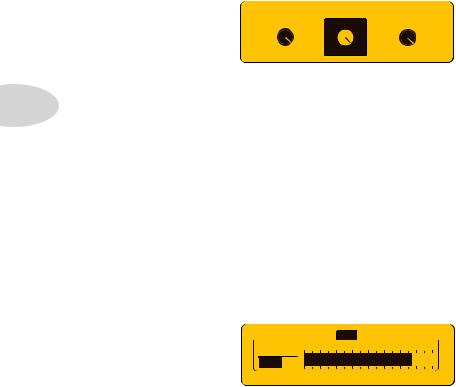
Press the LEVEL button to access Playback Levels. On this screen you have independent level control of the Song/Drums track, the Guitar track and the Mic/Aux/Wav track.
These are also the controls you’ll use for Mixdowns (see page 2•3 for Mixdown info).
|
|
|
|
|
|
|
|
|
|
|
|
|
PLAYBACK LEVELS |
|
|
|
|
||||||
|
|
|
|
100% |
|
|
|
|
|
||
|
100% |
|
100% |
|
|
||||||
|
|
|
|
|
|
GUITAR |
|
|
|
|
|
|
|
SONG/DRUMS |
MIC/AUX/WAV |
||||||||
1•2 |
• Navigate to any of the three Playback Levels knobs by pressing either the R Arrow |
||||||||||
or L Arrow buttons. |
|
|
|
|
|
|
|||||
•Once you select the playback track you want to adjust, turn the wheel to set the playback level of that track, from 0 (off) to 100%.
This makes it easy to balance the 3 tracks of your currently loaded recording, and also provides a way to mute the individual tracks if desired.
Input Levels
With a 2nd press of the LEVEL button you can access the Mic/Aux/CD Input Levels screen. This is where you adjust your input levels for the Mic input, Aux input and CD input, displayed as a dynamic bar. Navigate from tab to tab by pressing the L and R Arrow buttons. Set Input levels by turning the wheel as you monitor each respective Input.
|
|
AUX |
|
|
|
|
|
|
|
|
|||
MIC |
|
|
|
CD |
|||||||||
|
|
|
|
|
|
-40 |
-20 |
|
|
|
|
|
|
-80 |
-60 |
|
|
-0 |
|
|
|||||||
 +0 dB
+0 dB
•When setting levels for the Mic, Aux or CD inputs, make sure you first press the RECORD SELECT button and toggle it to Mic/Aux.
•The dB display on the lower left of the LCD indicates your input level trim setting. You can set it anywhere from -60dB to +12dB, or set it to Off.
When you plan on recording from one of the Mic, Aux or CD inputs, make sure you first press and hold the RECORD SELECT button to select the desired Input Routing. You can choose between mixing your input with the Microphone or Guitar track.
Updated Features
Menu Items
Here are some new menu items that have been added since the initial Spider Jam release:
Save Recording To SD Card – this command enables you to save the currently loaded recording to your SD card. Press the SAVE button to access it in the menu list.
Save RecordingTo Internal – this command enables you to save the currently loaded recording to internal memory. Press the SAVE button and turn the wheel to access it.
Erase All Internal Recordings – when you have all your recordings backed up to an SD card, you can clear Spider Jam’s internal memory by invoking this command.
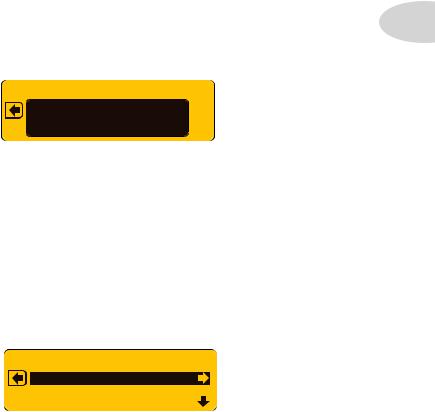
Output Routing – press the SETTINGS button 3 times then turn the wheel to 1•3 navigate to this menu item. Normal mode is the default. When you select Performance
Mode, your guitar will play only thru the Spider Jam’s 12 inch speaker.
OUTPUT ROUTING
NORMAL
 ALL AUDIO TO RCA AND PHONES
It’s important to note that if you plug in your headphones, the Spider Jam reverts to Normal routing, and your guitar goes to all outputs. You can manually change the routing back to Performance Mode, but it’s unlikely you’ll want to do so while wearing headphones.
Also keep in mind that Master Volume will control the level of the RCA Outs when headphones are plugged in. When headphones are unplugged, RCA Outs are unaffected by Master Volume control, so they put out 100% level, independent of output routing.
Tempo/Pitch Modes – press the SONG button twice to access Tempo/Pitch Modes.
Asdescribedonpage3•1,thisiswhereyoucanselectTime Stretching And Pitch Shifting or Varispeed. Press the R Arrow, then turn the wheel to select the mode you want.
TEMPO/PITCH MODES
|
|
|
|
|
LOOPING |
|
[ON] |
[ON] |
|
|
ENDLESS |
PLAY |
[ON] |
[ON] |
Looping – Looping for ‘one shot’ Guitar & Aux tracks can now be set to On or Off for playback and recording. Press SONG button twice to access the Looping menu item.

Updated Features
Jam Control Mode
If you toggle the SETTINGS button and set the FBV Mode menu item to Jam Control, you can control recording functions using an FBV. All Amp Model and FX controls on the Spider Jam will still be available, as well as the 4 buttons, wheel and 4-way navigator.

 E
E

1•4

 A
A


 B
B


 C
C


 D
D

In Jam Control Mode, Bank Up/Down and the FBV channel switches operate as follows:
ARecord/Overdub – step on Record to begin recording your loop. If you start with a Song or Drum countoff, recording begins after the count. If you punch in while a track is playing, recording begins on the nearest beat. Overdub on an existing track at any time.
BPlay/Stop – this switch simply plays or stops your loop. On your first pass, when you initially record your loop, hitting Stop also sets your loop out-point.
CUndo/Clear – step on this switch to undo your last recorded take. To clear a track, press and hold for a few seconds, then select Clear in the LCD and press Undo again.
D1/2 Speed – step on this switch to play your loop at 1/2 speed. Press it again to toggle back to normal speed. If you overdub a guitar track at 1/2 speed, then toggle playback to normal speed, your overdub will play back an octave higher.
EBank Up/Down – Bank Up loads the next internal recording; Bank Down loads the previous one. The current recording name will be displayed in the FBV display.
*Note: When an SD track is loaded for playback and overdubbing, Bank Up/Down will replace it with an internal recording, so be sure any SD track changes are saved.
SD Card Details
SD Card Details
In this chapter we’ll focus on the SD card. With an SD card inserted in your Spider Jam’s SD card slot, you can save and load your original recordings, perform mixdowns in WAV file format, import WAV files from your computer, and upgrade Spider Jam firmware.
All the SD card-specific menu items described in this chapter are accessed by pressing the |
2•1 |
SAVE button. The first thing you’ll want to do is format your SD card. |
|
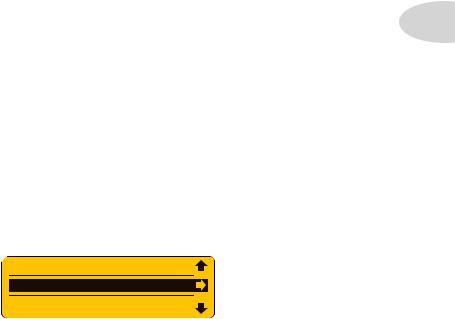
Format Card
It’s best to start out with a new 1 GB or 2 GB SD card. If you have an existing card, that’ll work fine, but make sure you’ve backed up any saved files on the card first, because when you format your card, all your files will be erased. The main reason to format your SD card is to ensure your card is set up with the JM4 filing system. It’s also a good way to get a fresh start in organizing your sessions. To format your SD card, follow these steps:
•Insert an SD card (up to 2 GB) into the SD card slot on the Spider Jam rear panel.
•Press the SAVE button; you’ll see a list of menu items in the LCD.
•Turn the wheel and navigate to Format Card, then press the R Arrow to format.
 IMPORT WAV FILE FROM CARD
FORMAT CARD
FIRMWARE VERSION
•Press the Up Arrow to confirm “Yes”. The format process will take a few seconds.
•When the format process is complete, press any button to begin a new session.
As you begin recording with Spider Jam, before you know it you’ll find you’ve accumulated quite a few recordings. Since internal memory is limited, you’ll want to develop a good system for backing them up, for beginning new sessions with a clean slate, and for importing WAV files from your computer. With that in mind, here are 3 good rules to go by:
•Use an SD card as your primary memory bank to keep internal memory freed up.
•Back up every session of internal memory recordings to SD card.
•For maximum recording time, begin every new session with JM4 memory cleared.
 Loading...