


Pilot’s Handbook
An in-depth exploration of the revolutionary technologies and tonal pleasures of the Flextone III.
Electrophonic Limited Edition. Also available at www.line6.com. Revision C.

The serial number can be found on the back panel of your Flextone III. It’s the number that begins with “(21)”. Please note it here for future reference:
SERIAL NO:
WARNING: To reduce the risk of fire or electric shock, do not expose this appliance to rain or moisture.
CAUTION: To reduce the risk of fire or electric shock, do not remove screws. No user-serviceable parts inside. Refer servicing to qualified service personnel.
CAUTION: This equipment has been tested and found to comply with the limits for a Class B digital device pursuant to Part 15 of FCC Rules. Operation is subject to the following two conditions: (1) This device may not cause harmful interference, and (2) this device must accept any interference received, including interference that may cause undesired operation.
The lightning symbol within a triangle means “electrical caution!” It indicates the presence of information about operating voltage and potential risks of electrical shock.
The exclamation point within a triangle means “caution!” Please read the information next to all caution signs.
YOU SHOULD READ THESE IMPORTANT SAFETY INSTRUCTIONS
KEEP THESE INSTRUCTIONS IN A SAFE PLACE
Before using your Flextone III, carefully read the applicable items of these operating instructions and safety suggestions:
1. |
Obey all warnings on the Flextone III and in this Pilot’s Handbook. |
2. |
Do not place near heat sources, such as radiators, heat registers, or appliances which produce heat. |
3. |
Guard against objects or liquids entering the enclosure. |
4. |
Connect only to AC power outlets rated 100-120V or 230V 47-63Hz (depending on the voltage range of the |
|
unit; refer to the back panel). Current ratings should be 4A for the 120V range and 2 A for the 230V range. |
5.Do not step on power cords. Do not place items on top of power cords so that they are pinched or leaned on. Pay particular attention to the cord at the plug end and the point where it connects to the amp.
6.Unplug your Flextone III when not in use for extended periods of time.
7.Do not perform service operations beyond those described in the Flextone III Pilot’s Handbook. In the following circumstances, repairs should be performed only by qualified service personnel:
•liquid is spilled into the unit
•an object falls into the unit
•the unit does not operate normally or changes in performance in a significant way
•the unit is dropped or the enclosure is damaged
8.Prolonged listening at high volume levels may cause irreparable hearing loss and/or damage. Always be sure to practice “safe listening.”
Flextone III Pilot’s Handbook © 2003, Line 6, Inc.
Please Note:
Line 6, Flextone, Vetta, POD, Duoverb, Tone Transfer, Line 6 edit, FBV Shortboard and FBV are trademarks of Line 6, Inc. All other product names, trademarks, and artists’ names are the property of their respective owners, which are in no way associated or affiliated with Line 6. Product names, images, and artists’ names are used solely to identify the products whose tones and sounds were studied during Line 6’s sound model development for this product. The use of these products, trademarks, images, and artists’ names does not imply any cooperation or endorsement.
Welcome to Flextone III ................................................................................................. |
1•1 |
Register ............................................................................................................................................ |
1•1 |
Connect at www.line6.com ................................................................................................. |
1•1 |
Line 6 and Flextone III............................................................................................................. |
1•1 |
Working It |
|
Quick Start Guide....................................................................... |
2•1 |
Front Panel Features ................................................................................................................ |
2•2 |
Manual Mode: What You See Is What You Get.................................................... |
2•6 |
Using The Channel Memories............................................................................................ |
2•6 |
Creating Amp Defaults........................................................................................................... |
2•7 |
Rear Panel Features.................................................................................................................. |
2•8 |
Using Your Direct XLR Outputs ...................................................................................... |
2•9 |
The Amps & Cabs |
|
Meet The Family......................................................................................................................... |
3•1 |
What’s In There.......................................................................................................................... |
3•2 |
The Cabinets ................................................................................................................................ |
3•28 |
The Effects |
|
About the Delay and Modulation Effects .................................................................... |
4•1 |
Delays ............................................................................................................................................... |
4•2 |
Modulations................................................................................................................................... |
4•4 |
Using Your Feet |
|
FBV Class Foot Controllers.................................................................................................. |
5•1 |
Connecting an FBV ................................................................................................................... |
5•1 |
So What Do All These Buttons and Pedals Do? .................................................... |
5•2 |
Saving and Naming with an FBV ....................................................................................... |
5•4 |
Appendices |
|
Amp Mod....................................................................................................................................... |
A |
Cabinet Models........................................................................................................................... |
B |
MIDI Channel & Programs.................................................................................................... |
C |
MIDI Continuous Control..................................................................................................... |
D |
Customer Service ...................................................................................................................... |
E |
Warranty Information ............................................................................................................. |
F |

Welcome to Flextone III • Register
WELCOME TO FLEXTONE III |
1 • 1 |
|
|
|
|
Register
Thanks for buying a Flextone III! Please send in that included registration card or
click on over to www.line6.com to get registered. We’ll wait right here...
Connect at www.line6.com
Join the thriving community at www.line6.com. It’s the place for ToneTransfer, the expanding online tone library for Line 6 products. It’s also the place to get free Line 6 Edit software that lets you tweak every last detail of you’re Flextone’s sound, backup its memory, and build up your own tone library on your computer! The discussion boards are humming with Line 6ers sharing insights to get the most from their gear and the great adventure of making music. And you can also learn what’s new from the artists that rely on Line 6, be the first to hear about new products, and tap into Customer Support via the powerful FAQTRAQ system.
Line 6 and Flextone III
You probably know Line 6 as a technological innovator in the guitar world—first to put digital software modeling technology to work in guitar combo amps, pioneering direct recording technology in POD and other products, and capturing the soul of classic pedals in modern stomp boxes. We make gear that’s packed with features and hi-tech breakthroughs, and bring new value and capabilities to guitarists.
With Flextone III, our goal was to give you everything you needed for gigging — including booty-shaking volume and simple operation—in one compact box. So it’s naturally got carefully selected premium amp models like those in our Vetta and PODXT, for the versatility to go from syrupy tweed rhythm to down right massive crunch without missing a beat. And powerful, great sounding effects that are also bone-head simple to use. The 112+ and 212 models even include Line 6’s signature A.I.R. II direct outs, so you can always get your tone to its destination without compromise or complication. And, of course, it’s all ready to dazzle your audience with the tasteful look and feel of a classic tube amp.
So flip the page, you lucky devil. And let’s take your hot new tone buggy for a spin!

Working It • Quick Start Guide
WORKING IT
2• 1
In a rush? Well, then, just read this page and come back to the rest later:
Quick Start Guide
POWER: Connect the power cord from Flextone III’s rear panel to your power outlet.
But don’t turn the power on yet.
PLUG IN: Jack your guitar into Flextone III’s INPUT. Turn Flextone III’s MASTER knob (on the far right) all the way down. Locate Flextone III’s POWER switch on the back by the power cord, and fire that bad boy up. Spin MASTER up to 9 o’clock or so. Get ready for tasty tones...
MODELS KNOB: Spin this to select from the 16 amp flavors, each with two variations, for 32 Amp Models total.
DRIVE, BASS, MID,TREBLE, PRESENCE,VOLUME KNOBS: What you see is what you get here—turn knobs ’til things sound good!
DELAY: Press the button to the left of the Delay knob to pick one of the Delay effects. Tap in a tempo for the delay, and turn the Delay knob to get more or less of the effect.
MOD: Press the button to the left of the Mod knob to pick one of the Mod effects. Turn the Mod knob to speed up or slow down the selected effect.
COMP/GATE: Press COMP and/or GATE to engage each effect. The Compressor will smooth out your dynamics and add sustain. The Gate will mute the inherent noise common to high gain amp tones when you’re not playing.
CHANNEL MEMORIES: These are like the buttons on a car radio that remember your favorite stations. Press A, B, C or D to recall one of the 4 Channel Memories. Press that button again to get back to “manual mode.” You’re in manual mode if none of the A, B, C, or D buttons are lit. And just like a car radio, hold any of the buttons for 3 seconds to save your current settings to that memory for later recall.

Working It • Front Panel Features
Front Panel Features
1 |
|
2 |
|
3 |
|
4 |
|
5 |
|
|
|
|
|
|
|
|
|
2• 2
|
|
MODELS |
|
|
|
|
|
|
CHANNEL SELECT |
|
|||
|
|
|
|
|
|
|
A |
B |
C |
|
D |
||
|
|
DOUBLE VERB |
|
|
|
|
|
|
|||||
|
|
|
|
|
|
|
|
|
|
|
|
||
|
TWEED B-MAN |
MATCH CHIEF |
|
|
|
|
|
|
|
|
|
|
|
|
BLACKFACE LUX |
CLASS A-30 |
|
|
|
|
|
|
|
|
|
|
|
|
JAZZ CLEAN |
|
PLEXI 45 |
|
|
|
|
|
|
|
|
|
|
|
LINE 6 INSANE |
|
PLEXI LEAD 100 |
|
|
|
|
|
|
|
|
|
|
|
LINE 6 MOOD |
|
BRIT J-800 |
|
|
|
|
|
|
|
|
|
|
|
LINE 6 CRUNCH |
TREADPLATE |
0 |
10 |
0 |
10 |
0 |
10 |
0 |
10 |
0 |
10 |
|
INPUT |
DRIVE |
BASS |
|
MID |
TREBLE |
PRESENC |
|||||||
LINE |
6 CLEAN |
SOLO 100 |
|
||||||||||
|
|
|
|
|
|
|
|
|
|
|
|||
GIB EXPLORER
(PRESS TO SELECT CAB)
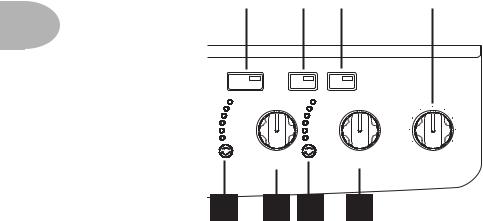
1.Guitar Input: Plug your guitar in here.
2.Models - Amps: As you turn this knob, one of the lights surrounding it will light. An AMBER (yellow) light next to one of the Model names tells you that you’ve selected that Amp Model. Turn the knob one more click to get a RED light, and you’ve chosen a second variation of that amp “flavor.” Chapter 3 describes all 32 Amp Models.
Models - Cabs: When you select an Amp Model, your Flextone III is selecting an appropriate Cab Model to go with it behind the scenes. To choose a different one from the 16 available Cab Models, press and hold the Model knob while turning it; you’ll see GREEN lights. The cabs run from smallest to largest, so selecting green lights from “Line 6 Crunch” through “Gib Explorer” takes you all the way from petite combo amp cabinets to ferocious 4x12s. Turn to “Line 6 Clean” to bypass the cab modeling.
3.Drive: Turn this knob to set how hard you’re driving the chosen Amp Model. Similar to the input volume control on a non-master volume amp, the higher the setting, the more “dirt.”
4.Tone Controls – Bass, Mid,Treble and Presence: These controls are made to behave like the controls of the amps that were modeled for Flextone III. Twist ’em round until things sound just the way you like. See Chapter 3 for details.
Working It • Front Panel Features
5 |
|
6 |
|
7 |
|
|
|
|
|
2• 3
CHANNEL SELECT
A B C D
0 |
10 |
0 |
10 |
0 |
10 |
0 |
10 |
0 |
10 |
|
MID |
TREBLE |
PRESENCE |
VOLUME |
REVERB |
||||
5.Channel Select Buttons – A, B, C, D: Flextone III uses these buttons to remember your favorite settings—no more need to mark up the front of your amp with grease pencil to note your favorite settings! Each memory is pre-set with delicious tone when a Flextone III leaves the factory—press a button to hear the saved setting. As you do, notice that Flextone III’s lights indicate which Amp Model is used in the Channel Memory, which effects are on, etc. To get back to the “manual mode,” just press the lit button again to turn it off. Plus...
As you come across your own favorite settings that you’d like to keep, you can save them to the A, B, C and D buttons to replace the factory presets. Just hold down any of A, B, C or D buttons for about 3 seconds until all of them flash and presto—Flextone III has now memorized your custom tone for easy recall! See Using The Channel Memories on page 2•6 for more detail. The Line 6 FBV class foot controllers let you select these Channel Memories with your feet—and expand the number of memories available to a total of 36. Chapter 5 has got the details.
6.Volume: Use this to set the volume for the current channel, and get it to the right relative volume versus the other channels that you use.
7.Reverb: Just turn the knob to get the amount of reverb you’d like. Turn the knob fully counter-clockwise for no reverb.
Bonus Feature: Reverb Tweak- To adjust the type and decay of the Reverb, press and hold the Tap Tempo button and turn the Reverb knob. There are three different Reverb types accessible throughout the range of the knob. The first third of the knob is a spring, the second third a Room, and the final third a Plate, each with a range of decays, from short to long.
Working It • Front Panel Features
9 |
|
12 |
|
13 |
|
15 |
|
|
|
|
|
|
|
2• 4
TAP |
GATE |
COMP |
|
|
TEMPO |
|
|
||
SWEEP ECHO |
ROTARY |
|
|
|
PING PONG |
|
U-VIBE |
|
|
DIGITAL |
|
PHASER |
|
|
ANALOG |
|
FLANGER |
|
|
TAPE ECHO |
|
CHORUS |
|
|
TUBE ECHO |
|
TREMOLO |
|
|
|
|
|
0 |
10 |
|
DELAY |
MOD |
MASTER |
|
8 10 11 14
8.Delay Select: Press this to step though the Delay effects listed to the left of the Delay knob, or to turn off the Delay (all lights off).
9.Tap Tempo: Tap the button at the tempo you’d like—the delay time switches to match that tempo.
10.Delay: Dynamically adjusts multiple delay parameters, including mix, feedback and tone. Spin it to get more or less delay.
Bonus Features: Delay Feedback - To adjust only the Delay Feedback, press and hold the Delay Select button and turn the Delay knob. Note: Turning the Delay knob after tweaking the feedback will override your feedback setting. So it’s best to first get the general Delay set with the Delay knob, and then fine-tune the feedback if necessary.
Delay Time - To set the delay time without having to deal with tempos and such, press and hold the Tap Tempo button while turning the Delay knob. For shorter delays dial counter-clockwise. Long delays, clockwise.

Working It • Front Panel Features
11.Mod: Press this to step though the Mod effects listed to the left of the Mod knob, or to turn off the Mod (all lights off).
12. Gate: Engages the on-board gate. The gate kicks in when your guitar signal drops |
2• 5 |
below a certain “threshold,” and is intended to mute the noise that you might otherwise hear at that time. To adjust the Gate threshold, press and hold the Gate button while turning either the Delay or Mod knob. The lower the threshold (clockwise), the more the sustain of your notes will tend to get chopped off.
13.Comp: Engages the on-board Compressor. The compressor will add sustain to your guitar sound, and smooth out your dynamics. To set the amount of compression, press and hold the Comp button while turning either the Delay or Mod knob. The lower the setting, (clockwise) the more your notes will sustain.
14.Mod: Dynamically adjusts multiple modulation parameters, including rate and depth.
Bonus Feature: Modulation 2nd Function - Each modulation model can be finetuned by pressing and holding the Mod Button while turning the Mod Knob. The list below shows which fine-tuning is available for each effect. Note: Turning the Mod knob after fine-tuning an effect will override the fine-tuned parameter you’ve tweaked. So it’s best to first get the general Mod set with the Mod knob, and then fine-tune if necessary.
MOD Effect |
Fine-Tune |
|
|
|
|
Rotary |
Tone |
U-Vibe |
Depth |
Phaser |
Feedback |
Flanger |
Feedback |
Chorus |
Depth |
Tremolo |
Depth |
15.Master: Sets the overall volume of your Flextone III. Adjust this to set your basic loudness, then use the Channel Volume knob to balance the relative volume of the sounds you store with the A, B, C, D buttons.

Working It • Manual Mode:WhatYou See Is WhatYou Get
Manual Mode: What You See Is What You Get
When none of the A, B, C, D Buttons are lit, Flextone III is operating in Manual 2• 6 Mode, meaning that all of the controls are active and the sound of the amp is
determined by the current knob settings. Just like a regular amplifier, right?
If you are not in Manual Mode and would like to be, simply give the lit A,B, C, or D Button a quick press.
Using The Channel Memories
Flextone III can store and recall your favorite settings using the A, B, C, D Buttons.
Save: Any time you’ve dialed up a sound that you’d like to save for later recall, all you have to do is hold down button A, B, C or D for 3 seconds. At the end of that 3 seconds, the button you held will flash to let you know that you’ve successfully stored your present setting of all the controls to that button.
Recall: When you tap one of the A, B, C, D Buttons to light it up, Flextone III recalls the settings that were stored in that button’s Channel Memory. This includes your choice of Amp and Cab Models, the Drive, Bass, Mid, Treble, Presence, Reverb and ChannelVolume settings, plus your Mod and Delay settings. Note: The Master Volume setting is not stored with each Channel, instead it acts as a global volume that controls the overall volume of all channels.
The various front panel lights will show the recalled settings, but the knobs will not. Turning any knob or operating any button will override the recalled setting for that control only. To override all the recalled settings and get the sound determined by the current setting of all the knobs, press the lit A, B, C, or D Button. You’re now back in what-you-see-is-what-you-get Manual Mode.
See Chapter 5 for details on how to store and recall a total of 36 Flextone III Channel Memories using your feet.
To reset all the Channel Memories (including all 36 available from an FBV and MIDI) to their factory state, hold the A and D Buttons while powering up your Flextone III.

Working It • Creating Amp Defaults
Creating Amp Defaults
Amp Defaults are simply snapshots of all the important Amp Model controls that
are automatically recalled when you select a model via the Model knob. Every
2• 7
time you select a model, Flextone III loads the associated Amp Default to expedite your trip to tone nirvana.
You can edit any or all of the Amp Defaults, and pack your Flextone III with all the special amp-tweaking genius that only you possess. This brilliance will then be available instantly at the turn of the MODEL knob. For instance, when you turn the MODEL knob to load the Plexi-45 model, you’ll get your personal Plexi-45, with all the controls set for your very own version! Here’s how it works:
Choose an Amp Model, change the cab if you like, dial in the amp controls, etc. When you’re happy with what you’ve got, press and hold the MODEL knob being careful not to turn it. After about 5 seconds, the light for the selected model will start to blink and you can let go. Your custom settings have been saved.
Using MIDI, you can customize a whole bunch of other controls and store them with the Amp Setup. Download the free Line 6 Edit software from www.line6.com to do all this with software customized for your Flextone III. The MIDI Appendix gives detail on the continuous controller messages that drive each of these parameters. After making tweaks via MIDI, you can save the result as the Amp Default.
Amp parameters accessible via MIDI and Line 6 Edit software include:
Drive |
Compression Gain |
Reverb Model |
Bass |
Compression Threshold |
Reverb Decay |
|
|
|
Mid |
Comp Enable |
Reverb Tone |
|
|
|
Treble |
Gate Threshold |
A.I.R. II Model |
Presence |
Gate Decay Time |
Cabinet Model |
|
|
|
Channel Volume |
Noise Gate Enable |
Volume PRE/POST |
|
|
|

Working It • Rear Panel Features
Rear Panel Features
2• 8
U.S. PATENT NO. 5,789,689
|
|
|
|
|
|
|
|
Part #41-00-1027 Rev. B |
® |
|
|
|
|
|
|
|
|
|
|
||
162 |
|
173 |
|
184 |
|
195 |
|
2016 |
|
2117 |
|
|
|
|
|
|
|
|
|
|
|
SPEAKER OUTS
Class 2 Wiring
8 Ohms Only
RIGHT |
LEFT |
PHONES |
For Plus Configuration Only:
Connect Right Speaker Output to External Cab
|
|
EFFECTS LOOP |
XLR OUTPUTS - PIN 2 HOT |
||
connect FBV Class Foot Controller here |
SEND |
RETURN |
RIGHT |
LEFT/MONO |
|
(not compatible with Floor Board) |
|||||
|
|
||||
PEDAL |
MIDI IN MIDI OUT LEFT (MONO) |
RIGHT LEFT (MONO) RIGHT |
LEVEL TRIM |
|
|
-22dBu +4dBu
GROUND
LIFT
2218
16.Phones: Keep it quiet around the house by connecting headphones to the Phones jack—plugging in headphones disables your speaker outputs. The Master knob sets the level while you’re using headphones—turn it down as you switch between headphones and the speakers so you won’t unexpectedly blast yourself with volume.
17.Pedal: Connect the RJ-45 cable supplied with your FBV or FBV Shortboard here. Chapter 5 has the full details.
18.MIDI In & MIDI Out: Connect standard MIDI cables here. Flextone III always sends and receives on MIDI Channel 1. Use MIDI with the free Line 6 Edit software from www.line6.com. See the MIDI appendix for more MIDI details.
19.Effects Loop: Use the Left(Mono) Send and Return for a mono rack effect. Connect stereo effects as shown. Generally, stomp boxes go before the amp, not in this loop.
Flextone III FX Loop |
|
Rack FX unit |
|
||
|
EFFECTS LOOP |
|
|
|
|
SEND |
RETURN |
LEFT |
RIGHT |
LEFT |
RIGHT |
LEFT (MONO) |
RIGHT LEFT (MONO) RIGHT |
|
|
|
|
OUTPUT |
INPUT |

Working It • Rear Panel Features
20. Level Trim: The level of the XLR Outputs is set by the small rear panel trim, and is |
2• |
9 |
not affected by the Master knob. |
|
|
21.XLR Balanced Outputs & Ground Lift: These versatile connections are designed with Line 6’s exclusive A.I.R. II technology to give you the perfect pair of direct connections for live performance and studio recording sessions. See UsingYour Direct XLR Outputs on page 2•10 for details. Try flipping the Ground Lift switch if you are experiencing buzzing or hum when connected to other equipment via the
Direct XLR Outs.
Please Note: there can be an audible ‘pop’ on the XLR outputs when powering Flextone III on or off. We recommend that you either disconnect the direct outputs or power down whatever the direct outs are connected to before turning your Flextone III On or Off.
22.Speaker Outs: This is where you can jack in an external cabinet or two to be powered by your Flextone III amp. Please note, the Flextone III XL and Plus are designed to be connected to 8 ohm speaker loads only.
Flextone III XL – Plugging into either the Left or Right speaker connection disconnects the internal speaker and lets you run a different 8 ohm speaker cabinet instead.
Flextone III Plus – If you have a Flextone III Plus, these jacks will be labeled Internal and External. Plugging into the Internal connection disconnects the internal speaker and lets you run a different 8 ohm speaker cabinet instead. The External connection is designed for the Flextone Cab, and operates at the same time as the internal speaker. It supplies 50 Watts of power to the Flextone Cab, giving you a 100 Watt Stereo setup.
Power Switch & Connector (not shown in diagram): These are on the side of the rear panel that’s not included in the illustration. Connect the supplied power cable to your wall outlet, then flick the power switch to let the electrons in to do their stuff.

Working It • UsingYour Direct XLR Outputs
Using Your Direct XLR Outputs
One of the nifty features inside your Flextone III is Line 6’s exclusive A.I.R. II
2• 10 technology that enables you to get that great mic’d up sound out of your amplifier without the microphone! Your Direct outputs can be used either in the studio or as a direct feed to the house sound system for a live performance.
The Master knob on your Flextone III sets the level for the internal speakers (and any external speakers you connect), without having any effect on your Direct Output level. This is a good thing, for instance, when you’re playing live. It means you can set a low volume level for your amp on stage (maybe it’s a small venue) while still pumping out full level at the direct outs so the house sound system is getting plenty of juice. And any adjustments you make to your on-stage level during the gig don’t send the sound man scrambling to compensate on his end. This is also a good thing if you’re recording in the studio, using your amp to monitor with the other band members while your direct out is being recorded. Once again, an appropriately low master volume level that you might want for the amp doesn’t force you to have a low level signal going to tape, and adjustments you make to your level don’t interfere with the levels in the control room.
Flextone III can send enough direct out level to light up the input meters for +4 dBu pro recording. For live sound systems, as well as many recording setups designed to work with lower levels, this can sometimes be overkill. The Level Trim knob on Flextone III’s rear panel lets you roll back the direct out level and keep your sound guy or lowerlevel recording system happy.
If you’re setting the levels yourself, and want to make sure you don’t overdo it, you can follow these basic steps. First, plug the hottest output level guitar you plan to use into Flextone III, switch to your hottest pickup setting, and crank the guitar’s output volume (or put it as high as you ever set it). If you plan to change sounds on your Flextone III during the gig, start by selecting the Flextone III sound that seems to have the loudest output level. You can set your Master knob on Flextone III low as you do all this so you don’t blow yourself out; it won’t affect the direct output level. Now, with this guitar and Flextone III setup, play hard (so you’re sending maximum volume out those direct outputs) and have someone adjust Flextone III’s rear panel Level Trim knob until a good healthy level is being received by the equipment you’re sending sound to. The level shouldn’t be so hot that it’s causing input distortion or clipping on that receiving equipment. If the receiving equipment has an input level adjustment, you’ll probably get your best signal-to-noise ratio by setting it as low as possible while setting your Flextone III’s Level Trim as high as possible.

The Amps & Cabs • Meet The Family
THE AMPS & CABS
Flextone III’s heart is its collection of Amp and Cab Models—resulting from Line 6’s
meticulous study of a dream collection of vintage and modern amplifiers and cabinets.
3 • 1
Each position of Flextone III’s Model knobs calls up a particular Amp/Cab combination, powered by many of the same coveted models that appear in the Line 6 Vetta series amps as well as PODXT.
Meet The Family
Once we’ve set our sights on creating a software emulation of a particular kind of amp or cabinet here at Line 6, the first step is to get our hands on the very best example that we can find to study. We will (and have) scoured the globe in search of just the right specimen—that one, very particular unit that has the magic.
After all, amps from ’57, ’62, ’65, ’67, ’75, and 2002 may all bear the same model name, yet have totally different circuit designs, sound and response—and quite often a different look as well. Even two amps with the same circuit design, from the same era, can sound radically different, just on the basis of variance in component tolerances, as well as how the wiring harness was dressed—and maybe even what the amp assembler had for lunch that day. Plus there’s the fact that every amp has its own special way of settling in over the years and, just like people, some of them only get better with age.
Each of the distinguished amps and cabs that we select for modeling thus has a character and specialness as uniquely individual as a treasured friend. And we’ve included photos here of the actual amps that we selected, studied and measured so that you’ll know exactly which amp we’re talking about.
So, let’s meet the Amp and Cab Models that live inside your Flextone III, and the
original equipment that helped to make them possible....

The Amps & Cabs • What’s In There
What’s In There
Line 6 Clean
To create this Amp Model, we essentially grafted the preamp and tone stack of a JC-120 (Roland’s popular “Jazz Chorus” solid state combo) onto the power amp and transformer of a classic Marshall JTM-45 tube head, thereby giving you the crisp and
3 • 2 clear front end typical of a solid state amp, but with a rich, satisfying tube amp-style bite as you turn it up.
Line 6 Super Clean (Red alternate model for “Line 6 Clean”)
Forget what you know about how clean or how bright a guitar amplifier can go. Line 6 Super Clean goes farther, adding a lot of brightness. Caution: Because Super Clean adds so much brightness, it generally won’t work so well with distortion pedals, since they usually add lots of high frequencies, too. The combination may produce un-natural artifacts—or just rip your head off. Plug an un-distorted guitar in here, though, and we’re talking super happy shiny bright.
Line 6 Crunch
While having cousins marry is not such a good idea in real life, in the amp world, it can have a great payoff. Since the design of some early Marshall amps had a lot in common with the Fender Tweed Bassman circuitry, we wondered what it would be like if we took the preamp and tone stack of our JTM-45 and ran it into the power amp and transformer of our ’58 Tweed Bassman. Point, click, cut, paste (it would be nice if it were really that easy, huh? We’d sure be able to get more sleep). What we got was way happening, as Line 6 Crunch will attest. Great grind and nice punch. A tone that the whole family can enjoy.
Line 6 Sparkle (Red alternate model for “Line 6 Crunch”)
We love tweed Fenders. We love blackface Fenders. We love ’em both so much, we can never really decide which one we like more. Luckily, we were able to come up with the perfect way to share the love. We took the preamp and tone stack from our model based on the ’58 Tweed Bassman, and we wired (in the virtual world) our model of a blackface Bandmaster power amp and transformer onto it. Voilà! Line 6 Sparkle.
Line 6 Mood
And here we give you a fantasia tone, based on our fondest memories of grunge guitar tones we have known and loved.
 Loading...