


 Loading...
VERSION 2.0
UPGRADE GUIDE
Rev B. Electrophonic version available at www.line6.com.

WELCOME
Welcome: PREPARING FOR INSTALLATION
UP•1
Version 2.0 software enhances the already beloved POD with a host of new features and improvements requested by the growing community of POD users, or dreamed up by the product design crew at Line 6. This publication gives you all the details.
PREPARING FOR INSTALLATION
First we’re gonna tell you how to backup your POD’s memory. Then we’ll help you get your new 2.0 software installed. And, finally, we’ll tell you about the new Version 2.0 features and improvements later in this guide.
REALLY IMPORTANT: Installing the 2.0 software will reset your POD’s memory, causing it to forget any personalized sounds you might have programmed.
If you have concocted some of your own sounds and saved them in your POD, now’s the time to think about backing them up with a computer or other MIDI device, or writing them down with the help of the Pilot’s Log on the fold-out back cover of your POD Pilot’s Guide. You can use the SoundDiver software that we supply to save all your sounds on a computer, or you can back them up to some other MIDI device as described in the POD Pilot’s Handbook’s chapter on Deep Editing and MIDI Control.
We’ve prepared step-by-step instructions for saving your pre-upgrade sounds with SoundDiver, and then getting them into your post-upgrade POD. This begins on the next page:

Welcome: STORING YOUR PRE-UPGRADE SOUNDS
UP• 2 STORING YOUR PRE-UPGRADE SOUNDS
We’ll assume you’ve got one of two scenarios. Either (1) You’ve already been using an earlier version of the SoundDiver software to edit and/or store your POD sounds on computer, or (2) You’ve never gone near that SoundDiver thing but you’re reluctantly feeling like you have to do it now to save your sonic creations. If you’re in situation 1 (SoundDiver savvy), all you have to do is make sure you’ve got all your current POD sounds stored in a SoundDiver Library file. Make sure you can open your Library file in SoundDiver, and get the sounds in it to and from your POD. Make sure you know where that Library lives in your computer (and consider giving it a name like “POD Pre-Upgrade Sounds”). You can jump ahead to installing the software chip, and then be sure to also read the Configuring SoundDiver for 2.0 section.
STEP-BY-STEP WITH SOUNDDIVER
If you’re in situation 2 (you’re new to SoundDiver), follow these steps. Remember, do this before installing the new Version 2.0 software chip in your POD.
Step 1 - Hook your POD up to your computer’s MIDI interface. Use both the MIDI IN and MIDI OUT connections for bi-directional communication (so POD can talk to your computer, and the computer can talk to POD). Remember that POD’s OUT connects to the computer’s IN, and the computer’s OUT connects to POD’s IN. Make sure POD is powered on.
Step 2 - Install the new version of SoundDiver that supports POD 2.0. We’ve included SoundDiver installers on the accompanying CD. We also strongly recommend that you surf the Support pages at www.line6.com to check for an updated version of the SoundDiver installer. Run the SoundDiver installer to get SoundDiver installed on your machine. Now, with your POD hooked up to the computer via MIDI and powered on, launch the newly-installed SoundDiver software.
Step 3 - First you’ll see the “splash screen” with Emagic’s contact info, including information on upgrading to the full version of the SoundDiver software. You’ll then get a dialogue box to select English or German (SoundDiver is made by Emagic, a German company).
Welcome: STORING YOUR PRE-UPGRADE SOUNDS
Step 4 (Macintosh) - Then you’ll configure your ports; make sure you are plugged |
UP•3 |
into the right port on your mac (Modem, Printer, or USB) and that you’ve checked |
|
the box for this port before hitting the OK button in the Preferences dialogue box. |
|
Step 4 (Windows) - SoundDiver will now probably give you a series of dialogue |
|
boxes to OK regarding MIDI ports. These will say something like “Port XXXX no |
|
longer exists,” and will include an OK button. Typically, you’ll get two dialogues |
|
referring to SoundBlaster ports, and eight referring to Unitor ports (the Unitor is a |
|
particular MIDI interface). Go ahead and OK all these dialogue boxes, and then |
|
SoundDiver should give you the dialogue box we’re about to describe in step 5.... |
|
Step 5 - SoundDiver should now establish communication with your POD (like we |
|
said above, make sure you have both MIDI In and MIDI Out connected to allow this), |
|
and will give you a dialogue box asking if you’d like to “Request Device’s Memories?” |
|
OK this dialogue, and SoundDiver sucks all the sounds out of your Version 2.0 POD, |
|
and opens them in a window titled “POD 2.0”. |
|
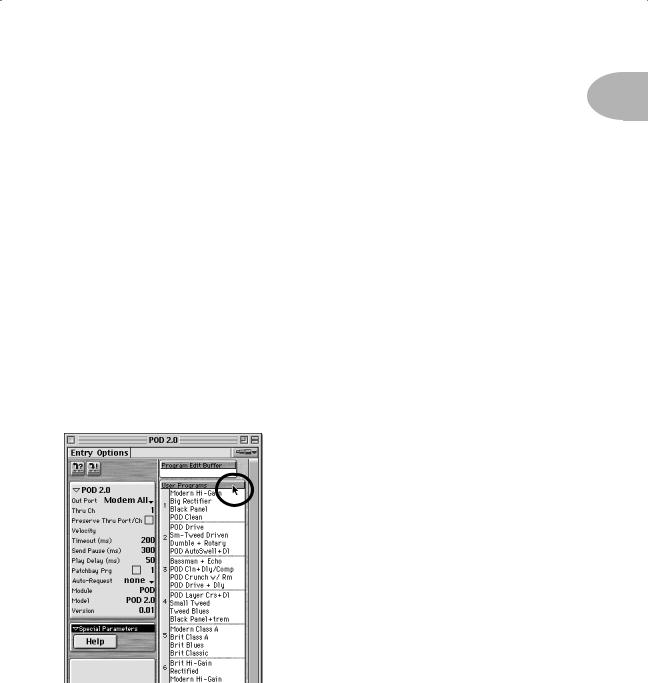
Step 6 - You’ll have a window that looks about |
|
like the one on the left. |
|
Use your mouse to move your on-screen arrow |
|
pointer to the User Programs header bar as |
|
shown, and click once. The list of all 32 user |
|
memories will then be highlighted to show that |
|
they are all selected (clicking on the header bar |
|
is a handy “select all user memories” command). |
|

Welcome: STORING YOUR PRE-UPGRADE SOUNDS
UP• 4 |
Step 7 (Macintosh) - |
|
|
|
and Options. From the |
|
shown below: |
Now, notice that there are two menus in this window: Entry
Entry menu, choose Save as... > Selected Entries, as
SoundDiver will give you a standard Save File dialogue box. A pop-up menu at the top of the dialogue box will say “Libraries,” letting you know you are about to save your library to the SoundDiver Libraries folder.
You can click on this “Libraries” pop-up menu to navigate to another place if you want to save this library file some place else. You can also change the name of your library by typing one here (we recommend something like “POD Pre-Upgrade Sounds”), and then you complete the Save by clicking Save.

Welcome: STORING YOUR PRE-UPGRADE SOUNDS
Step 7 (Windows) - On Windows, the Entry menu is at the top of the screen with |
UP•5 |
File and the rest of ’em. From it, choose Save as... > Selected Entries. SoundDiver |
|
will give you a standard Save File dialogue box. The SoundDiver software’s Libraries |
|
folder has been automatically selected for you as the destination for your library file. |
|
You can change the name of your library by typing one here (we recommend |
|
something like “POD Pre-Upgrade Sounds”), and then complete the Save by clicking |
|
the Save button. |
|
Step 8 - As a final check to make sure |
|
everything went as it should, choose Open |
|
from the File menu, and open the library |
|
you just saved. You should see a window |
|
like the one at the left, listing all 36 of your |
|
POD’s memories. |
|
Congratulations! You’ve now backed up |
|
the memory of your POD, and are ready to |
|
install your upgrade chip. |
|

Welcome: INSTALLING YOUR NEW 2.0 CHIP
UP• 6 INSTALLING YOUR NEW 2.0 CHIP
Installing the upgrade chip is simple. You’ll need a longish Phillips screwdriver with a smallish head.
Remember, installing the upgrade will clear your POD’s memory, so be sure you’ve backed up any custom sounds you created as described in the previous pages.
GETTING UNDER THE HOOD
Step 1 - Spread a towel on a table or work bench, and turn your POD upside down on top of the towel. Point the pedal connector away from you; the guitar input and headphone output jacks will be nearest you.
Step 2 - You’ll see 4 round shafts in the bottom of the POD. Insert the screwdriver into these and remove the four screws.
Step 3 - With the screws removed, pull the bottom off of your POD. You’re now looking at its circuit board, and you’ll see a socketed chip at the lower right (circled in the illustration to the right).
Step 4 - Use the included chip puller to remove the socketed chip. Pull straight up on the chip; you can rock it slightly from side to side as you do to loosen it.
Step 5 - Now grab the upgrade chip.
Note that the chip has a little notch on one side. You want this notch to be pointing to the left. The socket also has a little notch, and the idea is to have the socket’s notch
Loading...