


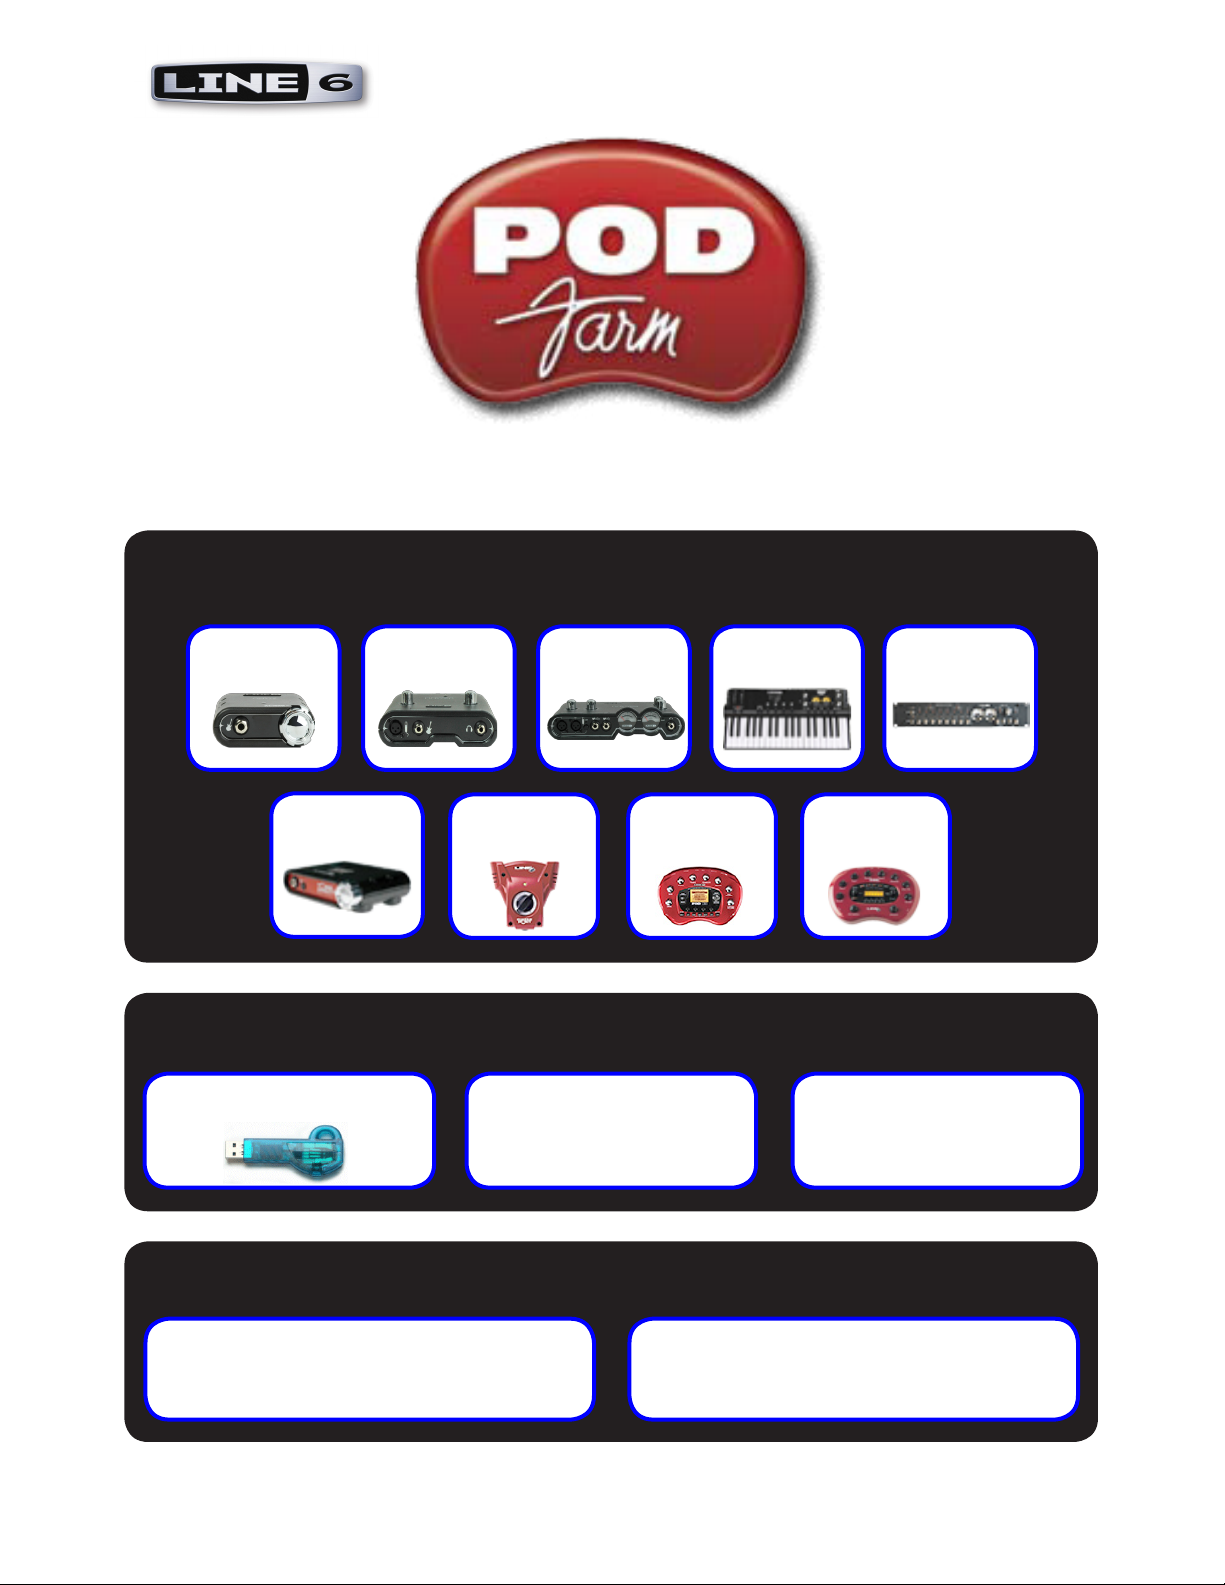
POD Farm GX
Line 6 POD Farm GX, UX8, DI, UX2, KB37 User Manual
...
Ve r s i o n 1.01 Us e r GU i d e
Getting Started With Your Hardware
GX KB37
DI
UX1 UX2
Guitar
Port
POD X3
Family
PODXT
Family
POD Farm Basics
iLok
POD Farm
Plug-In
UX8
Standalone
Operation
Online Resources
POD Farm
Online Support
Line 6
Online Store

Table of Contents
Start Here ................................................................................................1•1
About Line 6 Hardware & Software ..............................................................................1•1
System Requirements - POD Farm Plug-In & Standalone Operation .......................... 1•1
Updating & Registering with Line 6 Monkey ................................................................ 1•2
Product Activation & Authorization ............................................................................. 1•4
Transferring Activations ................................................................................................. 1•5
POD Farm Plug-In for iLok ............................................................................................ 1•6
Using Your Line 6 Hardware ...................................................................2•1
Making the Connection ................................................................................................. 2•1
GX (POD Studio & TonePort) ...................................................................................... 2•2
UX1 (POD Studio & TonePort) .................................................................................... 2•3
UX2 (POD Studio & TonePort) .................................................................................... 2•4
TonePort UX8 ................................................................................................................. 2•6
TonePort KB37 ............................................................................................................. 2•10
TonePort DI .................................................................................................................. 2•11
GuitarPort ..................................................................................................................... 2•13
Using POD X3 Family Devices with Your Computer... ............................................... 2•14
POD X3 ......................................................................................................................... 2•15
POD X3 Live ................................................................................................................ 2•16
POD X3 Pro .................................................................................................................. 2•17
Using PODxt Family Devices with Your Computer... .................................................. 2•22
PODxt Live ................................................................................................................... 2•24
PODxt PRO .................................................................................................................. 2•25
PODxt - Audio Signal Routing & Re-Amping ............................................................ 2•26
Routing Audio From Your Line 6 Hardware to an External Device ............................ 2•27
ToneDirect™ Monitoring .............................................................................................. 2•28
Sound Cards & Sound Issues ........................................................................................ 2•30
Line 6 Driver Panel & Recording ............................................................3•1
Audio Routing ................................................................................................................ 3•1
The Line 6 Audio-MIDI Devices Dialog ....................................................................... 3•1
Windows® - Line 6 Audio-MIDI Devices Dialog ........................................................... 3•2
Mac® - Line 6 Audio-MIDI Devices Dialog ................................................................. 3•13
Important Things to Know for Recording .................................................................... 3•25
POD Farm Plug-In ...................................................................................4•1
Windows
A Quickie Plug-In Primer ............................................................................................... 4•1
®
64 Bit Support ............................................................................................... 4•1
i i

Plug-In Parameter Automation ...................................................................................... 4•2
Supported Plug-In Formats ............................................................................................. 4•3
Activating the Plug-In .................................................................................................... 4•3
Plug-In User Interface Overview .................................................................................... 4•4
Main Control Bar ...........................................................................................................4•4
View Selection Buttons .................................................................................................. 4•6
Gear View ....................................................................................................................... 4•6
Panel View ...................................................................................................................... 4•7
Presets View .................................................................................................................. 4•11
Signal Flow View .......................................................................................................... 4•14
POD Farm Standalone Operation .........................................................5•1
ToneDirect™ Monitoring .............................................................................................. 5•1
Input Source Select & Input Metering .......................................................................... 5•2
Tuner View ...................................................................................................................... 5•3
Mixer View ..................................................................................................................... 5•4
Preferences ...................................................................................................................... 5•6
Saving Tones ................................................................................................................... 5•8
Model Gallery ...........................................................................................6•1
About the Model Gallery ............................................................................................... 6•3
Guitar Amp & Cab Models ............................................................................................ 6•3
Bass Amp & Cab Models.............................................................................................. 6•11
Preamp Models ............................................................................................................. 6•14
Effects Models ............................................................................................................... 6•15
Model List ..................................................................................................................... 6•25
How To... ....................................................................................................7•1
Troubleshooting .......................................................................................8•1
What Is… ..................................................................................................9•1
Online Help & Support ........................................................................ 10•1
Line 6, POD, PODxt, POD X3, POD Farm, POD Farm Plug-In, TonePort, GearBox, GearBox Plug-In, Line
6 Monkey, ToneDirect Monitoring, GuitarPort, FBV, Variax, Line 6 Edit and Custom Tone are trademarks of
Line 6, Inc. All other product names, trademarks, and artists’ names are the property of their respective owners,
which are in no way associated or affiliated with Line 6.
© 2008 Line 6, Inc.
i i i

Line 6 POD Farm 1.01 – Start Here
St a r t He r e
About Line 6 Hardware & Software
OK, you’ve got your guitar, a computer and a head full of songs and cool licks, so how do you get this
all going? You’re just a few steps away from turning your computer into a serious tone, jamming and
recording machine. First, here is some valuable information on getting started, and to ensure you have
all the latest and greatest updates….
System Requirements - POD Farm Plug-In & Standalone Operation
Windows
®
Pentium 4 -1.2GHz or better (2.5 GHz or better, or multi-core CPU recommended)•
Windows•
Windows® Vista® X64
512 MB RAM minimum (1 GB or more recommended)•
1 GB free hard disk space minimum (10 GB or more recommended for recording)•
Drive speed 5400 rpm minimum (7200 rpm or faster recommended)•
1024 x 768 minimum screen display resolution•
CD-ROM drive•
One free USB 1.1 or 2.0 compatible port on computer (USB hubs are not supported for Line 6 •
devices)
Internet connection for online features•
Compatible Line 6 USB hardware or iLok (device must be connected to computer & authorized •
to use POD Farm):
POD Farm Plug-In• - POD Studio, TonePort, GuitarPort, POD X3, PODxt hardware, or
iLok
POD Farm Standalone Operation• - POD Studio, TonePort, or GuitarPort hardware
®
XP® (with SP2 or SP3), Windows® XP® X64, Windows® Vista® (including SP1),
®
®
Mac
Intel or Power PC based G4 1.5 GHz or better (G4 1.67 or better, or multi-core CPU •
recommended)
OS X 10.4 or later •
512 MB RAM minimum (1 GB or more recommended)•
1GB free hard disk space minimum (10GB or more recommended for recording)•
Drive speed 5400 rpm minimum (7200 rpm or faster recommended)•
1024 x 768 minimum screen display resolution•
CD-ROM drive•
One free USB 1.1 or 2.0 compatible port on computer (USB hubs are not supported for Line 6 •
devices)
1•1
Line 6 POD Farm 1.01 – Start Here
Internet connection for online features•
Compatible Line 6 USB hardware or iLok (device must be connected to computer & authorized •
to use POD Farm):
POD Farm Plug-In• - POD Studio, TonePort, GuitarPort, POD X3, PODxt hardware, or
iLok
POD Farm Standalone Operation• - POD Studio, TonePort, or GuitarPort hardware
Windows 64 Bit support
If you have a 64 bit Windows PC, then no worries! POD Farm 1.0 and the included Line 6 USB
hardware drivers do indeed support Windows® XP® x64 and Windows® Vista® 64-Bit systems. Note
that POD Farm 1.0 (as well as the POD Farm Plug-in) still runs as a 32 bit application, but has been
made compatible to run on these Windows 64 bit operating systems. If you need to check the specific
system requirements or need some assistance with installing POD Farm on your computer, please refer
to the additional documents located on the POD Farm Online Help page of the Line 6 web site.
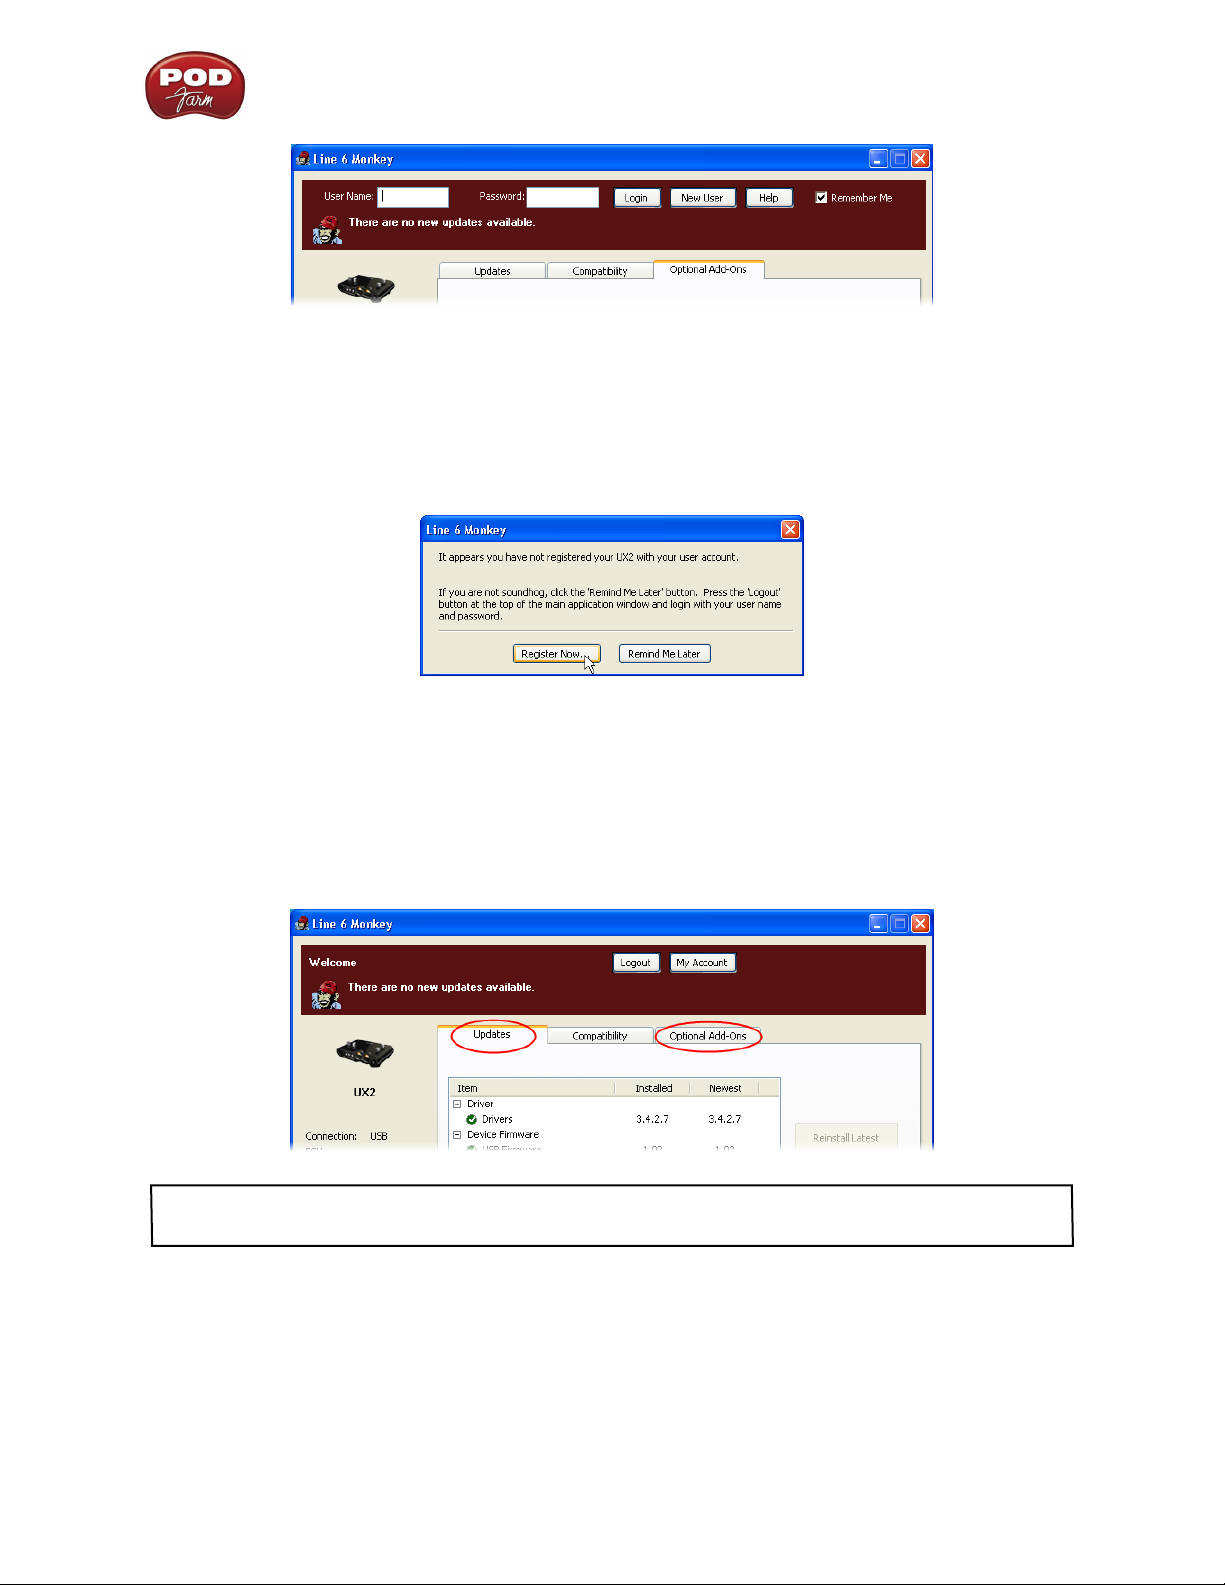
Updating & Registering with Line 6 Monkey
Attention iLok users... You won’t need to run Line 6 Monkey. Obtaining and authorizing a POD Farm
Plug-In license for an iLok USB key has its own simple, online process that you can perform on any
Internet-connected computer. Please skip ahead to the POD Farm for iLok section for details.
Line 6 Monkey is the intelligent updater utility automatically installed with your POD Farm application.
It is highly recommended that you run Line 6 Monkey at the end of your POD Farm installation, and
to do so often to be sure you have all the latest updates for all your Line 6 software and hardware
products. Registering your Line 6 hardware is also very important because it ensures that you’re dialed
in for warranty service and makes it possible for us to contact you if new software versions or other
cool enhancements are offered - cutting edge technology and such! So don’t put this off any longer.
Connect your Line 6 hardware to your computer and follow these steps to launch Line 6 Monkey...
On Mac•
On Windows•
®
, go to Applications - Line 6.
®
, go to the Start button menu - Programs - Line 6 - Tools.
Login Account
You’ll need to Login so that Line 6 Monkey can communicate with the online Line 6 Server and
provide you with exactly what you need. It’s just a few clicks, and it’s free!
If you have a Line 6 account, then type in your User Name and Password at the top of the •
Monkey dialog.
If you have not yet created an account, click the New User button and you’ll be walked right •
through the steps.
1•2
Line 6 POD Farm 1.01 – Start Here
Register Your Hardware
If you have not already done so, you’ll be prompted to Register your connected Line 6 hardware. It’s a
painless process really, so click that Register Now button and fill in the blanks on the Web page. This
page will list all your registered Line 6 gear in one place.
Grab Those Updates
Go to the Updates tab in Line 6 Monkey. If you see any items where a newer, updated version is
available, then you should click on that item and let the little monkey fellow walk you through the
installation steps. This is the easiest way to stay current on the latest POD Farm software updates, as
well as drivers and firmware updates. You can check the Optional Add-Ons* tab to see what other
goodies might be available for your specific Line 6 device too.
*Note - Some Line 6 hardware models already include the POD Farm Plug-In, and/or other Add-Ons for
free. You’ll need to “activate” these items by running Line 6 Monkey - see the following section.
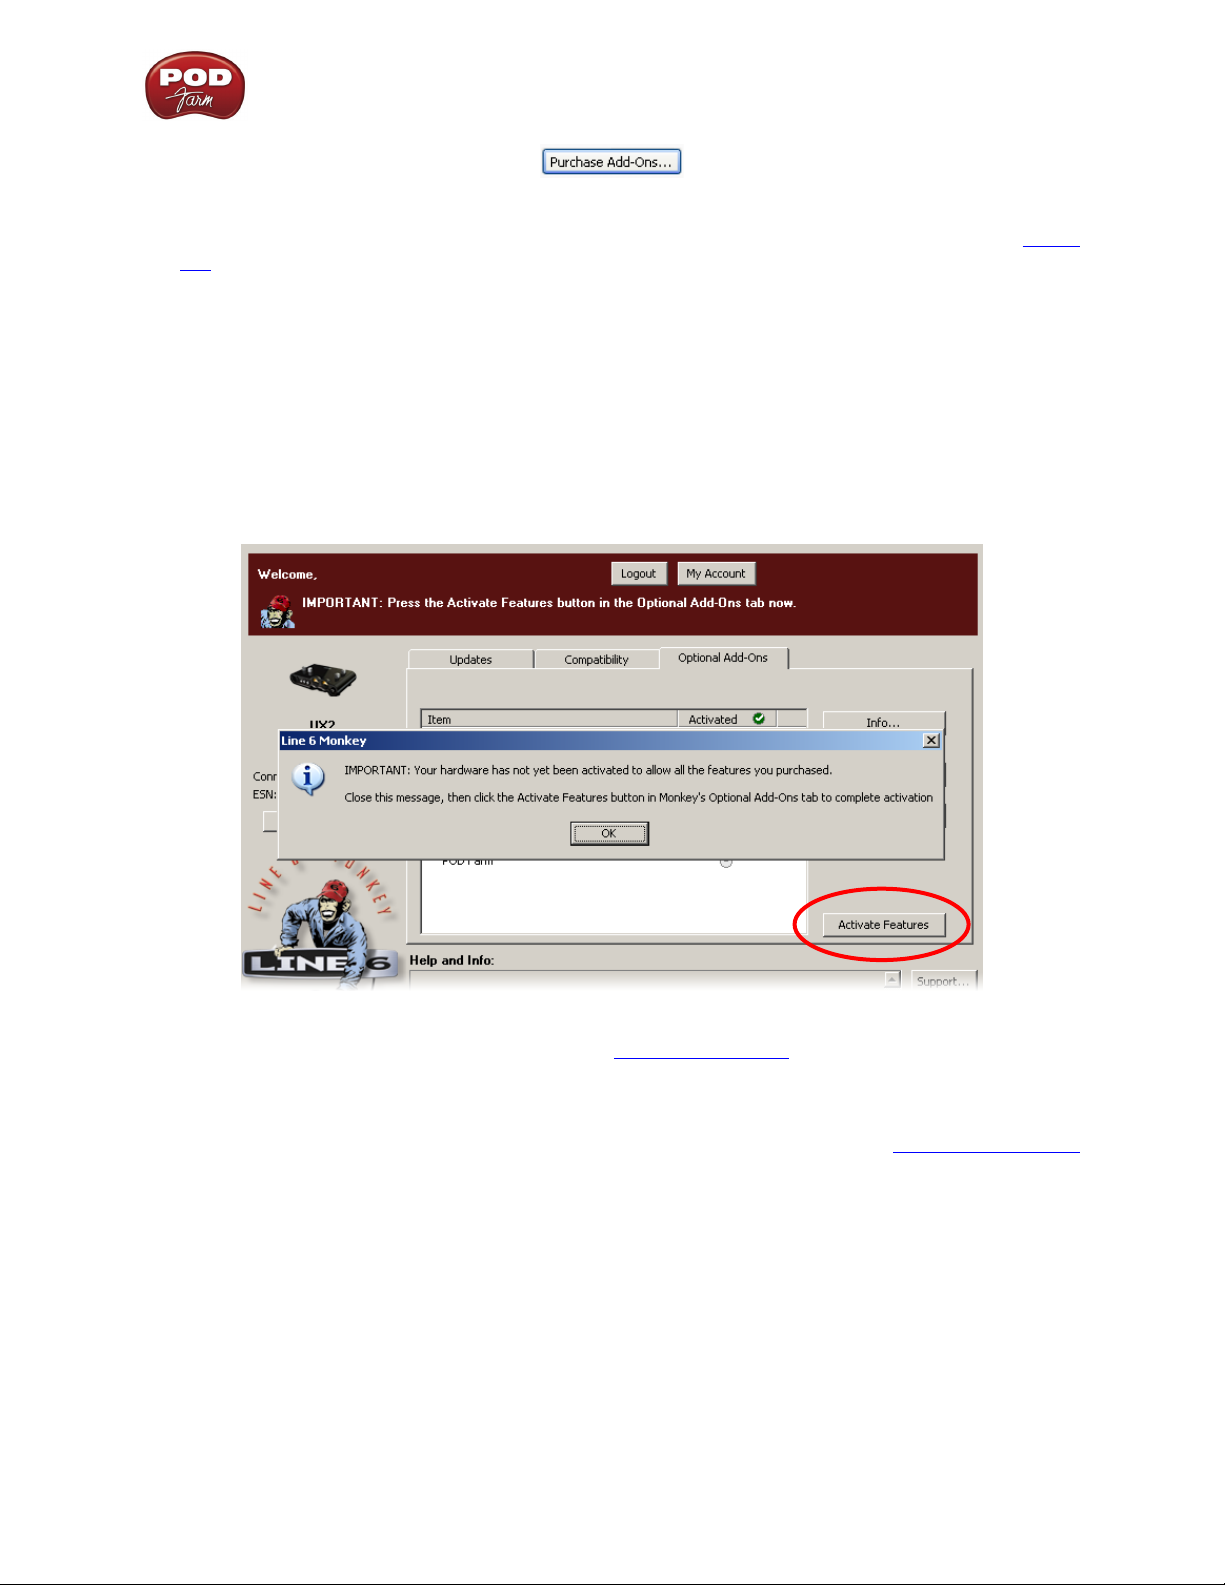
Purchasing POD Farm Plug-In
POD Farm Plug-In is of course already included with the new POD Studio hardware. But if you own a
Line 6 TonePort, GuitarPort, POD X3 or PODxt device, then you can purchase the POD Farm Plug-In
as an Add-On. Just click on the Optional Add-Ons tab in Line 6 Monkey, select POD Farm Plug-In,
then click on Purchase Add-Ons.
1•3
Line 6 POD Farm 1.01 – Start Here
You will be taken to the Line 6 Store, where you can purchase a license for the plug-in. Follow the
instructions on the resulting page to receive your activation key. Or, just head on over to the Line 6
site any time and see what is “in Store” for you.
Product Activation & Authorization
Some features of POD Farm and your Line 6 hardware require “Activation” using Line 6 Monkey and
a live Internet connection. As mentioned above, POD Studio and some other Line 6 devices include
one or more Add-Ons already “installed” on the hardware device itself. When you connect your Line
6 device and launch Line 6 Monkey for the first time, if you are prompted to press the “Activate
Features” button, then go ahead and do so to activate the included Add-On(s).
If you’ve purchased additional Add-Ons from the Line 6 Online Store - these also need to be activated.
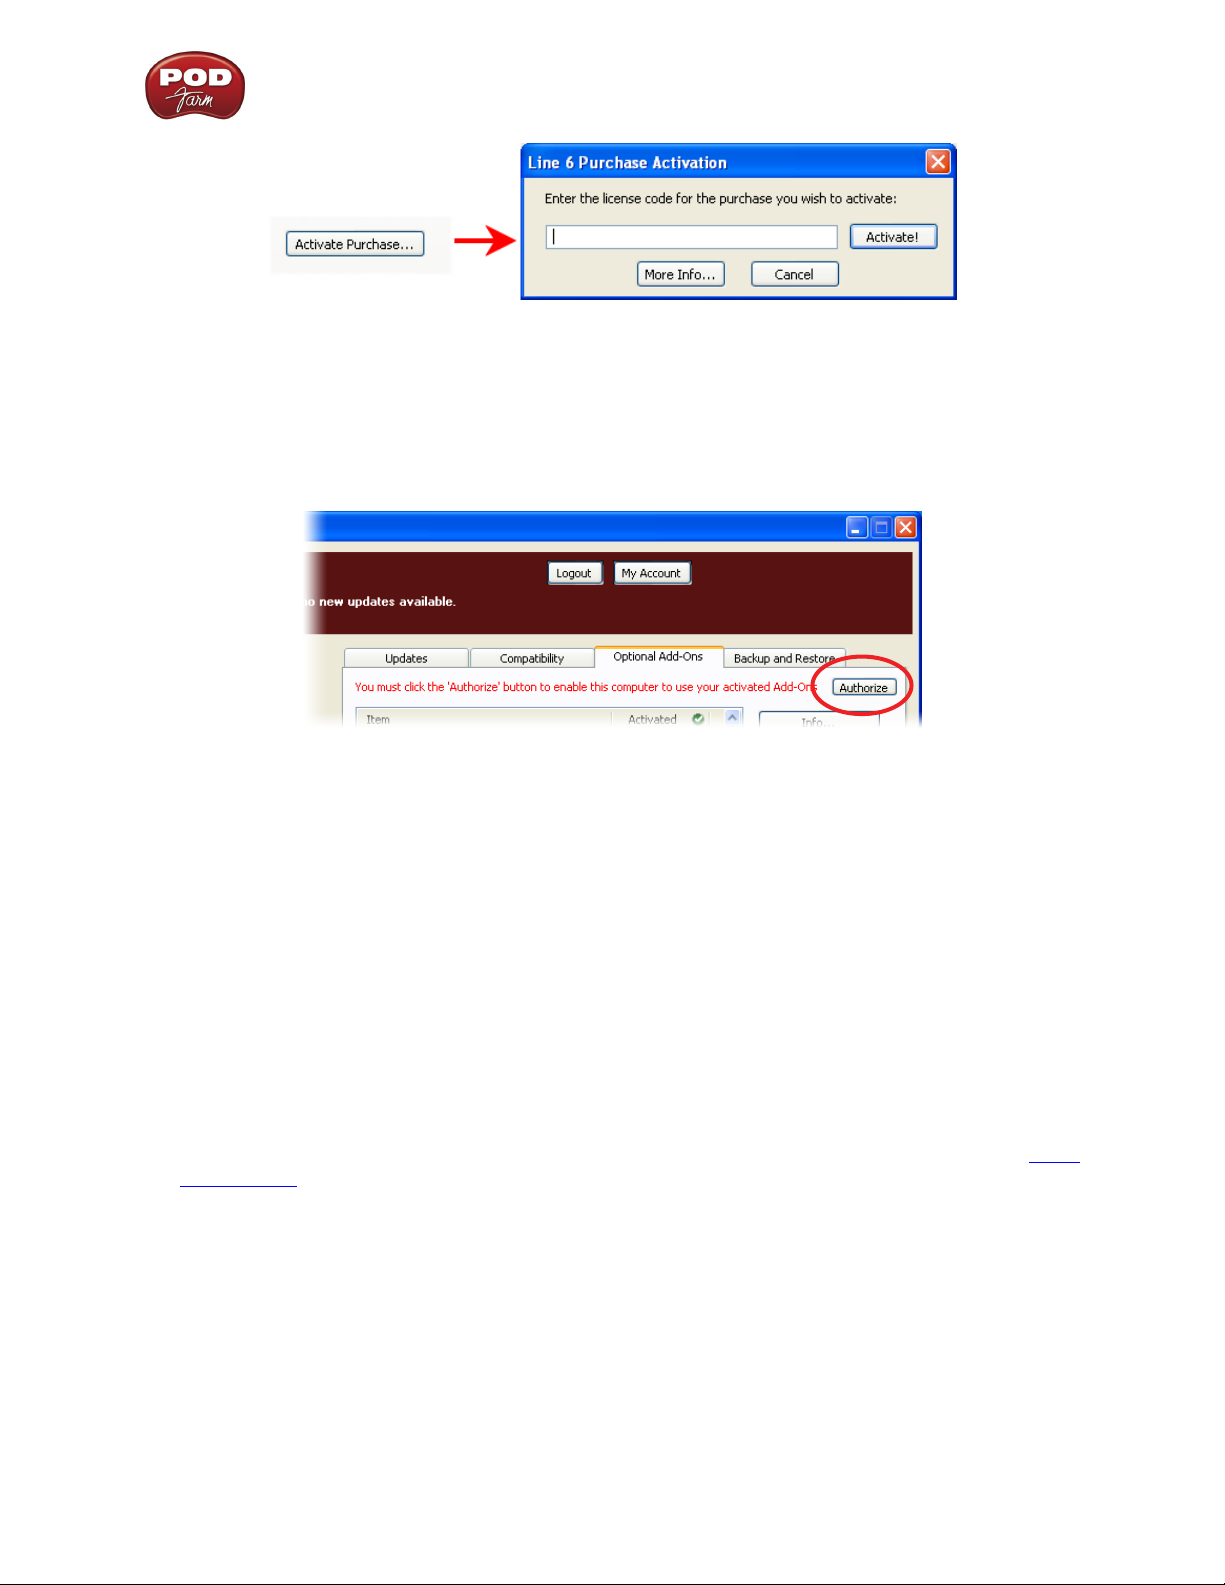
You will have received a License Key for each Add-On purchase. To activate purchased Add-ons,
launch Line 6 Monkey, go to the Optional Add-Ons tab, and then follow these steps...
You can find all Add-On license keys you’ve purchased by logging into the • Line 6 - My Account
online page, and looking in the License Keys page.
Copy the numerical License key code that appears on this page.•
Go back to the Line 6 Monkey screen and click on the • Activate Purchase button. A window
will pop up, prompting you to enter the activation key you just received.
1•4
Line 6 POD Farm 1.01 – Start Here
Activation turns the Add-On features “on” in your POD Farm-compatible hardware, so they can •
operate in the POD Farm stand-alone application and/or POD Farm Plug-in.
When using your Line 6 USB hardware on a new computer for the first time, you may also see the
following message at the top of the Add-Ons tab - just click the Authorize button to finish configuring
your computer to use your new hardware and Add-Ons.
Just remember that for POD Farm Plug-in operation, your Line 6 hardware must always be connected
via USB (even if you’re using a 3rd-party interface). You don’t necessarily need to be using your Line
6 hardware as your active USB audio device - it just needs to be USB-connected (and powered on for
units that have a power switch).
Transferring Activations
So, you’ve just upgraded your computer to the latest and greatest (this week anyway…) model, and
want to move POD Farm and your Add-Ons to your new system? In this section, we’ll explain how to
make the transfer process as easy as A-B-C, whether the new computer can connect to the Internet
or not.
The destination computer has an Internet connection
This is the easiest scenario: Download and install the POD Farm application (always available at line6.
com/software). This will also install the necessary drivers for your hardware and the Line 6 Monkey
application.
POD Farm Plug-in doesn’t work!!! Where are my Model Packs??? Relax – Your Add-Ons (Model
Packs, Plug-in, etc…) are tied-in to your hardware’s, built-in Electronic Serial Number (ESN), but also
need to be authorized with each new computer you’ll be using POD Farm on. In other words, they work
but just haven’t been enabled on the new computer yet.
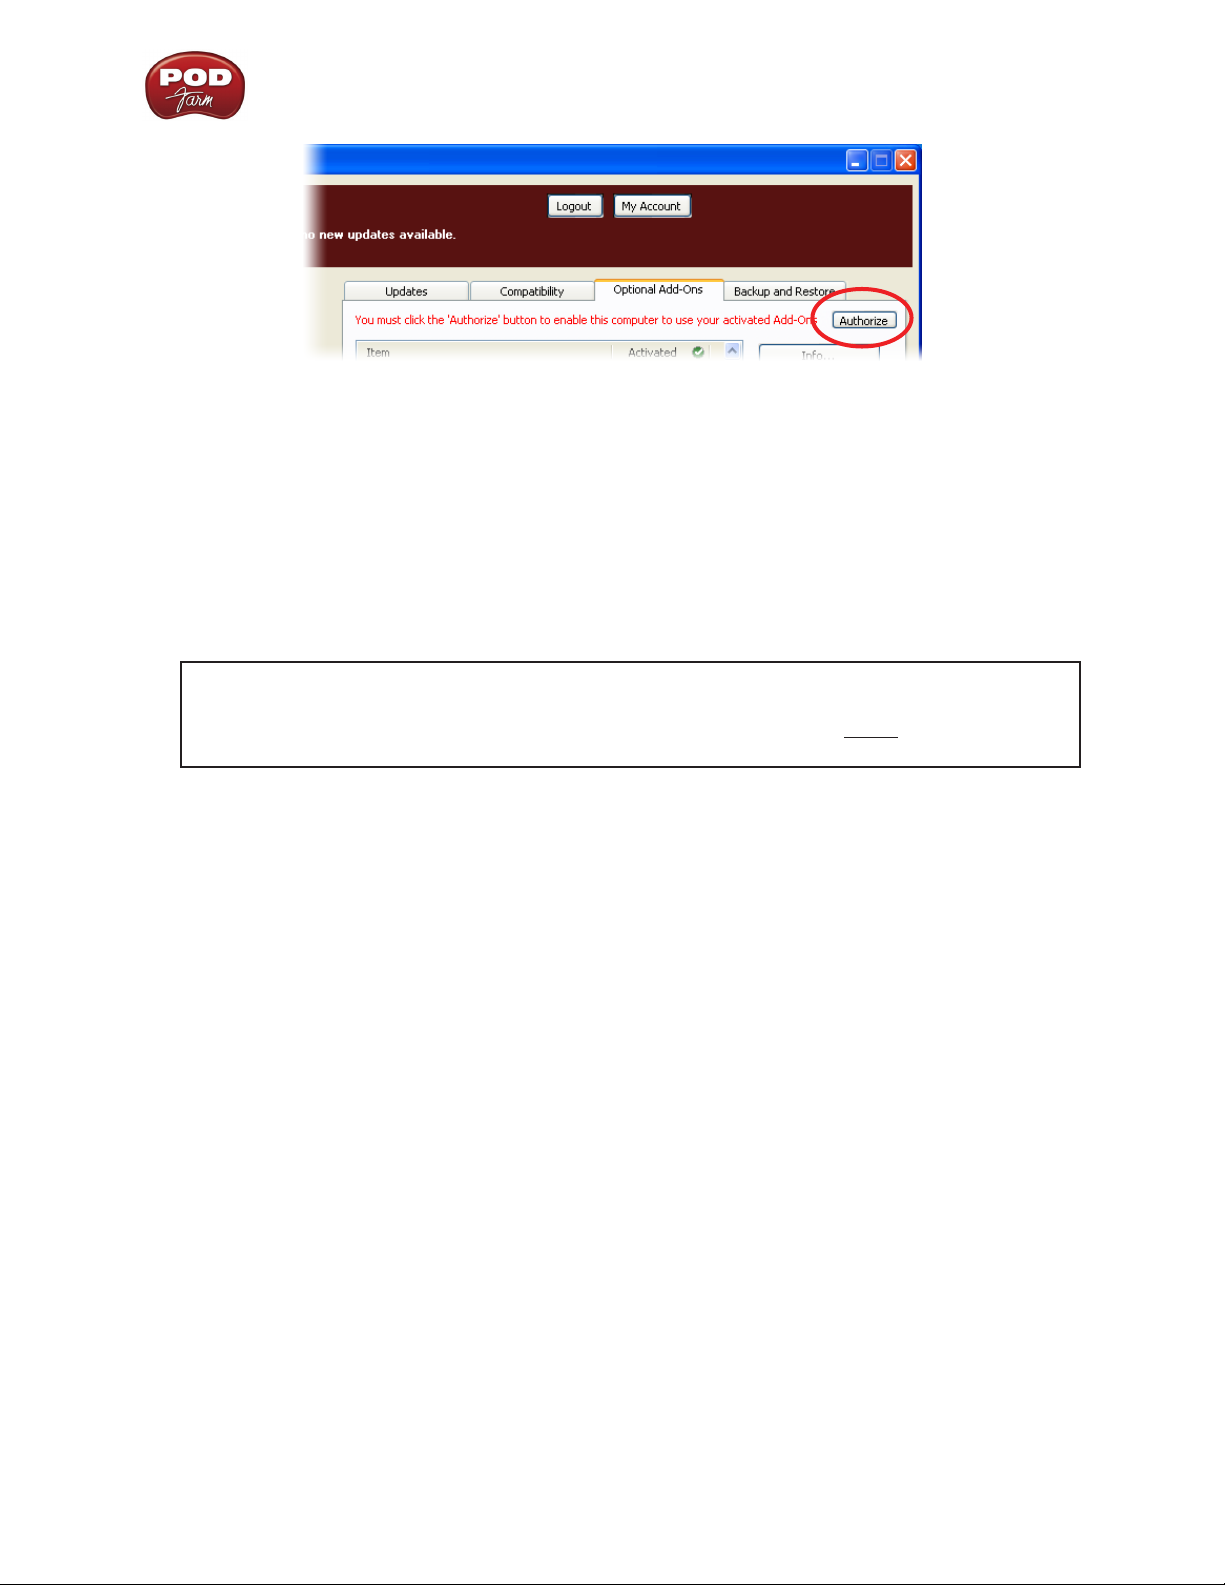
Launch Line 6 Monkey. The Monkey utility will connect to the server and scan your hardware for any
activated Add-ons, and if it finds any, will display the following message in red text:
1•5
Line 6 POD Farm 1.01 – Start Here
Just click Authorize, and Monkey will enable the use of your activated Add-On(s) on the new
computer system.
The destination computer lacks an Internet connection
So you just got the call from Mr. Big Time Producer for a session at so-and-so’s studio, and you want
to bring all this great Line 6 tone along for tracking – but their computer does not connect to the
Internet. You can still move your POD Farm activation to their recording environment by following
these steps:
Prerequisite - This may seem obvious but we’ll mention it anyway: Your hardware and all POD
Farm software and Add-ons must already be activated and authorized on your own computer
(meaning, an Internet connection is required and has been used for the initial activation of your
POD Farm assets).
On your computer:
Locate and copy all • .aet files to removable media (burn to a CD, copy to a Flash drive, etc…).
In Windows® environments, these files can be found in the C:\Document_and_Settings\
(username)\Application Data\Line 6\GuitarPort folder; on Mac®, look in /Users/(username)/
Library/Application Support/Line 6/GuitarPort.
Copy the POD Farm installer to removable media, since the destination computer will not be •
able to download it.
On the destination computer:
Install the POD Farm software. •
Copy the • .aet files from your removable media into the correct folder (described above). You
may have to create this folder manually if it isn’t present on your destination computer.
You’re done! You should now be able to launch the POD Farm application with all Add-Ons
enabled.
POD Farm Plug-In for iLok
POD Farm Plug-In is a protected software and requires an authorized license to run on your computer.
The POD Farm Plug-In license comes with, or can be added to, all the Line 6 USB audio interfaces,
as discussed in the Line 6 Monkey and Hardware sections of this User Guide. And now, Line 6 also
offers the POD Farm Plug-In license to be purchased specifically for your iLok USB “smart key”! If
1•6

Line 6 POD Farm 1.01 – Start Here
you don’t already have an iLok key, you can purchase one at most store where audio software is sold,
or directly from iLok.com. To follow are the steps for purchasing and configuring POD Farm Plug-In
and your iLok.
What is an iLok?
The iLok key is a proprietary USB hardware dongle that holds licenses for software protected by PACE
Anti-Piracy’s Interlok® system.
The iLok USB Key
If you own an iLok and purchase the POD Farm Plug-In for iLok, you can use the iLok USB key to
store your POD Farm Plug-In license, as well as any other Mac® and Windows® iLok-enabled software
licenses, all on the one iLok USB key. The iLok is portable and allows you to run POD Farm Plug-In
on any computer. It is also easy to manage all your iLok software licenses with iLok.com - where you
can set up a secure account, view all licenses on your iLok key, take delivery of new licenses, and even
move them between multiple iLok keys!
Create an iLok Account
If you’ve just purchased a new iLok, your first step is to go to the iLok.com site to set up an account.
Note that it is important you set up only ONE account, even if you own multiple iLok keys! Create
your account here. If you already have an iLok account, then you’ll use it for the following steps.
Next, for a new iLok USB key, you’ll need to download the iLok Client Software and the iLok Driver
and install them. There are a few different options here, depending if you want to manage your iLok
on the same computer as you plan on actually using POD Farm Plug-in on or not. Please see the steps
outlined on the iLok.com Help page for the complete instructions.
Purchasing POD Farm Plug-In for iLok
If you don’t already have one, create a Line 6 account now. It is free and is necessary for activating
and retrieving your POD Farm Plug-In license. To create your account, go here.
To purchase the POD Farm Plug-In license for iLok, you can go the Line 6 Online Store and select
the iLok hardware option, or visit your favorite music gear retailer and pick up the boxed version.
(Note that the iLok USB software key is sold separately, and not part of the Line 6 POD Farm Plug-In
purchase). There are a few options for the purchase of POD Farm Plug-In for iLok...
POD Farm• - Includes the same great set of guitar & bass amps, mic preamps and effects that
come with our POD Studio devices.
POD Farm Platinum• - Includes all the models of the POD Farm product, and additionally
includes all the optional Model Pack Add-Ons we make!
POD Farm Platinum Upgrade• - For owners of the POD Farm iLok version that want to step up
to the Platinum, you can purchase this upgrade.
All POD Farm Plug-In versions include RTAS/VST/AU support for Mac® and RTAS/VST support for
Windows®. See the info on the Online Store pages for more details.
1•7
Line 6 POD Farm 1.01 – Start Here
If you’ve purchased the POD Farm iLok license from the Line 6 Online Store, please skip ahead to
the following iLok Deposit section, since your purchase does not require the “Activation” steps.
Note: You can perform the following Online Purchase, Activation and iLok licensing processes on any
computer that has Internet access - These steps do not necessarily need to be performed on the computer
on which you plan to use POD Farm Plug-In.
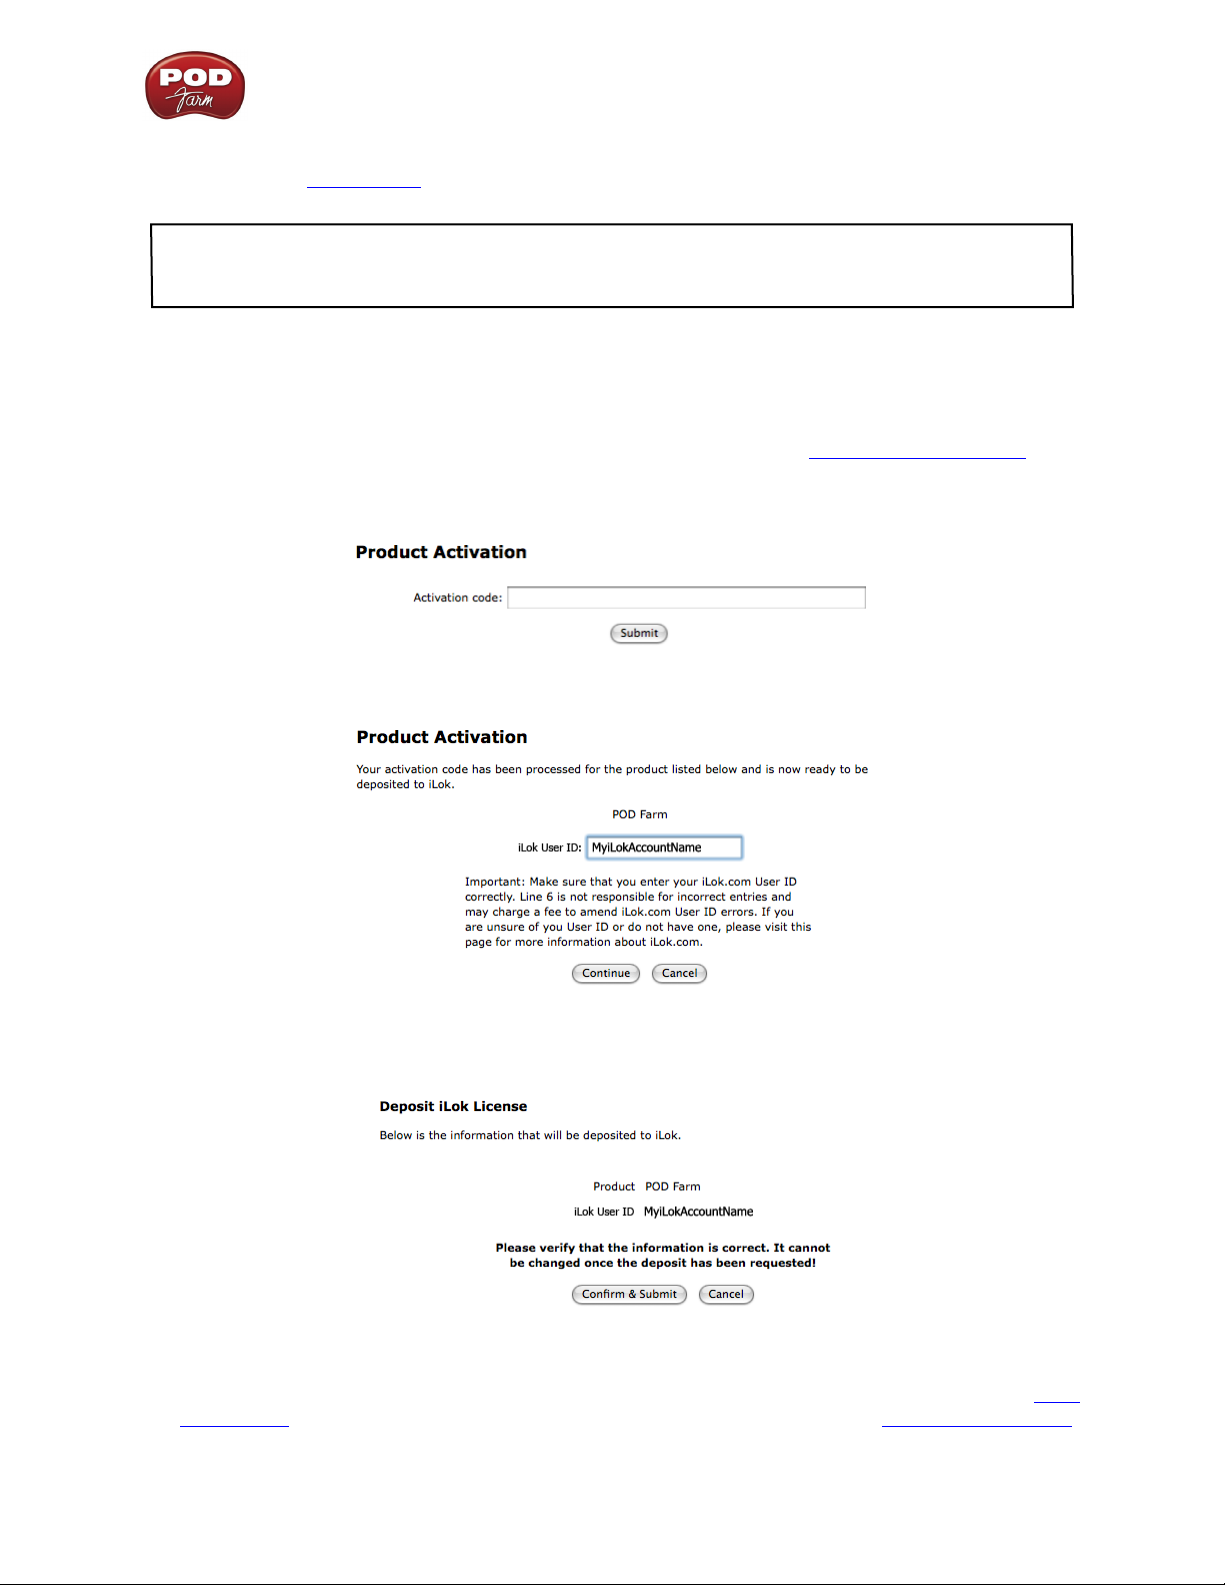
Product Activation (Retail boxed version only)
For your purchase of the boxed POD Farm license for iLok, you’ll find an Activation Code printed
on a card within the box. With this card in hand, go to the Line 6 Online iLok Activation page,
read through the steps in the Product Activation section, and enter your Activation Code and click
Submit:
Next you’ll be prompted for the iLok User ID for your iLok.com account...
Enter your iLok User ID - This is the Username you use to login to your account at iLok.com. Type
it in and click Continue.
Next you are prompted to verify that your iLok User ID is entered correctly - Please be sure it is to
avoid the added task of contacting iLok to fix it! Click Confirm & Submit if all is correct. Once the
process completes, a POD Farm license is “Deposited” in your iLok.com account. Proceed to the iLok.
com website to download the license to your iLok USB key. Please skip to the iLok License section.
1•8

Line 6 POD Farm 1.01 – Start Here
iLok Deposit (Line 6 Online Store purchase)
If you’ve purchased POD Farm Plug-In for iLok directly from the Line 6 Online Store... Once your
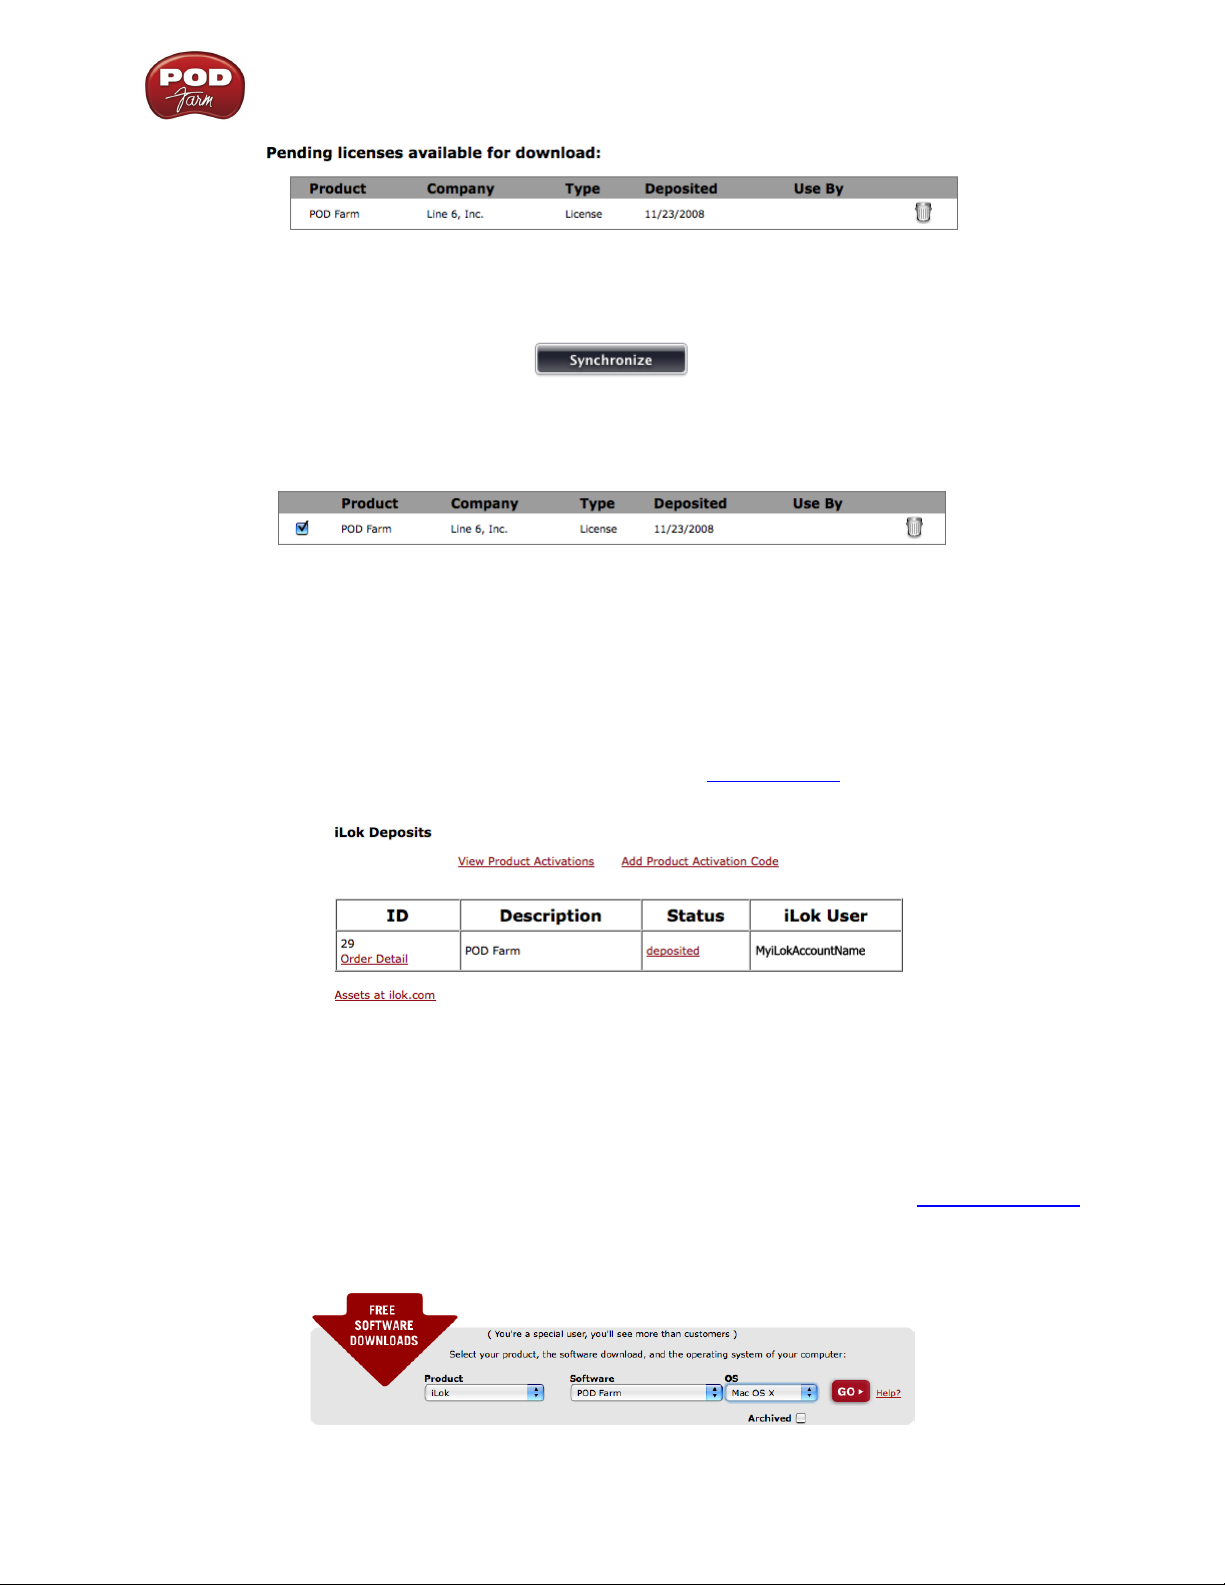
transaction is complete, log into your Line6.com account and go to the iLok Deposits page. Here you
can check the Status of your iLok License.
Initially, following your Online Store transaction, you should see the Status listed here as “inserted”,
as shown above. Click the Deposit button to proceed.
Next you are prompted to enter your iLok User ID - This is the Username you use to login to your
account at iLok.com. Type it in and click Continue.
You are then asked to verify the iLok User ID is entered correctly - Please be sure it is to avoid the
added task of contacting iLok to fix it! Click Confirm & Submit if all is correct. You should next see
confirmation that your iLok Deposit was successful and your license sent to iLok.com. Head on over
to the iLok.com website and log into your account there to download your license. If any error was
encountered, you can return to the iLok Deposits page and repeat the process.
iLok License
Once logged in to your iLok.com account, you should find your “pending” POD Farm license waiting
for you in the Download Licenses section.
1•9
Line 6 POD Farm 1.01 – Start Here
Connect your iLok to your USB port and follow the instructions on the iLok site to Synchronize your
iLok key.
Allow the Synchronize process to complete, and you’ll then be able to select your POD Farm license
for download.
Follow the steps listed on the iLok.com page to Download the POD Farm License to your iLok key...
And you’re done! Now that your iLok USB key is all configured, you can log out and exit the iLok
web site. Your next step is to download the POD Farm application installer and run it on any Mac®
or Windows® computer where you want to run POD Farm Plug-In! Remember, you need to have the
iLok key connected to the computer for POD Farm Plug-In to run in its “authorized” state within your
host software.
In the event that your POD Farm license does not appear on your iLok.com account, you can check
the status of the deposit on the iLok Deposits page of your Line 6 account.
Note that the Status may initially appear as “queued” for a short time until accepted by iLok.com
for processing. Once it appears as “deposited”, as shown above, then this means your new POD Farm
license asset has been sent to your iLok.com account.
Download and POD Farm Application Installer
We always have the latest POD Farm installer available for free download on the Line 6 Downloads
page. On the Downloads page, select “iLok” as the Product, “POD Farm” as the Software, and then
select your computer’s Operating System (Mac® OS X, Windows® XP® or Vista®), as shown here:
1•10
Line 6 POD Farm 1.01 – Start Here
Then press the “Go” button and the correct installer will be displayed for your system so that you can
download it to your computer. Once the download of the installer file completes, run the installer file
following its step-by-step instructions.
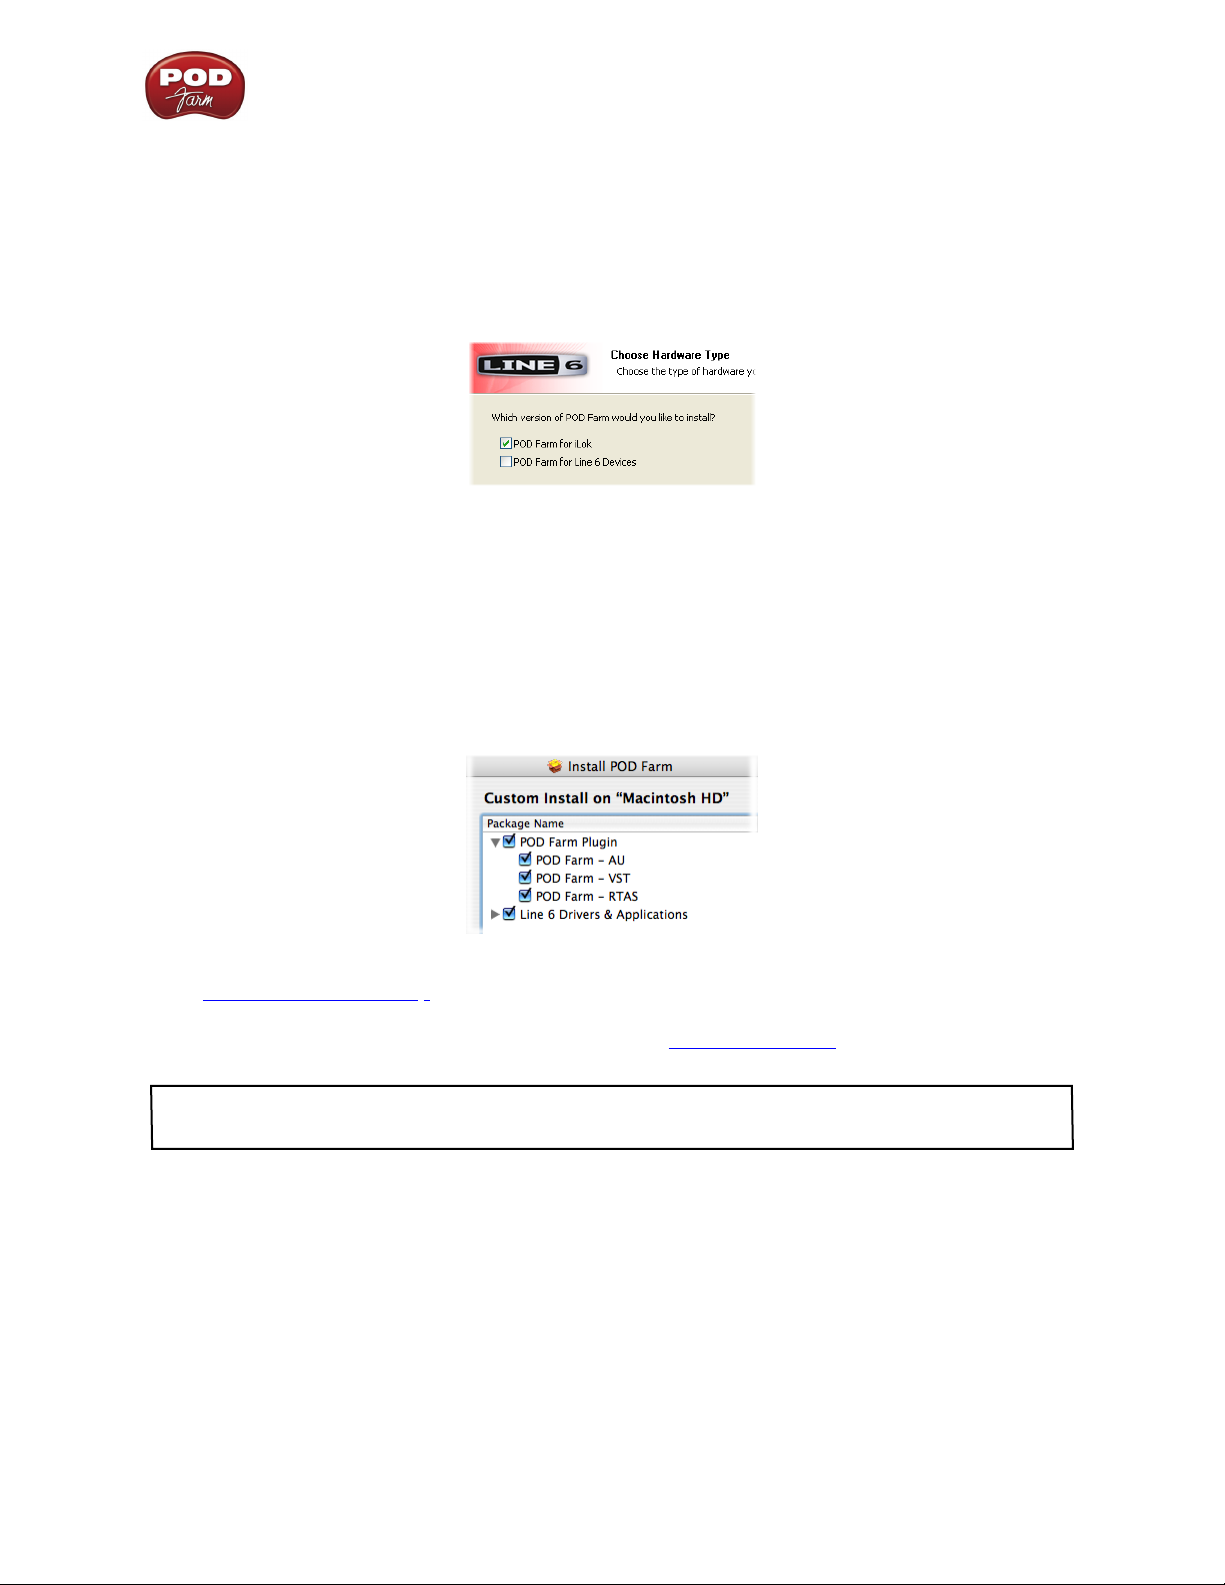
Windows® XP® and Vista® users... When you see the Choose Hardware Type screen during the
POD Farm installation, be sure to check the box for “POD Farm iLok”, as shown here:
If you are also going to be using any Line 6 USB audio device (POD Studio, TonePort, POD X3,
PODxt or GuitarPort) then you’ll want to check the “POD Farm for Line 6 Devices” box as well.
Mac® Users... The POD Farm installer’s default settings will install the necessary files for your
iLok, as well as the audio drivers for any Line 6 USB audio devices automatically. If desired, you
can uncheck any individual POD Farm Plug-In formats and/or Line 6 Device Drivers that you may
not need. But you will need to install at least one POD Farm Plug-In format supported by your host
audio software so that you will be able to use POD Farm Plug-In with your iLok:
For further assistance with POD Farm installation, check out the Installer Guide document available
at POD Farm Online Help. With the above steps completed, you’ll be able to access and utilize POD
Farm Plug-In in your host audio software! You are, of course, free to use any audio type of audio
interface with your DAW configuration. Please see the POD Farm Plug-In chapter for more info.
Note that POD Farm cannot be run in Standalone Operation with the iLok alone, since this requires the
use of a Line 6 POD Studio, TonePort or GuitarPort USB audio interface.
1•11

POD Farm 1.01 – Using Your Line 6 Hardware
US i n g Y o U r Li n e 6 Ha r d w a r e
The POD Farm software is designed to work with the new Line 6 POD Studio family of USB audio
interfaces. Additionally, a POD Farm Plug-In license can purchased for an iLok USB “smart key”. POD
Farm also supports all Line 6 TonePort (models GX, UX1, UX2, UX8, D.I. & KB37) and GuitarPort
USB devices. All Line 6 POD X3 and PODxt family devices can be used with the POD Farm Plug-
In Add-On as well! This chapter includes details on using POD Farm with all Line 6 USB hardware.
Please be sure to see the additional documentation on the POD Farm Online Help site.
All Line 6 USB audio interfaces utilize the high-performance Line 6 Audio & MIDI drivers, and
therefore, are easily configured to work as your computer’s sound card. This means that you can access
all your POD Tones directly from most any audio recording application, all at the highest quality! But
you are of course not just limited to using your Line 6 hardware to record into your computer – the
outputs provided on the back of your device additionally allow you to feed your POD Farm signal to
external tape machines, DAT recorders, PA systems, or any other external audio hardware!
If you are using an iLok USB smart key to run POD Farm Plug-In, then you are, of course, free to use
any audio interface with your computer and audio software. Once you have your POD Farm license
successfully added to your iLok key, just keep the iLok in your USB port and you can skip ahead to the
POD Farm Plug-In chapter.
Making the Connection
You do need to connect your Line 6 hardware to your computer via a USB cable to utilize POD Farm,
POD Farm Plug-In and/or to use your Line 6 hardware as your computer’s sound card device. Note
that you should always connect to a separate USB controller channel from other USB audio or MIDI
interfaces to provide your device with the full USB bandwidth. You should also always connect directly
to a USB 1.1 or 2.0 USB port on your computer and not into a USB hub.
Note - Be sure to always power off or mute your speakers or monitoring setup before connecting and
disconnecting the USB cable between your Line 6 device and computer, as well as before booting up or
shutting down your computer if the device is already connected. The best practice is to always power on
your speakers last, and power them off first when connected to other audio gear to avoid a “pop” which
could be damaging to your speakers (or to your ears!)
There are some differences in the setup and functionality between the supported Line 6 devices, so
be sure to look for the instructions in the following sections for your specific device. Primarily, POD
Studio, TonePort and GuitarPort devices function quite similarly since all the Digital Signal Processing
(DSP) is performed on your computer when using these units. POD X3 & PODxt devices do all their
DSP magic inside the POD hardware itself. Use the handy links here to jump directly to the section
covering your Line 6 device...
GX
UX1
UX2
TonePort UX8
TonePort KB37
TonePort DI
GuitarPort
POD X3 Family Devices
PODxt Family Devices
2•1

POD Farm 1.01 – Using Your Line 6 Hardware
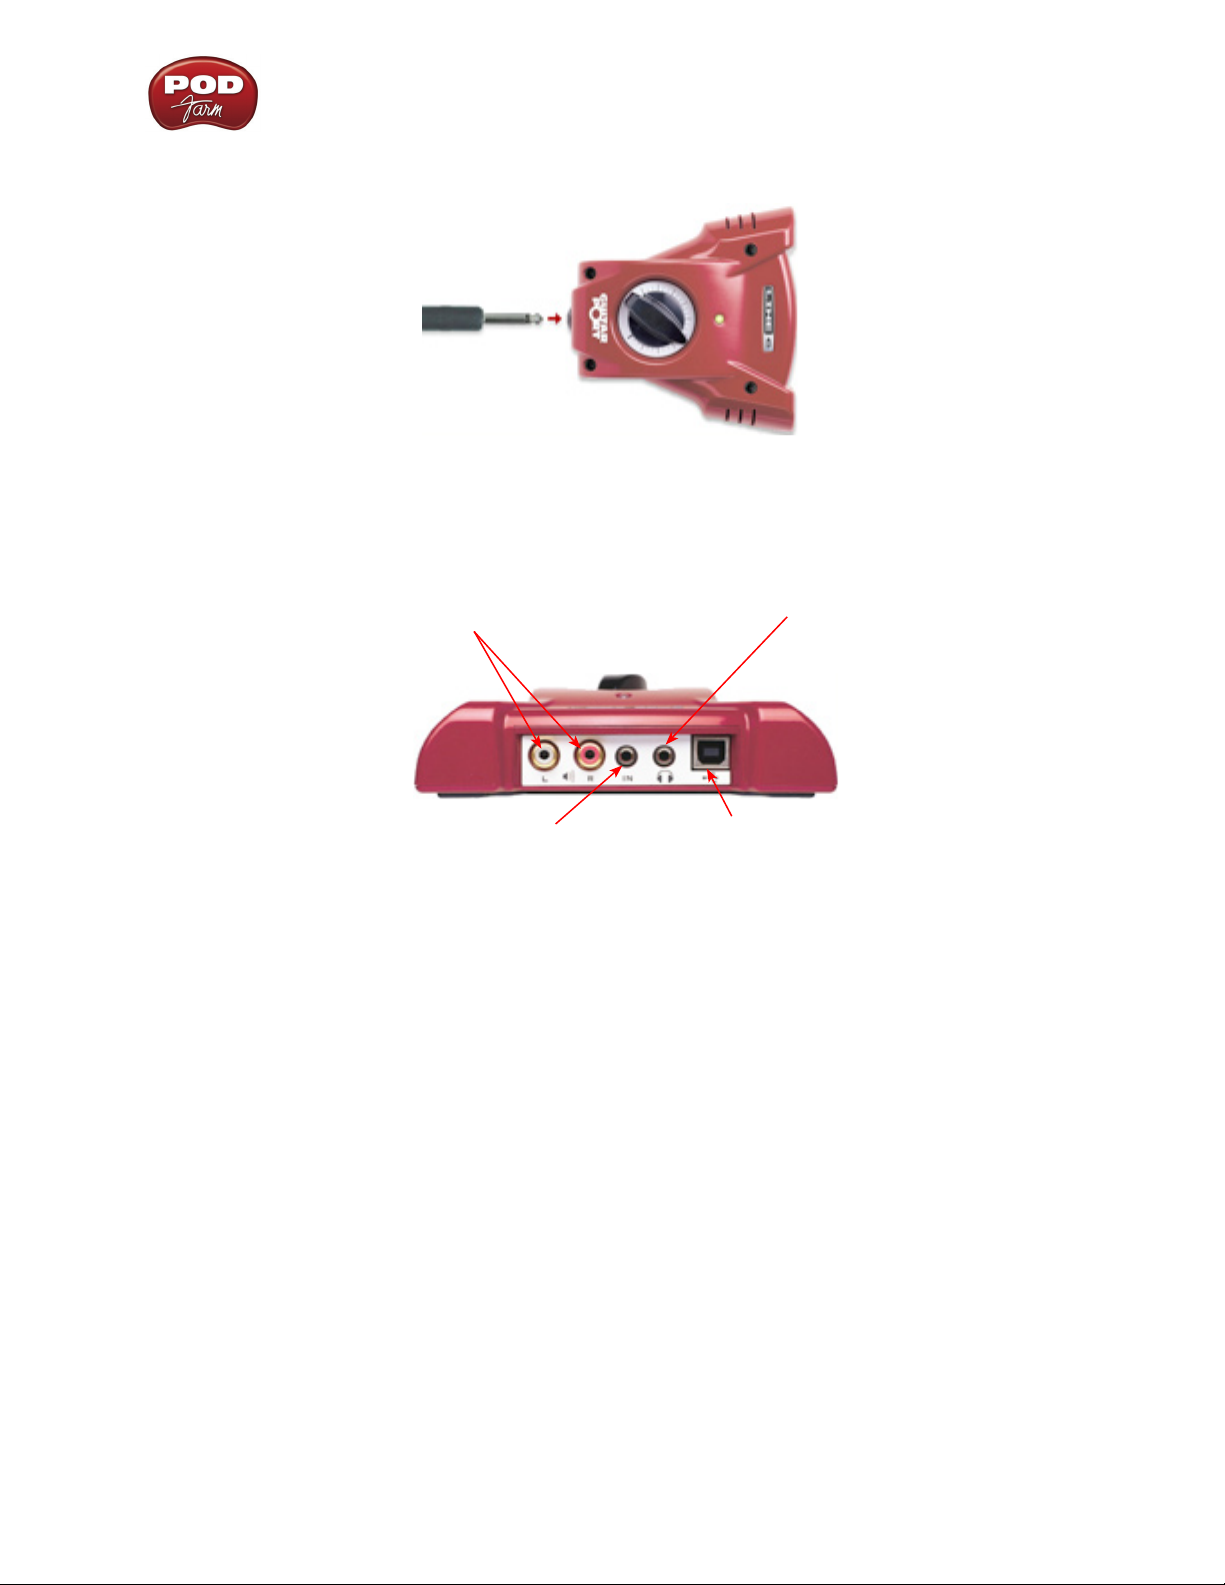
GX (POD Studio & TonePort)
Connect your electric
Guitar or Bass
Instrument Input - To input your electric guitar or bass, plug it in here using a standard 1/4-inch TS
instrument cable. When in POD Farm Standalone operation, this inputs the signal into POD Farm,
where you can choose your Tone, and then route the processed signal both to the Record Sends (to
your audio software) and directly to the GX hardware outputs.
Connect your stereo
Headphones/Line Out Cable
Connect USB cable from here
to your computer
USB - This of course is where you connect the supplied USB cable to GX, with the other end going
to your computer’s USB 1.1 or 2.0 port.
Line Out/Phones - Connect here to either a monitoring system or stereo headphones, using an 1/8inch stereo cable. When connecting GX as an audio interface for your recording application, this line
out/headphone jack outputs the playback audio from your audio software on the computer, as well as
anything plugged into the Instrument input. If you ‘re using a 3rd-party audio interface, these outputs
supply the ToneDirect™ magic to your interface or mixer, when using POD Farm in Standalone
operation alongside the plug-in. See the ToneDirect™ Monitoring section for more details.
2•2

POD Farm 1.01 – Using Your Line 6 Hardware
UX1 (POD Studio & TonePort)
Connect your electric guitar or bass
Connect a microphone
Mic - To input a signal from a microphone, connect it here using an XLR cable. When in POD Farm
Standalone operation, this inputs the microphone signal into POD Farm, where you can choose your
Tone, and then route the processed signal both to the Record Sends (to your audio software) and
directly to the UX1 hardware outputs.
Instrument Input - To input your electric guitar or bass, plug it in here using a standard 1/4-inch TS
instrument cable. When in POD Farm Standalone operation, this inputs the signal into POD Farm
where you can choose your tone, and then route the processed signal both to the Record Sends (to your
audio software) and directly to the UX1 hardware outputs.
Connect your stereo headphones
Phones - If you want to listen to the audio from UX1 using stereo headphones, then plug them into this
1/4-inch stereo jack. This headphone jack outputs the same signal fed to the Analog Outs on the rear
panel; the audio from your audio software, as well as anything plugged into any front panel input.
Connect any line level input
source for monitoring to the Stereo
Connect a USB cable from here to
your computer’s USB port
Connect the Analog Outs
to your audio monitors
Line Inputs - To record the signal from a line level source, such as a keyboard, your stereo receiver,
the line out from a mixing console, etc., connect to these Left and Right ins using 1/4-inch TS audio
cables.
Monitor In
Connect any line level input
source that you want to record
into the Line Inputs
2•3
POD Farm 1.01 – Using Your Line 6 Hardware
Monitor In - If you want to hear the signal from a line level source along with all the other audio
coming from your computer, but do not want this audio recorded via the UX1 Record Sends, then plug
the source in here. Note that this is a stereo jack, so you should use a stereo, 1/4-inch TRS audio cable
for this connection.
USB - This of course is where you connect the supplied USB cable to UX1, with the other end going
to your computer’s USB 1.1 or 2.0 port.
Analog Outs - These Left and Right unbalanced jacks output all the audio from UX1; the audio from
your audio software on the computer, and anything plugged into any input. These are what you want to
connect to your powered speakers or monitoring system for a recording setup. Use 1/4-inch TS cables
to connect directly to powered speakers, mixer or power amp setup. Note that you can also use the
headphone jack on the front of UX1 if you want to use headphones for monitoring.
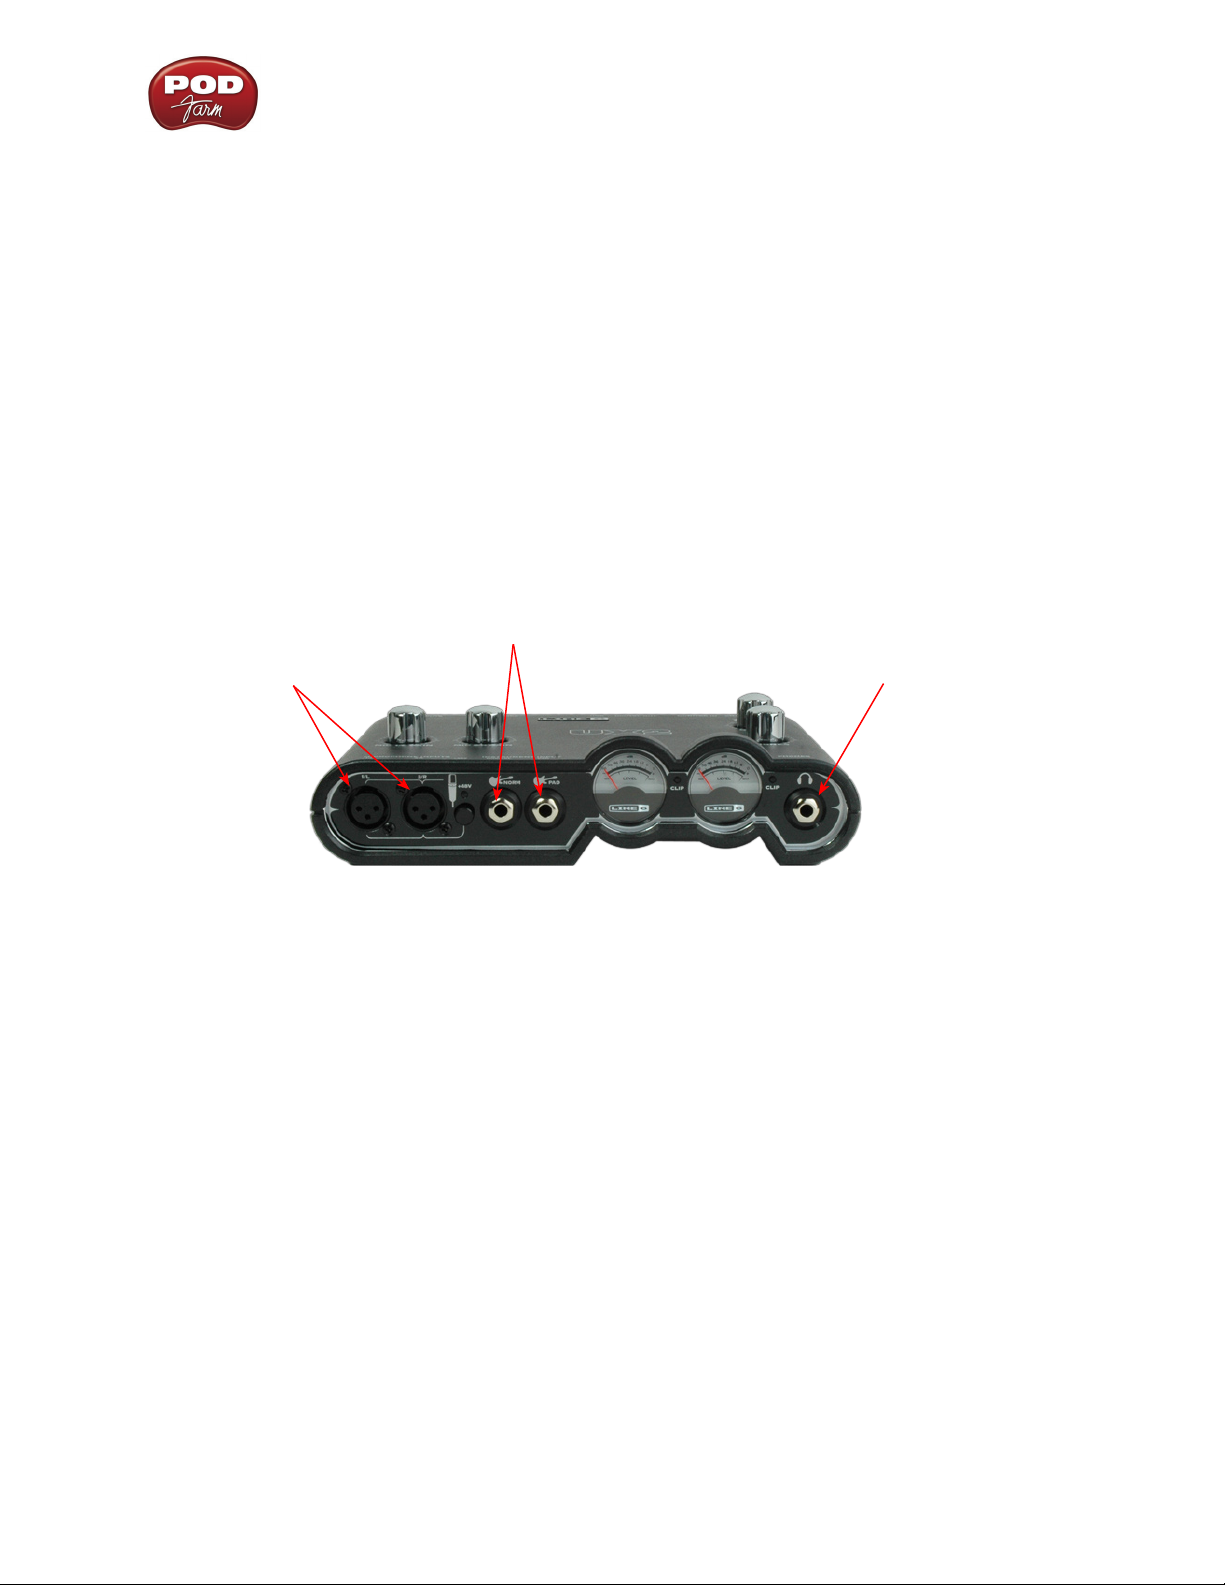
UX2 (POD Studio & TonePort)
Connect your electric Guitar or Bass
Connect up to two
Microphones
Connect your stereo
Headphones
Microphone Inputs - You can receive input from one or two mics at the same time using these ins.
There is also a +48V Phantom Power switch that you should set to “on” if your mic requires phantom
power (most condenser type mics do, but check the documentation for your mic if you are not sure).
Connect each mic using an XLR cable. When in POD Farm Standalone operation, this inputs each
microphone signal independently into POD Farm where you can choose your Tone, and then route the
processed signal to the Record Sends (to your audio software) and to the UX2 Analog Outs.
Instrument Inputs -To input your electric guitar or bass, plug it into one of these inputs. When in
POD Farm Standalone operation, either of these routes the instrument’s signal into POD Farm where
you can choose your tone, and then route the processed signal to the Record Sends (and to your audio
software) and to the UX2 Analog Outs. The difference between these two input jacks is:
Norm• – This input is for a standard instrument level output. Plug your guitar/bass into here using
a standard 1/4-inch TS instrument cable.
Pad • - This input is designed for high output level basses and guitars, especially those with active
pickups. Plug your high output instrument into here using a standard 1/4-inch TS instrument
cable.
Headphone - If you want to listen to the audio from UX2 using stereo headphones, then plug them
into this 1/4-inch stereo jack. This Headphone jack outputs the same signal fed to the Analog Outs on
the rear panel; the audio from your audio software, as well as anything plugged into any UX2 input.
2•4

POD Farm 1.01 – Using Your Line 6 Hardware
Connect to the S/PDIF input of an
external device to send UX2’s output
digitally
Connect any line level input
source for monitoring to the
Stereo Monitor In
Connect the
Analog Outs
to your audio
monitors
Line Inputs - If you want to record the signal from a line level source, such as a keyboard, your stereo
receiver, the line out from a mixing console, etc., connect to these Left and Right ins using 1/4-inch
TS audio cables.
USB - This of course is where you connect the supplied USB cable to UX2, with the other end going
to your computer’s USB 1.1 or 2.0 port.
Connect your USB cable from
your computer’s USB port
Connect any line level
input source that you
want to record into the
Line Inputs
S/PDIF Digital Out - To send the output of UX2 to an external device digitally, connect a 75-Ohm
coaxial cable into this RCA jack and then into the S/PDIF digital input on the external device. This
is the best choice for connecting to digital recording devices, such as a DAT recorder, MiniDisc, etc.
This S/PDIF output sends the same audio as is sent to the Analog Outs (with the exception that any
audio coming into the Monitor In jack is not routed to the S/PDIF output). The digital signal is always
sent at 24-bit resolution.
Monitor In - If you want to hear the signal from a line level source mixed with all the other audio
coming from your computer, but do not want this audio recorded, then plug the source in here. Note
that this is a stereo jack, so you should use a stereo 1/4-inch TRS audio cable for this connection.
Analog Outs - These Left and Right unbalanced jacks output all the audio from UX2; the audio from
your DAW, and anything plugged into any input. These are what you want to connect to your powered
speakers or monitoring system for a recording setup. Use 1/4-inch TS cables to connect directly to
powered speakers, mixer or power amp setup. Note that you can also use the headphone jack on the
front of UX2 if you want to use headphones for monitoring.
2•5
POD Farm 1.01 – Using Your Line 6 Hardware
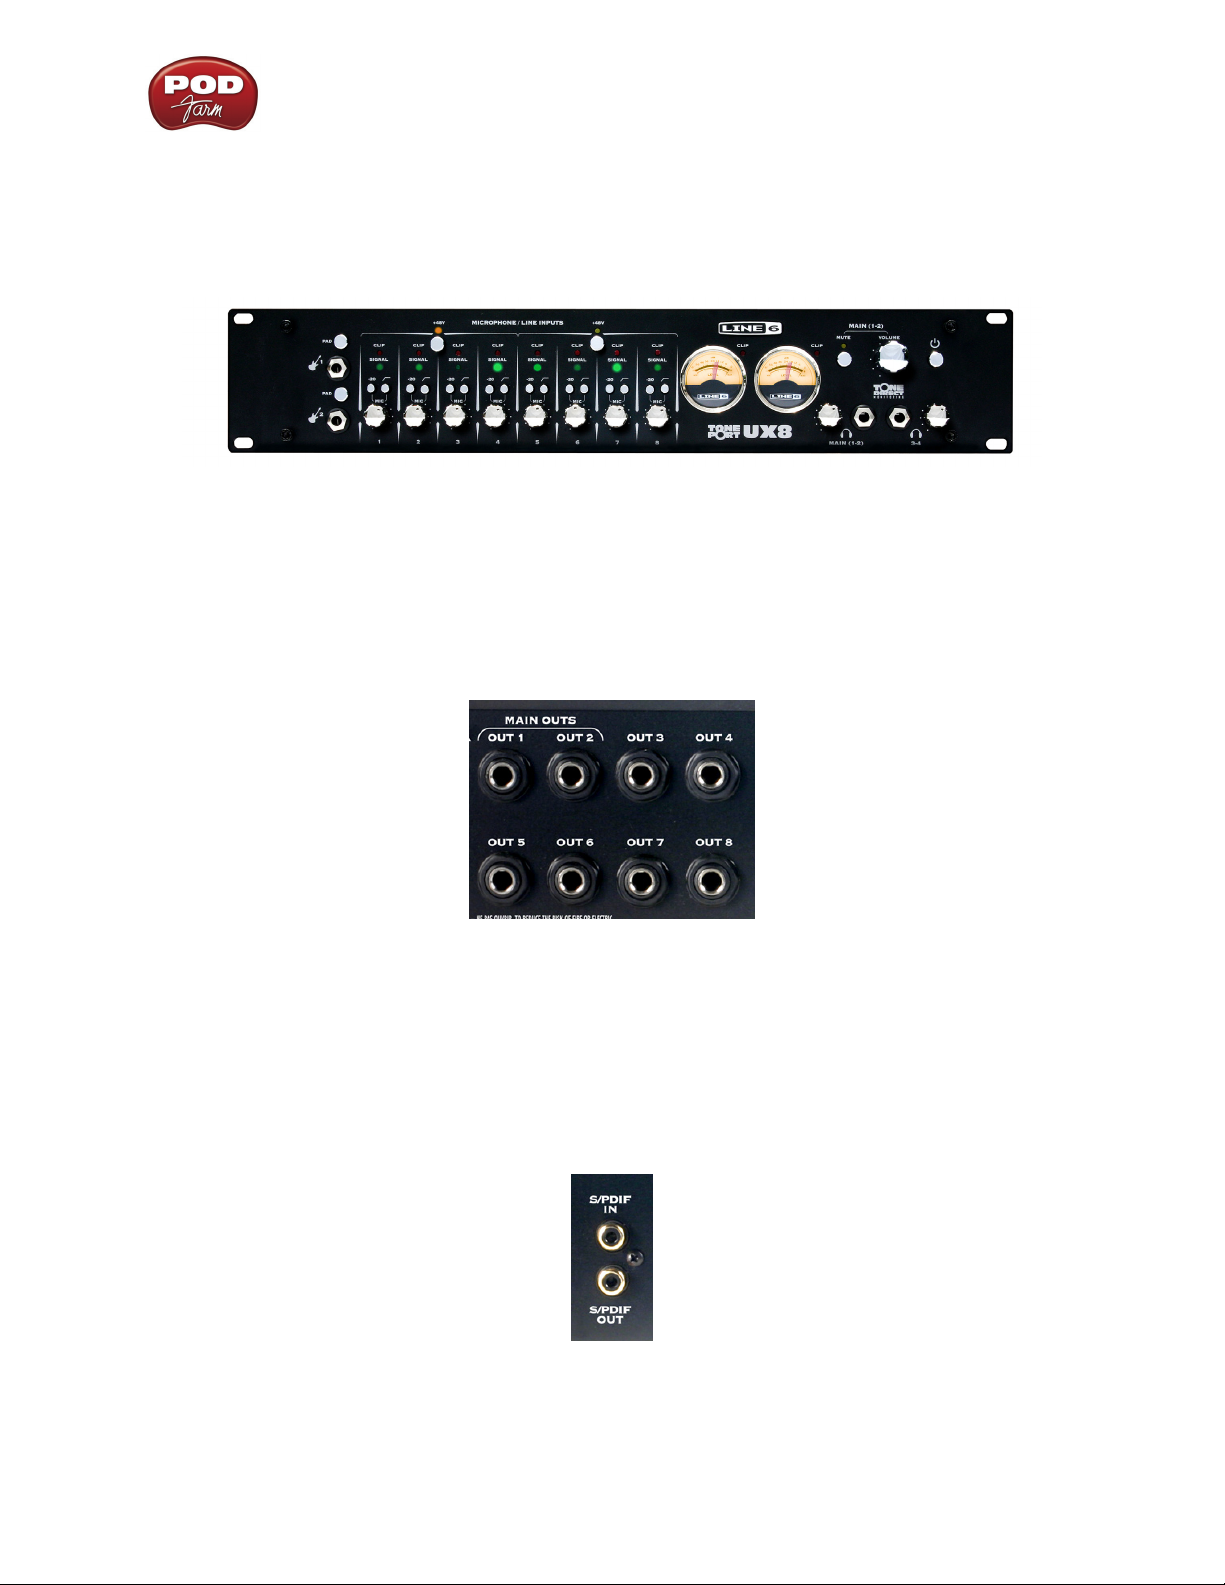
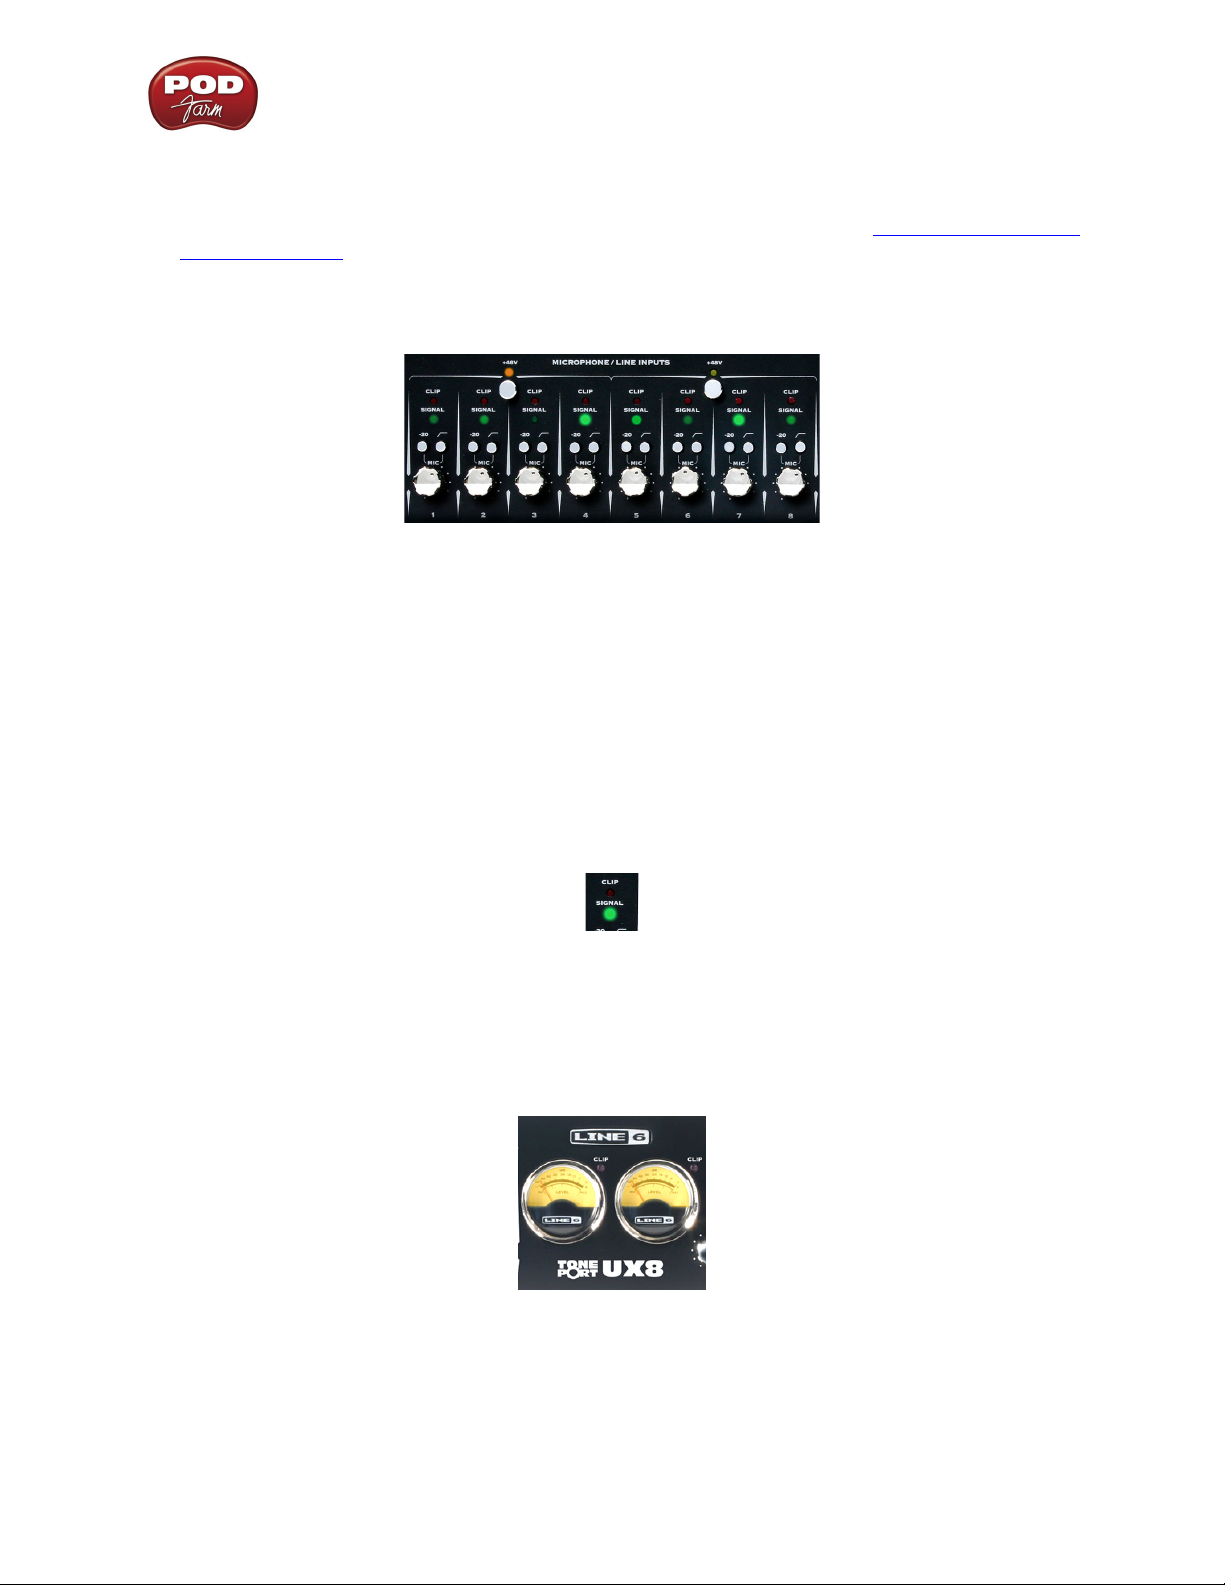
TonePort UX8
TonePort UX8 is a multichannel recording interface designed for professional use, offering plenty
of headroom, a wide dynamic range and an exceedingly low noise floor. Designed with high quality
electrical components and a rugged exterior, UX8 is built to provide many years of reliability.
UX8 can be used with the POD Farm Plug-In, providing all your DAW tracks with same POD quality
Tone trusted by scores of platinum-selling musicians and recording engineers!
Rear Panel Features
Balanced Outputs
UX8 provides 8 balanced analog outputs (4 stereo pairs). For the cleanest audio signal, use 1/4-inch
TRS cables to connect directly to your powered speakers, mixer or power amp setup.
Note that you can use each output pair to provide different monitor mixes for musicians during a
tracking session. You can set the input mix levels for each output pair using the Line 6 Audio-MIDI
Devices application.
S/PDIF Digital Audio
To send or receive S/PDIF, connect a 75-Ohm coaxial cable to the UX8’s RCA jack and the external
S/PDIF device. This is the best choice for connecting to digital recording devices, such as a DAT
recorder, MiniDisc, etc. This S/PDIF output sends the same audio as Main Outs 1-2. The digital signal
2•6
POD Farm 1.01 – Using Your Line 6 Hardware
is always received and sent at 24 bit. To sync to an external S/PDIF device, set the UX8 clock to sync
to S/PDIF in the Line 6 Audio-MIDI Devices application.
USB 2.0
This of course is where you connect a USB cable to UX8, with the other end going to one of your
computer’s USB 2.0 ports.
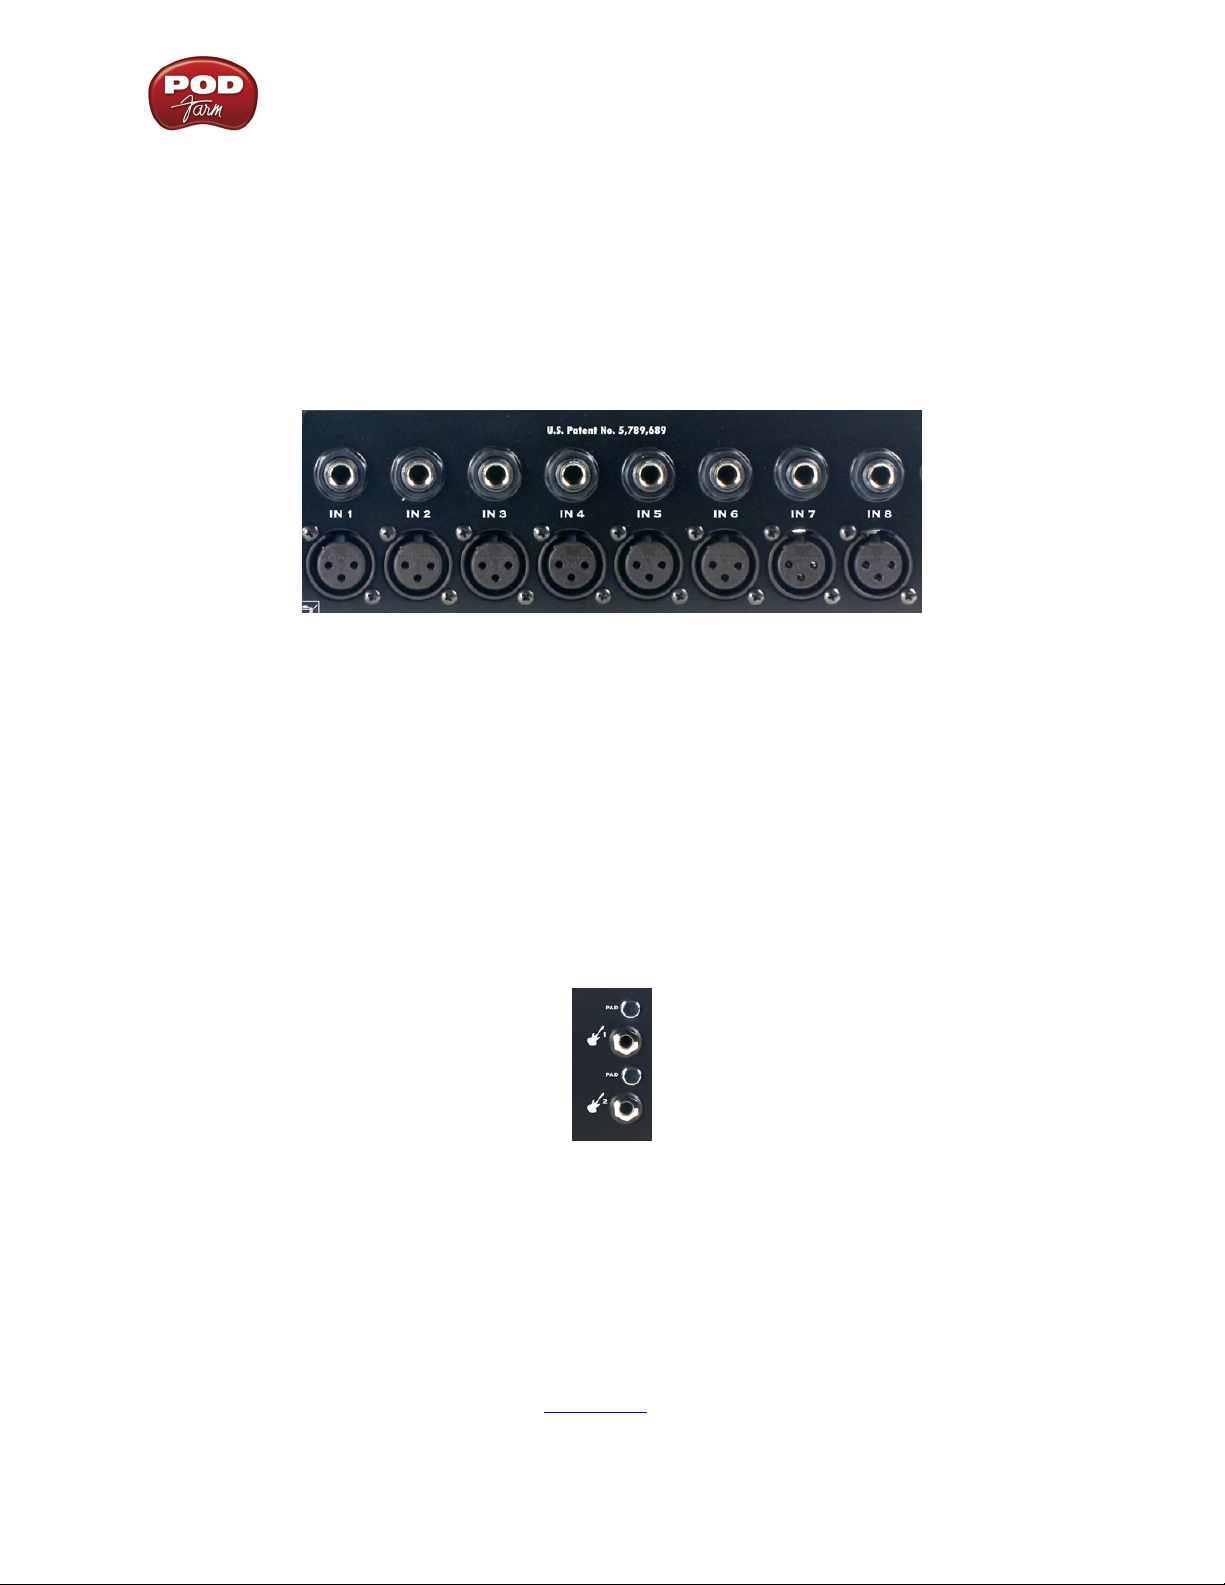
Line Level and XLR Inputs
8 unbalanced line level inputs are available for recording line level sources, such as a keyboard, stereo
receiver, the line out from a mixing console, etc. Connect to line level inputs using 1/4-inch TS audio
cables.
8 XLR preamp inputs are provided for balanced and mic input sources. +48v Phantom Power switches
are located on the front panel for mics requiring phantom power (most condenser type mics do, but
check the documentation for your mic if you are not sure). Connect to these inputs using XLR
cables.
Front Panel Features
Guitar/Bass Inputs
High-Z instrument inputs for guitar and bass are conveniently located on the front panel, •
providing convenient access for fast instrument switching.
-20 dB pad switches provide attenuation for hot levels, typically for instruments with onboard •
preamps or active pickups.
UX8’s instrument inputs work directly with POD Farm when in Standalone Operation to provide •
ToneDirect™ Monitoring, which provides a fully processed signal with ultra-low latency, critical
for tracking with the desired sound.
Note that the Tones from POD Farm in Standalone operation will show up in your recording application
as Record Sends 9-10 and 11-12. Use the Mixer View in POD Farm Standalone operation to configure
the level and type of audio you want fed to these Record Sends (Tone 1, Tone 2, Mix of Tone 1 &
2•7
POD Farm 1.01 – Using Your Line 6 Hardware
2, as well as Processed, Semi-Processed, or Dry Input). You’ll also see four additional Record Sends in
your recording application for UX8 (Sends 1-2 thru 7-8). These Sends are fed directly by UX8’s analog
inputs 1 – 8. You can simultaneously record the direct, unprocessed signal from any of these Sends
for later processing using POD Farm Plug-In! For more info, check out the POD Farm Standalone
Operation chapter.
Microphone Input Controls
Rear panel XLR input levels are controlled by a row of Trim knobs on the front panel. Use these inputs
for microphones or balanced input signals with a gain range of 0 dB to 45 dB.
Each XLR input has a -20 dB pad switch, which can be used to provide more headroom for high output
microphones. A 75 Hz cutoff switch is also provided, useful for eliminating low frequency rumble from
microphone sources.
Two +48v phantom power switches are provided for powered mics, such as condenser mics. Phantom
power is distributed via two XLR input banks, permitting the option to run dynamic mics in a nonpowered bank.
Signal and Clip LEDs
Signal and Clip LEDs exist for each input. The signal LED lights up when signal activity is present,
glowing brighter as the signal level increases. When the input level reaches the 0 dBfs, the clip LED
lights up momentarily.
VU Meter and Clip Display
UX8 provides a stereo pair of large VU meters on the front panel. By default, these meters display
Inputs 1-2 levels. Using the Inputs & Recording Tab of the Line 6 Audio-MIDI Devices application,
you can assign the hardware meters to display input and output levels of any stereo pair or POD Farm
Record Send. The clip LEDs light up when the signal reaches 0 dBfs.
2•8
POD Farm 1.01 – Using Your Line 6 Hardware
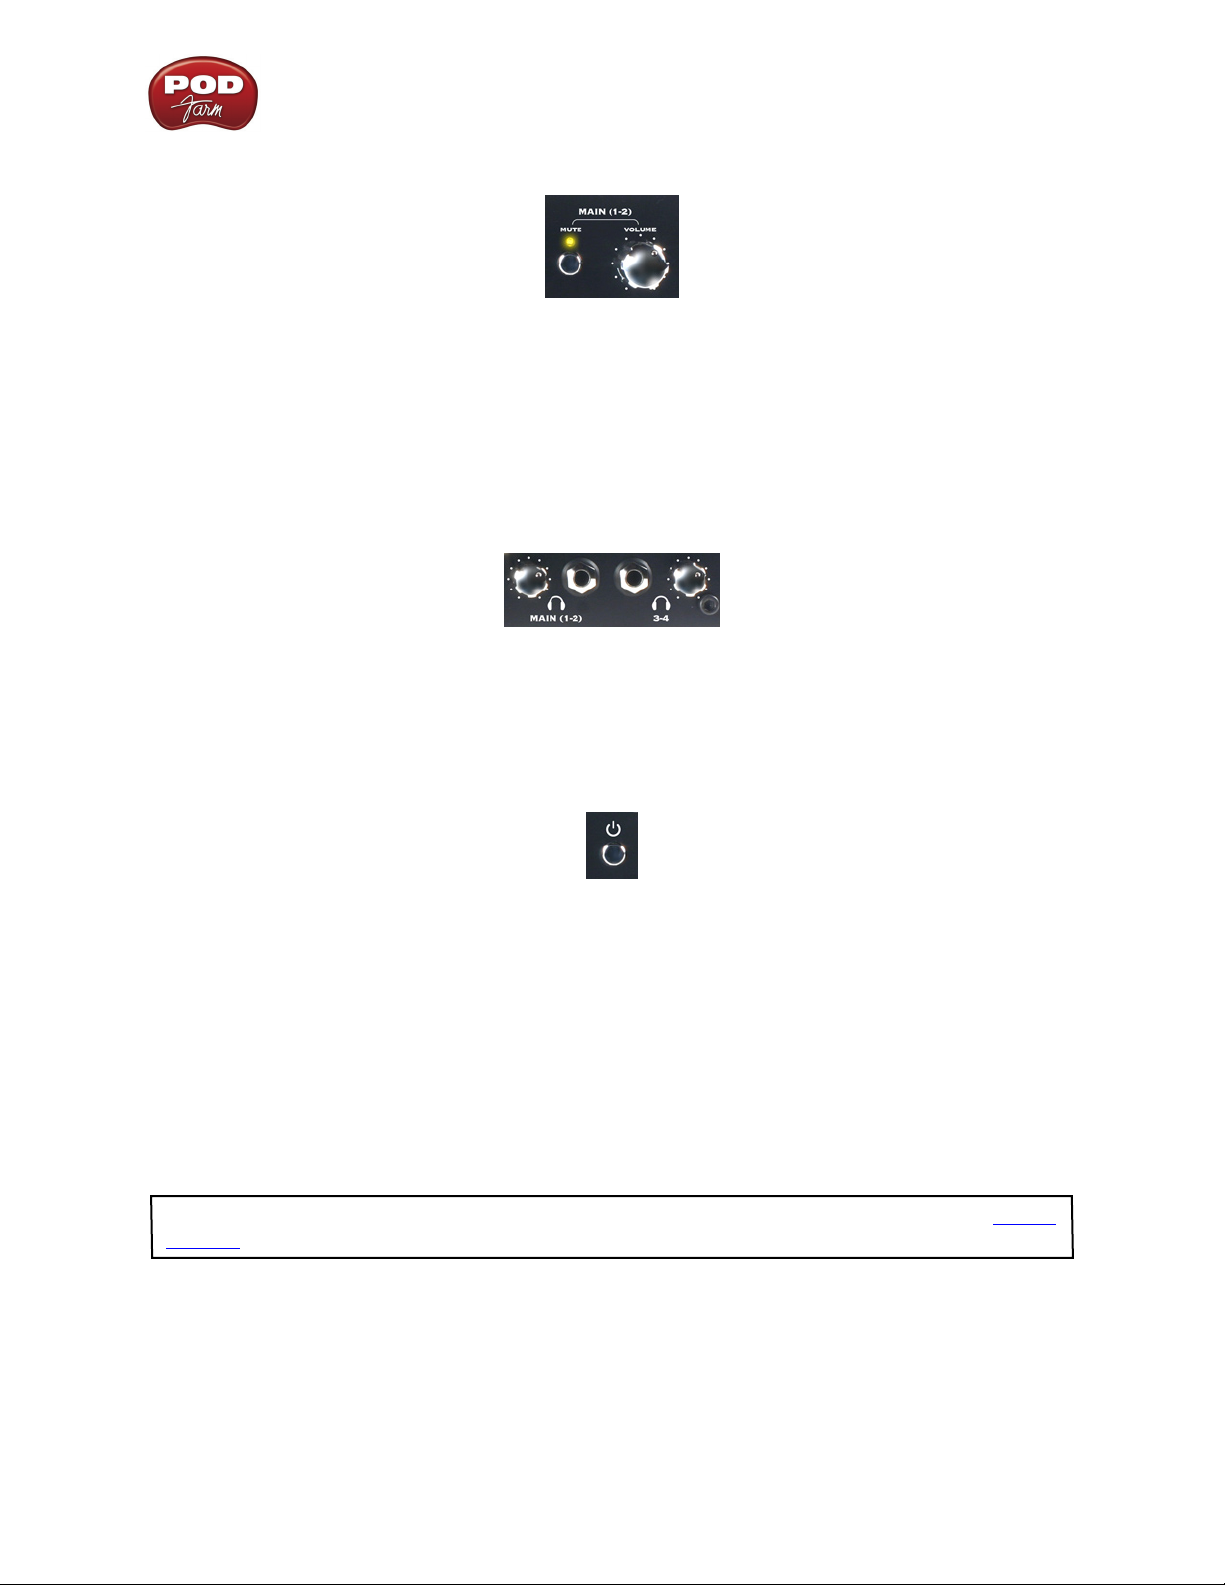
Main Output Level Controls
Main Outputs 1-2 are controlled by a main volume knob and main mute button. The volume knob
is an analog level control and does not affect any level being sent to your computer. When Mute is
engaged, as solid amber LED illuminates, blinking about once every 2 seconds.
Note that these controls operate on main outputs 1-2 only (headphone and S/PDIF levels are not
affected). Outputs 3 – 8 are software controlled, via the Line 6 Audio-MIDI Devices application.
Headphone Output Controls
Headphone outputs 1-2 and 3-4 provide duplicate stereo outputs or Main Outs 1-2 and 3-4 respectively,
providing discrete control over output levels sent over the headphone jacks. Note that headphone
output levels are controlled independently of the Main volume control.
Power Button
When the power button is engaged, UX8’s main LEDs will illuminate. UX8 is not USB powered and
receives no power from the computer.
LED status indicators
The Main Mute and Main Clip LEDs provide secondary functions in their ability to indicate the
connection status of USB and S/PDIF, as follows:
No USB connection - The main clip LEDs alternate steadily between left and right, about once •
every second. The USB cable may be unplugged or the UX8 Line 6 audio driver may not be
installed on your computer.
The Line 6 audio driver is installed with the POD Farm applications installer - or you can launch Line 6
Monkey
and go to the Updates tab to check for and install the latest driver version.
No S/PDIF clock sync - The Mute LED blinks 3 times rapidly about once every second when the •
clock mode set to S/PDIF, and no external clock is present.
2•9

TonePort KB37
Connect any line
level input source for
monitoring to the Stereo
Monitor In
POD Farm 1.01 – Using Your Line 6 Hardware
Connect any line level input
source that you want to
record into the Line Inputs
Connect your electric
Guitar or Bass
Connect
your stereo
Headphones
Connect the Analog Outs
to your monitor system
Microphone Inputs - You can receive input from one or two mics at the same time using these ins.
There is also a +48V Phantom Power switch that you should toggle to “on” if your mic requires phantom
power (most condenser type mics do, but check the documentation for your mic if you are not sure).
Connect each mic using an XLR cable. When using POD Farm in Standalone operation, this inputs
each microphone signal independently into POD Farm, where you can choose your Tone, and then
route the processed signal to the Record Sends (to your audio software) and to the Analog Outs.
Instrument Input - To connect your electric guitar or bass, plug it into this input. When using POD
Farm in Standalone operation, this inputs the signal into POD Farm, where you can choose your Tone,
and then route the processed signal to the Record Sends (to your audio software) and to the Analog
Outs.
This input also features a Pad switch; engage this switch when using a guitar/bass with high-output or
active pickups, to avoid overdriving the input.
Headphones - If you want to listen to the audio from KB37 using stereo headphones, then plug them
into this 1/4-inch stereo jack. This Headphone jack outputs the same signal fed to the Analog Outs on
the rear panel; the audio from your audio software on the computer, as well as anything plugged into
any KB37 input.
Connect up to two
Microphones
Connect to the S/PDIF input
of an external device to send
TonePort’s output digitally
Connect your USB
cable from your
computer’s USB port
Line Inputs - If you want to record the signal from a line level source, such as a keyboard, your stereo
receiver, the line out from a mixing console, etc., connect to these Left and Right ins using 1/4-inch
TS audio cables.
USB - This of course is where you connect a USB cable to KB37, with the other end going to your
computer’s USB 1.1 or 2.0 port.
S/PDIF Digital Out - To send the output of KB37 to an external device digitally, connect a 75-Ohm
coaxial cable into this RCA jack and then into the S/PDIF digital input on the external device. This
is the best choice for connecting to digital recording devices, such as a DAT recorder, MiniDisc, etc.
This S/PDIF output sends the same audio as is sent to KB37’s Analog Outs (with the exception that
2•10
POD Farm 1.01 – Using Your Line 6 Hardware
any audio coming into the Monitor In jack is not routed to the S/PDIF output). The digital signal is
always sent at 24-bit resolution.
Monitor In - If you want to hear the signal from a line level source mixed with all the other audio
coming from your computer, but do not want this audio recorded via the POD Farm Record Sends,
then plug the source in here. Note that this is a stereo jack, so you should use a stereo 1/4-inch TRS
audio cable for this connection.
Analog Outs - These Left and Right balanced jacks output all the audio from KB37; the audio from
your DAW, and anything plugged into any KB37 input. So, these are what you want to connect to your
monitoring system when using KB37 as your computer’s sound card. Use either 1/4-inch TS or TRS
cables to connect directly to your powered speakers, mixer or power amp setup. Note that you can also
use the headphone jack if you want to use headphones for monitoring.
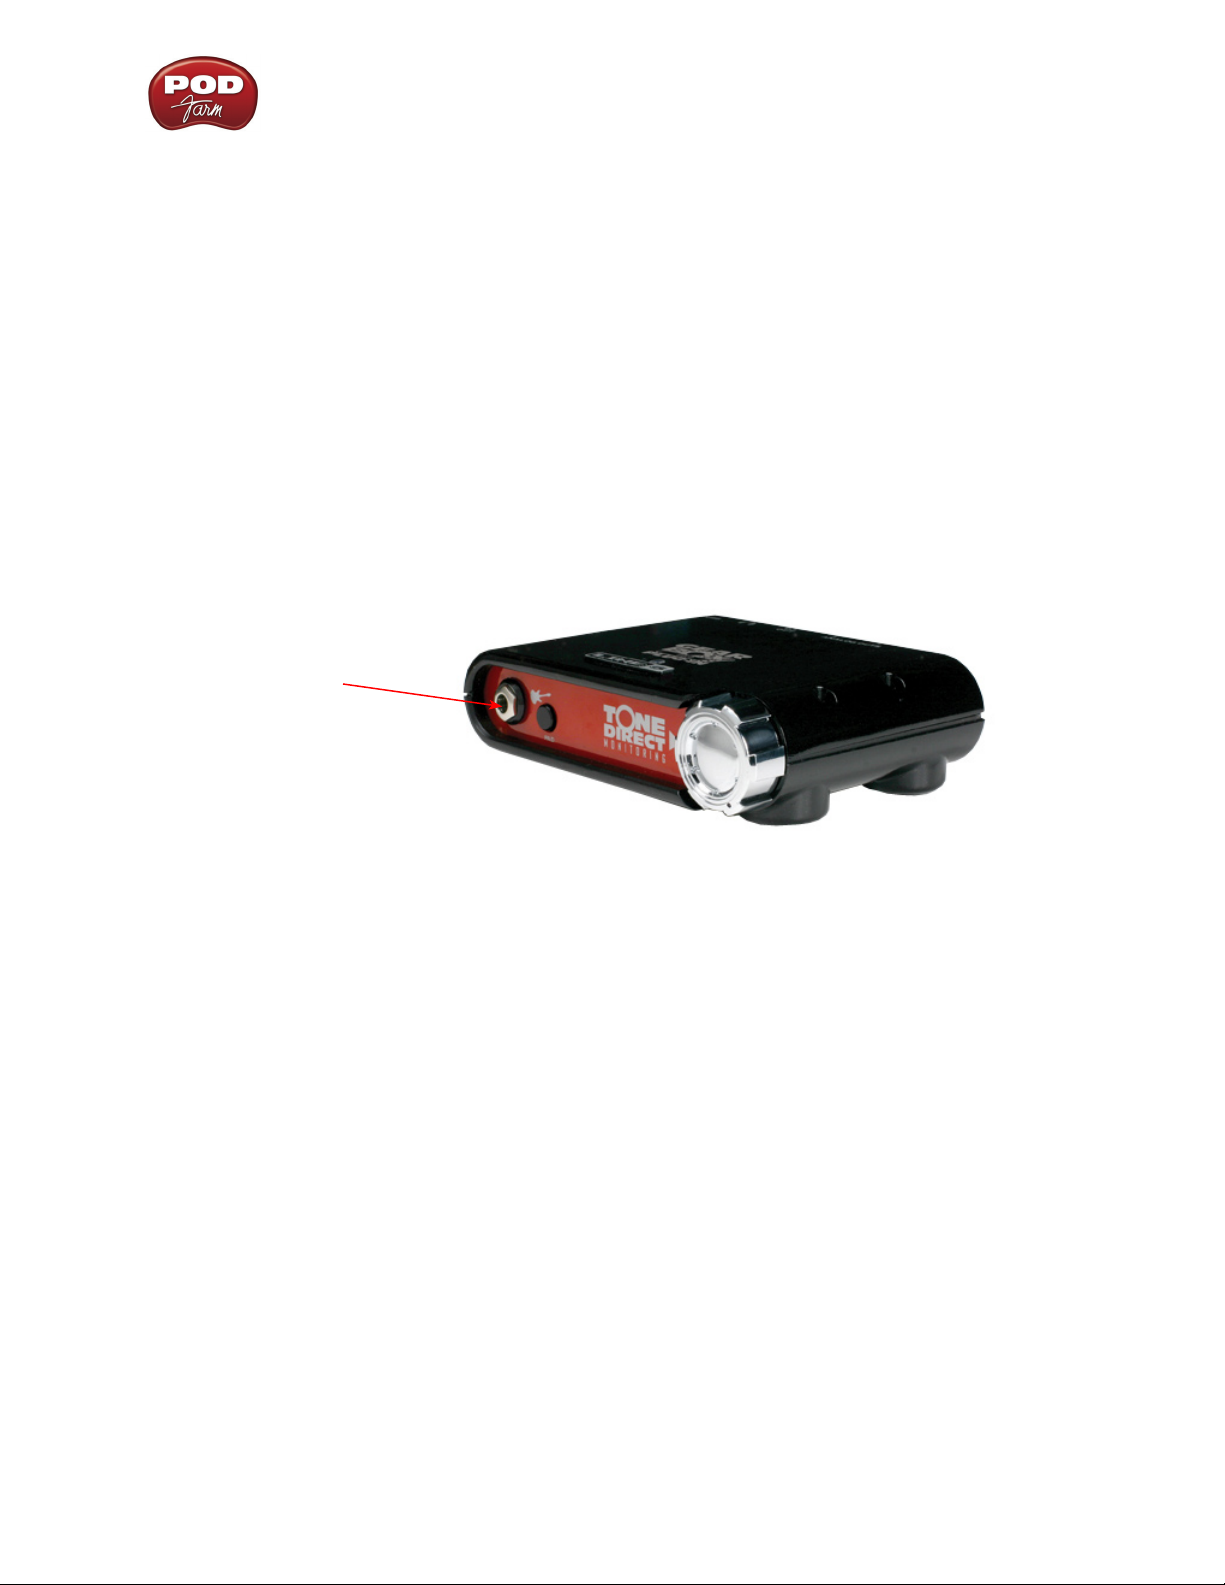
TonePort DI
Connect your electric Guitar
or Bass
Instrument Input - To connect your electric guitar or bass, plug it into this input. When using POD
Farm in Standalone operation, this connection routes the instrument’s signal into POD Farm where
you can choose your Tone, and then route the processed signal to the Record Sends (to your audio
software) and to the Analog Outs. This input also features a Pad switch; engage this switch when using
a guitar/bass with high-output or active pickups, to avoid overdriving the input.
2•11
POD Farm 1.01 – Using Your Line 6 Hardware
Connect to your 3rd-party audio
Connect your stereo
Headphones
interface’s input for “dry” recording
Analog Line Outs – connect
Connect a USB cable from
here to your computer
to your powered speakers or
mixer
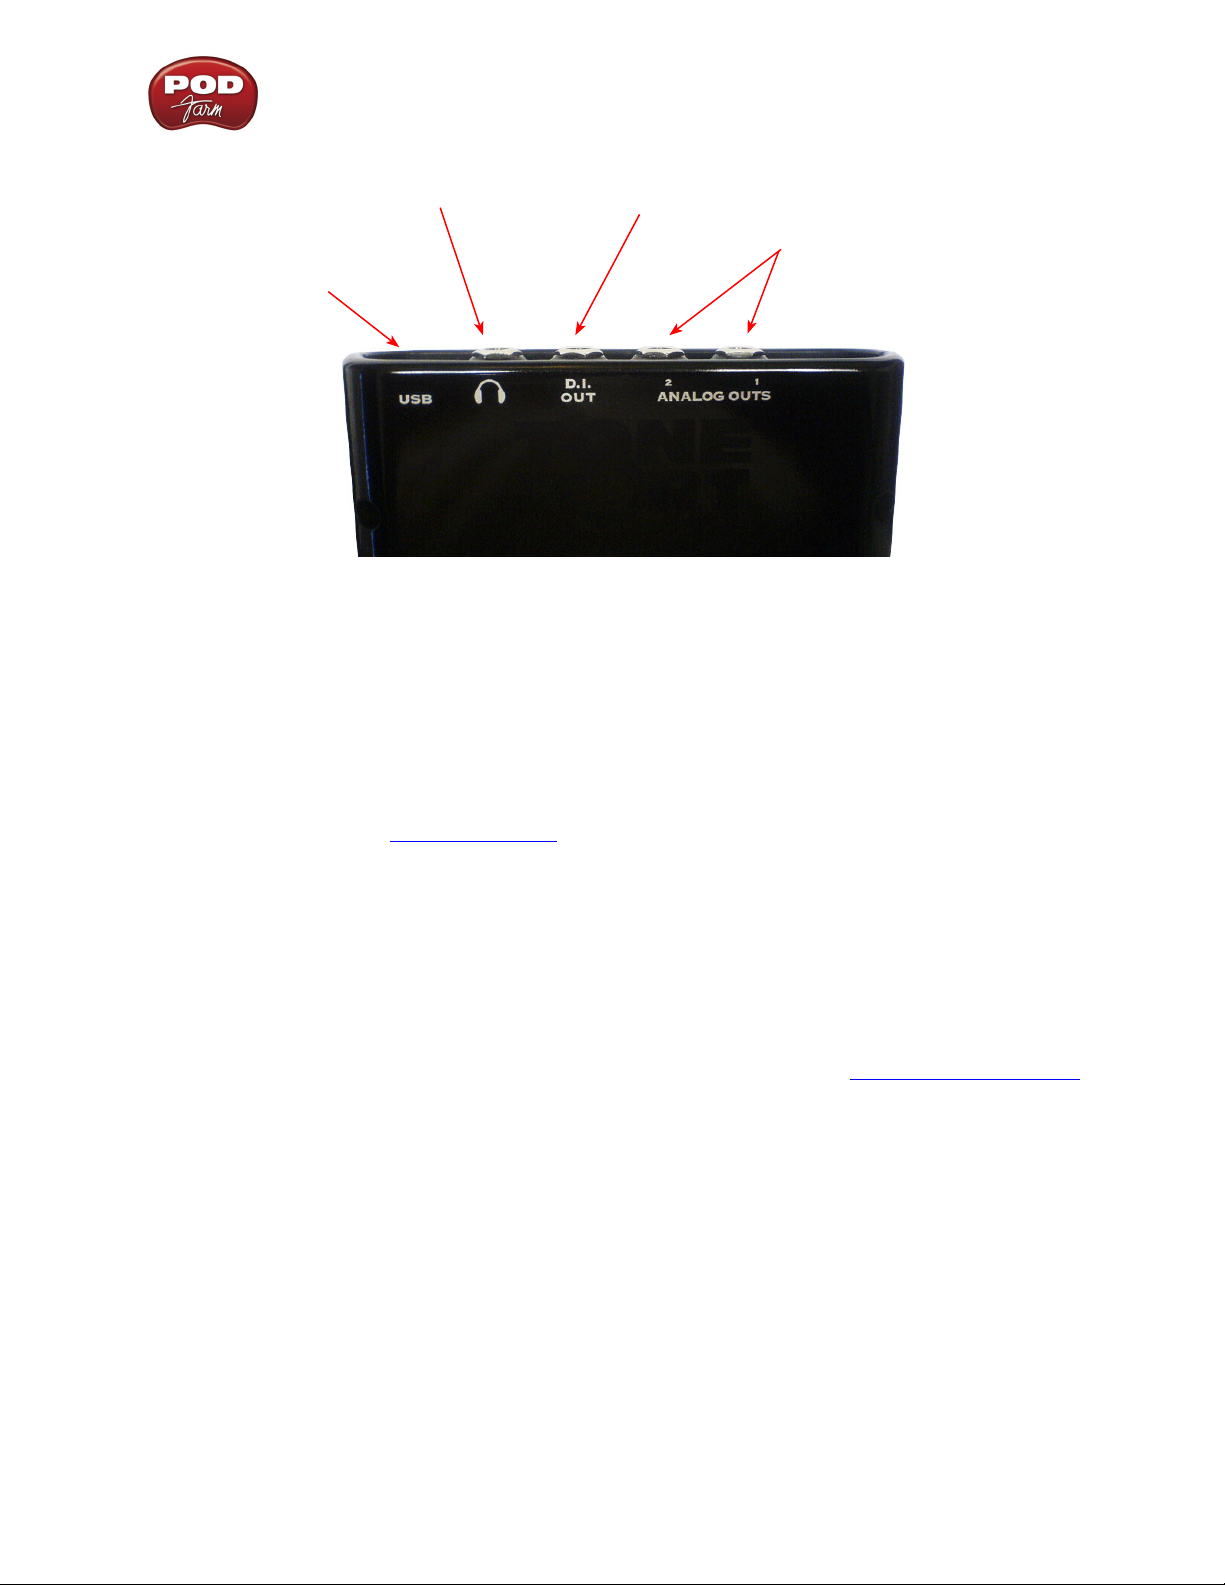
USB - This of course is where you connect a USB cable to TonePort DI, with the other end going to
your computer’s USB 1.1 or 2.0 port.
Phones - If you want to listen to the audio from TonePort DI using stereo headphones, then plug them
into this 1/4-inch stereo jack. This headphone jack outputs the same signal fed to the Analog Outs on
the rear panel; the audio from your audio software on the computer, as well as anything plugged into
the Instrument Input.
D.I. Out - This analog connection lets you record an unprocessed signal to your DAW audio track,
to which you can apply POD Farm Plug-In. If you use a 3rd-party audio interface (such as a Digidesign
Mbox, for example), connect the D.I. Out to one of its inputs, and record the “dry” signal into your
audio software, while still having the ability to hear your POD Farm “processed” signal through
TonePort D.I.’s Analog Outs.
Analog Outputs - These Left and Right unbalanced jacks are your main outputs and carry all the audio
from TonePort D.I.; the audio from your audio software on the computer, and anything plugged into
D.I.’s Instrument input. These are what you want to connect to your powered speakers or monitoring
system if you are using TonePort D.I. as your primary audio interface for your recording software. If you
are using a 3rd-party audio interface, these outputs supply the ToneDirect™ magic to your interface or
mixer, when using the POD Farm application alongside the plug-in. See the ToneDirect™ Monitoring
section for more details.
2•12
POD Farm 1.01 – Using Your Line 6 Hardware
GuitarPort
Instrument Input - To connect your electric guitar or bass, plug it into this input. When using POD
Farm in Standalone operation, this connection routes the instrument’s signal into POD Farm, where
you can choose your Tone, and then route the processed signal to the Record Sends (to your audio
software) and to the Analog Line Outs.
Analog Line Outs – connect to your
powered speakers or mixer
Monitor In – connect a line level, stereo
output (from your stereo, MP3 player,
etc).
Analog Line Outs - These Left and Right RCA jacks output all audio signals; the audio from your
DAW, and anything plugged into any the Instrument or Monitor inputs. So, these are what you want
to connect to your monitoring system when using GuitarPort as your computer’s sound card. Use
shielded RCA to RCA tipped cables to connect directly to your powered speakers, mixer or power amp
setup. Note that you can also use the headphone jack on GuitarPort if you want to use headphones for
monitoring.
Headphones - If you want to listen using stereo headphones, then plug them into this 1/8-inch stereo
jack. This Headphone jack outputs the same signal fed to the Analog Line Outs; the audio from your
audio software on the computer, as well as anything plugged into the Instrument or Line inputs.
Connect your stereo headphones
Connect USB cable from here to your
computer
Monitor In - If you want to hear the signal from a line level source mixed with all the other audio
coming from your computer, but do not want this audio recorded, then plug the source in here. Note
that this is a stereo jack, so you should use a stereo 1/8-inch tipped stereo audio cable for this connection.
You’ll hear any audio coming into this jack via the Analog Line Outs and Phones, but it won’t be fed
to GuitarPort’s Record Sends.
USB - This is where you connect the supplied USB cable to GuitarPort, with the other end going to
your computer’s USB 1.1 or 2.0 port.
2•13
POD Farm 1.01 – Using Your Line 6 Hardware
Using POD X3 Family Devices with Your Computer...
If you own a POD X3, POD X3 Live or POD X3 Pro, then you can also reap the DAW benefits with
POD Farm Plug-In! To get the POD Farm Plug-In, as well as any other available “Add-Ons”, just
connect POD X3 to your computer and run Line 6 Monkey to download, install and authorize the
POD Farm software & Plug-In. Read more about Line 6 Monkey and this process here, or just head on
over to the Line 6 Online Store.
You can also of course utilize POD X3 as a high performance sound card for your Windows® or Mac®
computer, allowing you to record all those groovy POD X3 Tones, or even dry input signals, directly
into your audio recording software. POD X3 devices offer four stereo Record Sends, which carry the
following signals:
Record Send 1-2: Main Out (Studio/Direct Mix) •
Record Send 3-4: Tone 1 Only•
Record Send 5-6: Tone 2 Only•
Record Send 7-8: Tone 1 Inputs Dry (on Send 7) and Tone 2 Inputs Dry (on Send 8)•
POD Farm software does not function in Standalone operation with POD X3 family devices. Since all
processing is done on your POD X3 hardware itself, you can call up your POD X3 tones and adjust
settings on the device itself to feed whatever signal you want out the Record Sends for use with your DAW
software!
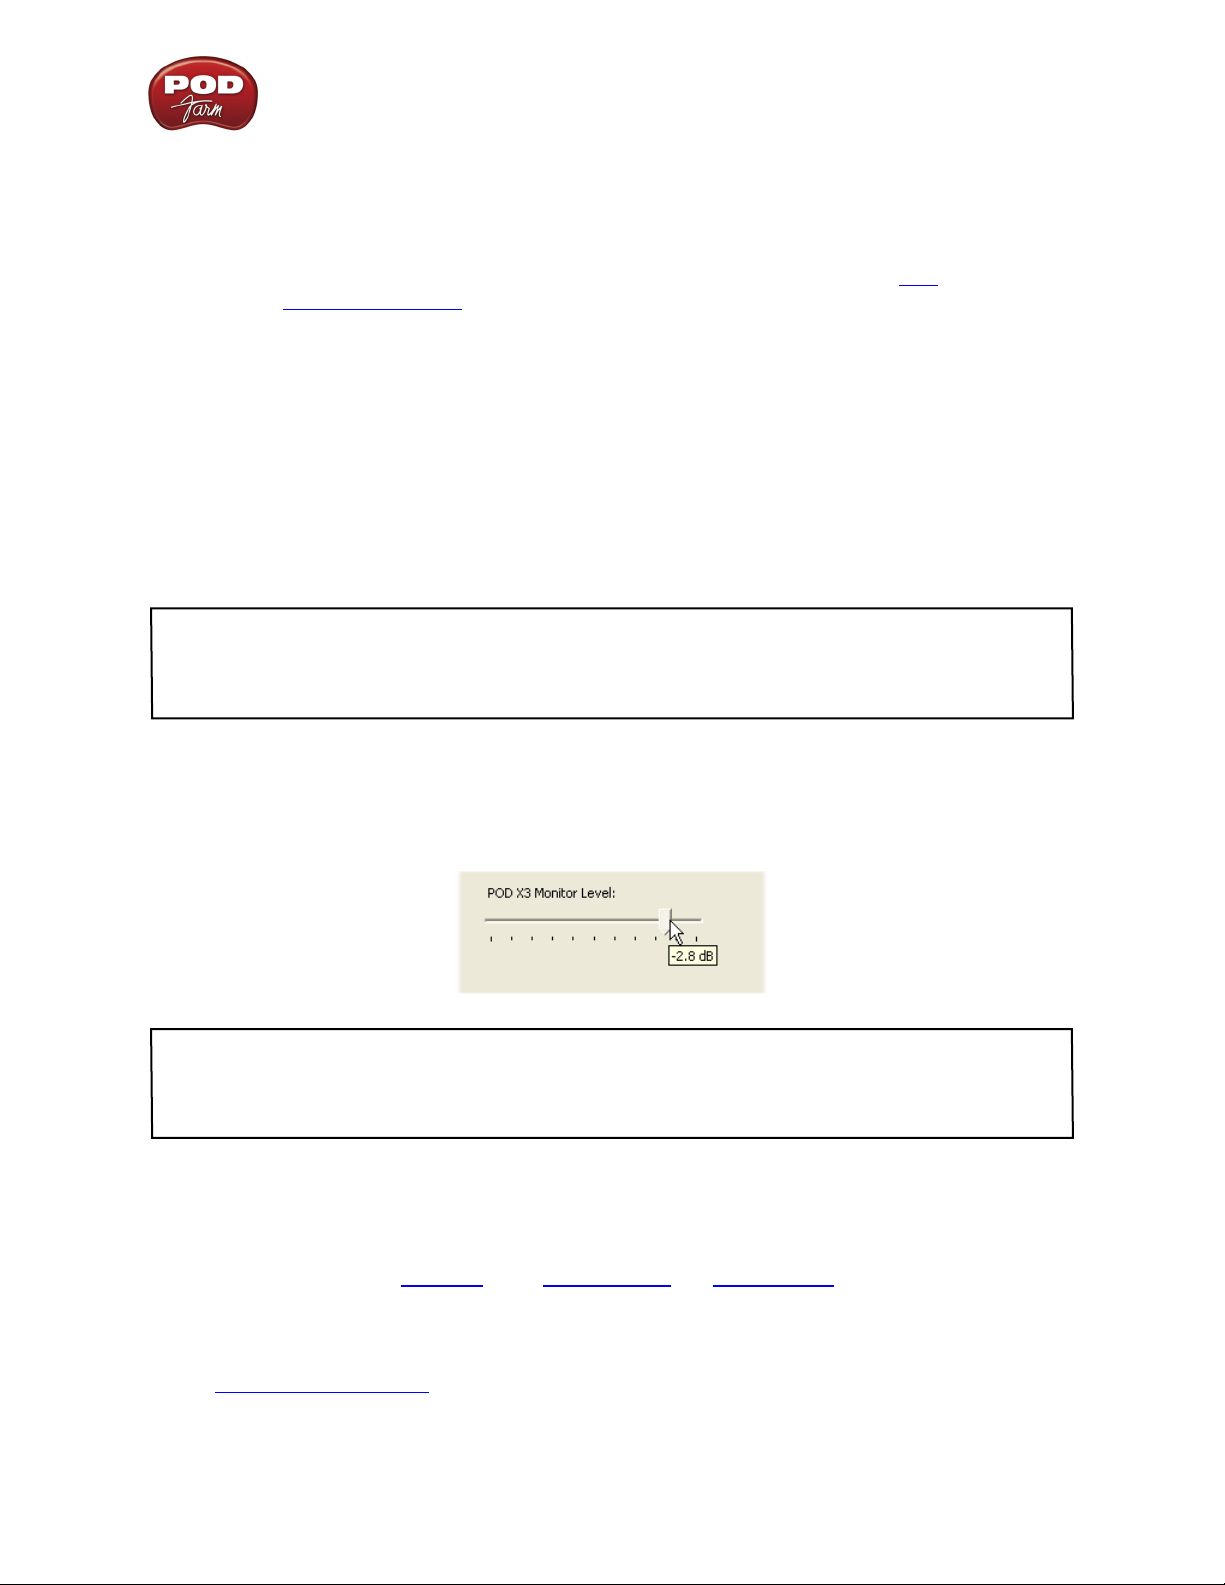
To control the Monitor level of POD X3 independently of the Record Send levels, use the Monitor
Level slider in the Inputs & Recording tab in the Line 6 Audio-MIDI Devices dialog on you computer
(found in the System Preferences on Mac®, and in the Control Panel on Windows®).
Note - be sure to always power off or mute your speakers or monitoring setup before connecting/
disconnecting the USB cable and powering on/off POD X3, as well as before booting up or shutting down
your computer if POD X3 is already connected. The best practice is to always power on your speakers last,
and power them off first when connected to other audio gear to avoid a “pop”.
The following sections cover the basic connections for using POD X3 family devices for recording.
Use these links to jump to the section covering your specific POD X3 device:
POD X3 POD X3 Live POD X3 Pro
Be sure to also check out your POD X3 Pilot’s Handbook and the additional documentation found on
the POD Farm Online Help page of the Line 6 site.
2•14
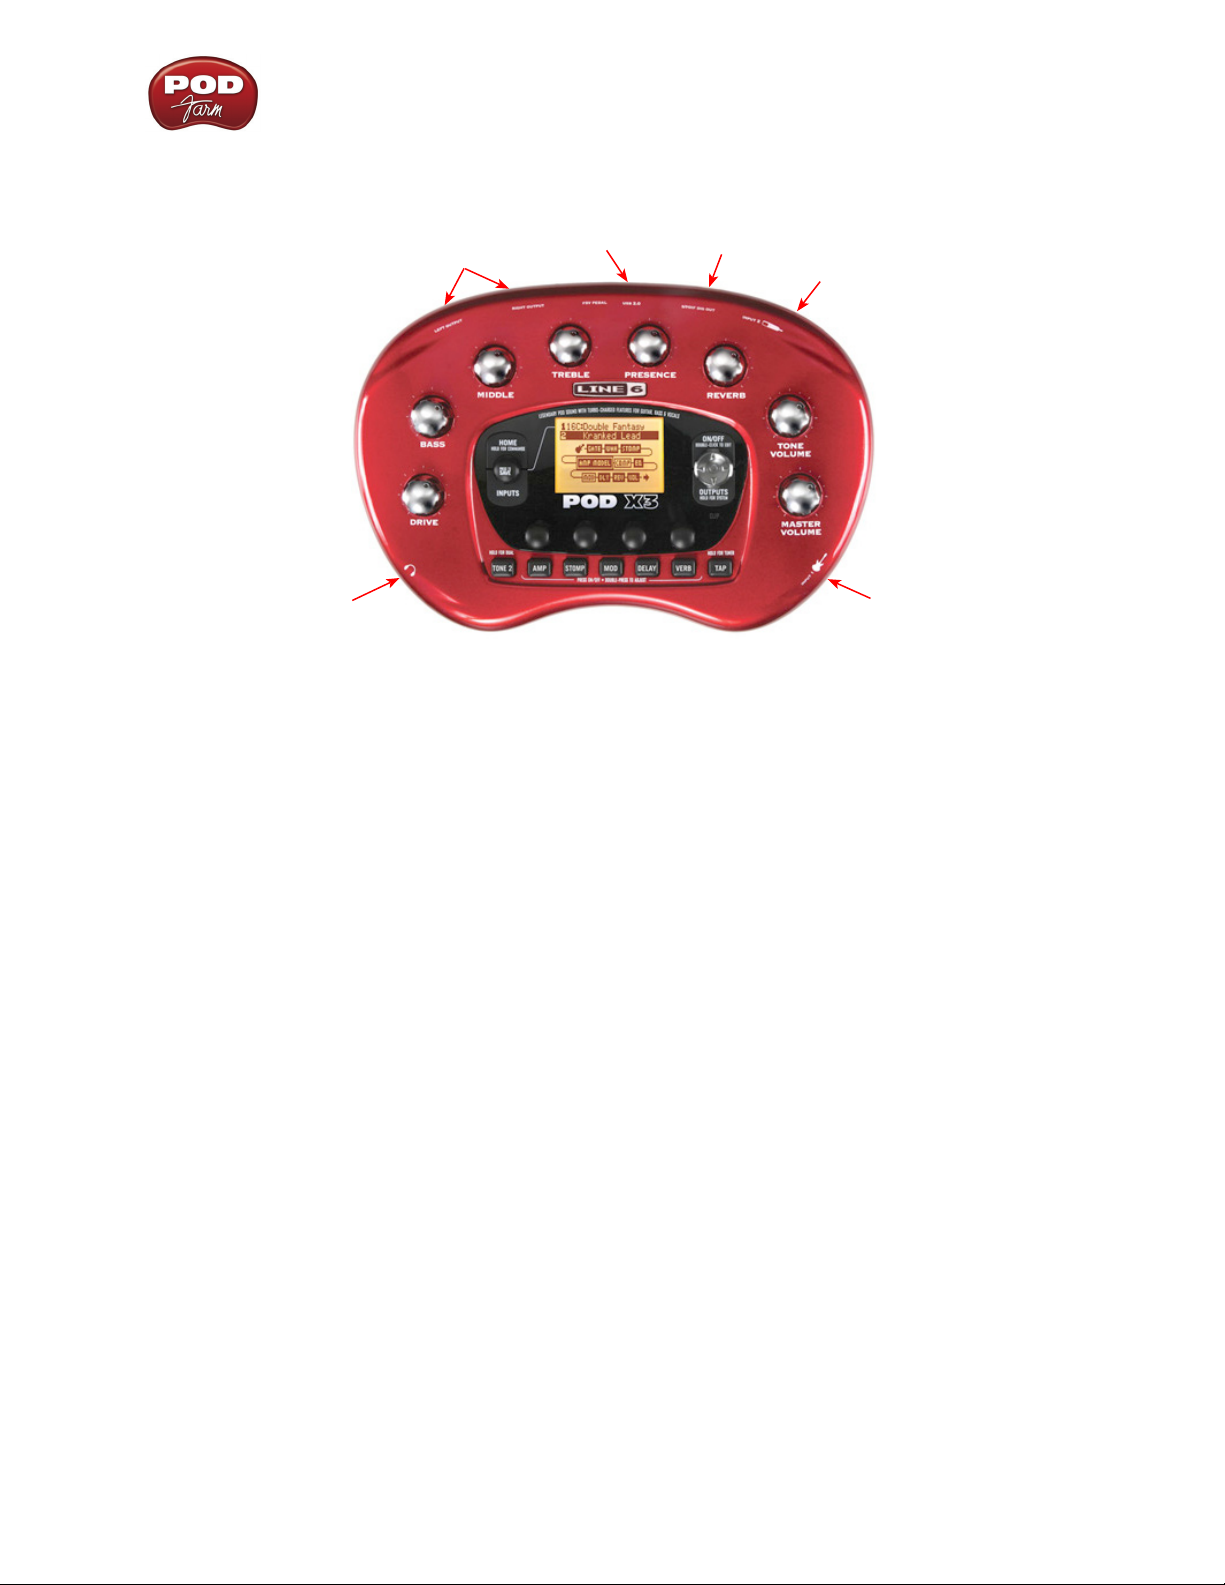
POD X3
POD Farm 1.01 – Using Your Line 6 Hardware
USB 2.0 - Connect
to your computer
Left & Right Analog Outputs
– Connect to your powered
speakers or mixer
Phones - Connect your
stereo Headphones
Input 1 (Instrument) – Connect your guitar or bass here using a standard 1/4-inch TS instrument
cable. POD X3 itself contains the processing power that turns your naked input signal into that roaring
guitar Tone, which is then fed to the “Direct/Studio Mix”, out the Analog Left & Right Outputs, as
well as fed to the S/PDIF digital output, and out the Record Sends digitally to your computer across
the USB 2.0 connection. POD X3 is of course also capable of applying two Tones on your Input 1 - just
dial up one of the tone presets in the “Blends” folder of POD X3 and you’ll have two complete Tones
applied to your Input 1 signal! Or, go the POD X3’s Inputs screen to choose what you want Tone 1 and
Tone 2 applied to.
S/PDIF Out - Connect
to other S/PDIF devices
Input 2 - Connect
your microphone
Input 1 - Connect
your guitar or bass
Input 2 (Mic) & Trim knob – Connect a microphone here using a standard XLR cable. You can use
the little “Trim” knob to adjust the mic signal coming into POD X3, much like you would on a mixer
console. Just like with Input 1, POD X3 itself applies preamp and effects models to your mic input,
which is then fed out the Analog Left & Right Outputs, as well as fed to the S/PDIF digital output, and
out the Record Sends digitally to your computer across the USB 2.0 connection. POD X3 is of course
also capable of applying a Dual-Tone, such as independently slathering a guitar Tone on Input 1, and a
mic preamp and effects on Input 2 simultaneously! Just go to the “Pairs” folder of your POD X3 to call
up some of these pre-baked guitar/mic Dual-Tones! Or, go the POD X3’s Inputs screen to choose what
you want Tone 1 and Tone 2 applied to.
Phones - If you want to listen using stereo headphones, then plug them into this 1/4-inch stereo jack.
This Headphone jack outputs the same signal fed to the Analog Line Outs; the audio from your audio
software on the computer, as well as anything plugged into Inputs 1 &2.
Left & Right Outputs - These Left and Right ¼-inch jacks output all audio signals; the audio from
your DAW, and anything plugged into any Inputs 1 & 2. So, these are what you want to connect to
your monitoring system when using POD X3 as your computer’s sound card. Use shielded ¼-inch
cables to connect directly to your powered speakers, mixer or power amp setup. Note that you can also
use the Phones jack if you want to use headphones for monitoring.
USB - This is where you connect a USB cable from POD X3 to your computer’s 2.0 port. Of course
your POD X3 is capable of processing your guitar Tone all by itself, but you’ll need to connect the USB
2•15

POD Farm 1.01 – Using Your Line 6 Hardware
cable to your computer to use it with POD Farm Plug-In, and/or to use POD X3 as your computer’s
sound card device.
S/PDIF Digital Output - To send output from POD X3 to another device digitally, connect from this
S/PDIF Dig Out to the S/PDIF in on your other device. Connecting digitally is the best choice for
routing to external digital recording devices, such as a DAT recorder or MiniDisc. The S/PDIF output
sends out the Tone(s) according to your device settings - these options are found on the POD X3
device itself by pressing the “Outputs” button. The digital signal is always sent at 24-bit resolution.
POD X3 Live
Left & Right Direct Outs
Use as a D.I. for recording or
to the house mixer/P.A.
Left & Right Live Outs
Connect to your powered
speakers or mixer
Aux In - Connect a 2nd
instrument
S/PDIF Out - Connect
to other S/PDIF devices
USB 2.0 - Connect
to your computer
Guitar in - Connect
your guitar or bass
CD/MP3 In - Connect
an audio player
Guitar In – Connect your guitar or bass here using a standard 1/4-inch TS instrument cable. POD X3
itself contains the processing power that turns your naked input signal into that roaring guitar Tone,
which is then fed to the “Direct/Studio Mix”, out the Analog Left & Right Outputs, as well as fed to
the S/PDIF digital output, and out the Record Sends digitally to your computer across the USB 2.0
connection. POD X3 is of course also capable of applying two Tones on your Input 1 - just dial up one
of the tone presets in the “Blends” folder of POD X3 and you’ll have two complete Tones applied to
your Input 1 signal! Or, go the POD X3’s Inputs screen to choose what you want Tone 1 and Tone 2
applied to.
CD/MP3 Input – Connect a CD player, MP3 player, drum machine or other audio device into this
stereo 1/8-inch jack and you’ll hear it at POD X3 Live’s Phones, Direct Out, and Live Out so you can
jam along. Note that the audio coming into this input is not routed to the Record Sends, so it won’t
be recorded.
Phones - If you want to listen to the audio using stereo headphones, then plug them into this 1/4-inch
stereo jack. This Headphone jack outputs the same signal fed to the Analog Line Outs; the audio from
your audio software on the computer, as well as anything plugged into the Guitar, Mic, Aux, Variax or
CD/MP3 inputs.
Phones - Connect your
stereo Headphones
Mic In & Trim - Connect
a Mic & adjust trim level
Variax In - Connect your
Variax Guitar here
2•16
 Loading...