


ACOUSTIC
Pilot’s Handbook
40-00-0039 Electrophonic Limited Edition available @ www.line6.com |
Rev A |

Before using your Variax you should read these Important Safety Instructions. Keep these instructions in a safe place.
1.Obey all warnings in this Pilot's Handbook.
2.Do not place near heat sources, such as radiators, heat registers, or appliances which produce heat.
3.Guard against objects or liquids.
4.To avoid damage to Variax’s Digital Communications Connector, always use Line 6 supplied cables and replace the protective end cap when not in use.
5.Power the XPS Footswitch only with the included PX-2 Power Supply or equivalent.
6.Connect the PX-2 Power Supply only to AC power outlets rated 100-120V or 230V 47-63Hz (depending on the voltage range of the included power supply).
7.Do not step on power cords. Do not place items on top of power cords so that they are pinched or leaned on.
8.Unplug your Variax Acoustic and XPS Footswitch when not in use for extended periods of time.
9.Do not perform service operations beyond those described in the Variax Acoustic Pilot's Handbook. Repairs and service operations beyond the scope of those in the Pilot's Handbook should be performed only by qualified service personnel.
10.Prolonged listening at high volume levels may cause irreparable hearing loss and/or damage. Always be sure to practice "safe listening."
Your Variax should include these accessories:
Gigbag, XPS Footswitch, PX-2 Power Supply,TRS Cable, Bridge Saddle Wrench, Truss Rod Wrench
WARNING: To reduce the risk of fire or electric shock, do not expose this appliance to rain or moisture.
CAUTION: No user-serviceable parts inside. Refer servicing to qualified service personnel.
CAUTION: This equipment has been tested and found to comply with the limits for a Class B digital device pursuant to Part 15 of FCC Rules. Operation is subject to the following two conditions: (1) This device may not cause harmful interference, and
(2) this device must accept any interference received, including interference that may cause undesired operation.
Please Note:
Line 6, Variax Acoustic, Variax, POD, and the Line 6, Variax Acoustic and Variax logo are trademarks of Line 6, Inc. All other product names, trademarks, and artists' names are the property of their respective owners, which are in no way associated or affiliated with Line 6. Product names, images, and artists' names are used solely to identify the products whose tones and sounds were studied during Line 6's sound model development for this product. The use of these products, trademarks, images, and artists' names does not imply any cooperation or endorsement.
Table of Contents |
|
Welcome toVariax ................................. |
1–2 |
Basic Operations...................................... |
3-6 |
Connections |
|
Battery Power |
|
XPS Direct Box Operation |
|
Primary Controls ........................................ |
7 |
Volume |
|
Mic Position |
|
Compressor |
|
Model Select |
|
Instant Alternate Tuning........................ |
8-10 |
Preset Tunings |
|
Custom Tunings |
|
Save Our Sounds....................................... |
11 |
The Guitars of Variax Acoustic .......... |
12-28 |
Care and Maintenance........................ |
29-30 |
Customer Service..................................... |
32 |
Warranty Information.............................. |
33 |
Welcome to Variax Acoustic
Thanks for buying a Variax Acoustic and joining us in our quest to apply the miracle of modern technology to the pursuit of great acoustic guitar tone. You now own detailed models of some of the most distinctive acoustic instruments of all time–wrapped up in a single comfortable and highly playable guitar.
How does it work?
How do we get so much great acoustic sound from the compact Variax Acoustic? We use piezo bridge saddles, similar to the piezo pickup in many electricacoustic guitars, to capture each individual string's vibrations. We then process the signals through software algorithms that capture the physical properties of the guitars that we've modeled.
|
This process dynamically alters Variax Acoustic's |
|
own natural string vibrations in real time to match |
|
the modeled instrument's unique tonal |
|
characteristics. That means there's no delay caused |
|
by having to detect a pitch and turn it into a MIDI |
|
note, and there's also no issue with tracking hammer- |
|
on's, pull-off's, slides, bends, slurs or any other |
|
techniques that are a part of your style. |
1 |
How did we manage to capture the tonal souls of |
|
these classic instruments for instant recall from
your Variax Acoustic? We're glad you asked....
The Dream...
Several years before Variax Acoustic was born, we turned our attention from the PODs, amps, and effects that we had been developing to take a fresh look at the guitar itself. We wondered–could it be possible to capture a complete range of guitar tone in a single instrument? After a couple of years of research, development, and countless hours playing dozens of vintage electric and acoustic guitars, we released the original Variax, the world’s first modeling guitar. But while the Variax is perhaps the ultimate general-purpose guitar, we also wanted to specifically address the unique needs of the acoustic musician.
How, we asked ourselves, can we use modeling technology to improve such a traditional instrument?
The first requirement, of course, would be sound. Since this new instrument would be dedicated entirely to acoustic instruments, we developed new algorithms that use all of the power of the Variax brain to authentically re-create the complex timbres of the vibrating strings and resonant bodies of the guitars we were modeling.
Next, we decided to tackle a problem that had plagued acoustic guitarists since the advent of electrified music–how to get a great acoustic sound on-stage and in the studio. With our unique Mic Position control, you can adjust your tone the way professionals do–by changing mic position. And since our mic is a DSP algorithm, you don’t have to worry about feedback or noise leakage.
Another key ingredient to both live and recorded acoustic instrument sound is compression. To further simplify the life of the Variax Acoustic owner we decided to add a remarkably effective, yet simple to operate compressor.
Many acoustic guitarists are fond of alternate tunings, but re-tuning during a performance can often become–literally–a show-stopper. To remove this obstacle from between you and your creativity, we gave the Variax Acoustic the ability to re-tune for you, at the press of a button.
The Journey
Once we had decided what we wanted the Variax Acoustic to do, we then had to figure out how to make it work. As we refined the modeling techniques we developed for the original Variax, we created a guitar that would feel (and look) right
for the wide variety of musical environments in which this instrument would live.
A guitar this different, with so many unique abilities, deserved an equally unique approach to its onboard controls. So we worked out a way to give the player simple ways to optimize the sound for specific techniques and musical contexts. And easy access to the memory and alternate tuning functions that make the Variax Acoustic so amazingly convenient. And of course, to fill our instrument with the sounds of so many archetype acoustics, we had to audition truckloads of vintage guitars to find the ones with just the right sound. Just as we did with the original Variax, we refined our models while constantly referring back to the originals for accuracy. When each model reached the point of not only sounding like the original, but also being as much fun to play, it was done.
The result of our labors? Variax Acoustic. An entire acoustic collection in a single instrument.
2
Basic Operations
Connections
You may have already noticed that the Variax Acoustic has two output connectors: a familiar 1/4- inch jack and a second RJ45 jack protected by a rubber cap. The RJ45 connector will be the way you will connect to Line 6 products with a “Variax” input, and add additional sounds and abilities to your Variax Acoustic in the future. The uses of the RJ45 connection will be described in the owners manual for the products that offer that input; all of the operations described in this manual will use the 1/4-inch output.
OR
Simple Operation
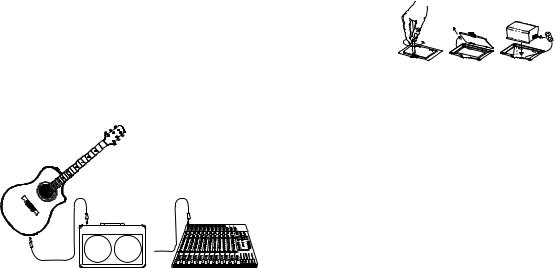
The simplest way to use the Variax Acoustic is to connect it directly to the mixer or an acoustic 3 amplifier with a standard mono guitar cable.
Battery Power
Of course, the electronics of the Variax Acoustic will need power, so to use this simple hookup, you'll need to install six AA cells in the on-board battery compartment. If you use fresh alkalines, you should get approximately 10-12 hours of operation.
Battery Low Indication
Being surprised by a battery failure is no fun, so we give you a warning when your AA’s are failing. The indicator LED, if green, will give a short red blink about once every second. If it’s red, it will give a short green blink about once every second. More on the indicator LED later…
The battery will only be used when a standard guitar cable is connected. For longest battery life, always "turn off" your Variax Acoustic by unplugging it when not in use.
NOTE: At the gig with no AA batteries? Unclip the plastic battery holder from the connector and swap in an ordinary 9V battery. This "emergency" setup will give 1 to 2 hours of battery life.

XPS Direct Box Operation
We realize that constantly changing batteries can be a real drag, so we included a more convenient option–the unobtrusive yet capable XPS.
|
|
|
PX-2 Power Supply |
|
XLR |
POWER |
|
To Amp |
1/4” |
|
ToVariax |
|
|
Tip |
Sleeve |
|
|
|
Ring |
Powering your Variax Acoustic with the XPS is easy. Use the included TRS cable (meaning "Tip- Ring-Sleeve" or also simply known as a "stereo" cable) to connect the Variax Acoustic to the INPUT jack of the XPS. Connect the PX-2 power supply to the XPS POWER jack, and use a standard mono guitar cable to connect the XPS's 1/4-inch OUTPUT to your acoustic amp or mixer.
Mono Cable


 TRS Cable
Use a standard XLR/mic cable to connect the XPS's XLR output to feed a mixer or recorder's input with a balanced, +4dBu "line level" signal. While you can also connect this to some acoustic guitar amps, you may get better results with the 1/4-inch cable, because most amps like to receive a lower level signal than the XPS's XLR puts out.
The XPS can also work as either an A/B or a Standby switch. If, for example, you want to send your DREADNOUGHT sound to the PA but want to send your ROUNDNECK sound to an acoustic amp, just use the switch: When the 1/4" indicator light is lit on your XPS, you've got your signal
routed to the 1/4" OUTPUT. When the XLR
4
indicator light is lit, your signal will now be routed to the XLR OUTPUT. If you are only using one of the outputs, selecting the other one is a handy way to mute your output.
The Phantom Menace
When sending the XLR output of the XPS to a mixing board, be sure that phantom power is either off or not supplied to the XPS. Since phantom power puts a healthy voltage on the cable, using the A/B switching function of the XPS will produce a very unhealthy pop in the speakers. The soundman will not be pleased.
XLR Hum
The XLR output of the XPS is designed to connect to the balanced inputs that are typical on good quality mixers and recording systems. Connecting the XLR output to a device with an un-balanced input may cause hum on that device when the XPS 1/4-inch output is selected.
Cable Specifications
If you happen to lose the Custom Cable supplied with your Variax Acoustic, you can obtain a replacement from Line 6 Customer Service (see page 32 of the Pilot's Handbook for contact 5 information). You can also simply use any high-
quality TRS cable up to 18 feet in length.
NOTE: If you have batteries installed in your Variax Acoustic, they will be bypassed when using your XPS Direct box. If the guitar is connected to the XPS and the XPS power is disconnected, any batteries installed in the Variax acoustic will be drained.

XLR Cable
To P.A., Mixer or Recorder
To Amp - Mono Cable
TRS Cable
6
Primary Controls
Let’s start simple, and work up to the fancy stuff:
Volume
The center slider is also the most important. Push it toward the Model Select knob to get louder. Pretend to push it away from the Model Select knob when people ask you to turn down.
Mic Position
The top slider (the one furthest away from you when you hold the guitar) allows you to alter the position of the modeled microphone. Here’s a simple way to remember how it works: As you move the slider closer to the soundhole (away from the Model Select knob), the Mic Position is also getting closer to the soundhole. Some of the instruments modeled in the Variax Acoustic don't have a soundhole, but the control will work similarly for these instruments. When the slider is close to the Model Select knob, the strings (and upper frequencies) are emphasized; when the slider is close to the soundhole, the body (and lower frequencies) are emphasized.
|
Compressor |
|
The bottom slider allows you to change the level |
|
of compression. A compressor usually has a lot of |
7 |
controls to adjust, but we take care of all the |
|
complicated stuff for you. Just push the slider toward the Model Select knob for more compression, and away from the knob for less.
Model Select
The Model Select knob has several functions. First of all, it allows you to choose the active instrument model. Rotate the knob to choose from the 16 Variax Acoustic models. The name visible in the slot is the active model. The LED will help you see the name on dark stages, or in the closet if you are very shy. The Model Select knob also lets you engage the Instant Alternate Tuning function. With a quick press on the knob, the LED will change from green to red. Now, none of the notes are where you thought they were! To learn the method to our madness, refer to the next section, Instant Alternate Tuning. But wait, there’s more: The Model Select knob also lets you save any customizations you have carried out. More on that in the upcoming Save Our Sounds section


 MIC POSITION


 VOLUME


 COMPRESSOR

.
 Loading...