


 ®
®

 2.65 OWNER’S MANUAL
40-00-0408 Rev A (For use with HX Stomp Firmware 2.65) |
© 2018 Yamaha Guitar Group, Inc. All rights reserved. |
 0•1
0•1 
Contents
Welcome to HX Stomp |
3 |
Common Terminology |
3 |
Updating HX Stomp to the Latest Firmware |
3 |
The Hardware |
4 |
Quick Start |
7 |
Hooking It All Up |
7 |
Play View |
10 |
Selecting a Preset |
10 |
Preset List |
11 |
Edit View |
11 |
Selecting Blocks/Adjusting Parameters |
11 |
Bypassing a Block |
12 |
Bypassing HX Stomp Completely |
12 |
Choosing a Block's Model |
12 |
Moving Blocks |
13 |
Copying/Pasting a Block |
13 |
Clearing a Block |
13 |
Clearing All Blocks |
13 |
Saving/Naming a Preset |
14 |
Serial vs. Parallel Routing |
14 |
Setting Path B's Output |
15 |
TAP Tempo |
15 |
The Tuner |
15 |
Dynamic DSP |
16 |
Block Order and Stereo Imaging |
17 |
The Blocks
Input
Outputs
Effects
Amp+Cab
Amp
Preamp
Cab
Impulse Response (IR)
Send/Return
Looper
Split
Mixer
U.S. Registered Trademarks
Snapshots
Using Snapshots
Copying/Pasting a Snapshot
Swapping Snapshots
Saving Snapshots
Determining Snapshot Edit Behavior
Bypass Assign
Quick Footswitch Assign
Manual Bypass Assign
Clearing Bypass Assignments
Clearing All Bypass Assignments
Swapping Stomp Footswitches
18 |
Controller Assign |
37 |
|
18 |
Assigning a Controller |
37 |
|
18 |
Clearing a Block's Controller Assignment(s) |
38 |
|
19 |
Clearing All Controller Assignments |
38 |
|
24 |
Global EQ |
39 |
|
25 |
|||
Resetting Global EQ |
39 |
||
25 |
|||
26 |
Global Settings |
40 |
|
27 |
Setting Proper Levels |
40 |
|
28 |
|||
Resetting All Global Settings |
40 |
||
29 |
|||
Global Settings > Ins/Outs |
41 |
||
29 |
|||
Global Settings > Preferences |
41 |
||
30 |
|||
Global Settings > Footswitches |
42 |
||
31 |
|||
Global Settings > EXP Pedals |
43 |
||
32 |
|||
Global Settings > MIDI/Tempo |
43 |
||
32 |
Global Settings > Displays |
43 |
|
33 |
USB Audio |
44 |
|
33 |
Hardware Monitoring vs. DAW Software Monitoring |
44 |
|
33 |
|||
DI Recording and Re-amping |
45 |
||
33 |
|||
Core Audio Driver Settings (macOS only) |
46 |
||
35 |
|||
ASIO Driver Settings (Windows only) |
46 |
||
35 |
MIDI |
48 |
|
35 |
Preset and Snapshot Recall via MIDI |
48 |
|
36 |
|||
Block Bypass via MIDI |
48 |
||
36 |
|||
Parameter Control via MIDI |
48 |
||
36 |
|||
Synchronizing Tempo via MIDI |
49 |
||
|
|||
|
MIDI CC |
49 |
|
|
Additional Resources |
51 |
© 2018 Yamaha Guitar Group, Inc. All rights reserved.
Yamaha Guitar Group, Line 6, the Line 6 logo, Ampeg, SVT, Portaflex, HX Stomp and Helix are trademarks or registered trademarks of Yamaha Guitar Group, Inc. in the U.S. and/ or other jurisdictions. Apple, Mac, macOS, iPad, iPhone, and iTunes are trademarks of Apple, Inc., registered in the U.S. and other countries. Apple is not responsible for the operation of this product or its compliance with safety and regulatory standards. Windows is a registered trademark of Microsoft Corporation in the United States and/or other countries. YouTube is a trademark of Google, Inc.
 2
2 

Welcome to HX Stomp
"50 pages for a pedal? Man, I hate reading manuals!"
I know, right?! We're not overly fond of writing them either, especially when so few people read them. What if we make a handful of super-short videos that get you up and running with HX Stomp in minutes, and you promise to not jump online and complain about having to read a 50-page manual for a pedal. Agreed?
Go here line6.com/meet-hx-stomp:
"Wheee! I love reading manuals!"
That sounds a bit sarcastic, but regardless, thank you for buying the Line 6® HX
Stomp™ pedal, one of the most powerful and flexible stompboxes ever created. We hope it helps drive your search for tonal bliss and spawns years of creativity, both on stage and in the studio.
Although you’re likely anxious to rip open the plastic and plug in, wait! At the very least, check out the HX Stomp Cheat Sheet that came in the box, and keep it handy. Then read the "Quick Start" chapter of this manual and we’ll have you up and shredding in no time.
IMPORTANT! Because the HX Stomp pedal can be used in so many ways, its factory presets are sort of all over the map. For example, any presets starting with "FX" denote tones designed with effects only, for going straight into your guitar amp. Any presets starting with "DIR" denote tones with amp, cab/IR, and effects blocks for going direct into a full-range amplification system like FRFR
(Full Range Flat Response) or PA speakers. Also note that presets starting with "4CM" won't sound at all unless your HX Stomp pedal is connected to your amp via 4-Cable Method - see page 7.
Common Terminology
While reading this manual, you may encounter several unfamiliar terms. It’s important to know what they mean. Be careful—we might toss a pop quiz your way.
Block |
Blocks are objects that represent various elements of your tone, such |
|
as amps, cabs, effects, splits, loopers, inputs, outputs, and impulse |
|
responses. The HX Stomp pedal can accommodate up to six simul- |
|
taneous amp, cab, IR, effects, and/or looper blocks, DSP permitting. |
Model |
Each processing block can accommodate one model (or in some |
|
cases, two models). HX Stomp includes over 77 guitar and bass amp |
|
models, 37 cab models, 16 mic models, and 200 effects models. |
Preset |
A preset is your tone. It consists of all blocks, snapshots, footswitch |
|
assignments, and controller assignments. |
Controller |
Controllers are used to adjust various parameters in real time. For ex- |
|
ample, an external expression pedal can be used to control wah, or |
|
the mod wheel on your MIDI keyboard can be used to control delay |
|
feedback and reverb depth. |
Send/ |
The HX Stomp stereo TRS Send and separate left and right Returns are |
Return |
for connecting to your guitar amp via 4-Cable Method - see page 7. |
|
used to insert your favorite stompboxes anywhere in the signal flow or |
IR |
IRs (Impulse Responses) are mathematical functions representing the |
|
sonic measurements of audio systems. HX Stomp can store up to 128 |
|
custom or third-party IRs at a time.* See "Impulse Response (IR)" |
 *NOTE: To import IRs into your HX Stomp hardware, you'll need to download
  and install the latest Line 6 HX Edit application. The free HX Edit app is not only an indispensable librarian for managing and backing up all your presets and IRs, but also provides a full-size display for easy editing, right on your Mac or Windows® computer! Visit line6.com/software to get it now.
Updating HX Stomp to the Latest Firmware
Line 6 is continually improving HX family products. Updating the HX Stomp pedal will ensure you always have the latest models, features, and factory presets.
1.Download and install the latest version of Line 6 Updater from line6.com/software. (If using a Windows computer, you'll also need to download and install the HX Stomp USB Driver for Windows.)
2.Connect HX Stomp to your computer via the supplied USB cable and turn it on.
3.Launch Line 6 Updater, log into your Line 6 account, and follow the prompts.
 3
3 
The Hardware
IN
16 |
MIDI |
OUT/THRU |
17

1 |
06B |
1 |
2 |
4 |
3 |
|
|
ACTION |
VOLUME |
||||
Pastor of Muppets |
VIEW |
|
7 |
|||
|
|
|
|
SAVE |
|
|
Particle |
Dynamix |
TAP/ |
|
|
|
|
Verb |
Flanger |
TUNER |
|
5 |
|
|
|
|
|
PAGE |
PAGE |
|
|
6
8
9
EXP 1/2 |
|
INPUT |
OUTPUT BAL/UNBAL |
USB DC IN |
|
FS 4/5 |
L/MONO |
RIGHT |
L/MONO |
RIGHT |
9VDC 3A |
|
|
|
|
|
|


 15
15 

10 |
11 |
12 |
13 |
14 |
SEND RETURN / AUX IN
STEREO L/MONO RIGHT

 18
18
 4
4 
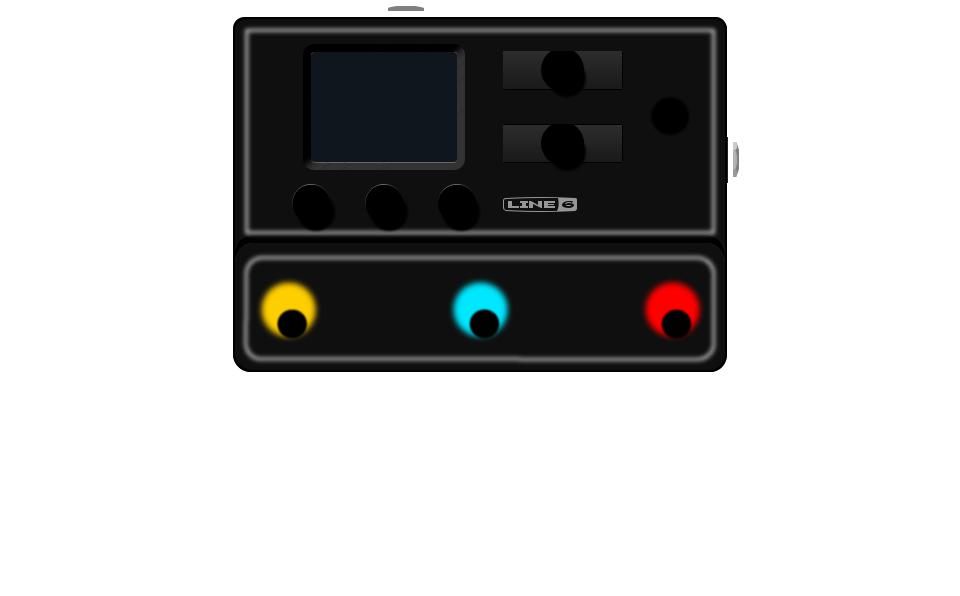
1.Main Display This color LCD is your window into the power of HX Stomp.
2. VIEW If you ever get lost, press this button to return home. Press
  again
again
to toggle between the two main Home views—see "Play View" and "Edit View".
3. ACTION Press this button to open the action panel for the selected block or menu. From Edit view, the action panel lets you move, copy, paste, and clear blocks. Other menus may have unique action panels; for example, the Global Settings action panel lets you reset all global settings at once.
Press  and ACTION together to open the Save menu for renaming and saving changes to a preset. Press both buttons twice to quick save. See "Saving/Naming a Preset".
4. Upper Knob In Play view, turn this knob to select a preset. Press this knob to open the preset list. In Edit view, turn this knob to select a block for editing. Press this knob to bypass/enable the selected block.
5. Lower Knob In Edit view, turn this knob to change the current block's model. Press this knob to open the model list. See "Choosing a Block's Model".
TIP: Press the Upper Knob and Lower Knob together to completely bypass
HX Stomp. The display will read "Analog [or DSP] bypass! Press any switch."
6.  PAGE/PAGE
  In Play view, press
  PAGE or PAGE
  to change foot-
switch modes. In Edit view, press to view more parameters for the selected block or menu. Press both  PAGE and PAGE
  to dive deeper into HX Stomp, and
you'll find Controller Assign, Global Settings, and other menus.
7.VOLUME Turn this knob to control the main output and headphones volume.
8.Knobs 1-3 In Edit view, turn one of the three knobs below the main display
to adjust the parameter's value above; press the knob to reset the parameter's value. If a rectangular button appears above a knob, press the knob to engage its function.
SHORTCUT: For most time-based parameters such as delay time or modulation speed, press the knob to toggle between setting the value in ms or Hz and note divisions (1/4-note, dotted 1/8-note, etc.).
SHORTCUT: Controllers can be assigned to most parameters. Press and hold a parameter’s knob to quickly jump to the "Controller Assign" page for that parameter.
9. Footswitches 1-3 These capacitive, touch-sensitive footswitches have colored LED rings that tell you the current state of the assigned block or its function. See "Play View" for more information.
SHORTCUT: While in Stomp footswitch mode and in the Edit view screen, touch (but don’t press) a footswitch for two seconds to create a Bypass Assignment for the selected block.
SHORTCUT: While in Stomp footswitch mode, touch and hold (but don’t  press) two switches to swap all assignments between them.
SHORTCUT: While in Stomp or Scroll footswitch modes, touch (but don’t press) TAP to briefly display the tempo panel. This lets you quickly fine-tune the current tempo without navigating to the Global Settings > MIDI/Tempo menu.
10. EXP 1/2, FS 4/5 Connect an expression pedal here to adjust a wide variety of parameters. With a Y-cable (tip-ring-sleeve 1/4" jack, split to two tip-sleeve 1/4" jacks), two expression pedals can be connected. Alternatively, one (or with a Y-cable, two) external footswitches can be added to access additional stomps, presets, snapshots, etc. (FS4=tip, FS5=ring). To set this jack's function(s), see page 41. By default, this jack is set to accommodate a Mission SP1-L6H Line 6 Expression Pedal, which has a toe switch that toggles between EXP 1 (Wah/ Pitch Wham) and EXP 2 (Volume/Pan). For external footswitches, the momentary (unlatched) type should be used.
11. INPUT L/MONO, RIGHT Connect your guitar, bass guitar, or mono pedals to the L/MONO input. Connect stereo pedals, keyboards, synths, or modelers to both the L/MONO and RIGHT inputs.
12. OUTPUT L/MONO, RIGHT These 1/4" outputs can accommodate either unbalanced TS cables to connect to your guitar amp or other pedals or balanced TRS cables to connect to your mixing console or studio monitors. When connecting to a mono pedal or single amp, connect only the L/MONO 1/4" jack.
13. USB HX Stomp also functions as a high quality multichannel 24-bit/96kHz audio interface for Mac and Windows computers, with DI, re-amping and MIDI functionality built right in. Use of a USB 2.0 or 3.0 port is required—do not use an external USB hub. HX Stomp can also record to an Apple iPad or iPhone mobile device (with optional Apple Camera Connection Kit).
14. DC In Line 6 recommends using only the supplied DC-3G power supply. Yes, we know it's large, but the HX Stomp pedal packs a lot of circuitry into its tiny housing. To ensure the same signal integrity of Helix®, Helix Rack/Control, and Helix LT devices, we needed a burly power supply.
That said, Line 6 has provided a list of third-party supplies that we've tested with HX Stomp, which can be found here: https://line6.com/support/page/kb/effects-
controllers/.
 5
5 

15. Power Switch Nine out of ten blues dentists agree: HX Stomp is more fun when powered on. The tenth dentist is a nihilist.
16. MIDI IN, OUT/THRU Connect HX Stomp to your MIDI gear for sending and receiving program changes, continuous controllers, and other MIDI messages. See "MIDI" for more information.
17. Phones Out Connect stereo headphones here; turn the VOLUME knob to adjust volume.
IMPORTANT! Always turn the VOLUME knob down before connecting headphones. Protect your hearing!
"What?!"
I said... ALWAYS TURN THE VOLUME KNOB DOWN BEFORE CONNECTING HEADPHONES. PROTECT YOUR HEARING!
18. SENDS/RETURNS L/R These 1/4” ins and outs can be used as an FX loop for inserting external stompboxes between specific blocks in HX Stomp, or as inputs and outputs for running 4-Cable Method rigs. See "HX Stomp in 4-Cable Method". Alternatively, the L/MONO and RIGHT inputs can act as an always-on Aux In for monitoring mixers, keyboards, drum machines or MP3 players. To set the function of the Return L/R jacks, see "Global Settings > Ins/Outs"
 6
6 
Quick Start
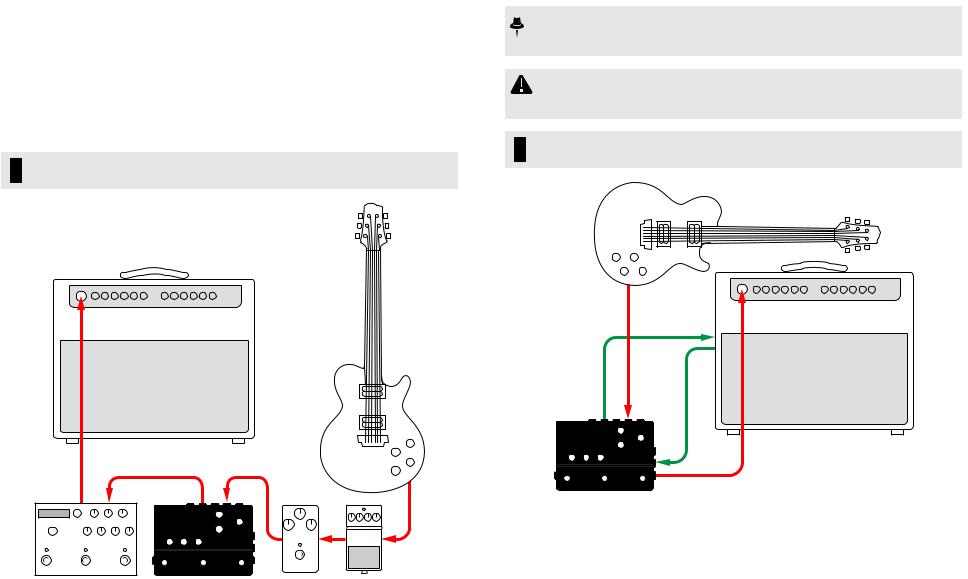
Hooking It All Up
There are many ways to connect HX Stomp to other gear, and the following pages illustrate only a few.
HX Stomp on a Pedalboard
Although HX Stomp has amp and cab modeling, there's no reason you have to use it, especially if you have a favorite guitar or bass amp. All six processing blocks can be dedicated to effects and effects control.
 TIP: Look for factory presets with names starting with "FX." These have been
  created with effects blocks only.
HX Stomp in 4-Cable Method
"4 Cable-Method" is a popular and flexible way of hooking things up, allowing you to route some effects blocks (most often drives, distortions, wahs, and compressors) before your amp's preamp and other effects blocks (often time-based effects like delays and reverbs) in its effects loop.
 NOTE: The effects loops on most amplifiers run at instrument level. If your amp's effects loop happens to run at line level, you should set the inputs and outputs of
HX Stomp to line level as well. See "Setting Proper Levels".
IMPORTANT! Make sure you add a Send/Return > Mono > FX Loop block at the point in your signal flow where you wish your amp's preamp to be, otherwise you won't hear anything.
TIP: Look for factory presets starting with "4CM." Note that these presets will not pass any audio unless hooked up in the method below!
GUITAR IN
|
AMP |
|
RETURN |
|
AMP |
|
SEND |
L/MONO |
L/MONO |
OUT |
IN |
4CM |
RETURN |
|
|
L/MONO OUT L/MONO IN |
L/MONO |
|
SEND |
FX |
|
 7
7 

HX Stomp with Powered Speakers
Depending on how complex your tones are, HX Stomp may be able to act as your entire processing rig, providing amp modeling, cab modeling or cab IRs (Impulse Responses), effects, looping, and even a tuner.
When connecting HX Stomp to a powered speaker (or two powered speakers in stereo), set the main outputs to line level. See "Setting Proper Levels".
With a Y cable, you can connect up to two expression pedals and/or momentary type footswitches to HX Stomp's rear panel EXP 1/2 | FS 4/5 jack. Alternatively, you can connect a single Mission SP1-L6H Line 6 Expression Pedal, which has a toe switch built in that can toggle its function between EXP 1 (Wah by default) and EXP 2 (Volume by default).
 TIP: Look for factory presets starting with "DIR" (short for direct). These have
  been created with a full tone's worth of amps, cabs, and effects.
HX Stomp in a Hybrid Amp/Direct Setup
When playing live, some guitarists and bassists love running their signal direct to the FOH (Front of House) console but prefer the feel of standing in front of a real amp. HX Stomp can accommodate both playback systems simultaneously.
Place a Send/Return > Mono > Send L block directly before any Amp or Amp+Cab block in your signal flow. This will be the point where the signal is tapped and sent to your real amp. Then the full signal flow with Amp and Cab/IR blocks can be sent to the FOH console.
 TIP: Look for factory presets starting with "BAS." These have been created
  with a Send/Return > Mono > Send L block positioned after Effects blocks and before the Amp or Amp+Cab block. Although they've been designed with bass players in mind, there's nothing wrong with swapping out the bass amp and cab for a guitar amp and cab (or IR).
L/MONO OUT OR L/R |
L/MONO |
(FX+AMP+CAB/IR) |
IN |
BAS |
|
|
SEND |
|
(FX ONLY) |
|
Y-CABLE |
|
L/MONO OUT |
|
|
OR L/R STEREO |
OR |
OR |
|
||
DIR |
|
|
 8
8 

HX Stomp as DSP Expansion
Let's face it—there are a lot of great digital guitar products out there and maybe you just can't part with your favorite box. But maybe you're also a bit curious about HX amp modeling and effects. Decisions, decisions.
Fortunately, you can have both. If you place HX Stomp in the stereo effects loop of your favorite modeler or profiler, it's like instantly adding 77 amps and 200 effects to your existing arsenal. Plus, the six processing blocks in HX Stomp are utilized in addition to your modeler's DSP, so you get more simultaneous amps and effects. You may even be able to synchronize presets and tempi between the two with a single MIDI cable; see your modeler's documentation for more information.
HX Stomp in the Studio
HX Stomp also includes a multichannel USB audio/MIDI interface for your production studio, with professional-quality A/D/A conversion, 123dB of dynamic range, and a programmable impedance circuit. This makes it the perfect front end for the Helix Native plug-in.
If you aren't using Helix Native, HX Stomp can re-amp, or use USB audio streams to process tracks or busses in your DAW (Digital Audio Workstation) after they're recorded. See "USB Audio" for more information.
|
R OUTPUT |
L OUTPUT |
|
|
|
|
USB |
|
|
|
L/MONO IN |
MIDI OUT |
RETURN |
SEND |
RETURN L/R |
|
L/R |
L/R |
|
L/R OUT |
L/R IN |
MIDI OUT |
MIDI IN |
L/R AUDIO OUT |
MIDI IN
 9
9 

Play View
HX Stomp has two main views—Play view and Edit view. Play view is typically used when performing or jamming.
1. Press  VIEW to select Play view.
The current preset number and name appear on the upper half of the display and the current footswitch mode's assignments appear on the lower half:
16B 1
Pastor of Muppets
Dynamix Harmony TAP/
Flanger Delay TUNER
2. Press PAGE or PAGE to select one of four footswitch modes
(see below).
Selecting a Preset
HX Stomp stores 42 banks of three presets (A, B, and C) for a total of 126 presets.
1.If not already there, press  VIEW to select Play view.
2.Press  PAGE or PAGE
  to select Preset Mode (see below).
3.Press FS1+FS2 (or FS2+FS3) to choose the desired bank.
The bank's presets flash, indicating they are ready to load:
17A Not Adorable
17B Crystal Lettuce
17C Marketing Bullet
17A 17B 17C
4. Press one of the footswitches to load its preset.
Alternatively, turn the Upper Knob to select a preset.
Stomp Mode |
|
Scroll Mode |
Dynamix Harmony |
TAP/ |
PRESET PRESET TAP/ |
Flanger Delay |
TUNER |
TUNER |
Step on FS1/FS2 to turn any assigned block(s) on and off.
Touch FS1 or FS2 repeatedly to view additional assignments, if any.
Step on FS3 to set the tempo. Hold FS3 to open the tuner.
Touch FS3 to open the tempo panel.
Step on FS1 to select the previous preset.
Step on FS2 to select the next preset.
Hold FS1+FS2 to toggle between Preset Up/Down and Snapshot Up/Down
Step on FS3 to set the tempo. Hold FS3 to open the tuner.
Touch FS3 to open the tempo panel.
Preset Mode
16A 16B 16C
Step on a footswitch to select a preset (A, B, or C).
Step on FS1+FS2 to queue the previous bank of presets.
Step on FS2+FS3 to queue the next bank of presets.
Snapshot Mode
1 2 3
Step on a footswitch to select Snapshot 1, 2, or 3.
Step on FS1+FS2 to queue the previous bank of presets.
Step on FS2+FS3 to queue the next bank of presets.
See "Snapshots" for more information.
 10
10 
Preset List
1.If not already there, press  VIEW to select Play view.
2.Press the Upper Knob to open the Preset list:
16A Bel Haven, Yo!
16B Pastor of Muppets
16C Stolarskyvision
17A Not Adorable
1
ReorderPreset Snapshot CC69:000PC:061
Turn the Upper Knob to select a preset.
Turn Knob 1 (Reorder Preset) to move the selected preset up and down the list.
Turn Knob 2 (Snapshot) to select Snapshot 1, 2, or 3 without having to be in Snapshot footswitch mode. See "Snapshots" for more information.
 TIP: The grayed out numbers above Knob 3 represent the messages re-
  quired to recall the current preset (PC:XXX) and snapshot (CC69:XXX) from an external MIDI controller or sequencing software.
Edit View
HX Stomp has two main views—Play view and Edit view. Edit view is used for creating or tweaking your tones.
Press  VIEW to select Edit view.
Colored blocks representing amps, cabs, effects, and other items appear on the upper half of the display and the selected block's parameters appear on the lower half:
16B Pastor of Muppets
 Harmony Delay
1/8 |
|
37% |
|
35% |
|||
|
|
|
|
|
|
|
|
Time |
Feedbk |
Mix |
|||||
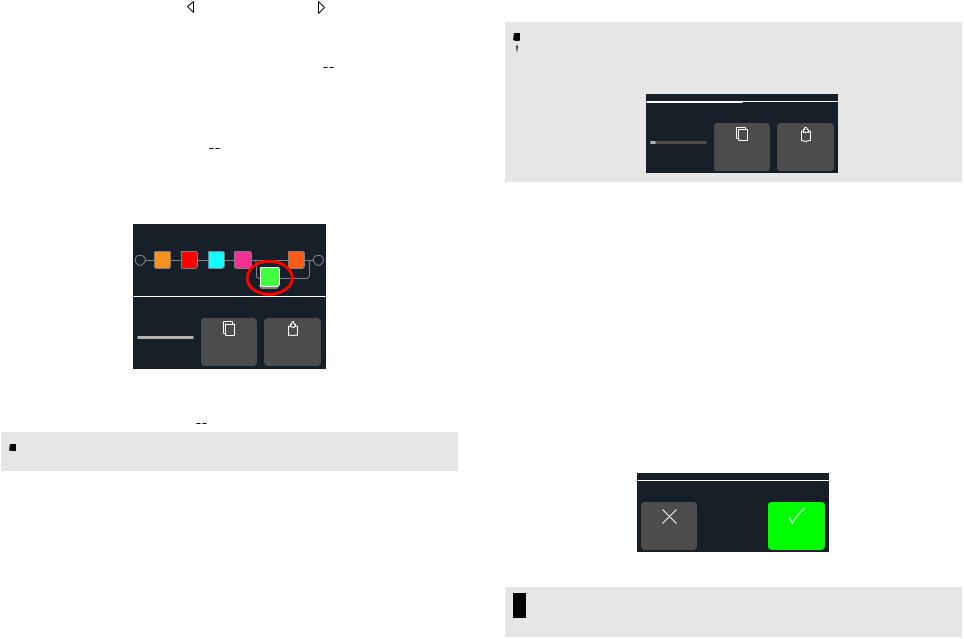
Selecting Blocks/Adjusting Parameters
Each preset in HX Stomp can accommodate up to six blocks. Blocks are objects that represent various elements of a preset, such as amps, cabs, effects, or even a
1 Switch Looper. In addition to the six processing blocks, each preset has an Input block, Output block, and for presets with two parallel paths, Split and Mixer blocks.
1.While in Edit view, from Stomp footswitch mode, briefly touch
(but don’t press) the footswitch assigned to the block (if any).
If multiple blocks are assigned to a footswitch, touch the top of the switch repeatedly until the desired block is selected.
Alternatively, turn the Upper Knob to select blocks.
The selected block appears with a white outline:
2. Turn Knobs 1-3 below the screen.
Some blocks have more than one page of parameters. In this case, the center inspector line will display a thin colored scroll bar:
 Harmony Delay
3. Press PAGE or PAGE to access more parameters (if available).
SHORTCUT: For most time-based parameters such as delay time or modulation speed, press the knob to toggle between setting the value in ms or Hz and note divisions (1/4-note, dotted 1/8-note, etc.).
 11
11 
Bypassing a Block
1.If not already there, press  VIEW to select Edit view.
2.Turn the Upper Knob to select a block and then press it to toggle the block on and off.
A bypassed block appears semi-transparent and, if assigned to a Stomp mode footswitch, its LED ring dims:
|
BLOCK ON |
BLOCK BYPASSED |
|||||
|
|
|
|
|
|
|
|
|
|
|
|
|
|
|
|
|
|
|
|
|
|
|
|
Bypassing HX Stomp Completely
1. Press the Upper Knob and Lower Knob together.
While HX Stomp is completely bypassed, the inspector displays the following:
ANALOG BYPASS |
|
DSP BYPASS |
|
|
|
Analog Bypass! |
|
DSP Bypass! |
Press any switch |
|
Press any switch |
|
|
|
 NOTE: There are two types of All Bypass in HX Stomp: Analog bypass (sometimes called "true bypass"), where mechanically switching relays route your signal directly from the inputs to the outputs with no processing or A/D/A conversion, and DSP bypass, where any delay echoes and reverb tails decay naturally. By default, HX Stomp is set for Analog bypass, but this behavior can be set from "Global Settings > Preferences".
2. Press any footswitch.
HX Stomp returns to normal operation.
TIP: You can also re-purpose the TAP/TUNER switch (or external footswitch FS4 or FS5) to All Bypass. See "Global Settings > Footswitches".
Choosing a Block's Model
1.If not already there, press  VIEW to select Edit view.
2.Turn the Upper Knob to select the desired block, then turn the Lower Knob to change its model.
To create a new block, turn the Upper Knob to select an empty location and then turn the Lower Knob.
Selecting models within the same category can be very quick. However, as HX Stomp has hundreds of items to choose from, using this method to, say, change a mono distortion block (beginning of the list) into a 1 Switch Looper block (end of the list) is very slow. Instead, you should open the model list:
3. Press the Lower Knob to open the model list:
CATEGORY |
SUBCATEGORY |
MODEL |
Category |
Delay |
Delay |
EQ |
Mono |
Transistor Tape |
Modulation |
Stereo |
Cosmos Echo |
Delay |
Legacy |
Harmony Delay |
Reverb |
|
Bucket Brigade |
Pitch/Synth |
|
Adriatic Delay |
Most model categories include subcategories. For example, effects in the "Mono" and "Stereo" subcategories are HX (Helix) models. Effects in the "Legacy" subcategory are taken from the classic Line 6 M13®, M9®, M5®, DL4™, MM4™, FM4™, and DM4™ pedals. Amp+Cab and Amp models have Guitar and Bass subcategories. Cab models have Single and Dual subcategories.
Turn the Lower Knob to select items in a list.
Press the Lower Knob (or PAGE ) to view a category or subcategory’s contents.
Press  PAGE to go back one level.
 NOTE: Effects blocks with stereo or legacy models display small icons to the right of the model name:
|
MONO |
|
|
STEREO |
|
|
LEGACY |
|
Courtesan Flange |
Courtesan Flange |
Analog Flanger |
|
|||||
4.3 |
7.1 |
5.3 |
4.3 |
7.1 |
5.3 |
0.055Hz |
33% |
88% |
IMPORTANT! If you encounter items in the list that are grayed out or unavailable, this means the preset cannot accommodate that category, subcategory, or model. See "Dynamic DSP".
 12
12 
4. Using the Lower Knob, PAGE, and PAGE , select the desired category, subcategory, and model.
5.To close the model list, select an item in the far right column and press the Lower Knob again (or press  to cancel).
Moving Blocks
1.If not already there, press  VIEW to select Edit view.
2.Turn the Upper Knob to select any block (other than Input or Output) and press ACTION.
The block appears "picked up" and the action panel appears.
 Turn to move
 Harmony Delay
B
Copy Paste
Path Block Block
3.Turn the Upper Knob to move the block.
4.Press ACTION again (or  ) to close the action panel.
 NOTE: To move a block between parallel paths A and B, press ACTION and then
  turn Knob 1 - See "Serial vs. Parallel Routing".
Copying/Pasting a Block
Blocks can be copied and then pasted onto either another block location, or into an entirely different preset.
1.From Edit view, select the block you wish to copy and press ACTION.
2.Press Knob 2 (Copy Block).
3.Select the location you wish to paste the block—even in a location within different preset—and press ACTION.
4. Press Knob 3 (Paste Block).
 NOTE: Inputs, Outputs, Splits, Mixers, and Loopers can also be copied and
 pasted, where permitted. If you, for example, try pasting the Looper into the Split block's location, Knob 2 (Paste Block) will be grayed out. Furthermore, if the destination preset cannot accommodate the copied block, the header will briefly read “DSP full!” See "Dynamic DSP".
 DSP full!
A
Copy Paste Path Block Block
Clearing a Block
1.From Edit view, select the block you wish to clear and press ACTION.
2.Press PAGE  and press Knob 1 (Clear Block).
Clearing All Blocks
Clearing all blocks removes all processing blocks and resets the signal flow to serial. It does not affect Input and Output blocks.
1.Press ACTION.
2.Press PAGE  and press Knob 2 (Clear All Blocks).
The following dialog appears:
 Clear all blocks?
Cancel |
OK |
3. Press Knob 3 (OK).
 TIP: To retain your changes, remember to Save after making edits before switch-
  ing to a different preset (see next section). Once a preset change is made, all edited settings in an unsaved preset are discarded.
 13
13 
Saving/Naming a Preset
SHORTCUT: To quickly save any changes to the current preset, press  and ACTION together twice. Remember the mantra - Save early and save often!
1. Press  and ACTION together to open the Save Preset screen:
Save Preset
Pas t o r o f Muppe t
 16B Pastor of Muppet
P
Cancel Character Save
Turn the Upper Knob to move the cursor left and right.
Turn Knob 2 (Character) to change the selected character.
Press PAGE |
and then Knob 1 (Delete) to delete the selected character and |
shift all following characters to the left. |
|
Press PAGE |
and then Knob 2 (Insert) to insert a space and shift all follow- |
ing characters to the right.
SHORTCUT: Press Knob 2 (Character) to cycle between upper case, lower case, 0, and [SPACE].
2.Turn the Lower Knob to choose the preset location you wish to overwrite.
Any of the 126 presets can be overwritten.
3. Press Knob 3 (Save).
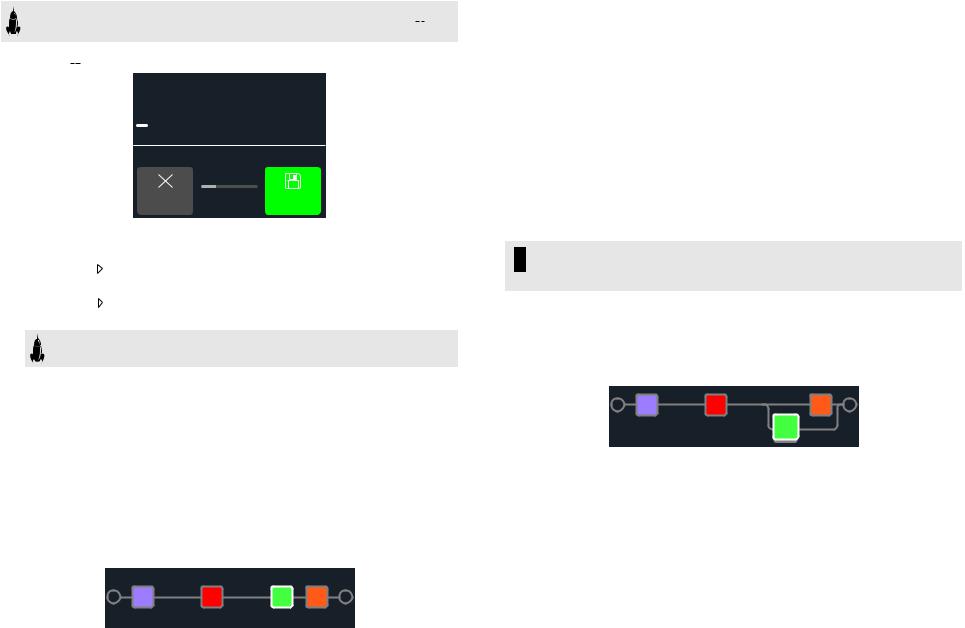
Serial vs. Parallel Routing
Formanyguitartones,aserial(asingle,stereopath)signalflowismorethanadequate.
For example, the preset below has a Pitch/Synth block (violet) into an Amp+Cab block (red) into a Delay block (green) into a Reverb block (dark orange):
For more sophisticated tones, a parallel (two stereo paths) signal flow can be created.
This lets one split the signal into two stereo paths, process them separately, and mix the two paths back together.
A few advantages of parallel routing:
•If a reverb follows a delay on a serial path, the delay's echoes will have reverb applied. Likewise, if a delay follows a reverb on a serial path, the reverb's tail will have distinct echoes. Conversely, if a reverb and delay are on separate parallel paths, they won't affect one another and can sometimes result in cleaner, more defined notes
•If your effect blocks don't have Mix or Blend controls, adding them to a parallel path allows the dry guitar or bass signal to pass through unaffected and be blended with the effected signal. This can be especially effective when blending clean and distorted bass signals
•Instead of a single Amp+Cab block, you may be able to run a standalone Amp block into two parallel Cab blocks or Impulse Responses (or one of each)
•With stereo rigs, by using the Mixer block, each path can be panned freely between the left and right speakers or amps. Different delay and/or reverb models panned hard left and hard right can sound particularly huge
 TIP: Remember that with parallel routing, both paths A and B are stereo paths,
  allowing you to utilize either mono or stereo processing blocks on each, and pan as desired. Also see "Block Order and Stereo Imaging" on page 17.
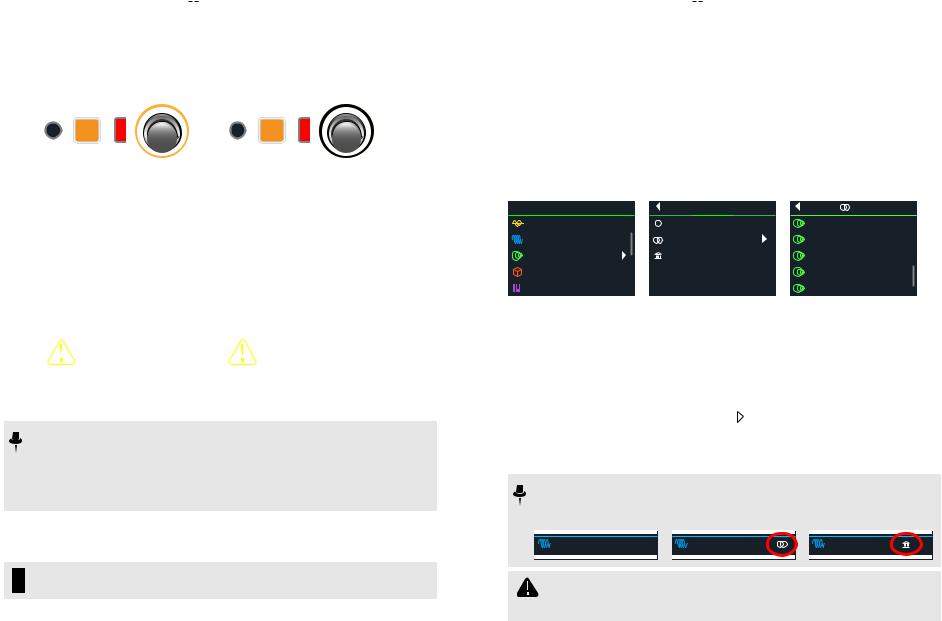
1.From Edit view, turn the Upper Knob to select a processing block and press ACTION to pick it up.
2.Turn Knob 1 (Path) to select "B."
The Delay block is moved to a newly created parallel path B.
In the preceding illustration:
Our guitar signal goes into the purple Pitch block and then the red Amp+Cab block. The signal is split to path A (upper) and path B (lower).
Stereo path A (upper) is sent to the dark orange Reverb block and stereo path B (lower) is sent to the green Delay block.
Stereo paths A and B are merged together and sent to the Output.
3.Press ACTION again to drop the Delay block.
To remove path B, return all blocks that reside on path B (lower) to path A (upper).
 14
14 

Setting Path B's Output
There may be situations where you want parallel path B to be sent to a completely different set of outputs.
1.From Edit view, turn the Upper Knob to select the point where the two paths merge.
The Mixer block appears only when selected:
2. Press ACTION and turn Knob 1 (Path) to select "B."
The Mixer moves to path B and a new Output block is created. In this case, path A is being sent from the HX Stomp Main L/R outputs, and path B is being sent from its stereo Send L/R output:
3. Press ACTION again to drop the Mixer block.
TAP Tempo
From either Stomp or Scroll footswitch modes, press FS3 (TAP/ TUNER) repeatedly to set the tempo in BPM (Beats Per Minute).
Certain Delay and Modulation parameters such as Time and Speed can be represented with fixed numeric values (ms or Hz) or note values (1/4-note, dotted 1/8-note, etc.). When set to note values, the parameter will follow Tap Tempo or incoming MIDI clock. Press the parameter knob to toggle between ms (or Hz) and note values.
MANUAL TIME/SPEED |
TAP/MIDI CLOCK TEMPO |
||||
Harmony Delay |
|
Harmony Delay |
|
||
750 ms |
37% |
35% |
1/4 |
37% |
35% |
Time |
Feedbk |
Mix |
Time |
Feedbk |
Mix |
The current tempo can also be set from "Global Settings > MIDI/Tempo".
SHORTCUT: From Stomp or Scroll mode, touch FS3 (TAP/TUNER) to briefly display Tempo parameters.
 Tempo
Tempo
|
|
|
Preset |
120.0 |
|
||||
|
|
|
|
|
|
|
|
|
|
|
|
|
Tempo |
BPM |
|||||
|
|
|
|
|
|
||||
Knob |
Parameter |
Description |
|
|
|
||||
2 |
Tempo |
Choose whether the tempo is stored and recalled with |
|||||||
each snapshot, recalled with each preset, or is applied |
|||||||||
|
|
globally across all presets and snapshots. |
|||||||
3 |
BPM |
Depending on the Knob 2 (Tempo) setting, this Beats Per |
|||||||
Minute value is saved per snapshot, per preset, or globally. |
|||||||||
|
|
||||||||
The Tuner
1. If not already there, press  VIEW to select Play view.
2. Press PAGE or PAGE to select either Stomp Mode or Scroll
Mode.
FS3 appears as TAP/TUNER.
3. Hold FS3 (TAP/TUNER) until the Tuner screen appears:
 A
A

Tuner
|
Mute |
|
440 Hz |
On |
||
|
|
|
|
|
|
|
Output |
Refrnc |
Offsets |
||||
4. Pluck an individual string on your guitar.
When the colored box is left of center, your string is flat. When the colored box is right of center, your string is sharp. When the colored box approaches the correct tuning, a second smaller colored box can be used for more precision. When both arrows are illuminated, your string is perfectly in tune.
 15
15 
5. To exit the Tuner, step on any footswitch.
All tuner settings are global.
TIP: If you have a favorite pedal tuner and wish to use it instead of the tuner in HX Stomp, connect the HX Stomp Send output to your tuner's input and turn Knob 1 (Output) to select "Send L/R." This way, every time you hold the TAP footswitch, HX Stomp will automatically route the signal to your favorite tuner.
Tuner Settings
Page Knob |
Parameter |
Description |
||
|
|
|
Determines the active output while the Tuner screen |
|
|
1 |
Output |
is active. If you prefer to hear nothing while tuning, |
|
|
choose "Mute." Normally, you should choose "Main |
|||
1 |
|
|
L/R." |
|
2 |
Refrnc |
If you'd like to tune to a reference other than stan- |
||
|
dard 440 Hz, select from 425 to 455 Hz. |
|||
|
|
|
||
|
3 |
Offsets |
Enables the Tuner offsets displayed on Pages 2 and |
|
|
3. |
|||
|
|
|
||
|
1 |
String 6 Offset |
Some guitarists feel that tuning certain strings |
|
2 |
2 |
String 5 Offset |
||
slightly sharp or flat in relation to concert tuning can |
||||
|
3 |
String 4 Offset |
improve intonation. String offsets calibrate the tuner |
|
|
|
|
so that these slightly out-of-tune pitches appear |
|
|
1 |
String 3 Offset |
||
|
as in tune. String 6 is low E and String 1 is high |
|||
3 |
2 |
String 2 Offset |
E. Tuning offsets won't be applied unless Knob 3 |
|
|
|
|
(Offsets) on Page 1 is turned on. |
|
|
3 |
String 1 Offset |
||
|
|
|||
Dynamic DSP
Like nearly all modern audio processors, the HX Stomp engine is based on DSP (Digital Signal Processing). Some models require many times more DSP horsepower than others, so it makes logical sense that fewer of those models could exist in a tone. To work around this, some processors restrict you to one amp, one reverb, one delay, etc. With HX Stomp, who are we to say you can't run six distortions in a row? Or two Amp blocks into two IRs? Or two parallel mods into two parallel delays into two parallel reverbs for some massive swirly stereo ambient wash? We feel it's important to let you keep adding whatever you want to your tone, even if you may eventually run out of DSP.
To see which models can be added to the current preset, from Edit view, press the Lower Knob to open the model list.
Grayed out items cannot be accommodated and are skipped over - See "Selecting Blocks/Adjusting Parameters".
 Amp+Cab


 A30 Fawn Brt
 Matchstick Ch1
 Matchstick Ch2
 Matchstick Jump
 Mandarin 80
Tips to Optimize DSP
•Some block types use much more DSP than others, such as amps, cabs, IRs, and pitch shifters. Not surprisingly, the Amp+Cab block uses the most. EQ, Dynamics, Volume/Pan, and Send/Return blocks use relatively little
•Some models may use more DSP than others in the same category. This is especially true with amp models
•Instead of a parallel path with two Amp+Cab blocks or two separate Amps and Cabs, try adding a single Amp block followed by a single Cab > Dual block
(mixing two different Cabs can provide some substantial variations)
•The stereo version of an effects block will use roughly twice as much DSP as a mono version of the same block. Likewise, the dual version of a cab block will use roughly twice as much DSP as the single version
•Some model categories have “Simple” blocks, which utilize less DSP than others
•Effects models in the Legacy subcategory generally—but not always—use less DSP than those in the Mono and Stereo subcategories
•Instead of toggling between two of the same amp or effects blocks (with different settings), use controllers or snapshots to instantly adjust parameters within a single block. You'd be surprised at how wildly different tones you can get from simply adjusting an amp model's tonestack knobs
 16
16 
 Loading...