


Vetta Combo
Table of contents
 Loading...
An in-depth exploration of the revolutionary
technologies and tonal pleasures of the Vetta.
Electrophonic Limited Edition. Also available at www.line6.com. Revision C.
Pilot’s Handbook

SERIAL NO:
Y
OU
SHOULD
READ
THESE
I
MPORTANT
S
AFETY
I
NSTRUCTIONS
K
EEP
THESE
INSTRUCTIONS
IN
A
SAFE
PLACE
The serial number can be found on the back panel of your Vetta. It’s the
number that begins with “(21)”. Please note it here for future reference:
CAUTION:
To reduce the risk of fire or electric shock,
do not remove screws. No user-serviceable parts inside. Refer
servicing to qualified service personnel.
The lightning symbol within a triangle means
“electrical caution!” It indicates the presence
of information about operating voltage and
potential risks of electrical shock.
The exclamation point within a
triangle means “caution!” Please
read the information next to all
caution signs.
Vetta Pilot’s Handbook © 2001, Line 6, Inc.
Before using your Vetta, carefully read the applicable items of these operating instructions and safety suggestions:
1. Obey all warnings on the Vetta and in this Pilot’s Handbook.
2. Do not place near heat sources, such as radiators, heat registers, or appliances which produce heat.
3. Guard against objects or liquids entering the enclosure.
4. Connect only to AC power outlets rated 100-120V or 230V 47-63Hz (depending on the voltage range of the
unit; refer to the back panel). Current ratings should be 4A for the 120V range and 2 A for the 230V range.
5. Do not step on power cords. Do not place items on top of power cords so that they are pinched or leaned on.
Pay particular attention to the cord at the plug end and the point where it connects to the amp.
6. Unplug your Vetta when not in use for extended periods of time.
7. Do not perform service operations beyond those described in the Vetta Pilot’s Handbook. In the following
circumstances, repairs should be performed only by qualified service personnel:
• liquid is spilled into the unit
• an object falls into the unit
• the unit does not operate normally or changes in performance in a significant way
• the unit is dropped or the enclosure is damaged
8. Prolonged listening at high volume levels may cause irreparable hearing loss and/or damage. Always be sure
to practice “safe listening.”
WARNING:
To reduce the risk of fire or
electric shock, do not expose this appliance to
rain or moisture.
CAUTION:
This equipment has been tested and found to comply with the limits for a Class B digital device
pursuant to Part 15 of FCC Rules. Operation is subject to the following two conditions: (1) This device may not cause
harmful interference, and (2) this device must accept any interference received, including interference that may cause
undesired operation.


Please Note:
Line 6, Vetta, POD and Flextone are trademarks of
Line 6, Inc. All other product names, trademarks,
and artists’ names are the property of their
respective owners, which are in no way associated
or affiliated with Line 6. Product names, images,
and artists’ names are used solely to identify the
products whose tones and sounds were studied
during Line 6’s sound model development for this
product. The use of these products, trademarks,
images, and artists’ names does not imply any
cooperation or endorsement.

Welcome to Vetta ......................................................................... 1•1
Really
Quick Start Guide...............................................................2•1
Knobs, Buttons, Flashing Lights
Front Panel: The Big Picture ...............................................................................................3•1
Navigation .....................................................................................................................................3•2
Amp Controls ............................................................................................................................3•3
Effects................................................................................................................................................3•4
Functions .......................................................................................................................................3•5
Global Controls .........................................................................................................................3•6
Main Display ................................................................................................................................3•7
Vetta Combo Rear Panel Power and Speaker Outs ...........................................3•8
Vetta HD Rear Panel Power and Speaker Outs ....................................................3•9
Vetta Combo & HD Common Rear Panel Connections .................................3•10
Basic Operations
Selecting Factory/User Memory .......................................................................................4•1
Selecting a Channel .................................................................................................................4•1
Editing Amps ...............................................................................................................................4•2
Working With One Amp ...............................................................................................4•2
Working With Two Amps .............................................................................................4•3
Cabinets ....................................................................................................................................4•7
Effects ..............................................................................................................................................4•8
On/Off Control ....................................................................................................................4•8
Edit Mode .................................................................................................................................4•8
Stompboxes ............................................................................................................................4•8
In-Line Effects .........................................................................................................................4•10
Routable Post Effects .........................................................................................................4•11
Tap Tempo and Time/Speed control ......................................................................4•11
The Effects Loop ..................................................................................................................4•13
Double Tracker .....................................................................................................................4•16
Effects Routing .......................................................................................................................4•17

Saving ...............................................................................................................................................4•22
Saving a Channel ..................................................................................................................4•22
Setting Your Favorite Channel .....................................................................................4•23
Saving Model Default Settings ......................................................................................4•24
Backing Up Your Channel Memories .......................................................................4•25
Things to Know About Vetta’s Memory ................................................................4•26
Restoring From Backups ..................................................................................................4•27
Backing Up Your Model Default Settings ..............................................................4•29
Restoring Your Model Default Settings ..................................................................4•29
Output Setup .............................................................................................................................4•30
Wide Mode .............................................................................................................................4•30
Dir Trim ....................................................................................................................................4•31
Speakers On/Off ..................................................................................................................4•32
Vetta HD Speaker Configuration.................................................................................4•32
Foot Control ...............................................................................................................................4•33
System Setup ..............................................................................................................................4•34
Display.........................................................................................................................................4•34
Channel Select Mode..........................................................................................................4•35
MIDI Channel ..........................................................................................................................4•35
Knob Mode...............................................................................................................................4•36
Software Version...................................................................................................................4•36
Running External Speakers with Vetta Combo ......................................................4•37
Running External Speakers with Vetta HD.................................................................4•39
Speaker Cabinet Basics......................................................................................................4•39
Hooking Up to a Single 2x12 in Mono ....................................................................4•42
Hooking Up to Two 2x12’s in Stereo......................................................................4•43
Hooking Up to a Single 4x12 in Mono or Stereo..............................................4•44
Hooking Up to Two 4x12’s in Stereo......................................................................4•45
Vetta and MIDI ..........................................................................................................................4•38
The Amps & Cabs
General Notes About the Models .................................................................................5•1
What’s In There ........................................................................................................................5•2
Musings on Tone Controls .................................................................................................5•5
The Cabinets ...............................................................................................................................5•35

The Stompboxes
About the Stompboxes .........................................................................................................6•1
Distortions and Overdrives ................................................................................................6•1
Modulation Effects ...................................................................................................................6•9
Delays ..............................................................................................................................................6•16
Dynamics Processors (aka Compressors and Auto Swell) ..............................6•25
Post Effects
About the Effects ......................................................................................................................7•1
Tremolo .........................................................................................................................................7•1
Gate .................................................................................................................................................7•4
Compressor .................................................................................................................................7•5
EQ .....................................................................................................................................................7•6
Pitch Shift ......................................................................................................................................7•10
Mod ..................................................................................................................................................7•11
Delay.................................................................................................................................................7•14
Reverb ............................................................................................................................................7•16
Double Tracker .........................................................................................................................7•21
Hints & Tips
Building a New Tone .............................................................................................................8•1
Using Two Amps at Once ..................................................................................................8•4
Effects Tips & Tricks ................................................................................................................8•8
Making The Factory Bank Your Own ...........................................................................8•10
Using the FBV Foot Controller
Exercising Your Options ......................................................................................................9•1
Hooking up the FBV ..........................................................................................................9•1
Setting Up Your FBV ..............................................................................................................9•2
Punching Your Buttons .........................................................................................................9•2
Waggling Your Toes ...............................................................................................................9•4

Appendices
Amp Models ................................................................................................................................10•1
Cabinet Models...........................................................................................................................10•2
Effects Models..............................................................................................................................10•3
Stompbox Models................................................................................................................10•3
Post Effects Models..............................................................................................................10•4
A.I.R. II Mic Options ................................................................................................................10•5
Post Effects Routing ................................................................................................................10•6
Signal Flow Diagram ...............................................................................................................10•7
MIDI Functions ...........................................................................................................................10•8
Customer Service......................................................................................................................10•10


Welcome to Vetta •
More Than Just An Amplifier
1 •
1
W
ELCOME
TO
V
ETTA
More Than Just An Amplifier
First off, thanks for buying a Vetta and taking a great big step into the future of
guitar amplification! You now own extremely detailed models of vintage, classic,
modern, and original guitar amplifier tones as well as a collection of virtual
stompboxes, rack gear, speaker cabinets, switchers and routers. In short, the most
complete and toneful guitar system ever created.
Who is Line 6?
As you may know, Line 6 first came on the scene with a new kind of guitar
amplifier—the first to put digital software modeling technology to work in a combo
amp for guitarists. In order to pioneer this technology, we had set ourselves the
modest task of understanding everything there is to know about all the great guitar
amps of history. We knew it meant countless hours of playing our guitars with an
endless parade of lust-inspiring amps—but for the good of the world, we were
willing to do it.
So we began what has continued to be our constant quest, assembling the world’s
finest collection of amplifiers, each one a uniquely excellent example of an amp
design recognized by guitarists the world over as a true “tone classic.” We plugged
in, we played, we probed, we measured, we dissected—and we began to discover a
new knowledge to change the world of guitar.
With a guitar in one hand and modern computer measuring gear in the other, we
put our amps through their paces and got them to give up their secrets—a guitar
pickup output, after all, is an electronic signal, and tubes and the rest of the guitar
amplifier electronics, speakers and cabinets are really just a complex form of signal
processing. We figured out how to make software to emulate these world-class
amplifiers. And thus distilled the noble history of guitar tone heritage into a

Welcome to Vetta •
Who is Line 6?
1 •
2
revolutionary, patented DSP (digital signal processing) software-based modeling
technology to power the first Line 6 amplifiers and bring a new revolution of tone and
technology to guitarists.
The next stop for Line 6 was the world of direct guitar recording and
preamplification. We stocked up on the coffee, snacks, strings and more gear—the
basic essentials of the guitarist’s lifestyle—and turned our tone technologists loose to
solve the age old problem of getting great live amp tone when recording in the studio.
Behind the security-sealed doors of our research laboratories, electric guitars wailed,
test tones warbled, microphones got poked and prodded, a few people got shocked by
power tubes or filter caps (those things can pack a wallop!) and the magical mysteries
of acoustical physics were gradually revealed as never before.
When it was finally time to get out and see the sunshine again, we emerged to meet
the world with a world-changing direct recording technology we call A.I.R. (which
officially stands for Acoustically Integrated Recording outputs), and an idea for
something we called POD. We realized we were gonna need a bigger building. So we
got a new place, kept cranking out the amps, and expanded the assembly line to
spawn PODs destined to become the choice of platinum recording artists the world
over—as well as regular everyday guitarists—forever changing the world of guitar
recording.
With the new building came space to stretch out, and our thoughts turned from our
amps to our feet. Pretty handy for walking around, but they become
really
useful when
they’re working all those great stompboxes that have been as much a part of the
electric guitar experience as the amplifier. So we began a new quest, assembling the
most in demand and hippest stompboxes ever made in order to put them through the
same rigorous modeling procedures.
Many was the night we had to stay up late drinking way too much Pepsi, comparing
the subtle appeal of different delay pedals, and the weekends we had to spend hauling
vintage effects home for more testing in our personal studios—yes, it’s a rough job,
but someone has to do it. Much caffeine, careful study and a whole lot of strings later,
we proudly premiered our series of stompbox Modelers and their rack mounted
cousins, the Studio Modelers. Each one contains a dream collection of lovingly
crafted digital software models resulting from our meticulous study of a carpet-full of
the greatest effects of guitar history.

Welcome to Vetta •
And Away We Go
1 •
3
Then came our biggest challenge. Ideas that had been fermenting in our lab for years
were finally ready to be distilled in a complete ground-up reworking of our modeling
technology. This was the chance to go far beyond everything we’d done, combining the
knowledge and unique technological tools we’d created along our way with a whole
new round of innovation. That’s when we began a top secret project to make the
greatest guitar amp ever known.
More strings, more snacks, a few new guitars (you’ve gotta keep things fresh) and we
were ready for our new mission. As unsuspecting suburban life continued to spin on
around us, we spent our days and nights crafting a new method for emulating the
amplifier and effects electronics with far greater detail than ever before. We built brand
new software components of each critical stage of the signal chain. All the classic amps
and effects in our collection got a new round of study. We found new ways to duplicate
the effects of tubes and other electronic components with a quality and exactness that
had never been achieved before. We took a thoroughly fresh approach to our direct out
technology, to insure that what goes to a recording or live sound system can be every
bit as satisfying as what comes out of a live amp setup. And, to put it all together, we
created a completely new way to ‘wire’ these software parts together to work their
combined magic. The result was not only vastly more accurate models based on the
great vintage and classic amplifiers and effects in our collection, but also fresh hybrid
amp models and completely unique and original amp tones that respond in ways
physical circuits never could. We call this new modeling technology “Point to Point
Interactive Modeling,” and it’s what’s pounding along in the heart of your Vetta.
And Away We Go
So, as our little walk through the halls of history shows us, your new Vetta is the
culmination of years of research in service of Line 6’s endless quest for great guitar tone.
And now that you know where it comes from, it’s time to fire up and find out exactly
what this puppy can do....


Really Quick Start Guide
2•
1
R
EALLY
Q
UICK
S
TART
G
UIDE
POWER:
Connect the power cord between Vetta’s rear panel and your power outlet.
Don’t turn the power on yet. If you’ve got a Vetta HD, hook up your speakers.
FBV:
If you’ve got a Line 6 FBV foot controller, connect it to Vetta’s rear panel (the
older Line 6 Floor Board does
not
work with Vetta).
PLUG IN:
Jack your guitar into Vetta’s GUITAR input. Turn Vetta’s MASTER
VOLUME knob (on the far right) all the way down. Flick Vetta’s POWER switch on.
Spin MASTER VOLUME up to 8 o’clock or so.
PRESETS:
Press the FACTORY button (it lights). Turn the knob near Vetta’s smaller
display to select from the 64 Factory channels. There are 16 Factory Banks; each Bank
has four channels (labeled A, B, C, D).
AMP TONE KNOBS:
Look at the amp tone knobs (DRIVE, BASS, MID, TREBLE,
PRESENCE, VOLUME). The two ON buttons to the left turn Vetta’s two
simultaneous
amps on and off. The KNOBS buttons decide whether the amp tone knobs control
Amp 1, Amp 2, or both (press both buttons at once).
AMP 1 & AMP 2:
Press
only
Amp 1 on. Spin the AMP MODEL knob, watch the big
display. Press
only
Amp 2 on, turn the Amp Model knob to set the model for Amp 2.
EFFECTS:
Turn the Reverb knob to 12 o’clock. Look at the 12 Effect On/Off – Select
buttons on the top right of the amp, to the right of the EDIT button. Press the
REVERB button. Play guitar. Press Reverb again. Play. Get it?
EDITING:
Let’s edit Reverb. Press EDIT. If the Reverb Page isn’t on the big display,
press REVERB. The little knob below MODEL on the display now sets Reverb model.
Turn the PAGE knob (rightmost of the 5 little knobs) for more Reverb pages.
GLOBAL CONTROLS:
Unlike most everything else, these knobs don’t get stored
when you save. Reverb can be edited and saved per channel, and then this knob adjusts
the overall Vetta experience ‘wetter’ or ‘drier’ to suit your taste. Set the three Global
Control knobs straight up at 12 o’clock for the standard sound experience.
SAVE:
The SAVE button saves your changes. Read on for more details.


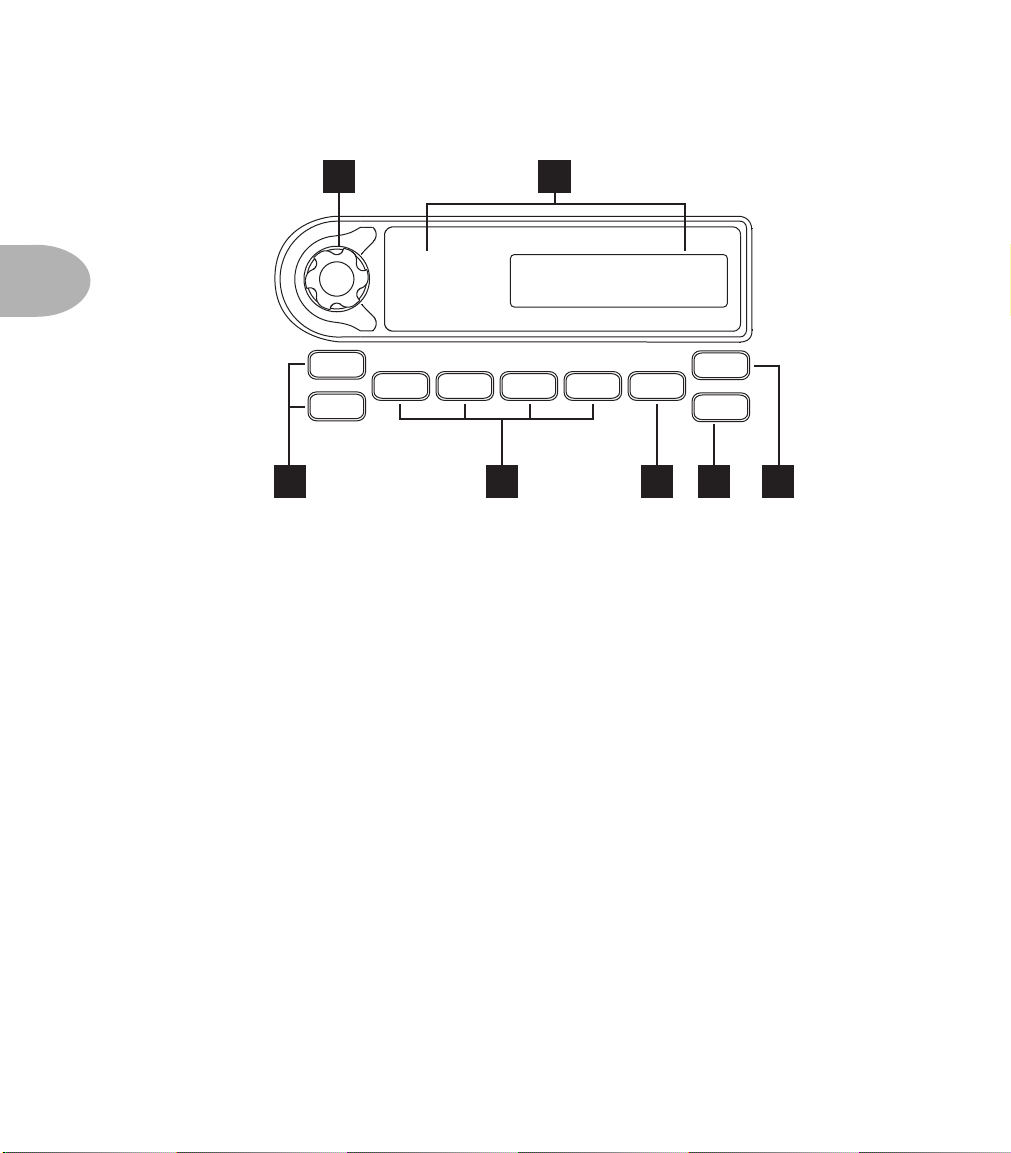
Knobs, Buttons, Flashing Lights •
Front Panel: The Big Picture
3 •
1
K
NOBS
, B
UTTONS
, F
LASHING
L
IGHTS
Front Panel: The Big Picture
We realize that on first glance at your Vetta, you probably thought to yourself, “My,
what a lot of knobs and buttons and flashing lights!” You’re right, we’re not gonna
make any bones about it. There they are. On a
guitar amp!
There’s no need for panic, though. We’ve organized everything so that using your Vetta
can be as simple or as complex as you want. If you want to use only the incredibly
toneful amp models and ignore the rest of the amp, you can easily do that. If you want
to tweak everything, we’ve made it easy to do that as well. And all thanks to the knobs
and buttons and flashing lights.
To help you get it all sussed out, let’s break down the control panel of your Vetta into
five different sections: Navigation, Amp Controls, Effects, Functions, and Global
Controls, and let’s look at these one at a time.
Knobs, Buttons, Flashing Lights •
Navigation
3 •
2
Navigation
This is where you choose which section of memory (Factory or User) you want to use,
as well as which Channel you want. This is also the place to save, and select the tuner.
1. Select Knob: Use this knob to choose which channel you want to use. Each area
(Factory or User) has 16 banks of 4 channels each for a total of 128 channels.
2. Channel Display: Shows you which channel you have selected both
alphanumerically (e.g. 12A) and by channel name (e.g. Bubba’s Big Boom).
3. Factory/User Buttons: These switch between the Factory and User sections of
Vetta’s memory. User memories are rewritable (you can change them). Factory are
non-rewritable. Vettas leave Line 6 with the same thing in Factory and User memory.
4. Channel Select Buttons: These select between the channels in the current bank.
A, B, C, or D, it’s easy as 1-2-3... 4?
5. Favorite Button: One button instant access to your favorite channel. The Basic
Operations chapter tells you how to choose a channel as your Favorite.
6. Save Button: Press this when you want to save something, whether it’s the current
channel, custom settings for amps or effects, or even sending Vetta’s memory out the
MIDI port. For more details about saving stuff, see the Basic Operations chapter.
7. Tuner Button: Press it once to turn on the built-in chromatic tuner. Press it a second
time to turn the tuner off. There’s that easy-to-use technology again.
FACTORY
USER
FAVORITE
TUNER
SAVE
A B C D
12A
2
3 4 5 6 7
CHANNEL SELECT CONTROLS
1
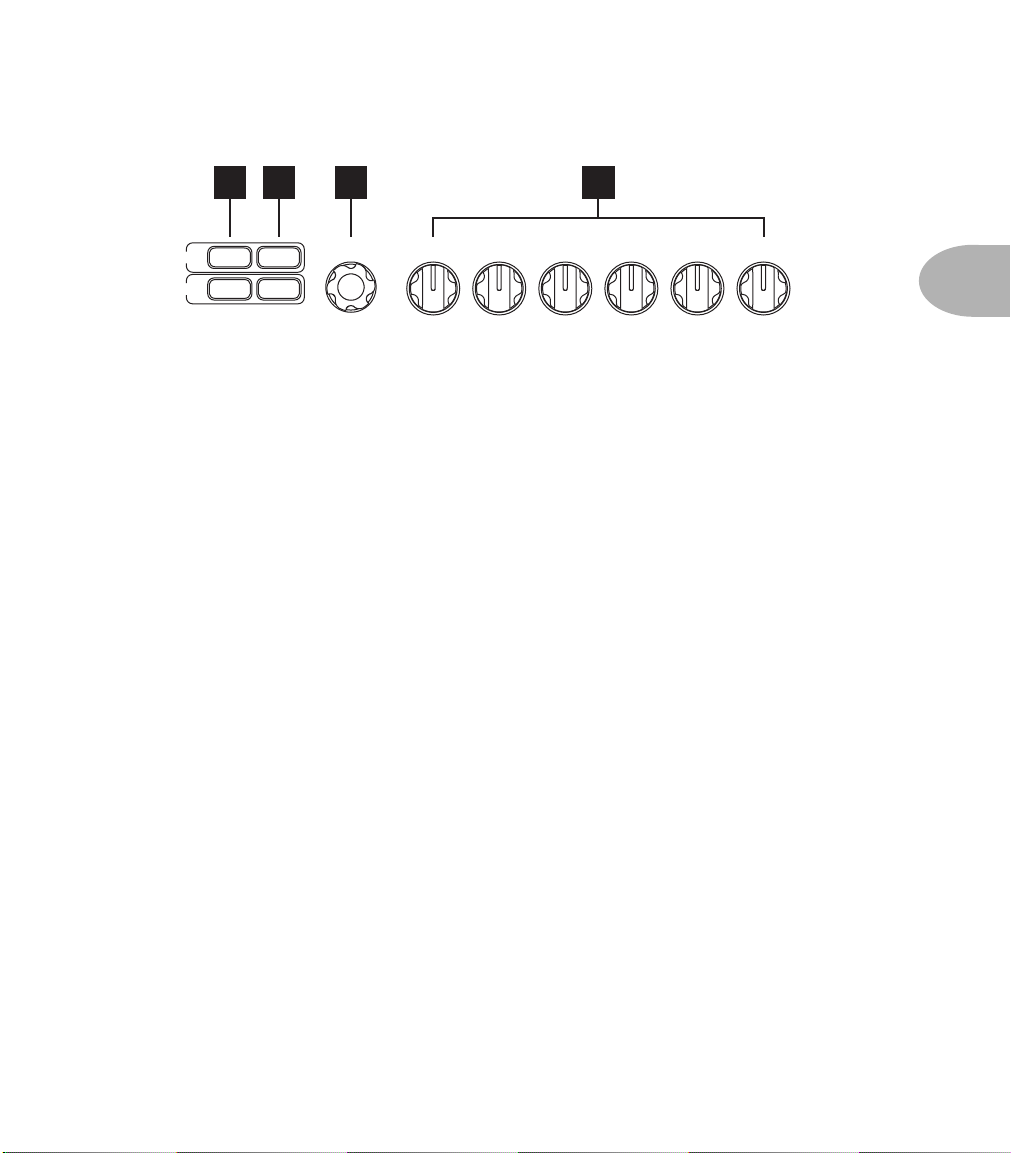
Knobs, Buttons, Flashing Lights • Amp Controls
3 • 3
Amp Controls
In this area, you select amp models, turn them on and off, and dial in your basic amp
tones.
8. Amp Buttons: These buttons let you turn Amp 1 and Amp 2 on and off (or, more
accurately, toggle between on and standby states for an amp). As you might guess, if
it’s lit, it’s on, and if it’s dark, it’s on standby.
9. Knobs Buttons: Select which amp will be controlled by the Amp Control knobs.
Once again, lit indicates it’s the amp you’re adjusting, dark means it’s not. Press both
buttons at once, and you can lock their controls together and adjust them both at once
(more about this in Basic Operations).
10. Amp Model Knob: Use this to select just which one of Vetta’s amazing amp models
is going to run in the Amp 1 or Amp 2 slot for the sound you’re creating.
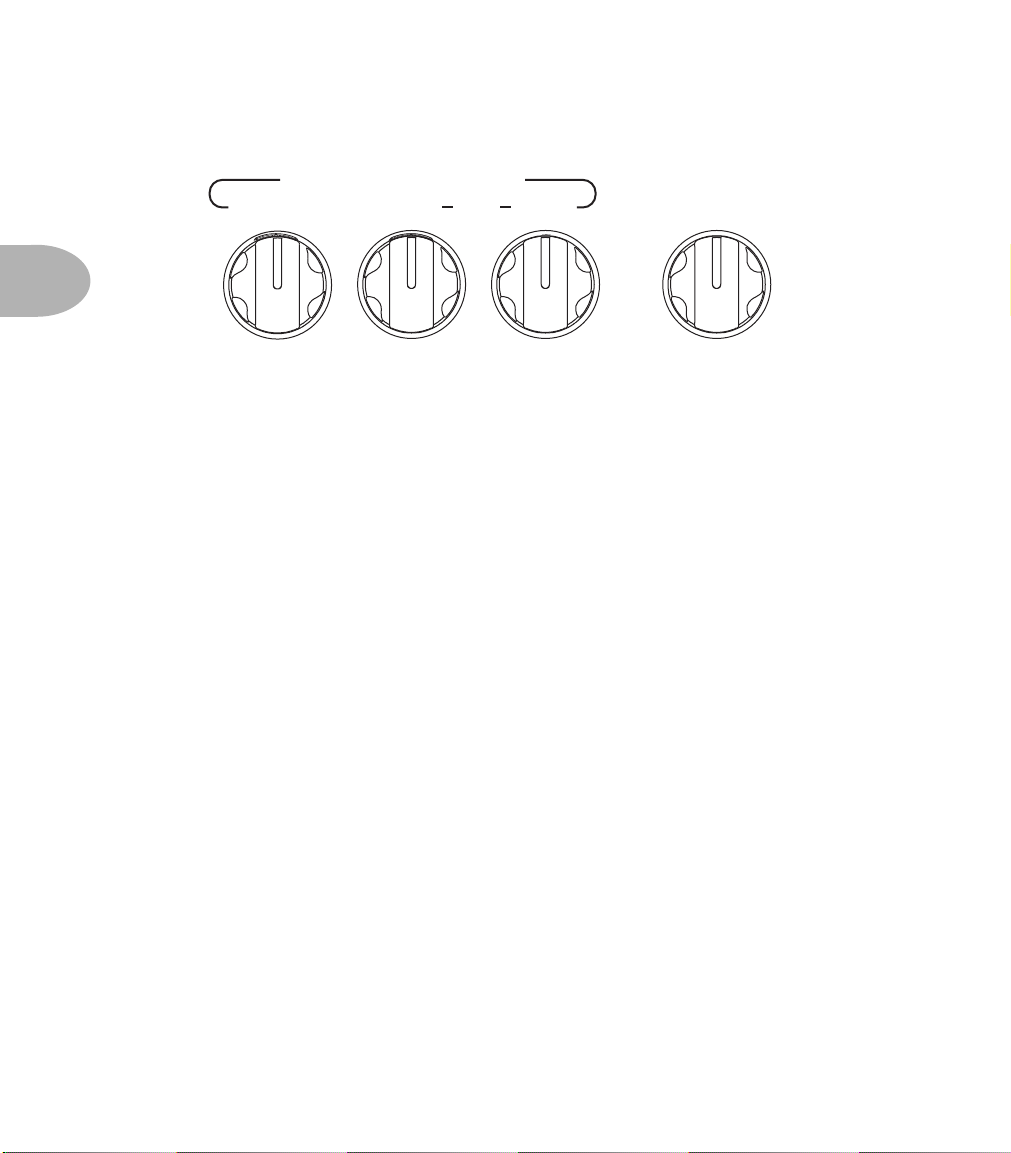
11. Amp Tone Control Knobs: Drive, Bass, Mid Treble, Presence, and Channel
Volume. They do just what you’d expect them to do for the selected amp(s). In the
case of amp models that emulate classic equipment, these tone controls are carefully
crafted, for each model, to mimic the behavior of the controls of the original unit that
we studied to create the amp model.
KNOBS
ON
ON
KNOBS
11
AMP 1
AMP 2
AMP MODEL PRESENCETREBLEMIDBASSDRIVE VOLUME
8 9 10
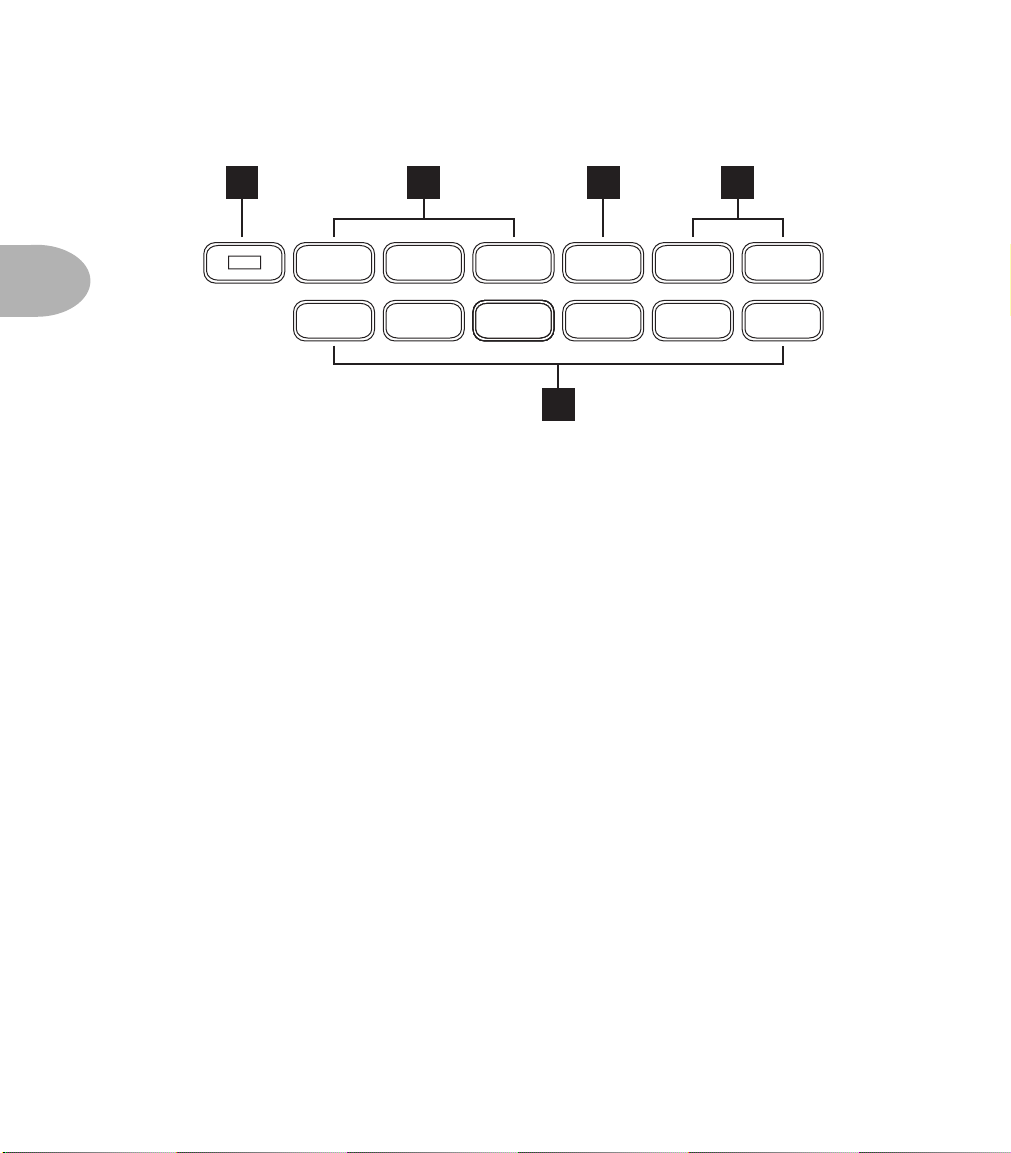
Knobs, Buttons, Flashing Lights • Effects
3 • 4
Effects
Here’s where you control and setup all your effects. The basic brain dead mode of
operation is light on, effect on. Light off, effect off. All the effects work at the same
time, to achieve any level of moderation or excess you desire. Press the Edit button to
dive deep into the details of any effect and tweak it to make it your own.
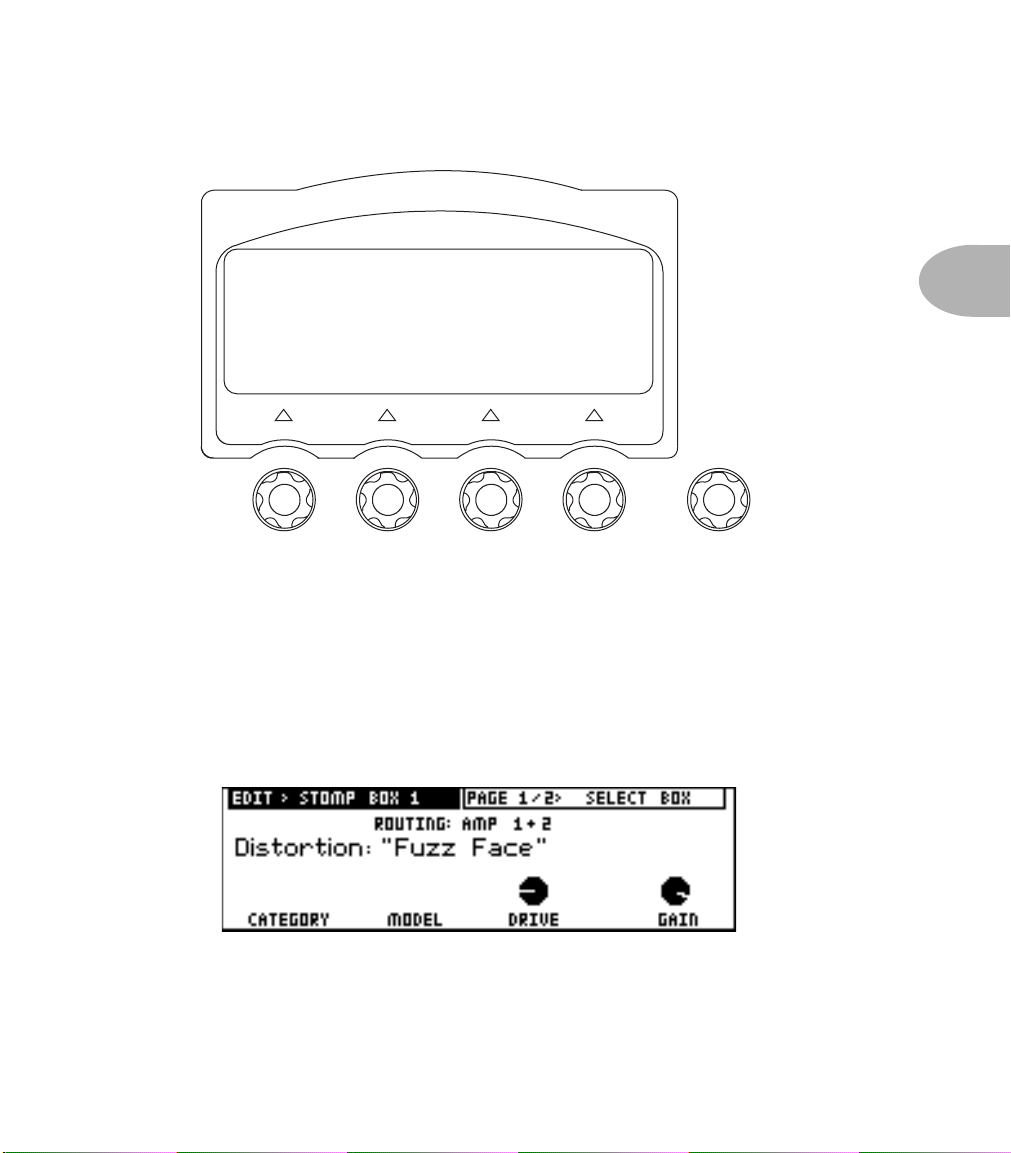
12. Edit Button: When Edit is lit, we call this “Edit Mode”, and the larger Vetta display
(just to the left of this button) can show Edit Pages for fine tuning effect details. The
most important things to know about Edit Mode are that the little knobs below the
display set the values shown on the display, with the PAGE knob on the far right
selecting different pages for the currently selected effect. An effect selected for display/
editing flashes its light. A first press of an effect button in this state selects it for
editing, and additional presses of the same button turn the effect on and off. See the
Basic Operations chapter for the details.
13. Stompbox Buttons: These buttons turn the three stompbox effects on or off. As just
described, when Edit mode is on, they also call up the stompbox effects’ Edit Pages so
you can fine tune stompbox settings.
14. Tremolo Button: Turns Tremolo on or off, or selects it for editing, as above.
15. Post Effects Buttons: Turns the appropriate effect (or the Effects Loop) on or off, or
selects it for editing, as above.
15
13 15
EDIT
STOMP
BOX 1
STOMP
BOX 2
STOMP
BOX 3
TREMOLO GATE COMP
REVERBDELAYMODEQEQEQ
PITCH
SHIFT
LOOPEQ
12 14

Knobs, Buttons, Flashing Lights • Functions
3 • 5
Functions
All of these buttons except Tap Tempo light up when you press them the first time, and
turn off with your second press. When lit, the larger Vetta display is used to display
settings related to the selected Function.
16. Tap Tempo Button: This handy button can be used to set the time for delays,
tremolos, choruses, vibratos, phasers, flangers, or any other effects that have a time-
based element. For each effect, you can determine whether the Tap Tempo will affect
it, and how, on a channel-by-channel basis. If you’re into synchronized effects, you
need to know all about this stuff; see the chapters on the stompboxes and Post Effects
for all the details.
17. Amp/Cab Details Button: Press this when you want to choose which speaker
cabinet model is assigned to which amp and set the panning of the amps in the stereo
field.
18. Effects Routing Button: Lots of fun to be had here. Press this to move stompboxes,
wah, volume pedal, and post effects around in the signal path.
19. Double Tracker Button: Press this to access the parameters for Vetta’s exclusive
Double Tracker effect. This modern wonder simulates the sonic experience of
recording two separate performances of a guitar part in the studio, and does it in real
time. Please note that Double Tracker only works if you’re using two amps.
20. Output Setup Button: Press this to display the pages for setting up the Line 6
exclusive A.I.R. II processing for the direct outs, turn the speakers on and off, turn
Vetta’s unique ‘Wide’ mode on and off, or set the level for the Direct Outs.
21. Foot Control Button: Give this a push to set details of operation for the FBV Foot
Controller.
22. System Setup Button: Press this to adjust the contrast of the displays, choose which
MIDI channel Vetta will use, and other basic housekeeping tasks.
16 18 19
TAP
TEMPO
GATEGATEGATE
AMP/CAB
DETAILS
COMPRESSCOMPRESSCOMPRESS
EFFECT
ROUTING
DOUBLE
TRACKER
LOOPLOOPLOOP
OUTPUT
SETUP
EQEQEQ
FOOT
CONTROL
LOOPLOOPLOOP
SYSTEM
SETUP
17 20 21 22
Knobs, Buttons, Flashing Lights • Global Controls
3 • 6
Global Controls
These knobs give you control over Reverb, your overall bass and treble, and volume.
Unlike most other things on Vetta, the positions of these knobs is NOT saved when
you save a channel.
The basic idea is that, when you are at your gig, recording session or just jamming, you
may find that the space you’re playing in makes it desirable to make a temporary tweak
to your Vetta’s overall sound. Let’s say you’re playing in a place that’s all brick walls,
and things are just way too bright. Or maybe it’s nothing but sumptuous velvet, and
your high end seems to have disappeared. In either case, the Low and High EQ knobs
should help you improve the situation. Straight up, the knobs have no effect (there’s a
little notch to make it easy to set them to this ‘Normal’ position). Turn clockwise past
12 o’clock for more EQ, turn counterclockwise below 12 o’clock for less EQ. This EQ is
independent of, and unrelated to, the Amp Tone Controls Bass, Mid and Treble.
The Reverb knob increases or decreases the amount of Reverb you’ll hear when any
Vetta channel is selected and the Reverb is on. This is designed to give you the basic
experience you expect from Reverb on a guitar amp: set the knob high and everything
you do with the amp has a lot of reverb; set it low and there’s less reverb. At the
minimum setting, you hear no reverb at all, regardless of whether the Reverb effect’s
button is on or not.
In general, we recommend that you leave the Reverb knob set to its 12 o’clock
‘Normal’ position any time that you’re setting up sounds that you plan to save or use
regularly. Set the amount of Reverb that you want for the particular channel by
pressing the Edit Button to light it, pressing the Reverb Button to display its Edit Pages,
and turning the little knob below the MIX value shown on Vetta’s larger display. Then
press SAVE to save the channel with that Reverb setting, and if you find you need a bit
more overall Reverb (or less) when you get to the gig, grab the Reverb knob!
+
-
+
-
+
-
MASTER VOLUME
GLOBAL CONTROLS
REVERB EQ HIGHLOW
NORMALNORMAL NORMAL
Knobs, Buttons, Flashing Lights • Main Display
3 • 7
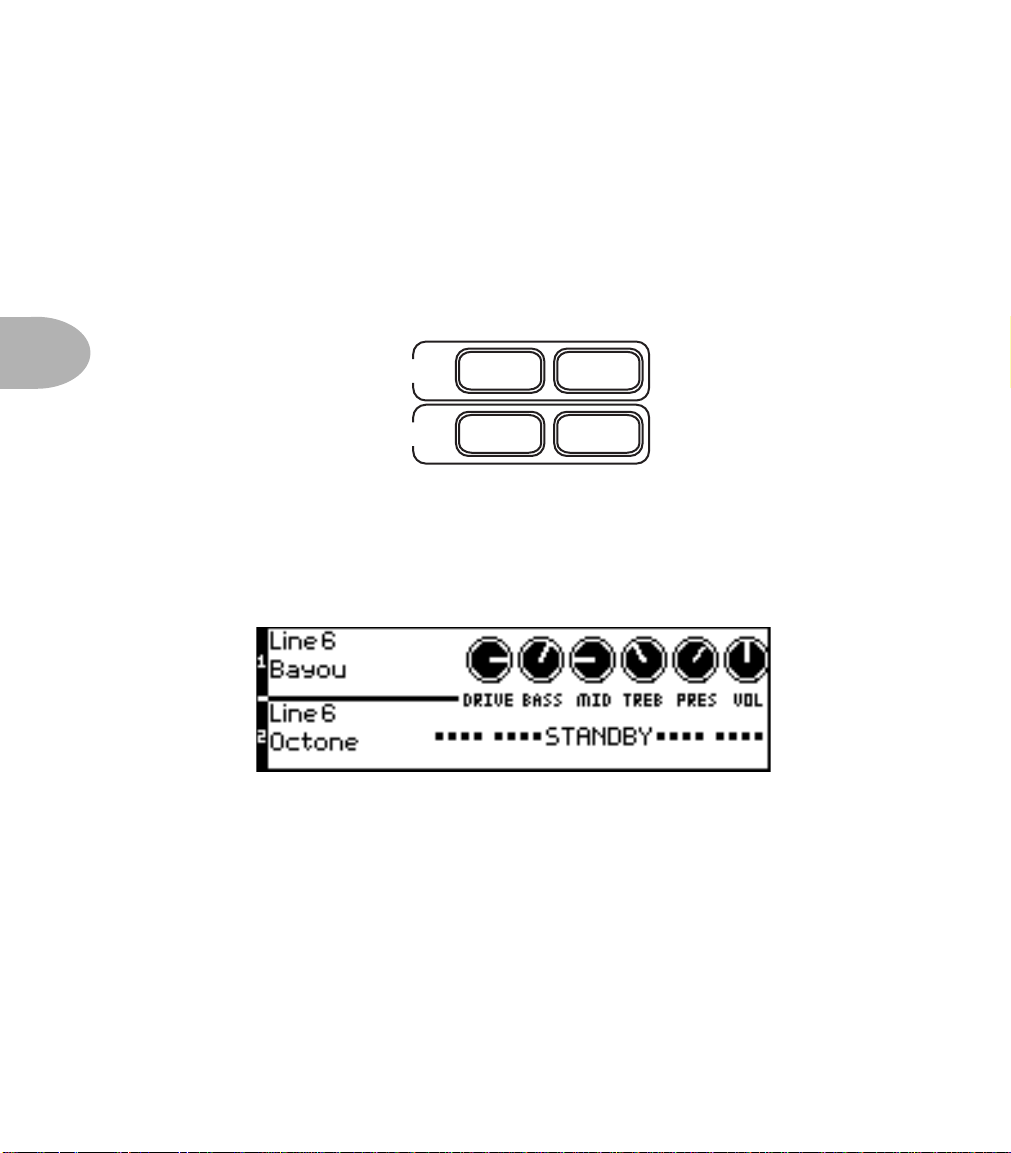
Main Display
The normal display state, called the Amps At A Glance Page, shows which amp
models you’ve got going, and how their Tone Controls are set; this is detailed in the
Basic Operations chapter. In this state, the knobs below the display don’t function.
At other times, the light red arrow lights between the little knobs and the display will
light to show that one or more of the knobs is ready to do something. When editing a
stompbox, for instance, the display will look something like this, and the little arrow
lights will be lit to show that their knobs set things on this page:
The words ‘Page 1/2’ at the top right box tell you this is the first of two different Edit
Pages for this stompbox. The Page knob moves you through these pages. These versatile
knobs and display make frequent appearances in the Basic Operations chapter.
PAGE
Knobs, Buttons, Flashing Lights • Vetta Combo Rear Panel Power and
3 • 8
Vetta Combo Rear Panel Power and Speaker Outs
And now we come to the combo’s ‘gazintas and gazoutas’, as audio engineer types say:
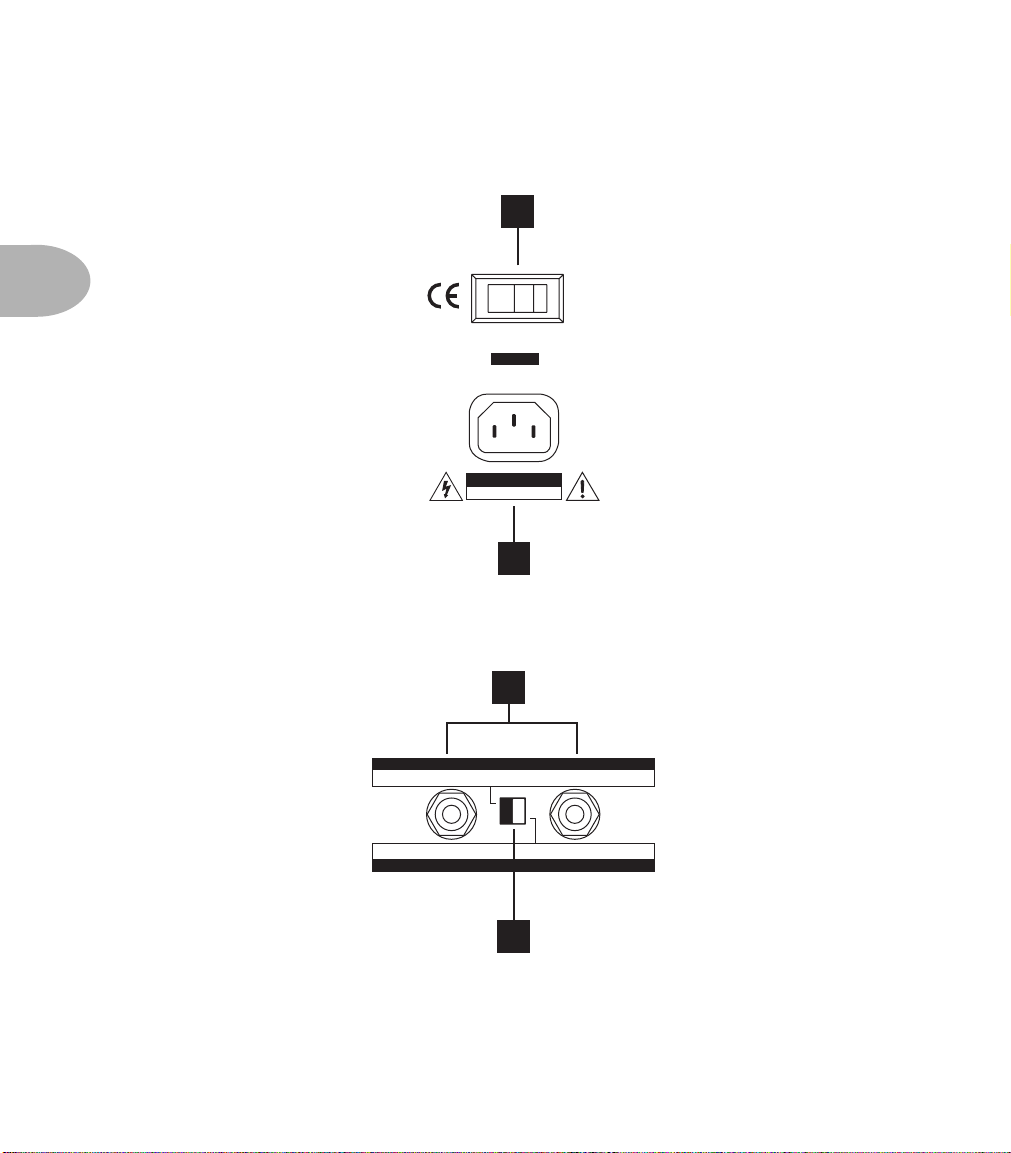
23. Power Connector: Where the power cable goes. We’ll let you decide which end.
24. Power Switch: The original digital control: one finger determines on or off.
25. External Speakers: These jacks are for connecting external speaker cabs.
26. Speaker Configuration Switch: Selects between Split Stereo and Normal modes.
23
CAUTION
RISK OF ELECTRIC SHOCK
DO NOT OPEN
POWER
24
25
26
LeftRight
SPEAKER OUTPUTS - NORMAL MODE: VETTA COMBO = STEREO, EXTERNAL CABS = STEREO
CLASS 2 WIRING
8 OHMS EACH
External CabNot Used
SPEAKER OUTPUTS - SPLIT STEREO MODE: VETTA COMBO = LEFT, EXTERNAL CAB = RIGHT
4 OHMS
Knobs, Buttons, Flashing Lights • Vetta HD Rear Panel Power and
3 • 9
Vetta HD Rear Panel Power and Speaker Outs
Whereas the Vetta HD has things arranged somewhat differently:
23. Power Connector: Little bitty electrons flow in here to make things work.
Connect the supplied cable to the source of electrons, then flick the power switch
that’s on the front panel to let the electrons in.
24. Left/Mono: These two jacks are wired in parallel and output the left signal (if
you’re running in stereo) or the mono signal if you’re running mono. Be sure
you’ve chosen the corresponding stereo or mono operation on the Vetta front
panel as described on page 4•32.
25. Right: These jacks carry the right output when you’re running stereo.
26. Ohm Selector: Be sure to set this switch to match the ohm rating of the speaker
cabinets that you are connecting to your Vetta HD. If this switch and your speaker
cabinets’ ohm ratings are mismatched, your Vetta will sound wrong.
26
25 24
23
CAUTION
RISK OF ELECTRIC SHOCK
DO NOT OPEN
POWER
Left/MonoRightRight Left/Mono
MAX 200 WATTS = 100 WATTS/CHANNEL
SAME POWER OUTPUT AT ALL OHM LOADS
4 OHM 8 OHM 16 OHM
SPEAKER OUTPUTS
CLASS 2 WIRING
Knobs, Buttons, Flashing Lights • Vetta Combo & HD Common Rear Panel
3 • 10
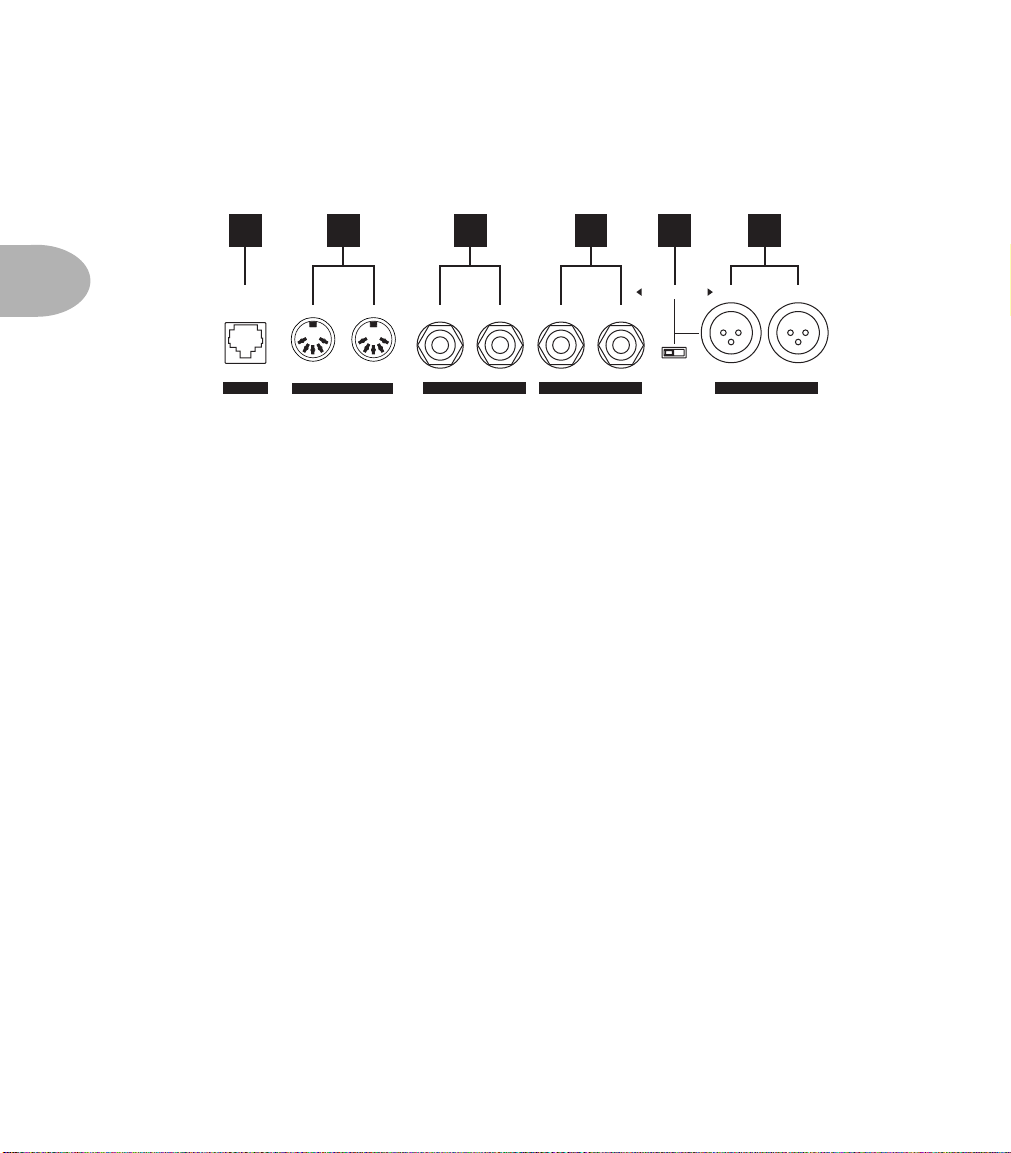
Vetta Combo & HD Common Rear Panel Connections
The Vetta combo and HD have these rear panel connections in common:
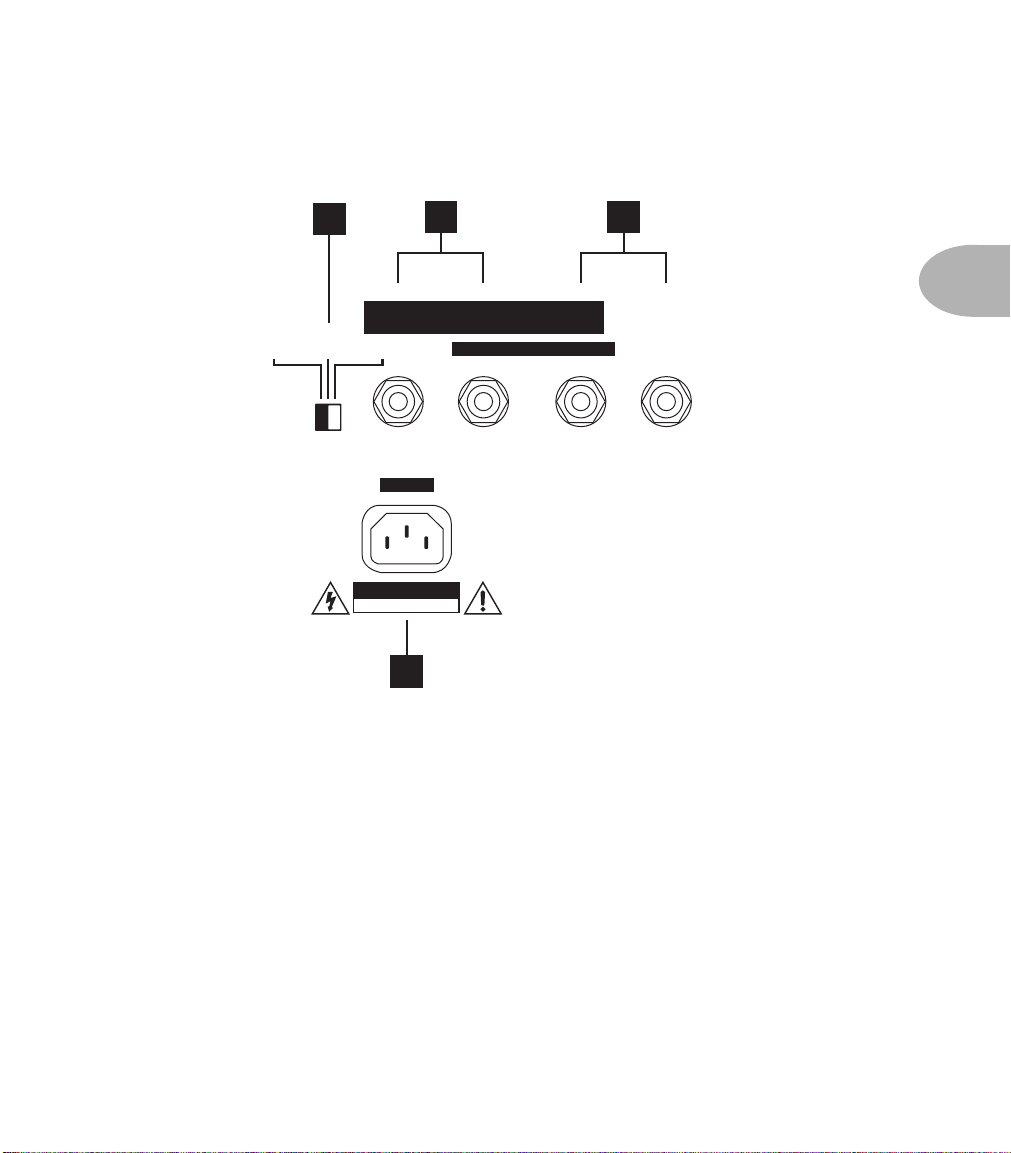
27. Pedal Connector: Connect your FBV foot controller here.
28. MIDI In/Out: Hook up MIDI cables for doing MIDI stuff here. Like the rest of your
cables, you should get some decent ones for the job, with nice molded plastic ends.
29. Stereo Effects Loop Send/Return: Stereo Send and Return for the programmable
stereo effects loop of your Vetta. Use a pair of 1/4-inch TRS to dual 1/4-inch TS cables
(commonly called ‘Y’ or ‘insert’ cables), one for the send, one for the return. More
detail, plus pictures are to be found on page 4•13.
30. 1/4-inch Direct/Wet Outputs: Normally, these are your Direct Outs, for recording,
or sending a feed to a house sound system when you’re playing live. These outputs
utilize a new, second generation of Line 6’s exclusive A.I.R. processing which has
made Line 6 products like POD the undisputed standard for recording guitar direct.
The level at these outputs is set via the Outputs Setup Button. See page 4•30 for
details.
Vetta also has a ‘Wide Mode’ which lets you use these outputs for the kind of wet cab/
dry cab setup employed by some guitarists, and which is normally only possible with a
much more elaborate switching and routing system (all of which Vetta takes care of for
you). See page 4•30 for more on Wide Mode.
31. Ground Lift Switch: If you’re getting ground loops when connecting Vetta’s Direct/
Wet Outs to other equipment, use this to lift the grounds of the XLR Direct Outs only.
The unbalanced 1/4-inch outs don’t have separate grounds that can be lifted.
32. XLR Direct/Wet Outputs: Same thing as the 1/4-inch outs, only these are the
connections the pros typically use, and the Ground Lift Switch works with these.
323127
In Out Left/MonoRight Left/MonoRightReturnSend
Tip = Left/Ring = Right
Unbalanced Outs
Balanced Outs
PEDAL MIDI DIRECT / WIDE OUTPUTSSTEREO EFFECTS LOOP DIRECT / WIDE OUTPUTS
LIFT/GROUND
connect FBV Foot Controller here
(not compatible with Floor Board)
28 29 30

Knobs, Buttons, Flashing Lights • Vetta Combo & HD Common Rear
3 • 11
A quick note about direct outs:
When using the direct outs, there can be a ‘pop’ on the outputs on power up or
power down. We recommend that you either disconnect the direct outs or power
down whatever the direct outs are connected to before powering your Vetta on or
off.


Basic Operations • Selecting Factory/User Memory
4 • 1
BASIC OPERATIONS
Selecting Factory/User Memory
From Vetta
Vetta has two sections of memory (Factory and User) of 64 Channels each. These are
organized as 16 banks of 4 channels each, which gives us a total of 128 Channel
Memories. Press the Factory or User button to select one or the other.
From the FBV
From the FBV foot controller, simply press the Bank Up and Bank Down switches
simultaneously to toggle between Factory and User.
Selecting a Channel
From Vetta
Turn the knob to the left of Vetta’s smaller display to spin through all the channels.
You’ll spin through the four channels of a Bank as you go. So, if you start at Bank 1,
you’ll get 1A, 1B, 1C, 1D and then 2A, 2B, etc. Press the A, B, C, D buttons to select
one of the four channels in the current bank. And, because we’re all creatures of habit,
we’ve given you a Favorite button for easy, instant access to any one of the Vetta’s
channels without any knob turning required (see page 4•23 for details). Channel
selection from Vetta is normally ‘instant access’, but you can also choose a ‘deferred’
mode if you prefer (see page 4•36 for details).
From the FBV
On the FBV, you use the Bank Up or Bank Down switches to select a new bank, but a
new channel will not load until you press one of the Channel Select switches. This
enables you to switch to channels that are several banks away without you (or your
audience) having to hear all the channels in between.
From MIDI
Vetta responds to MIDI Patch Change commands. Patch Changes 0-63 select the User
Channels. 64-127 select the Factory Channels.
Basic Operations • Editing Amps
4 • 2
Editing Amps
Working With One Amp
One of the revolutionary features of Vetta is its ability to provide two totally
independent amp models at the same time. As amazing as this is, and as hard as it can
be to go back to a single amp after you’ve gotten used to the whole new world of sonic
possibilities opened up by this feature, sometimes you only want to use one amp at a
time. Here’s how.
Standby Mode
The ON knobs are like the standby switches on old tube amps. Simply press an ON
button to turn an amp on (light on) or put in standby mode (light off). Amp 2 is in
Standby in the example shown below:
Note that as you switch from two amps on to only one amp on, the amp that’s left on
may also change its location in the stereo field. The ‘Amp Panning’ page of the
Amp/Cab Details Button sets separate panning depending on whether an amp is on
by itself or with a second amp. (See ‘Changing Amp Panning’, page page 4•3.)
Remember that, although you may choose to work with a single amp, two amps are
always available in every stored channel. The name of the model assigned to the amp
that is in Standby is displayed so you know what you’re gonna get when you turn an
amp on.
KNOBS
ON
ON
KNOBS
AMP 1
AMP 2
Loading...