


PODXT
ULTIMATE TONE FOR GUITAR
PODXT
PRO
ULTIMATE TONE FOR GUITAR + DIG I/O
Pilot’s Handbook
An in-depth exploration of the revolutionary technologies and pulsing tonal pleasures that lurk within PODxt and PODxt Pro.
Includes details on Version 3 features.
Use free Line 6 Monkey to make sure your PODxt is up to date: www.line6.com/monkey
Electrophonic Limited Edition. Also available at www.line6.com. Revision H.

PODXT MODELS
PODXT, PODXT Live and PODXT Pro all include the Standard and Power Pack Models plus all guitar Cab Models. See www.line6.com/modelpack to learn about adding other Model Pack Models.
GUITAR AMPS & CABS
STANDARD & POWER PACK AMP MODELS |
CAB MODELS |
|
# Standard |
Power Pack |
# Cab Model |
0 BYPASS
1
2
3
4
5
6
7LINE 6 CHEM X
8LINE 6 INSANE
9LINE 6 ACO 2
11SMALL TWEED
12TWEED B-MAN
14BLACKFACE LUX
18PLEXI 45 PP
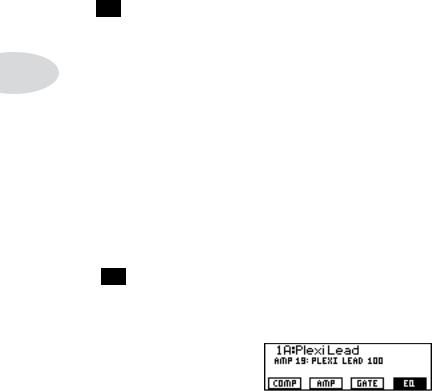
19PLEXI LEAD 100
20PLEXI JUMP LEAD
22BRIT J-800
26TREADPLATE DUAL
28JAZZ CLEAN
29SOLO 100
32CLASS A-30 TB
34L6 TREADPLATE
|
0 |
NO CAB |
|
TUBE PREAMP |
1 |
1X6 SUPER O |
|
LINE 6 CLEAN |
2 |
1X8 TWEED |
|
LINE 6 JTS-45 |
3 |
1X10 |
GIBTONE |
LINE 6 CLASS A |
4 |
1X10 |
G-BRAND |
LINE 6 MOOD |
5 |
1X12 |
LINE 6 |
SPINAL PUPPET |
6 |
1X12 |
TWEED |
|
7 |
1X12 |
BLACKFACE |
|
8 |
1X12 |
CLASS A |
|
9 |
2X2 MINI T |
|
ZEN MASTER |
10 |
2X12 |
LINE 6 |
|
11 |
2X12 |
BLACKFACE |
|
12 |
2X12 |
MATCH |
TINY TWEED |
13 |
2X12 |
JAZZ |
|
14 |
2X12 |
CLASS A |
DOUBLE VERB |
15 |
4X10 |
LINE 6 |
TWO-T0NE |
16 |
4X10 |
TWEED |
HIWAY 100 |
17 |
4X12 |
LINE 6 |
|
18 |
4X12 |
GREEN 20’S |
|
19 |
4X12 |
GREEN 25’S |
|
20 |
4X12 |
BRIT T75 |
PLEXI VARIAC |
21 |
4X12 |
BRIT V30’S |
|
22 |
4X12 |
TREADPLATE |
BRIT JM PRE |
23 |
1X15 |
THUNDER |
MATCH CHIEF |
24 |
2X12 |
WISHBOOK |
MATCH D-30
CALI CRUNCH
SUPER O
CLASS A-15
L6 AGRO
L6 LUNATIC
VARIAX ACOUSTIC
CITRUS D-30
CLASS A-30 FAWN
BRIT GAIN 18
J-2000 #2
LINE 6 BOUTIQUE
LINE 6 MODERN GAIN #1
METAL SHOP AMPS |
COLLECTOR CLASSICS AMPS |
||||
# |
Amp Model |
# |
Amp Model |
||
37 |
BOMBER UBER |
55 |
BOMBER X-TC |
||
38 |
CONOR 50 |
56 |
DEITY CRUNCH |
||
39 |
DEITY LEAD |
57 |
BLACKFACE VIBRO |
||
40 |
DEITY’S SON |
58 |
DOUBLE SHOW |
||
41 |
ANGEL P-BALL |
59 |
SILVERFACE BASS |
||
42 |
BRIT SLIVER |
60 |
MINI DOUBLE |
||
43 |
BRIT J-900 CLN |
61 |
GIBTONE EXPO |
||
44 |
BRIT J-900 DST |
62 |
BRIT BASS |
||
45 |
BRIT J-2000 |
63 |
BRIT MAJOR |
||
46 |
DIAMOND PLATE |
64 |
SILVER TWELVE |
||
47 |
CRIMINAL |
65 |
SUPRO ‘62 THUDERBOLT |
||
48 |
L6 |
BIG BOTTOM |
66 |
L6 |
BAYOU |
49 |
L6 |
CHUNK CHUNK |
67 |
L6 |
CRUNCH |
50 |
L6 |
FUZZ |
68 |
L6 |
PURGE |
51 |
L6 |
OCTONE |
69 |
L6 |
SPARKLE |
52 |
L6 |
SMASH |
70 |
L6 |
SUPER CLN |
53 |
L6 |
SPARKLE CLN |
71 |
L6 |
SUPERSPARK |
54 |
L6 |
THROTTLE |
72 |
L6 |
TWANG |
BASS AMPS & CABS
BASS EXPANSION AMPS |
BASS EXPANSION CABS |
||||
# |
Amp Model |
# |
Cab Model |
||
73 |
TUBE PREAMP |
25 |
1X12 |
BOUTIQUE |
|
74 |
L6 |
CLASSIC JAZZ |
26 |
1X12 |
MOTOR CITY |
75 |
L6 |
BRIT INVADER |
27 |
1X15 |
FLIP TOP |
76 |
L6 |
SUPER THOR |
28 |
1X15 |
JAZZ TONE |
77 |
L6 |
FRANKENSTEIN |
29 |
1X18 |
SESSION |
78 |
L6 |
EBONY LUX |
30 |
1X18 |
AMP 360 |
79 |
L6 |
DOPPELGANGER |
31 |
1X18 |
CALIFORNIA |
80 |
SUB DUB |
32 |
1X18+12 STADIUM |
||
81 |
AMP 360 |
33 |
2X10 MODERN UK |
||
82 |
JAGUER |
34 |
2X15 |
DOUBLESHOW |
|
83 |
ALCEMIST |
35 |
2X15 |
CALIFORNIA |
|
84 |
ROCK CLASSIC |
36 |
2X15 |
CLASS A |
|
85 |
FLIP TOP |
37 |
4X10 |
LINE 6 |
|
86 |
ADAM AND EVE |
38 |
4X10 |
TWEED |
|
87 |
TWEED B-MAN |
39 |
4X10 |
ADAM EVE |
|
88 |
SILVERFACE BASS |
40 |
4X10 |
SILVERCONE |
|
89 |
DOUBLE SHOW |
41 |
4X10 |
SESSION |
|
90 |
EIGHTIES |
42 |
4X12 |
HIWAY |
|
91 |
HIWAY 100 |
43 |
4X12 |
GREEN 20’S |
|
92 |
HIWAY 200 |
44 |
2X12 |
GREEN 25’S |
|
93 |
BRIT MAJOR |
45 |
4X15 |
BIG BOY |
|
94 |
BRIT BASS |
46 |
8X10 |
CLASSIC |
|
95CALIFORNIA
96JAZZ TONE
97STADIUM
98STUDIO TONE
99MOTOR CITY
100BRIT CLASS A100
EFFECTS
STOMPS
Standard Power Pack FX Junkie
FACIAL FUZZ FUZZ PI SCREAMER CLASSIC DIST
OCTAVE FUZZ
BLUE COMP
RED COMP
VETTA COMP
AUTO SWELL AUTO WAH
KILLER Z TUBE DRIVE VETTA JUICE BOOST + EQ
BLUE COMP TREB DINGO-TRON CLEAN SWEEP SEISMIK SYNTH DOUBLE BASS BUZZ WAVE
REZ SYNTH SATURN 5 RING M SYNTH ANALOG SYNTH FX
SYNTH HARMONY SYNTH LEAD SYNTH STRING
BASS OVERDRIVE
BRONZE MASTER
SUB OCTAVES
BENDER
REVERBS |
|
|
Standard |
Power Pack FX Junkie |
|
STD SPRING |
LUX SPRING |
|
KING SPRING |
||
|
||
|
SMALL ROOM |
|
BRITE ROOM |
TILED ROOM |
|
DARK HALL |
||
MEDIUM HALL |
||
LARGE HALL |
||
|
||
|
RICH CHAMBER |
|
CAVERNOUS |
CHAMBER |
|
|
||
SLAP PLATE |
VINTAGE PLATE |
|
|
||
|
LARGE PLATE |
MODS |
|
Standard |
Power Pack FX Junkie |
SINE CHORUS
ANALOG CHORUS
LINE 6 FLANGER
JET FLANGER
PHASER
U-VIBE
OPTO TREM
BIAS TREM
ROTARY DRUM +HORN
ROTARY DRUM AUTO PAN
|
|
ANALOG SQUARE |
|
|
SQUARE CHORUS |
|
|
EXPO CHORUS |
|
|
RANDOM CHORUS |
|
|
SQUARE FLANGE |
|
|
EXPO FLANGE |
|
|
LUMPY PHASE |
|
|
HI-TALK |
|
|
SWEEPER |
|
|
POD PURPLE X |
|
|
RANDOM S/H |
|
|
TAPE EATER |
|
|
WARBLE-MATIC |
DELAYS |
|
|
Standard |
Power Pack FX Junkie |
|
|
ANALOG DELAY |
|
ANALOG W/ MOD |
|
|
TUBE ECHO |
MUTLI-HEAD |
|
|
|
|
|
SWEEP ECHO |
|
DIGITAL DELAY |
|
|
|
STEREO DELAY |
|
|
PING PONG |
|
|
REVERSE |
ECHO PLATTER |
|
|
|
|
|
TAPE ECHO |
|
|
LOW REZ |
|
|
PHAZE EKO |
|
|
BUBBLE ECHO |
WAHS |
|
|
Standard |
Power Pack |
FX Junkie |
VETTA WAH
JEN FASSEL
WEEPER
CHROME
CHROME CUSTOM
THROATY
CONDUCTOR
COLORFUL

PODXT PRO CONTROLS REFERENCE
|
1 |
21 |
19 |
20 |
23 |
15 |
|
|
|
|
|
10 |
|
|
|
|
26 |
|
|
|
|
|
AMP MODELS |
DRIVE |
|
BASS |
MIDDLE |
TREBLE |
PRESENCE |
||||||
|
|
|
MOD |
|
|
|
|
|
|
|
|
|
|
|
|
|
|
|
POWER |
|
|
|
|
|
|
|
|
|
|
|
|
|
|
|
|
|
|
|
|
|
28 |
CLIP |
0 |
10 |
0 |
10 |
0 |
10 |
0 |
10 |
0 |
10 |
I/O & DIG |
|
|
16 |
17 |
14 |
|
|
|
|
|
|
|
|
|
|
|
SELECT |
|
|
|
|
|
|
|
|
|
|
|
|
|
|
XT |
||||
|
|
|
|
|
|
|
|
|
|
|
|
|
|
||||
|
|
|
|
PHONES |
REVERB |
CHAN VOL |
OUTPUT |
Guitar in |
PRO |
||||||||
|
|
27 |
SIGNAL |
PODULTIMATE TONE FOR GUITAR + DIG I/O |
|||||||||||||
|
|
|
|
|
|
|
|
|
|
|
|
|
|
|
INPUT LEVEL |
||
|
|
|
|
|
|
|
|
|
|
|
|
|
|
|
|
|
|
|
|
|
|
|
|
|
|
|
|
|
|
|
|
|
|
|
NORMAL PAD |
|
|
|
|
|
|
|
|
|
0 |
10 |
0 |
10 |
0 |
10 |
|
|
|
|
|
|
|
|
|
EFFECTS |
|
|
|
|
|
|
|
|
|
|
|
29 |
30 |
22 |
18 |
|
24 |
13 |
|
3 |
|
12 |
|
11 |
|
4 |
|
2 |
25 |
|
|
Balanced: Tip = + / Ring = - |
|
|
|
WARNING/AVIS: |
|
|
|
|
|
|
|
|
|
CAUTION |
|
ANALOG REAMPING INPUT/OUTPUT
Line Level |
|
|
|
|
|
|
|
|
|
|
|
|
|
Unprocessed |
||||||||||||||||
Input |
|
|
|
|
|
|
|
|
|
|
|
|
|
|
Guitar Out |
|||||||||||||||
|
|
|
|
|
|
|
|
|||||||||||||||||||||||
SERIES/PARALLEL VIA I/O & DIG SELECT BUTTON |
||||||||||||||||||||||||||||||
EFFECTS SEND |
|
|
|
|
|
EFFECTS RETURN |
||||||||||||||||||||||||
|
|
|
|
|
Unbalanced |
|
|
|
|
|
|
|
|
|
|
|
|
|
|
|
|
|
|
|
|
|||||
|
|
|
|
|
|
|
|
|
|
|
|
|
|
|
|
|
|
|
|
|
|
|
|
|
|
|
|
|
|
|
|
|
|
|
|
|
|
|
|
|
|
|
|
|
|
|
|
|
|
|
|
|
|
|
|
|
|
|
|
|
|
LEFT/MONO RIGHT |
|
|
LEFT/MONO RIGHT |
|||||||||||||||||||||||||||
|
|
|
|
|
|
|
|
|
|
|
|
|
|
|
|
|
|
|
|
|
|
|
|
|
|
|
|
|
|
|
|
|
|
|
|
|
|
|
|
|
|
|
|
|
|
|
|
|
SHOCK HAZARD – DO NOT OPEN. RISQUE DE CHOC ÉLECTRIQUE – NE PAS |
THIS DEVICE COMPLIES WITH PART 15 OF THE FCC RULES. |
|
|
|
|
RISK OF ELECTRIC SHOCK |
||||
|
|
|
|
|
|
|
|
|
|
|
|
|
|
|
|
|
|
|
|
|
|
|
|
|
|
|
|
|
|
|
|
|
|
|
|
|
|
|
|
|
|
|
|
|
|
|
|
|
OUVRI R. TO R EDUCE THE R ISK OF FIR E OR ELECTR IC SHOCK D O NOT |
OPER ATI ON IS SUBJ ECT TO THE FOL LOW ING T WO |
|
|
|
|
DO NOT OPEN |
||||
|
|
|
|
|
|
|
|
|
|
|
|
|
|
|
|
|
|
|
|
|
|
|
|
|
|
|
|
|
|
|
|
|
|
|
|
|
|
|
|
|
|
|
|
|
|
|
|
|
EXPOSE THIS EQUIPMENT TO RAIN OR MOISTUR E. TO REDUCE THE RISK |
CONDITIONS: (1) THIS DEVICE MAY NOT CAUSE HARMFUL |
|
|
|
|
POWER REQUIREMENTS |
||||
|
|
|
|
|
|
|
|
|
|
|
|
|
|
|
|
|
|
|
|
|
|
|
|
|
|
|
|
|
|
|
|
|
|
|
|
|
|
|
|
|
|
|
|
|
|
|
|
|
OF ELECTR IC SHOCK DO NOT REMOVE COVER. NO USER SERVICEABLE |
INTERFERENCE, AND (2) THIS DEVICE MUST ACCEPT ANY |
|
|
|
|
|||||
|
|
|
|
|
|
|
|
|
|
|
|
|
|
|
|
|
|
|
|
|
|
|
|
|
|
|
|
|
|
|
|
|
|
|
|
|
|
|
|
|
|
|
|
|
|
|
|
|
PARTS INSID E. REFER S ERVICING TO QUALIFIED SERVICE PERS ONNEL. |
INTERFERENCE RECEIVED, INCLUDING INTERFERENCE THAT |
|
|
|
|
|
||||
|
|
|
|
|
|
|
|
|
|
|
|
|
|
|
|
|
|
|
|
|
|
|
|
|
|
|
|
|
|
|
|
|
|
|
|
|
|
|
|
|
|
|
|
|
|
|
|
|
|
|
|
MAY CAUSE UNDESIRED OPERATION. |
|
|
|
|
100 - 120V ~ |
||
|
|
|
|
|
|
|
|
|
|
|
|
|
|
|
|
|
|
|
|
|
|
|
|
|
|
|
|
|
|
|
|
|
|
|
|
|
|
|
|
|
|
|
|
|
|
|
|
|
|
|
|
|
|
|
|
|
|
|
|
|
|
|
|
|
|
|
|
|
|
|
|
|
|
|
|
|
|
|
|
|
|
|
|
|
|
|
|
|
|
|
|
|
|
|
|
|
|
|
|
|
|
SET MODES & LEVELS VIA I/O & DIG SELECT BUTTON |
|
|
|
|
|
|
|
50 - 60Hz |
|||||||||
|
UNBAL ANALOG OUT |
|
BALANCED ANALOG OUT |
|
|
|
|
AES/EBU |
S/PDIF |
|
|
|
|
100 W Max. |
|||||||||||||||||||||||||||||||||||||||||||||
|
|
|
|
|
|
|
|
|
|
|
|||||||||||||||||||||||||||||||||||||||||||||||||
STUDIO: RECORDING OUTPUT |
|
|
|
|
|
|
|
|
|
|
|
|
|
|
|
|
|
|
|
|
|
|
|
PEDAL |
USB |
|
|
|
|
|
MIDI |
|
|||||||||||||||||||||||||||
LIVE: FEED TO ONSTAGE AMP |
|
|
|
|
|
|
|
|
|
|
|
|
|
|
|
|
|
|
|
|
|
|
|
|
|
IN |
|
|
|
||||||||||||||||||||||||||||||
|
|
|
|
|
|
|
|
|
|
|
|
|
|
|
|
|
|
|
|
|
|
|
|
|
|
|
|
||||||||||||||||||||||||||||||||
|
|
|
|
|
|
|
|
|
|
|
|
|
|
|
|
|
|
|
|
|
|
|
|
|
|
|
|
|
|
|
|
|
|
|
|
|
|
|
|
|
|
|
|
|
|
|
|
GROUND |
|
|
|
|
OUT |
|
|
|
|
|
|
|
|
|
|
|
|
|
|
|
|
|
|
|
|
|
|
|
|
|
|
|
|
|
|
|
|
|
|
|
|
|
|
|
|
|
|
|
|
|
|
|
|
|
|
|
|
|
|
GROUND |
LIFT |
|
|
|
|
|
|
|
|
|
|
|
L/MONO |
|
|
|
|
|
R/MONO |
|
|
|
LEFT |
|
|
|
|
|
|
|
RIGHT |
|
IN |
|
OUT |
|
IN |
OUT/THRU |
N222 |
||||||||||||||||||||||||||||||||
|
|
|
|
|
|
|
|
|
|
|
|
|
|
|
|
|
|
|
|
|
|||||||||||||||||||||||||||||||||||||||
|
|
|
|
|
|
|
|
|
|
|
|
|
|
|
|
|
|
|
|
|
|
|
|
|
|
|
|
|
|
|
|
STUDIO: +4 dBu |
|
|
|
|
|
|
FBV Class Foot Controller only |
|
|
|
|
|
|
|
|
||||||||||||
|
|
|
|
|
|
|
|
|
|
|
|
|
|
|
|
|
|
|
|
|
|
|
|
|
|
|
|
|
|
|
|
|
LIVE: -10 dBV |
|
|
|
|
|
|
(not compatible with Floor Board or FB4) |
|
|
|
|
|
|
|
|
|
||||||||||
|
|
|
|
|
|
|
|
|
|
|
|
|
|
|
|
|
|
|
|
|
|
|
|
|
|
|
|
|
|
|
|
|
|
|
|
|
|
|
|
|
|
|
|
|
|
|
|
|
|
|
|
|
|
|
|
|
|
|
|
31 |
32 |
33 |
34 |
35 |
6 |
7 |
NAVIGATION REFERENCE
• When EDIT, SAVE or TUNER is lit, “SELECT” selects pages |
MOD |
SELECT
• Otherwise, “SELECT” chooses Channel Memories
• Amp Settings
• Amp Bypass Settings
EDIT PAGES • A.I.R. Settings
• Compressor and Gate Settings
• EQ Settings
• Stomp Select and Settings
• Stomp Settings (page 2 for some models)
• Modulation Select and Settings
• Modulation Settings (page 2)
• Delay Select and Settings
• Delay Settings (page 2)
• Reverb Select and Settings
• Reverb Settings (page 2)
• Wah Settings
• Volume Settings
• Switch Pedal, Effect Tweak and Tempo Settings
368
•For Comp, Stomp, Mod, and Delay, the effect is on when lit.
• |
CAB/A.I.R. is lit when you are using a cab simulation. |
|
• |
Double press an effect button to go straight to its EDIT page. |
|
|
• Save Sound to Channel Memory |
|
SAVE PAGES |
• |
Custom Save Amp Model |
• |
MIDI Dump |
|
|
• |
Tuner |
TUNER PAGES |
• What are you connecting to? |
|
• |
Display contrast |
|
•MIDI/Variax
•PODXT Live Software Version
PODXT CONTROLS REFERENCE
5 |
|
|
|
6 |
7 |
8 |
|||
|
|
|
|
|
|
|
|
|
|
|
|
|
|
|
10 |
|
10 |
|
|
|
1 |
|
|
10 |
|
0 |
10 |
0 |
10 |
|
10 |
|
|
|
|
|
|
|
|
||||||
|
|
|
|
MIDDLE |
TREBLE |
|
|
|
|
||
|
|
0 |
10 |
|
|
XT |
20 |
0 |
10 |
|
|
|
|
BASS |
|
|
PODULTIMATE TONE FOR GUITAR |
PRESENCE |
|
|
|||
|
|
|
|
|
|
|
|
|
|
||
|
9 |
|
|
|
MOD |
|
|
|
|
11 |
|
|
|
|
|
|
|
|
|
|
|
|
|
0 |
10 |
21 |
|
|
19 |
|
|
|
23 |
0 |
10 |
DRIVE |
|
|
|
|
|
CHAN VOL |
|||||
|
|
16 |
SELECT |
17 |
|
EFFECT |
14 |
|
|
||
|
|
|
TWEAK |
|
|
||||||
4 |
|
22 |
|
|
18 |
|
|
|
24 |
|
12 |
0 |
10 |
|
|
|
|
|
0 |
10 |
|||
|
|
|
|
|
|
|
|
||||
OUTPUT |
|
|
|
|
|
|
|
|
REVERB |
|||
|
|
|
|
|
|
|
|
|
|
|
|
|
|
|
|
|
|
|
|
|
|
|
|
|
|
|
|
|
|
|
|
|
|
|
|
|
|
|
3 |
|
|
|
|
|
15 |
|
|
|
|
|
|
|
|
|
|
|
|
|
|
|
|
|
|
|
|
|
|
13 |
|
|
|||||
|
|
|
|
|
|
|
|
|
|
|
|
|
|
|
|
|
|
|
|
|
|
|
|
|
|
|
|
|
|
|
|
2 |
||||
AMP MODELS |
|
|
|
|
|
|
|
|
|
|
|
|
|
|
|
|
|
|
|
EFFECTS |
||||||||||||||||
|
|
|
|
|
|
|
|
|
|
|
|
|
|
|
|
|
|
|
|
|
|
|
|
|
|
|
|
|
|
|
|
|
|
|
|
|
NAVIGATION REFERENCE
• When EDIT, SAVE or TUNER is lit, “SELECT”
MOD
SELECT selects pages
•Otherwise, “SELECT” chooses Channel Memories
•For Comp, Stomp, Mod, and Delay, the effect is on when lit.
•CAB/A.I.R. is lit when you are using a cab simulation.
•Double press an effect button to go straight to its EDIT page.
|
• |
Amp Settings |
|
|
• |
Amp Bypass Settings |
|
EDIT PAGES |
• |
A.I.R. Settings |
|
• Compressor and Gate Settings |
|||
|
|||
|
• |
EQ Settings |
|
|
• Stomp Select and Settings |
||
|
• Stomp Settings (page 2 for some models) |
||
|
• Modulation Select and Settings |
||
|
• Modulation Settings (page 2) |
||
|
• Delay Select and Settings |
||
|
• Delay Settings (page 2) |
||
|
• Reverb Select and Settings |
||
|
• Reverb Settings (page 2) |
||
|
• |
Wah Settings |
|
|
• |
Volume Settings |
|
• Switch Pedal, Effect Tweak and Tempo Settings
SAVE PAGES
TUNER PAGES
•Save Sound to Channel Memory
•Custom Save Amp Model
•MIDI Dump
•Tuner
•What are you connecting to?
•Display contrast
•MIDI/Variax
•PODXT Live Software Version
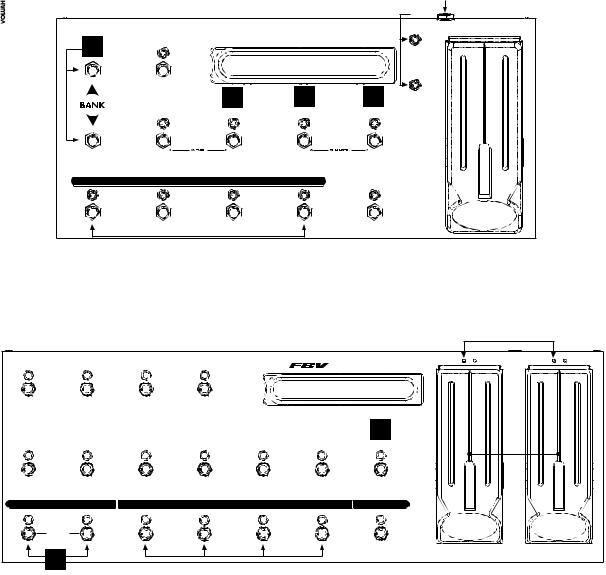
FBV SERIES REFERENCE
|
|
|
|
13 |
|
3 |
|
|
11 |
|
FBV SHORTBOARD |
|||
|
|
|||
1 |
FX LOOP |
|
|
|
|
|
|
|
|
|
4 |
8 |
9 |
7 |
|
STOMP |
MODULATION |
DELAY |
REVERB |
|
|
|
|
12 |
CHANNEL A |
CHANNEL B |
CHANNEL C |
CHANNEL D |
TAP |
|
|
|
|
HOLD FOR TUNER |
|
2 |
|
|
10 |
3 |
4 |
5 |
6 |
|
|
|
|
11 |
|
|
|
|
|
|
|
||||
FX LOOP |
STOMP BOX 1 |
STOMP BOX 2 |
STOMP BOX 3 |
|
|
WAH |
PEDAL 1 |
VOLUME |
PEDAL 2 |
|
CUS TOM FOO T CONTRO LLER |
|
|
|
|||||
|
|
7 |
|
8 |
9 |
10 |
|
|
|
AMP 1 |
AMP 2 |
REVERB |
TREMOLO |
MODULATION |
DELAY |
TAP TEMPO |
|
12 |
|
|
|
|
|
|
|
|
|
|
|
|
|
|
|
|
|
HOLD FOR TUNER |
|
|
|
BANK DOWN |
BANK UP |
CHANNEL A |
CHANNEL B |
CHANNEL C |
CHANNEL D |
FAVORITE CHANNEL |
|
|
|
|
FACTORY/USER |
|
|
|
|
|
|
|
|
|
1 |
|
|
2 |
|
|
|
|
|
SIGNAL FLOW & EFFECTS ROUTING OPTIONS
GATE
|
|
|
|
|
|
|
|
|
|
|
|
|
|
VOLUME |
WAH |
STOMP |
MODULATION |
DELAY |
AMP/CAB + A.I.R. II |
||||||
|
|
|
|
|
|
|
|
|
|
|
|
|
|
|
|
|
|
|
|
|
|
|
|
|
|
|
|
|
|
|
|
|
|
|
|
|
|
|
|
|
|
|
|
|
|
|
|
|
|
|
|
|
|
|
|
|
|
|
|
|
|
|
|
|
|
|
|
|
|
|
|
|
|
|
|
|
|
COMP |
EQ |
VOLUME |
MODULATION |
DELAY |
REVERB |
LOOP |
|
|
|
|
|
|
(PODXT Pro only) |
THE "WHAT ARE YOU CONNECTED TO?" EDIT PAGE (see text pages for PODXT Pro details)
STUDIO : DIRECT |
LIVE : 4x12 |
LIVE : 2x12 |
Be sure to use TRS cables when |
|
|
you want to get +4dBu levels to |
|
|
the balanced inputs of a recorder, |
|
LEFT OUTPUT |
mixer or power amp. |
|
|
|
|
|
|
|
|
Use your A.I.R. settings to get the right mic sound you’re looking for! Choose from:
MIC 1 |
.........................................................57 ON AXIS |
MIC 2 ....................................................... |
57 OFF AXIS |
MIC 3 ..................................................... |
421 DYNAMIC |
MIC 4 ................................................... |
67 CONDENSER |
All product names are trademarks of their respective owners, which are in no way associated or affiliated with Line 6. the specific products that were studied during Line 6’s sound model development.
Use the VIBE parameter to adjust the sound for your particular Live setup. Experiment with all the options, since different amp/cab combinations can give very different results, and you may get the best sound with an unusual combination of settings.
These product names and descriptions are provided for the sole purpose of identifying
The serial number can be found on the underside of your PODxt, or back panel of your PODxt Pro. It’s the number that begins with “(21)”. Please note it here for future reference:
SERIAL NO:
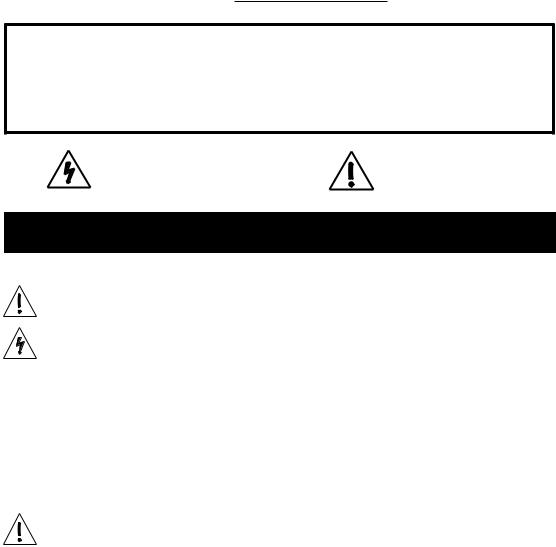
WARNING: To reduce the risk of fire or electric shock, do not expose this appliance to rain or moisture.
CAUTION: To reduce the risk of fire or electric shock, do not remove screws. No user-serviceable parts inside. Refer servicing to qualified service personnel.
CAUTION: This equipment has been tested and found to comply with the limits for a Class B digital device pursuant to Part 15 of FCC Rules. Operation is subject to the following two conditions: (1) This device may not cause harmful interference, and
(2) this device must accept any interference received, including interference that may cause undesired operation.
The lightning symbol within a triangle means “electrical caution!” It indicates the presence of information about operating voltage and potential risks of electrical shock.
The exclamation point within a triangle means “caution!” Please read the information next to all caution signs.
You should read these Important Safety Instructions Keep these instructions in a safe place
Before using your PODxt, carefully read the applicable items of these operating instructions and safety suggestions:
1.Obey all warnings on the PODxt and in this Pilot’s Handbook.
2.Do not place near heat sources, such as radiators, heat registers, or appliances which produce heat.
3. |
Guard against objects or liquids entering the enclosure. |
|
|
|
|
4a. |
PODxt: Connect only to AC power outlets rated 100-120V or 230V 47-63Hz (depending on the |
voltage |
|||
|
range of the included power supply). |
|
|
|
|
4b. |
PODxt Pro: Connect only to AC power outlets rated 100-120V or 220-240V 47-63Hz (depending on the |
voltage |
|||
|
range of the unit). |
|
|
|
|
5. |
Do not step on power cords. Do not place items on top of power cords so that they are |
pinched or leaned |
|||
|
on. Pay particular attention to the cord at the plug end and the point |
where |
it connects to the PODxt. |
||
6. |
Unplug your PODxt when not in use for extended periods of time. |
|
|
|
|
7. |
Do not perform service operations beyond those described in the PODxt Pilot’s Handbook. In the |
follow- |
|||
|
ing |
|
|
|
|
circumstances, repairs should be performed only by qualified service personnel: |
|
|
|
||
•liquid is spilled into the unit
•an object falls into the unit
•the unit does not operate normally or changes in performance in a significant way
•the unit is dropped or the enclosure is damaged
8.Prolonged listening at high volume levels may cause irreparable hearing loss and/or damage. Always be sure to
practice “safe listening.”
PODxt Pilot’s Handbook © 2006, Line 6, Inc.
Please Note:
Line 6, POD, PODxt, PODxt Pro, Vetta, FBV, FBV Shortboard, FBV4, Amp Farm, Line 6 Edit and Custom Tone are trademarks of Line 6, Inc. All other product names, trademarks, and artists’ names are the property of their respective owners, which are in no way associated or affiliated with Line 6. Product names, images, and artists’ names are used solely to identify the products whose tones and sounds were studied during Line 6’s sound model development for this product. The use of these products, trademarks, images, and artists’ names does not imply any cooperation or endorsement.

Contents
Quick Start Guide |
|
1•1 |
Register now!. . . . . . . . . . . . . . . . . . . |
|
1•2 |
Go on-line and get more stuff! . . . . . . . . . . . . |
. |
1•2 |
Introduction .. . . . . . . . . . . . . . . . . . . |
|
1•3 |
Welcome To PODxt.... |
|
1•3 |
Who is Line 6?. |
|
1•3 |
Modeling. . . . . . . . . . . . . . . . . . . |
. |
1•4 |
Amp, Cab and Effect Models . |
|
1•4 |
There’s Magic in the A.I.R.. . . . . . . . . . . . . |
. |
1•5 |
And Away We Go..... . . . . . . . . . . . . . . |
. |
1•7 |
|
|
|
Controls & Connections |
|
2•1 |
PODxt Pro . . . . . . . . . . . . . . . . . . . . 2•10 |
||
|
|
|
Getting Set Up |
|
3•1 |
All Purpose Basics .. .. .. .. .. .. .. .. .. .. .. .. .. .. .. .. .. |
|
3•1 |
What are you connecting to? . |
|
3•2 |
The Ins and Outs of Great Tone. |
|
3•2 |
Setting Levels . . . . . . . . . . . . . . . . . |
. |
3•3 |
Radiation Alert . |
|
3•3 |
Pedal Power. |
|
3•4 |
MIDI Mania. |
|
3•4 |
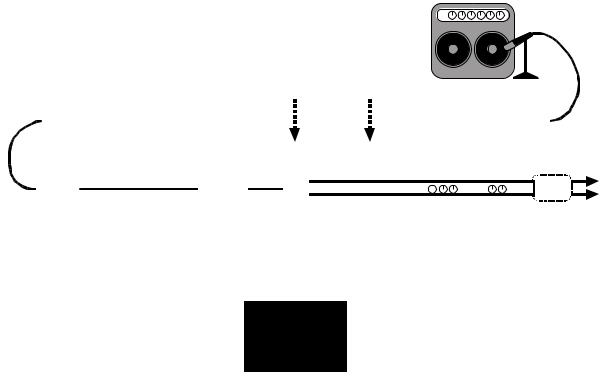
Re-Amping . . . . . . . . . . . . . . . . . . . . 3•4 |
||
What is Re-Amping?. |
|
3•4 |
PODxt — Playing Live. . . . . . . . . . |
. . . . . |
. |
3•9 |
|
Mount Up. |
|
|
|
3•9 |
Keeping Your Options Open. . . . . . . |
. . . . . |
. |
3•9 |
|
What are you connecting to? . |
|
|
|
3•9 |
Getting The Right Tone With An Amp. . . . |
. . . . . |
|
. 3•11 |
|
External Stomp Boxes and PODxt. . . . |
. . . . . . 3•12 |
|||
PODxt Pro — Configurations & Connections .. . |
. . . . |
. |
|
3•13 |
Selecting An Input . . . . . . . . . . |
. . . . . |
|
. 3•13 |
|
Input & Digital Out Options. . . . . . . |
. . . . . . 3•14 |
|||
FORMAT: Sample rate, word length (bit depth), and clock source 3•14 |
||||
MODE: Normal or Dry Guitar. . . . . . . |
. . . . . |
|
. 3•15 |
|
GAIN: Extra gain on the digital outs. . . . . |
. . . . . |
|
. 3•15 |
|
What are you connecting to? . |
|
|
|
3•16 |
FX Loop . . . . . . . . . . . . . . . . . . . . 3•17 |
||||
AES/EBU or S/PDIF Data Format?. |
|
|
|
3•18 |
Radiation Alert . |
|
|
|
3•18 |
Pedal Power. |
|
|
|
3•19 |
MIDI Mania. |
|
|
|
3•19 |
Re-Amping with PODxt Pro . . . . . . . . |
. . . . . |
. 3•19 |
||
Analog Re-amping. |
|
|
|
3•19 |
Digital Re-amping . |
|
|
|
3•21 |
|
|
|
|
|
Creating & Storing Sounds |
|
|
|
4•1 |
Recalling Channel Memories.. . . . . . . . |
. . . . |
. |
|
4•1 |
Recalling Effect Setups .. . . . . . . . . . |
. . . . |
. |
|
4•1 |
Editing Basics . . . . . . . . . . . . . . . . . . . 4•1 |
||||
Double Press for Easy Access . |
|
|
|
4•2 |
ii
Inside the Edit Menu.. . . . . . . . . . . . . . . . |
|
4•2 |
Amp knob settings . . . . . . . . . . . . . . . |
. |
4•3 |
Amp Bypass Channel Volume. |
|
4•3 |
Cabinet and Mic settings (There’s magic in the A.I.R.!) . |
|
4•4 |
Comp/Gate settings. . . . . . . . . . . . . . . |
. |
4•4 |
EQ settings. . . . . . . . . . . . . . . . . . |
. |
4•5 |
Stomp settings . |
|
4•6 |
Mod and Delay settings . . . . . . . . . . . . . |
. |
4•6 |
Config. . . . . . . . . . . . . . . . . . . . |
. |
4•7 |
Setting your Tone to Tempo. . . . . . . . . . . . . . |
|
4•8 |
Reverb settings.. . . . . . . . . . . . . . . . . . |
|
4•8 |
Wah Settings. . . . . . . . . . . . . . . . . . |
. |
4•9 |
Volume Settings . . . . . . . . . . . . . . . . . . 4•9 |
||
Assigning the Pedal and Tweak Knob and dialing in Tempo. . |
. 4•10 |
|
SavingYourself .. . . . . . . . . . . . . . . . . . |
|
4•11 |
Saving a Channel Memory. |
|
4•11 |
Custom Saving Amp Models. . . . . . . . . . . . |
. 4•12 |
|
Custom Saving Effect Setups. |
|
4•13 |
MIDI Dumps. |
|
4•14 |
|
|
|
Modeled Amps & Cabs |
|
5•1 |
Which Amps and Cabs Are Modeled?.. . . . . . . . . . |
|
5•1 |
Cabinet Models. . . . . . . . . . . . . . . . . . |
|
5•34 |
|
|
|
Effect Model Details |
|
6•1 |
Comp .. . . . . . . . . . . . . . . . . . . . . |
|
6•1 |
Gate . . . . . . . . . . . . . . . . . . . . . |
. |
6•2 |
iii
The Stomp Effects: Fuzz, Distortion, Overdrive .. .. .. .. .. |
.. |
.. |
6•3 |
Stomp Effects: Compressors. . . . . . . . . . . . |
. |
. |
6•9 |
The Wah Pedals. . . . . . . . . . . . . . . . |
. |
. |
6•13 |
The Modulation Effects .. .. .. .. .. .. .. .. .. .. .. .. .. |
.. |
.. |
6•15 |
The Delay Effects .. .. .. .. .. .. .. .. .. .. .. .. .. .. .. |
.. |
.. |
6•23 |
Reverb .. .. .. .. .. .. .. .. .. .. .. .. .. .. .. .. .. .. .. |
.. |
.. |
6•30 |
|
|
|
|
MIDI |
|
|
7•1 |
MIDI Basics.. . . . . . . . . . . . . . . . . |
. |
. |
7•1 |
What’s MIDI? . . . . . . . . . . . . . . . . |
. |
. |
7•1 |
In/Out . . . . . . . . . . . . . . . . . . |
. |
. |
7•1 |
MIDI Channel . . . . . . . . . . . . . . . . |
. |
. |
7•2 |
MIDI Messages. |
|
|
7•3 |
Backing Up PODxt Programs to Other Devices . . . . . . . 7•4 |
|||
Other ThingsYou Can Do with MIDI . . . . . . . . . |
. |
. |
7•6 |
Changing PODxt Channels with MIDI Program Changes . |
|
|
7•6 |
Tweaking PODxt Tones with MIDI Controllers. |
|
|
7•6 |
Full MIDI Automation of PODxt . . . . . . . . . |
. |
. |
7•6 |
MIDI Setup Trouble-shooting .. . . . . . . . . . . |
. |
. |
7•7 |
|
|
|
|
Putting Your Feet to Work |
|
|
8•1 |
Meet the FBV Shortboard .. . . . . . . . . . . . |
. |
. |
8•1 |
PushingYour Buttons.. . . . . . . . . . . . . . |
. |
. |
8•1 |
Saving and Naming with the FBV Shortboard .. . . . . |
. |
. |
8•3 |
Using an EX-1.. . . . . . . . . . . . . . . . |
. |
. |
8•4 |
|
|
|
|
Appendix A:Amp Models |
|
|
9•1 |
iv

Appendix B: MIDI Program Changes |
9•3 |
|
|
Appendix C: PODxt MIDI Controls |
9•4 |
|
|
Appendix D: Note Value Controller Values |
9•7 |

|
Quick Start Guide |
Quick Start Guide |
1•1 |
or: |
|
“Manual? I don’t need no stinking manual!”
PODxt Pro owners, if you’re going to use anything beyond the standard guitar input and analog outputs, we can’t cover all your options on this brief page. See Chapter 2 to learn about con-
trols, and then get deep with the inputs and outputs in the PODxt Pro — Configurations & Connections section that starts on page 3•8.
1.Turn the Output Level control all the way down to zero.
2.Connect the Left and Right Outputs to your recorder or mixer’s inputs, or plug the left output into your guitar amp’s input. Or connect headphones to the Phones jack on your PODxt for silent jamming.
3.Connect the included power pack or power cable to your PODxt, and plug the other end into a power jack.
4.Connect your guitar to PODxt’s Input (PODxt’s Pro Guitar In).
5.Flip the Power switch to fire up.
6.PODxt comes ready to rock for direct connection to your recording setup. If you’re connecting to a guitar amp, it’s essential to let your PODxt know so it gives you the best tone. Do this by pressing Tune/System, then turning the
Select knob one step clockwise. Press the button below Dest (Destination) and then turn the EffectTweak knob to tell your PODxt what type of amp you’re connecting to. PODxt will automatically override this setting when you plug in headphones, so you don’t have to do anything to get great headphone sound.
7.Select an Amp Model using the Amp Model knob. Set the ChanVol to max and the Drive, Bass, Mid, Treble and Presence to your heart’s desire. Output sets the, uh, output level.
8.Turn the Effects knob to load an Effects Setup, then twist the Reverb and Effect Tweak knobs so you’re happy with the sound. Tap the Tap tempo button to set the speed of the selected effect.
9.Browse pre-programmed tones using the Select knob. Press the far left button under the display when the Edit button is NOT lit for a “Manual Override” and where-the-knobs-are-is-how-it-sounds operation.
Now before you run off, please give the page a quick flip and....

Quick Start Guide
Register now!
1•2 |
Included in this manual is a handy, postage-paid card for you to send back to us to regis- |
|
|
|
ter your purchase. It’s very important that you fill that registration card out right now |
|
and drop it in the mail, or jump on the Internet and register at www.line6.com. Register- |
|
ing insures that you’re dialed in for warranty service (warranty info is at the end of this |
|
manual) and insures we can contact you if new software versions or other cool enhance- |
|
ments are offered — cutting edge technology and such. |
Go on-line and get more stuff!
Here at Line 6, our mission is to help you be more creative by bringing you powerful new technologies. As part of that mission, we focus great effort on making the Internet a valuable resource for every one of our customers. The Line 6 web site is one of the most effective ways for us to deliver you what you need to make you and your PODxt ever more powerful.
Connect to www.line6.com to check out Custom Tone—a truly massive, free, exclu- sive-to-Line-6 online tone library that gives you instant access to the signature sounds of the greatest guitarists, bands, songs and gear of all time. It integrates with the free Line 6 Edit software that lets you edit your PODxt’s sounds, and save copies of them on your computer. Our web site is also the place to download our GuitarPort software and USB driver software, all free for your PODxt. You can even add more Models to your PODxt (see www.line6.com/modelpacks for the details on that). And to make it easy to get all this cool, computer-related stuff, look for the handy Line 6 Monkey utility, downloadable from our web site, which will check for and install the latest versions of every-
thing for you! Visit the discussion boards to learn tips & tricks, trade advice, and generally hang out and get POD-a-licious with the whole extended family of PODxt users. Use the Support pages to get answers to your technical questions and contact our customer service experts. Or grab electronic versions of this book and other documentation, learn what your favorite artists are doing with Line 6 gear, and see the latest products we’re introducing for you.
Not on the Internet yet? This may be the time to make the big jump, and thereby ensure that you will get all the great resources we can offer for you and your PODxt.

Quick Start Guide
Introduction
WelcomeTo PODxt... |
1•3 |
|
|
Thank you for inviting PODxt into your life. Whether you use your PODxt as a direct |
|
recording miracle, a powerhouse preamp, a practice partner, or as a creative digital signal |
|
processing tool (and heck, why should it be just one of these?) — we think you’ll agree |
|
that PODxt is about the most amazing thing to happen to the electric guitar since, well, |
|
since the guitar amplifier itself! PODxt delivers the incredible tones of the acclaimed |
|
Line 6 Point-to-Point Interactive modeling technology (as featured in our Vetta series |
|
amps) and fuses it with the wonderfully portable and easy to use POD, which has been |
|
the guitar recording world standard for years. So you’ve got the tonal heritage of the |
|
past century of guitar amplifier and stomp box design, plus no-compromise recording and |
|
direct sound excellence — all ready to roll when you are. |
|
Who is Line 6? |
|
As you may know, Line 6 first came on the scene several years back with a new kind |
|
of guitar amplifier — the first to put digital software modeling technology to work in a |
|
combo amp for guitarists. We also knew then that guitarists need great amp tone when |
|
recording, but generally don’t have the room to crank up that classic stack, or the money |
|
to hire a team of ace engineers to get it to tape. So we squished our patented modeling |
|
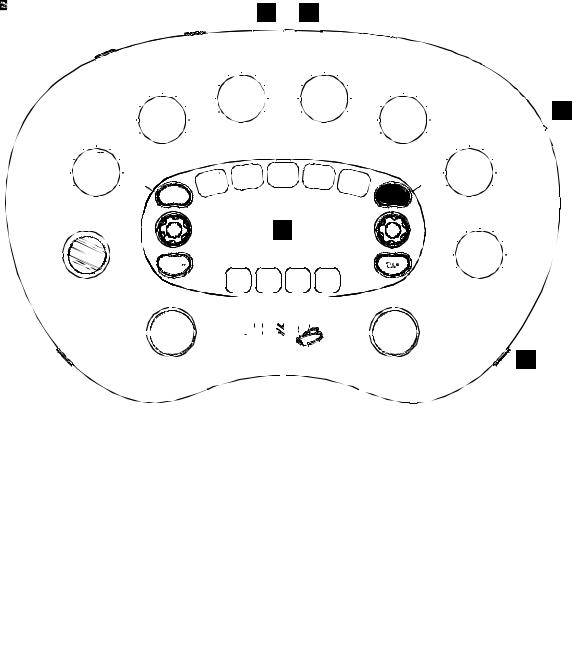
technology down into a small, kidney-bean-shaped wonder called POD, and forever |
|
changed the world of guitar recording. |
|
Once we’d gotten this whole modeling amp and POD thing started, it was time to see |
|
what we could do if we really cranked up the horsepower and took our modeling to the |
|
next level. I mean, once you’ve climbed to the top of the mountain, it’s on to the next |
|
mountain, right? So, eyes glowing like power tubes, we stocked up on the Pepsi, gathered |
|
our genius engineers into a secret lab, fired up our extensive collection of amplifiers and |
|
stomp boxes... and spirited their treasured tones into a newly-supercharged modeling |
|
technology we dubbed Point-to-Point modeling. It first hit the streets in the award-win- |
|
ning Vetta amp, whose superb tone and unparalleled selection of dream amps, cabinets |
|
and effects make it a pretty good contender for the world heavyweight amp title. After |
|
that, we poured the same magic elixir into the classic POD and—ta-dah!—PODxt was |
|
born. |
|
How does PODxt help you create a guitar tone that is out of this world, and then get |
|
that tone wherever you need it? Easy! It’s… |
|

Quick Start Guide
|
Modeling |
1•4 |
Modeling: just what is it, and why is it so important? |
|
To answer that question, we’ll start with tubes (better know as “valves” to our friends in |
|
England and elsewhere). Tubes, we can all agree, are the heart and soul of pretty much |
|
every legendary guitar amp, and are key to the warm, harmonic-rich tone quality of |
|
those amps. Solid state devices (transistors) are simply unable to duplicate tube warmth |
|
and performance. And “hybrids” — a tube in a circuit along with a bunch of transistors |
|
— are really a vain attempt at warming up a transistor-based tone. They fall short in any |
|
comparison to a 100% tube circuit. So that’s it — tubes or nothin’, right? Well, not any |
|
more.... |
|
You see, Line 6’s team of crack engineer-guitarists has spent years understanding pretty |
|
much everything there is to know about tube-powered gear, including exactly how dif- |
|
ferent types of tubes respond under various conditions typical of guitar amplifier design. |
|
How tubes process an input signal, how the signal is colored and shaped, at what point it |
|
begins to distort, the quality and characteristic of the distortion, what happens when the |
|
signal gets to other parts of the system — complicated stuff, but all analyzable as elec- |
|
tronic data. A guitar pickup output, after all, is an electronic signal, and tubes and all the |
|
rest are really just a complex form of signal processing. |
|
Having sussed it all out, the Line 6 engineers translated all this arcane knowledge into |
|
software that simulates the signal processing of guitar amps’ tubes and other electronics, |
|
entirely within the digital domain. Cool, huh? The Line 6 crew also directed their caf- |
|
feine-enhanced modeling attention to a study of guitar speaker cabinets and the impor- |
|
tant part they play in communicating great guitar tone. And the great variety of stomp |
|
box and rack effects that guitarists use to juice things up. They translated it all into |
|
yet more powerful software, and it’s this revolutionary DSP (Digital Signal Processing) |
|
software-based modeling technology that gives Line 6 the power to create super silicon- |
|
based life forms like PODxt. |
Amp, Cab and Effect Models
The tone and technology know-how of Line 6 thus comes to you as Amp, Cab and Effect Models based on a collection of gear recognized by guitarists the world over as true “tone classics.” These models were tweaked through careful, scientific A/B comparisons to the gear that inspired them, with an ear open for the effects of different volume levels and settings of the originals’ tone and gain controls. The gain and equalization characteristics of the modeled gear were carefully measured so that changes to knobs on the models

Quick Start Guide
would mirror the effects of these changes on the originals as closely as possible. We’re
talkin’ major attention to detail here. Tone control center frequencies, slopes, and cut/ 1•5 boost range were painstakingly analyzed, in addition to a whole host of factors unique
to each piece of gear. Not only that, but since many classic amps and effects have highly interactive circuits, we paid careful attention to the way that the setting of one knob changes the way that another knob may behave. All in an effort to make our Models as much like the amps, cabs and effects in our collection as possible. The resulting Amp, Cab and Effect Models are the foundation of PODxt.
Now, then — here are a couple of things we want to be completely crystal clear on:
1.The Line 6 modeling process is a patented, 100% digital soft- ware-based technology exclusive to Line 6.
2. Line 6 Modeling is not sampling, nor is it solid state; no special guitar, pickup, or cabling is needed.
There’s Magic in the A.I.R.
PODxt delivers its modeling tones through another innovation: Line 6’s A.I.R. direct recording output. The A.I.R. (acoustically integrated recording) technology is the result of intensive research and careful study of the tonal characteristics produced by the interaction of amplifiers, cabinets, speakers, microphones and the recording room during the recording process.
The direct output of many preamps, amplifiers and direct box-style amp replacements available today offer some limited form of cabinet simulation or speaker emulation. Those that happen to be more than simple high end roll-offs have little or no control options. Generic cabinet simulations cannot reproduce the markedly different tones resulting from the choice of speakers, wood, and other details of a great real-life speaker cabinet. Other equipment also fails to reproduce the significant tonal contribution of microphone selection and placement, and do nothing to reproduce the subtle ambience of the recording space.
The result is the familiar dissatisfaction with direct recording products — even those that deliver a reasonably usable basic tone fail to reproduce the “life” of the guitar sound, and destroy the proper feel in the process. It is as if your guitar strings became heavier and less responsive, like they just went up a couple of gauges when you plugged into your direct box. And your sound lost its life.

Quick Start Guide
PODxt’s combination of Amp Models and A.I.R. technology provides superior direct 1•6 tones by recreating all the elements contributing to a great recorded guitar sound, and giving you that tone with the same feel as playing through a real amp and speaker cabi-
net:
•The effect of the guitar amplifier circuit is emulated by the Amp Model you choose. Each model was developed from extensive study of a classic amplifier treasured as a tone classic.
•In a guitar amp, once the guitar signal passes through the electronics, it is output to one or more speakers in a speaker cabinet. The specific design of the speakers, how many there are, and how they are arranged contributes significantly to your guitar tone, as does the construction and resulting tone of the wood box itself. A Marshall
head driving a single 12-inch speaker in an open-back cabinet, for instance, will sound dramatically different from the same head driving a 4x12 closed-back cabinet. Line 6 has carefully constructed virtual software speaker cabinets that emulate the contribution made by real speaker cabinets to get great guitar sound.
•Once the sound makes it out of the speaker cabinet, the next important link in the recording system is the microphone that receives that sound. Guitar recordists select different microphones, and arrange them in different placements, to get particular sounds. A microphone pointing directly into the cone of a speaker will hear something different than one positioned off-axis. Line 6 carefully analyzed the coloring that various microphones add to the guitar sound, as well as the effects of different mic placement techniques, and gave you control of these details in your PODxt.
•The guitar amp, cabinet, and microphone don’t just sit in empty space. The room that they are in contributes importantly to the guitar sound you will record. Reverb can be used to capture the basic character of the space, simulating the effect of the sound reflecting off the room’s walls, floors and ceiling. But there are other subtle details that have more to do with the “spread” of the sound as it passes through the air between the speaker and microphone. This final component is the key to the sense that the listener is in one position in the room, and the guitar sound is in another position, and that the two are separated by a mass of air that sound spreads through to reach the listener.

Quick Start Guide
All of these important sound-shaping components are accounted for in your PODxt.
Turn the Amp Model knob to call up the amplifier emulation you want. PODxt auto- 1•7 matically matches that amplifier with an appropriate cabinet and microphone setup, and
gives you the sound of that setup coming through the air of a recording space. Turn the reverb knob to taste, and start recording incredible mic’d up sound. Press a button and twiddle a knob or two, and you can switch cabinets, change out mics and their placement, and adjust the “spread” of the sound in your virtual room as well.
The A.I.R. direct recording output is exclusive to Line 6. In combination with the Line 6 Amp, Cab and Effect Models, it is the key to PODxt’s phenomenally satisfying direct recording sound.
And Away We Go....
So, now that you know what’s in store, it’s time to experience PODxt for yourself. Grab
your favorite axe, plug in, and flip back to the handy Quick Start Guide on the first
page of this chapter if you haven’t already been through that. Then fold out the back
cover and follow me, my friend, for the PODxt Grand Tour....
Controls & Connections
Controls & Connections
Now would be a good time to turn to the nifty back cover of this manual and notice |
2•1 |
|
|
||
that it folds out. Ooh, pretty pictures! The idea is to have this essential pictorial refer- |
|
|
ence always opened out while you’re thumbing through the manual. It’s also got all the |
|
|
essential details for quickly getting around on your PODxt. The boxed numbers that pop |
|
|
up throughout this manual correspond to the numbers on the foldout’s illustrations. The |
|
|
back side of the cover’s got handy pictures for the FBV and FBV Shortboard foot con- |
|
|
trollers, plus signal flow and connection guides. |
|
|
|
Power Switch - Flip this to bring your PODxt to life. PODxt Pro includes |
|
1 |
|
|
a |
standard IEC grounded power cable. For PODxt, use only the included PX-2 power |
|
pack. |
|
|
|
Input/Guitar In - Plug your guitar in here. (You techies will want to know |
|
2 |
|
|
this is a mono, un-balanced connection). |
|
|
|
Phones - Plug your headphones in here for silent concertos. The volume is set |
|
3 |
|
|
by |
the Output knob. Any time you use headphones, it important to be sure they’re not |
|
set for ridiculous volume before your slap them on your ears. Try an Output knob setting |
|
|
of about 10 o’clock when first putting the headphones on, them turn up from there if you |
|
|
need more volume. |
|
|
So that you hear appropriate sound through the headphones, PODxt automatically |
|
|
switches to Studio Mode whenever headphones are connected (for more on Studio |
|
|
Mode, see “What are you connecting to?” on page 3•2). |
|
|
A quick note about headphones: Earbuds and headphones designed for use with portable |
|
|
MP3 players and tape players are very low impedance as well as not very accurate in |
|
|
frequency response. This makes them not suitable for use with PODxt. We recommend a |
|
|
pair of 150-600 ohm pro or semi-pro level studio headphones for best results. |
|
|

Controls & Connections
4 Output - This controls the overall output level of PODxt and also sets the headphone level. Changing the Output level does not change your tone, so you can get the tone you want at any volume level. This setting is not saved when you store settings
into one of the PODxt’s memory locations.
2•2
PODxt Pro users, note that this does not affect the level of the XLR Outputs in Live Mode (for more on Live Mode, see “What are you connecting to?” on page 3•5).
PODxt will give the best signal-to-noise performance when you have the Output control at max. With the Output control turned down low, you may get extra hiss—which obviously ain’t what you want—if you turn up your mixer or recorder’s output to compensate. In order to allow you to set the Output as high as possible when connecting to recording, mixing, and other studio gear, be sure you are plugging PODxt’s outputs into line level, not microphone or guitar level inputs. Line level inputs should allow you to turn PODxt’s Output up all the way (or close to it) and thereby get the best sound possible. If your gear has inputs that function as mic/line level inputs, try to set the trim for those inputs to the minimum level, and PODxt’s Output to maximum, when setting levels.
5 Left & Right Output - (See numbers 33 and 34 for PODxt Pro’s outputs.)
These balanced 1/4-inch TRS (tip/ring/sleeve) connectors are ready to rock with pro +4dBu balanced equipment. They will also work happily with unbalanced –10dBV equipment and standard guitar cables. If you need mono output, you can use either one.
6 Pedal - Looks like a telephone connector on steroids. Connect optional Line 6 FBV or FBV Shortboard foot controllers here. PODxt’s do not work with the Line 6 Floor Board and FB4.
7 USB - PODxt’s USB jack lets you connect it directly to most computers, and record your PODxt directly to a wide variety of popular recording software. We’ve included a USB cable for use with our GuitarPort Windows software, Line 6 Edit software for Mac OS X and Windows, our Custom Tone online tone library, and PODxt driver software. All this software—along with directions for using it—is free for you to download at www.line6.com.

Controls & Connections
8 MIDI In & Out - Connect PODxt to your MIDI equipment to select Channel Memories (via Program Change messages), or automate PODxt settings (via controllers and/or SySex). You can also use MIDI (or USB) to communicate with the free Line 6 Edit software downloadable from www.line6.com. The PODxt MIDI OUT connects
to another device’s MIDI IN; its MIDI IN goes to another device’s MIDI OUT. Please 2•3 also see Chapter 7, Deep Editing and MIDI Control, to setup your MIDI gear with
PODxt and find out what MIDI can do for PODxt and you.
9 Drive - This knob controls how hard you’re driving the input of the chosen Amp Model. Like the input volume control on a non-master volume guitar amp, higher settings give you more “dirt.”
10 Tone Controls - Bass, Middle, Treble, Presence. Just like any guitar amp, only when you change Amp Models, the response and interactivity of the controls changes, too — so they act like the tone controls of the original amp that inspired the Amp Model you’ve selected.
11 ChanVol - This knob controls the relative volume level of the “channel” you are playing through — thus, Channel Volume. Use this to balance levels between the sounds you store in two different PODxt Channel Memories (say between your rhythm and lead tones). In general, you want to set the Chan Vol as high as possible to insure you’re getting the best signal-to-noise ratio performance — but back off on this control if you’re seeing CLIP in PODxt’s display.
TIP: You probably want to have all of your favorite sounds as loud as possible, while also having the right difference in volume between your lead and rhythm sounds, clean and dirty sounds, etc. Right? OK, then, to get this happy balance, start with your favorite ‘clean’ sounds. Turn up their Chan Vol as high as you can without getting the CLIP indicator in PODxt’s display when you strum hard. and save them that way. Then switch amongst them to see if some are too loud, and turn them down a bit to match well with the others. Next, move on to select your ‘dirtier’ crunch and lead tones, comparing them to the clean sounds and saving them with lower Chan Vol settings to match well with those clean sounds. Now, each time you use your PODxt, you just have to set an Output volume level you like, and you can switch amongst your various sounds without unhappy volume differences.

Controls & Connections
12 Reverb - How much reverb do you want today? Spin this knob to set the Reverb level. Several flavors of reverb live inside PODxt, including springs, rooms, chambers, halls and plate reverbs.
2•4
13 Effects - This knob selects from PODxt’s Effect Setups — which set up a combination of effects for you (all the details on effects are in Chapter 6, Stompboxes & Effects). Think of each Effect Setup as a virtual pedal board or outboard gear rack that you can match with any Amp Model. When you turn the Effects knob, PODxt shows the name of the Effect Setup that is loaded and you’ll hear the effects change instantly. The effect buttons light to show which effects are on. There are 64 of these effect “rigs” pre-programmed and ready for you to use.
14 EffectTweak - This knob varies some aspect of the effect you’ve chosen. Turn it up and the effect will generally go deeper, louder, faster, longer or just plain more. You’ll know what you’re tweakin’ because a window will pop up on PODxt’s display to show you. The delay time is usually set by the Tap button. For the inside scoop, including how you can customize the Effect Tweak knob see Chapter 4, Creating & Storing Sounds. If the effect that Effect Tweak is “targeting” is off, then, big surprise, Effect Tweak won’t change anything. While the Edit or Tune/System button is lit, the Effect Tweak knob adjusts parameter values instead.
15 Amp Models - When you spin this knob, it’s essentially like changing what electronic “circuitry” is running inside PODxt to make your amp sound. (See the groovy details in Chapter 5, Modeled Amps and Cabs.) You’ll see the Amp Model names change in PODxt’s display. When you choose an Amp Model, Cabinet and Microphone Models are also loaded automatically. For instance, when you choose the Brit Hi Gain model (based on the classic Marshall JCM 800 head), a Cabinet Model based on a Marshall 4x12 will be loaded with it. You can also choose a different cabinet/mic setup by pressing the CAB/A.I.R. button (below).
In fact, Amp Models automatically load with all the amp-related settings pre-set for a ready to go tone. Drive, Bass, Mid, Treble, Presence, Cab/A.I.R., EQ etc. will all be determined by the Amp Model you choose — giving you a ready-to-rock sound with
the turn of just this one knob. Once you get familiar with PODxt, you can change these amp-associated defaults to customize the settings of each of the Amp Models to fit your tastes. Note that when you’re in Manual Mode, Drive, Bass, Mid, Treble, Presence, Channel Volume and Reverb are set by the physical knob positions instead of being automatically set with the amp selection. Complete details are in Chapter 5.

Controls & Connections |
|
16 Select - The PODxt has 128 Channel Memories. They are arranged in 32 banks |
|
of four channels each. (The four are called A, B, C, and D.) You can think of each bank |
|
as a sort of virtual four-channel guitar amp — and you’ll find that the same layout is used |
|
on the optional Line 6 foot controllers for PODxt (the FBV and FBV Shortboard) which |
2•5 |
are discussed later in Chapter 8. |
|
The first 64 Channel Memories (Banks 1-16) store a variety of complete amp-and-effect selections pre-programmed by the tone mavens at Line 6. The second 64 (Banks 17-32) are left for your own creations (or you can load them up with one of the thousands of great tones you’ll find at customTone.com).
You load PODxt channels by turning the Select knob. When recalling a channel, you may have left the physical Bass knob at minimum, whereas the just-recalled channel has this control set to max. To change Bass (or anything else), just grab the knob you want and tweak.
To leave the Channel Memory world and enter Manual operation, make sure the Edit button is not lit, and press the Soft Button 18 below the word manual. The display will read Manual Mode to let you know you’ve got WYSIWYG (what-you-see-is-what- you-get) operation, and all the physical knob positions are being used to determine your sound. More on all this later.
When the Edit, Save or Tune/System button is lit, the Select knob selects from the available display pages. When you press Edit, it selects pages of effect and channel parameters; when you press Tune/System, it takes you through all of the Tuner and systemwide settings; when Save is lit, you’ll find amp and effect customization features as well as MIDI dump operations. The vertical “scroll bar” on the left side of each display page shows you where you are in that group of pages.
Controls & Connections
17 Display - PODxt’s LCD (liquid crystal display) is your window into every parameter and setting available. Here’s how to get around:
1. When the Save, Edit or Tune/System button is lit, a scroll bar on the left side of 2•6 PODxt’s display shows you where you are in the available display “pages.” Press one
of these buttons to see the scroll bar now. For those that really need to get all the nerdy details, each dot in that bar represents a page. As you turn the Select knob, you move through the pages and so does the little square. When you’re on the first page, the little square is at the top. When you get to the last page, the square’s at the bottom. Square goes up, square goes down. Square goes up, square goes down. Fun for the whole family!
2.Each page typically has words that appear in the bottom of the display. These words label things you can adjust. Press the button below the thing you want to adjust, then turn the EffectTweak knob to do your adjusting.
18 Soft Buttons - These four buttons operate differently depending on what you’re doing.
If the Edit button is NOT lit, the PODxt’s display will look about like this:
You can press the far left Soft Button to enable Manual mode. Press the second Soft Button from the left to show the saved settings of the Amp Model’s tone controls, then press the lit Edit button to exit that display. Press one of the two Soft Buttons on the right to turn the Gate and EQ effects on/off (in the illustration, the Gate effect is off, and the EQ effect is on). Double-pressing the button for Gate or EQ will jump you right to the detailed settings for those effects. You can then press the lit Edit button when you’re finished tweaking.
If the Edit button IS lit, the Soft Buttons will let you select which displayed setting you’d like to tweak. See Chapter 4 for the detail on that.

Controls & Connections
19 Effect On/Off Buttons - These four buttons allow you to quickly turn any of four effects on or off (the effects are on when the buttons are lit).
• |
The Comp button turns on/off the Compressor effect |
2•7 |
|
• |
The Stomp button turns on/off the loaded Stomp-Box effect |
||
|
•The Mod button turns on/off the loaded Modulation effect
•The Delay button turns on/off the loaded Delay effect.
Double-press one of these buttons to adjust the loaded effect or load a different one. For example, just press the Comp button two times quickly and you’re instantly taken to the Compressor and Gate Edit page. Double-pressing the Stomp button will quickly take you to the first Stomp Box Edit page. Double-press the same button again (or press the Edit button) to leave Edit Mode.
20 CAB/A.I.R. - Press the CAB/A.I.R. button once to pick a Cab Model to pair with your amplifier, select the microphone used on the cabinet and even set the amount of “room” that the mic captures. Unlike the Effect On/Off buttons, this button is not an on/off type control. A single press of this button simply lets you change cabs and mics quickly. When the Cabinets are off, this button’s light will be off as well.
21 Save - When you want to store your own tweaked-up sounds in your PODxt this button is the key. Exactly how it works is detailed in Chapter 4, Creating & Storing Sounds. But you’re probably impatient, so here are the basics:
When using a pre-programmed sound, PODxt will display the bank number, channel letter and channel name at the top of the display. If you turn one of the knobs or change a parameter in the Edit mode pages, you’ll notice an asterisk appears to the left of the bank number. This is a reminder to you that you have tweaked the memorized channel, and that you should save it if you want your PODxt to remember the tweak.
To save the changes you’ve made to a Channel Memory, press the Save button. The button will start to flash. Just press Save again if you want to overwrite the currently loaded Channel, using the same name. Or, if you’d like to change the name first, use the middle two Soft Buttons to select a character, then press the right soft button and turn the Effect Tweak knob to change the character. Press the soft button under dest, turn the Effect Tweak knob, and you will see that you are switching through memory locations A, B, C, and D in each of the sixteen numbered banks. Pick one to store your sound in, and

Controls & Connections
|
press that Save button a second time. The button’s light will stop flashing, a progress bar |
|
will shown on the display, and the sound is stored at the location you chose, replacing |
|
the sound that was there before. |
2•8 |
After the sound is stored, you can bring it back any old time by simply turning the Select |
knob to call up the location where you stored it. (See Chapter 8 to learn how to do all this with your feet on the optional foot controllers).
If you aren’t using one of the PODxt Channel Memories — you’re in Manual mode, and you’re just getting the sound of where the knobs are set — you can store that state into a memory location the same way. Press Save, then dest, then use Effect Tweak to choose a place to save to, and press Save again.
If you decide you don’t want to store the sound after you’ve started saving, press any other button to cancel the save. (The save will also be canceled if you don’t touch anything for 15 seconds after pressing Save.) If you accidentally save over a factory sound you liked, the Save button’s additional pages let you recall the factory preset version of a Channel Memory any time. See Chapter 4 for details on this feature.
The Save button also lets you customize any of the Amp Models and Effect Setups to your own taste, so your favorite version of the amp or effect comes up instantly when you turn Amp Models or Effects. See Chapter 4 for the details on that.

Controls & Connections
22 Edit - A deep-dive into tone central is available at the press of the Edit button. While Edit is lit, the Select knob selects pages of everything that makes up a Channel Memory. From here, you set all the effect parameters, select cabinets and microphones, and assign a parameter to the Effect Tweak knob. To learn more about deep editing,
please see Chapter 4. |
2•9 |
23 Tune/System - Press that puppy and — shazam! Instant digital chromatic tuner. All Amp Model and effects processing are bypassed so you can hear those ques- tionably-tuned strings clearly, should you choose to do so.
Play a note on your guitar and PODxt will show you what it is on that handy display; all notes are displayed as flats, so you’ll see Ab instead of G#. Play that string you’re trying to tune again, spin its tuning key so it goes sharp and flat, and the little ball will move to the right if it’s sharp and back down to the left when the note’s flat. The little ball will sit right in the middle when you’ve got it just right. Give PODxt’s Tune/System button a push and the tuner disappears just as swiftly as it came, taking you right back to normal operation.
Tuner Bypass/Volume - Normally, the audio will be muted while you’re tuning, but if you prefer to hear yourself tune, press the button labeled Mute, and turn Effect Tweak counter-clockwise to select Bypass.
Tuner Reference - Want a different reference than A=440Hz? When you’re in the tuner mode, press the button labeled 440 Hz and turn the Effect Tweak knob on PODxt while watching the display. This control lets you set the reference frequency anywhere from 430-450 Hz. This setting is stored so you don’t have to reset it every time you turn on PODxt if you decide you want to be different (or if that piano in your rehearsal room has decided to be different).
24 Tap - PODxt allows you to control the time and speed of your effects by simply tapping on this button. To use the Tap control, just tap the button at the tempo you want and the effects that are set to “lock” to that tempo will change to match what you tapped. There’s also a Tempo parameter near the end of the Edit pages, so you’ll see exactly what Tempo you’ve Tapped. This is especially useful if you are trying to nudge your Tap setting to just the right value. See Chapter 4 to learn how to set up effects to follow the tempo that you’ve tapped.
Controls & Connections
2•10
FEATURE FOCUS
PODxt Pro
The following controls and connections are found on the PODxt Pro only.
25 Input Level - The Normal setting of this switch is appropriate for most guitars. If you see the Clip light 28 coming on, that means you’re overloading PODxt Pro’s input. If that happens frequently, try the Pad setting here. This switches in input circuitry that’s appropriate for hotter signals output by some guitars with active pickups, or from keyboards and other sources. For those non-guitar sources you may also want to try the rear panel Line Level Input 29, which is a balanced TRS connection. A separate CLIP indicator shows in the display if you are clipping in the internal DSP.
26 I/O & Dig Select - Press this to tell your PODxt Pro what it’s connected to so it can give you the best sound, and to choose digital audio and other options.
•Press it once to select where you’re going to connect your input source to the PODxt Pro, and exactly what you want to come out of the digital outputs.
•Press it a second time to tell PODxt Pro whether you’re using it in the studio or live, how you have connected your effects loop and what kind of digital gear you have connected to PODxt Pro.
•Press it a third time and it will dismiss the pages and take you back to whatever was in the display before you pressed the button.
27 Signal Light - This lights to say, “Yep, I’m hearing some input.” If you’ve got something feeding audio to your PODxt Pro but you can’t hear it and don’t see it here, press the I/O & DIG SELECT button 26 and be sure you’ve got the right input selected. (This light doesn’t show input from USB, by the way.)
28 Clip Light - This lights to say, “Whoa, Nelly! That’s too much input!” (And, again, it doesn’t show the status of USB audio.) Reduce the output level of the device that’s feeding your PODxt Pro, or try the Pad setting of the handy Input Level 25 switch. For non-guitar sources, you may instead want to use the...
 Loading...