


 Loading...
2.0 OWNER’S MANUAL 
90-20-0358 - D (For use with Helix Firmware 2.00) |
©2016 Line 6, Inc. |
 0•1
0•1 
Contents
Welcome to Helix |
4 |
What’s In the Box? |
4 |
Common Terminology |
4 |
Top Panel |
5 |
Back Panel |
7 |
Home Screen |
8 |
Quick Start |
9 |
Setting Proper Output Levels |
9 |
Selecting Presets and Setlists |
10 |
Preset Footswitch Mode |
10 |
Stomp Footswitch Mode |
11 |
Snapshot Footswitch Mode |
11 |
Looper Footswitch Mode |
12 |
Pedal Edit Mode |
12 |
Selecting Blocks/Adjusting Parameters |
13 |
Bypassing a Block |
14 |
Choosing a Block's Model |
14 |
Choosing an Input |
15 |
Choosing an Output |
15 |
Moving Blocks |
15 |
Copying and Pasting a Block |
15 |
Clearing a Block |
16 |
Clearing All Blocks |
16 |
Saving/Naming a Preset |
16 |
Serial vs. Parallel Routing |
17 |
Removing Parallel Path B |
17 |
Moving Split & Merge Blocks for More Parallel |
18 |
Routings |
|
Dynamic DSP |
19 |
Block Order and Stereo Imaging |
20 |
What is Variax? |
20 |
The Blocks
Input
Output
Effects
Amp+Cab
Amp
Preamp
Cab
Impulse Response (IR)
Send/Return
Looper
Split
Merge
Tuner
Tuner Settings
Snapshots
Snapshots > Block Bypass
Snapshots > Parameter Control
Snapshots > Command Center
Using Snapshots
Copying/Pasting a Snapshot
Swapping Snapshots
Renaming a Snapshot
Saving Snapshots
Determining Snapshot Edit Behavior
Arranging Preset, Snapshot, and Stomp Switches
Bypass Assign
Quick Bypass Assign
Manual Bypass Assign
Customizing a Footswitch Label
Customizing a Footswitch Color
Swapping Footswitches
21 |
Controller Assign |
42 |
|
21 |
Quick Controller Assign |
42 |
|
22 |
Manual Controller Assign |
42 |
|
23 |
Clearing a Block's Controller Assignment(s) |
44 |
|
26 |
Clearing All Controller Assignments |
44 |
|
27 |
Customizing a Controller Footswitch Label |
44 |
|
27 |
Command Center |
45 |
|
28 |
|||
Assigning a Command |
45 |
||
29 |
|||
Copying and Pasting a Command |
47 |
||
30 |
|||
Copying and Pasting All Commands |
47 |
||
31 |
|||
Clearing a Command |
47 |
||
31 |
|||
Clearing All Commands |
47 |
||
31 |
|||
Customizing a Command Footswitch Label |
47 |
||
33 |
|||
Customizing a Command Footswitch Color |
47 |
||
33 |
Global EQ |
48 |
|
34 |
|||
Resetting Global EQ |
48 |
||
34 |
Global Settings |
49 |
|
35 |
|||
Resetting All Global Settings |
49 |
||
36 |
|||
Global Settings > Ins/Outs |
50 |
||
36 |
|||
Global Settings > Preferences |
51 |
||
37 |
|||
Global Settings > MIDI/Tempo |
51 |
||
37 |
|||
Global Settings > Footswitches |
52 |
||
37 |
|||
Global Settings > EXP Pedals |
52 |
||
38 |
|||
Global Settings > Displays |
52 |
||
38 |
|||
Hardware Monitoring vs. DAW Software Monitoring |
54 |
||
38 |
|||
DI Recording and Re-amplification |
54 |
||
40 |
|||
ASIO® Driver Settings (Windows® only) |
56 |
||
40 |
Core Audio Driver Settings (Mac® OS X only) |
56 |
|
40 |
MIDI |
57 |
|
41 |
|||
MIDI Bank/Program Changes |
57 |
||
41 |
|||
MIDI CC |
57 |
||
41 |
|||
|
|
 2
2 
Please Note: Line 6, POD, StageSource and Variax are trademarks of Line 6, Inc. registered in the U.S. and other countries. L6 LINK, DT25, DT50, and Helix are trademarks of Line 6, Inc. All rights reserved. James Tyler is a registered trademark of James Tyler, used under license. Apple, Mac, OS X, iPad, iPhone, Logic, GarageBand, and iTunes are trademarks of Apple, Inc. registered in the U.S. and other countries. Apple is not responsible for the operation of this device or its compliance with safety and regulatory standards. iOS is a trademark or registered trademark of Cisco in the U.S. and other countries and is used under license. Windows is a registered trademark of Microsoft Corporation in the United States and/or other countries. YouTube is a trademark of Google, Inc. Cubase and ASIO are trademarks and software of Steinberg Media Technologies GmbH. Pro Tools is a registered trademark of Avid Technology, Inc.
 3
3 

Welcome to Helix
Thank you for purchasing Helix, one of the most powerful and flexible audio processors ever created. We hope it helps drive your search for tonal bliss and spawns years of creativity, both on stage and in the studio.
What Have I Gotten Myself Into?
Although Helix may appear complicated at first glance, it's designed in such a way that once you learn a few basic concepts and shortcuts, you'll be able to construct both simple and complex tones at nearly the speed of thought, with very little menu diving required.
Although you’re likely anxious to rip open the plastic and plug in, wait! At the very least, check out the big color Helix Cheat Sheet that came in the box, and keep it handy. Then read the "Quick Start" chapter of this manual and we’ll have you up and shredding in no time.
 NOTE: If you prefer to edit tones from your Mac® or PC, download the free Helix
  editor application from line6.com/software.
TIP: Be sure to also visit line6.com/videos where we're always adding new video tutorials covering the latest Line 6 gear!
What’s In the Box?
•Line 6 Helix
•Full-color Helix Cheat Sheet (read that one first!)
•USB flash drive containing the Helix Owner's Manual you’re reading right now
•AC power cable
•USB cable
•Hex wrench for adjusting the resistance of the Helix expression pedal
•Warranty card
Common Terminology
While reading this manual, you may encounter several unfamiliar terms. It’s important to know what they mean. Don’t worry—there’s no math.
Home The Home screen is your primary workspace for creating and editing tones. If you ever get lost, press  to return to the Home screen.
Block |
Blocks are objects that represent various elements of a preset, such |
|
as amps, cabs, effects, splits, loopers, inputs, outputs, and impulse |
|
responses. |
Path |
A path represents the signal flow of your tone. Helix has two separate |
|
paths, 1 and 2, each with its own input(s) and output(s). Paths can be |
|
serial (single) or parallel (dual). Path 1 can be routed into path 2 for |
|
more sophisticated tones. |
Preset |
A preset is your tone. It consists of all blocks on the Home screen, foot- |
|
switch assignments, controller assignments, and Command Center |
|
messages. |
Setlist |
A setlist is a collection of presets. Helix has eight setlists containing |
|
128 presets each. |
Model |
Each processing block can accommodate one model (or in some |
|
cases, two models). Helix includes 45 guitar amp models, 7 bass amp |
|
models, 30 cab models, 16 mic models, and 93 effects models. |
Controller |
Controllers are used to adjust various parameters in real time. For ex- |
|
ample, the expression pedal can be used to control wah, or the tone |
|
knob on a Variax guitar can be used to control amp gain and reverb |
|
depth. |
Send/ |
Sends and Returns are used to connect additional equipment to Helix |
Return |
for effects loops or processing multiple instruments simultaneously. |
Helix has four mono sends and returns, but adjacent pairs can be se- |
|
|
lected for stereo operation. |
IR |
IRs (Impulse Responses) are mathematical functions representing the |
|
sonic measurements of audio systems (for Helix, speaker cabinet and |
|
microphone combinations). Helix can store up to 128 custom or third- |
|
party IRs at a time. See "Impulse Response (IR)" |
Variax® |
Variax isn't just a great guitar, it also contains special electronics that |
|
recreate the sound of other specific guitars and instruments, and allow |
|
for instant retuning of each string. Helix and Variax communicate with |
|
one another in unique and powerful ways. See "What is Variax?" |
L6 LINK™ |
L6 LINK provides easy, single-cable, digital audio connectivity between |
|
Helix and Line 6 StageSource® monitors and/or DT-Series amplifiers. |
|
See "L6 LINK Output" |
FRFR |
FRFR (Full Range, Flat Response) speakers, such as Line 6 Stage- |
|
Source monitors, have the ability to amplify a modeler without adverse- |
|
ly affecting its tone, ensuring great detail, a wide sweet spot, predict- |
|
ability, and consistency from studio to stage. You could almost think of |
|
FRFR monitors as very loud, gig-ready studio monitors. |
DAW |
DAW (Digital Audio Workstation) refers to any computer (or iPad) used |
|
for audio recording. The components of a DAW include an audio in- |
|
terface, audio recording software (such as Cubase®, Logic, Garage- |
|
band, Pro Tools®, etc.), and monitoring system (amplifier & speakers |
|
or headphones). Helix functions as a high-performance USB 2.0 audio |
|
interface with all major DAW software - See "USB Audio" |
 4
4 

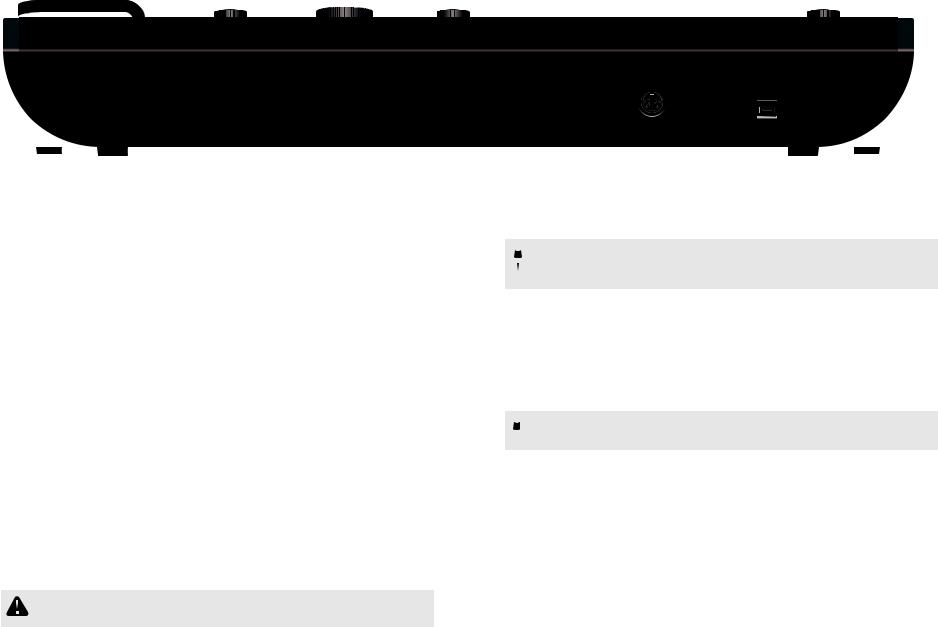
Top Panel
3 |
4 |
16B Dream Rig Duet |
|
|
1 |
8 |
9 |
|
|
EXP 1 EXP 2 |
|||
|
|
|
|
|
|||||||||
SAVE |
|
|
|
|
|
|
|
|
BYPASS |
ACTION |
VOLUME |
PHONES |
|
PRESET |
|
|
|
|
|
|
|
|
|
|
|
14 |
|
|
2 |
|
|
|
1 |
|
|
|
7 |
|
12 |
13 |
|
|
|
Delay Harmony Delay |
|
|
|
|
|
|
|
|
|
|
|
|
|
1/8 |
[37%] |
D |
Minor |
40% |
0.0dB |
|
PAGE |
PAGE |
|
|
|
5 |
6 |
Time |
Feedback |
Key |
Scale |
Mix |
Level |
|
|
|
|
||
|
|
|
|
|
|
||||||||
|
|
|
|
|
|
|
10 |
|
|
|
|||
|
|
|
|
|
|
|
|
|
|
|
|
||
|
|
|
|
|
11 |
|
|
|
|
|
|
|
|
BANK |
|
Scream 808 |
|
Mystery Filter |
|
Ubiquitous Vibe |
|
Harmony Delay |
MODE |
|
|||
|
|
|
|
|
|
|
|
|
|
|
HOLD TO EDIT |
16 |
|
|
|
|
|
|
|
|
14 |
|
|
|
|
|
|
|
|
|
|
|
|
|
|
|
|
|
|
|
|
|
|
|
|
|
|
|
15 |
|
|
|
|
|
|
BANK |
|
16A |
|
|
16B |
|
|
|
16C |
|
16D |
TAP |
|
|
None More Black |
|
Dream Rig Duet |
|
|
Jimi, Not Jimmy |
|
DAW Remote |
HOLD FOR TUNER |
|
|||
|
|
|
|
|
|
|
14 |
|
|
|
|
|
|
|
|
|
|
|
|
|
15 |
|
|
|
|
|
|
|
|
|
|
|
|
|
|
|
5 |
|
|
|
|

1.Main Display This large color LCD is your window into the power of Helix.
2.PRESET Turn this knob to select a preset. Press the knob to open the Setlist
menu. See "Selecting Presets and Setlists"
3.SAVE Press this button to rename and save changes to a preset.
4. Press this button to dive a bit deeper into Helix, and you'll find Command
Center, Global EQ, Global Settings, and other menus.
5. If you ever get lost, press this button to return to the main Home screen.
6.
 Press this button once, or multiple times, to quickly jump to the tonestack
parameters (Gain, Bass, Mid, Treble, etc.) of any Amp+Cab, Amp, and Preamp models in the current preset.
7. Joystick Move the joystick to navigate the main display. On the Home screen, move the joystick to select a block. Press ACTION and move the joystick to move the selected block. Turn the joystick to change the selected block’s model. Press the joystick to open the model list. Yeah, the joystick does a lot.
8. BYPASS Press this button to turn the selected block on and off.
SHORTCUT: Press and hold BYPASS to turn Global EQ on (  icon ap-
 pears in the upper right corner of the LCD) and off.
9. ACTION Press this button to open the action panel for the selected block or screen. From the Home screen, the action panel lets you move, copy, paste, and clear blocks. Other screens may have unique action panels; for example, the Global Settings action panel lets you reset all global settings at once.
10. <PAGE/PAGE> If the selected block or item has more than one page of parameters, dots appear to the right of the item’s name. 


 Press < PAGE or PAGE > to view more parameters.
11. Knobs 1-6 Turn one of the six knobs below the main display to adjust the parameter's value above; press the knob to reset the parameter's value. If a rectangular button appears above a knob, press the knob to engage its function.
SHORTCUT: For most time-based parameters such as delay time or modulation speed, press the knob to toggle between setting the value in ms or Hz and note divisions (1/4-note, dotted 1/8-note, etc.).
 SHORTCUT: Controllers can be assigned to most parameters. Press and
hold a parameter’s knob to quickly jump to the "Controller Assign" page for that parameter.
12. VOLUME Turn this knob to control the Helix device's main output volume.
13.PHONES Turn this knob to control volume from the PHONES output.
14.Scribble Strips The thirteen Helix LCD scribble strips tell each footswitch's
current assignment, so there are never any surprises during a show. If a particular footswitch has more than one block or item assigned, the scribble strip may read “MULTIPLE (X)," where X is the number of assignments. You can custom label scribble strips - see "Customizing a Footswitch Label"
15. Footswitches The capacitive, touch-sensitive footswitches have colored LED rings that tell you the current state of the assigned block or item. While in Stomp footswitch mode, touch (but don't press) a footswitch to quickly select the assigned block or item. Touch the switch repeatedly to cycle through multiple assigned items. See "Stomp Footswitch Mode"
SHORTCUT: While in Stomp footswitch mode, touch (but don’t press) a  footswitch for two seconds to assign that switch to the selected block.
SHORTCUT: While in Stomp footswitch mode, touch and hold (but don’t press) two switches to swap all assignments between them (including any custom scribble strip names or LED colors).
SHORTCUT: Touch (but don’t press) TAP to briefly display the tempo panel. This lets you quickly fine-tune the current tempo without navigating to the
Global Settings > MIDI/Tempo menu.
 NOTE: The "Touch-Select" feature can optionally be turned off, and other
  footswitch settings customized - See "Global Settings > Footswitches"
16. Expression Pedal Move the expression pedal to control volume, wah, or a combination of amp and/or effects parameters. Activate the hidden toe switch to toggle between EXP 1 and EXP 2. (The scribble strip above tells you which one is active.) If an external pedal is connected to the rear panel EXP 2 jack, the built-in pedal becomes EXP 1 only. See "Controller Assign"
 NOTE: Adding a Wah or Pitch Wham block automatically assigns it to EXP
  1. Adding a Volume Pedal or Pan block automatically assigns it to EXP 2.
 6
6 
Back Panel
|
|
|
|
|
|
|
|
|
|
|
|
|
|
|
|
|
|
|
|
|
|
|
|
|
|
|
|
|
|
|
|
|
|
|
|
|
|
|
|
|
|
|
|
|
|
|
|
|
|
|
|
|
|
|
|
|
|
|
|
|
|
|
|
|
|
|
|
|
|
|
|
|
|
|
|
|
|
|
|
|
|
|
|
|
|
|
|
|
|
|
|
|
|
|
|
|
|
|
|
|
|
|
|
|
|
|
|
|
|
|
|
|
|
|
|
|
|
|
|
|
|
|
|
|
|
|
|
|
|
|
|
|
|
EXP2 |
EXT |
GUITAR IN |
AUX IN |
|
MIC IN |
SENDS / RETURNS |
|
|
|
XLR OUT |
|
1/4” OUT PHONES |
|
VARIAX |
MIDI |
|
|
DIGITAL |
USB |
|
|
POWER |
|
||||||||||||||||||
|
|
AMP |
|
|
|
|
|
-1- |
|
|
-3- |
|
|
|
|
LEFT/MONO |
|
|
|
|
|
|
|
|
|
|
AES/EBU |
|
|
|
|
|
|
||||||||||
|
|
|
|
|
|
|
|
|
|
|
|
|
|
|
|
|
|
|
|
|
|
|
|
|
|
|
|
|
|
|
|
||||||||||||
|
|
|
|
|
|
|
|
|
|
|
|
|
|
|
|
|
|
|
|
|
|
|
|
|
|
|
|
|
|
|
|
|
|
S/PDIF |
L6 LINK OUT |
|
|
|
|
|
|
||
|
|
|
|
|
|
|
|
|
|
|
|
PUSH |
|
|
|
|
|
|
|
LEFT/MONO |
RIGHT |
|
|
PUSH |
|
|
|
|
|
|
|
|
|
|
|||||||||
|
|
|
|
|
|
|
|
|
|
|
|
|
|
|
|
|
|
|
|
|
|
|
|
IN |
OUT/THRU |
IN |
|
|
|
|
|
|
|
|
|
||||||||
|
|
|
|
|
|
|
|
|
|
|
|
|
|
|
|
|
|
|
|
|
|
|
|
|
|
|
|
|
|
|
|
|
|
|
|
|
|
|
|||||
|
|
EXP3 |
CV |
|
|
|
|
|
-2- |
|
|
-4- |
|
GND |
RIGHT |
|
|
|
|
|
|
|
|
|
|
|
|
|
|
|
|
|
|
||||||||||
|
|
|
|
|
|
|
|
|
|
|
|
|
LIFT |
|
|
|
|
|
|
|
|
|
|
|
|
|
|
|
|
|
|
||||||||||||
|
|
|
|
|
|
|
|
|
|
|
|
|
|
SEND |
RETURN |
SEND |
RETURN |
|
|
|
|
|
|
|
|
|
|
|
OUT |
|
|
|
|
|
|
|
|
|
|||||
|
|
|
|
|
|
|
|
|
|
|
|
|
|
|
|
|
|
|
|
|
|
|
|
|
|
|
|
|
|
|
|
|
|
|
|
||||||||
|
|
|
|
|
|
|
|
|
|
|
|
|
|
|
|
|
|
|
|
|
|
|
|
|
|
|
|
|
|
|
|
|
|
|
|
||||||||
|
|
|
|
|
|
|
|
|
|
|
|
|
|
|
|
|
|
|
|
|
|
|
|
|
|
|
|
|
|
|
|
|
|
|
|
|
|
|
|
|
|
|
|
|
|
|
|
|
|
|
|
|
|
|
|
|
|
|
|
|
|
|
|
|
|
|
|
|
|
|
|
|
|
|
|
|
|
|
|
|
|
|
|
|
|
|
|
17. EXP 2 and 3 Two additional expression pedals can be connected to Helix and assigned to adjust a wide variety of parameters. See "Controller Assign"
18. EXT AMP 1/2 Connect to your traditional guitar amp to switch its channels or turn its reverb on and off. Use a TRS cable for dual operation (1=tip, 2=ring).
19. CV/Expression Out Connect to the expression pedal input on stompboxes or CV (Control Voltage) input on vintage pedals or synths.
20. GUITAR IN Connect your primary guitar or bass guitar here. This jack provides impedance selection and a switchable pad.
21. AUX IN (10kΩ) Connect a secondary, active-pickup equipped guitar or bass here.
22. MIC IN Plug your microphone in here for processing your vocals or recording to your computer via USB. This XLR jack provides 48V phantom power for studio condenser mics and a variable low cut filter.
23. SENDS/RETURNS 1-4 These 1/4” ins and outs can be used as FX loops for inserting external stompboxes into your tone or as additional inputs and outputs for connecting keyboards, drum machines, mixers, and other gear. See "Send/ Return"
24. Ground Lift Switch If you are experiencing hums and buzzes, press this button in to eliminate ground loops between your equipment.
25. XLR OUT Use balanced XLR cables to connect to your studio gear or the house mixer, PA or FRFR speaker(s) when playing live. When using a mono playback system, connect only the LEFT/MONO XLR jack.
IMPORTANT! Never connect the Helix device's XLR outputs to a device whose XLR inputs have 48V phantom power enabled!
26. 1/4” OUT Use unbalanced 1/4" TS cables to connect to your guitar amp, FRFR
speaker(s), studio monitors, or other playback system. When using a single amp or speaker, connect only the LEFT/MONO 1/4” jack.
27. PHONES Out (12Ω) Connect stereo headphones here; turn the top panel PHONES knob to adjust volume.
 NOTE: Helix provides plenty of gain for high impedance headphones. With
 lower impedance headphones, you may notice a bit of distortion if the PHONES knob is turned all the way up. This is normal.
28. VARIAX Input This input provides power, digital audio, effects control, and instant recall between Helix and a Line 6 Variax guitar. See "What is Variax?"
29. MIDI IN, OUT/THRU Connect Helix to your MIDI gear for sending and receiving program changes, continuous controllers, and other MIDI messages.
30. S/PDIF IN/OUT Digitally connect Helix to your studio equipment via S/PDIF (75-ohm RCA) cables.
 NOTE: S/PDIF and AES/EBU cannot be active at the same time. See "Global
 Settings > Ins/Outs"
31. AES/EBU, L6 LINK L6 LINK provides easy digital audio connectivity between Helix and Line 6 StageSource monitors and/or DT-Series amplifiers. Alternatively, digitally connect Helix to your studio equipment via an AES/EBU (110Ω
XLR) cable. See "L6 LINK Output"
32. USB Helix also functions as a high quality, multi-in/out, 24-bit/96kHz audio interface for Mac® and Windows® computers, with DI, Re-amping and MIDI functionality built right in. Helix can also record to an Apple iPad (with optional Apple Camera Connection Kit). Use of a USB 2.0 or 3.0 port is required - Do not use an external USB hub. See "USB Audio"
33.AC In Connect Helix to a grounded AC power outlet.
34.POWER switch It’s alive!
 7
7 
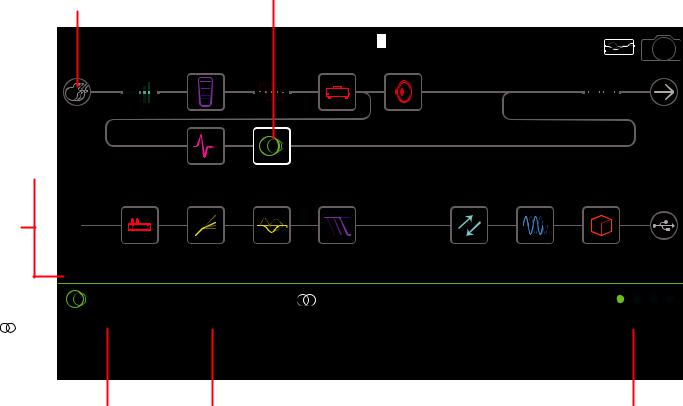
Home Screen
90% of your daily tone building is accomplished from the Home screen.
Press  at any time to return to the main Home screen.
|
|
|
Select an input block |
Use the joystick or |
Split block (only |
"E" appears if |
Merge block |
Press BYPASS to |
|
Hold BYPASS to |
|||||||||||||||||
|
|
|
and turn the joystick to |
touch a switch top |
visible when |
the preset has |
(only visible when |
turn block on and |
|
turn Global EQ |
|||||||||||||||||
|
|
|
set the input source. |
to select a block |
selected); move |
been edited |
selected); move |
off(bypassed |
|
onandoff;Icon |
|||||||||||||||||
|
|
|
Each path can have one |
(outlined in white) |
down to create |
|
|
|
down to create a |
blocks appear |
|
appears when |
|||||||||||||||
|
|
|
or two input blocks |
|
a duplicate input |
|
|
|
duplicate output |
dim) |
|
|
|
Global EQ is on |
|||||||||||||
|
|
|
|
|
|
|
|
|
|
block |
|
|
|
|
|
block |
|
|
|
|
|
|
|
Press PRESET and then |
|||
|
|
|
|
|
|
|
|
|
|
|
|
|
|
|
|
|
|
|
|
|
|||||||
select a preset |
16B Dream Rig Duet |
|
|
|
|
|
|
|
|
|
|
|
1 |
||||||||||||||
|
|
|
|
|
|
|
|
|
|
|
|||||||||||||||||
|
|
|
|
|
|
|
|
|
|
|
Snapshot) to choose |
||||||||||||||||
Turn PRESET to |
|
|
|
|
|
|
|
|
|
|
|
|
|
|
|
|
|
|
|
|
|
|
|
|
|
turn Knob 5 (Select |
|
|
|
|
|
|
|
|
|
|
|
|
|
|
|
|
|
|
|
|
|
|
|
|
|
|
|
|
one of eight snapshots |
|
|
|
A |
|
|
|
|
|
|
|
|
|
|
|
|
|
|
|
|
|
|
|
|
|
|
Select an output block and |
|
|
|
|
|
|
|
|
|
|
|
|
|
|
|
|
|
|
|
|
|
|
|
|
|
|
|||
PATH 1 |
|
|
|
|
|
|
|
|
|
|
|
|
|
|
|
|
|
|
|
|
|
|
|
turn the joystick to route the |
|||
|
|
|
|
|
|
|
|
|
|
|
|
|
|
|
|
|
|
|
|
|
|||||||
|
|
|
|
|
|
|
|
|
|
|
|
|
|
|
|
|
|
|
|
|
|
|
|
|
signal to back panel jacks, |
||
|
B |
|
|
|
|
|
|
|
|
|
|
|
|
|
|
|
|
|
|
Path 2, or your computer via |
|||||||
Each of the two signal |
|
|
|
|
|
|
|
|
|
|
|
|
|
|
|
|
|
|
USB. Each path can have |
||||||||
|
|
|
|
|
|
|
|
|
|
|
|
|
|
|
|
|
|
one or two output blocks |
|||||||||
paths can be either parallel |
|
|
|
|
|
|
|
|
|
|
|
|
|
|
|
|
|
|
|
|
|
|
|
|
|
||
(A and B) or serial (A only) |
|
|
|
|
|
|
|
|
|
|
|
|
|
|
|
|
|
|
|
|
|
|
|
|
|
||
|
|
|
|
|
|
|
|
|
|
|
|
|
|
|
|
|
|
|
|
|
|
|
|
|
|||
PATH 2 A 
Turn the joystick to select |
|
|
|
Delay Harmony Delay |
|
|
|
|
|
|
|
|
|
|
|
|
|
|
|
|
|
|
|
Press <PAGE/PAGE> to |
||||||||
|
|
|
|
|
|
|
|
|
|
|
|
|
|
|
|
|
|
|
|
|
|
|||||||||||
a model; press the joystick |
1/8 |
|
[37%] |
|
|
|
D |
|
|
|
|
Minor |
40% |
|
|
0.0dB |
|
|
|
|
view more parameters for |
|||||||||||
to open the model list. |
|
|
|
|
|
|
|
|
|
|
|
|
|
|
the selected block. This |
|||||||||||||||||
indicates a stereo model |
|
|
|
|
|
|
|
|
|
|
|
|
|
|
|
|
|
|
|
|
|
|
|
|
|
|
|
|
|
|
block has four pages |
|
|
|
Time |
Feedback |
Key |
|
|
|
|
Scale |
|
|
Mix |
|
|
Level |
|
|
|
||||||||||||||
|
|
|
|
|
|
|
|
|
|
|
|
|
|
|
|
|
||||||||||||||||
|
|
|
|
|
|
|
|
|
|
|
|
|
|
|
|
|
|
|
|
|
|
|
|
|
|
|
|
|
|
|
|
|
|
|
|
|
|
|
|
|
|
|
|
|
|
|
|
|
|
|
|
|
|
|
|
|
|
|
|
|
|
|
|
|
|
Press knob to toggle between note value and ms (or Hz)
Value appears white and in brackets if a controller or snapshot is assigned to it
Turn knobs 1-6 to adjust parameters for the selected block
Press knob to return Levels to unity (0.0dB) and Pans to center
 8
8 
Quick Start
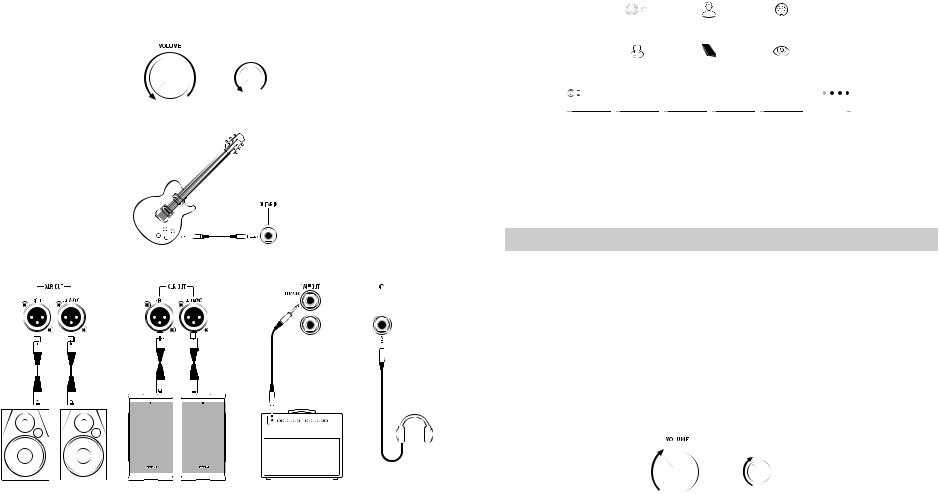
Setting Proper Output Levels
1. Make sure the VOLUME and PHONES knobs are turned down.
PHONES
2.Connect a guitar to the Helix GUITAR IN jack.
3.Connect the Helix outputs to your playback system.
OR
The Helix device's 1/4” and XLR output levels must be set to match your playback system. If you’re only using headphones for now, skip to step 9.
4.Press  to open the Menu.
5.Press Knob 6 (Global Settings).
The Global Settings screen appears:
Global Settings |
|
|
|
Firmware Version 2.00.0 |
|||||
|
|
Ins/Outs |
Preferences |
|
MIDI/Tempo |
|
|
|
|
|
Footswitches |
EXP Pedals |
|
Displays |
|
|
|
||
|
|
|
|
|
|
|
|
|
|
Ins/Outs |
|
|
|
|
|
|
|
||
Off |
|
Off |
0dB |
|
Off |
Multi |
0.0dB |
|
|
Guitar In |
|
Mic In |
Mic In |
Mic In |
USB In 1/2 |
USB In 1/2 |
|
||
Pad |
48V Phantom |
Gain |
Low Cut |
Destination |
Trim |
||||
6.If necessary, move the joystick to select the Ins/Outs submenu.
7.Press PAGE > to select 


 .
.
8.Using Knobs 1 and 2 under the display, set levels according to the table below:
Output |
Are you connecting to...? |
Then do this: |
|
|
Guitar pedal or the front of a guitar |
Set 1/4” Outputs to |
|
1/4” |
amp |
“Instrument” |
|
Powered speakers with unbalanced |
Set 1/4” Outputs to “Line” |
||
|
|||
|
inputs or digital recorder |
||
|
|
||
|
Mic inputs on mixer or standalone |
Set XLR Outputs to “Mic” |
|
XLR |
mic preamps |
||
|
|||
PA/FRFR speakers or studio monitors |
Set XLR Outputs to “Line” |
||
|
|||
|
with balanced inputs |
|
9. Slowly turn up the VOLUME knob.
If you’re listening on headphones, slowly turn up the PHONES knob.
PHONES
 9
9 
Selecting Presets and Setlists
1. Turn PRESET to select presets within the current setlist.
Helix stores eight setlists, each containing 32 banks of four presets (A, B, C, and D). As we promised, no math - that’s a grand total of 1,024 preset locations. If that's not enough, your cover band should be asking for more money.
2. Press PRESET to open the Setlist menu:
1 FACTORY 1 |
15A |
Cold Shot |
|
2 |
FACTORY 2 |
15B |
Hey Joe |
3 |
USER 1 |
15C |
Tom Sawyer |
4 |
USER 2 |
15D |
Untitled Streets |
5 |
USER 3 |
16A |
Have a Cigar |
6 |
USER 4 |
16B |
Bottle Message |
7 |
USER 5 |
16C |
Mad House |
8 |
TEMPLATES |
16D Run Like |
|
|
|
|
|
1 |
FACTORY 1 16B Bottle Message |
||
|
|
|
|
|
|
|
|
SNAPSHOT 1 |
|
|
CC32: 007 |
|
|
|
|||||
Rename |
|
|
PC: 005 |
|
Reorder |
Rename |
Select |
Rename |
|
|
|
||||||||
Setlist |
|
Preset |
Preset |
Snapshot |
Snapshot |
||||
CC69: 000 |
|||||||||
|
|||||||||
Navigating the Setlist menu is straightforward:
Turn the joystick (or move it up and down) to select items in a list.
From the Setlist column, press the joystick (or move it right) to load its first preset.
From the Preset column, move the joystick left to go back to the Setlist column.
Turn Knob 3 (Reorder Preset) to move the selected preset up and down the list.
3.Use the joystick to select Setlist 8 TEMPLATES > Preset 01A Quick Start.
TIP: The dark text above Knob 2 displays the required MIDI messages for recalling the Helix device's setlists, presets, and/or snapshots from external MIDI devices or software. In the illustration above, the FACTORY 1 setlist is recalled with a CC32 message of 007, the 16B Bottle Message preset is recalled with a PC (program change) message of 005, and SNAPSHOT 1 is recalled with a CC69 message of 000.
4. Press  to return to the Home screen.
You should see something like this:
01A Quick Start |
1 |
||
|
|
|
|
|
|
|
|
Amp+Cab |
|
|
US Deluxe Nrm |
|
|
|
|
|
|
|
|
|
|
|||||||||
|
|
|
|
|
|
|
|
|
|
|
|
|||||||||||
5.0 |
|
|
5.1 |
5.0 |
|
4.4 |
2.0 |
8.0 |
|
|||||||||||||
|
|
|
|
|
|
|
|
|
|
|
|
|
|
|
|
|
|
|
|
|
|
|
Drive |
Bass |
|
Mid |
Treble |
|
Presence |
|
Ch Vol |
||||||||||||||
Preset Footswitch Mode
Preset mode is used to navigate presets in the current setlist.
1. If not already there, press FS6 (MODE) to select Preset mode.
The middle eight switches display two banks of presets and the active preset appears with a red LED ring and white scribble strip:
BANK |
02A |
02B |
02C |
02D |
MODE |
Powercore |
HechoDeEstrellas |
Starsburn |
The Bishop Game |
HOLD TO EDIT |
|
BANK |
01A |
01B |
01C |
01D |
TAP |
None More Black |
Dream Rig+Vocals |
Jimi, Not Jimmy |
DAW Remote |
HOLD FOR TUNER |
2. Press BANK  or BANK
  to choose the desired banks.
The banks’ presets flash, indicating they’re ready to load.
3. Press one of the eight preset switches to load the preset.
 NOTE: Footswitch behavior can be customized. See "Global Settings > Foot-
  switches"
 10
10 
Stomp Footswitch Mode
While in Stomp mode, each of the middle eight footswitches can do a number of things:
•Toggle one or more blocks on and off
•Toggle between two values of one or more parameters
•Generate a MIDI, External Amp control, or CV/Expression message
•All of the above, even simultaneously
If not already there, press FS6 (MODE) to select Stomp mode.
The middle eight footswitches display blocks' model names, parameter names, Command Center messages, and/or customized labels:
BANK |
|
MODE |
|
||
|
HOLD TO EDIT |
BANK |
TAP |
HOLD FOR TUNER |
 NOTE: If a switch is assigned to multiple blocks or items, its scribble strip reads
  "MULTIPLE (X)," where X is the number of assignments, and stepping on the switch turns them all on and off. If some blocks are on and some are bypassed, stepping on the switch toggles each block's bypass state.
 NOTE: While in Stomp mode, stepping on BANK
  or BANK
  temporar-
  ily enters Preset mode. Once you’ve selected a preset, Helix returns to Stomp mode.
Snapshot Footswitch Mode
Similar to the snapshots feature in some high end digital mixers, each of the Helix device's eight snapshots stores and recalls the state of certain elements in the current preset, including:
•Block Bypass—The bypass (on/off) state of all processing blocks (except
Looper), independent of any footswitch assignments. Also see "Snapshots > Block Bypass")
•Parameter Control—The values of any parameters assigned to controllers (up to 64 per preset). Also see "Snapshots > Parameter Control"
•Command Center—The values of any instant MIDI CC, Bank/Prog, MMC, and CV Out messages, plus the state (dim or lit) of any CC Toggle, CV Toggle, and Ext Amp messages. Also see "Command Center"
•Tempo—The current system tempo, if "Global Settings > MIDI/Tempo" > Tempo Select is set to "Per Snapshot." (By default, it's set to "Per Preset")
1.Press BANK  and BANK
  simultaneously to enter Snapshot mode.
The middle eight switches flash, indicating a snapshot is ready to be selected.
BANK |
5 SNAPSHOT 5 |
6 SNAPSHOT 6 |
7 SNAPSHOT 7 |
8 SNAPSHOT 8 |
CANCEL |
BANK |
1 SNAPSHOT 1 |
2 SNAPSHOT 2 |
3 SNAPSHOT 3 |
4 SNAPSHOT 4 |
HOLD FOR TUNER |
|
TAP |
2. Press one of the eight snapshot switches to select it.
 NOTE: Snapshots are powerful enough to warrant their own chapter. See "Snap-
  shots" for more information.
 NOTE: If you don’t want Snapshot footswitches to disappear after selecting one,
  set "Global Settings > Footswitches" > Knob 4 (Snapshot Mode Switches) to “Manual Return.” In this case, Helix stays in Snapshot footswitch mode until you press FS6 (CANCEL).
 11
11 
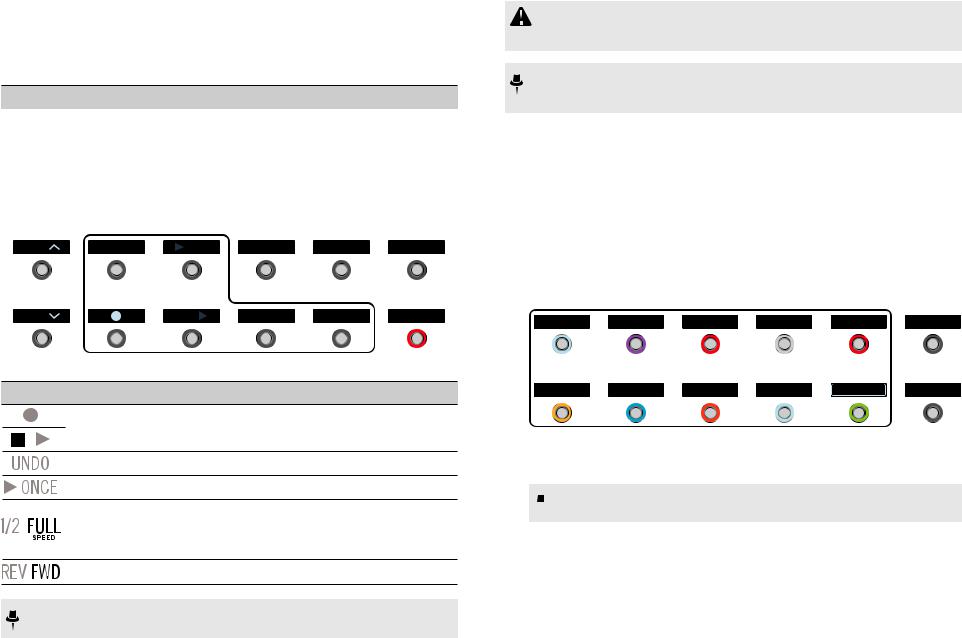
Looper Footswitch Mode
Looper mode is only available if a Looper block has been assigned to a footswitch in Stomp mode. Nearly all factory presets in Helix have a Looper block assigned to a footswitch, but your custom presets may not.
Looper Type |
Max. Loop Length (1/2 Speed) |
Max. Loop Length (Full Speed) |
Mono |
120 seconds |
60 seconds |
Stereo |
60 seconds |
30 seconds |
1.From Stomp mode, press the footswitch labeled “Looper” (if available).
Looper mode appears:
|
|
|
|
|
|
|
|
|
|
EXIT |
BANK |
|
|
|
ONCE |
|
|
|
|
|
|
|
|
|
|
|
|
FULL |
|
|
LOOPER |
|
|
|
|
|
|
|
|
|
|
TAP |
|
BANK |
|
|
|
|
|
1/2 |
REV |
FWD |
||
|
|
|
|
|
|
SPEED |
HOLD FOR TUNER |
|||
|
|
|
|
|
Switch Description
Step on  to start recording a loop. Step on
 to end the loop and immediately start playback. Step on
  to overdub additional parts. Step on
 again to stop playback.
If you make a mistake on your last overdub, step on UNDO to erase it.
Step on 

 to play the recorded loop once through.
Recording at full speed and then switching to 1/2 speed will also drop the loop down one octave. Recording at 1/2 speed will double your looping memory and switching to full speed will cause the loop to play at double speed (up an octave).
Step on REV/FWD to hear your loop backwards.
 NOTE: If you press
  while loop playback is stopped, this will always record a new loop, and any previous recording will be discarded.
IMPORTANT! You may change presets while looping, but loop playback will stop unless the preset you select includes the same type of looper block (mono or stereo) on the same path (1 or 2) and is assigned to a footswitch.
 NOTE: While in Looper mode, stepping on BANK
  or BANK
  temporar-
ily enters Preset mode. Once you’ve selected a preset, Helix returns to Looper mode.
2. To return to the previous mode, press FS6 (EXIT).
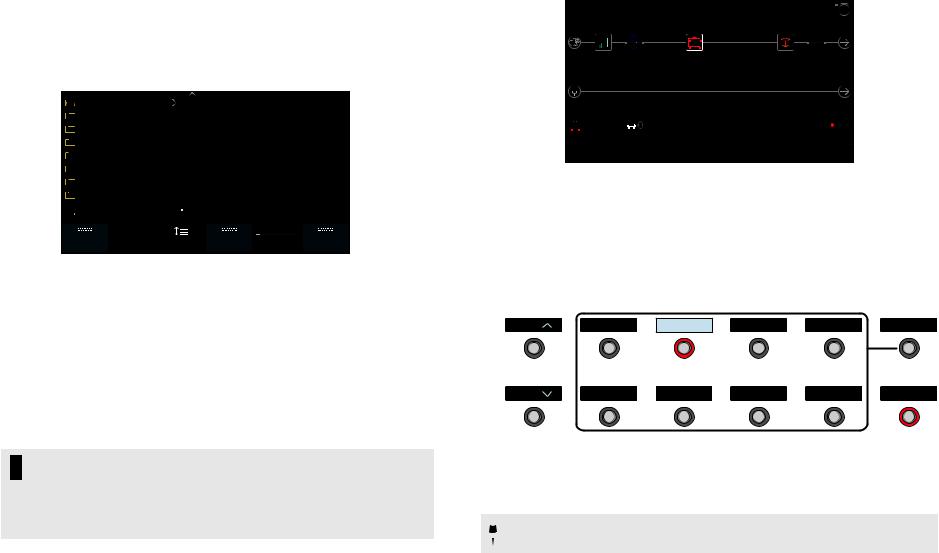
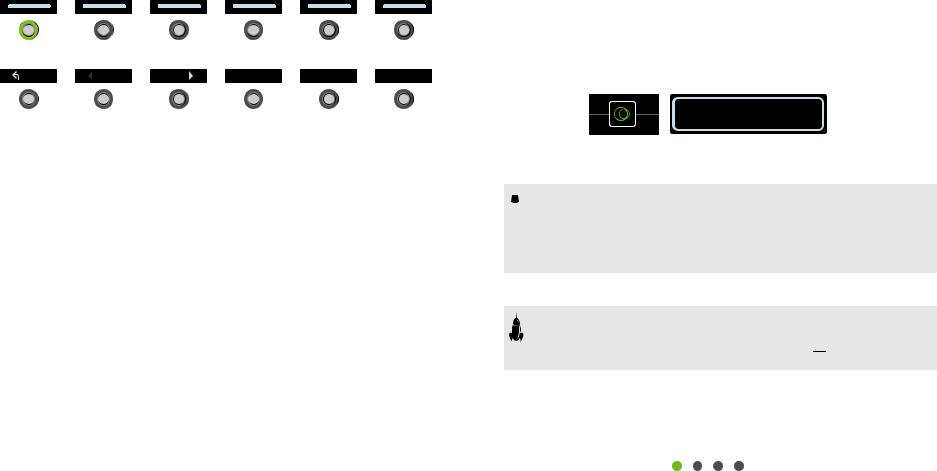
Pedal Edit Mode
Most blocks can be edited without taking your hands off the guitar; if you hate having to reach down and twist knobs, Pedal Edit mode will be your new best friend. Although Pedal Edit is not intended to replace proper controller assignment, in a pinch, it can also be used to tweak one parameter at a time during a performance.
1. Hold FS6 (MODE) for two seconds.
The preset's processing blocks appear on the footswitches, flashing:
MORE...
EXIT
HOLD TO SAVE+EXIT
If the preset has more than ten processing blocks, you may not see the block you want. Press FS6 (MORE...) one or more times until you do.
 NOTE: Selecting a block in Pedal Edit mode has no correlation to any foot-
  switch assignment it may have.
 12
12 
2. Press the footswitch displaying the block you want to edit.
The block's first page of parameters appear at FS1—FS6.
500 ms |
50% |
20 Hz |
84% |
0° |
25% |
Time |
Feedback |
Mod Speed |
Mod Depth |
Mod Phase |
Mix |
|
|
|
|
|
|
EXIT |
|
BACK |
PAGE |
|
PAGE |
VALUE– |
VALUE+ |
||
|
HOLD TO SAVE+EXIT |
||||||
|
If the block has more than one page of parameters, press FS8 (<PAGE) or FS9
(PAGE>) until you find the parameter.
3.Press the footswitch displaying the parameter you want to adjust.
Press and hold a Time or Speed switch to toggle between setting the value in ms or Hz and note divisions (1/4-note, dotted 1/8-note, etc.).
4. Use the expression pedal to adjust the parameter.
For fine adjustment, press FS10 (VALUE–) and FS11 (VALUE+). Hold FS10
(VALUE–) or FS11 (VALUE +) for faster adjustments.
To select a different block, press FS7 (BACK).
5. When finished, press FS12 (EXIT).
If you want to save any changes made to the preset, hold FS12 (EXIT) for two seconds.
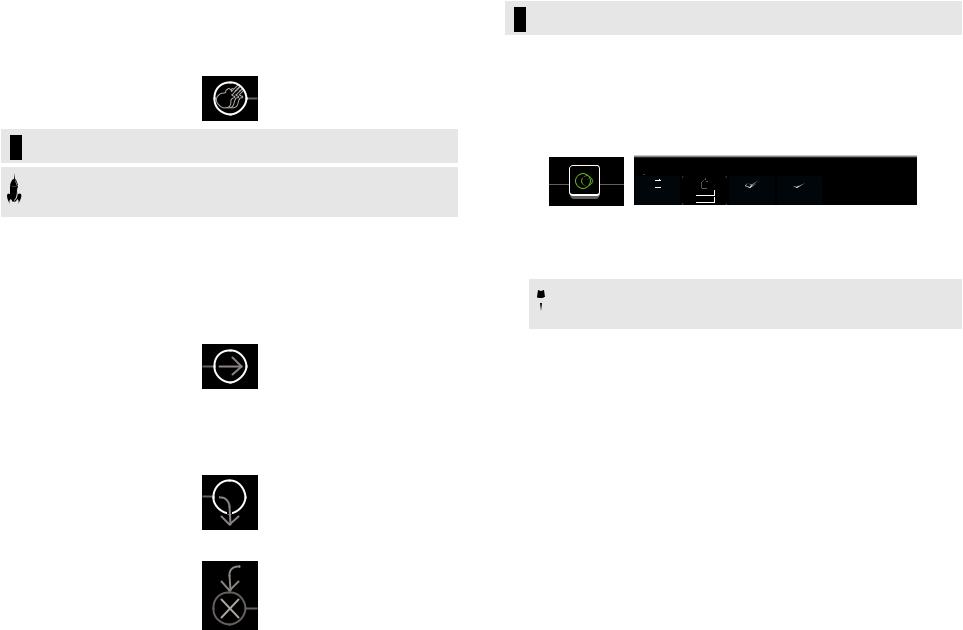
Selecting Blocks/Adjusting Parameters
Blocks are objects that represent various elements of a preset, such as amps, cabs, effects, splits, loopers, and even inputs and outputs.
1.From Stomp footswitch mode, briefly touch (but don’t press) the footswitch assigned to the desired block.
The selected block appears with a white box on both the main LCD and the scribble strip:
If multiple blocks are assigned to a footswitch, its scribble strip reads “MULTIPLE
(X).” Touch the top of the switch repeatedly until the desired block is selected.
 NOTE: Repeatedly touching a "MULTIPLE (X)" switch may jump to complete-
 ly different screens, depending on its assignments. For example, if a switch is assigned to an effect block, an effect parameter, and a Command Center MIDI message, repeated touches will cycle through all three items on the Home, Controller Assign, and Command Center screens, respectively. Basically, anything on the switch is only a touch away.
Alternatively, move the joystick to select a block.
SHORTCUT: Press  to quickly select the Amp+Cab, Amp, or Preamp block and its tonestack parameters (Gain, Bass, Mid, Treble, etc.) appear. If a preset has more than one of these blocks, press
  repeatedly to cycle through all tonestacks.
2. Turn Knobs 1-6 below the screen.
Some blocks have more than one page of parameters, in which case dots on the right side of the inspector indicate the current page. For example, the dots below indicate that page 1 parameters are visible (the colored dot) and a total of four pages of parameters are available:
3. Press <PAGE/PAGE> to access more parameters (if available).
 13
13 
Bypassing a Block
If a footswitch is assigned to the block, press the switch.
Alternatively, select the block and press BYPASS to toggle the block on and off.
Bypassed blocks appear semitransparent and, if assigned to a footswitch, its LED ring dims and scribble strip label grays out:
 NOTE: The switch's LED ring and scribble strip label reflect the color and bypass
  state of its most recently selected block or item, even if other blocks assigned to the same switch are enabled.
Choosing a Block's Model
To change an existing block’s model, select the block and turn the joystick.
To create a new block, select an empty location and turn the joystick.
Selecting models within the same category can be very quick. However, as Helix has hundreds of items to choose from, using this method to, say, change a mono distortion block (beginning of the list) into a stereo FX Loop block (end of the list) is very slow. Instead, you should open the model list:
1. Press the joystick to open the model list:
None |
Mono |
Multitap 6 |
Distortion |
Stereo |
Ping Pong |
Dynamics |
|
Sweep Echo |
EQ |
|
Ducked Delay |
Modulation |
|
Reverse Delay |
Delay |
|
Vintage Digital |
Reverb |
|
Transistor Tape |
Pitch/Synth |
|
Harmony Delay |
|
|
|
 Delay Harmony Delay
1/8 |
|
[37%] |
A |
Minor |
50% |
|
0.0dB |
|
|||||||||
|
|
|
|
|
|
|
|
|
|
|
|
|
|
|
|
|
|
Time |
Feedback |
Key |
Scale |
|
Mix |
|
Level |
|
|||||||||
Most model categories include subcategories. For example, effects can generally be mono or stereo (stereo models display the  icon). Amp+Cab and Amp models have Guitar and Bass subcategories. Cab models have single and dual subcategories.
Turn the joystick (or move it up and down) to select items in a list.
Press the joystick (or move it right) to view a category or subcategory’s contents.
Move the joystick left to go back one column.
IMPORTANT! If you encounter items in the list that are grayed out or unavailable, this means the current path (1 or 2) cannot accommodate that category, subcategory, or model. See "Dynamic DSP"
2.Using the joystick, select the desired category, subcategory, and model.
 NOTE: Amp+Cab and Cab > Dual blocks are special in that they repre-
 sent two models within a single block. To change the amp model in an
Amp+Cab block, press <PAGE until the amp icon is white and turn the joystick. To change the cab model, press PAGE> until the cab icon is white and turn the joystick.
To change the first cab model in a Cab > Dual block, press <PAGE until the left cab icon is white and turn the joystick. To change the second cab model, press PAGE> until the right cab icon is white and turn the joystick.
3.To close the model list, select an item in the far right column and press the joystick again (or press  ).
).
 14
14 
Choosing an Input
Move the joystick left to select an Input block and turn the joystick.
Normally you should select “Multi,” which includes three simultaneous inputs: Guitar, Aux, and Variax.
TIP: To view a list of available inputs, press the joystick.
SHORTCUT: From any Input block, joystick left to jump to the Output block. From any Output block, joystick right to jump to the Input block. We call this the "Pac Man Shortcut."
Choosing an Output
Move the joystick right to select an Output block and turn the joystick.
Normally you should select “Multi,” which includes four simultaneous pairs of outputs: 1/4", XLR, Digital, and USB 1/2.
If Path 1 doesn't have enough block locations or DSP to accommodate your tone, it can be routed to Path 2:
Select Path 1’s output block and turn the joystick to select Path
2A.
Path 2’s Input block displays an arrow, indicating it is being fed by Path 1.
If Path 2 has two input blocks, you may select either Path 2A or 2B, or even split your signal further to both 2A and 2B. See "2 into 1" for an example.
TIP: To view a list of available outputs, press the joystick.
Moving Blocks
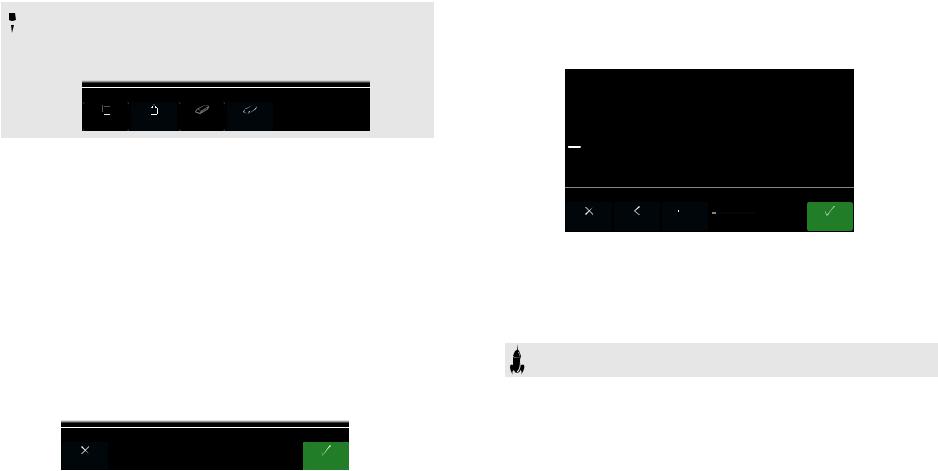
1. Select any block (other than Input or Output) and press ACTION.
The block appears “picked up” and the action panel appears. The inspector's icon shows you the directions in which the block can be moved.

 Use joystick to move block; move down to create Path B
Copy |
Paste |
Clear |
Clear All |
Block |
Block |
Block |
Blocks |
2. Move the joystick left or right to move the block.
Moving the joystick down moves the block to a new parallel B path. See "Serial vs. Parallel Routing" for details.
 NOTE: A block on Path 1 cannot be moved to Path 2 (and vice versa). You
 can, however, copy and paste a block from one path to the other. See next section.
3. Press ACTION again (or  ) to close the action panel.
Copying and Pasting a Block
Blocks from one path can be copied and then pasted into the same path, the other path, or a path in an entirely different preset.
1.Select the block you wish to copy and press ACTION.
2.Press Knob 1 (Copy Block).
3.Select the location you wish to paste the block—even in a different preset—and press ACTION.
4.Press Knob 2 (Paste Block).
 15
15 
 NOTE: Inputs, Outputs, Splits, Merges, and Loopers can also be copied and
  pasted. However, if you, for example, try pasting the Looper into the Split block's location, Knob 2 (Paste Block) will be grayed out. Furthermore, if the destination path’s DSP cannot accommodate the copied block, the header will briefly read “Cannot Paste—Path 1 [or 2] DSP full!” See "Dynamic DSP"
 Cannot Paste—Path 1 DSP Full!
Copy |
Paste |
Clear |
Clear All |
Block |
Block |
Block |
Blocks |
Clearing a Block
1.Select the block you wish to clear and press ACTION.
2.Press Knob 3 (Clear Block).
Clearing All Blocks
Clearing all blocks removes all processing blocks (including the Looper) and resets both Path 1 and 2 to serial. It does not affect Path 1A or Path 2A Input and Output blocks, nor does it affect the "Command Center"
1.Press ACTION.
2.Press Knob 4 (Clear All Blocks).
The following dialog appears:
 Clear all blocks?
Cancel |
OK |
3. Press Knob 6 (OK).
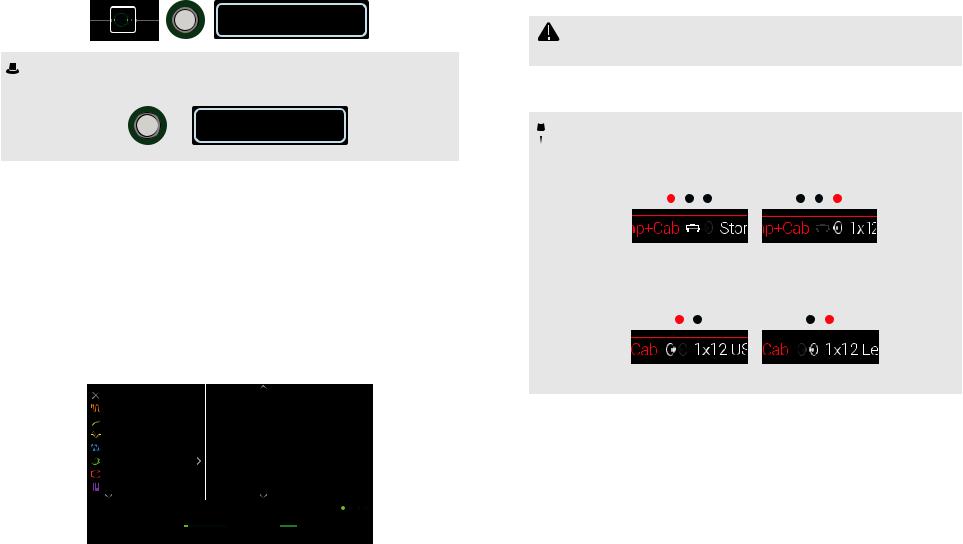
Saving/Naming a Preset
1. Press SAVE to open the Save Preset screen:
Save Preset
J
K
L
M ‘ L a d y N e c k b e a r d
N
O
P
 Replace 1 FACTORY 1 > 26A M’Lady Neckbeard
1 26A
|
|
|
|
|
|
|
|
|
Cancel |
Delete |
Insert |
Setlist Destination |
Save |
||||
Move the joystick left or right to move the cursor.
Turn the joystick (or move it up/down) to change the selected character.
Press Knob 2 (Delete) to delete the selected character and shift all following characters to the left.
Press Knob 3 (Insert) to insert a space and shift all following characters to the right.
SHORTCUT: Press the joystick to cycle through A, a, 0, and [SPACE].
2.Turn Knob 4 (Setlist) and Knob 5 (Destination) to choose the Setlist and Preset location you wish to overwrite.
Any of the Helix 1,024 presets can be overwritten.
3. Press SAVE again or Knob 6 (Save).
 16
16 
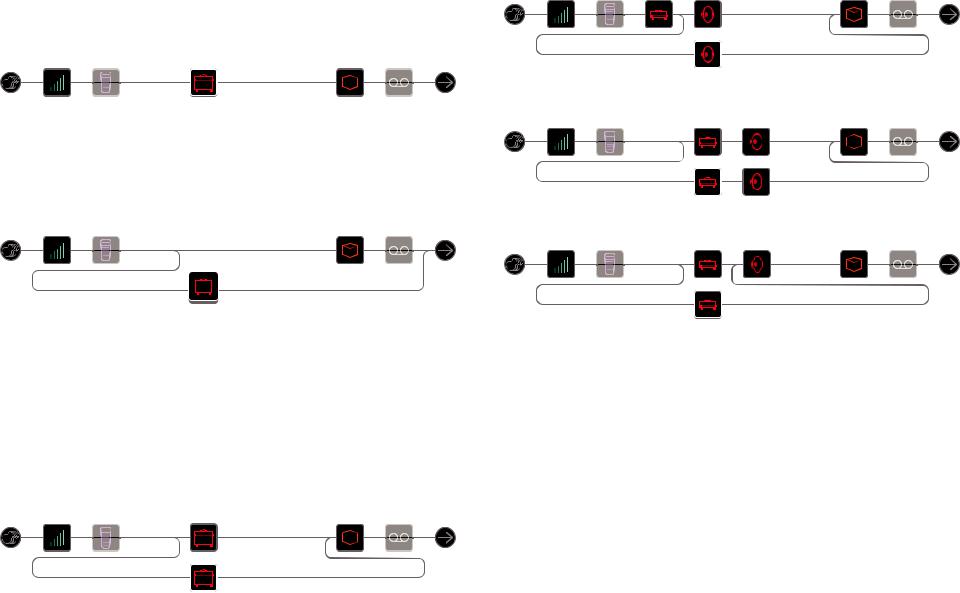
Serial vs. Parallel Routing
For many guitar tones, a serial (one stereo path) signal flow is more than adequate.
For example, our 8 TEMPLATES > 01A Quick Start preset has a volume pedal, wah pedal, Amp+Cab, reverb, and looper, but there's still room for distortion, modulation, and delay blocks:
For more sophisticated tones, a parallel (two stereo paths) signal flow can be created.
This lets one split the signal into two stereo paths, process them separately, and mix the two paths back together.
1.Select the Amp+Cab block and press ACTION to pick it up.
2.Move the joystick down.
The Amp+Cab block is moved to a newly created parallel path B (lower).
In the illustration above:
Our guitar signal goes into the Volume and Wah blocks. The signal is split to path 1A (upper) and path 1B (lower).
Stereo path 1A (upper) is sent to the Reverb and Looper blocks and Stereo path 1B (lower) is sent to the Amp+Cab block.
Stereo paths 1A and 1B are merged together after the Looper block and sent to the Multi Output.
3. Press ACTION again to drop the Amp+Cab block.
This preset probably doesn't sound ideal. A more appropriate tone may have paths 1A and 1B each with an Amp+Cab block, only to merge again before the Reverb...
...or maybe a single Amp block splitting into two separate Cab blocks...
...or two separate Amp and two separate Cab blocks...
...or two separate Amp blocks merging into a Cab > Dual block.
Remember, this is only half of your tone. You still have Paths 2A and 2B to play with!
Removing Parallel Path B
To remove path B, simply clear any blocks on path B (lower) or move them all back up to path A (upper).
 17
17 
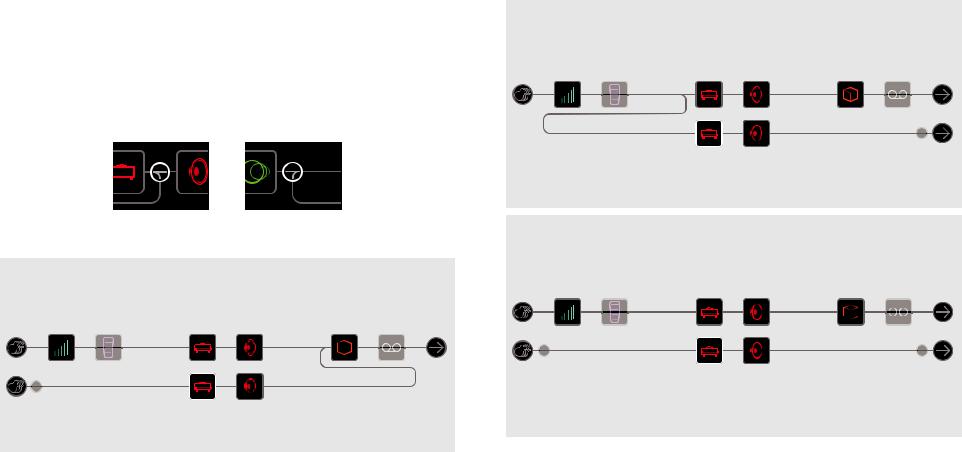
Moving Split & Merge Blocks for More Parallel Routings
1.Use the joystick to select the point where paths A and B split or merge.
"Split" and "Merge" blocks only appear when selected, but can be adjusted and moved like any other processing block.
2. Press ACTION to pick up the Split or Merge block for moving.
Choose one of the following parallel routing options:
2 into 1
Move the Split block down to path B.
The Split block shifts left and a duplicate Input block is created:
This new Input block can be assigned to a completely different input. This routing can be used for mixing a guitar and vocal, or the models and magnetic pickups in a connected Variax guitar, each with their own processing blocks.
1 into 2
Move the Merge block down to path B.
The Merge block shifts right and a duplicate Output block is created:
In this example, the Input block is split to paths A and B, each with its own Output block. Path A could be routed to the 1/4” outputs while path B could be routed to the XLRs.
True Parallel
Move both the Split and the Merge blocks down to path B.
Duplicate Input and Output blocks are created:
In this routing, a guitar and vocal could be processed independently, each with its own input, stereo path, processing blocks, and outputs. Alternatively, two different band members could be processed independently.
 18
18 
Loading...