


®
Spider Jam
with version 2 firmware features
Pilot’s Handbook
Manuel de pilotage Pilotenhandbuch Pilotenhandboek Manual del Piloto
Please visit www.line6.com/manuals to download information on SD Card features.
40-00-0134 |
Electrophonic Limited Edition available @ www.line6.com/manuals |
Rev D |

WARNING: To reduce the risk of fire or electric shock, do not expose this appliance to rain or moisture.
CAUTION: To reduce the risk of fire or electric shock, do not remove screws. No user-serviceable parts inside. Refer servicing to qualified service personnel.
NOTICE: This equipment has been tested and found to comply with the limits for a Class B digital device pursuant to Part 15 of FCC Rules. Operation is subject to the following two conditions: (1) This device may not cause harmful interference, and (2) this device must accept any interference received, including interference that may cause undesired operation.
The lightning symbol within a triangle means “electrical caution!” It indicates the presence of information about operating voltage and potential risks of electrical shock.
The exclamation point within a triangle means “caution!” Please read the information next to all caution signs.
The serial number can be found on the back panel of your Spider Jam. It’s the number that begins with “(21)”. Please note it here for future reference:
SERIAL NO:
Please Note:
All product names referred to in this manual are trademarks of their respective owners, which are in no way associated or affiliated with Line 6. These trademarks of other manufacturers are used solely to identify the products of those manufacturers whose tones and sounds were studied during Line 6’s sound model development.

You should read these Important Safety Instructions
Keep these instructions in a safe place
Before using your Spider Jam, carefully read the applicable items of these operating instructions and the safety suggestions.
1.Obey all warnings on the amp and in the Spider Jam Manual.
2.Connect only to AC power outlets rated 100-120V or 200-240V 47-63Hz (depending on voltage range of the power supply; refer to label on the unit).
3.Do not perform service operations beyond those described in the Spider Jam Manual. Service is required when the apparatus has been damaged in any way, such as:
•power-supply cord or plug is damaged
•liquid has been spilled or objects have fallen into the apparatus
•the unit has been exposed to rain or moisture
•the unit does not operate normally or changes in performance in a significant way
•the unit is dropped or the enclosure is damaged.
4.Transformers can get hot during operation. Do not touch during operation or shortly after.
5.Do not place near heat sources, such as radiators, heat registers, or appliances which produce heat. Keep the rear of the unit at least three inches from walls or other items that might block heat radiation.
6.Do not block any of the ventilation openings or use in an enclosed space.
7.Guard against objects or liquids entering the enclosure. Do not use or place unit near water.
8.Do not step on power cords. Do not place items on top of power cords so that they are pinched or leaned on. Pay particular attention to the cord at the plug end and the point where it connects to the amp.
9.Unplug the amp when not in use for extended periods of time. Unplug the amp during lightning storms.
10.Clean only with a damp cloth.
11.Do not defeat the safety purpose of the grounding type plug. A grounding type plug has two blades and a third grounding prong. The third prong is provided for your safety. When the provided plug does not fit into your outlet, consult an electrician for replacement of the obsolete outlet.
12.Only use attachments/accessories specified by the manufacturer.
13.Prolonged listening at high volume levels may cause irreparable hearing loss and/or damage. Always be sure to practice “safe listening.”
Spider Jam Pilot’s Handbook © 2009 Line 6, Inc.
Table of Contents
Tutorials................................................................................... |
1•1 |
Tutorial 1 – Jam with a Song.......................................................................... |
1•1 |
Tutorial 2 – Record & Overdub with Drums................................................. |
1•2 |
Tutorial 3 – Record & Play with FBV Foot Controller.................................. |
1•4 |
Tutorial 4 – Connect a Mic to the XLR Input............................................... |
1•6 |
Tutorial 5 – Using the Aux Input................................................................... |
1•7 |
Controls & Connections........................................................ |
2•1 |
Spider Jam the Amp............................................................... |
3•1 |
Recalling Amp Presets ................................................................................... |
3•1 |
Saving Guitar Tone Presets ........................................................................... |
3•2 |
Mic/Aux FX Presets ....................................................................................... |
3•3 |
Aux Input Assign ........................................................................................... |
3•3 |
Guitar Noise Gate ......................................................................................... |
3•3 |
Guitar Tuner................................................................................................... |
3•4 |
FX Auto Select .............................................................................................. |
3•5 |
Microphone Trim Knob.................................................................................. |
3•5 |
Microphone, Aux, and CD/MP3 Input Levels ............................................. |
3•5 |
Mic/Aux EQ .................................................................................................. |
3•6 |
Mic/Aux Delay And Reverb .......................................................................... |
3•6 |
Mic/Aux Compressor ..................................................................................... |
3•7 |
Factory Reset .................................................................................................. |
3•7 |
Jamming with Spider Jam...................................................... |
4•1 |
Loading Drum Grooves ................................................................................. |
4•1 |
Loading Songs ................................................................................................ |
4•1 |
Play Preview ................................................................................................... |
4•2 |
Endless Play .................................................................................................... |
4•2 |
Setting the Band/Drum Playback Level ........................................................ |
4•3 |
Time Stretch/Transpose a Song or Drum Groove ......................................... |
4•3 |
Changing the Speed/Pitch of a Song or Drum Groove ................................. |
4•4 |
Setting Guitar Tones with Songs ................................................................... |
4•4 |
Output Routing for RCA Jacks ..................................................................... |
4•5 |
Setting the FBV Mode ................................................................................... |
4•5 |
Loop Recording with Spider Jam.......................................... |
5•1 |
Loop Recording 101........................................................................................ |
5•1 |
Recording without a Song or Drum Groove.................................................. |
5•2 |
Recording with a Song or Drum Groove........................................................ |
5•2 |
Quick Capture................................................................................................ |
5•3 |
Undoing the Last Recording.......................................................................... |
5•3 |
Clearing (Erasing) the Current Track............................................................ |
5•3 |
Saving Recordings ......................................................................................... |
5•4 |
Loading Recordings ....................................................................................... |
5•4 |
Setting the Recorder Playback Level ............................................................ |
5•5 |
Setting the Recorder Overdub Level ............................................................. |
5•5 |
Erasing Recordings ......................................................................................... |
5•6 |
Appendix A: Modeled Amps................................................. |
A•1 |
Which Amps Are Modeled?.......................................................................... |
A•1 |
Appendix B: UsingYour Feet................................................. |
B•1 |
FBV Cable....................................................................................................... |
B•1 |
FBV Express.................................................................................................... |
B•2 |
FBV Shortboard.............................................................................................. |
B•4 |

Tutorials
Tutorials
Tutorial 1 – Jam with a Song
1•1
CLIP
/MP3 |
|
REVERB MASTER |
|
POWER |
|
|
PEDAL |
|
Plug in your guitar. |
Turn on power. |
Set MASTER about as shown. |
DR |
U |
|
S
MS
SONGS |
DRUMS |
REC |
A Cool 2 Beat Swing
063 |
COOL 2 |
BEAT SWING |
063 |
COOL 2 |
BEAT SWING 2 |
064 |
RATS |
|
080 |
TRAPPED |
|
081 |
MOODY BALLAD |
|
Press the |
If the SONGS tab isn t already selected as shown, |
SONG/DRUMS |
press left on the 4-way button to select it. |
button. |
|
Turn the wheel and you ll see the list of songs, and hear a preview of each as it s selected.
|
Play along with the |
|
song. A matched |
|
guitar preset is |
REC |
loaded by default. |
OVERDUB |
CLEAR |
Press 

INPUTS
|
|
|
CHAN VOL |
|
|
|
|
Use CHAN VOL to |
|
. Song loads and plays. |
|
adjust guitar volume. |
|
|
PLAYBACK LEVELS |
|
REC |
UNDO |
|
100%100% |
100% |
100% |
||
|
|
|
OVERDUB |
CLEAR |
SONG/DRUMS |
GUITAR |
MIC/AUX |
|
|
L
Press the INPUTS/LEVEL button.With the SONG/DRUMS tab selected, turn the wheel to adjust the song volume.
Press 
 to stop song.
You can also jam with Drums. Give it a try!

Tutorials
Tutorial 2 – Record & Overdub with Drums
CLIP
1•2
/MP3
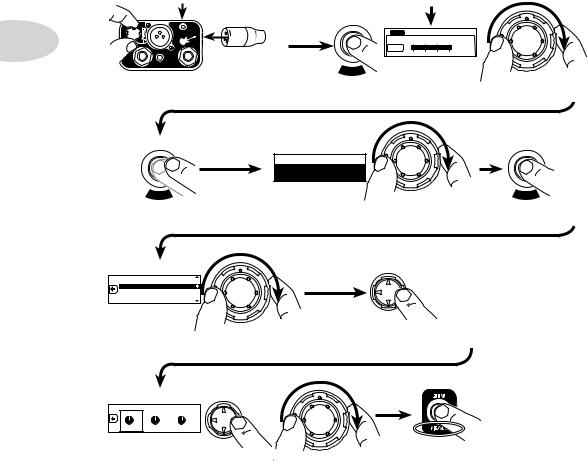
Plug in your guitar.
DR |
U |
MS |
|
|
|
|
SONGS |
DRUMS |
RECORDINGS |
|
|
STRAIGHT GROOVE |
||
S |
|
Press the |
If DRUMS tab isn t selected as shown, press |
SONG/DRUMS button. |
left/right on the 4-way button to select it. |
063 |
2 BEAT SWING |
069 |
JAX |
071 |
MY SUN |
077 |
UN-DEAD |
082 |
HOLIDAY |
Turn the wheel and you ll see the list of drums, and hear a preview of each as it s selected.
|
HOLD FOR REC MODE |
To load DRUMS press |
If GUITAR is not already |
right on the 4-way button. |
lit, press RECORD |
|
SELECT to light it. |
 Bar 1
Bar 1 Bar 2
Bar 2 Bar 3
Bar 3 Bar 4
Bar 4
 Recording...
Press REC. |
Count in plays. |
Play your guitar for 4 bars then... press |
|
|
REC/OVERDUB at downbeat of bar 5 to loop back |
|
|
beginning and immediately enter play mode. |
Bar 1 |
Bar 2 |
Bar 3 |
Bar 4 |
This is your already recorded guitar |
|||
|
Your first overdub. |
|
Play your guitar: you’re recording your first overdub... |
|
Your second overdub. |
Press REC/OVERDUB |
and additional overdubs for each repeat of the loop |
again to enter |
|
overdub mode. |
and so on. |
|
Continues top of next page.

REC
/STOP OVERDUB
Press UNDO to discard |
Press |
once. Loop |
|
|
most recent overdub. |
play/recording stops. |
|
Press SAVE. |
|
SAVE |
RECORDING |
|
SAVE |
GUITAR |
TONE |
ERASE SAVED |
RECORDING |
|
Make sure SAVE RECORDING is selected as shown.
Rec #00 |
|
OK |
|
Press RIGHT on the 4-way button. |
Turn the wheel to change |
Your display should now look something like this. |
the first character. |
Tutorials
1•3
Press right on the 4-way |
Press down on the 4-way |
button to select other |
button to finish. |
characters you wish to change. |
|

Tutorials
Tutorial 3 – Record & Play with FBV Foot Controller
1•4

Tutorials
1•5
Tutorials
Tutorial 4 – Connect a Mic to the XLR Input
CLIP
1•6
CD/MP3
Connect your mic to the XLR input.
Increase mic TRIM. Decrease if clipping.
INPUTS
MIC AUX CD -80..-60..-40..-20..0
+0dB
Press LEVEL/INPUTS button twice. Press left/right on the 4-way button to select MIC tab. Turn the wheel to balance Mic Level.
SETT
IN
GS
SETT
IN
GS
Mic/Aux Presets
Vocals Female 1
Press TONE/SETTINGS button twice |
Turn the wheel to select a vocal preset. |
Press TONE/SETTINGS |
|||
to show MIC/AUX PRESETS. |
|
|
again to show more |
||
|
|
|
|
|
functions. |
MIC/AUX EQ |
|
|
|
|
|
MIC/AUX REVERB & DELAY |
|
|
|
||
MIC/AUX COMPRESSOR |
|
|
|
||
FBV MODENORMAL |
|
|
|
|
|
|
Turn wheel to select |
|
Press right on 4-way |
|
|
MIC/AUX REVERB & DELAY |
button to see the reverb |
|
|||
|
|
|
|
and delay settings. |
|
MIC/AUX REVERB AND DELAY |
|
|
|
||
50% |
50% |
50% |
|
|
|
REVERB |
DELAY |
DLY TIME |
|
|
|
|
|
|
|
HOLD FOR REC MODE |
|
|
|
Press left/right on 4-way button to select values, |
If you want to record your |
||
|
|
and turn wheel to adjust them. |
mic, press RECORD SELECT |
||
|
|
|
|
until MIC/AUX is lit. |
|
Pop quiz: Follow the steps for recording as described earlier and create your first ever vocal harmony loop.

Tutorials
Tutorial 5 – Using the Aux Input
LEVEL |
1•7 |
AU CD/ |
|

Controls & Connections
Controls & Connections
2•1
1 Guitar In – Plug your guitar in here. The Guitar input has dedicated Amp and FX processing.
2 Mic In andTrim – Connect a microphone to this XLR input and use the Trim knob to adjust its gain. The Mic input has its own independent EQ, Reverb, Delay and Compressor FX processing.
Note: When not using a mic, always turns this all the way left (clockwise) to minimum to avoid any noise from the unconnected mic preamp.
3 Aux In – This 1/4-inch input can be used for a second guitar, mic or just about any other audio source. You can choose whether this input gets processed and recorded with the Guitar input or Mic input.
4 CD/MP3 – Plug in any audio source to jam with your favorite music or drum machine. Use the device’s output control to adjust its volume. Note: Start with the volume on your device at it’s lowest setting and bring it up to the volume you desire.
This input gets mixed with the Mic input for recording, but without any processing.
5 Clip Light – This lights to say, “Whoa, Nelly! That’s too much input!” If the Guitar and Aux inputs cause clipping, turn down the device that’s feeding your Spider Jam. If the Mic input causes clipping, turn down the MicTrim.
6 Amp Models – Spin this knob to select one of (12) Amp Models. All the guitar
 Loading...