


0827887
K R U P S P R E P E X P E R T
H E L P L I N E
If you have any product problems or queries, please contact our
Customer Relations Team first for expert help and advice:
0845 602 1454 - UK
(01) 4018448 - Ireland
or consult our website:
www.krups.co.uk
Engineered to prepare and perform
K A 9 5 0 K i t c h e n M a c h i n e
Beyond reason
K R U P S P R E P E X P E R T
I N S T R U C T I O N &
R E C I P E B O O K
K A 9 5 0 K i t c h e n M a c h i n e
Beyond reason
002 |
CONTENTS |
|
|
INSTRUCTIONS AND INFORMATION |
|
|
|
|
|
ACCESSORIES .................................................................................. |
page 3 - 5 |
|
DESCRIPTION OF ACCESSORIES .......................................................... |
page 6 |
|
SAFETY INSTRUCTIONS.......................................................................... |
page 7 |
|
USING YOUR APPLIANCE ...................................................................... |
page 8 |
|
SPEED SETTINGS AND MAXIMUM CAPACITIES .................................... |
page 9 |
|
YOUR FOOD PROCESSOR’S FUNCTIONS .................................... |
page 10 - 15 |
|
CLEANING, TROUBLESHOOTING .................................................. |
page 16-17 |
|
IMPERIAL TO METRIC CONVERSION TABLE ........................................ |
page 18 |
|
DISPOSAL OF PACKAGING .................................................................... |
page 18 |
|
RECIPES |
|
|
SOUPS AND STARTERS ................................................................ |
page 20 - 21 |
|
MAIN COURSES ............................................................................ |
page 22 - 25 |
|
DESSERTS...................................................................................... |
page 26 - 29 |
|
BREADS AND BAKERY .................................................................. |
page 30 - 33 |
|
CAKES .......................................................................................... |
page 34 - 37 |
|
BASIC RECIPES ............................................................................ |
page 38 - 39 |
DESCRIPTION OF ACCESSORIES 03
Thank you for choosing an appliance from the KRUPS range, which is intended exclusively for the preparation of food and is only for indoor, domestic use.
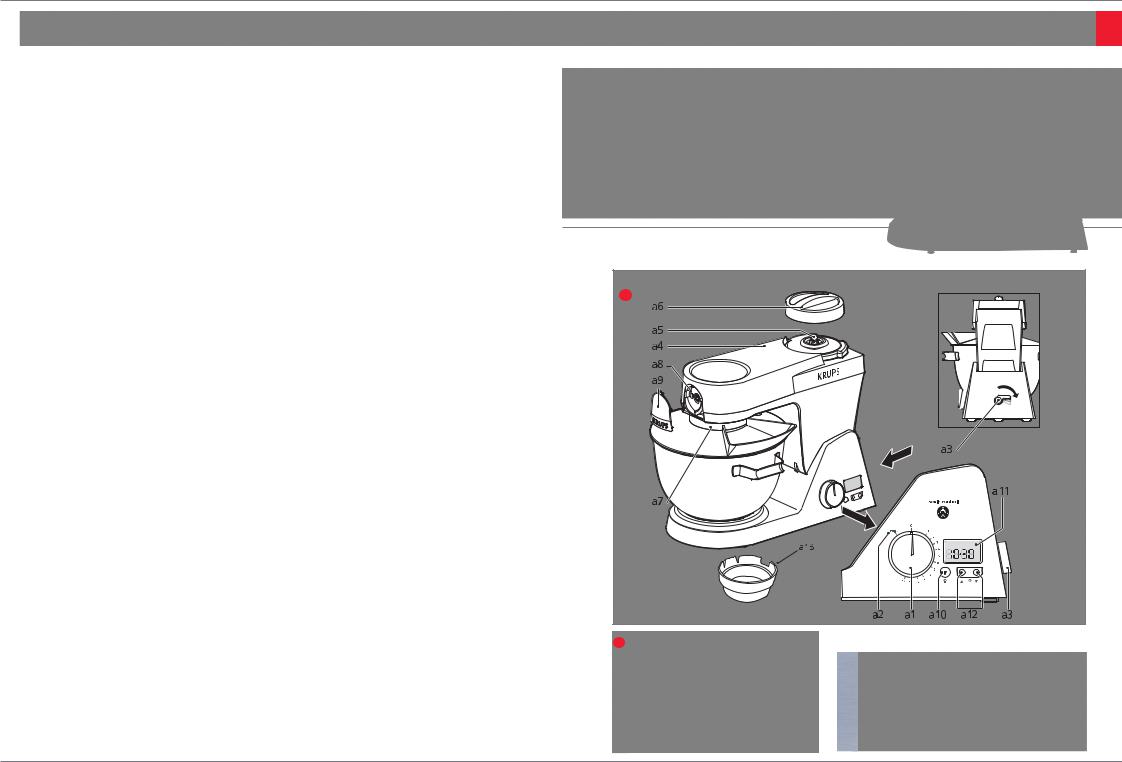
a |
a Motor Unit & Control Panel a1 Electronic speed control
a2 ‘Pulse’ setting (intermittent operation)
a3 Release lever for multifunction head (a4)
a4 Multifunction head
a5 Power outlet for blender/minichopper/grinder
a6 Cover for outlet a5
a7 Power outlet for mixing accessories (kneading hook, whisk, mixer blade)
a8 Power outlet for mincer
a9 Removable cover for mincer power outlet
a10 Set zero button for weighing
a11 Display for weight (in grams only) for weighing function and time (in seconds and minutes) for timer function
a12 Adjustment buttons for operating time and of TIMER
a13 Power outlet cover for a7
00

04 |
ACCESSORIES (According to model) |
ACCESSORIES (According to model) |
05 |
|
|
|
|
b
d
b Bowl assembly b1 Stainless steel bowl b2 Splashguard
c Mixer accessories c1 Kneading hook
c2 Mixer blade
c3 Whisk
d Blender (according to model) d1 Removable blade/nut assembly d2 Reversible seal
d3 Stainless steel jug
d4 Lid
d5 Measuring cap
e |
f |
|
g |
e |
Mincer (according to model) |
e1 |
Metal body |
e2 |
Feed screw |
e3 |
Blade |
e4 |
Coarse mincing screen |
e5 |
Medium mincing screen |
e6 |
Cap nut |
e7 |
Pusher |
e8 |
Metal tray |
f |
Mini-chopper (according to model) |
f1 |
Cover |
f2 |
Bowl |
g |
Grinder (according to model) |
g1 |
Cover |
g2 |
Bowl |
|
|
h
i
h Spatula
i Dough cutter
The accessories included with the model that you have just purchased are shown on the flap found at the top of the box.

06 DESCRIPTION OF ACCESSORIES
Kneading Hook (c1)
The hook is used when making all types of bread or yeast dough and takes all the hard work out kneading. The planetary action ensures a smooth, elastic dough. Use it for bread, rolls, buns, pizza, pasta dough and sweet dough including yeast batter doughs for savarin, kugelhopf and rum babas.
Mixer blade (c2)
This is the attachment that is most frequently used. You can use it for mixing cake mixtures either by the creamed or all-in-one method, making pastry, for rubbed-in mixtures such as crumbles and rock cakes, mashed potatoes, biscuit dough, choux pastry, icing and crumbing biscuits for cheesecakes and biscuit crumb flan cases.
Whisk (c3)
The shape of the whisk is designed to incorporate the maximum amount of air into the food. Use for whisking egg whites, meringues, whipping cream, batters mixtures, mayonnaise, whipped desserts such as soufflés and mousses, cheesecakes, and whisked sponges. Do not use the whisk for heavy mixtures, such as creaming fat and sugar, as you could damage it.
Blender (d)
Ideal for blending and puréeing soups and sauces, making frothy milkshakes, smoothies and cocktails, puréeing soft fruits or cooked vegetables and fruit, making batters and mayonnaise. The stainless steel jug, apart from being stylish, has the advantage of keeping the ingredients cool which is ideal when making smoothies, cocktails and milkshakes. It can blend up to 1.5 litres.
Mincer (e) (Available as an additional accessory)
This accessory enables you to mince your own meat, game, poultry and fish to make burgers, fish cakes, pâtés, terrines and minced meat for chilli-con-carne, bolonnaise sauce, Shepherds pie, meatballs, etc. There are two
Accessories included are:
Stainless steel bowl |
|
|
Splash guard |
|
|
Blender |
|
|
|
||
Kneading hook |
||
Mixer blade |
|
|
|
||
Whisk |
||
|
||
Spatula |
||
|
||
Dough Cutter |
||
|
different sizes of mincing screens – medium and coarse.
Mini-chopper (f) (Available as an additional accessory)
Useful for chopping cloves of garlic, herbs, parsley, cooked ham, small amounts of bread for breadcrumbs and baby food.
Note: the mini-chopper is not designed to grind coffee beans or hard spices.
Grinder (g) (Available as an additional accessory)
Grinds spices, pepper, dried figs and dried fruit in seconds.
Note: the grinder is not designed to grind coffee beans. A separate coffee grinder is available to purchase.
Stainless steel bowl (b1)
The large capacity bowl is made of stainless steel which has the advantage of staying cool when whipping cream, making pastry and whisking egg whites. The bowl has handles to assist when scraping out food and is dishwasher safe for easy cleaning.
Splash guard (b2)
The splashguard stops powdery food like flour from producing a cloud of powder when mixing. It also prevents any splashes from liquid being mixed in the bowl. There is an opening at the front so that additional ingredients can be spooned directly into the bowl during mixing. The accessory can easily be changed without having to remove the splashguard.
Spatula (h)
The flexible spatula is designed to fit the contours of the bowl and scrape every last bit of mixture out.
Dough cutter (i)
An extremely useful tool, for cutting bread and biscuit dough. Make up a batch of dough and divide it into portions using the dough cutter.
•Carefully read the instructions before using your appliance; any use which does not conform to the instructions for use will release KRUPS from all responsibility.
•Never leave the appliance to run unsupervised, especially when young children or disabled persons are present.
•Check that the voltage rating of the appliance matches that of your electrical system. Any error in connections will negate the guarantee.
•This product has been designed for domestic use only. Any commercial use, inappropriate use or failure to comply with the instructions, the manufacturer accepts no responsibility and the guarantee will not apply.
•Unplug the appliance as soon as you have finished using it and when you clean it.
•Do not use your appliance if it is not working correctly or if it has been damaged. If this is the case, contact the Krups Helpline - see back cover.
•Any work on the appliance other than normal care and cleaning by the customer must be carried out by a KRUPS approved service centre.
•Do not immerse the appliance, the power cord or the plug in water or in any other liquid.
•Do not allow the power cord to hang within the reach of children.
•Do not allow the power cord to come close to or in contact with the hot parts of your appliance, any other heat source or any sharp edge.
•If the power cord or the plug is damaged do not use the appliance. To avoid any risk these must be replaced by an approved KRUPS service centre Please call our Helpline (see back page).
SAFETY INSTRUCTIONS 07
•Do not store the accessories; mixer blade, dough hook and whisk inside the bowl as their weight could damage the weighing system.
•Do not put any accessories containing metal into a microwave oven.
•For your safety, only use KRUPS accessories and spare parts that correspond to your appliance.
•Always remove the blender (d) before activating the release button (a3) for the multifunction head (a4).
•Always use the pusher (e7) to feed food items down the feed tube of the mincer (e); never use fingers or cutlery or any other implement. Do not touch moving parts.
•Handle the blades of accessories (d), (e), (f),
(g) with great care; they are extremely sharp.
•Do not touch the whisk, mixer blade or kneading hook while the appliance is in operation.
•Do not use the spatula while the appliance is in operation.
•Only remove the accessories when the appliance has come to a complete stop.
•Do not let long hair, scarves, ties, etc. hang over the appliance when in operation.
•Never insert utensils (spoon, spatula etc.) through the feed tube of the splash guard (b2) or lid (d4).
•Do not operate the blender without its lid.
•Only use one accessory at a time.
•The appliance must not be used in proximity to a microwave appliance or mobile phone because of radio frequency interference.
•Always use the appliance on a flat, stable, heat-resistant work surface away from water splashes and sources of heat.

08 USING YOUR APPLIANCE
Weighing mode |
Timer mode |
•This function enables you to dispense with separate scales and weigh your ingredients up to a total of 4kg in grams only. The scales weigh in 5g increments.
•Place the machine on a clean, horizontal work surface.
•Place the stainless steel bowl (b1) or either the assembled blender (d) or the assembled mini-chopper (f) or the assembled grinder (g) into position.
•Press the zero ‘T’ button (a10); Initially the display shows 8888 but after a delay of a few seconds a ‘0’ will appear on the display (a11). Fill the bowl to the desired amount. Allow a few seconds for the weight to stabilise to avoid adding too much of the ingredients.
•Make sure all ingredients you use are evenly distributed in the bottom of the bowl to get an accurate weight reading.
•To weigh additional ingredients press the zero ‘T’ button (a10) each time to reset to zero.
•You can weigh additional ingredients directly in the stainless steel bowl (b1) or place a separate bowl or plate on top of the multifunction head. Press the ‘T’ button to reset the weighing scale to zero.
This function enables you to:
•Measure the processing time: once the ingredients are weighed and the accessory cover in place, the seconds counter will start to run as soon as you turn the speed control (a1), enabling you to measure the processing time.
•Program an operating time up to 16
:Once theminutesingredients are weighed
and the accessory cover in place, press the  button or the
  button (a12) of the timer; the display (a11) will show 0. Time is shown in 10sec increments.
To set an operating time, press the  button to increase the setting or the
  button to reduce it (a12).
-For longer times press and hold the  button and the setting will change more quickly.
-For shorter times or fine adjustment, press the  button or the
  button briefly several times.
-To set a time more quickly, press and hold down the  button or the
  button pressed until the desired time is shown.
-To jump directly from the maximum time of 16 minutes to zero, press the  button for 2 seconds.
-To jump directly from zero to the maximum time of 16 minutes, press the  button for 2 seconds.
-To cancel a time setting, press the  button and the
  button together for one second.
As soon as you turn the speed control knob (a1), the display will show the time counting down and the appliance will stop at the end of the programmed time. Once STOP is displayed, to clear this the speed control knob should be turned back to 0.
For speed 1 you may need to turn the control knob (a1) slightly past speed 1 setting and back again to the number 1.
The appliance can also be stopped at any time by turning the speed control knob (a1) back to ‘0’.
|
SPEED SETTINGS AND MAXIMUM CAPACITIES |
|
09 |
||||
|
|
|
|
|
|
|
|
|
|
|
|
|
|
|
|
Function |
Type of Food |
Accessory |
Speed |
Minimum |
Max Capacity |
|
|
|
|
|
|
capacity |
(total weight of |
|
|
|
|
|
|
|
ingredients) |
|
|
|
|
|
|
|
|
|
|
kneading |
White bread dough |
Kneading |
1-4 only |
250g flour |
2 kg |
|
|
|
& pizza dough |
hook |
|
|
|
|
|
|
Yeast batter doughs |
Kneading |
1 to 4 only |
250 g flour |
2 kg |
|
|
|
(for savarin, rum |
hook |
|
|
|
|
|
|
babas, kugelhopf) |
|
|
|
|
|
|
|
|
|
|
|
|
|
|
|
Bread dough made |
Kneading |
|
|
|
|
|
|
with wholemeal, rye or |
hook |
1 to 4 only |
250 g flour |
1.3 kg |
|
|
|
bran bread |
|
|
|
|
|
|
|
(maximum of 750g |
|
|
|
|
|
|
|
of flour at a time) |
|
|
|
|
|
|
Mixing |
Sponge cake mix |
Mixer blade |
1 to 12 |
2 egg sponge |
2 kg |
|
|
|
(Victoria sponge cake) |
|
|
|
|
|
|
|
or cake mix |
|
|
|
|
|
|
|
All-in-one method sponge |
Mixer blade |
1 to 12 |
2 egg sponge |
2 kg |
|
|
|
cake mixture |
|
|
|
|
|
|
|
|
|
|
|
|
|
|
|
Biscuit dough |
Mixer blade |
1 to 12 |
250 g flour |
2 kg |
|
|
|
|
|
|
|
|
|
|
|
Shortcrust pastry, |
Mixer blade |
1 to 4 only |
200 g flour |
2 kg |
|
|
|
Crumble & Rock cake mix |
|
|
|
|
|
|
|
|
|
|
|
|
|
|
|
Mashed potatoes |
Mixer blade |
3 to 5 |
500 g |
1.5 kg |
|
|
|
and mashed vegetables |
|
|
|
|
|
|
|
|
|
|
|
|
|
|
|
Choux pastry |
Mixer blade |
4 to 8 |
3 egg mixture |
2 kg |
|
|
|
|
|
|
|
|
|
|
|
Shortbread dough |
Mixer blade |
1 to 8 only |
200g flour |
2 kg |
|
|
|
|
|
|
|
|
|
|
Beating |
Mayonnaise |
Whisk |
1 to 12 |
2 egg yolk |
2 kg |
|
|
|
|
|
|
quantity |
|
|
|
|
|
|
|
mayonnaise |
|
|
|
|
Batters |
Whisk |
1 to 12 |
250 ml liquid |
2 kg |
|
|
|
|
|
|
|
|
|
|
Whisking |
Whisked egg whites |
Whisk |
1 to 12 |
2 medium size |
Up to 10 egg |
|
|
|
|
|
|
egg whites |
whites |
|
|
|
Whisked sponges, Genoese . |
Whisk |
8 to 10 |
2 eggs |
6 eggs |
|
|
|
sponge. Roulades, Swiss roll |
|
|
|
|
|
|
|
|
|
|
|
|
|
|
Whipping |
Whipped cream |
Whisk |
6 to 10 |
284 ml tub cream |
Up to 500 ml |
|
|
|
|
|
|
|
|
|
|
Blending |
Soups, stewed fruit, |
Blender jug |
Pulse or any |
0.5 litre |
1.25 litre for |
|
|
|
milkshakes, smoothies |
|
speed setting |
(500 ml) |
thin preparations, |
|
|
|
cocktails, batters |
|
|
|
1.5 litre for thick |
|
|
|
|
|
|
|
thick preparations. |
|
|
|
|
|
|
|
|
|
|
Chopping small |
Herbs, garlic, bread, rusks, |
Mini Chopper |
Pulse or any |
Sufficient food to |
100 g |
|
|
small quantities |
ham, nuts and baby food |
or Grinder |
speed setting |
cover blades |
|
|
|
very fine |
|
|
|
|
|
|
|
|
|
|
|
|
|
|
|
Mincing |
Raw & cooked meat, poultry, |
Mincer head |
12 |
Not applicable |
Not applicable |
|
|
|
game and fish. |
|
|
|
|
|
|
|
|
|
|
|
|
|
|

10 USING YOUR APPLIANCE
1 |
Adjusting the height of your accessories |
|
1.2 |
|
1.1 |
Adjusting the height of your accessories
Your accessories are equipped with a system for adjusting the height above the bottom of the bowl for optimum results.
•Unplug the appliance.
•Loosen the nut on the whisk, mixing blade and kneading hook using a 14mm spanner (not included with the product).
•Press the release lever (a3), lift the multifunction head and insert the whisk, mixing blade or kneading hook by pushing upwards and at the same time turn it a quarter turn anti-clockwise to lock it in position (fig 1.1)
•Lower the head of the appliance (a4) with the lever (a3) and press down until a click is heard.
•Adjust the height by turning the shaft (fig 1.2) Adjust the accessories to the ideal position, i.e. as close as possible to the sides of the bowl without touching it. If the accessory is too far away from the bottom of the bowl it may not mix all the ingredients properly.
•Lift the head (a4) of the appliance again, holding the whisk, mixing blade or kneading hook in position, and retighten the nut.
Before using for the first time
•Clean all parts of the accessories with warm water and washing up liquid. Rinse and dry.
•Place the appliance on a flat, stable, heatresistant, clean and dry work surface and then plug in your appliance.
Operating your appliance
• It can be started in a number of ways: Intermittent (pulse) operation: turn the speed control knob (a1) to the pulse position (a2) repeatedly for better control of the preparation process.
Continuous operation: turn the speed control knob (a1) to the desired setting from 1 to 12 according to the food being prepared.
You can change the setting during use. Stop: return the knob (a1) to the 0 setting.
N.B When selecting speed 1, you may find that to start the machine you may need to turn the control knob (a1) slightly past the speed 1 setting and back again to the number1.
Important: the appliance will not start if the cover (a6) is not properly closed and clicked into place.
a6 |
a5 |
YOUR FOOD PROCESSOR’S FUNCTIONS 11
2: USING THE MIXER
Depending on the type of recipe, the bowl (b1) with the splash guard can be used to prepare up to 2 kg of mixture.
ACCESSORIES USED
Bowl (b1), Splash guard (b2), Kneading hook (c1), Mixing blade (c2) , or Whisk (c3)
2 |
Fitting the accessories |
|
|
2.2 |
2.3 |
|
|
|
|
2.1 |
|
Fitting the accessories
1Fit the bowl (b1) onto the appliance by positioning the handle on the bowl as shown in figure 2.1 and turning it clockwise until it locks into position. Place the ingredients in the bowl, weighing them as indicated under the WEIGHING function (see figure 2.1).
2Position the splash guard (b2) on the head (a4) with the filling opening at the front of the appliance (see figure 2.1) and push upwards until it clicks into place.
3Fit the desired accessory (c1, c2 or c3) in the power outlet (a7), pushing the shaft of the accessory home and then push upwards and at the same time turn it a quarter turn anti-clockwise to lock it into position (see figure 2.2).
4Press button (a3) again. Lower the multifunction head of the appliance (a4) to a horizontal position until you hear a click.
5Check that the cover (a6) is properly positioned over the blender outlet (a5) by turning it clockwise (see figure 2.3) as far as it will go.
Starting
Program an operating time as indicated under the TIMER function or start at once by turning the speed control (a1) to the position required
for the recipe.
1The appliance will start at once. During preparation, you can add ingredients through the opening in the Splash guard (b2).
2To stop the appliance, turn the knob (a1) back to 0 or wait for the appliance to stop automatically if under control of the programmed TIMER. (Once STOP is displayed, to clear this the speed control knob should be turned back to 0).
 Loading...