


0827886
K R U P S P R E P E X P E R T
HELPLINE
If you have any product problems or queries, please contact our
Customer Relations Team first for expert help and advice:
0845 602 1454 - UK
(01) 4018448 - Ireland
or consult our website:
www.krups.co.uk
Engineered to prepare and perform
K A 8 5 0 F o o d P r o c e s s o r
Beyond reason
K R U P S P R E P E X P E R T
I N S T R U C T I O N &
R E C I P E B O O K
KA850 Food Processor
Beyond reason
002 |
CONTENTS |
|
|
INSTRUCTIONS AND INFORMATION |
|
|
|
|
|
ACCESSORIES .................................................................................. |
page 3 - 5 |
|
DESCRIPTION OF ACCESSORIES .......................................................... |
page 6 |
|
SAFETY INSTRUCTIONS.......................................................................... |
page 7 |
|
USING YOUR APPLIANCE .................................................................... |
page 8-9 |
|
SPEED SETTINGS AND MAXIMUM CAPACITIES .................................. |
page 10 |
|
YOUR FOOD PROCESSOR’S FUNCTIONS .................................... |
page 11 - 16 |
|
CLEANING, TROUBLESHOOTING & DISPOSAL OF PACKAGING ........ |
page 17 |
|
IMPERIAL TO METRIC CONVERSION TABLE ........................................ |
page 18 |
|
RECIPES |
|
|
SOUPS AND STARTERS ................................................................ |
page 20 - 23 |
|
MAIN COURSES ............................................................................ |
page 24 - 27 |
|
VEGETABLE DISHES AND SALADS................................................ |
page 28 - 31 |
|
DESSERTS...................................................................................... |
page 32 - 33 |
|
CAKES AND BISCUITS .................................................................. |
page 34 - 37 |
|
BREADS AND SCONES .................................................................. |
page 38 - 39 |
|
DRINKS .......................................................................................... |
page 40 - 41 |
|
BASIC RECIPES ............................................................................ |
page 42 - 46 |
DESCRIPTION OF ACCESSORIES 03
Thank you for choosing an appliance from the KRUPS range exclusively designed for food preparation. Please take a moment to read the following instructions carefully before using the appliance for the first time.
a |
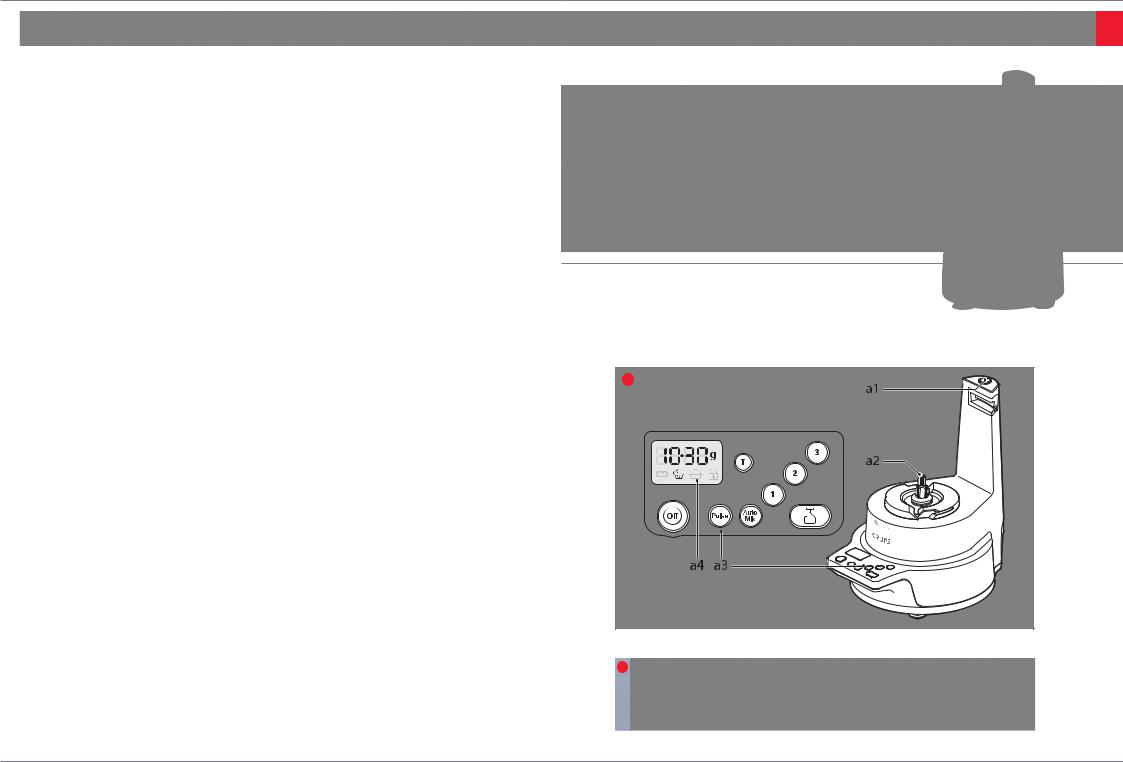
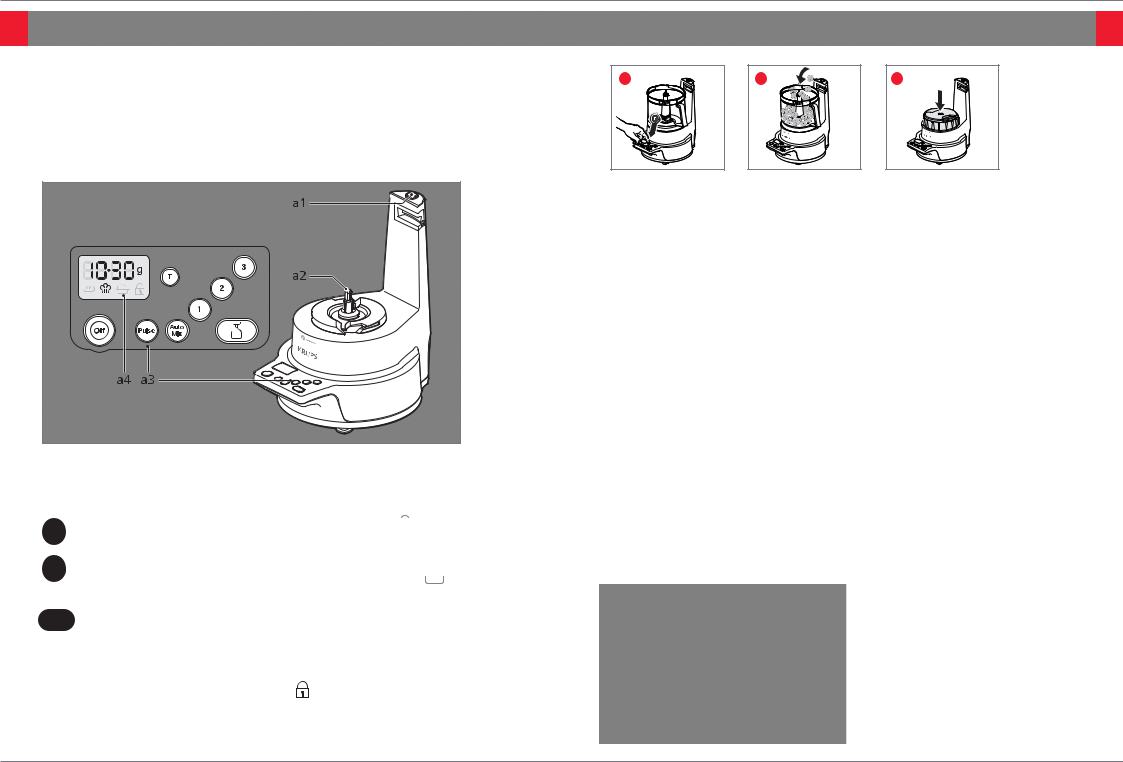
a Motor Unit & Control Panel
a1 Release button for chopping & kneading lids
a2 Motor outlet
a3 Control panel
a4 Display panel
00

04 ACCESSORIES (According to model)
b
g |
c |
d |
|
e |
f |
|
dSpindle
eStainless steel blade
b Chopping bowl assembly
b1 Pusher with measuring section
b2 Lid with feeder tube
b3 Transparent bowl
c Kneading assembly (according to model) c1 Opening
c2 Stainless steel bowl lid
c3 Transparent bowl lid
c4 Stainless steel kneading blade
c5 Stainless steel bowl
fStainless steel slicing/grating discs Side A: Fine grating
Side D: Thin slicing (reversible) Side C: Coarse grating
Side H: Thick slicing (reversible)
E:French fries (depending on model)
G:Parmesan
g Wire whisk
g1 Whisk drive unit
g2 Whisk
ACCESSORIES (According to model) 05
h |
i |
j |
k
h |
Blender |
h1 |
Measuring cap |
h2 |
Lid |
h3 |
Glass jug |
h4 |
Seal |
h5 |
Blade support |
|
|
i |
Chopper |
|
i1 |
lid |
|
i2 |
bowl |
|
j |
Grinder |
|
j1 |
lid |
|
j2 |
bowl |
l |
k |
Storage box |
|
k1 |
lid / weighing tray |
|
k2 |
accessories storage support |
|
l |
Spatula |
|
|
|
|
The accessories included with the model that you have just purchased are shown on the flap found at the top of the box.

06 DESCRIPTION OF ACCESSORIES
Stainless Steel Blade (e)
This attachment is used for chopping, mixing, making breadcrumbs and batters. You can also use it for blending and puréeing instead of the blender but the texture for soups is not usually as smooth. The blade is fitted onto the spindle.
Kneading Blade (c4)
For kneading and mixing. Ideal for bread & pizza dough, cake making and pastry dough.
Grating Discs (A/C)
The appropriate disc is fitted onto the spindle. One of the discs is reversible with side (A) for fine grating and side (C) for coarse grating plus there is a Parmesan grating disc. With all grating a small piece of unprocessed food always remains between the disc and the lid. This is normal.
Slicing Disc (D/H)
The disc is fitted onto the spindle. The disc is reversible with side (D) for fine slicing and side
(H) for coarse slicing. The fine side gives wafer thin slicing but the coarse side slices food to about 2-3 mm thickness.
Wire Whisking Attachment (g2)
For mayonnaise, whisking egg whites, meringues and whipped cream. Note: when whipping egg whites the total time taken is about 1 - 11/2 minutes instead of seconds.
Blender Jug (h3)
Ideal for puréeing soups and sauces, making frothy milkshakes and cocktails, puréeing soft fruits or cooked vegetables and fruit, making batters plus crushing ice.
Mini Chopper (i)
Chops cloves of garlic, herbs, parsley, ham, small amounts of bread for breadcrumbs, nuts and to prepare baby food.
Note: It is not suitable for grinding coffee beans.
Grinder (j)
(Available as an optional accessory)
Grinds dried fruits such as figs, stoned prunes, dried apricots, etc
French fries disc (depending on model) (E)
(Available as an optional accessory)
Easily cuts thin cut ‘American style’ fries from potatoes.
Storage box (k2)
The box (k2) holds the metal blade, the spindle, reversible grating disc, reversible slicing disc and parmesan disc. Twist the lid (k1) anti-clockwise to lock it shut.
The lid (k1)
(k1) can also be used as a weighing platform box on the food processor. Remove the transparent bowl (b3) and place the lid
(k1) over the motor outlet (a2) (see fig.3 on page 9).
Accessories included are:
Wire whisk |
|
|
Kneading blade |
|
|
Stainless Steel blade |
|
|
|
||
Stainless Steel Grating/ |
|
|
Slicing discs thick and thin |
||
Parmesan grating disc |
|
|
|
||
Accessory storage support |
||
Lid/Weighing tray |
|
|
|
||
Blender jug |
||
Chopper |
|
|
|
||
Spatula |
||
|
•Read the instructions for use carefully before using your appliance for the first time: use that does not comply with the instructions will release Krups from all responsibility.
•Do not leave the appliance running unsupervised, particularly in the presence of young children or disabled people.
•Check that the power voltage matches your mains installation. Any connection error renders the guarantee invalid.
•This product has been designed for domestic use only. Any commercial use, inappropriate use or failure to comply with the instructions, the manufacturer accepts no responsibility and the guarantee will not apply.
•Always unplug your appliance as soon as you have finished using it, when cleaning it or in the event of a power cut.
•Do not use your appliance if it is not working correctly or if it has been damaged or if the power cord or the plug is damaged. So as to avoid any danger, it is imperative that you have them replaced by a Krups approved service centre Helpline and website details on back page.
•Any intervention other than standard cleaning and maintenance by the customer must be carried out by a Krups approved service centre.
•Do not place the appliance, the power cable or the plug in liquid.
•Do not leave the power cable hanging within the reach of children
•Do not leave the power cable near or in contact with the hot parts of the appliance, near a heat source or over a sharp corner. Use the cable tidy.
SAFETY INSTRUCTIONS 07
•For your safety, only use Krups accessories and spare parts that correspond to your appliance.
•Handle the stainless steel blade, the blender blade, the mini-chopper, the grinder and the vegetable cutting discs with care, they are extremely sharp. You must remove the stainless steel blade (e) by holding its spindle (d) before emptying the contents of the bowl.
•Do not run your appliance empty.
•Always use your blender with its lid on.
•When grating and slicing, always use the pushers to guide the food in the feeder tubes, never your fingers, a fork, spoon, knife or any other object.
•Never touch moving parts.
•Do not use the bowls as containers (for freezing, cooking, sterilisation or microwaving).
•Only remove the accessories when the appliance has come to a complete stop.
•Only use one accessory at a time.
•Do not let long hair, scarves, ties, etc. hang over the accessories when in operation.
08USING YOUR APPLIANCE
•Before using for the first time, wash all accessory parts in warm water with washing up liquid (caution: the drive unit for the whisk (g1) and the lid of the blender (h2) are not dishwasher safe). Rinse and dry.
•Place the motor unit on a flat, stable, clean and dry surface.
•Plug in your appliance. The LCD display screen lights up and you can use all your food processor’s functions.
Using the control panel buttons
1 2 3 Speed selector buttons for continuous operation.
Intermittent operation for better control of chopping or blending.
AUTO MIX operates continuously with bursts of power for optimal mixing of certain preparations.
For making dough, pastry and cakes with the kneading accessory, the preprogrammed functions regulate the time and ideal speed of your food processor as well as stopping it automatically.
Off
T
Press once: making bread, pizza dough and shortcrust pastry (processing time 2 min 30 sec).
Press twice: making leavened dough such as Brioche, Kugelhopf (processing time 5 min 30 sec).
Press three times:  making cakes (processing time 5 min).
Stop button or timer programming.
Tare button to return the weight to zero plus activation of the weighing function
Safety button. See ‘trouble shooting’ on page 17
1 |
2 |
Weighing mode
Scale control
•To make it easier to prepare your food, your food processor is equipped with kitchen scales integrated into your appliance.
•To use, place the bowl and the accessory of your choice on the motor unit (a2).
•Press button ‘T’ (this is the Tare function) to activate the weighing function. (fig.1). 0g is displayed after a few seconds.
•Pour your ingredients directly into the bowl up to the desired amount (fig.2). The scale weighs in increments of 5g. Make sure all your ingredients are distributed evenly in the bowl to ensure you get an accurate weight reading.
•You can weigh additional ingredients without emptying the bowl by resetting the ‘T’ button each time so the display changes to 0g.
•Place the lid on the bowl and press one of the speed buttons (1,2 or 3) to start the appliance.
•If you wish to weigh your ingredients in a container other than those provided, use the lid (k1) of your storage box (k) as a weighing tray. (fig.3).
Practical tips when using the weighing mode
•You can only use the weighing mode when the motor is not in operation.
•Do not use on a work surface that is not flat.
•Do not exceed the maximum load of 4.5kg.
•Do not use your food processor near a mobile phone or microwave, if the latter is in operation, as it may cause interference.
•The scale is sensitive to any movement or knocks on the work surface.
USING YOUR APPLIANCE 09
3
Timer mode
•When your appliance is set in operation, the time is automatically displayed on the screen. You can thus view the running time.
•By pressing the ‘OFF’ button repeatedly, the timer will increase in 10 second increments up to a maximum time of 6 minutes.
•By pressing and holding the ‘OFF’ button the timer will increase more quickly up to a maximum time of 6 minutes.
•Once you have set the timer select a speed 1, 2 or 3 or Auto Mix and the appliance will start.
•A time countdown appears on your screen and the motor stops automatically at the end of the programmed time. You can stop your food processor at any time by pressing the ‘OFF’ button.
To cancel an error in programming the time
Should you make a mistake in programming the timer, it is necessary to hold down the ‘OFF’ button up to the maximum time of 6 minutes; then briefly press the ‘OFF’ button again to return the timer to zero.
In the event of any instability
Your Krups food processor is equipped with a microprocessor that controls and analyses its stability. In the event of any instability, the rotational speed of the motor will be reduced, and if it persists, the motor will come to a standstill and ‘STOP’ will be displayed on the screen. To restart your appliance, press the desired button.

10 |
SPEED SETTINGS AND MAXIMUM CAPACITIES |
YOUR FOOD PROCESSOR’S FUNCTIONS |
11 |
|
|
|
|
Accessory |
Function |
Type of food |
Speed |
Bowl type |
Max Capacity |
|
|
|
|
|
(total weight of |
|
|
|
|
|
ingredients) |
|
|
|
|
|
|
Kneading |
Bread dough |
White bread dough |
Kneading |
Stainless Steel |
2 kg |
blade |
|
& pizza dough |
(press once) |
|
|
|
Plastic |
1.5 kg |
|||
|
|
|
|
||
|
|
|
|
|
|
|
Shortcrust pastry |
All Butter Shortcrust pasty |
Kneading |
Stainless Steel |
1.2 kg |
|
|
& shortbread dough, |
(press once) |
|
|
|
|
Plastic |
900g |
||
|
|
choux pastry |
or: 3 |
||
|
|
|
|
||
|
|
|
|
|
|
|
Leavened dough |
Brioche, Kugelhopf, |
Kneading |
Stainless Steel |
1.2 kg |
|
|
Savarin, Rum Babas |
(press twice) |
|
|
|
|
Plastic |
1 kg |
||
|
|
|
|
||
|
|
|
|
|
|
|
Cake mixture |
Sponge cake mixture |
Kneading |
Stainless Steel |
2 kg |
|
|
(All-in-one method) or |
(press three times) |
|
|
|
|
Plastic |
1.5 kg |
||
|
|
cake mixture |
|
||
|
|
|
|
|
|
|
|
|
|
|
|
Stainless Steel |
Shortcrust pastry |
Shortcrust pastry made |
3 |
Plastic |
900 g |
blade |
|
with margarine, |
|
|
|
|
|
crumble mix |
|
|
|
|
|
|
|
|
|
|
Chopping |
Onions, vegetables, fruit, |
3 or Pulse |
Plastic |
1 kg raw or |
|
|
raw & cooked meat or fish |
or Auto Mix |
|
cooked meat |
|
|
|
|
|
600 g vegetables, |
|
|
|
|
|
fish, cheese, etc |
|
|
|
|
|
|
|
Blending/Mixing |
Soups, pâte & stewed |
3 |
Plastic |
1 Litre soup or |
|
|
fruits |
|
|
stewed fruit |
|
|
|
|
|
|
|
Mixing |
Batters for pancakes, |
3 |
Plastic |
1 Litre batter |
|
|
Yorkshire pudding, |
|
|
|
|
|
fritter batter, |
|
|
|
|
|
Scotch pancakes, etc |
|
|
|
|
|
|
|
|
|
Grating & Slicing |
Grating & Slicing |
Vegetables, fruit and hard |
1 |
Plastic |
Until bowl is full |
Discs |
|
cheese |
|
|
|
|
|
|
|
|
|
Grating Disc (G) |
Grating |
Parmesan, coconut |
1 |
Plastic |
Until bowl is full |
|
|
|
|
|
|
Wire Whisk |
Whisking |
Egg whites |
2 or 3 |
Plastic |
1 to 7 egg whites |
|
|
|
|
|
|
|
Whipping |
Cream |
2 or 3 |
Plastic |
Up to 500 ml cream |
|
|
|
|
|
|
|
Emulsifying |
Mayonnaise & dressings |
2 or 3 |
Plastic |
1 Litre oil |
|
|
|
|
|
|
Blender |
Fine Blending |
Extra smooth soups, |
1, 2 or 3 or Pulse |
Blender jug |
1.5 Litre for thick |
|
|
sauces, smoothies, |
or Auto Mix |
|
mixtures |
|
|
milkshakes, cocktails and |
|
|
1.2 Litre thick |
|
|
puréed fruit |
|
|
mixtures |
|
|
|
|
|
|
|
Blending |
Batters for pancakes, |
Auto Mix |
Blender jug |
Up to 1.5 Litres |
|
|
Yorkshire pudding, |
|
|
|
|
|
fritter batter, |
|
|
|
|
|
Scotch pancakes, etc |
|
|
|
|
|
|
|
|
|
|
Crush Ice |
Crush ice for drinks, |
Auto Mix |
Blender jug |
6 to 10 large ice |
|
|
cocktails and granitas |
|
|
cubes (0.5 level) |
|
|
|
|
|
|
Mini Chopper |
Chopping |
Nuts, herbs, parsley, |
3 or Pulse |
Mini chopper |
60 g |
|
|
garlic, breadcrumbs |
or Auto Mix |
|
|
|
|
|
|
|
|
|
Baby Purées |
Puréed vegetables, fish, |
3 or Pulse |
Mini chopper |
120 g |
|
|
meat and fruit |
or Auto Mix |
|
|
|
|
|
|
|
|
Grinder |
Grinding |
Dried fruit such as figs, |
3 or Pulse |
Grinder |
180 g |
|
|
stoned prunes |
|
|
|
|
|
|
|
|
|
French Fries |
Chip Cutting |
Potatoes for French fries |
1 |
Plastic |
Until bowl is full |
Disc (E) |
|
and vegetables |
|
|
|
|
|
|
|
|
|
Stainless steel kneading blade (c4) for kneading bread,mixing pastry mixes and cake making.
1: KNEADING
(bread, pastry & cake mixture)
ACCESSORIES USED
Kneading assembly depending on the model: stainless steel kneading bowl (c5) and its lid (c2) or transparent chopping bowl (b3) and its lid (c3).
1 |
|
Fitting the stainless steel bowl & lid |
|
1 |
Position the stainless steel bowl (c5) on the motor |
||
|
|||
|
|
unit outlet (a2) so that the opening on the rim is on |
|
|
|
the right at the back of the bowl. |
|
|
2 |
Turn the bowl anti-clockwise as far as it will go. |
|
|
3 |
Fit the stainless steel kneading blade (c4) onto the |
|
|
|
shaft of the bowl. |
|
|
4 |
Put your ingredients into the bowl. |
|
|
5 |
Position the stainless steel bowl lid (c2) so that the |
|
|
|
tab is at the 2 o’clock position, then turn anti- |
|
|
|
clockwise to lock in position. |
|
|
|
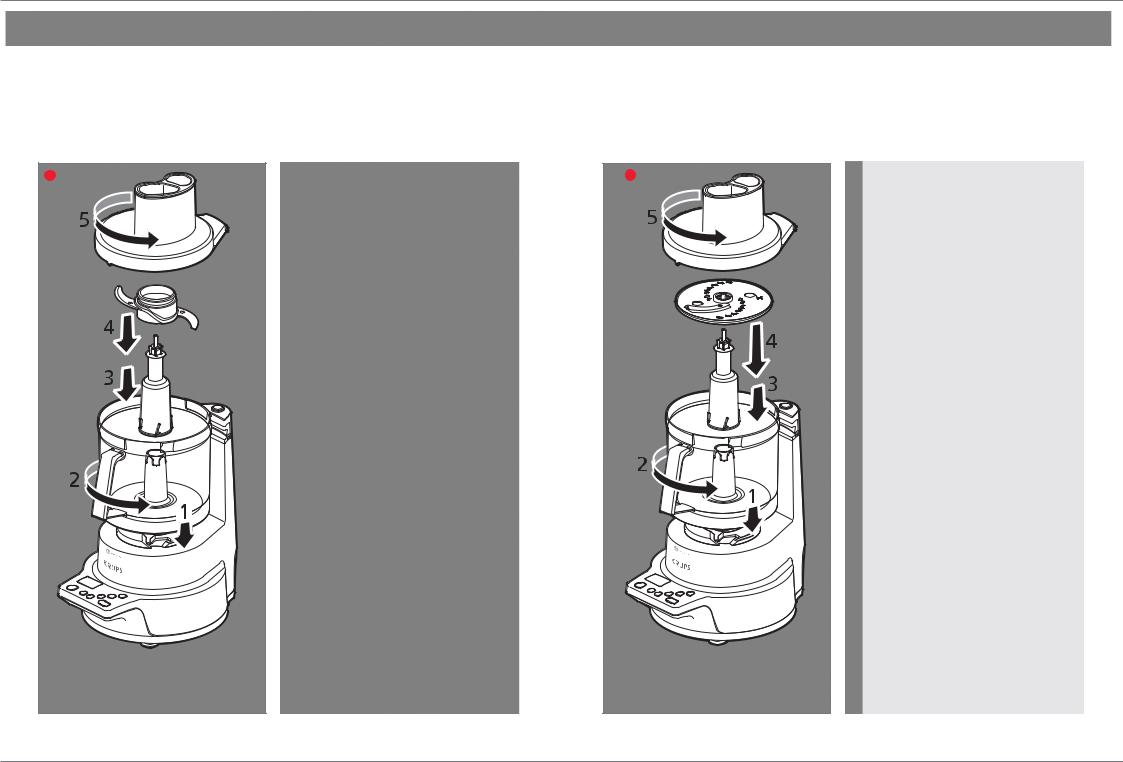
Fitting the transparent bowl & lid |
|
|
1 |
Position the transparent bowl (b3) on the motor |
|
|
|
unit outlet (a2) with the handle in the 4 o’clock |
|
|
|
position. |
|
|
2 |
Turn the bowl anti-clockwise until it locks. |
|
|
3 |
Fit the stainless steel kneading blade (c4) onto the |
|
|
|
shaft of the bowl. |
|
|
4 |
Put your ingredients into the bowl. |
|
|
5 |
Position the lid with feeder tube (b2) so that the notch |
|
|
|
on the lid is aligned with the open padlock symbol on |
|
|
|
the bowl. Turn the lid anti-clockwise to lock. |
|
|
|
Note: If the bowl, blender jug or lid is not |
|
|
|
correctly fitted the appliance will not start. |
|
|
|
Usage and practical tips |
|
|
|
The pre-programmed functions regulates the ideal |
|
|
|
speed and time for the type of recipe prepared, as |
|
|
|
well as automatically stopping your food |
|
|
|
processor. With the leavened dough and cake |
|
|
|
setting the speed will vary during the processing |
|
|
|
time. |
12 |
YOUR FOOD PROCESSOR’S FUNCTIONS |
YOUR FOOD PROCESSOR’S FUNCTIONS |
13 |
|
|
|
|
2: MIXING/BLENDING/CHOPPING |
|
|
|
3: GRATING/SLICING |
ACCESSORIES USED |
|
|
|
ACCESSORIES USED |
Chopping bowl assembly (b) |
|
|
|
Chopping bowl (b) and spindle (d) |
Spindle (d) |
|
|
|
Disc of choice (f) |
Stainless steel blade (e) for blending, mixing and chopping |
|
|
|
|
2 |
Fitting the Accessories |
3 |
Fitting the Accessories |
|
|
|
|||
|
1 Place the transparent bowl (b3) on the motor unit |
1 |
Place the transparent bowl (b3) on the motor unit |
|
|
|
outlet (a2). |
|
|
|
outlet (a2). |
|
|
|
|
2 |
Turn until it locks into position. |
||
|
2 Turn until it locks into position. |
|||
|
3 |
Lock the disc chosen (f) by placing onto the |
||
|
3 Slide the metal blade (e) onto the spindle drive (d) |
|||
|
|
spindle (d) and rotating clockwise. For the |
||
|
and turn clockwise to lock in place. |
|
||
|
|
parmesan disc the sharp side marked G should |
||
|
4 Place the whole assembly on the motor unit outlet |
|
||
|
|
be uppermost. |
||
|
(a2). |
|
||
|
4 |
Place the spindle and disc assembly onto the |
||
|
5 Put the ingredients into the bowl and place the lid |
|||
|
|
shaft of the bowl. |
||
|
(b2) on the bowl. Turn lid anti-clockwise until it |
|
||
|
5 |
Place the lid (b2) on the bowl, and turn anti- |
||
|
locks into position with (a1). |
|||
|
|
clockwise until it locks into position with (a1). |
||
|
|
|
||
|
Mixing/blending |
|
Usage and practical tips |
|
|
• Press speed button ‘3’ to start the appliance. You |
|
||
|
|
For ease of use, your food processor is equipped |
||
|
can blend up to 1Litre of broth, soup or compote |
|
||
|
‘1’ |
with a stand-by mode on speed . This system |
||
|
in 20 seconds. You can mix up to 1Litre of |
|||
|
|
allows the motor to operate slowly when there are |
||
|
pancake batter, waffle batter, etc. in 1min to 1min |
|
||
|
|
no ingredients and increases the operating speed |
||
|
30seconds. |
|
||
|
|
when foodstuffs are pushed down the feeder tube |
||
|
|
|
||
|
Chopping |
|
using the pusher. |
|
|
You have 3 options: |
• |
Cut the food into pieces approximately 8cm high |
|
|
|
and a maximum of 4cm width. |
||
|
• Use speed ‘3’ for continuous operation. |
|
||
|
• |
Press speed button ‘1’. |
||
|
• Use the ‘Pulse’ button for better control of |
|||
|
• |
Introduce the foodstuffs into the feeder tube and |
||
|
chopping. |
|||
|
|
push them down using the pusher (b1). |
||
|
• Use the ‘Auto Mix’ button for optimum preparation |
|
||
|
• |
Press ‘OFF’ to stop the machine. After the food |
||
|
results.You can chop up to 1kg of raw or cooked |
|||
|
|
processor has come to a stop, press the release |
||
|
meat (boned, cut into cubes, with gristle |
|
||
|
|
button (a1) and turn the lid to release it. |
||
|
removed). |
|
||
|
|
|
|
|
|
You can chop up to 600g of foodstuffs such as: |
|
Discs (f) (depending on the model) |
|
|
|
Disc A: |
finely grate: celeriac, potatoes, carrots, |
|
|
• hard products: cheese, dried fruit, certain |
|
||
|
|
|
cheese, etc. |
|
|
vegetables (carrots, celery, etc.). |
|
|
|
|
|
Disc C: |
coarsely grate: celeriac, potatoes, |
|
|
• soft products: certain vegetables (onions, |
|
||
|
|
|
carrots, cheese, etc. |
|
|
spinach, etc.). |
|
|
|
|
|
Disc D: |
thinly slice: potatoes, onions, apples, |
|
|
• raw or cooked fish, etc. |
|
||
|
|
|
cucumbers, beetroot, carrots, |
|
|
|
|
|
|
|
After the food processor has come to a stop, |
|
|
cabbage, etc. |
|
|
Disc H: |
thickly slice: potatoes, onions, apples, |
|
|
press the release button (a1) and turn the lid to |
|
||
|
|
|
cucumbers, beetroot, carrots, |
|
|
release it. |
|
|
|
|
|
|
cabbage, etc. |
|
|
|
|
|
|
|
|
|
Disc E: cut chips (French fries) |
|
|
|
|
Disc G: |
grate parmesan, coconut, chocolate, etc. |
14 YOUR FOOD PROCESSOR’S FUNCTIONS
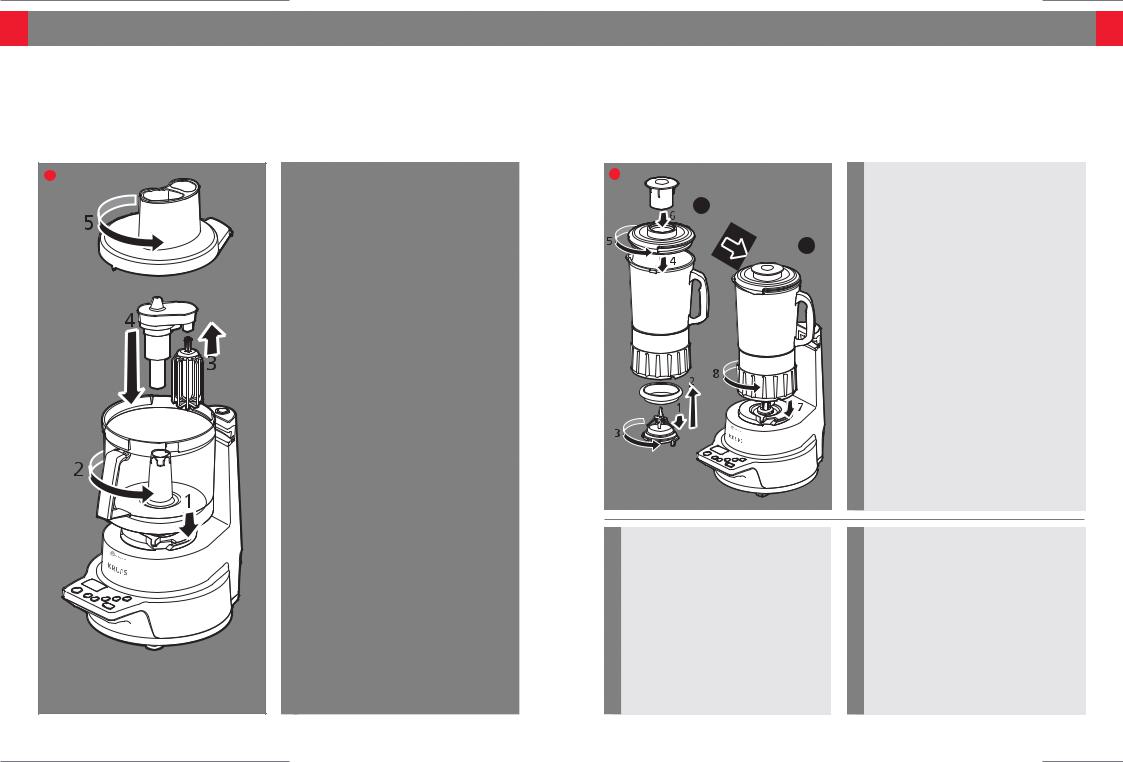
4: BEATING/WHISKING/EMULSIFYING
ACCESSORIES USED
Chopping bowl assembly (b),
Metal whisk assembly (g)
4
Fitting the Accessories
1Place the transparent bowl (b3) on the motor unit outlet (a2).
2Turn anticlockwise until it locks into position.
3Push the whisk (g2) into the whisk drive unit (g1). (If it is not already assembled)
4Position the whisk assembly onto the shaft of the bowl.
5Put ingredients into the bowl and place the lid (b2) on the bowl. Turn anticlockwise until it locks into position.
Usage and Practical tips
•Press speed button ‘2’ or ‘3’.
•Never use this accessory for kneading heavy dough, cake mixtures or mixing light batters.
•Press the ‘OFF’ button to stop the machine. After the food processor has come to a stop, press the release button (a1) and turn the lid to release it.
•You can prepare mayonnaise, mousses,
whip egg whites (1 to 7), whipped cream, chantilly cream (up to 0.5Litres).
•When whipping egg whites the bowl must be completely clean with no trace of fat.
YOUR FOOD PROCESSOR’S FUNCTIONS 15
5: MIXING/FINE BLENDING
ACCESSORIES USED
Blender assembly (h)
5 |
Fitting the Accessories |
|
Glass blender (h) assembly (If it is not |
||
|
||
|
already assembled): |
|
5.1 |
1 Dampen the silicone seal (h4), and place it on the |
blade support (h5): pay attention to the direction of the seal (the narrowest diameter should always be positioned upwards).
5.22 Place this assembly under the bottom of the glass jug (h3).
3 Screw it in completely turning clockwise. Put the ingredients into the blender (h3) without exceeding the maximum level.
4Position the tab on the lid to the left of the glass tab on the lid.
5Turn lid anticlockwise to lock onto glass jug.
6Place measuring cap (h1) onto lid.
7Position the assembled blender (h) on the motor unit outlet (a2) with the handle in the 4 o’clock position.
8Turn assembly anticlockwise until it locks into
position.
Usage
You have 3 options:
1 Use one of the speed buttons 1, 2 or 3 for continuous operation.
2Use the ‘Pulse’ button for better control of mixing.
3Use the ‘Auto Mix’ button for optimum preparation results.
Practical tips |
• If the ingredients remain stuck to the sides of the |
|
• Never fill the blender with boiling liquid. Only use |
blender jug during mixing, stop the appliance and |
|
liquids at simmering temperature or below. |
unplug it. Remove the blender assembly from the |
|
• Never use the blender to grind dry products |
body of the appliance. Using the spatula (i), |
|
(hazelnuts, almonds, peanuts, sugar & spices). |
scrape down the mixture onto the blade. Never |
|
• Always use your blender with its lid. |
put your fingers or hands into the glass jug or near |
|
• Always pour the liquid ingredients into the glass |
the blade. |
|
bowl first before adding the solid ingredients, |
You can: |
|
without exceeding the maximum level shown: |
||
• Prepare finely blended broths, cream soups, |
||
– 1.5L for thick mixtures |
||
sauces, stewed fruit, milkshakes and cocktails. |
||
– 1.25L for liquid mixtures. |
||
• Mix all types of batter (pancakes, waffles, fritters, |
||
• To add ingredients while blending, remove the |
||
yorkshire puddings and custard flan). |
||
measuring cap (h1) from the lid and pour the |
||
• Crush ice with ‘Auto Mix’: operate with a |
||
ingredients through the opening. |
||
maximum of 6 to 10 large ice cubes (0.5L level). |
||
• After the food processor has come to a stop, unlock |
||
• Process breadcrumbs by dropping cubes of any |
||
the blender by rotating clockwise to release it. |
||
dry bread onto the blade while it is rotating. |
||
|
 Loading...