


 Loading...
PageScope
My Panel Manager Ver. 3.0
User’s Guide
My Panel Manager

Contents
1 General
1.1 |
What is My Panel Manager?.............................................................. |
1-1 |
1.2 |
General setup operation.................................................................... |
1-2 |
|
Device Manager settings ................................................................ |
1-2 |
1.2.1 |
My Panel Manager setting .............................................................. |
1-2 |
2 Logging on
2.1 |
Logging on to Enterprise Suite ......................................................... |
2-1 |
2.2 |
Basic Operations................................................................................ |
2-2 |
2.2.1 |
Main Menu ...................................................................................... |
2-2 |
2.2.2 |
Pages for the functions .................................................................. |
2-3 |
3 My Panel Manager operations
3.1 |
Available operations in the My Address page |
.................................3-1 |
3.2 |
Using an address book...................................................................... |
3-3 |
3.2.1 |
Viewing the address book list ......................................................... |
3-3 |
3.2.2 |
Registering an address book .......................................................... |
3-4 |
|
When "E-mail" is selected .............................................................. |
3-5 |
|
When "Fax" is selected .................................................................. |
3-7 |
|
When "WebDAV" is selected.......................................................... |
3-9 |
|
When "PC (SMB)" is selected ...................................................... |
3-11 |
|
When "FTP" is selected................................................................ |
3-13 |
|
When "IP Address Fax" is selected.............................................. |
3-16 |
|
When "Internet Fax" is selected ................................................... |
3-18 |
3.2.3 |
Editing an address book ............................................................... |
3-20 |
3.2.4 |
Deleting an address book ............................................................. |
3-22 |
3.3 |
Using a group ................................................................................... |
3-23 |
3.3.1 |
Viewing the group list ................................................................... |
3-23 |
3.3.2 |
Registering a group ...................................................................... |
3-24 |
3.3.3 |
Editing Group ............................................................................... |
3-25 |
3.3.4 |
Deleting a group ........................................................................... |
3-26 |
3.4 |
Using expansion functions.............................................................. |
3-27 |
3.4.1 |
Selecting the expansion function ................................................. |
3-27 |
My Panel Manager |
i |

|
|
|
|
|
|
|
|
|
3.4.2 |
..................................................................Importing My Address |
3-27 |
|
3.4.3 |
Viewing import results .................................................................. |
3-28 |
|
3.4.4 |
Exporting My Address .................................................................. |
3-30 |
|
|
Export file formats ........................................................................ |
3-31 |
|
|
Export file items (Address Book) .................................................. |
3-31 |
|
|
Export file items (Group)............................................................... |
3-37 |
|
3.5 |
Available operations in the My Panel page.................................... |
3-38 |
|
3.6 |
Customizing My Panel ..................................................................... |
3-40 |
|
3.6.1 |
Specifying the My Panel environment .......................................... |
3-40 |
|
|
Screen example............................................................................ |
3-41 |
|
3.6.2 |
Setting up the main menu ............................................................ |
3-42 |
|
|
Screen example............................................................................ |
3-43 |
|
3.6.3 |
Setting up the Copy screen .......................................................... |
3-44 |
|
|
Shortcut keys in the Copy screen ................................................ |
3-45 |
|
3.6.4 |
Setting up the Fax/Scan screen ................................................... |
3-46 |
|
|
Fax/Scan screen example ............................................................ |
3-47 |
|
|
Types of the Fax/Scan screen...................................................... |
3-48 |
|
3.6.5 |
Setting up the User Box screen ................................................... |
3-51 |
|
|
User Box screen example ............................................................ |
3-51 |
|
|
Types of the User Box screen ...................................................... |
3-52 |
|
3.7 |
Specifying expansion functions...................................................... |
3-54 |
|
3.7.1 |
Selecting the expansion function ................................................. |
3-54 |
|
3.7.2 |
Importing My Panel ...................................................................... |
3-54 |
|
3.7.3 |
Viewing import results .................................................................. |
3-55 |
|
3.7.4 |
Exporting My Panel ...................................................................... |
3-56 |
|
|
Export file formats ........................................................................ |
3-57 |
|
|
Export file items............................................................................ |
3-57 |
|
3.8 |
Customizing Browser Data ............................................................. |
3-62 |
|
3.8.1 |
Browser Setting ............................................................................ |
3-62 |
4 |
Managing My Panel Manager |
|
|
|
4.1 |
My Panel Manager administrative setting ....................................... |
4-1 |
|
4.2 |
Specifying administrators of My Panel Manager ............................ |
4-3 |
|
4.2.1 |
Viewing the administrator of My Panel Manager list ...................... |
4-3 |
|
4.2.2 |
Adding an administrator ................................................................. |
4-4 |
|
4.2.3 |
Canceling the administrator privileges ........................................... |
4-5 |
|
4.3 |
Specifying a device to be managed ................................................. |
4-6 |
My Panel Manager |
ii |

|
|
|
|
|
|
4.3.1 |
..........................................................................Selecting a device |
4-6 |
4.3.2 |
Specifying device management information .................................. |
4-8 |
4.3.3 |
Displaying the device setting results .............................................. |
4-9 |
4.4 |
Specifying the operating environment ........................................... |
4-10 |
4.5 |
Editing the address book of each user .......................................... |
4-11 |
4.5.1 |
Displaying My Address users list .................................................. |
4-11 |
4.5.2 |
Editing an address book ............................................................... |
4-13 |
4.5.3 |
Editing Group ............................................................................... |
4-14 |
4.5.4 |
Deleting My Address .................................................................... |
4-14 |
4.6 |
Editing the panel settings for each user ........................................ |
4-15 |
4.6.1 |
Displaying a list of My Panel users ............................................... |
4-15 |
4.6.2 |
Editing the System Settings ......................................................... |
4-18 |
4.6.3 |
Editing the Select items to display in main menu ......................... |
4-18 |
4.6.4 |
Editing the Main Menu Settings ................................................... |
4-19 |
4.6.5 |
Editing Copy Setting ..................................................................... |
4-21 |
4.6.6 |
Editing Fax/Scan Settings ............................................................ |
4-22 |
4.6.7 |
Editing Box Settings ..................................................................... |
4-23 |
4.6.8 |
Deleting My Panel ......................................................................... |
4-23 |
4.6.9 |
Editing Browser Settings .............................................................. |
4-24 |
4.7 |
Address Batch Setting..................................................................... |
4-25 |
4.7.1 |
Selecting an import file ................................................................. |
4-25 |
4.7.2 |
Selecting a target user .................................................................. |
4-26 |
4.7.3 |
Displaying batch setting result ..................................................... |
4-27 |
4.7.4 |
Displaying an import file error ....................................................... |
4-28 |
4.8 |
Specifying the panel batch setting ................................................. |
4-29 |
4.8.1 |
Selecting an import file ................................................................. |
4-29 |
4.8.2 |
Selecting a target user .................................................................. |
4-30 |
4.8.3 |
Displaying batch setting result ..................................................... |
4-31 |
4.8.4 |
Displaying an import file error ....................................................... |
4-32 |
4.9 |
Displaying the error history............................................................. |
4-33 |
4.10 Specifying functions of My Panel Manager ................................... |
4-34 |
|
4.11 Specifying the default value of My Address/My Panel ................. |
4-37 |
|
4.12 Displaying the version information................................................. |
4-39 |
|
4.13 |
ImageConverter................................................................................ |
4-40 |
My Panel Manager |
iii |

|
|
|
|
|
|
|
|
|
4.13.1 |
....................................................................................Installation |
4-40 |
|
4.13.2 |
Uninstallation ................................................................................ |
4-41 |
|
4.13.3 |
Using ImageConverter .................................................................. |
4-41 |
|
4.14 |
AddressImporter .............................................................................. |
4-43 |
|
4.14.1 |
Installation .................................................................................... |
4-43 |
|
4.14.2 |
Uninstallation ................................................................................ |
4-44 |
|
4.14.3 |
Using AddressImporter ................................................................ |
4-44 |
|
|
Select import method ................................................................... |
4-45 |
|
|
System Settings ........................................................................... |
4-48 |
|
|
Select/register address book data ............................................... |
4-49 |
|
|
Import Result ................................................................................ |
4-50 |
5 |
Setting by purpose |
|
|
|
5.1 |
I want to display the registered personal screen on the device.... |
5-1 |
|
|
How to display the personal screen ............................................... |
5-1 |
5.2I want to use the registered personal address book on
|
the device............................................................................................ |
5-2 |
|
How to display the personal address book.................................... |
5-2 |
5.3 |
I want to send scanned images to my E-mail address................... |
5-3 |
6 Troubleshooting
6.1 |
Problems on Administrative Setting................................................. |
6-1 |
My Panel Manager |
iv |

About this product
My Panel Manager is network-based software used for managing personal address books and panels used on MFPs and other devices. By using My Panel Manager, the address information and panel settings of each user can be managed easily in a Web browser.
My Panel Manager is an application that runs on Device Manager. Device Manager must be installed in order to install My Panel Manager.
My Panel Manager |
v |

Abbreviation of product names
This manual describes product names using the following abbreviations.
Product name |
Abbrev. |
KONICA MINOLTA PageScope Enterprise Suite |
Enterprise Suite |
|
|
KONICA MINOLTA PageScope Net Care Device |
Device Manager |
Manager |
|
|
|
KONICA MINOLTA PageScope Account Manager |
Account Manager |
|
|
KONICA MINOLTA PageScope My Panel Manager |
My Panel Manager |
|
|
KONICA MINOLTA ImageConverter |
ImageConverter |
|
|
KONICA MINOLTA AddressImporter |
AddressImporter |
|
|
My Panel Manager |
vi |

Trademarks and registered trademarks
Trademark acknowledgements
KONICA MINOLTA and KONICA MINOLTA logo are registered trademarks or trademarks of KONICA MINOLTA HOLDINGS, INC.
PageScope is a registered trademark or trademark of KONICA MINOLTA BUSINESS TECHNOLOGIES, INC.
Microsoft, Active Directory and Windows are either registered trademarks or trademarks of Microsoft Corporation in the United States and/or other countries.
All other company and product names are either trademarks or registered trademarks of their respective companies.
Dialog boxes
The dialog boxes shown in this manual are those that appear in Windows XP.
!
Detail
The dialog boxes that appear in this document may differ from those that appear on your computer, depending on the installed devices and specified settings.
Note
Unauthorized reproduction, translation or duplication of this document, whether in its entirety or in part, is strictly prohibited.
The content of this document is subject to change without notice.
Copyright © 2007 KONICA MINOLTA BUSINESS TECHNOLOGIES, INC. All rights reserved.
My Panel Manager |
vii |

General |
1 |
|
1General
1.1What is My Panel Manager?
My Panel Manager provides the following functions.
-My Address
Edits a personal address book (My Address) managed by the server using a Web application. This is a function for general users.
-My Panel
Edits personal panel settings (My Panel) managed by the server using a Web application. This is a function for general users.
-Administrative Setting
Specifies settings for devices managed by My Panel Manager or edits an address book or panel settings for each user managed by My Panel Manager using a Web application. This is a function for administrators.
My Panel Manager |
1-1 |

General |
1 |
|
1.2General setup operation
In order to use My Panel Manager, configure settings in the following order.
Device Manager settings
Log on to Device Manager as a system administrator, and then specify settings for the following.
Function |
Description |
Device List |
Refer to the Device Manager User's Guide. |
|
|
User List |
|
|
|
Server Settings |
|
|
|
1.2.1My Panel Manager setting
Log on to My Panel Manager as a system administrator, and then specify settings for the following. The following settings are required to enable My Panel Manager for general users.
-Device Management
Specifies devices for which My Address and My Panel are managed by My Panel Manager. (p. 4-6)
-Operating environment settings
Specifies settings for the operating environment of My Panel Manager. (p. 4-10)
My Panel Manager |
1-2 |
Logging on |
2 |
|
2 Logging on
This chapter provides details on logging on to My Panel Manager.
2.1Logging on to Enterprise Suite
For details on logging on to the Enterprise Suite server, refer to the Device Manager User's Guide.
My Panel Manager |
2-1 |
Logging on |
2 |
|
2.2Basic Operations
The basic operation of My Panel Manager is described below.
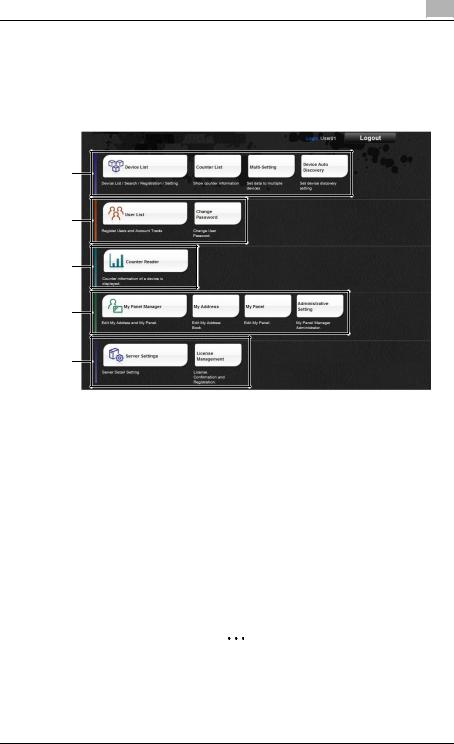
2.2.1Main Menu
1
2
3
4
5
No. |
Function |
Description |
1 |
Device List |
Registers and manages devices. For details, refer to the |
|
|
chapter related to Device List in the Device Manager User's |
|
|
Guide. |
|
|
|
2 |
User List |
Registers and manages users. For details, refer to the |
|
|
chapter related to User List in the Device Manager User's |
|
|
Guide. |
|
|
|
3 |
Counter Reader |
Checks the device usage status. For details, refer to the |
|
|
chapter related to Counter Reader in the Device Manager |
|
|
User's Guide. |
|
|
|
4 |
My Panel Manager |
Specifies panel settings and manages an address book for |
|
|
the each user. It also specifies administrator settings for My |
|
|
Panel Manager. For details, refer to "3 My Panel Manager |
|
|
operations" and "4 Managing My Panel Manager". |
|
|
2 |
|
|
Reminder |
|
|
When logged on as a general user (except for |
|
|
My Panel Manager administrator), only the ad- |
|
|
dress book and panel settings registered for |
|
|
that user's account can be edited. |
|
|
|
My Panel Manager |
2-2 |
Logging on |
2 |
|
No. |
Function |
Description |
5 |
Server Settings |
Sets up the Enterprise Suite server. For details, refer to the |
|
|
chapter related to Server Settings in the Device Manager |
|
|
User's Guide. |
|
|
|
2.2.2Pages for the functions
1 |
2 |
|
|
|
|
|
|
||||||||||||
3 |
|
|
|
|
|
|
|
|
|
|
|
|
|
|
|
|
|
|
5 |
|
|
|
|
|
|
|
|
|
|
|
|
|
|
|
|
|
|
||
|
|
|
|
|
|
|
|
|
|
|
|
|
|
|
|
|
|
||
|
|
|
|
|
|
|
|
|
|
|
|
|
|
||||||
|
|
|
|
|
|
|
|
|
|
|
|
|
|
|
|
||||
|
|
|
|
|
|
|
|
|
|
|
|
|
|
|
|
6 |
|||
|
|
|
|
|
|
|
|
|
|
|
|
|
|
|
|
||||
|
|
|
|
|
|
|
|
|
|
|
|
|
|
||||||
|
|
|
|
|
|
|
|
|
|
|
|
|
|
|
|
||||
4 |
|
|
|
|
|
|
|
|
|
|
|
|
|
|
|
|
|
7 |
|
|
|
|
|
|
|
|
|
|
|
|
|
|
|
|
|
||||
|
|
|
|
|
|
|
|
|
|
|
|
|
|
|
|
|
|||
|
|
|
|
|
|
|
|
|
|
|
|
|
|
|
|
|
|
8 |
|
|
|
|
|
|
|
|
|
|
|
|
|
|
|
|
|
|
|
9 |
|
|
|
|
|
|
|
|
|
|
|
|
|
|
|
|
|
|
|
||
|
|
|
|
|
|
|
|
|
|
|
|
|
|
|
10 |
||||
|
|
|
|
|
|
|
|
|
|
|
|
|
|
|
|
|
|
|
|
No. |
Function |
Description |
|
|
|
1 |
Login user name |
Displays the name of the user who is logged in. |
|
|
|
|
|
|
|||
2 |
[Logout] button |
Click this button to log off of My Panel Manager and display |
|||
|
|
the Login page. |
|
|
|
|
|
|
|
||
3 |
[Go to Top Menu] button |
Click this button to move to the Top Menu page. |
|
||
|
|
|
|
|
|
4 |
Menu |
The menu items are displayed. |
|
|
|
|
|
Click a menu item to display details on the right side of the |
|||
|
|
page. |
|
|
|
|
|
2 |
|
|
|
|
|
Note |
|
|
|
|
|
If |
appears beside the menu title, click |
to |
|
|
|
display the collapsed menu. Click |
to close |
||
|
|
the menu. |
|
|
|
|
|
|
|
|
|
My Panel Manager |
2-3 |
Logging on |
2 |
|
No. |
Function |
Description |
5 |
|
Click this button to display the page for the item one level |
|
|
higher in the menu. |
|
|
2 |
|
|
Note |
|
|
The "Back" button of the Web browser cannot |
|
|
be used. |
|
|
|
|
|
Click this button to update the information in the current |
|
|
page. |
|
|
2 |
|
|
Note |
|
|
The "Refresh" button of the Web browser can- |
|
|
not be used. |
|
|
|
|
|
Click this button to display the Help information for the cur- |
|
|
rent page. |
|
|
|
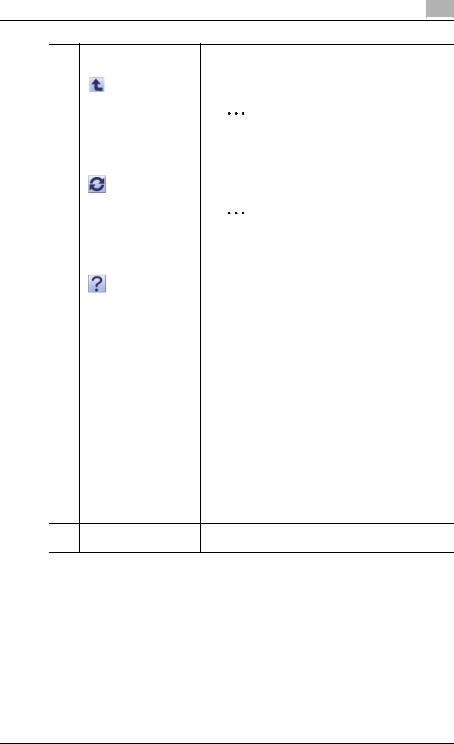
6 |
Search Condition |
When a list is displayed in the page, the listed items can be |
|
|
narrowed. |
|
|
Select a column to search from the drop-down list, and |
|
|
then type in the text to be searched for in the text box. |
|
|
|
7 |
[Select All/Uncheck all] |
When a list is displayed in the page, all items can be select- |
|
button |
ed or cleared. |
|
|
|
8 |
Maximum number of dis- |
When a list is displayed in the page, select the number of |
|
played lines |
data items displayed in the list. |
|
|
For example, if "10" is clicked, ten data items are displayed |
|
|
in the current page. |
|
|
|
9 |
Page selection |
These buttons appear when the list displayed in the page |
|
|
extends over multiple pages. |
•Click the [<] button to display the previous page.
•Click the [>] button to display the next page.
•Click the [<<] button to display the first page.
•Click the [>>] button to display the last page.
•Type the desired page number in the text box, and then click the [Go] button to display the specified page.
10 |
Sort |
When a list is displayed in the page, click an item name in |
|
|
the list to sort the entire list using the item as a sort key. |
My Panel Manager |
2-4 |

My Panel Manager operations |
3 |
|
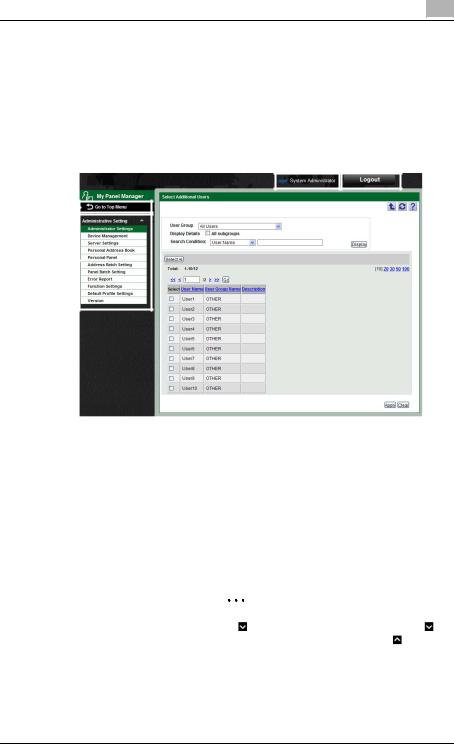
3My Panel Manager operations
3.1Available operations in the My Address page
My Address is a personal address book managed in a server. Because only the registered destinations of the user are displayed in My Address, it is easy to select the destination.
Every user can edit My Address using a Web application and use My Address within a range of devices selected in Administrative Setting. A general user can edit the following items using a Web application.
2
Note
To use an address book edited by My Panel Manager on each device, the relevant device must be specified as a device to be managed by My Address Book function in Administrative Setting.
My Panel Manager |
3-1 |

My Panel Manager operations |
3 |
|
|
Function |
Details |
|
Address Book |
Registers a new address book, or edits or deletes the ex- |
|
|
isting data. |
|
|
|
|
Group |
Registers a new group, or edits or deletes the existing data. |
|
|
|
|
Expansion Function |
Imports or exports My Address data. |
|
|
|
2 |
|
|
Reminder
My Address can be edited from the panel of the target device. For details, refer to chapters on My Address in the User's Guide (for expansion functions) that comes with your device.
2
Reminder
Some of the functions specified here may not be available on some devices. For details on device functions, refer to the user's guide that comes with your device.
2
Note
If editing is disabled for a particular user in Administrative Setting, the user cannot edit the personal My Address. Even if an edit-disabled user attempts to edit from the panel on the target device, the setting is not reflected in My Panel Manager. (p. 4-11)
My Panel Manager |
3-2 |
My Panel Manager operations |
3 |
|
3.2Using an address book
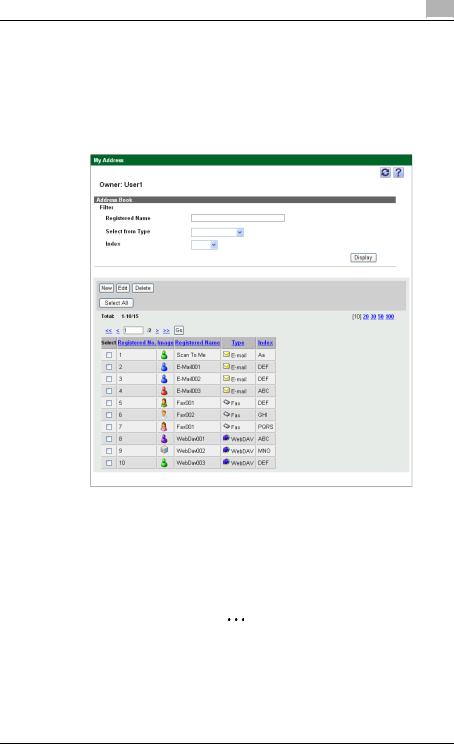
3.2.1Viewing the address book list
Clicking [Address Book] on the "My Address" menu displays the Address Book page. On this page, the following operations can be executed for desired purposes.
Function |
Details |
Filter |
Specify the address book search conditions. |
(Registered Name/Select from |
Registered Name: Type in the keyword to search for regis- |
Type/Index) |
tered name. |
|
Select from Type: Select the type. |
|
Index: Select a letter. |
|
2 |
|
Reminder |
|
When searching by registered name, address |
|
books including the entered keyword are listed. |
|
If multiple conditions are specified, address |
|
books matching all conditions are listed. |
|
|
My Panel Manager |
3-3 |

My Panel Manager operations |
3 |
|
Function |
Details |
[Display] button |
Displays address books matching the specified search |
|
conditions. |
|
|
[New] button |
Registers a new address book. For details, refer to "Regis- |
|
tering an address book" on page 3-4. |
|
|
[Edit] button |
Edits the address book selected in the Address Book List. |
|
For details, refer to "Editing an address book" on |
|
page 3-20. |
|
2 |
|
Reminder |
|
Multiple address books cannot be edited at the |
|
same time. |
|
|
[Delete] button |
Deletes the address book selected in the Address Book |
|
List. For details, refer to "Deleting an address book" on |
|
page 3-22. |
|
|
[Select All/Uncheck all] button |
Selects all address books displayed in the Address Book |
|
List. Clicking this button again cancels all selections. |
|
|
Address Book List |
Displays a list of address books registered in My Address. |
|
Select the check box, and then select the address book to |
|
be edited or deleted. |
|
|
3.2.2Registering an address book
Clicking the [New] button on the Address Book page displays the New Address Book page. On this page, a new address book can be registered in My Address. Select the type according to the purpose of the address book to be registered. The settings to be displayed differ depending on the selected type.
2
Reminder
Up to 100 address books can be registered for each user.
To select the type, select one of the following from the drop-down list, and then click the [Change Type] button.
Function |
Details |
Registers an address book for sending E-mails. For details, |
|
|
refer to "When "E-mail" is selected" on page 3-5. |
|
|
Fax |
Registers an address book for Fax. For details, refer to |
|
"When "Fax" is selected" on page 3-7. |
|
|
WebDAV |
Registers an address book for WebDAV. For details, refer |
|
to "When "WebDAV" is selected" on page 3-9. |
|
|
PC (SMB) |
Registers an address book for PC (SMB). For details, refer |
|
to "When "PC (SMB)" is selected" on page 3-11. |
|
|
My Panel Manager |
3-4 |
My Panel Manager operations |
3 |
|
Function |
Details |
FTP |
Registers an address book for FTP. For details, refer to |
|
"When "FTP" is selected" on page 3-13. |
|
|
IP Address Fax |
Registers an address book for IP Address Fax. For details, |
|
refer to "When "IP Address Fax" is selected" on page 3-16. |
|
|
Internet Fax |
Registers an address book for Internet Fax. For details, re- |
|
fer to "When "Internet Fax" is selected" on page 3-18. |
|
|
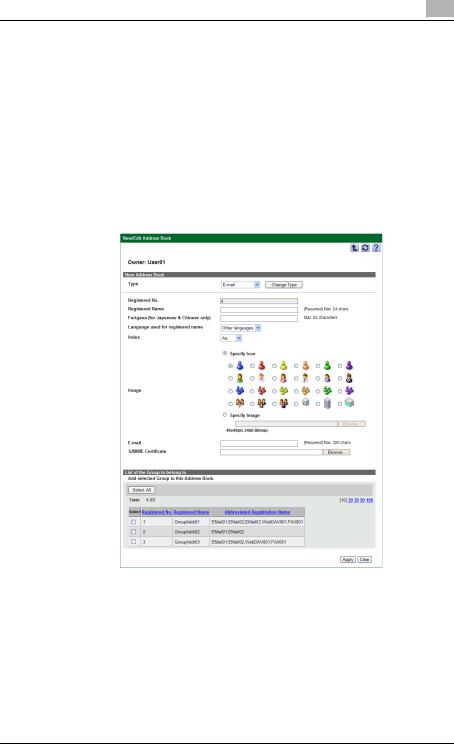
When "E-mail" is selected
When "E-mail" is selected in "Type", the following items appear on the page. Specify the settings according to the desired purpose.
Function |
Details |
Type |
Select the type of address book to be registered. Click the |
|
[Change Type] button to change the items (settings) on the |
|
page. |
|
|
Registered No. |
Displays the registered number assigned automatically |
|
(cannot be changed). |
|
|
Registered Name |
Type in the name of the address book. |
|
|
My Panel Manager |
3-5 |

My Panel Manager operations |
3 |
|
Function |
Details |
Furigana (for Japanese & Chinese |
Enter the same name as that used for the registered name. |
only) |
Addresses can be sorted by registered name. |
|
|
Language used for registered |
Select whether or not the language used for registered |
name |
names is Chinese or a language other than Chinese. |
|
|
Index |
Select an index letter. The selected letter is used as an ad- |
|
dress book search condition. |
|
|
Image |
Select an image. To use a supplied icon, select [Specify |
|
Icon], and then select an icon. To use any other image, se- |
|
lect [Specify Image], and then click the [Browse] button to |
|
specify the image file (24-bit BMP (Bitmap) file of 48 x 48 |
|
pixels). |
|
2 |
|
Reminder |
|
To change the image registered in the address |
|
book, select [Edit], and then specify the image |
|
file. |
|
|
Type in the destination of E-mail. |
|
|
|
S/MIME Certificate |
Click the [Browse] button to specify the S/MIME Certificate |
|
file. The destination specified in the S/MIME certificate and |
|
the e-mail destination must be the same. |
|
2 |
|
Reminder |
|
To change the S/MIME Certificate registered for |
|
the address book, select [Edit], and then specify |
|
the S/MIME Certificate file. |
|
|
[Select All/Uncheck all] button |
Selects all groups displayed in the Group List. Clicking this |
|
button again cancels all selections. |
|
|
Group List |
Displays a list of groups registered in My Address. Select |
|
the check box, and then select the group where the ad- |
|
dress book currently specified is registered. |
|
|
[Apply] button |
Registers the address book with the specified settings. |
|
|
[Clear] button |
Clears the specified settings and reverts to the initial set- |
|
tings. |
|
|
My Panel Manager |
3-6 |
My Panel Manager operations |
3 |
|
When "Fax" is selected
When "Fax" is selected in "Type", the following appear on the page. Specify the settings according to the desired purpose.
Function |
Details |
Type |
Select the type of address book to be registered. Click the |
|
[Change Type] button to change the items (settings) on the |
|
page. |
|
|
Registered No. |
Displays the registered number assigned automatically |
|
(cannot be changed). |
|
|
Registered Name |
Type in the name of the address book. |
|
|
Furigana (for Japanese & Chinese |
Enter the same name as that used for the registered name. |
only) |
Addresses can be sorted by registered name. |
|
|
Language used for registered |
Select whether or not the language used for registered |
name |
names is Chinese or a language other than Chinese. |
|
|
Index |
Select an index letter. The selected letter is used as an ad- |
|
dress book search condition. |
|
|
My Panel Manager |
3-7 |

My Panel Manager operations |
3 |
|
Function |
Details |
Image |
Select an image. To use a supplied icon, select [Specify |
|
Icon], and then select an icon. To use any other image, se- |
|
lect [Specify Image], and then click the [Browse] button to |
|
specify the image file (24-bit BMP (Bitmap) file of 48 x 48 |
|
pixels). |
|
2 |
|
Reminder |
|
To change the image registered in the address |
|
book, select [Edit], and then specify the image |
|
file. |
|
|
Destination (Fax Number) |
Type in the destination of a fax (fax number). |
|
|
SIP-Fax |
Select to enable or disable SIP-Fax Transmission. |
|
|
Machine Type of Destination |
Select [Color] when the destination is a color device, or se- |
|
lect [Black and White] when the destination is a black-and- |
|
white device. |
|
2 |
|
Reminder |
|
This function can only be set when SIP-Fax |
|
Transmission is enabled. |
|
|
Check Dest. & Send |
Select to enable or disable Check Dest. & Send. |
|
2 |
|
Reminder |
|
This function can only be set when SIP-Fax |
|
Transmission is disabled. |
|
|
Select Line |
Select the line to be used. Selecting [Overseas TX] enables |
|
the Overseas TX mode. Selecting [ECM OFF] disables the |
|
ECM mode. Selecting [V34 OFF] disables the V34 mode. |
|
2 |
|
Reminder |
|
This function can only be set when SIP-Fax |
|
Transmission is disabled. |
|
The ECM and V34 modes cannot be disabled at |
|
the same time. |
|
|
[Select All/Uncheck all] button |
Selects all groups displayed in the Group List. Clicking this |
|
button again cancels all selections. |
|
|
Group List |
Displays a list of groups registered in My Address. Select |
|
the check box, and then select the group where the ad- |
|
dress book currently specified is registered. |
|
|
[Apply] button |
Registers the address book with the specified settings. |
|
|
[Clear] button |
Clears the specified settings and reverts to the initial set- |
|
tings. |
|
|
My Panel Manager |
3-8 |
My Panel Manager operations |
3 |
|
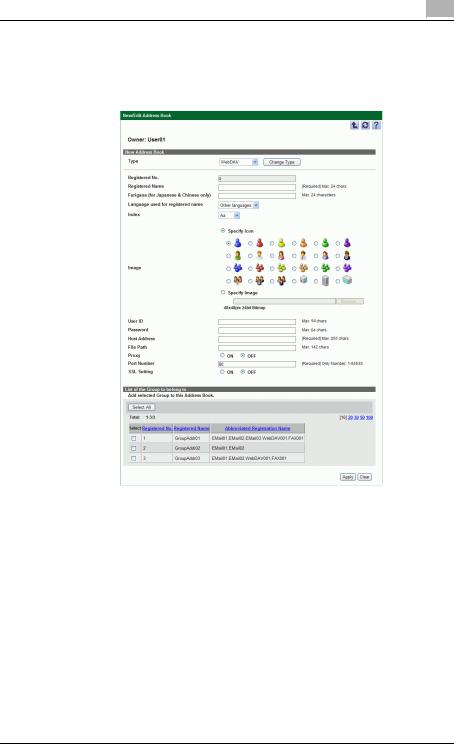
When "WebDAV" is selected
When "WebDAV" is selected in "Type", the following appear on the page. Specify the settings according to the desired purpose.
Function |
Details |
Type |
Select the type of address book to be registered. Click the |
|
[Change Type] button to change the items (settings) on the |
|
page. |
|
|
Registered No. |
Displays the registered number assigned automatically |
|
(cannot be changed). |
|
|
Registered Name |
Type in the name of the address book. |
|
|
Furigana (for Japanese & Chinese |
Enter the same name as that used for the registered name. |
only) |
Addresses can be sorted by registered name. |
|
|
Language used for registered |
Select whether or not the language used for registered |
name |
names is Chinese or a language other than Chinese. |
|
|
Index |
Select an index letter. The selected letter is used as an ad- |
|
dress book search condition. |
|
|
My Panel Manager |
3-9 |

My Panel Manager operations |
3 |
|
Function |
Details |
Image |
Select an image. To use a supplied icon, select [Specify |
|
Icon], and then select an icon. To use any other image, se- |
|
lect [Specify Image], and then click the [Browse] button to |
|
specify the image file (24-bit BMP (Bitmap) file of 48 x 48 |
|
pixels). |
|
2 |
|
Reminder |
|
To change the image registered in the address |
|
book, select [Edit], and then specify the image |
|
file. |
|
|
User ID |
Type in the user ID to connect to the WebDAV server. |
|
2 |
Note
The maximum number of characters allowed varies depending on the device. Note that a one-touch destination whose name contains a number of characters that exceeds the maximum is not sent to the device.
Password |
Type in the password to connect to the WebDAV server. |
|
2 |
|
Reminder |
|
To change the password registered for the ad- |
|
dress book, select [Edit], and then type in the |
|
new password. |
|
2 |
|
Note |
|
The maximum number of characters allowed |
|
varies depending on the device. Note that a |
|
one-touch destination whose name contains a |
|
number of characters that exceeds the maxi- |
|
mum is not sent to the device. |
|
|
Host Address |
Type in the host address of the WebDAV server. |
|
2 |
|
Note |
|
The maximum number of characters allowed |
|
varies depending on the device. Note that a |
|
one-touch destination whose name contains a |
|
number of characters that exceeds the maxi- |
|
mum is not sent to the device. |
|
|
File Path |
Type in the file path. |
|
|
Proxy |
Select to enable or disable the proxy. |
My Panel Manager |
3-10 |
My Panel Manager operations |
3 |
|
Function |
Details |
Port Number |
Type in the port number. |
|
|
SSL Setting |
Select to enable or disable the SSL setting. |
|
|
[Select All/Uncheck all] button |
Selects all groups displayed in the Group List. Clicking this |
|
button again cancels all selections. |
|
|
Group List |
Displays a list of groups registered in My Address. Select |
|
the check box, and then select the group where the ad- |
|
dress book currently specified is registered. |
|
|
[Apply] button |
Registers the address book with the specified settings. |
|
|
[Clear] button |
Clears the specified settings and reverts to the initial set- |
|
tings. |
|
|
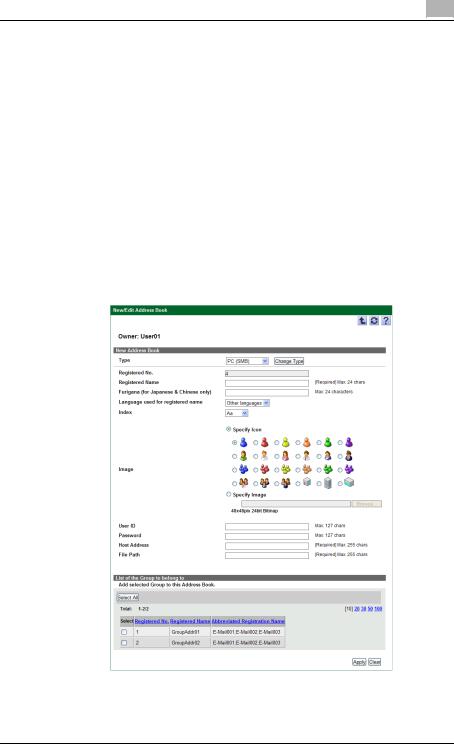
When "PC (SMB)" is selected
When "PC (SMB)" is selected in "Type", the following appear on the page. Specify the settings according to the desired purpose.
My Panel Manager |
3-11 |

My Panel Manager operations |
3 |
|
Function |
Details |
Type |
Select the type of address book to be registered. Click the |
|
[Change Type] button to change the items (settings) on the |
|
page. |
|
|
Registered No. |
Displays the registered number assigned automatically |
|
(cannot be changed). |
|
|
Registered Name |
Type in the name of the address book. |
|
|
Furigana (for Japanese & Chinese |
Enter the same name as that used for the registered name. |
only) |
Addresses can be sorted by registered name. |
|
|
Language used for registered |
Select whether or not the language used for registered |
name |
names is Chinese or a language other than Chinese. |
|
|
Index |
Select an index letter. The selected letter is used as an ad- |
|
dress book search condition. |
|
|
Image |
Select an image. To use a supplied icon, select [Specify |
|
Icon], and then select an icon. To use any other image, se- |
|
lect [Specify Image], and then click the [Browse] button to |
|
specify the image file (24-bit BMP (Bitmap) file of 48 x 48 |
|
pixels). |
|
2 |
|
Reminder |
|
To change the image registered in the address |
|
book, select [Edit], and then specify the image |
|
file. |
|
|
User ID |
Type in the user ID to connect to the SMB server. |
|
|
Password |
Type in the password to connect to the SMB server. |
|
2 |
|
Reminder |
|
To change the password registered for the ad- |
|
dress book, select [Edit], and then type in the |
|
new password. |
|
|
Host Address |
Type in the host address of the SMB server. |
|
2 |
|
Note |
|
The maximum number of characters allowed |
|
varies depending on the device. Note that a |
|
one-touch destination whose name contains a |
|
number of characters that exceeds the maxi- |
|
mum is not sent to the device. |
|
|
File Path |
Type in the file path. |
|
|
[Select All/Uncheck all] button |
Selects all groups displayed in the Group List. Clicking this |
|
button again cancels all selections. |
|
|
My Panel Manager |
3-12 |
My Panel Manager operations |
3 |
|
Function |
Details |
Group List |
Displays a list of groups registered in My Address. Select |
|
the check box, and then select the group where the ad- |
|
dress book currently specified is registered. |
|
|
[Apply] button |
Registers the address book with the specified settings. |
|
|
[Clear] button |
Clears the specified settings and reverts to the initial set- |
|
tings. |
|
|
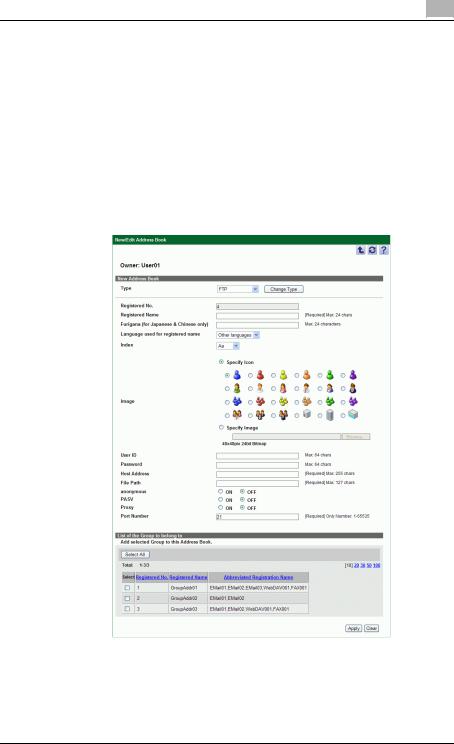
When "FTP" is selected
When "FTP" is selected in "Type", the following appear on the page. Specify the settings according to the desired purpose.
Function |
Details |
Type |
Select the type of address book to be registered. Click the |
|
[Change Type] button to change the items (settings) on the |
|
page. |
|
|
My Panel Manager |
3-13 |

My Panel Manager operations |
3 |
|
Function |
Details |
Registered No. |
Displays the registered number assigned automatically |
|
(cannot be changed). |
|
|
Registered Name |
Type in the name of the address book. |
|
|
Furigana (for Japanese & Chinese |
Enter the same name as that used for the registered name. |
only) |
Addresses can be sorted by registered name. |
|
|
Language used for registered |
Select whether or not the language used for registered |
name |
names is Chinese or a language other than Chinese. |
|
|
Index |
Select an index letter. The selected letter is used as an ad- |
|
dress book search condition. |
|
|
Image |
Select an image. To use a supplied icon, select [Specify |
|
Icon], and then select an icon. To use any other image, se- |
|
lect [Specify Image], and then click the [Browse] button to |
|
specify the image file (24-bit BMP (Bitmap) file of 48 x 48 |
|
pixels). |
|
2 |
|
Reminder |
|
To change the image registered in the address |
|
book, select [Edit], and then specify the image |
|
file. |
|
|
User ID |
Type in the user ID to connect to the FTP server. |
|
2 |
|
Note |
|
The maximum number of characters allowed |
|
varies depending on the device. Note that a |
|
one-touch destination whose name contains a |
|
number of characters that exceeds the maxi- |
|
mum is not sent to the device. |
|
|
Password |
Type in the password to connect to the FTP server. |
|
2 |
|
Reminder |
|
To change the password registered for the ad- |
|
dress book, select [Edit], and then type in the |
|
new password. |
|
2 |
Note
The maximum number of characters allowed varies depending on the device. Note that a one-touch destination whose name contains a number of characters that exceeds the maximum is not sent to the device.
My Panel Manager |
3-14 |

My Panel Manager operations |
3 |
|
Function |
Details |
Host Address |
Type in the host address of the FTP server. |
|
2 |
|
Note |
|
The maximum number of characters allowed |
|
varies depending on the device. Note that a |
|
one-touch destination whose name contains a |
|
number of characters that exceeds the maxi- |
|
mum is not sent to the device. |
|
|
File Path |
Type in the file path. |
|
|
anonymous |
Select to enable or disable anonymous. |
|
|
PASV |
Select to enable or disable PASV. |
|
|
Proxy |
Select to enable or disable the proxy. |
|
|
Port Number |
Type in the port number. |
|
|
[Select All/Uncheck all] button |
Selects all groups displayed in the Group List. Clicking this |
|
button again cancels all selections. |
|
|
Group List |
Displays a list of groups registered in My Address. Select |
|
the check box, and then select the group where the ad- |
|
dress book currently specified is registered. |
|
|
[Apply] button |
Registers the address book with the specified settings. |
|
|
[Clear] button |
Clears the specified settings and reverts to the initial set- |
|
tings. |
|
|
My Panel Manager |
3-15 |
My Panel Manager operations |
3 |
|
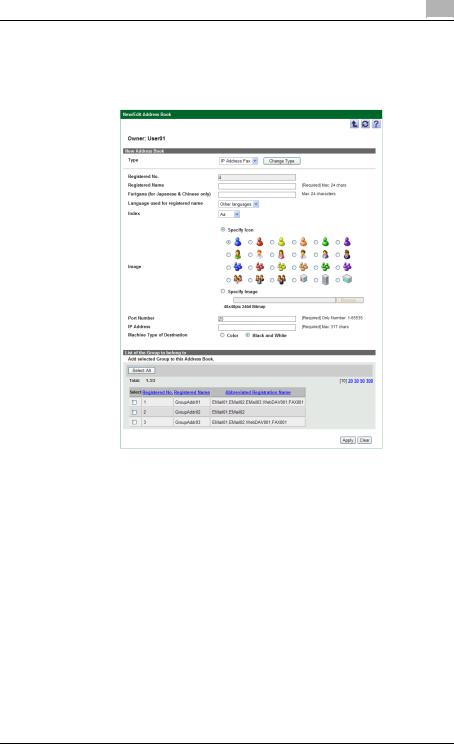
When "IP Address Fax" is selected
When "IP Address Fax" is selected in "Type", the following appear on the page. Specify the settings according to the desired purpose.
Function |
Details |
Type |
Select the type of address book to be registered. Click the |
|
[Change Type] button to change the items (settings) on the |
|
page. |
|
|
Registered No. |
Displays the registered number assigned automatically |
|
(cannot be changed). |
|
|
Registered Name |
Type in the name of the address book. |
|
|
Furigana (for Japanese & Chinese |
Enter the same name as that used for the registered name. |
only) |
Addresses can be sorted by registered name. |
|
|
Language used for registered |
Select whether or not the language used for registered |
name |
names is Chinese or a language other than Chinese. |
|
|
Index |
Select an index letter. The selected letter is used as an ad- |
|
dress book search condition. |
|
|
My Panel Manager |
3-16 |
Loading...