


E INSTRUCTION
MANUAL
BASIC OPERATION
FOCUS
USING THE BUILT-IN FLASH
SUBJECT PROGRAM MODES
CREATIVE EXPOSURE MODES
ADDITIONAL FEATURES
APPENDIX
Thank you for purchasing the Minolta Vectis S-1. The Vectis S-1 is an ultra compact IX240 type system camera with many Advanced Photo System™ features such as variable print- aspect-ratio and magnetic storage of date, title, and exposure information. The Vectis S-1 also incorporates the revolutionary TTL side viewfinder. The side viewfinder provides a high viewfinder magnification, high eyepoint, and large diopter range, in addition to giving the camera its distinctive profile.
This manual has been designed to help you understand the operation of your camera and its functions. Please familiarize yourself with the names of the controls and their locations on the camera, then read this manual thoroughly. Use the Quick Reference in the back of the manual as a guide when taking pictures.
•Advanced Photo System™ is a trademark of the five system developing companies, including Minolta.
This device complies with Part 15 of the FCC Rules. Operation is subject to the following two conditions: (1) This device may not cause harmful interference, and (2) this device must accept any interference received, including interference that may cause undesired operation. Changes or modifications not approved by the party responsible for compliance could void the user's authority to operate the equipment. This equipment has been tested and found to comply with the limits for a Class B digital device, pursuant to Part 15 of the FCC Rules. These limits are designed to provide reasonable protection against harmful interference in a residential installation. This equipment generates, uses and can radiate radio frequency energy and, if not installed and used in accordance with the instructions, may cause harmful interference to radio communications. However, there is no guarantee that interference will not occur in a particular installation. If this equipment does cause harmful interference to radio or television reception, which can be determined by turning the equipment off and on, the user is encouraged to try to correct the interference by one or more of the following measures:
•Reorient or relocate the receiving antenna.
•Increase the separation between the equipment and the receiver.
•Connect the equipment to an outlet on a circuit different from that to which the receiver is connected.
•Consult the dealer or an experienced radio/TV technician for help.
This Class B digital apparatus meets all requirements of the Canadian Interference-Causing Equipment Regulations.
Advantages of the Advanced Photo System
Easier to load…
Advanced Photo System cameras use the new IX240 type film. This new film features
drop-in-loading to make loading your camera simple, the first time, every time. Indicators on
the cassette tell you and your camera if the film is unexposed, partially exposed, exposed, or
processed.
New features…
Mid Roll Change - Rewind your film in the middle of the roll and reload it later, without fear of double exposures. p 34
Print Quantity Select - Choose the number of prints you want before taking the picture. p 65
Date and Title Imprinting - Set date, time, and title information for your photolab to imprint on your photographs. pp 67-74
Print Quality Improvement - Your camera records lighting and exposure information on the film’s magnetic strip to help the lab give you the best quality prints.
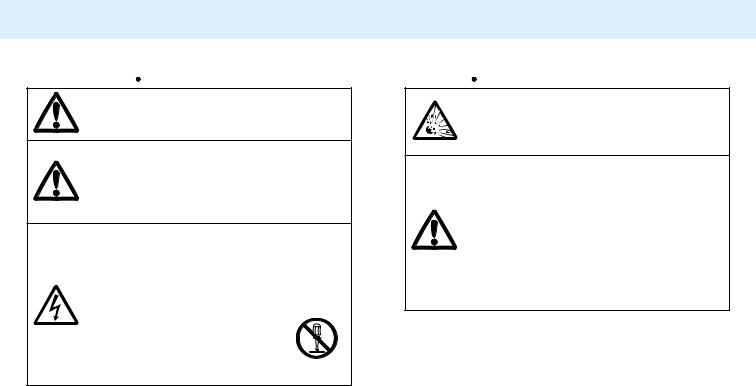
New print formats…
Classic C, wider H, and panorama P print formats are available with Advanced Photo System cameras.
New processing…
In addition to returning your prints in the format you selected, certified photofinishers will return your Advanced Photo System film in its original cassette with an index print. To order reprints, simply choose the
images you want from the index print. No more searching through negatives to find the right frame.
1

TABLE OF CONTENTS |
|
FOR PROPER AND SAFE USE ......................................... |
4 |
NAMES OF PARTS ........................................................... |
11 |
QUICK OPERATION ......................................................... |
16 |
BASIC OPERATION |
|
Attaching the Camera Strap ..................................... |
19 |
Installing the Batteries .............................................. |
20 |
Attaching and Removing the Lens ........................... |
22 |
Diopter Adjustment ................................................... |
24 |
Handling the Camera ................................................ |
25 |
Loading Film ............................................................. |
26 |
Full Auto Operation ................................................... |
30 |
Rewinding the Film ................................................... |
32 |
FOCUS |
|
Focus Signals ........................................................... |
36 |
Special Focusing Situations ..................................... |
37 |
Focus Hold ................................................................ |
38 |
Direct Manual Focus ................................................. |
39 |
Manual Focus ........................................................... |
40 |
USING THE BUILT-IN FLASH |
|
Flash Signals ............................................................ |
42 |
Flash Range .............................................................. |
43 |
Manual Fill-flash ........................................................ |
44 |
Flash Cancel ............................................................. |
44 |
Red-eye Reduction ................................................... |
45 |
SUBJECT PROGRAM MODES |
|
Subject Program Selectiion ...................................... |
47 |
Portrait Mode ............................................................ |
48 |
Landscape Mode ...................................................... |
49 |
Close-up Mode ......................................................... |
50 |
Sports Mode .............................................................. |
51 |
Night Portrait Mode ................................................... |
52 |
Photographing Night Scenes .................................... |
53 |
CREATIVE EXPOSURE MODES |
|
Creative Exposure Modes ........................................ |
55 |
A Mode - Aperture Priority ........................................ |
56 |
S Mode - Shutter Priority .......................................... |
59 |
M Mode - Manual Operation ..................................... |
62 |
ADDITIONAL FEATURES |
|
Print Quantity Select ................................................. |
65 |
Date/Time Imprinting ................................................ |
67 |
Title Imprinting .......................................................... |
71 |
Shutter Control |
|
Self-timer ......................................................... |
75 |
Continuous-drive Mode ................................... |
76 |
Remote Control (optional) ............................... |
77 |
Bulb .................................................................. |
80 |
Exposure Control |
|
Spot Metering .................................................. |
82 |
Exposure Compensation ................................. |
84 |
FTPM Fixed Time Printing Mode .................... |
86 |
Setting the Film Speed Manually .................... |
88 |
Flash Control |
|
AF Illuminator .................................................. |
89 |
Wireless/Remote Off Camera Flash Control .. |
90 |
Slow-Shutter Sync ........................................... |
95 |
APPENDIX |
|
Program Reset Button .............................................. |
96 |
Lab Services ............................................................. |
97 |
Accessory Information .............................................. |
98 |
Care and Storage ................................................... |
101 |
Technical Details .................................................... |
103 |
Trouble Shooting .................................................... |
105 |
Camera Warnings ................................................... |
106 |
Quick Reference Guide .......................................... |
108 |
2 |
3 |
FOR PROPER AND SAFE USE
STANDARD SYMBOLS
Various symbols are used throughout this instruction manual and on the product itself for the proper and safe use of this product and to prevent personal injury, injury to others, and property damage. An explanation of the symbols follows. Read and understand each caution thoroughly before reading the main text of this instruction manual.
EXAMPLES
The outer triangle is for warning. The symbol inside illustrates what is being warned against. The example at left means beware of electric shock.
The circle with a diagonal slash is for prohibition (don't do). The symbol inside illustrates what act is prohibited. The example at left means do not disassemble.
SAFETY CAUTIONS
Read and understand all cautions and warnings thoroughly before using this product.
 WARNING
Do not touch the flashtube during operation, it may become hot when the flash fires.
Do not look directly at the sun through the viewfinder.
Do not subject the camera to direct sunlight. Fire may occur if the sunlight focuses at one point.
4 |
5 |
FOR PROPER AND SAFE USE
 CAUTION
Don't walk while looking through the lens or viewfinder. You may trip and fall causing injury.
Do not fire the flash near the eyes of people or animals, especially infants and young children. Do not fire the flash if your subject is closer than the minimum flash distance stated in the manual.
If the camera is dropped or subjected to an impact in which the interior is exposed, immediately remove the batteries and discontinue use.
Do not disassemble. Take your camera to a Minolta Service Facility when repairs are required. Electric shock may occur if a high voltage circuit inside the camera is touched.
 BATTERY CAUTIONS
Batteries may explode due to improper use. Read and follow all warnings supplied with the batteries.
•Do not install the batteries with the polarity (+/-) reversed.
•Do not use batteries with visible damage.
•Do not subject batteries to fire or high temperatures.
•Do not attempt to recharge, short, or disassemble.
•Do not mix batteries of different types, brands, or ages.
6 |
7 |

FOR PROPER AND SAFE USE
Carefully observe the following warnings when using this product near young children, or persons who may have difficulty perceiving the potential danger associated with these products.
 WARNING
Use Caution
If caution is not used, the following accidents or others may occur:
• Flash fired near the eye.
• Strap wound around the neck.
 CAUTION
YOUNG CHILDREN MAY SWALLOW SMALL OBJECTS
Keep small accessories, or things that can be swallowed, away from young children. Contact a doctor immediately if an object is swallowed.
 BATTERY CAUTION
YOUNG CHILDREN MAY SWALLOW
BATTERIES
Keep batteries away from young children.
8
SPLASHPROOF
This camera is splashproof and can be used in light rain or snow.
• Do not place the camera under running water or immerse.
Please Note:
1.When using the camera outdoors in heavy rain, keep the camera protected from the rain. Do not leave the camera in the rain.
2.The interior of the camera is not moisture resistant.
-Dry the camera before opening the film or battery chambers, changing lenses, or installing an accessory flash.
-Keep your hands dry when inserting or removing film or batteries, changing lenses, or installing an accessory flash.
3.Do not load film or replace batteries in places where water, blowing sand, or dust can enter the camera.
4.This camera is not sandproof. Do not place the camera directly on the ground.
5.Remove moisture from the camera.
6.Do not expose the camera to salt water or liquids containing sugar.
7.If the rubber seals appear cracked or damaged, contact the nearest Minolta Service Facility to have them replaced.
8.Close the film and battery-chamber covers tightly. Clean the rubber seals before closing covers.
9
FOR PROPER AND SAFE USE
OPERATING TEMPERATURE AND CONDITIONS
•This camera is designed for use from -10° to 50° C (14° to 122° F).
•Never leave your camera where it may be subjected to extreme temperatures such as the glove compartment of a car.
•At colder temperatures, the data panel response time will be slow; at higher temperatures, the display will temporarily darken, but will restore when the temperature normalizes.
•Never subject the camera to extreme humidity.
•To prevent condensation from forming, place the camera in a sealed plastic bag when bringing it from the cold exterior into a warm building. Allow it to come to room temperature before removing it from the bag.
•The low-battery symbol may appear even with a fresh battery depending on the storage conditions. To restore camera power, repeat turning the camera on and off.
•When photographing in cold weather, we recommend that you keep the camera and spare batteries inside your coat to keep them warm when you are not shooting. Cold batteries will regain some of their charge when they warm up.
FILM CASSETTE WARNING
The film used in Advanced Photo System cameras stores some data magnetically. Do not place the cassette on or near anything that creates a magnetic field, such as a television or stereo speakers.
10
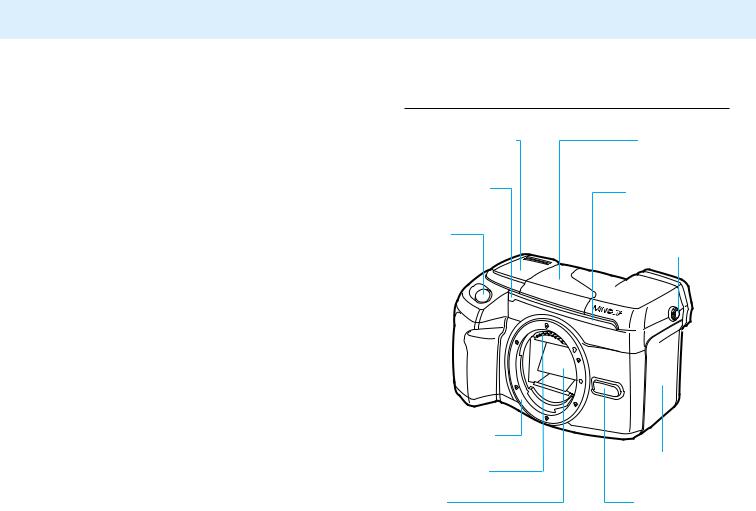
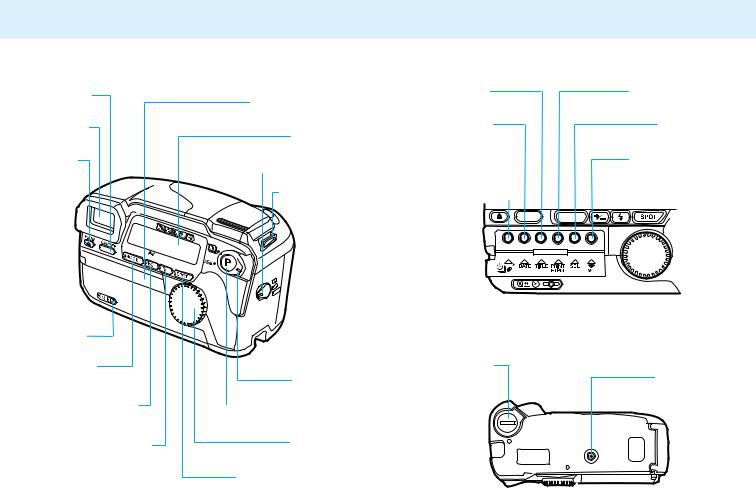
NAMES OF PARTS
For information on specific parts, refer to the page numbers shown in parenthesis.
Body
Accessory shoe (98)
Remote-control receiver (77)
Shutterrelease button
Lens mount (22)
Lens Contacts*
Mirror*
Built-in flash (41)
Self-timer/Remote-
receiver indicator
Diopter-adjustment
dial (24)
Film chamber (26)
Lens release (23)
* Do not touch
11
NAMES OF PARTS
Main switch
Viewfinder*
Filmchamber release (27)
Manualrewind button (33)
Commandmode button
Exposurecompensation (84)/ Aperture-select (62) button
Flash-mode button (42)
Control-panel door
Data panel
Format-selector switch
Strap eyelets
Command switch (47)
Program-reset button (96)
Control dial
Spot/AEL button (82)
Title button (71)
Date button (67)
Self-timer (75)/
Drive-mode(76)/ Remote-control (77) button
Battery chamber
Print-quantity (65)/
FTPM (86) button
Select button
Red-eye-reduction
button (45)
Tripod socket
12 |
13 |

NAMES OF PARTS
Data Panel |
|
|
Subject-program indicators |
Subject-program |
|
Portrait Mode (48) |
||
pointer |
||
Landscape Mode (49) |
|
|
Close-up Mode (50) |
Exposure-compensation |
|
Sports Mode (51) |
indicator (84) |
|
Night Portrait Mode (52) |
Wireless-flash |
|
Continuous-drive |
||
indicator (91) |
||
indicator (76) |
||
|
||
Flash-mode |
Manual- |
|
indicators (42) |
focus |
|
|
indicator |
|
|
(39 & 40) |
|
Remote- |
Frame |
|
control |
||
indicator |
counter |
|
(77) |
|
|
Date mark (67) |
Film-transport |
|
|
signals |
|
Self-timer indicator |
Cassette mark |
|
(75) |
Shutter-speed/Film |
|
|
||
Title mark (71) |
Speed/Print-quantity/ |
|
Aperture/Exposure- |
||
|
||
|
compensation/Date/ |
|
Exposure-mode |
Time/Title display |
|
|
||
indicators (55) |
|
Print mark (65) |
|
|
|
|
|
Battery-condition |
||
|
|
|
||||||
|
|
|
|
|
|
|
|
indicator (21) |
|
|
|
|
|
|
|
|
|
|
|
|
|
|
|
|
|
|
|
|
|
|
|
|
|
|
|
ISO mark |
|
|
|
|
|
|
|
FTPM mark (86) |
|
|
|
|
|
|
|||
|
|
|
|
|
|
|
|
|
Viewfinder
Focus frame
Flash-mode indicator (42)
Manual-focus mark (39 & 40)
Focus signals (36)
Spot-metering circle (82)
Spot-metering
mark (83)
Aperture/Exposurecompensation display
Exposure-compensation
indicator (84)
Shutter-speed display
14 |
15 |

QUICK OPERATION
1. Insert battery
Using the eyepiece cap, open the battery-chamber cover. Insert the batteries into the chamber, then close and lock the battery-chamber cover.
2. Attach lens
Align the red mounting dot on the lens with the one on the camera. Gently insert the lens into the mount and turn it clockwise until it clicks into the locked position.
3. Insert film
Press the film-chamber release. Insert the film cassette. Close the film-chamber door.
4. Turn on power
Press the main switch to turn the camera on.
5.Set Full Auto operation
Press the program-reset button to set the camera to fullyautomatic operation.
6.Select print format
Turn the format-selector switch to the desired format before taking the picture.
7.Focus on the subject
Align the subject within the focus frame [ ], then press the
shutter-release button partway down.  or
or will appear in the viewfinder when the subject is in focus. The flash will pop-up and fire when necessary.
8.Take the picture
Press the shutter-release button all-the-way down to take the picture.
16 |
17 |
BASIC
OPERATION
ATTACHING THE CAMERA STRAP
 1. Undo the camera-strap buckle and loop the strap through the upper eyelet of the camera.
2. Redo the camera-strap buckle.
3. Repeat for the lower eyelet.
18 |
19 |
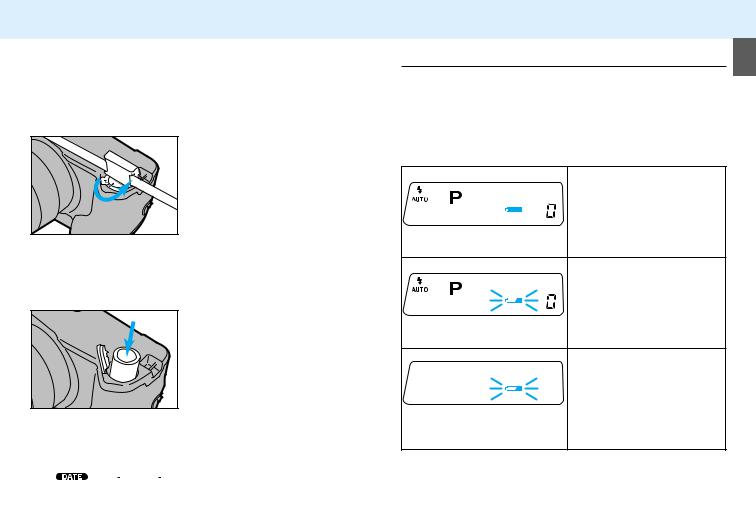
INSTALLING THE BATTERIES
Your camera uses two CR2 batteries to supply power for all camera operations. Please read all warnings in the Safety Cautions section of this manual as well as those supplied by the battery manufacturer.
1. Using the eyepiece cap, turn the battery-chamber cover counter-clockwise and open the batterychamber cover.
•Turn the camera off before removing the old batteries. •Remove dirt and moisture from the camera and batteries before opening the batterychamber cover.
2. Insert the batteries as indicated by the + and - marks.
3. Close the cover then, using the eyepiece cap, turn the battery-chamber cover to CLOSE to lock it.
•Main power is automatically switched on when a battery is installed.
•If  and
and 
 blink in the data panel when the camera is turned on, reset the date and time. See page 67.
Checking the Battery Power
Your camera is equipped with an automatic battery-power indicator. Each time the main switch is turned on, the battery symbol will appear in the data panel to indicate the power status of the batteries. It is recommended that you always carry spare batteries in your camera bag.
Power is sufficient for all camera operations.
Full-battery symbol
Power is extremely low, but all functions are operational.
Battery will have to be replaced very soon. Flash
Blinking low-battery symbol recycling time may be slow.
Power is insufficient for camera operation.
Blinking low-battery symbol alone and the shutter locks
If no display appears, replace the battery or check that it is inserted correctly.
20 |
21 |

ATTACHING AND REMOVING THE LENS
Attaching the Lens
|
1. Remove the camera body |
|
cap and rear lens cap as |
56 |
shown. |
80 |
|
|
AF/M |
Caution
•Do not force the lens if it does not turn smoothly.
•Do not touch the inside of the camera, especially the lens contacts and mirror.
•Remove dust, dirt, and moisture from the lens mount before attaching or removing a lens.
2.Align the red mounting dot on the lens with the red dot on the camera.
3.Gently insert the lens into
the mount and turn it clockwise until it clicks into the locked position.
•Do not insert the lens at an angle.
•Do not press the lens release when attaching the lens.
Removing the Lens
1. Press the lens release and turn the lens counterclockwise until it stops.
2. Gently remove the lens from the mount and replace the caps, or attach another lens.
Lens Hood
Use the lens hood to reduce flare and ensure maximum image quality.
•Remove the lens hood from your lens before using the camera’s built-in flash.
To attach a bayonet mount lens hood, fit the hood into the bayonet mount on the end of the lens barrel, then turn the lens clockwise until it stops.
If your lens and hood have guide marks, align the red line on the lens hood with the red line on the lens, then turn the lens hood clockwise until the dot on the lens hood is lined up with the line on the lens.
•To store the lens hood, reverse it and attach it to the lens, then replace the lens cap.
22 |
23 |
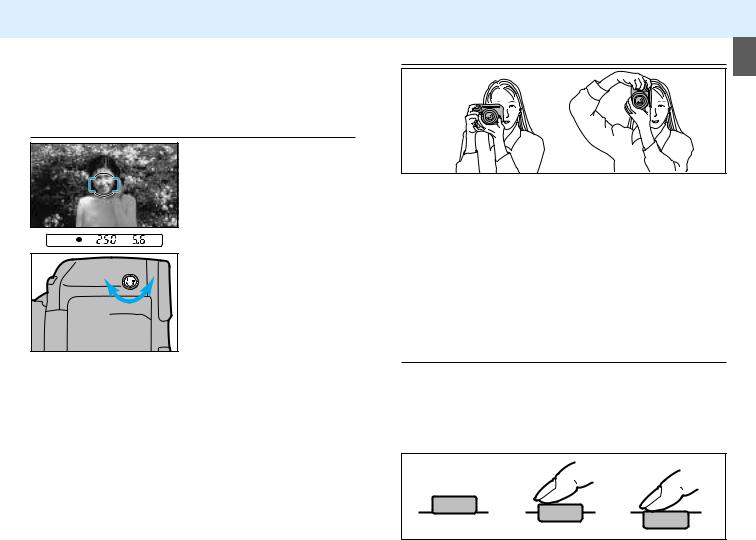
DIOPTER ADJUSTMENT
If you are near or far sighted, use this control to adjust the eyepiece for your eyesight. The diopter adjustment range is from -4.0 to +2.0 diopters.
Adjusting the Diopter
1.Center your subject in the focus frame.
2.Press the shutter-release button partway down to focus on the subject.
3.Turn the diopter-adjustment
dial until your subject appears sharpest.
HANDLING THE CAMERA
Holding the Camera
Hold the camera grip firmly with your right hand, while supporting the lens with your left hand. Make sure your fingers are not blocking any of the camera’s features. Your fingers should fit securely around the grip. To hold the camera steady, keep your elbows at your side and your feet shoulderwidth apart. Always keep the camera strap around your neck or wrist in the event you accidentally drop it.
Pressing the Shutter Release Button
Press the shutter-release button partway down to activate the camera’s autofocus and auto-exposure systems. Gently, never with a quick jab, press the shutter-release button all- the-way down to take the picture.
24 |
25 |
LOADING FILM
Your camera uses IX240 type film designed for use in Advanced Photo System cameras.
•Your camera has an automatic transport system which loads the film, sets the film speed, and advances the film after each exposure.
•Once loaded, the Film Chamber Lock feature prevents the film chamber from being opened until the film is rewound into the cassette.
•There is no need to worry about double exposure. The DEP (Double Exposure Prevention) feature prevents the camera from accepting exposed film.
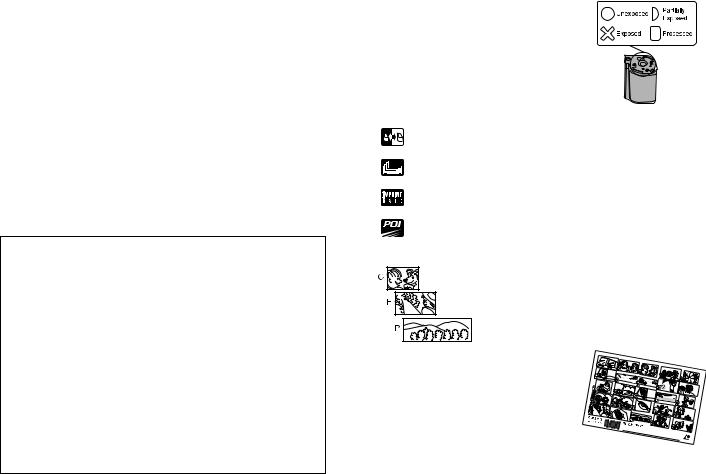
Visual Exposure Indicators
•The current VEI has a white indicator behind it.
•This camera can load film with either the  or
or  VEI current.
VEI MEANING
UNEXPOSED
PARTIALLY EXPOSED
EXPOSED
PROCESSED
•Only partially-exposed film (VEI  ) rewound in Minolta cameras with Mid Roll Change capability can be loaded in this camera.
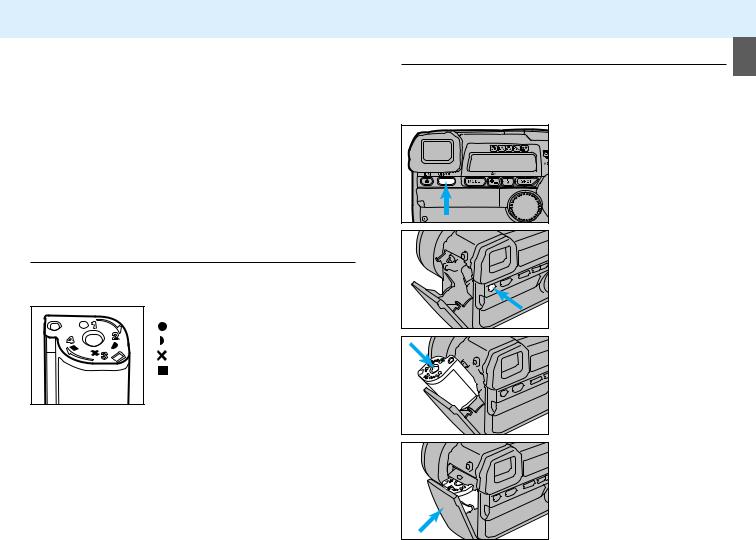
Loading the Film
Use IX240 type film designed for use in Advanced Photo System cameras. Your camera will automatically set the proper film speed for the film you are using.
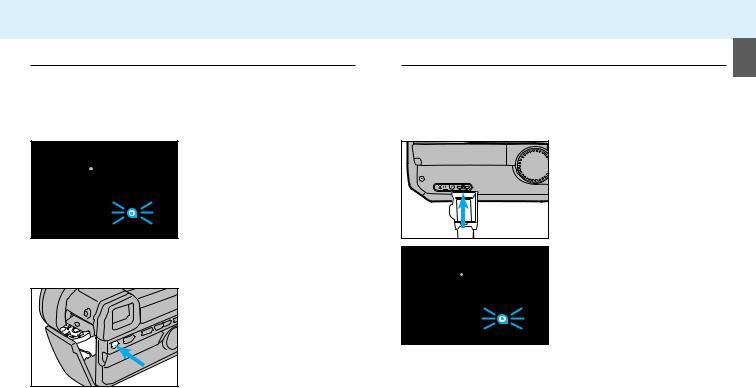
1. Press the main switch to turn the camera on.
• Film can be loaded when the camera is on or off.
2. Press the film-chamber release on the back of the camera. The film-chamber door will open.
3. Insert the new film cassette into the film chamber with the VEI on top.
4. Close the film-chamber door.
26 |
27 |
LOADING FILM
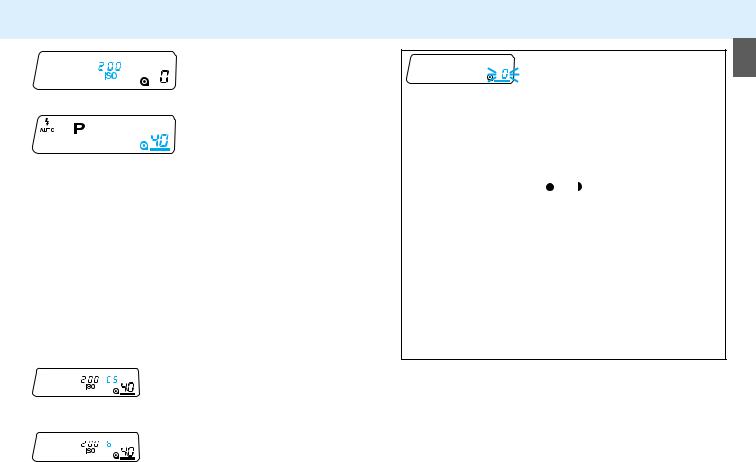
The film speed appears in the data panel, then the film is advanced to the first frame.
When the loading sequence is complete, the frame counter will show the number of frames remaining on the roll.
•If the shutter-release button is not pressed after loading, an
unexposed ( ) or partially exposed (
 ) roll can be removed by pressing the rewind button, then the film-chamber release. The VEI will be unchanged.
•If film is loaded with the power off, all indicators in the data panel will disappear after the number of frames remaining is displayed.
•After the film is loaded, pressing the film-chamber release will display the film speed and the exposure number in the data panel.
• If slide film is loaded, CS will appear in the data panel when the film-chamber door is closed.
• If black and white film is loaded, b will appear in the data panel when the film-chamber door is closed.
If 0 blinks and  appears in the data panel, press the filmchamber release and remove the film.
•Your camera can not load a film cassette, if the current VEI is
 or
or  . Load film with the
  or
or VEI current.
• If a processed roll of film was loaded into this camera, the VEI has been changed from  to
to .
.
•If the film’s current VEI is or , remove the film. Remove and reinsert the batteries, then reload the film. If the problem persists, contact the nearest authorized Minolta Service Facility.
If film is loaded with the VEI current, take note of the following:
•An accessory flash should not be mounted when loading film with the VEI current. Do not attach the flash until the camera has advanced to the first unexposed frame.
•Do not load partially exposed rolls within 1m (3.3 ft.) of operating speakers, microwave ovens, hairdryers, etc.
28 |
29 |
FULL-AUTO OPERATION
Full Auto is the camera’s standard operating mode and is suited for use in almost any situation. When the programreset button is pressed, the camera is returned to fullyautomatic operation. See page 96.
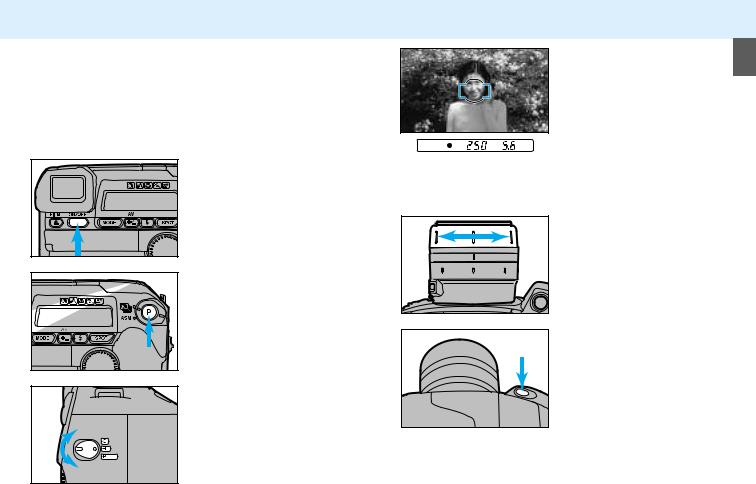
1. Press the main switch to turn the camera on.
2. Press the program-reset button to set the camera to Full Auto.
3.Set the format-selector switch to the desired print format (C, H, or P).
4.Center your subject in the focus frame [ ] and press the shutter-release button partway down to activate
autofocus.  or
or 
 will glow when the subject is in focus.
• The built-in flash will pop-up and fire when necessary.
5. If you are using a zoom lens, rotate the zooming ring on the lens to frame the subject as desired.
6.Press the shutter-release button all-the-way down
to take the picture.
•In low-light conditions, the AF illuminator (flash) will fire to determine focus distance.
•To take a picture with your subject outside the focus frame [ ] use focus hold. See page 38.
30 |
31 |
REWINDING THE FILM
Automatic Rewind
The camera automatically rewinds the film into the cassette after the last exposure.
1. Wait for the film to completely rewind into the cassette.
• While rewinding, the frame counter will count down.
• 0 will appear in the frame counter and  will blink when the film is rewound.
2. Press the film-chamber release to open the filmchamber door.
3. Remove the film.
• The VEI display will be  .
.
Manual Rewind
Use manual rewind when you want to switch to a different type or speed of film before the current roll is finished.
1. Using the eyepiece cap press the manual-rewind button.
2. Follow steps 1-3 from Automatic Rewind.
• See Mid Roll Change for VEI display information.
32 |
33 |
 Loading...