


 Loading...
KODAK ESP Office 2100 Series
All-in-One Printers
Extended User Guide

Eastman Kodak Company
Rochester, NY 14650
© Eastman Kodak Company, 2011
Kodak, EasyShare, ESP, and Perfect Touch are trademarks of Eastman Kodak Company.
Specifications subject to change without notice.
October 2011

Table of contents |
|
1 Printer Overview |
|
Components....................................................................................................................................................................... |
1 |
Control panel..................................................................................................................................................................... |
2 |
Home Center Software .................................................................................................................................................. |
3 |
Ordering supplies............................................................................................................................................................. |
4 |
Configuring printer settings .......................................................................................................................................... |
5 |
2 Networking Your Printer |
|
Connecting to a wireless network ............................................................................................................................... |
6 |
Before you connect ................................................................................................................................................... |
6 |
Connecting to a wireless network using the Wi-Fi Setup Wizard................................................................ |
6 |
Setting up an IP Address........................................................................................................................................ |
10 |
Viewing the network configuration...................................................................................................................... |
11 |
Printing the network configuration ...................................................................................................................... |
11 |
Installing your printer on additional computers on the network................................................................. |
12 |
Connecting to another KODAK All-in-One Printer ........................................................................................ |
12 |
Adding a wireless network connection to a USB-connected computer.......................................................... |
13 |
Changing from USB to a wireless connection .................................................................................................. |
13 |
3 Online Printer Management Tool |
|
Accessing the Online Printer Management Tool .................................................................................................. |
15 |
Using the Online Printer Management Tool........................................................................................................... |
16 |
Configuring printer settings.................................................................................................................................. |
16 |
Changing the printer name ................................................................................................................................... |
17 |
Adjusting fax settings............................................................................................................................................. |
18 |
Setting up Scan To Email ...................................................................................................................................... |
20 |
Setting up Scan To Network Folder ................................................................................................................... |
26 |
Setting up Cloud Printing ..................................................................................................................................... |
30 |
Changing printer settings for copying and printing ........................................................................................ |
32 |
4 Handling Paper |
|
Paper types...................................................................................................................................................................... |
35 |
Paper sizes...................................................................................................................................................................... |
36 |
Envelope sizes................................................................................................................................................................ |
36 |
Loading paper ................................................................................................................................................................. |
37 |
Loading plain paper................................................................................................................................................ |
38 |
Loading photo paper ............................................................................................................................................. |
39 |
Loading envelopes.................................................................................................................................................. |
40 |
Loading originals ............................................................................................................................................................ |
41 |
Using the scanner glass ......................................................................................................................................... |
41 |
Using the Automatic Document Feeder (ADF).............................................................................................. |
42 |
www.kodak.com/go/aiosupport |
i |

5 Printing |
|
|
|
Printing documents ...................................................................................................................................................... |
43 |
|
Printing two-sided documents............................................................................................................................ |
43 |
|
Printing forms from the control panel............................................................................................................... |
45 |
|
Printing pictures............................................................................................................................................................ |
45 |
|
Viewing pictures on a memory card or USB-connected device................................................................. |
46 |
|
Printing from a memory card or USB-connected device.............................................................................. |
47 |
|
Printing from a wireless device............................................................................................................................ |
52 |
|
Transferring pictures to a computer......................................................................................................................... |
53 |
|
Transferring pictures to a computer with WINDOWS OS........................................................................... |
53 |
|
Transferring pictures to a computer with MAC OS ....................................................................................... |
53 |
6 Mobile Printing |
|
|
|
Printing using Google Cloud Print ............................................................................................................................ |
54 |
|
Printing using KODAK Email Print Service.............................................................................................................. |
55 |
|
Printing emails, documents, and pictures......................................................................................................... |
55 |
|
Printing pictures from a mobile device .................................................................................................................... |
56 |
|
Printing pictures from an iPhone, iPad, or iPod touch device ...................................................................... |
56 |
|
Printing pictures from a BLACKBERRY Device................................................................................................ |
56 |
|
Printing pictures from an ANDROID OS Device ............................................................................................. |
57 |
7 Copying |
|
|
|
Loading originals for copying...................................................................................................................................... |
58 |
|
Copying a document..................................................................................................................................................... |
58 |
|
Using the default settings to copy a document............................................................................................... |
58 |
|
Adjusting the settings and copying a document............................................................................................. |
59 |
|
Changing the number of copies of a document ............................................................................................. |
60 |
|
Enlarging or reducing the size of a copy........................................................................................................... |
60 |
|
Darkening or lightening a copy ........................................................................................................................... |
60 |
|
Two-sided copying........................................................................................................................................................ |
61 |
|
Copying a photo............................................................................................................................................................. |
62 |
|
Using the default settings to copy a photo....................................................................................................... |
62 |
|
Adjusting the settings and copying a photo..................................................................................................... |
63 |
|
Changing the number of copies of a photo...................................................................................................... |
64 |
|
Enlarging or reducing a photo .............................................................................................................................. |
65 |
|
Darkening or lightening a copy of a photo....................................................................................................... |
66 |
8 Scanning |
|
|
|
Before you begin scanning .......................................................................................................................................... |
67 |
|
Changing the scan settings for scanning from the printer control panel.................................................. |
67 |
|
Loading originals for scanning................................................................................................................................... |
70 |
|
Scanning from the printer control panel................................................................................................................. |
70 |
|
Scanning to a computer.......................................................................................................................................... |
71 |
|
Scanning to a memory card or USB flash drive................................................................................................ |
72 |
ii |
www.kodak.com/go/aiosupport |
|

KODAK ESP Office 2100 Series All-in-One Printer |
|
Scanning to email .................................................................................................................................................... |
73 |
Scanning to network folder .................................................................................................................................. |
74 |
Scanning from the computer ..................................................................................................................................... |
75 |
Scanning multiple pictures simultaneously ..................................................................................................... |
75 |
Scanning from the Online Printer Management Tool ......................................................................................... |
77 |
9 Faxing |
|
Before you begin faxing............................................................................................................................................... |
78 |
Connecting the printer for faxing ....................................................................................................................... |
78 |
Entering fax sender information ......................................................................................................................... |
82 |
Selecting fax settings............................................................................................................................................. |
83 |
Working with the phonebook.............................................................................................................................. |
86 |
Preparing a fax for transmission ............................................................................................................................... |
89 |
Printing a fax cover page ...................................................................................................................................... |
89 |
Loading originals..................................................................................................................................................... |
89 |
Changing resolution and brightness.................................................................................................................. |
90 |
Sending a fax ................................................................................................................................................................... |
91 |
Using the phonebook to send a fax..................................................................................................................... |
91 |
Using Quick Dial to send a fax ............................................................................................................................. |
91 |
Using the numeric keypad to send a fax............................................................................................................ |
91 |
Using the Redial button to send a fax................................................................................................................ |
92 |
Receiving a fax............................................................................................................................................................... |
92 |
Receiving a fax automatically.............................................................................................................................. |
92 |
Receiving a fax manually ...................................................................................................................................... |
93 |
Printing fax reports....................................................................................................................................................... |
93 |
Fax settings report.................................................................................................................................................. |
93 |
Fax confirmation page........................................................................................................................................... |
94 |
Fax activity log......................................................................................................................................................... |
94 |
Canceling a fax .............................................................................................................................................................. |
94 |
10 Maintaining Your Printer |
|
General care and cleaning .......................................................................................................................................... |
95 |
Cleaning the scanner glass and document backing....................................................................................... |
96 |
Replacing ink cartridges .............................................................................................................................................. |
98 |
Replacing the printhead ............................................................................................................................................. |
101 |
Updating the software and printer firmware....................................................................................................... |
105 |
Updating if your printer is connected to a computer with WINDOWS OS .......................................... |
105 |
Updating if your printer is connected to a computer with MAC OS....................................................... |
106 |
Monitoring and adjusting printer performance .................................................................................................. |
107 |
Checking ink levels............................................................................................................................................... |
107 |
Resetting factory defaults .................................................................................................................................. |
107 |
www.kodak.com/go/aiosupport |
iii |

11 Troubleshooting |
|
Basic troubleshooting ................................................................................................................................................. |
108 |
Getting help on the Web ............................................................................................................................................ |
110 |
Status lights.................................................................................................................................................................... |
112 |
Power light ............................................................................................................................................................... |
112 |
Wi-Fi connectivity LED ......................................................................................................................................... |
112 |
12 Product and Safety Specifications |
|
Features and Specifications ....................................................................................................................................... |
113 |
Print performance .................................................................................................................................................. |
113 |
Photo printing features ......................................................................................................................................... |
113 |
Copy document features...................................................................................................................................... |
114 |
Copy photo features .............................................................................................................................................. |
114 |
Scanning features................................................................................................................................................... |
114 |
Faxing features and specifications..................................................................................................................... |
115 |
Input paper tray ..................................................................................................................................................... |
115 |
Output paper tray .................................................................................................................................................. |
115 |
Automatic Document Feeder (ADF) for originals ......................................................................................... |
115 |
Ink cartridges........................................................................................................................................................... |
115 |
Connectivity............................................................................................................................................................. |
115 |
Software support .................................................................................................................................................... |
116 |
Physical specifications .......................................................................................................................................... |
116 |
Warranty .................................................................................................................................................................. |
116 |
Minimum System requirements......................................................................................................................... |
117 |
Safety information....................................................................................................................................................... |
120 |
Regulatory compliance............................................................................................................................................... |
122 |
FCC statement ....................................................................................................................................................... |
122 |
Canadian statements ........................................................................................................................................... |
123 |
European compliance statement....................................................................................................................... |
123 |
German compliance statement ......................................................................................................................... |
123 |
REACH Article 33 declarations.......................................................................................................................... |
124 |
Waste electrical and electronic equipment labeling.................................................................................... |
124 |
ENERGY STAR® Qualified......................................................................................................................................... |
124 |
Warranty Information ................................................................................................................................................ |
125 |
Declaration of Conformity......................................................................................................................................... |
126 |
iv |
www.kodak.com/go/aiosupport |

1Printer Overview
This printer lets you print, copy, scan, and fax pictures and documents. In addition, this printer supports networking, letting you access the printer over a wireless (Wi-Fi) or Ethernet network.
Components
1 |
2 |
3 |
4 |
5 |
6 |
7 |
8 |
18 |
|
9 |
|||
|
|||||
|
|
|
|
||
10 |
|||||
|
|||||
17 |
|
|
|
|
|
13 |
|
|
|
|
14 |
|
|
|
11 |
|
|
|||
|
|
|
12 |
|
|
|
|
||
16 15
1 |
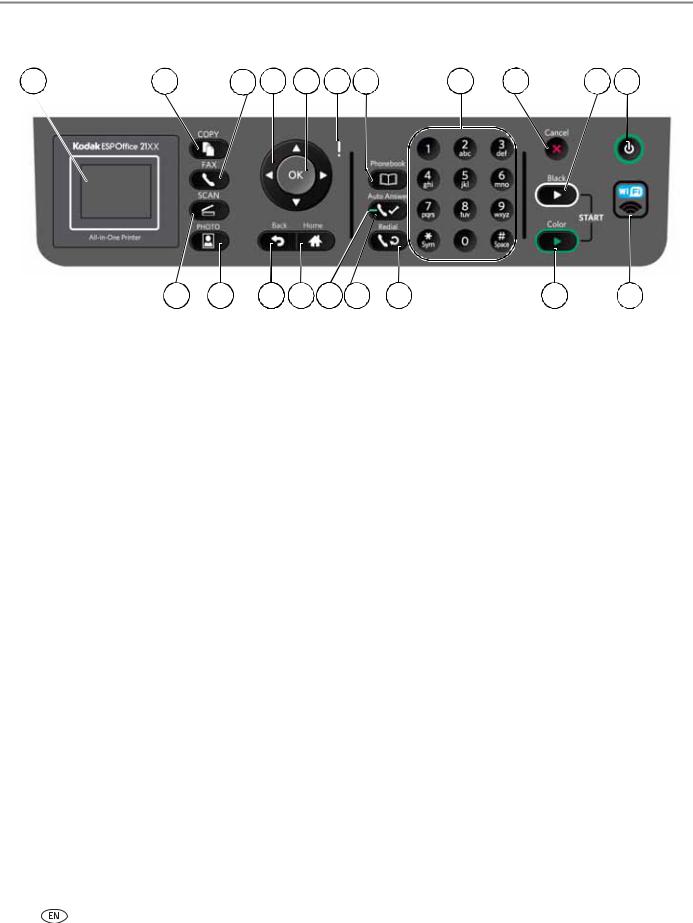
Control panel |
10 |
Scanner glass |
|
2 |
ADF paper-edge guides |
11 |
Access door |
|
3 |
Left paper-edge guide |
12 |
Printhead with ink cartridges installed |
|
4 |
Paper input tray |
13 |
Line in phone port |
|
5 |
Automatic Document Feeder (ADF) |
14 |
Ext out phone port |
|
6 |
Right paper-edge guide |
15 |
USB port (for connecting to computer) |
|
7 |
Front USB port (ESP Office 2170 Printer only) |
16 Power cord connection port |
|
|
8 |
Memory card slot |
17 |
Output tray extender |
|
9 |
Scanner lid |
18 |
Output tray |
|
|
www.kodak.com/go/aiosupport |
1 |
||
Printer Overview
Control panel
1 |
2 |
3 |
4 |
5 |
6 |
7 |
8 |
9 |
10 |
11 |
|
20 |
19 |
18 |
17 |
16 |
15 |
14 |
13 |
12 |
|
Feature |
Description |
|
|
|
|
|
|
|||
1 |
LCD |
Displays pictures, messages, and menus |
|
|
||||||
2 |
Copy mode button |
Displays the Copy Options menu |
|
|
|
|||||
3 |
Fax mode button |
Lets you enter a phone number for sending a fax, or choose the Fax Options menu |
||||||||
4 |
Navigation buttons |
Used to navigate menus and scroll through pictures |
|
|
||||||
5 |
OK button |
Selects a menu item, accepts a setting, and continues with the current operation |
||||||||
6 |
Attention light |
Blinks when an error occurs |
|
|
|
|
||||
7 |
Phonebook button |
Displays the phonebook of fax numbers entered on this printer; lets you enter or edit |
||||||||
|
|
phone numbers |
|
|
|
|
|
|
||
8 |
Numeric keypad |
Used to dial a phone number or a Quick Dial number for faxing; to enter information |
||||||||
|
|
and Quick Dial settings into the fax phonebook; to specify a quantity for making |
||||||||
|
|
copies; and to enter information for authenticating access to a network |
|
|||||||
9 |
Cancel button |
Stops the current operation and returns to the menu; clears certain errors to allow |
||||||||
|
|
scanning or sending a fax |
|
|
|
|
||||
10 |
Start Black button |
Starts the selected operation in black and white |
|
|
||||||
11 |
Power button |
Turns the printer on or off |
|
|
|
|
||||
12 |
Wi-Fi connectivity LED |
When lit, signals that the printer is connected to a wireless (Wi-Fi) network; blinks |
||||||||
|
|
when searching for an available Wi-Fi network or when the existing signal is too |
||||||||
|
|
weak to transmit or receive wireless signals |
|
|
||||||
13 |
Start Color button |
Starts the selected operation in color, if the source is in color |
|
|
||||||
14 |
Redial button |
Displays the last eight phone numbers dialed |
|
|
||||||
15 |
Auto Answer button |
Turns the fax auto answer feature on or off; when on, the fax answers all incoming |
||||||||
|
|
calls automatically |
|
|
|
|
|
|
||
16 |
Auto answer LED |
Lights when the fax auto answer feature is on |
|
|
||||||
17 |
Home button |
Displays the main menu |
|
|
|
|
||||
18 |
Back button |
Displays the next higher screen in the menu structure |
|
|
||||||
19 |
Photo mode button |
Displays the Print Photo Options menu |
|
|
||||||
20 |
Scan mode button |
Displays the Scan Options menu |
|
|
|
|||||
2 |
|
|
|
www.kodak.com/go/aiosupport |
|
|
||||

KODAK ESP Office 2100 Series All-in-One Printer
Home Center Software
KODAK Home Center Software is installed with your KODAK All-in-One Printer Software, unless you choose otherwise. The Home Center icon will appear on your desktop.
NOTE: You can choose to install the KODAK AiO Printer Software Essentials, which include the drivers and Printer Tools only.
On a computer with WINDOWS Operating System (OS), you can use Home Center Software to:
•browse, crop, enhance, and edit pictures
•print and scan
•make 3D pictures (from picture pairs taken to create 3D pictures)
•print from video
•send images to or print images from KODAK Gallery
•send images to or print images from FACEBOOK Social Network, FLICKR, PHOTOBUCKET, PICASA, SMILEBOX Photo Management Systems, and Google Docs
•configure your printer
•install new network printers
•upgrade to the latest printer software and firmware
•order supplies
•access the KODAK Tips and Projects Center
•access the Online Printer Management Tool
On a computer with MAC OS, you can use Home Center Software to:
•scan
•configure your printer
•upgrade to the latest printer software and firmware
•order supplies
•see the status of your printer
•access the KODAK Tips and Projects Center
•access the Online Printer Management Tool
www.kodak.com/go/aiosupport |
3 |

Printer Overview
Ordering supplies
You can order ink cartridges, paper, and accessories online. An Internet connection is required.
To order supplies directly from Home Center Software:
1.Open Home Center Software.
2.Select Order Supplies (on a computer with WINDOWS OS) or select the Tools tab, then click Order Supplies (on a computer with MAC OS).
3.Select the item(s) you want to buy, then follow the on-screen instructions.
To order supplies directly from the Web:
•For ink, go to www.kodak.com/go/printingsupplies
•For paper, go to www.kodak.com/go/inkjetpaper
4 |
www.kodak.com/go/aiosupport |
KODAK ESP Office 2100 Series All-in-One Printer
Configuring printer settings
NOTE: When you first power on the printer, the LCD prompts you to select the
Language and Country/Region.
To set or change basic printer settings:
1.Press Home.
2.Press  to select Printer Settings, then press OK.
3.Press  to select one of the following settings:
•Date and Time
–Press OK, then press  to select Year, Month, Day, Hour, or Minute.
–Press  or
or  to change the values; press OK when you are done.
–Press Back to return to the Printer Settings menu.
•Time to Low Power
To conserve energy, your printer will enter a low power (sleep) mode after being idle for a default delay time of 1 hour. You can increase the delay time to low power (in 0.5 hour increments) up to 4 hours. Increasing the delay time may result in reduced energy savings.
–Press  to change the time to energy-saving sleep mode (select from 1 to 4 hours in 0.5 hour increments).
•Tagged Images Printing (see Printing tagged pictures, page 51)
–Press  to select Off or On.
•Language
–Press OK, press  to select a language, then press OK.
•Country/Region
–Press OK, press  to select a country or region, then press OK.
•Reset All Settings (see Resetting factory defaults, page 107)
NOTE: Resetting factory defaults does not change the date and time, language, country/region, or network settings.
•Printer Info
–Press OK to view the Firmware Version number; press OK when you are done.
4.Press Back to return to the Main Menu.
www.kodak.com/go/aiosupport |
5 |

2Networking Your Printer
This section explains how to configure or change your wireless network settings.
Connecting to a wireless network
To connect your printer to an 802.11b/g/n wireless (Wi-Fi) network, refer to the following information.
Before you connect
You need:
•a wireless router.
•to determine whether your wireless router supports Wi-Fi Protected Setup (WPS).
NOTE: If you have specific questions about your router, see your router manufacturer’s documentation for more information.
Connecting to a wireless network using the Wi-Fi Setup Wizard
You can use the Wi-Fi Setup Wizard on the printer to connect to your wireless network. Use the procedures that is appropriate for your network setup.
Connecting to a non-WPS wireless router
To connect your printer to your wireless network, you need to know the network name, also called the Service Set Identifier (SSID). You can obtain your network name from the wireless router. See the manufacturer's documentation for more information.
If you have enabled security on your network, you also need to know the security string (passphrase or password), which may be a Wired Equivalent Privacy (WEP) or a Wi-Fi Protected Access (WPA/WPA2) passphrase.
Record your network information using the correct uppercase and lowercase letters.
Network Name (SSID): _______________________________________
Security String (case-sensitive): ________________________________
1.Press Home.
2.Press  to select Network Settings, then press OK.
3.With Wi-Fi Setup Wizard selected, press OK.
NOTE: The Wi-Fi radio turns on when you select Wi-Fi Setup Wizard.
6 |
www.kodak.com/go/aiosupport |
KODAK ESP Office 2100 Series All-in-One Printer
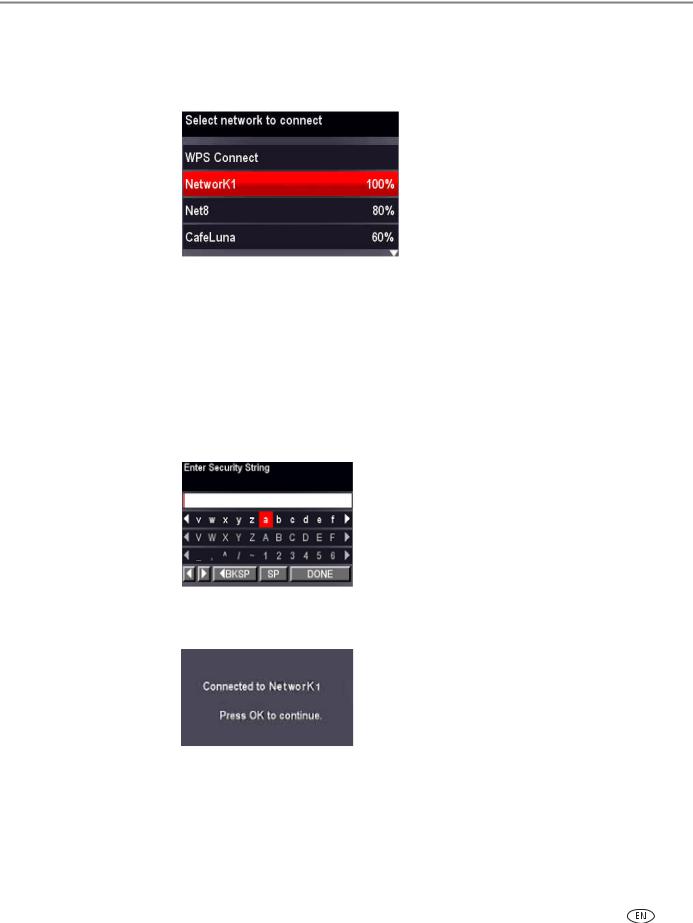
The Wi-Fi connectivity LED blinks as the printer searches for available wireless networks within range, then displays the list in order of signal strength. For example:
If there are additional networks than can be shown on the LCD, press  to view them.
4.Press  to select your network, then press OK.
If you don’t see your network in the list, or if you want to change your network, select Rescan for Wireless Networks, then press OK.
NOTE: If the name of your network is not listed, make sure your wireless router is turned on and within range.
5.If your network requires a password, use the LCD keyboard to enter your Security String. The Security String is case-sensitive.
On the control panel, press  ,
,  ,
,  or
or  to select the letters and numbers. When you are finished, select DONE, then press OK
6. When the confirmation message appears, press OK.
www.kodak.com/go/aiosupport |
7 |
Networking Your Printer
When the printer is successfully connected, the Wi-Fi connectivity LED will stop blinking and remains lit.
The printer with a wireless connection is listed as the name of the printer plus a number (for example, KodakESPOffice2150+0034).
7.If you haven’t yet installed the KODAK All-in-One Printer Software, insert the CD that came with the printer into the computer CD drive, and follow the on-screen instructions. When the software checks for updates, if a newer version exists, install the newer version. (On a computer with MAC OS, be sure to select the option to check for newer versions.)
NOTE: If you do not have the CD:
a.Go to www.kodak.com/go/aiodownloads.
b.In the results list, click the link for KODAK All-in-One Printer Software for your computer’s operating system.
c.Follow the on-screen instructions.
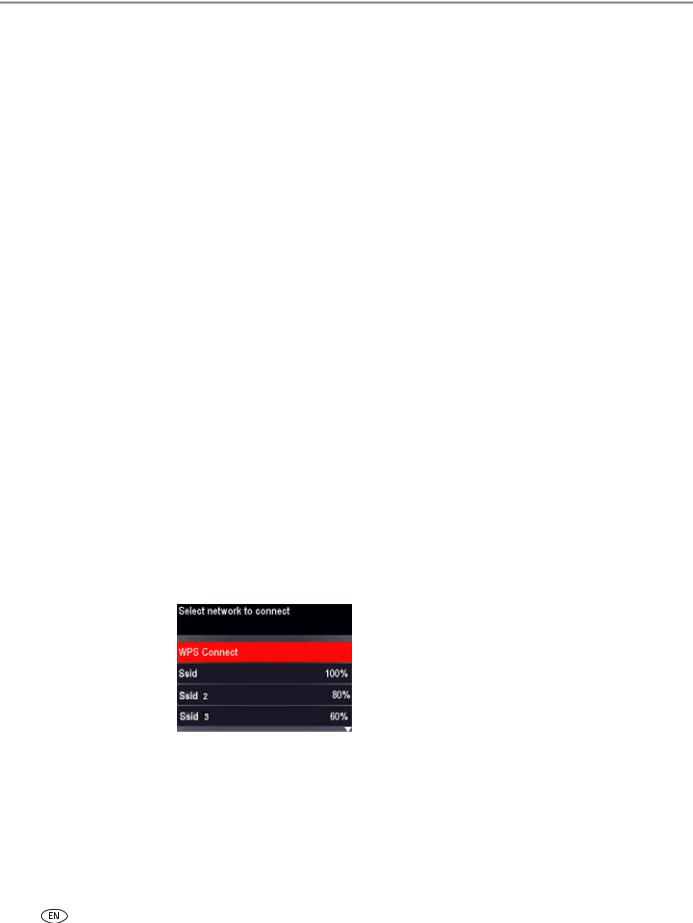
Connecting to a WPS wireless router
If your router supports Wi-Fi Protected Setup (WPS), use WPS Connect. WPS lets you configure your printer for a wireless network by pressing buttons or entering a PIN.
To connect to a network using WPS:
1.Press Home.
2.Press  to select Network Settings, then press OK.
3.With Wi-Fi Setup Wizard selected, press OK.
NOTE: The Wi-Fi radio turns on automatically when you select Wi-Fi Setup Wizard.
4.With WPS Connect selected, press OK.
8 |
www.kodak.com/go/aiosupport |

KODAK ESP Office 2100 Series All-in-One Printer
5.Select one of two methods of connecting:
IMPORTANT: Before you press OK on the printer, make sure you know where the router's push button is, or where to enter the generated PIN. If necessary, consult your Internet Service Provider or router device manufacturer’s documentation for more information.
Using Push Button Configuration |
Entering WPS PIN |
||
|
|
|
|
|
|
|
|
NOTE: You will have two minutes to |
a. Press |
to select Generate |
|
press or select the WPS button. |
WPS PIN, then press OK. |
||
It may be a button on the device |
b. In your wireless router’s software, |
||
or a virtual button in the device’s |
locate the PIN screen, then follow |
||
software. |
the router’s instructions. |
||
a. With Push Button Configuration |
c. Enter the PIN you received on the |
||
LCD into the PIN screen. |
|||
selected, press OK. |
|||
|
|
||
b. Press or select the WPS button for |
|
|
|
your wireless router. |
|
|
|
|
|
|
|
6. When the confirmation message appears, press OK.
When the printer is successfully connected, the Wi-Fi connectivity LED stops blinking and remains lit.
The printer with a wireless connection is listed as the name of the printer plus a number (for example, KodakESPOffice2150+0034).
7.If you haven’t yet installed the KODAK All-in-One Printer Software, insert the CD that came with the printer into the computer CD drive, and follow the on-screen instructions. When the software checks for updates, if a newer version exists, install the newer version. (On a computer with MAC OS, be sure to select the option to check for newer versions.)
NOTE: If you do not have the CD:
a. Go to www.kodak.com/go/aiodownloads.
b.In the results list, click the link for KODAK All-in-One Printer Software for your computer’s operating system.
c.Follow the on-screen instructions.
www.kodak.com/go/aiosupport |
9 |

Networking Your Printer
Setting up an IP Address
IMPORTANT: You should only need to set up an IP Address for your printer if you are having a problem connecting your printer to a wireless network. Typically, it is not necessary to set up an IP Address. This procedure is for advanced users.
All IP Address entries have the following format: 000.000.000.000. If an address or Subnet Mask has only one or two characters between the periods, include one or two leading zeros in front of that number. For example:
The address as it may appear in your documentation
How to enter the address in the printer menu
149.89.138.149 |
149.089.138.149 |
|
|
149.2.40.149 |
149.002.040.149 |
|
|
To set up your IP Address on the printer:
1.Press Home.
2.Press  to select Network Settings, then press OK.
3.Press  to select Advanced IP Address Setup, then press OK.
4.Press OK again to continue.
5.Select one of the following, then press OK:
•Dynamic (DHCP)
•Manual (Static)
6.If you selected Manual (Static), you are prompted to enter an IP Address, a Subnet Mask, a Gateway Address, and a DNS Server address. Press OK after each entry. Use the navigation buttons to enter each digit of the numbers.
Consult your Internet Service Provider or network administrator for more information.
10 |
www.kodak.com/go/aiosupport |

KODAK ESP Office 2100 Series All-in-One Printer
Viewing the network configuration
To view the network configuration and verify that you are connected to your wireless network:
1.Press Home.
2.Press  to select Network Settings, then press OK.
3.Press  to select View Network Configuration, then press OK. The wireless network settings appear on the LCD, including:
•Printer Name
•Printer Hostname
•Connection
•Speed
•IP Address
•IP Address Type
•Network Subnet
•Connected Network SSID
•Security
•Authentication
•Channel
•Region
•Radio (on/off)
•MAC Address
If the printer is connected to your network, you will see the network name and the word CONNECTED.
4.To scroll through the information, press  .
.
5.When you are done, press OK.
Printing the network configuration
To print the current network configuration:
1.Load plain paper into the printer. (See Loading plain paper, page 38.)
2.Press Home.
3.Press  to select Network Settings, then press OK.
4.Press  to select Print Network Configuration, then press OK.
www.kodak.com/go/aiosupport |
11 |

Networking Your Printer
Installing your printer on additional computers on the network
To add your printer to another computer(s) on your network, install the KODAK
All-in-One Printer Software on each computer.
•Insert the CD that came with the printer into the computer CD drive, and follow the on-screen instructions. When the software checks for updates, if a newer version exists, install the newer version. (On a computer with MAC OS, be sure to select the option to check for newer versions.)
NOTE: If you do not have the CD:
a.Go to www.kodak.com/go/aiodownloads.
b.In the results list, click the link for KODAK All-in-One Printer Software for your computer’s operating system.
c.Follow the on-screen instructions.
Connecting to another KODAK All-in-One Printer
If you are connecting to a newer model printer (for example, you have an ESP 7 printer and now you are adding an ESP Office 2150 printer), you must install the KODAK All-in-One Printer Software for the newer model.
NOTE: When you install the new software, the printer driver for the ESP 7 printer will be uninstalled, and an upgraded driver for the ESP 7 printer will be installed in addition to the driver for the ESP Office 2150 printer.
On a computer with WINDOWS OS:
1.Select Start > All Programs > Kodak > KODAK Printer Setup Utility.
•If your wireless printer (example: KodakESPOffice2150+0034) is not listed:
a.Select No, my printer is not listed, then click Next.
b.From the drop-down list, select your printer.
c.Select Network - Wireless/Wi-Fi, then click Next. When your printer is detected, driver installation begins.
•If your wireless all-in-one printer (example: KodakESPOffice2150+0034) is listed:
a.Select the all-in-one printer that is connected to your network.
b.Select Yes, my printer is listed, then click Next.
When your printer is detected, driver installation begins.
2.When driver installation is complete, click Done.
On a computer with MAC OS:
1.Select Apple > System Preferences.
2.Under Hardware, select Print & Fax or Print & Scan.
3.Click + in the dialog box.
4.Select your printer from the list.
5.Click Add, if required.
12 |
www.kodak.com/go/aiosupport |

KODAK ESP Office 2100 Series All-in-One Printer
Adding a wireless network connection to a USB-connected computer
You can change the way you connect to your printer at any time.
Changing from USB to a wireless connection
To change the printer connection type from USB to a wireless (Wi-Fi) network:
If your printer is connected to a computer with WINDOWS OS:
1.Disconnect the USB cable from your printer and computer.
2.On your computer, disable any firewall you have installed until you have successfully completed the installation.
3.If you have not already done so, connect your printer to your wireless network. See Connecting to a wireless network, page 6.
4.Select Start > All Programs > Kodak > KODAK Printer Setup Utility.
•If your wireless all-in-one printer (example: KodakESPOffice2150+0034) is not listed:
a.Select No, my printer is not listed, then click Next.
b.Select your printer from the list.
c.Select Network - Wireless/Wi-Fi, then click Next. When your printer is detected, driver installation begins.
•If your wireless all-in-one printer (example: KodakESPOffice2150+0034) is listed:
a.Select the all-in-one printer that is connected to your network.
b.Select Yes, my printer is listed, then click Next.
When your printer is detected, driver installation begins.
5.When driver installation is complete, click Done.
The printer with a wireless connection is listed as the name of the printer plus a number (for example, KodakESPOffice2150+0034).
If your printer is connected to a computer with MAC OS:
1.Disconnect the USB cable from your printer and computer.
2.If you have not already done so, connect your printer to your wireless network. See Connecting to a wireless network, page 6.
3.Select Apple > System Preferences.
4.Under Hardware, select Print & Fax or Print & Scan.
5.Click + in the dialog box.
6.Select your printer from the list.
7.Click Add, if required.
The printer with a wireless connection is listed as the name of the printer plus a number (for example, KodakESPOffice2150+0034).
www.kodak.com/go/aiosupport |
13 |
3Online Printer Management Tool
The KODAK Online Printer Management Tool lets you access your printer through an Internet browser (such as INTERNET EXPLORER, FIREFOX, SAFARI, CHROME) on any computer that is on the same network as your printer.
IMPORTANT: Your computer and your printer must be on the same wireless or Ethernet network. The Online Printer Management Tool is not available if your printer is connected to a computer with only a USB cable.
With the Online Printer Management Tool, you can:
•view printer status
•configure (or change) printer settings
•change fax settings and add entries to the Fax phone book
•create Scan to Email and Scan to Network Folder profiles (that you can access from the printer control panel)
•add entries to the Email Address book
•set up accounts for Google Cloud Print and KODAK Email Print Service
14 |
www.kodak.com/go/aiosupport |
KODAK ESP Office 2100 Series All-in-One Printer
Accessing the Online Printer Management Tool
Access the Online Printer Management Tool in one of the ways described below.
Directly from Home Center Software v7.x or higher:
1.Open Home Center Software.
2.Select Printer Tools on a computer with WINDOWS OS, or Tools on a computer with MAC OS.
3.Make sure that the name of your wirelessly connected printer appears in the bottom left of the window.
NOTE: A wirelessly connected printer is listed as the name of the printer plus a number (for example, KodakESPOffice2150+0034). If a different printer name appears, click Select, then choose your wirelessly connected printer.
4.Under Online Printer Tools, select Online Printer Management. The Online Printer Management Tool opens.
On any printer-supported computer:
1.Get the IP Address of your wirelessly connected printer:
a.On your printer control panel, press Home.
b.Press  to select Network Settings, then press OK.
c.Press  to select View Network Configuration, then press OK.
NOTE: If you prefer a printout, press  to select Print Network Configuration, then press OK. A Test Page prints, including the IP Address in the format xxx.xxx.xxx.xxx.
d.Press  to see the IP Address in the format xxx.xxx.xxx.xxx. (See Viewing the network configuration, page 11.)
2.On your computer, open your preferred Internet browser (such as INTERNET EXPLORER, FIREFOX, SAFARI, CHROME).
3.Type the printer IP Address in the browser address (URL) bar, then press Enter. The Online Printer Management Tool opens in the browser window.
www.kodak.com/go/aiosupport |
15 |
Online Printer Management Tool
Using the Online Printer Management Tool
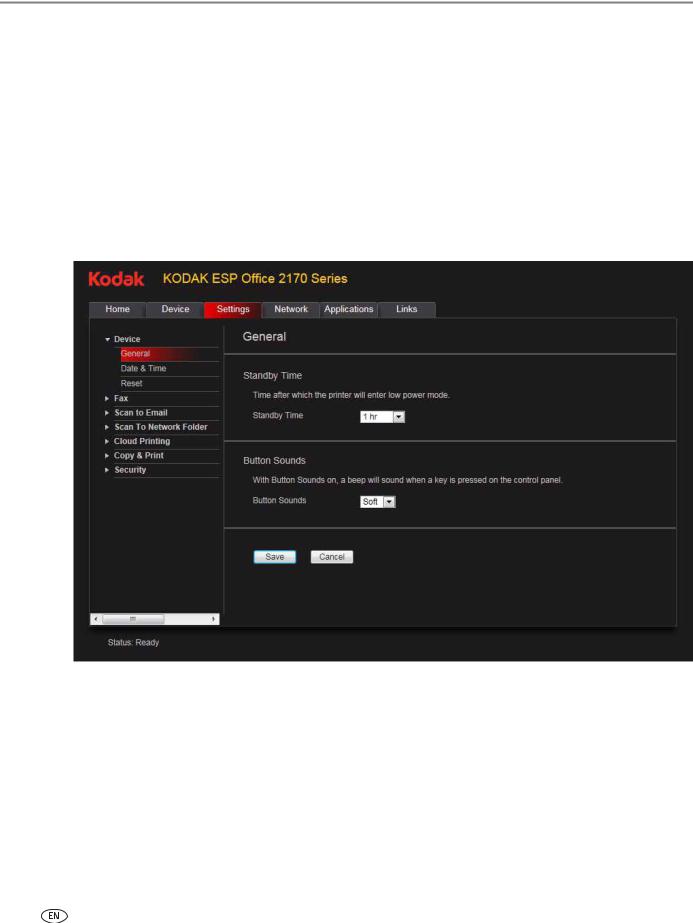
Configuring printer settings
To change the standby time, volume of the button sound, or date and time:
1.Open the Online Printer Management Tool (see Accessing the Online Printer Management Tool, page 15).
2.Select the Settings tab.
3.Select Device.
4.Select General or Date & Time, and make any necessary changes.
5. Click Save.
NOTE: Select Reset to restore default settings, if necessary.
16 |
www.kodak.com/go/aiosupport |
KODAK ESP Office 2100 Series All-in-One Printer
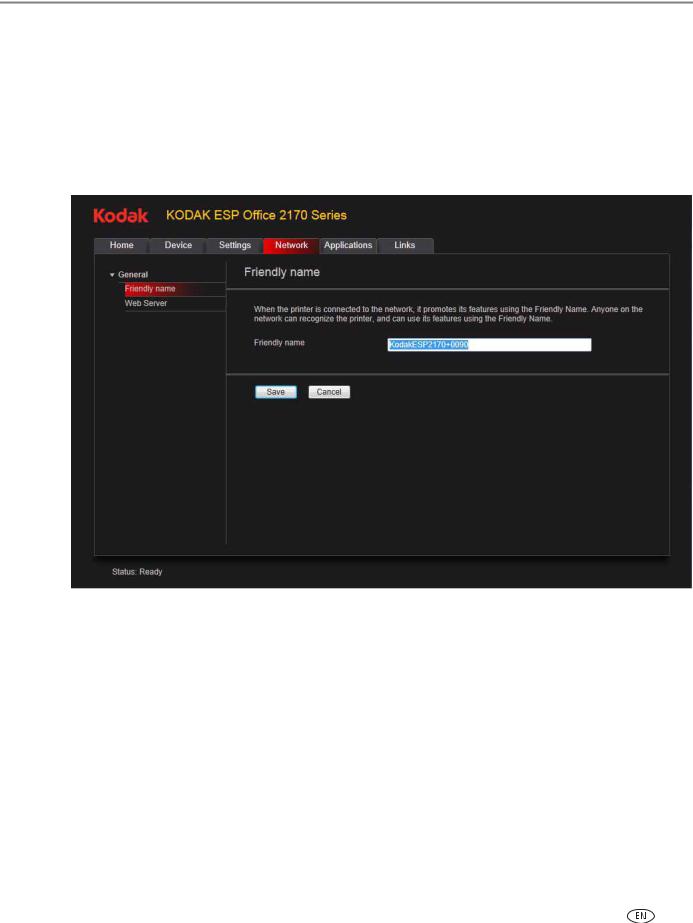
Changing the printer name
1.Open the Online Printer Management Tool (see Accessing the Online Printer Management Tool, page 15).
2.Select the Network tab.
3.Select General, then Friendly Name, if necessary.
4.Highlight the text in the Friendly name field and type the name you want, then click Save.
www.kodak.com/go/aiosupport |
17 |
Online Printer Management Tool
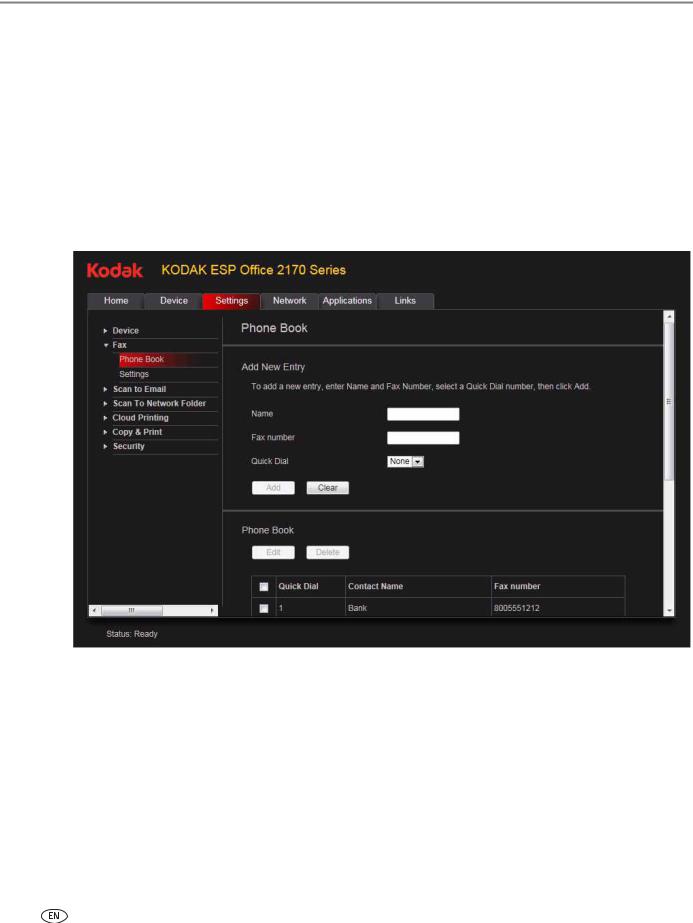
Adjusting fax settings
Edit your phone book, or change the fax settings.
Editing the fax phone book
To edit the fax phone book:
1.Open the Online Printer Management Tool (see Accessing the Online Printer Management Tool, page 15).
2.Select the Settings tab.
3.Select Fax > Phone Book.
To add a phone book entry:
1.Type the name and fax number, and, optionally, select a quick dial number for your fax entry.
2.Click Add.
18 |
www.kodak.com/go/aiosupport |
KODAK ESP Office 2100 Series All-in-One Printer
To edit a phone book entry:
1.Select the check box for an existing entry in the Phone Book.
2.Click Edit.
3.Make the changes.
4.Click Save, then click OK.
To delete a phone book entry:
1.Select the check box for an existing entry in the Phone Book.
2.Click Delete, then click Yes.
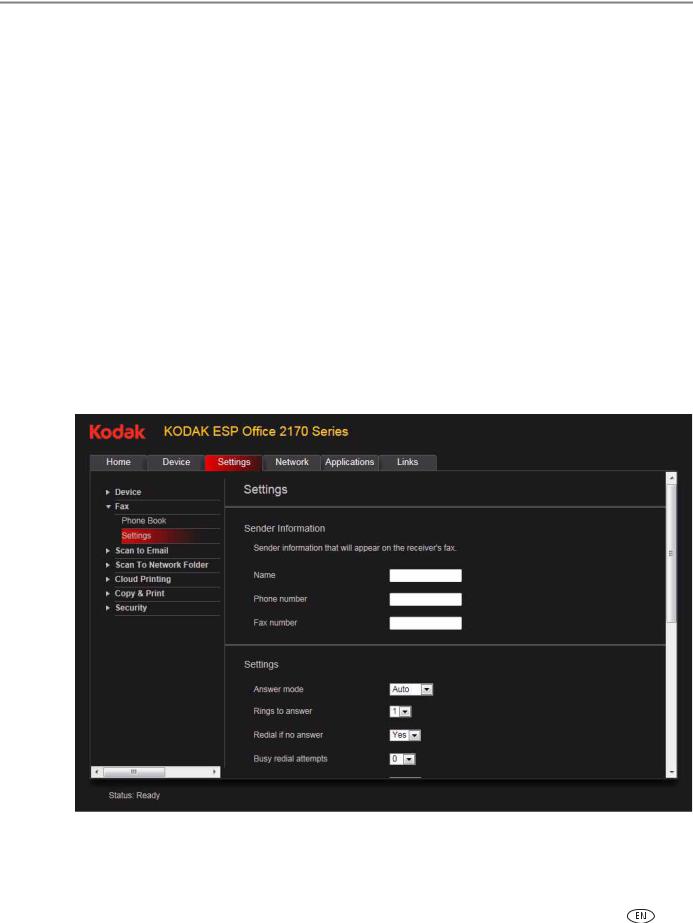
Changing fax settings
To change fax settings:
1.Open the Online Printer Management Tool (see Accessing the Online Printer Management Tool, page 15).
2.Select the Settings tab.
3.Select Fax > Settings.
www.kodak.com/go/aiosupport |
19 |
Online Printer Management Tool
4.Enter the sender information.
This information appears in the header of faxes you send from your printer. (For more information about sender information, see Entering fax sender information, page 82.)
5.Adjust any fax settings, as necessary. (For more information about settings, see Selecting fax settings, page 83.)
6.Click Save.
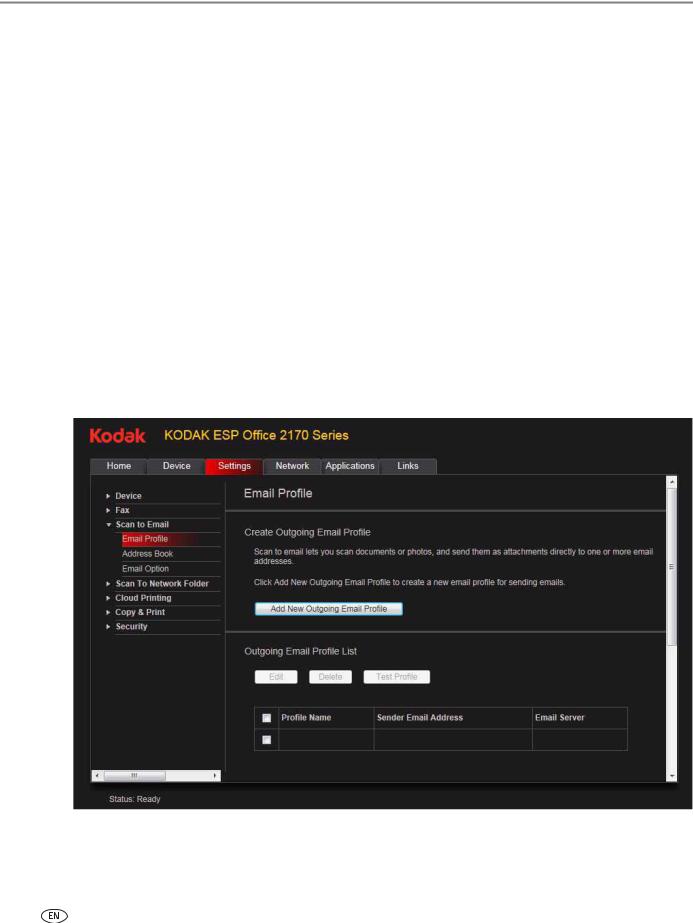
Setting up Scan To Email
When you scan with your printer, you can send the scans directly from the printer to an email recipient. To do so, you must first set up a profile for yourself, and define the email address(es) to which you want to send scans.
Creating the outgoing email profile
1.Open the Online Printer Management Tool (see Accessing the Online Printer Management Tool, page 15).
2.Select the Settings tab.
3.Select Scan To Email > Email Profile.
4. Click Add New Outgoing Email Profile.
20 |
www.kodak.com/go/aiosupport |
KODAK ESP Office 2100 Series All-in-One Printer
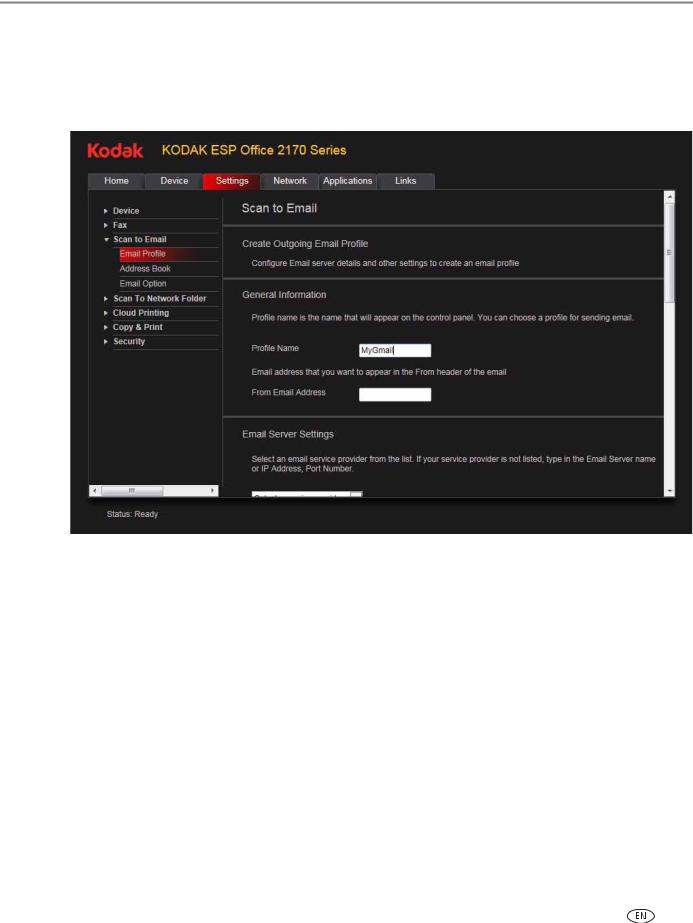
5.In the Profile Name field, type a name that has meaning to you; for example, your initials and your email provider, such as LR Hotmail or LR Gmail.
This name will appear on the printer control panel when you start a scan to be sent through email.
6.In the From Email Address field, type your email address.
Although the email will be sent from the printer, any replies will go to this email address.
www.kodak.com/go/aiosupport |
21 |
Online Printer Management Tool
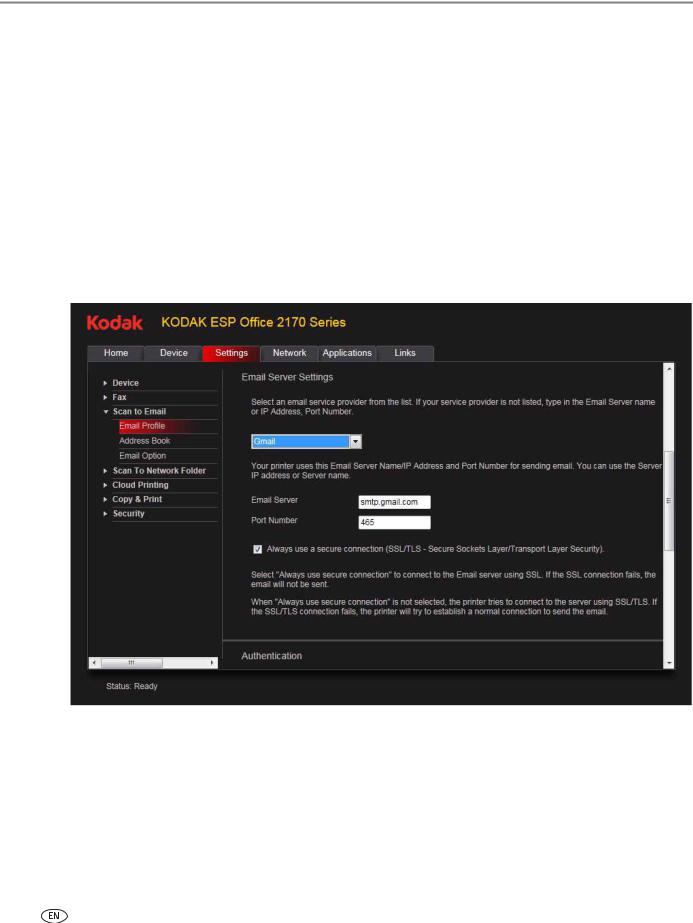
7.Under Email Server Settings, enter your email service provider.
•If your email service provider is Gmail, Yahoo, AOL, or Hotmail, select your services from the drop-down menu. The Email Service and Port Number fields fill in automatically.
•If your email service provider is not in the drop-down menu:
a.Type the email server name or the IP address of your email service provider in the Email Server field.
b.Type the port number of your email server in the Port Number field.
NOTE: Locate this information in the email account properties fields in your email application, or contact your Internet Service Provider.
c.If your mail server supports secure connection mode, select the Always use secure connection check box.
8.If your email server requires authentication for sending emails:
a.Select the The email server requires authentication for outgoing email check box.
b.Type the User ID and Password for your email account.
22 |
www.kodak.com/go/aiosupport |
KODAK ESP Office 2100 Series All-in-One Printer
9.If you want to limit who uses your profile (which appears on the printer LCD) to send scans:
a.Select the Enable Access PIN check box.
b.Type a 4-digit numeric PIN (your choice). You will need to enter this PIN each time you access your profile when scanning to an email address.
10.If you want a copies of all messages, select the Copy sender for all email messages sent from the printer checkbox.
11.Click Test Profile to confirm that the printer can access your account.
• If the printer can access your account, “Test profile: Successful” appears. Click OK, then click Save.
• If the printer cannot access your account, “Test Profile: Failed” appears. Click OK, then make changes to the profile.
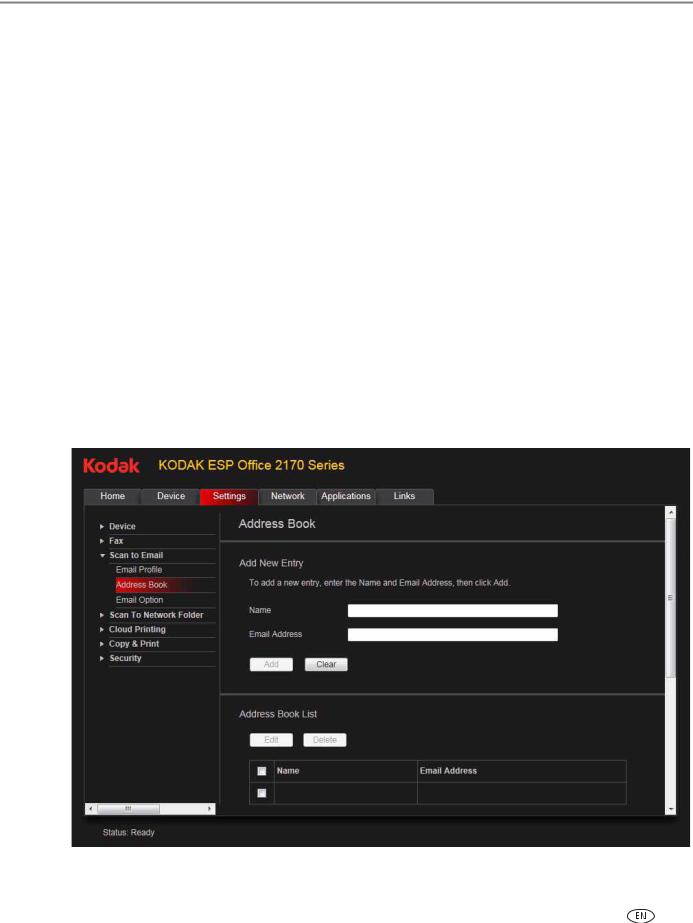
Setting up the email address book
To enter email addresses of people to whom to want to send scans by email:
1.Open the Online Printer Management Tool (see Accessing the Online Printer Management Tool, page 15).
2.Select the Settings tab.
3.Select Scan To Email > Address Book.
www.kodak.com/go/aiosupport |
23 |
Online Printer Management Tool
4.For each person:
a.Type the person’s Name.
b.Type the person’s Email Address.
c.Click Add.
5.When you are finished adding email addresses, click OK.
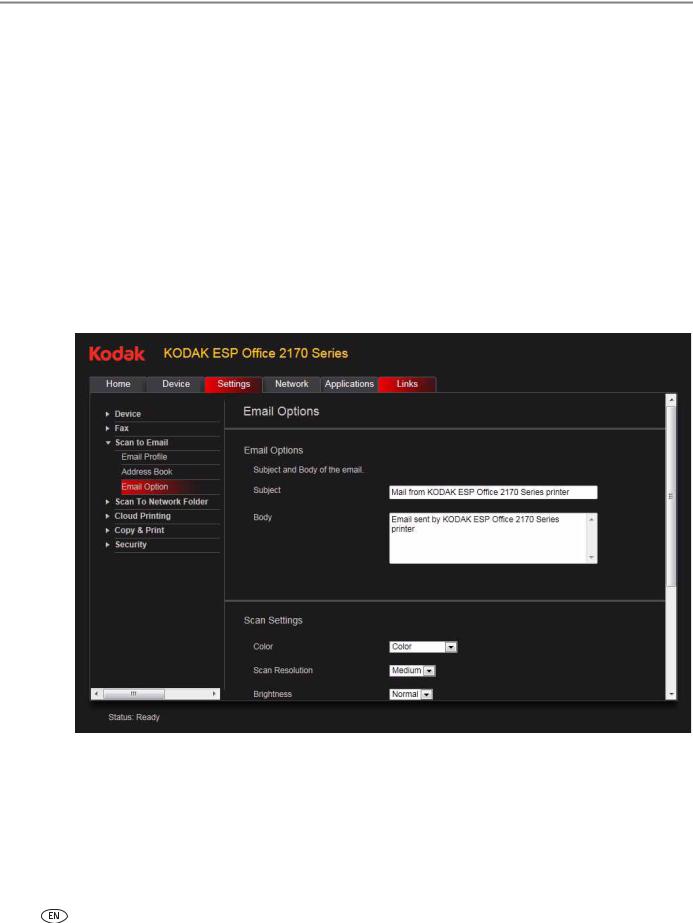
Setting options for scan to email
When you send a scan to an email address, the printer uses defaults — subject line, body, and scan settings — that you set up under email options.
1.Open the Online Printer Management Tool (see Accessing the Online Printer Management Tool, page 15).
2.Select the Settings tab.
3.Select Scan To Email > Email Option.
4.Select and replace the default subject line and body text, if necessary.
This subject line and body text will be included with every scan you send to an email address.
24 |
www.kodak.com/go/aiosupport |
Loading...