


Installing the software
Before connecting any cables, install the software that was included with your camera. Follow the on-screen instructions.
After installing the software, return to this
Getting Started Guide.
Loading the batteries
•Kodak oxy-alkaline digital camera batteries AA
•Kodak Ni-MH rechargeable digital camera batteries AA
•Kodak Ni-MH rechargeable digital camera battery KAA2HR
ENGLISH
www.kodak.com/go/c613support |
1 |
ENGLISH |
|
|
|
|
|
|
|
|
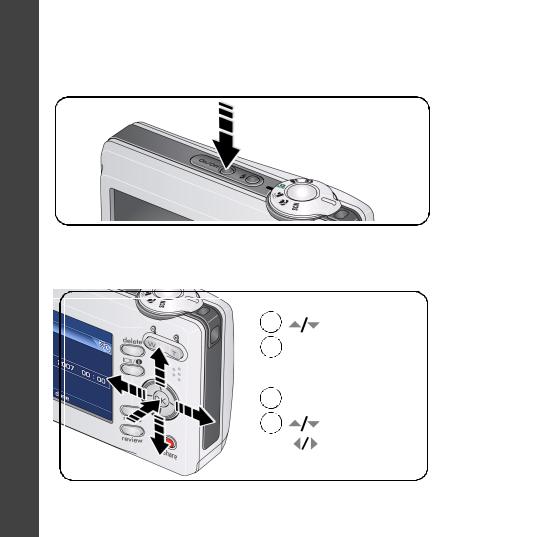
Turning on the camera |
||||||||
|
||||||||
|
|
|
|
|
|
|
||
|
|
|
|
|
|
|
||
|
Setting the language, date/time |
|||||||
|
|
|
|
|
|
|
|
|
|
|
|
|
Language: |
||||
|
|
|
|
|||||
|
|
1 |
||||||
|
|
|
|
|
to change. |
|||
|
|
|
|
|
||||
|
|
2 |
|
|
|
|||
|
|
|
OK to accept. |
|||||
|
|
1 |
Date/Time: |
|||||
|
|
At the prompt, press OK. |
||||||
|
|
2 |
|
|
|
to change. |
||
|
|
|
|
|
||||
|
|
|
|
|
|
|
for previous/next field. |
|
|
|
|
|
|
|
|||
|
|
|
|
|
OK to accept. |
|||
|
|
|
|
|
|
|
|
|
2 |
www.kodak.com/go/easysharecenter |

Taking a picture/video
Pictures
1
2
Framing brackets
Press the Shutter button halfway to focus and set exposure.
When the framing brackets turn green, press the Shutter button completely down.
Videos
1
2
Press the Shutter button completely down and release.
To stop recording, press and release the Shutter button again.
ENGLISH
www.kodak.com/go/c613support |
3 |
ENGLISH
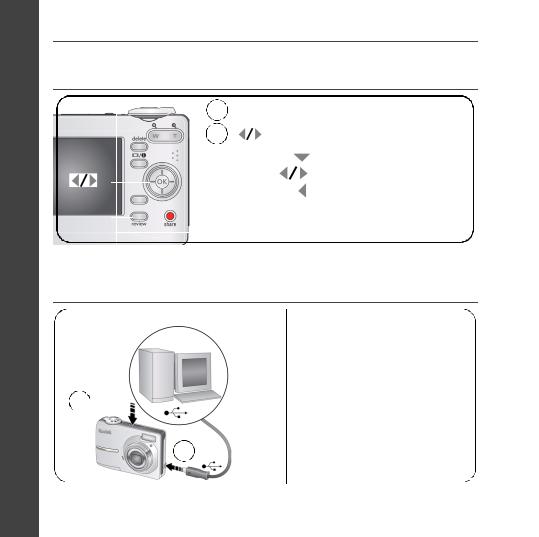
Reviewing pictures/videos
|
|
|
|
|
|
|
1 Press Review. (Press again to exit.) |
|||||
|
|
|
|
2 |
for previous/next picture/video. |
|||||||
|
|
|
|
|
|
|
|
Videos: |
|
Play/pause |
||
|
|
|
|
|
|
|
|
|
|
|
|
Play at 2X, 4X speed |
|
|
|
|
|
|
|
|
|
|
|
|
Play in reverse at 2X, 4X |
|
|
|
|
|
|
|
|
|
|
|
|
|
|
Review |
|
|
|
|
|
To hear audio, transfer the video |
|||||
|
|
|
|
|
|
to your computer. |
||||||
|
|
|
|
|
|
|
|
|||||
|
|
|
|
|
|
|
|
|||||
|
|
|
|
|
|
|
|
|
|
|
|
|
|
|
|
|
|
|
|
|
|
|
|
|
|
Transferring pictures/videos
USB cable
2 Turn on  camera
1
Kodak EasyShare printer dock or camera dock
(May be sold separately.)
For dock compatibility, visit www.kodak.com/go/dockcompatibility.
To purchase accessories, visit www.kodak.com/go/c613accessories.
To use an EasyShare dock, see its Getting Started Guide.
4 |
www.kodak.com/go/easysharecenter |
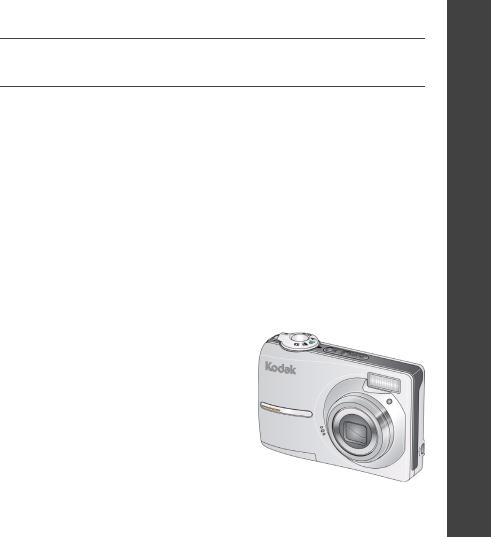
Keep learning about your camera!
Congratulations!
You have:
•set up your camera
•taken pictures
•transferred pictures to your computer
Keep learning!
Finish reading this book, so you can take and share your best pictures! To better understand each menu option, use camera Help.
(Highlight a menu choice, then press the 


 button.)
Visit www.kodak.com/go/c613support and
www.kodak.com/go/easysharecenter for:
•the extended user’s guide
•interactive troubleshooting and repairs
•interactive tutorials
•FAQs
•downloads
•accessories
•printing information
•product registration
ENGLISH
www.kodak.com/go/c613support |
5 |
ENGLISH
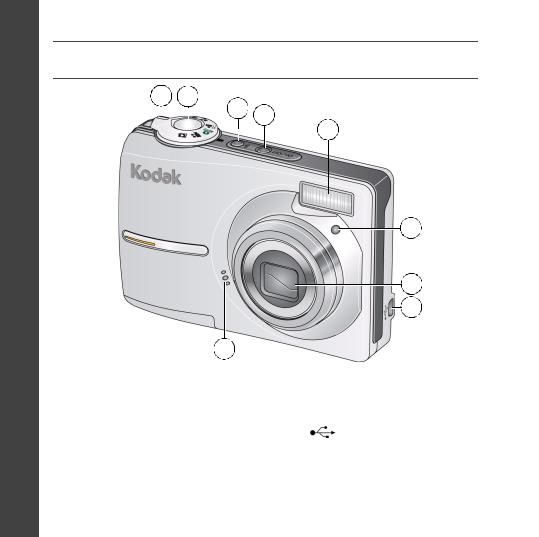
Front view
1 |
2 |
3 |
|
|
|
|
|
4 |
|
|
|
|
||
|
|
|
|
|
5
6
7
8
9
1 |
Mode dial |
6 |
Self-timer light |
2 |
Shutter button |
7 |
Lens |
3 |
Flash button |
8 |
USB |
4 |
On/Off button |
9 |
Microphone |
5 |
Flash |
|
|
6 |
www.kodak.com/go/easysharecenter |
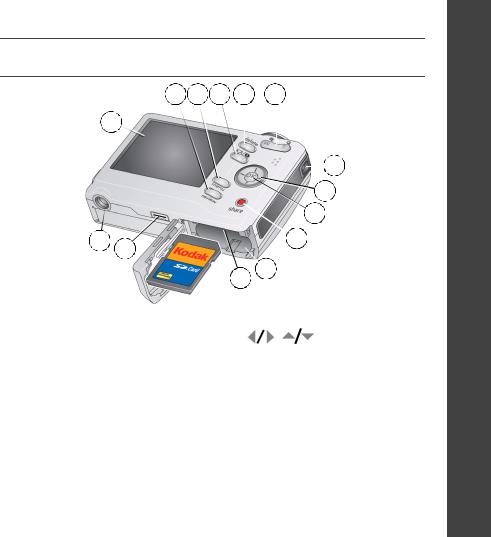
Back view
|
|
2 |
3 |
4 |
5 |
6 |
|
|
|||
|
1 |
|
|
|
|
|
|
|
|
|
|
|
|
|
|
|
|
|
|
|
|
|
|
|
|
|
|
|
|
|
|
|
|
|
7 |
|
|
|
|
|
|
|
|
|
|
||
|
|
|
|
|
|
|
|
|
|||
|
|
|
|
|
|
|
|
8 |
|||
|
|
|
|
|
|
|
|
9 |
|
||
|
14 |
13 |
|
|
|
|
|
10 |
|
|
|
|
|
|
|
|
|
|
|
|
|
||
|
|
|
|
|
|
12 |
11 |
|
|
|
|
|
|
|
|
|
|
|
|
|
|
||
|
|
|
|
|
|
|
|
|
|
|
|
|
|
optional |
|
|
|
|
|
|
|
||
1 |
LCD |
|
|
|
8 |
|
|
|
|
|
|
2 |
Review button |
|
|
|
9 |
|
OK button |
||||
3 |
Menu button |
|
|
|
10 |
|
Share button |
||||
4 |
LCD/Info button |
|
11 |
|
Battery compartment |
||||||
5 |
Delete button |
|
|
|
12 |
|
Slot for optional SD or MMC card |
||||
6 |
Zoom button (Telephoto/Wide) |
|
13 |
|
Dock connector |
||||||
7 |
Strap post |
|
|
|
14 |
|
Tripod socket |
||||
ENGLISH
www.kodak.com/go/c613support |
7 |
1 Doing more with your camera
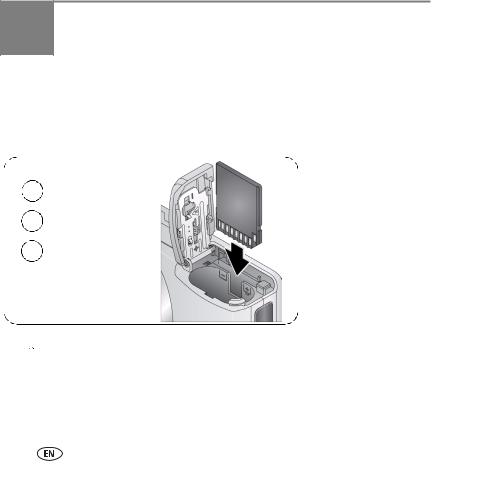
Storing pictures on an SD or MMC card
Your camera has internal memory. You can purchase an SD or MMC card to store more pictures and videos (www.kodak.com/go/c613accessories). We recommend Kodak SD or MMC cards.
1Turn off the camera.
2Insert or remove the optional card.
3Turn on the camera.
 CAUTION:
A card can only be inserted one way; forcing it may cause damage. If you insert or remove a card while the camera is accessing it, the card, pictures, or camera may be damaged.
NOTE: When using the card for the first time, format the card in this camera before taking pictures.
8 |
www.kodak.com/go/easysharecenter |
Doing more with your camera
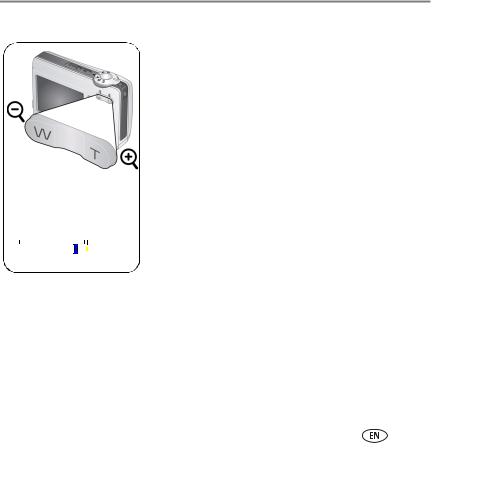
Using the zoom button
Zoom indicator
|
Optical |
Digital |
|
|||||
|
zoom |
zoom |
|
|||||
|
range |
range |
|
|||||
|
|
|
|
|
|
|
|
|
|
|
|
|
|
|
|
|
|
W T D
1 Use the LCD to frame your subject.
2Press Telephoto (T) to zoom in. Press Wide Angle (W) to zoom out.
The zoom indicator shows zoom status.
3 Take the picture or video.
NOTE: To get a focused picture every time, remember:
■Always use the auto focus framing marks.
■If you are using no zoom (1X, wide angle), you can be as close as 24 in. (60 cm) to your subject.
■As you zoom, you need to move further from your subject.
To use digital zoom in any Still mode:
Press Telephoto (T) to the maximum optical zoom limit. Release the button, then press it again.
NOTE: You may notice decreased image quality when using digital zoom. The slider on the zoom indicator turns red when the picture quality reaches the limit for an acceptable 4 x 6-in. (10 x 15 cm) print.
www.kodak.com/go/c613support |
9 |
 Loading...