


 Loading...
KODAK ESP 3200 Series
All-in-One Printer
Home
Includes Information for the:
ESP 3250 All-in-One Printer
ESP 3260 All-in-One Printer
Extended User Guide

Eastman Kodak Company Rochester, NY 14650
© Eastman Kodak Company, 2009
Kodak, EasyShare, and Perfect Touch are trademarks of Eastman Kodak Company. Specifications subject to change without notice.
P/N 1K5832 September 2009

Table of contents |
|
1 Printer Overview |
|
Components....................................................................................................................................................................... |
1 |
Control panel..................................................................................................................................................................... |
2 |
Home Center Software .................................................................................................................................................. |
3 |
Home Center Software for WINDOWS OS-based computers ..................................................................... |
3 |
Home Center Software for MACINTOSH Computers .................................................................................... |
3 |
2 Configuring Your Printer |
|
Configuring printer settings .......................................................................................................................................... |
4 |
Configuring basic printer settings ......................................................................................................................... |
4 |
Setting your printer as the default printer........................................................................................................... |
5 |
Connecting to another KODAK All-in-One Printer................................................................................................. |
5 |
3 Handling Paper |
|
Paper types........................................................................................................................................................................ |
7 |
Paper sizes......................................................................................................................................................................... |
7 |
Envelope sizes................................................................................................................................................................... |
8 |
Loading paper ................................................................................................................................................................... |
8 |
Loading plain paper................................................................................................................................................... |
8 |
Loading photo paper ................................................................................................................................................ |
9 |
Loading envelopes................................................................................................................................................... |
10 |
4 Printing Pictures |
|
Changing Print Photos Options / Defaults .............................................................................................................. |
11 |
Printing pictures from a memory card ..................................................................................................................... |
12 |
Types of memory cards ......................................................................................................................................... |
12 |
Printing a picture using the default settings..................................................................................................... |
12 |
Printing pictures using non-default photo options ......................................................................................... |
13 |
Printing tagged pictures......................................................................................................................................... |
14 |
Printing panoramic pictures.................................................................................................................................. |
15 |
Transferring pictures to a computer......................................................................................................................... |
15 |
Transferring pictures to a WINDOWS OS-based computer ....................................................................... |
15 |
Transferring pictures to a MACINTOSH Computer ...................................................................................... |
15 |
5 Copying |
|
Making a copy................................................................................................................................................................. |
16 |
Changing copy options................................................................................................................................................. |
16 |
Changing copy document options ...................................................................................................................... |
16 |
Changing copy photo options .............................................................................................................................. |
18 |
Adjusting copy settings................................................................................................................................................ |
19 |
Enlarging or reducing a document ...................................................................................................................... |
19 |
Enlarging or reducing a photo .............................................................................................................................. |
19 |
Darkening or lightening copies ........................................................................................................................... |
20 |
www.kodak.com/go/aiosupport |
iii |

Table of contents |
|
6 Scanning |
|
Before you begin scanning ........................................................................................................................................... |
21 |
Simple scanning .............................................................................................................................................................. |
21 |
Scanning multiple pictures simultaneously ............................................................................................................ |
22 |
Scanning multiple pictures with a WINDOWS OS-based computer ........................................................ |
22 |
Scanning multiple pictures with a MACINTOSH Computer ....................................................................... |
22 |
7 Maintaining Your Printer |
|
General care and cleaning........................................................................................................................................... |
23 |
Cleaning the scanner glass .................................................................................................................................. |
24 |
Cleaning inside the scanner lid ............................................................................................................................ |
25 |
Replacing ink cartridges............................................................................................................................................... |
26 |
Replacing the printhead ............................................................................................................................................... |
29 |
Upgrading the printer software and firmware ....................................................................................................... |
33 |
Upgrading software and firmware on a WINDOWS OS-based computer .............................................. |
33 |
Upgrading software and firmware on a MACINTOSH Computer ............................................................. |
33 |
Monitoring and adjusting printer performance .................................................................................................... |
34 |
Checking ink levels................................................................................................................................................. |
34 |
Resetting factory defaults .................................................................................................................................... |
34 |
8 Troubleshooting |
|
Basic troubleshooting ................................................................................................................................................... |
35 |
Status light....................................................................................................................................................................... |
36 |
Power status light.................................................................................................................................................... |
36 |
9 Product and Safety Specifications |
|
Specifications and features......................................................................................................................................... |
37 |
Print performance ................................................................................................................................................... |
37 |
Photo printing features .......................................................................................................................................... |
37 |
Copy document features....................................................................................................................................... |
38 |
Copy photo features ............................................................................................................................................... |
38 |
Scanning features.................................................................................................................................................... |
38 |
Paper tray features.................................................................................................................................................. |
39 |
Ink cartridges............................................................................................................................................................ |
39 |
Connectivity.............................................................................................................................................................. |
39 |
Software support ..................................................................................................................................................... |
39 |
Physical specifications .......................................................................................................................................... |
40 |
Warranty .................................................................................................................................................................. |
40 |
System requirements ............................................................................................................................................ |
40 |
iv |
www.kodak.com/go/aiosupport |

|
KODAK ESP 3200 Series All-in-One Printer |
Safety information ........................................................................................................................................................ |
42 |
Regulatory compliance................................................................................................................................................ |
44 |
FCC statement ........................................................................................................................................................ |
44 |
Canadian statements............................................................................................................................................. |
44 |
German compliance statement .......................................................................................................................... |
45 |
REACH Article 33 declarations........................................................................................................................... |
45 |
Waste electrical and electronic equipment labeling..................................................................................... |
45 |
ENERGY STAR® Qualified .......................................................................................................................................... |
45 |
Warranty Information.................................................................................................................................................. |
46 |
Declaration of Conformity.......................................................................................................................................... |
47 |
Index |
|
www.kodak.com/go/aiosupport |
v |

1Printer Overview
This printer lets you print, copy, and scan pictures and documents.
Components
1 |
2 |
3 |
4 |
5 |
6 |
14 
7
13
12 
|
11 |
10 |
9 |
|
8 |
1 |
Memory card slot |
|
|
8 |
Printhead with ink cartridges installed |
2 |
Control panel |
|
|
9 |
Right paper-edge guide |
3 |
LCD |
|
|
10 |
Paper tray |
4 |
USB port |
|
|
11 |
Paper tray extender / paper stop |
5 |
Power cord connection port |
|
12 |
Left paper-edge guide |
|
6 |
Rear-access cleanout area |
|
13 |
Scanner glass |
|
7 |
Printer access door |
|
14 |
Scanner lid |
|
www.kodak.com/go/aiosupport |
1 |
Printer Overview
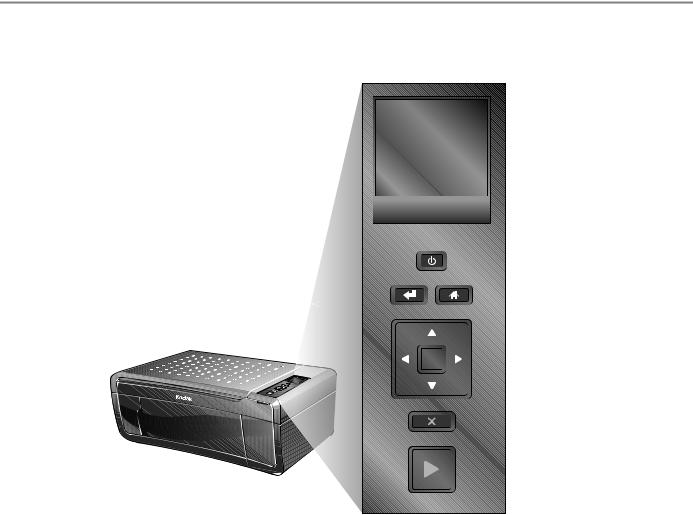
Control panel


 ESP 3250
1
All-in-One-Printer
|
|
2 |
||
|
Back |
Home |
||
8 |
|
|
3 |
|
|
|
|
|
4 |
|
|
|
||
7
6
OK
Cancel
Start
5
Feature |
Description |
|
1 |
LCD |
Displays pictures, messages, and menus |
2 |
On/Off button |
Turns the printer on or off |
3 |
Home button |
Displays the main menu, and toggles between screens |
4 |
Navigation buttons |
Used to navigate menus, scroll through pictures |
5 |
Start button |
Begins copying, scanning, printing, maintenance task, and file transfer |
6 |
Cancel button |
Stops the current operation and returns to the menu; returns to previous item when |
|
|
navigating menus |
7 |
OK button |
Selects a menu item, accepts a zoom setting, and lets you continue with the current |
|
|
operation |
8 |
Back button |
Displays the previous screen |
2 |
www.kodak.com/go/aiosupport |

KODAK ESP 3200 Series All-in-One Printer
Home Center Software
KODAK Home Center Software is installed as part of the software installation on your computer. The Home Center icon will appear on your desktop. Use this icon to start Home Center Software.
Home Center Software for WINDOWS OS-based computers
Home Center Software for MACINTOSH Computers
On a WINDOWS OS-based computer, you can use Home Center Software to browse and edit pictures, print, copy, scan, order supplies, access the Extended User Guide, and configure your all-in-one printer from your computer. You can also access the KODAK Tips and Projects Center Web site or upgrade your printer with a newer version of software and/or firmware.
Clicking one of the three icons located in the upper-right corner of Home Center Software does the following:
Home - takes you to the main Home Center Software window from other functions within Home Center Software
Tools - displays menu options, including links to Kodak sites, troubleshooting, and maintenance functions
 Help - displays a Help panel for Home Center Software
On a MACINTOSH Computer, Home Center Software has three panes: Select, Tools, and Maintenance. These panes let you do the following:
Select pane — select your printer from a list of connected printers and check the printer ink levels.
Tools pane — start a scan, select scanning settings, change Home Center Software settings, and restore all factory default settings.
Maintenance pane — print a test page, align and clean the printhead, and initiate an upload of diagnostic data for service personnel.
From any pane, you can order supplies from the KODAK Web site and view the status of your printer.
From the File menu of Home Center Software, you can check for software updates.
www.kodak.com/go/aiosupport |
3 |

2Configuring Your Printer
This chapter presumes that you have set up your printer and that you may or may not have installed the printer software.
Configuring printer settings
Configuring basic NOTE: When you first power on the printer, the printer automatically steps you printer settings through the process of selecting the Language.
To set or change basic printer settings:
1.Press Home.
2.Press  to select Printer Settings, then press OK.
3.Press  to select one of the following settings:
•Date and Time*
–Press OK, then press  to select Year, Month, Day, Hour, or Minute. Press
  or
or  to change the values; press OK when you are done.
•Time to Low Power
–Press  to change the time to energy-saving low power (select from 1 to 4 hours in 0.5 hour increments). After the Time to Low Power, the printer goes into a low-power mode.
•Tagged Images Printing (see Printing tagged pictures, page 14)
–Press  to select On or Off.
If you select On, when you are printing pictures, the printer LCD prompts you to verify that you want to print pictures that were tagged (or marked) using your camera. Different cameras use different terminology; KODAK Digital Cameras use “marked” images; others use either tagged images or DPOF.
•Language
–Press OK, press  to select a language, then press OK.
•Reset All Settings (see Resetting factory defaults, page 34)
NOTE: Resetting factory defaults does not change the date and time, language, or country/region.
4.Press Back.
* You can also synchronize the printer's date and time to your computer from Home Center Settings under Tools in Home Center Software.
4 |
www.kodak.com/go/aiosupport |
KODAK ESP 3200 Series All-in-One Printer
Setting your printer as the default printer
If you have more than one printer, and after installation your all-in-one printer was not the default printer, you can make your all-in-one printer your default printer.
For all computers and operating systems: If you haven’t yet installed the printer software, insert the software CD that came with your printer and follow the on-screen instructions to install the software.
For WINDOWS XP OS-based computers
1.Select Start > Control Panel > Printers and Faxes.
2.Right-click your printer, and select Set as Default Printer.
For WINDOWS VISTA OS-based computers
1.Select Start > Control Panel > Hardware and Sound > Printers.
2.Right-click your printer, and select Set as Default Printer.
For WINDOWS 7 OS-based computers
1.Select Start > Control Panel > Hardware and Sound > Devices and Printers.
2.Right-click your printer, and select Set as Default Printer.
For MACINTOSH Computers
When a new printer is installed, it becomes the default printer. If your all-in-one printer is not the default printer:
1.From the dock, open System Preferences.
2.In the Hardware section, click Print & Fax.
3.Select your printer from the drop-down list next to Default Printer.
Connecting to another KODAK All-in-One Printer
If you are connecting to a newer model printer (for example, you already have an ESP 7 printer and now you adding an ESP 3250 printer), you must install the software for the newer model.
If you are connecting to another ESP 3250 printer or to an older model:
•On a WINDOWS OS-based computer:
a.Select Start > All Programs > Kodak > Kodak Printer Network Setup Utility.
b.If your all-in-one printer is not listed:
•Select No, my printer is not listed, then click Next.
•From the drop-down list, select your printer.
•Select USB Cable - connect your cable now.
•Connect the USB cable to the computer and printer.
•Click Next.
When your printer is detected, driver installation begins
www.kodak.com/go/aiosupport |
5 |

Configuring Your Printer
c.If your all-in-one printer is listed:
•Highlight the all-in-one printer that is connected to your network.
•Select Yes, my printer is listed, then click Next.
When your printer is detected, driver installation begins.
d.When driver installation is complete, click Done.
•On a MACINTOSH Computer:
a.From the dock, open System Preferences.
b.Click Print & Fax.
c.Click the + sign to add the printer.
d.Select the printer from the list of available printers, then click Add.
6 |
www.kodak.com/go/aiosupport |

3Handling Paper
For the best photo printing results, use KODAK Photo Papers, which are optimized to work with KODAK All-in-One Printers.
For the best document printing results, use KODAK Document Papers or a paper with the COLORLOK Technology logo on the package. Use only paper that is designed for inkjet printers.
When handling paper:
•Hold the paper by the edges; avoid placing your fingerprints on it.
•Do not touch the glossy side of photo paper.
•Store paper flat, away from direct sunlight and heat.
Paper types
You can use:
•Plain paper — 20 to 24 lb / 75 to 90 gsm
•Photo paper — up to 12 mil (290 gsm)
•Card stock — 110 lb / 200 gsm, max
•Envelopes — most standard types
•Transparencies — inkjet variety with white stripe
•Labels — all inkjet varieties on 8.5 x 11-in. or A4 sheets
•Iron-on transfers — all inkjet varieties on 8.5 x 11-in. or A4 sheets
Paper sizes
The printer accepts the following paper sizes:
•4 x 6 in. / 101 x 152 mm
•4 x 7 in. / 101 x 178 mm
•4 x 12 in. / 101 x 305 mm
•5 x 7 in. / 127 x 178 mm
•8 x 10 in. / 203 x 254 mm
•8.5 x 11 in. / 216 x 279 mm
•8.5 x 14 in. / 216 x 356 mm
•A4 (8.27 x 11.69 in. / 210 x 297 mm)
•A5 (5.83 x 8.27 in. / 148 x 210 mm)
•A6 (4.13 x 5.83 in. / 105 x 148 mm)
•B5 (6.93 x 9.48 in. / 176 x 250 mm)
NOTE: Do not load paper smaller than 4 x 6 in. / 101 x 152 mm or A6.
www.kodak.com/go/aiosupport |
7 |
Handling Paper
Envelope sizes
The printer accepts the following envelope sizes:
•C5 (6.38 x 9 in. / 162 x 229 mm)
•C6 (4.5 x 6.38 in. / 114 x 162 mm)
•DL (4.31 x 8.69 in. / 110 x 220 mm)
•US #7¾ (3.88 x 7.5 in. / 98 x 190 mm)
•US #9 (3.88 x 8.88 in. / 98 x 225 mm)
•US #10 (4.13 x 9.5 in. / 105 x 241 mm)
IMPORTANT: Do not load envelopes with cutouts or with cellophane windows.
Loading paper
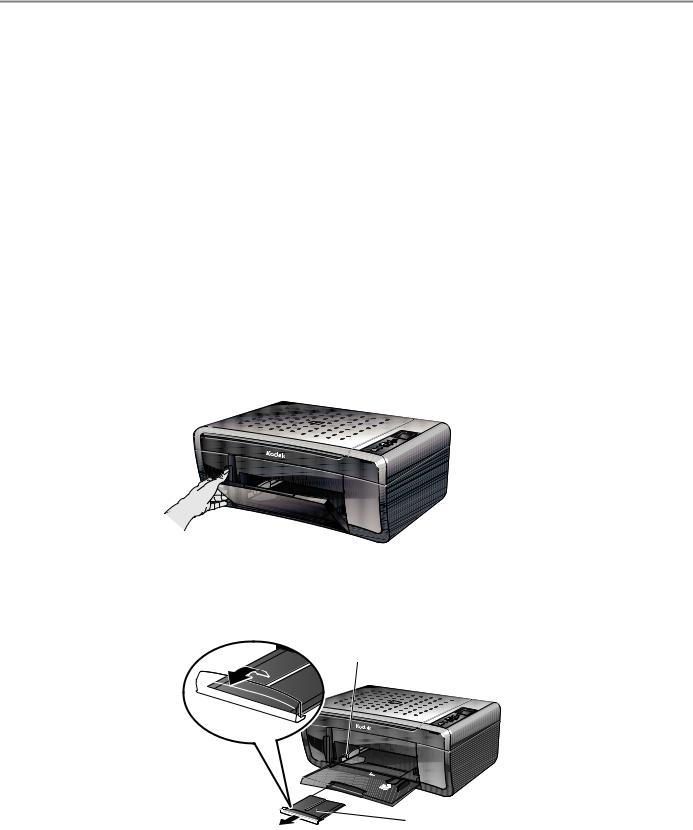
Loading plain paper
The paper tray capacity is 100 sheets of plain paper.
To load plain paper:
1. Open the paper tray.
2.Pull out the paper tray extender until it is fully extended.
3.Lift the paper stop.
4.Make sure the left paper-edge guide is to the far left.
left paper-edge guide
paper stop 


 paper tray extender
8 |
www.kodak.com/go/aiosupport |

KODAK ESP 3200 Series All-in-One Printer
5.Carefully fan and stack the paper, then insert it into the tray.
6.Move the paper forward until it stops.
7.Move the left paper-edge guide until it touches the paper.
left paper-edge guide
Loading photo paper
The paper tray capacity is 20 sheets of photo paper.
To load photo paper:
1.Remove any paper from the tray.
2.Carefully fan and stack the photo paper, then insert the paper (short side first) into the tray with the logo side facing up.
3.Move the paper forward until it stops.
4.Move the left paper-edge guide until it touches the paper.
left paper-edge guide
www.kodak.com/go/aiosupport |
9 |

Handling Paper
Loading envelopes
The paper tray capacity is 20 envelopes.
To load envelopes:
1.Remove any paper from the tray.
2.Insert the envelope(s) into the tray with the flap up and against the right side of the tray.
3.Move the left paper-edge guide until it touches the envelope(s).
left paper-edge guide 


10 |
www.kodak.com/go/aiosupport |

4Printing Pictures
The quickest way to print pictures is from a memory card inserted into the printer.
Another way to print pictures is to use Home Center Software on your computer running the WINDOWS Operating System. Home Center Software lets you edit and enhance your pictures on your computer before printing. Open Home Center Software, select Print Pictures, then follow the on-screen instructions.
If you have a MACINTOSH Computer, print your pictures using KODAK
EASYSHARE Software, iPhoto, or another picture-editing program.
Changing Print Photos Options / Defaults
You can change the print photos options for an individual picture or group of pictures, or you can change the settings and save them as the default.
To change print photos options:
1.Press Home.
2.If necessary, press  to select View and Print Photos, then press OK.
3.Press  or
or  as needed to change the settings below.
Print Photos Option |
Settings |
Description |
|
|
|
View Photos |
-- |
Scroll through the pictures on the |
|
|
memory card. |
|
|
|
Transfer All to PC |
-- |
To transfer all the pictures on the |
|
|
memory card to your computer, press |
|
|
OK then Start. (Your printer and |
|
|
computer must be connected with a USB |
|
|
cable.) |
|
|
|
Quantity |
1 (default) to 99 |
The number of copies that print. |
|
|
|
Print Size |
2 x 3 |
If the selected copy size is smaller than |
|
3.5 x 5 |
the paper in the paper tray, the printer |
|
4 x 6 (default) |
automatically arranges the pictures to |
|
best fit the paper size. |
|
|
4 x 7 |
|
|
|
|
|
5 x 7 |
|
|
4 x 12 |
|
|
8 x 10 |
|
|
8.5 x 11 or A4 |
|
|
|
|
Plain Paper Quality |
Normal (default) |
Good quality output; prints faster than |
|
|
Best. |
|
|
|
|
Best |
The highest quality. |
|
|
|
|
Draft |
The fastest print speed. |
|
|
|
Photo Paper Quality |
Automatic |
The printer detects when you load photo |
|
(default) |
paper and sets Best quality |
|
|
automatically. |
|
|
|
www.kodak.com/go/aiosupport |
11 |
Loading...