


 Loading...
Table of Contents
Overview . . . . . . . . . . . . . . . . . . . . . . . . . . . . . . . . . . . . . . . . . . . . . . . . . . . . . . . . . . . . 8
About This Manual . . . . . . . . . . . . . . . . . . . . . . . . . . . . . . . . . . . . . . . . . . . . . . . . . . . . . . . . . . . .8 Introduction . . . . . . . . . . . . . . . . . . . . . . . . . . . . . . . . . . . . . . . . . . . . . . . . . . . . . . . . . . . . . . . . . .9 Features . . . . . . . . . . . . . . . . . . . . . . . . . . . . . . . . . . . . . . . . . . . . . . . . . . . . . . . . . . . . . . . . . . .11 System Requirements . . . . . . . . . . . . . . . . . . . . . . . . . . . . . . . . . . . . . . . . . . . . . . . . . . . . . . . .12 When in Portable Mode . . . . . . . . . . . . . . . . . . . . . . . . . . . . . . . . . . . . . . . . . . . . . . . . . . 12 When Connected to a MACINTOSH . . . . . . . . . . . . . . . . . . . . . . . . . . . . . . . . . . . . . . . . 12 When Connected to a PC . . . . . . . . . . . . . . . . . . . . . . . . . . . . . . . . . . . . . . . . . . . . . . . . . 13 Electromagnetic Emissions . . . . . . . . . . . . . . . . . . . . . . . . . . . . . . . . . . . . . . . . . . . . . . . . . . . .14 Japan . . . . . . . . . . . . . . . . . . . . . . . . . . . . . . . . . . . . . . . . . . . . . . . . . . . . . . . . . . . . . . . . 14 Taiwan . . . . . . . . . . . . . . . . . . . . . . . . . . . . . . . . . . . . . . . . . . . . . . . . . . . . . . . . . . . . . . . 14 European Union (EU) . . . . . . . . . . . . . . . . . . . . . . . . . . . . . . . . . . . . . . . . . . . . . . . . . . . . 15 USA . . . . . . . . . . . . . . . . . . . . . . . . . . . . . . . . . . . . . . . . . . . . . . . . . . . . . . . . . . . . . . . . . 15
About the DCS Pro Back Plus . . . . . . . . . . . . . . . . . . . . . . . . . . . . . . . . . . . . . . . . . . . 16
Overview . . . . . . . . . . . . . . . . . . . . . . . . . . . . . . . . . . . . . . . . . . . . . . . . . . . . . . . . . . . . . . . . . .16
Rear . . . . . . . . . . . . . . . . . . . . . . . . . . . . . . . . . . . . . . . . . . . . . . . . . . . . . . . . . . . . . . . . . 16 Front (Attaches to Camera Body) . . . . . . . . . . . . . . . . . . . . . . . . . . . . . . . . . . . . . . . . . . . 16
Sides. . . . . . . . . . . . . . . . . . . . . . . . . . . . . . . . . . . . . . . . . . . . . . . . . . . . . . . . . . . . . . . . . 17
Top . . . . . . . . . . . . . . . . . . . . . . . . . . . . . . . . . . . . . . . . . . . . . . . . . . . . . . . . . . . . . . . . . . 18 Imager . . . . . . . . . . . . . . . . . . . . . . . . . . . . . . . . . . . . . . . . . . . . . . . . . . . . . . . . . . . . . . . . . . . .18
Focus Screen Overlay . . . . . . . . . . . . . . . . . . . . . . . . . . . . . . . . . . . . . . . . . . . . . . . . . . . . . . . .19
Applying an Overlay . . . . . . . . . . . . . . . . . . . . . . . . . . . . . . . . . . . . . . . . . . . . . . . . . . . . . 19
|
|
|
|
|
Next |
|
|
Contents-1 |
|
Contents |
|
Back |
|
|
Index |
||
|
|
|
|
|
|
|
|
|
|
|
|
|
|
|
|
|
|

Table of Contents
IR Filter . . . . . . . . . . . . . . . . . . . . . . . . . . . . . . . . . . . . . . . . . . . . . . . . . . . . . . . . . . . . . . . . . . .20 Anti-aliasing Filter . . . . . . . . . . . . . . . . . . . . . . . . . . . . . . . . . . . . . . . . . . . . . . . . . . . . . . . . . . . .20 Removing an IR or Anti-aliasing Filter . . . . . . . . . . . . . . . . . . . . . . . . . . . . . . . . . . . . . . . 21 Inserting a Filter . . . . . . . . . . . . . . . . . . . . . . . . . . . . . . . . . . . . . . . . . . . . . . . . . . . . . . . . 21 Image LCD . . . . . . . . . . . . . . . . . . . . . . . . . . . . . . . . . . . . . . . . . . . . . . . . . . . . . . . . . . . . . . . . .22 How the Image LCD Works . . . . . . . . . . . . . . . . . . . . . . . . . . . . . . . . . . . . . . . . . . . . . . . 22 Turning the Image LCD On and Off . . . . . . . . . . . . . . . . . . . . . . . . . . . . . . . . . . . . . . . . . 23 Tilting the Image LCD . . . . . . . . . . . . . . . . . . . . . . . . . . . . . . . . . . . . . . . . . . . . . . . . . . . . 23 Menu Bar . . . . . . . . . . . . . . . . . . . . . . . . . . . . . . . . . . . . . . . . . . . . . . . . . . . . . . . . . . . . . 24 Menus . . . . . . . . . . . . . . . . . . . . . . . . . . . . . . . . . . . . . . . . . . . . . . . . . . . . . . . . . . . . . . . . 25 Status Screen . . . . . . . . . . . . . . . . . . . . . . . . . . . . . . . . . . . . . . . . . . . . . . . . . . . . . . . . . . . . . . .27 Displaying the Status screen . . . . . . . . . . . . . . . . . . . . . . . . . . . . . . . . . . . . . . . . . . . . . . 27 Digital Buttons . . . . . . . . . . . . . . . . . . . . . . . . . . . . . . . . . . . . . . . . . . . . . . . . . . . . . . . . . . . . . .28 Four-way Switch . . . . . . . . . . . . . . . . . . . . . . . . . . . . . . . . . . . . . . . . . . . . . . . . . . . . . . . . 28 Menu Button . . . . . . . . . . . . . . . . . . . . . . . . . . . . . . . . . . . . . . . . . . . . . . . . . . . . . . . . . . . 28 OK Button . . . . . . . . . . . . . . . . . . . . . . . . . . . . . . . . . . . . . . . . . . . . . . . . . . . . . . . . . . . . . 28
Cancel Button . . . . . . . . . . . . . . . . . . . . . . . . . . . . . . . . . . . . . . . . . . . . . . . . . . . . . . . . . . 28
Quick Guide for Using the Image LCD and Digital Buttons . . . . . . . . . . . . . . . . . . . . . . . . . . . .29 Power Button . . . . . . . . . . . . . . . . . . . . . . . . . . . . . . . . . . . . . . . . . . . . . . . . . . . . . . . . . . . . . . .30
Ports and Jacks . . . . . . . . . . . . . . . . . . . . . . . . . . . . . . . . . . . . . . . . . . . . . . . . . . . . . . . . . . . . .31
Lens Sync Cable Jack . . . . . . . . . . . . . . . . . . . . . . . . . . . . . . . . . . . . . . . . . . . . . . . . . . . 31 IEEE 1394 Port . . . . . . . . . . . . . . . . . . . . . . . . . . . . . . . . . . . . . . . . . . . . . . . . . . . . . . . . . 31
Flash Sync Cable Jack . . . . . . . . . . . . . . . . . . . . . . . . . . . . . . . . . . . . . . . . . . . . . . . . . . . 31
|
|
|
|
|
Next |
|
|
Contents-2 |
|
Contents |
|
Back |
|
|
Index |
||
|
|
|
|
|
|
|
|
|
|
|
|
|
|
|
|
|
|

Table of Contents
Battery Connection Jack. . . . . . . . . . . . . . . . . . . . . . . . . . . . . . . . . . . . . . . . . . . . . . . . . . 31
Remote Shutter Release Port. . . . . . . . . . . . . . . . . . . . . . . . . . . . . . . . . . . . . . . . . . . . . . 32
S-Video Output Port . . . . . . . . . . . . . . . . . . . . . . . . . . . . . . . . . . . . . . . . . . . . . . . . . . . . . 32
The Basics . . . . . . . . . . . . . . . . . . . . . . . . . . . . . . . . . . . . . . . . . . . . . . . . . . . . . . . . . . 33
Assembling the Camera . . . . . . . . . . . . . . . . . . . . . . . . . . . . . . . . . . . . . . . . . . . . . . . . . . . . . . .33 Connecting the DCS Pro Back Plus to the Camera Body and Accessories . . . . . . . . . . . . . . . .34 MAMIYA Interface Plate . . . . . . . . . . . . . . . . . . . . . . . . . . . . . . . . . . . . . . . . . . . . . . . . . . 34 Connecting the DCS Pro Back Plus to the Camera Body . . . . . . . . . . . . . . . . . . . . . . . . 35 Disconnecting the DCS Pro Back Plus from the Camera Body . . . . . . . . . . . . . . . . . . . . 37 Connecting the Camera Lens . . . . . . . . . . . . . . . . . . . . . . . . . . . . . . . . . . . . . . . . . . . . . . 38 Connecting Flash/Strobe Units . . . . . . . . . . . . . . . . . . . . . . . . . . . . . . . . . . . . . . . . . . . . . 39 Image Files . . . . . . . . . . . . . . . . . . . . . . . . . . . . . . . . . . . . . . . . . . . . . . . . . . . . . . . . . . . . . . . . .40 Storing Images . . . . . . . . . . . . . . . . . . . . . . . . . . . . . . . . . . . . . . . . . . . . . . . . . . . . . . . . . . . . . .41 Compact Flash (CF) Cards . . . . . . . . . . . . . . . . . . . . . . . . . . . . . . . . . . . . . . . . . . . . . . . . . . . .42
Inserting a CF Card . . . . . . . . . . . . . . . . . . . . . . . . . . . . . . . . . . . . . . . . . . . . . . . . . . . . . 43
Ejecting a CF Card . . . . . . . . . . . . . . . . . . . . . . . . . . . . . . . . . . . . . . . . . . . . . . . . . . . . . . 44 Selecting a CF Card or Folder . . . . . . . . . . . . . . . . . . . . . . . . . . . . . . . . . . . . . . . . . . . . . 45
Accessing Images on a CF Card . . . . . . . . . . . . . . . . . . . . . . . . . . . . . . . . . . . . . . . . . . . 46
Formatting a CF Card . . . . . . . . . . . . . . . . . . . . . . . . . . . . . . . . . . . . . . . . . . . . . . . . . . . . 47 Recovering Data on a CF Card . . . . . . . . . . . . . . . . . . . . . . . . . . . . . . . . . . . . . . . . . . . . 48
Configuring Your Camera . . . . . . . . . . . . . . . . . . . . . . . . . . . . . . . . . . . . . . . . . . . . . . 49
|
|
|
|
|
Next |
|
|
Contents-3 |
|
Contents |
|
Back |
|
|
Index |
||
|
|
|
|
|
|
|
|
|
|
|
|
|
|
|
|
|
|

Table of Contents
Setting the Date and Time . . . . . . . . . . . . . . . . . . . . . . . . . . . . . . . . . . . . . . . . . . . . . . . . . . . . .49
Setting Camera Properties . . . . . . . . . . . . . . . . . . . . . . . . . . . . . . . . . . . . . . . . . . . . . . . . . . . . .50
Displaying the Properties Menu . . . . . . . . . . . . . . . . . . . . . . . . . . . . . . . . . . . . . . . . . . . . 50
Setting Battery Save Onset . . . . . . . . . . . . . . . . . . . . . . . . . . . . . . . . . . . . . . . . . . . . . . . 51
Setting Display Off Time . . . . . . . . . . . . . . . . . . . . . . . . . . . . . . . . . . . . . . . . . . . . . . . . . . 51
Total Actuations . . . . . . . . . . . . . . . . . . . . . . . . . . . . . . . . . . . . . . . . . . . . . . . . . . . . . . . . 52
Use Folder01 . . . . . . . . . . . . . . . . . . . . . . . . . . . . . . . . . . . . . . . . . . . . . . . . . . . . . . . . . . 52
Video Format . . . . . . . . . . . . . . . . . . . . . . . . . . . . . . . . . . . . . . . . . . . . . . . . . . . . . . . . . . 53
Video Signal . . . . . . . . . . . . . . . . . . . . . . . . . . . . . . . . . . . . . . . . . . . . . . . . . . . . . . . . . . . 53
Using the Camera Connected to a Computer . . . . . . . . . . . . . . . . . . . . . . . . . . . . . . . 54
Getting Started . . . . . . . . . . . . . . . . . . . . . . . . . . . . . . . . . . . . . . . . . . . . . . . . . . . . . . . . . . . . . .54 Connecting the Camera to the Computer and Power Supply . . . . . . . . . . . . . . . . . . . . . . . . . .55 AC Adapter . . . . . . . . . . . . . . . . . . . . . . . . . . . . . . . . . . . . . . . . . . . . . . . . . . . . . . . . . . . . 55 Connecting to a Computer with Two IEEE 1394 Ports . . . . . . . . . . . . . . . . . . . . . . . . . . . 56
Connecting to a Computer with a Single IEEE 1394 Port. . . . . . . . . . . . . . . . . . . . . . . . . 57
Connecting to a Computer and Using Battery Power . . . . . . . . . . . . . . . . . . . . . . . . . . . . 58 Powering Your Camera . . . . . . . . . . . . . . . . . . . . . . . . . . . . . . . . . . . . . . . . . . . . . . . . . . . . . . .59
Using the Camera in Portable Mode . . . . . . . . . . . . . . . . . . . . . . . . . . . . . . . . . . . . . . 60
Getting Started . . . . . . . . . . . . . . . . . . . . . . . . . . . . . . . . . . . . . . . . . . . . . . . . . . . . . . . . . . . . . .60
Connecting to a Power Supply . . . . . . . . . . . . . . . . . . . . . . . . . . . . . . . . . . . . . . . . . . . . . . . . . .61 Connecting to a Compatible Third Party Battery . . . . . . . . . . . . . . . . . . . . . . . . . . . . . . . 61
|
|
|
|
|
Next |
|
|
Contents-4 |
|
Contents |
|
Back |
|
|
Index |
||
|
|
|
|
|
|
|
|
|
|
|
|
|
|
|
|
|
|

Table of Contents
Connecting to the AC Adapter . . . . . . . . . . . . . . . . . . . . . . . . . . . . . . . . . . . . . . . . . . . . . 62 Turning the Camera On and Off . . . . . . . . . . . . . . . . . . . . . . . . . . . . . . . . . . . . . . . . . . . . 62 Conserving Batteries . . . . . . . . . . . . . . . . . . . . . . . . . . . . . . . . . . . . . . . . . . . . . . . . . . . . 63 Battery Save State . . . . . . . . . . . . . . . . . . . . . . . . . . . . . . . . . . . . . . . . . . . . . . . . . . . . . . 63
Capturing Images . . . . . . . . . . . . . . . . . . . . . . . . . . . . . . . . . . . . . . . . . . . . . . . . . . . . 64
Overview . . . . . . . . . . . . . . . . . . . . . . . . . . . . . . . . . . . . . . . . . . . . . . . . . . . . . . . . . . . . . . . . . .64
Formatting Images . . . . . . . . . . . . . . . . . . . . . . . . . . . . . . . . . . . . . . . . . . . . . . . . . . . . . . . . . . .65
Intervalometer . . . . . . . . . . . . . . . . . . . . . . . . . . . . . . . . . . . . . . . . . . . . . . . . . . . . . . . . . . . . . .66
Intervalometer Options . . . . . . . . . . . . . . . . . . . . . . . . . . . . . . . . . . . . . . . . . . . . . . . . . . . 67
Using the Image LCD . . . . . . . . . . . . . . . . . . . . . . . . . . . . . . . . . . . . . . . . . . . . . . . . . |
68 |
Reviewing Images . . . . . . . . . . . . . . . . . . . . . . . . . . . . . . . . . . . . . . . . . . . . . . . . . . . . . . . . . . .68 Selecting a Display Mode . . . . . . . . . . . . . . . . . . . . . . . . . . . . . . . . . . . . . . . . . . . . . . . . . 68 Single Image Display Mode . . . . . . . . . . . . . . . . . . . . . . . . . . . . . . . . . . . . . . . . . . . . . . . 69 Zoom Display Mode . . . . . . . . . . . . . . . . . . . . . . . . . . . . . . . . . . . . . . . . . . . . . . . . . . . . . 69 Histogram Display Mode. . . . . . . . . . . . . . . . . . . . . . . . . . . . . . . . . . . . . . . . . . . . . . . . . . 71
Multiple Image Display Mode . . . . . . . . . . . . . . . . . . . . . . . . . . . . . . . . . . . . . . . . . . . . . . 71
Image Delete Display Mode . . . . . . . . . . . . . . . . . . . . . . . . . . . . . . . . . . . . . . . . . . . . . . . 72 Status Bar . . . . . . . . . . . . . . . . . . . . . . . . . . . . . . . . . . . . . . . . . . . . . . . . . . . . . . . . . . . . . 73
Location Bar . . . . . . . . . . . . . . . . . . . . . . . . . . . . . . . . . . . . . . . . . . . . . . . . . . . . . . . . . . . 73
Navigating through Displayed Images . . . . . . . . . . . . . . . . . . . . . . . . . . . . . . . . . . . . . . . 74 Deleting Groups of Images . . . . . . . . . . . . . . . . . . . . . . . . . . . . . . . . . . . . . . . . . . . . . . . . . . . . .75
|
|
|
|
|
Next |
|
|
Contents-5 |
|
Contents |
|
Back |
|
|
Index |
||
|
|
|
|
|
|
|
|
|
|
|
|
|
|
|
|
|
|

Table of Contents
Display Contrast . . . . . . . . . . . . . . . . . . . . . . . . . . . . . . . . . . . . . . . . . . . . . . . . . . . . . . . . . . . . .76
Overexposure Indicator . . . . . . . . . . . . . . . . . . . . . . . . . . . . . . . . . . . . . . . . . . . . . . . . . . . . . . .76
Tagging Images . . . . . . . . . . . . . . . . . . . . . . . . . . . . . . . . . . . . . . . . . . . . . . . . . . . . . . . . . . . . .77
Caring for Your DCS Pro Back Plus . . . . . . . . . . . . . . . . . . . . . . . . . . . . . . . . . . . . . . |
78 |
Cleaning . . . . . . . . . . . . . . . . . . . . . . . . . . . . . . . . . . . . . . . . . . . . . . . . . . . . . . . . . . . . . . . . . . .78 Cleaning the DCS Pro Back Plus . . . . . . . . . . . . . . . . . . . . . . . . . . . . . . . . . . . . . . . . . . . 78 Cleaning the IR or Anti-aliasing Filter . . . . . . . . . . . . . . . . . . . . . . . . . . . . . . . . . . . . . . . . 78 Storing . . . . . . . . . . . . . . . . . . . . . . . . . . . . . . . . . . . . . . . . . . . . . . . . . . . . . . . . . . . . . . . . . . . .79 Firmware . . . . . . . . . . . . . . . . . . . . . . . . . . . . . . . . . . . . . . . . . . . . . . . . . . . . . . . . . . . . . . . . . .81 Checking the Current Firmware Version. . . . . . . . . . . . . . . . . . . . . . . . . . . . . . . . . . . . . . 81 Updating Firmware . . . . . . . . . . . . . . . . . . . . . . . . . . . . . . . . . . . . . . . . . . . . . . . . . . . . . . 82
Specifications . . . . . . . . . . . . . . . . . . . . . . . . . . . . . . . . . . . . . . . . . . . . . . . . . . . . . . . . 83
Unsupported Features . . . . . . . . . . . . . . . . . . . . . . . . . . . . . . . . . . . . . . . . . . . . . . . . . 84
Unsupported or Partially Supported Features (HASSELBLAD Cameras) . . . . . . . . . . . . . . . . .84
Unsupported or Partially Supported Features (MAMIYA RZ67 PRO II) . . . . . . . . . . . . . . . . . . .85
Using an S-Video Monitor . . . . . . . . . . . . . . . . . . . . . . . . . . . . . . . . . . . . . . . . . . . . . . 86
Connecting . . . . . . . . . . . . . . . . . . . . . . . . . . . . . . . . . . . . . . . . . . . . . . . . . . . . . . . . . . . . . . . . .86
Enabling . . . . . . . . . . . . . . . . . . . . . . . . . . . . . . . . . . . . . . . . . . . . . . . . . . . . . . . . . . . . . . . . . . .87
Disabling . . . . . . . . . . . . . . . . . . . . . . . . . . . . . . . . . . . . . . . . . . . . . . . . . . . . . . . . . . . . . . . . . . .87
|
|
|
|
|
Next |
|
|
Contents-6 |
|
Contents |
|
Back |
|
|
Index |
||
|
|
|
|
|
|
|
|
|
|
|
|
|
|
|
|
|
|

Table of Contents
Navigating Through Images . . . . . . . . . . . . . . . . . . . . . . . . . . . . . . . . . . . . . . . . . . . . . . . . . . . .87
Warnings and Cautions . . . . . . . . . . . . . . . . . . . . . . . . . . . . . . . . . . . . . . . . . . . . . . . . 88
Glossary . . . . . . . . . . . . . . . . . . . . . . . . . . . . . . . . . . . . . . . . . . . . . . . . . . . . . . . . . . . . 89
Warranty . . . . . . . . . . . . . . . . . . . . . . . . . . . . . . . . . . . . . . . . . . . . . . . . . . . . . . . . . . . 93
|
|
|
|
|
Next |
|
|
Contents-7 |
|
Contents |
|
Back |
|
|
Index |
||
|
|
|
|
|
|
|
|
|
|
|
|
|
|
|
|
|
|

Overview
About This Manual
This manual describes the functions available with the KODAK PROFESSIONAL DCS Pro Back Plus (DCS Pro Back Plus). It does not describe the following:
!Functions available with the HASSELBLAD 555ELD, 553ELX, 503CXi, 503CW, or MAMIYA RZ67 PRO II camera bodies, except to point out unsupported features (page 84). Refer to the manual included with your HASSELBLAD or MAMIYA camera body.
!Functions in the KODAK PROFESSIONAL DCS Capture Studio, DCS Photo Desk, or
DCS Camera Manager software that open, edit and convert images from your DCS Pro Back Plus. Refer to the user’s manuals or
Help on the software CDs.
This is an on-line manual. Click the following items to jump to the associated topic:
!Entries in the Table of Contents or Index
!Page numbers underlined in blue
!The Contents, Back, Next, or Index buttons
In this manual, the term “camera” refers to the camera body with attached DCS Pro Back Plus.
Some menu screens (page 26) have OK and Cancel choices. These choices are implemented by pressing the OK or Cancel digital buttons
(page 28).
|
|
|
|
|
Next |
|
|
8 |
|
Contents |
|
Back |
|
|
Index |
||
|
|
|
|
|
|
|
|
|

Overview
Introduction
Thank you for purchasing the KODAK PROFESSIONAL DCS Pro Back Plus. This digital camera back attaches to the following camera bodies:
!HASSELBLAD 555ELD, 553ELX, 503CXi, and 503CW
!MAMIYA RZ67 PRO II (when used with the optional KODAK PROFESSIONAL DCS Pro Back Plus RZ Interface Kit)
The DCS Pro Back Plus is interchangeable with the camera body’s film magazine. You can use the camera body for digital or film photography.
If you use a HASSELBLAD 503CXi or 503CW camera body, you must use the HASSELBLAD Winder CW and the KODAK PROFESSIONAL DCS Pro Back Plus 503CW/CXi Cable Assembly (EK Cat. Number 195 3736).
If you use a HASSELBLAD 553ELX camera body, you must use the KODAK PROFESSIONAL DCS Pro Back Plus 553ELX Cable Assembly (EK Cat Number 837 1205).
|
|
|
|
|
Next |
|
|
9 |
|
Contents |
|
Back |
|
|
Index |
||
|
|
|
|
|
|
|
|
|

Overview
The DCS Pro Back Plus is designed for studio and portable use. Take care to avoid inclement weather.
You can use the DCS Pro Back Plus connected to a MACINTOSH computer (page 54), a PC, or in portable mode (page 60).
When connected to a computer, use the included AC adapter as the power source. Power is supplied to the DCS Pro Back Plus through the IEEE 1394 cable. If the included Capture Studio software is running, images are saved on the computer. If the software is not running, images are saved on a Compact Flash Card (CF Card).
When used in portable mode, you must supply the DCS Pro Back Plus power from a battery. Suitable batteries may be obtained from these
Web sites: DIGITAL CAMERA BATTERY
(www.digitalcamerabattery.com) or QUANTUM INSTRUMENTS Inc. (www.qtm.com.)
|
|
|
|
|
Next |
|
|
10 |
|
Contents |
|
Back |
|
|
Index |
||
|
|
|
|
|
|
|
|
|
Overview
Features
!16 Megapixel imager (4080 x 4080 pixels)
!Untethered burst rate: 1 image / 2 seconds, burst depth: 6 images (varies depending on image content and type of Compact Flash Card)
!ISO:100
!Removable IR filter
!Image Display LCD with two-position viewing (vertical and 45°) provides image thumbnails and status of digital features
!S-Video output jack for viewing images on an external monitor (not included)
!Remote Shutter Release jack for connection to HASSELBLAD camera bodies 553ELX, 503CXi, and 503CW (cables not included)
!Power source
When connected to computer: From included AC adapter
When in portable mode: Battery pack from DIGITAL CAMERA BATTERY, QUANTUM INSTRUMENTS Inc. or other third party vendor.
!Two slots for Type II Compact Flash Cards, each slot with a card-busy LED
!Images can be edited using DCS Capture Studio or DCS Photo Desk software (included with DCS Pro Back Plus)
!400 Mbps IEEE 1394 interface
|
|
|
|
|
Next |
|
|
11 |
|
Contents |
|
Back |
|
|
Index |
||
|
|
|
|
|
|
|
|
|

Overview
System Requirements
In addition to items included with the DCS Pro Back Plus, your camera body and its accessories, the following items are required:
When in Portable Mode
!Battery pack and cable from DIGITAL CAMERA BATTERY or from QUANTUM INSTRUMENTS Inc. Refer to their web sites for model numbers and ordering information: www.digitalcamerabattery.com or www.qtm.com
!QUANTUM battery cable adapter: QUANTUM INSTRUMENTS part MDC3
!Compact Flash Cards
!Card reader
"To process the images, you need a computer with an operating system and RAM as described in the following sections.
When Connected to a MACINTOSH
!Mac OS 9.1 or higher (with CarbonLib 1.5 or higher) or Mac OS 10.2.3 or higher
!MACINTOSH or compatible with POWERPC G3 processor (G4 recommended)
!256 MB RAM (512 MB recommended)
!200 MB free disk space
!Free IEEE 1394 port for tethered camera operation
|
|
|
|
|
Next |
|
|
12 |
|
Contents |
|
Back |
|
|
Index |
||
|
|
|
|
|
|
|
|
|

Overview
When Connected to a PC
!WINDOWS 2000 or WINDOWS XP
!WINDOWS/INTEL PC with 266 MHz PENTIUM II processor
!256 MB RAM (512 MB recommended)
!200 MB free disk space
!IEEE 1394 OHCI compatible adapter with a free port for tethered camera operation
!1024 pixel by 768 pixel display
If your PC does not have IEEE 1394 ports, you need an IEEE 1394 card with dual ports or an
IEEE 1394 card with a single port and an IEEE 1394 hub. If you do not have an IEEE 1394 hub and you have a computer with a single IEEE
1394 port, you must operate the DCS Pro Back Plus using battery power.
|
|
|
|
|
Next |
|
|
13 |
|
Contents |
|
Back |
|
|
Index |
||
|
|
|
|
|
|
|
|
|

Overview
Electromagnetic Emissions
Japan
This is a Class A product based on the standard of the Voluntary Control Council for Interference by Information Technology Equipment (VCCI). If this equipment is used in a domestic environment, radio disturbance may arise. When such trouble occurs, the user may be required to take corrective action.
Taiwan
|
|
|
|
|
Next |
|
|
14 |
|
Contents |
|
Back |
|
|
Index |
||
|
|
|
|
|
|
|
|
|

Overview
European Union (EU)
Warning:
This is a class A product. In a domestic environment this product may cause radio interference in which case the user may be required to take adequate measures.
USA
NOTE: This equipment has been tested and found to comply with the limits for a Class A digital device, pursuant to part 15 of the FCC rules. These limits are designed to provide reasonable protection against harmful interference when the equipment is operated in a commercial environment. This equipment generates, uses and can radiate radio frequency energy and, if not installed and used in accordance with the instruction manual, may cause harmful interference to radio communications. Operation of this equipment in a residential area is likely to cause harmful interference in which case the user will be required to correct the interference at his own expense.
|
|
|
|
|
Next |
|
|
15 |
|
Contents |
|
Back |
|
|
Index |
||
|
|
|
|
|
|
|
|
|
About the DCS Pro Back Plus
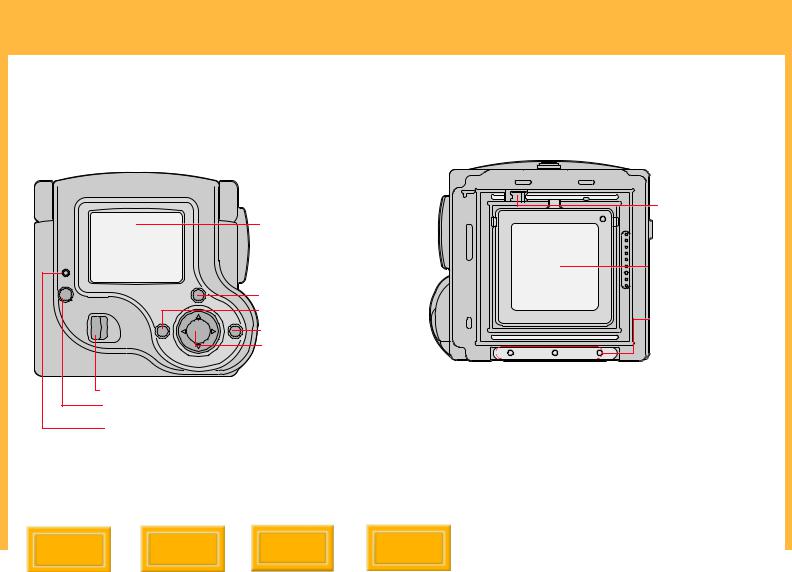
Overview
Rear |
Front (Attaches to Camera Body) |
CANCEL
PWR
MENU |
OK |
DCS Pro Back Plus
Image LCD Tilt Latch
Power button
Camera Ready LED
Image LCD
Cancel button Menu button OK button Four-way switch
Filter latch |
IR Filter * |
Slots for |
connecting to |
camera body |
or MAMIYA |
Interface Plate |
* To obtain correct focus you must use either an IR filter (included) or an anti-aliasing filter
(available as an accessory).
|
|
|
|
|
Next |
|
Index |
16 |
|
Contents |
|
Back |
|
|
|||
|
|
|
|
|
|
|
|
|

About the DCS Pro Back Plus
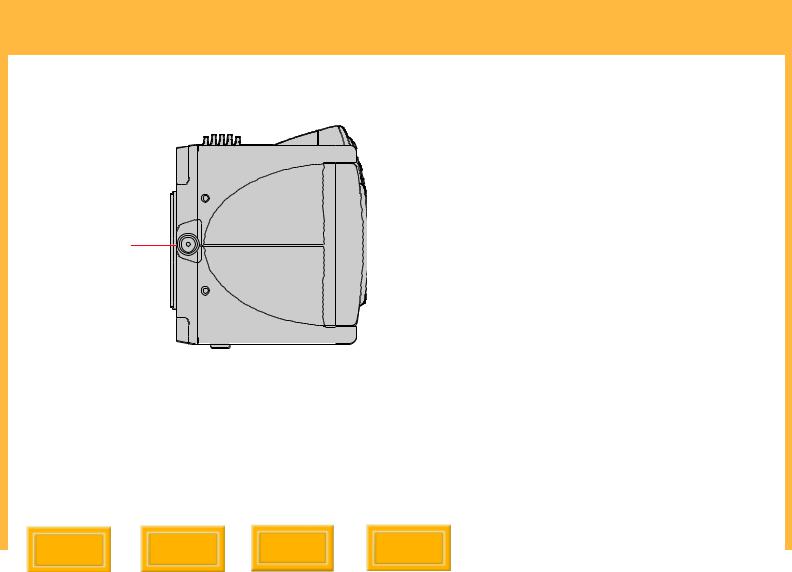
Sides
Lens Sync Cable  jack
jack
Flash Sync Cable jack
IEEE 1394 Port
Battery Connection jack
Card2 Busy LED
Card1 Eject button


 Remote Shutter Release jack
 Card2 slot

 Card1 slot

 Card door
S-Video Output |
jack |
Card1 Busy LED |
Card2 Eject button |
|
|
|
|
|
Next |
|
Index |
17 |
|
Contents |
|
Back |
|
|
|||
|
|
|
|
|
|
|
|
|
About the DCS Pro Back Plus
Top
DCS Pro Back Plus Release button with safety release catch
Imager
The imager converts light into electrical charges when you capture an image. Its specifications are noted below:
Horizontal pixels: |
4080 |
Vertical pixels: |
4080 |
Total pixels: |
16,646,400 |
Horizontal active area (mm): |
36.72 |
Vertical active area (mm): |
36.72 |
The imager is located behind the IR or antialiasing filter (page 20).
|
|
|
|
|
Next |
|
Index |
18 |
|
Contents |
|
Back |
|
|
|||
|
|
|
|
|
|
|
|
|

About the DCS Pro Back Plus
Focus Screen Overlay
The viewfinder’s field of view is greater than that of the imager. Therefore, an apparent focal length magnification or telephoto effect appears in the captured image.
Five viewfinder overlays are included with the DCS Pro Back Plus. Each indicates the scene content that is actually captured. Each overlay has crop indicators which indicate the view captured when you choose an Image Format option (page 65).
Applying an Overlay
1Remove the viewfinder from the camera body.
2Lay a Focus Screen overlay over the focus screen.
3Replace the viewfinder.
|
|
|
|
|
|
|
|
|
|
|
|
|
|
|
|
|
|
|
|
|
|
|
|
|
|
|
|
|
|
|
|
|
|
|
|
|
|
|
|
|
|
|
|
|
|
|
|
|
|
|
|
|
|
|
|
|
|
|
|
|
|
|
|
|
|
Contents |
|
Back |
|
Next |
|
Index |
19 |
||||
|
|
|
|
|
|
|
|
|
|
|
|
|

About the DCS Pro Back Plus
IR Filter
A removable (page 21) IR filter is included with the DCS Pro Back Plus. This filter, which is installed in front of the imager, maintains proper focus, filters out infrared light to improve image quality, and helps protect the imager’s coverglass.
"For proper focus, you must use either the IR filter or the anti-aliasing filter.
Anti-aliasing Filter
You can replace the IR filter with an anti-aliasing filter which can be purchased separately from Kodak. The filter performs the IR filter functions and helps reduce aliasing at certain focal distances.
"The anti-aliasing filter has a white dot in its upper-right corner. The IR filter does not.
|
|
|
|
|
Next |
|
Index |
20 |
|
Contents |
|
Back |
|
|
|||
|
|
|
|
|
|
|
|
|
About the DCS Pro Back Plus
Removing an IR or Anti-aliasing Filter
CAUTION:
The Anti-aliasing filter and IR filter are fragile devices and must be handled with care.
Slide the Filter latch to the right, then carefully remove the filter.
"Store the unused filter in the pocket of the included body cap (page 79).
Inserting a Filter
1Insert the two tabs at the bottom of the filter into the slots on the DCS Pro Back Plus.
2Gently press the top of the filter into place until it is latched.
|
|
|
|
|
Next |
|
Index |
21 |
|
Contents |
|
Back |
|
|
|||
|
|
|
|
|
|
|
|
|

About the DCS Pro Back Plus
Image LCD
There is a two-inch diagonal Image LCD on the rear of the DCS Pro Back Plus where you can view images and change settings.
When an S-Video monitor (page 86) is in use, the
Image LCD turns off. (Pressing the OK, Cancel, or Menu buttons (page 28) restores the display to the Image LCD and disables the external monitor.)
How the Image LCD Works
You can view images on the Image LCD in a variety of display modes. You can also access options from the Menu bar and from menus which are accessible from the Menu bar.
Access the options on the Image LCD in a hierarchical manner:
Display mode (page 68): Appears when you turn the Image LCD on
Menu bar (page 24): Accessible from Display mode
Menus (page 25): Accessible from the Menu bar
|
|
|
|
|
Next |
|
Index |
22 |
|
Contents |
|
Back |
|
|
|||
|
|
|
|
|
|
|
|
|

About the DCS Pro Back Plus
Turning the Image LCD On and Off
1Power the DCS Pro Back Plus by battery (page 61) or AC Adapter (page 55).
2Press the OK button to turn the Image LCD on.
3Press the Cancel button to turn the Image LCD off. If the LCD is not in Display mode, press the Cancel button more than once.
Tilting the Image LCD
Slide the Image LCD Tilt Latch and tilt the LCD to a 45° angle for easier viewing, if needed.
Slide the latch and gently press to return the tilted section to its original position.
|
|
|
|
|
Next |
|
Index |
23 |
|
Contents |
|
Back |
|
|
|||
|
|
|
|
|
|
|
|
|

About the DCS Pro Back Plus
Menu Bar
The Menu bar is available in any Display mode (page 68) except Zoom mode when the Region of Interest box is disabled. The Menu bar appears on the Image LCD and contains icons which access various digital functions.
Folder icon
Menu icon
Status screen icon
Video icon (appears when Video is enabled) Tag icon
Contrast icon
Displaying and Navigating the Menu Bar
1Turn the Image LCD on (page 23).
2Press the Menu button to turn the Menu bar on.
3Press the left or right side of the Four-way switch to highlight the needed Menu bar icon.
4Press the Cancel button or Menu button to turn the Menu bar off.
|
|
|
|
|
Next |
|
Index |
24 |
|
Contents |
|
Back |
|
|
|||
|
|
|
|
|
|
|
|
|

About the DCS Pro Back Plus
Menus
Many DCS Pro Back Plus functions can be accessed through the menus on the Image LCD.
Making a Menu Selection
1Navigate the Menu bar (page 24) until the Folder or Menu icon is highlighted.
The appropriate menu appears.
2Press the top or bottom of the Four-way switch to highlight a menu option.
3Press the OK button to activate the option.
Additional screens may appear, depending on your choice.
4Repeat steps 2 and 3 for each screen. (If the choices are “horizontal” as in the example below, use the left or right of the Four-way switch when highlighting options.)
|
|
|
|
|
Next |
|
Index |
25 |
|
Contents |
|
Back |
|
|
|||
|
|
|
|
|
|
|
|
|

About the DCS Pro Back Plus
Menu Hierarchy
|
|
|
|
|
Next |
|
Index |
26 |
|
Contents |
|
Back |
|
|
|||
|
|
|
|
|
|
|
|
|

About the DCS Pro Back Plus
Status Screen
You can view information about the DCS Pro Back Plus on the Status screen.
Displaying the Status screen
Highlight the Status screen icon (page 24).
The Status screen appears with the following information:
|
|
|
|
|
|
|
|
|
c |
a |
|
|
|
|
|
|
|
|
d |
|
|
|
|||||||
|
|
|
|
|
|
|
|
||
b |
|
|
|
|
|
|
|
|
g |
e |
|
|
|
|
|
|
|
|
|
|
|
|
|
|
|
|
|
||
|
|
|
|
|
|
|
|
||
f |
|
|
|
|
|
|
|
|
|
|
|
|
|
|
|
|
|
|
a - Number of available images that can be captured to the active CF Card (page 42)
b - Fill level (in color) indicates the approximate amount of space available on the active card
c - Current image format - full frame, horizontal, or vertical (page 65)
d - Appears if the DCS Pro Back Plus is connected to a computer (page 55) and flashes if the Capture Studio software is not running
e - Indicates the active card if two are inserted (page 42)
f - Name of active folder and the number of images in that folder
g - Number of the currently selected image (page 74)
|
|
|
|
|
Next |
|
Index |
27 |
|
Contents |
|
Back |
|
|
|||
|
|
|
|
|
|
|
|
|

About the DCS Pro Back Plus
Digital Buttons
The Four-way switch and the OK, Cancel, and Menu buttons activate the digital functions.
Four-way Switch
Press the left or right side to:
!Navigate through images
!Navigate the Menu bar
!Move the Region of Interest box (Zoom mode)
Press the top or bottom to:
!Change the Display mode
!Navigate a drop-down menu
!Move the Region of Interest box (Zoom mode)
Menu Button
! Toggles the Menu bar off and on
OK Button
!Turns the Image LCD on
!Enables the Region of Interest box (Zoom mode)
!Implements a zoom when Region of Interest box is enabled
!Implements a highlighted menu option
!Deletes the active image (Delete mode)
!Turns the Overexposure indicator on
Cancel Button
!Exits from menus without applying any changes
!Turns the Image LCD off
!Disables the Region of Interest box (Zoom mode)
!Turns the Overexposure indicator off
|
|
|
|
|
Next |
|
Index |
28 |
|
Contents |
|
Back |
|
|
|||
|
|
|
|
|
|
|
|
|

About the DCS Pro Back Plus
Quick Guide for Using the Image LCD and Digital Buttons
The digital buttons take on different functions, depending on the current state of the Image LCD.
Turn the Image LCD on: |
Press the OK button. |
Select a highlighted menu option: |
Press the OK button. |
Enable Region of Interest box (Zoom mode): |
Press the OK button. |
Implement a zoom (Zoom mode): |
Press the OK button. |
Delete an image (Delete mode): |
Press the OK button. |
Toggle the Menu bar on/off: |
Press the Menu button. |
Turn the Image LCD off: |
Press the Cancel button. |
Dismiss a menu without implementing change: |
Press the Cancel button. |
Disable Region of Interest box (Zoom mode): |
Press the Cancel button. |
Navigate through images in all Display modes |
Press the left or right side of the Four-way switch. |
(except Zoom mode when Region of Interest |
|
box is enabled): |
|
Navigate the Menu bar and display menus: |
Press the left or right side of the Four-way switch. |
Navigate a drop-down menu: |
Press the top or bottom of the Four-way switch. |
Change to a different Display mode: |
Press the top or bottom of the Four-way switch. |
Move the Region of Interest box (Zoom mode): |
Press any edge of the Four-way switch. |
|
|
|
|
|
Next |
|
Index |
29 |
|
Contents |
|
Back |
|
|
|||
|
|
|
|
|
|
|
|
|

About the DCS Pro Back Plus
Power Button
The Power button turns the camera on and off when the camera is powered by a battery. This button does not function when the camera is powered by the IEEE 1394 connection.
The Camera Ready LED is illuminated when the DCS Pro Back Plus is receiving power.
Camera Ready LED
Power button
CANCEL
PWR
MENU |
OK |
DCS Pro Back Plus
|
|
|
|
|
Next |
|
Index |
30 |
|
Contents |
|
Back |
|
|
|||
|
|
|
|
|
|
|
|
|
Loading...