


NOVAJET 750
NovaJet 750 Printer
T
T
r
r
a
a
i
i
n
n
i
i
n
n
g
g
G
G
u
u
i
i
d
d
e
e
Ink Installation
Printer Calibrations
Routine Maintenance
Preventive Maintenance
Cartridge Checklist
Advanced Troubleshooting
Print Server Networking

NJ750 Training Guide
2
Installed needle assembly
Do not break connection when installing
new cartridge
25 ml inside - preprimed
A. Ink Installation
1. ‘Plug and Play Cartridge’ characteristics
2. Installing ink into reservoirs
It is suggested to fill reservoirs over a table to prevent spills on printer; fill to a
maximum of 400 ml (50 ml minimum).
3. Attach septum fitting to valve body. Prime line (and cartridge if
necessary).
NOTE: When the valve body is raised to the up
position ink flow is cut off, when the valve body (latch)
is closed then the ink line is open.

NJ750 Training Guide
3
a) Prime line using the short needles
(purple in color); attach short needle
to each of the 4 valves. Connect
septum needle to EasyPrime by
inserting into female receiver.
Depress and hold EasyPrime
activation button to provide a solid
burst, wait 20 seconds, or until ink
line is full.
b) Lift valve actuator (to up postion)
and remove purple septum needle
assembly.
c) Connect cartridge’s septum needle to valve and close valve – wait 60 seconds
then remove the blue tape from cartridge jet plate.
NOTE: If attempting to recharge an
existing cartridge, then disconnect
cartridge from stall position and
prime cartridge (print head) using
multiple sets of one-second bursts
until ink is visible in the ink line.
This may take 1-2 minutes to
accomplish depending on the
prime of entire ink line. Ensure
EasyPrime adapter is flush to
cartridge jet plate – a siphoning
sound (slight sucking) should be
heard when priming the cartridge
properly.
4. Activate the color test pattern for ink starvation problems.
Select: SETUP MENU – PRINT MODE MENU – PRINT PASSES – SELECT 3, OK.
Select: UTILITY MENU – SERVICE MENU – DIAGNOSTICS – COLOR TEST MENU –
STALL SELECT (or ALL COLORS)– choose color. Select DENSITY SELECT to 100%.
Select COLOR TEST PRINT. Verify color bar is printed without ink starvation.
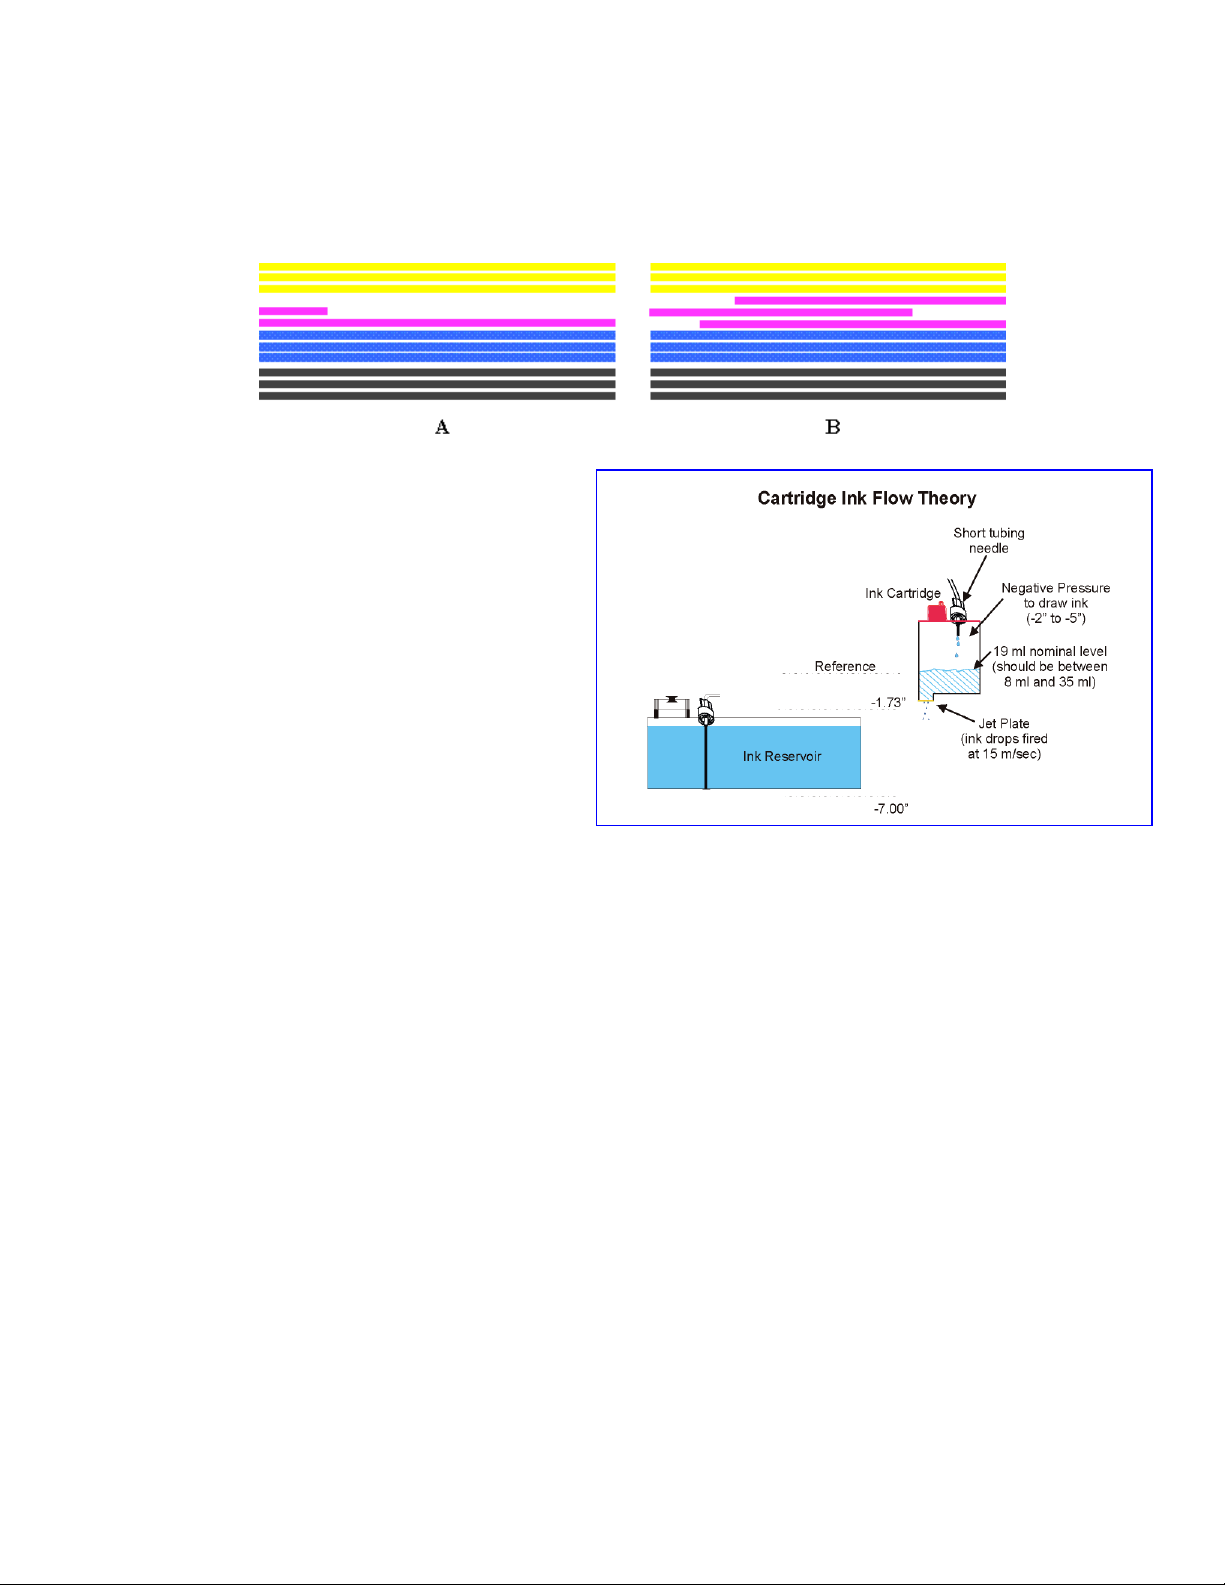
Ink Test/Recovery Procedure
(Color Test Print)
This is a pressure test of the
system, so please disregard the
two-pass quality. Each pass of
the carriage assembly should lay
NJ750 Training Guide
4
down a solid band of color with 33% ink load.
Color Test Failures:
- Example A above depicts
complete ink starvation in magenta.
This problem may be corrected by
using the EasyPrime and
establishing the required pressure
inside the cartridge. Replace
septum connector/needle if repeated
attempts continue to fail.
- Example B above depicts partial
ink starvation in magenta (ink fires
at 100% at the beginning of each
pass but then starves). This
problem can be corrected by
ensuring 19 ml of ink is present
inside the cartridge (level must be between 8 ml and 35 ml for proper operation – refer to
NOTE below).
NOTE: To install ink into a cartridge or to verify proper cartridge ink level obtain syringe
with tube extension from accessory kit. Pull 20 ml of ink into syringe. Lift cartridge stall
position valve to up position to cut off ink flow. Temporarily remove septum connector
from cartridge. Install ink into cartridge by depressing syringe plunger; pull back on
plunger to remove excess ink (if any). Reconnect septum needle to cartridge and close
valve actuator (lower) to restore ink flow to cartridge. The cartridge will need to be primed
to restore negative pressure inside cartridge – refer to step 3 above.
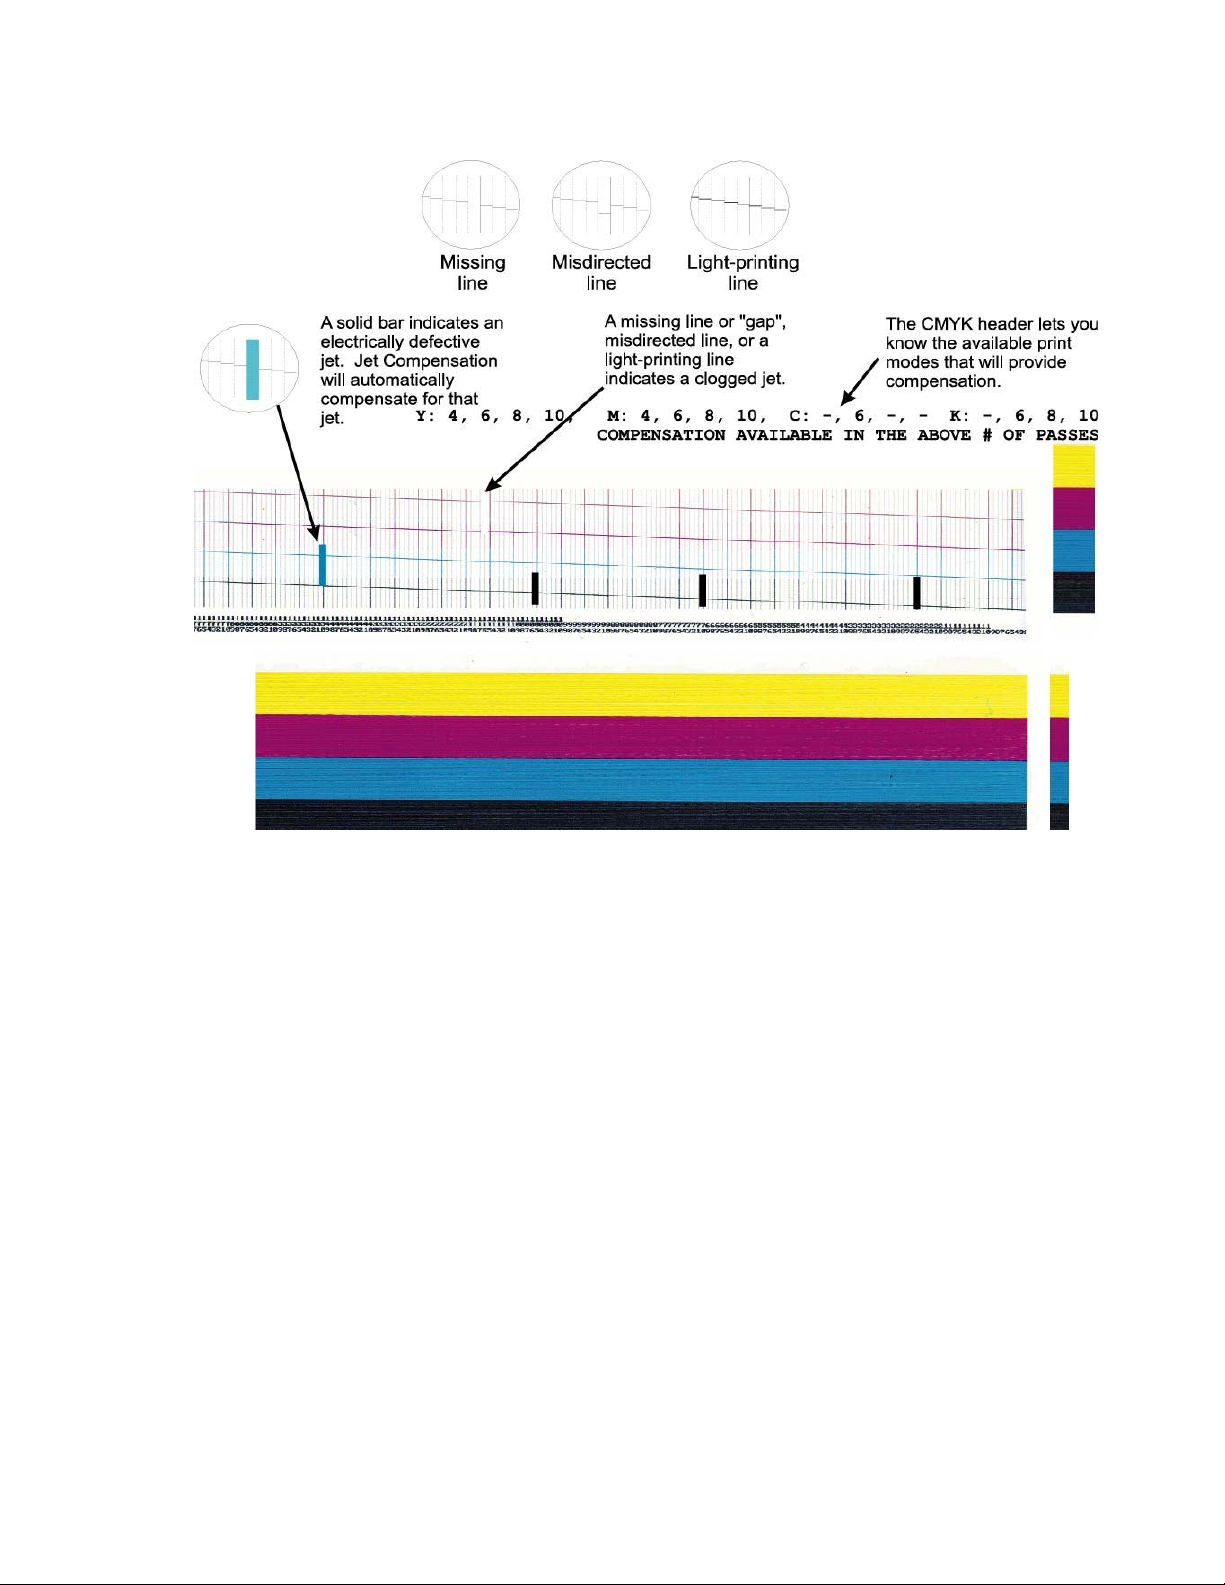
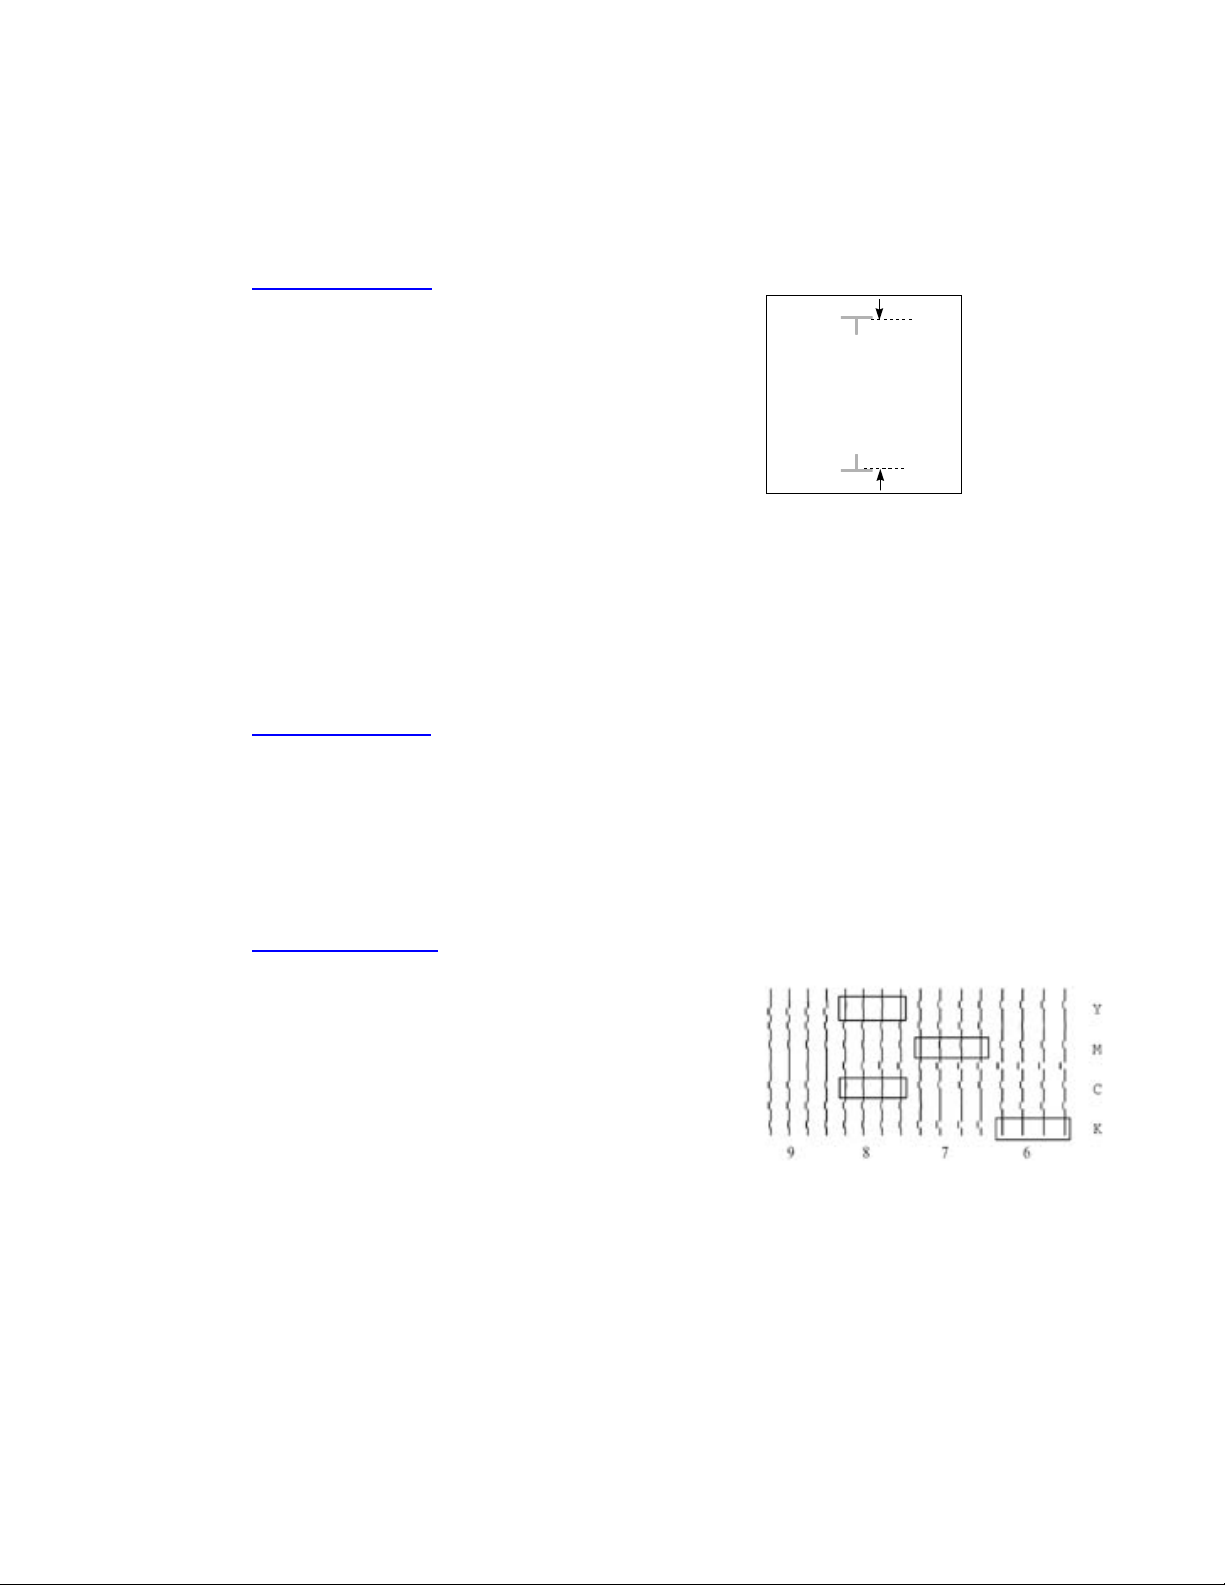
5. Activate the Prime pattern.
Select UTILITY MENU – PRIME. Verify all colors are printed. Verify no clogs are
present in the prime pattern. Manual or automatic jet compensation is provided up
to 20 jets in each cartridge. Ensure the integrity of the diagonal lines are
consistent and smooth. Clean or replace cartridge if unsatisfactory.
NJ750 Training Guide
5
NJ750 Training Guide
6
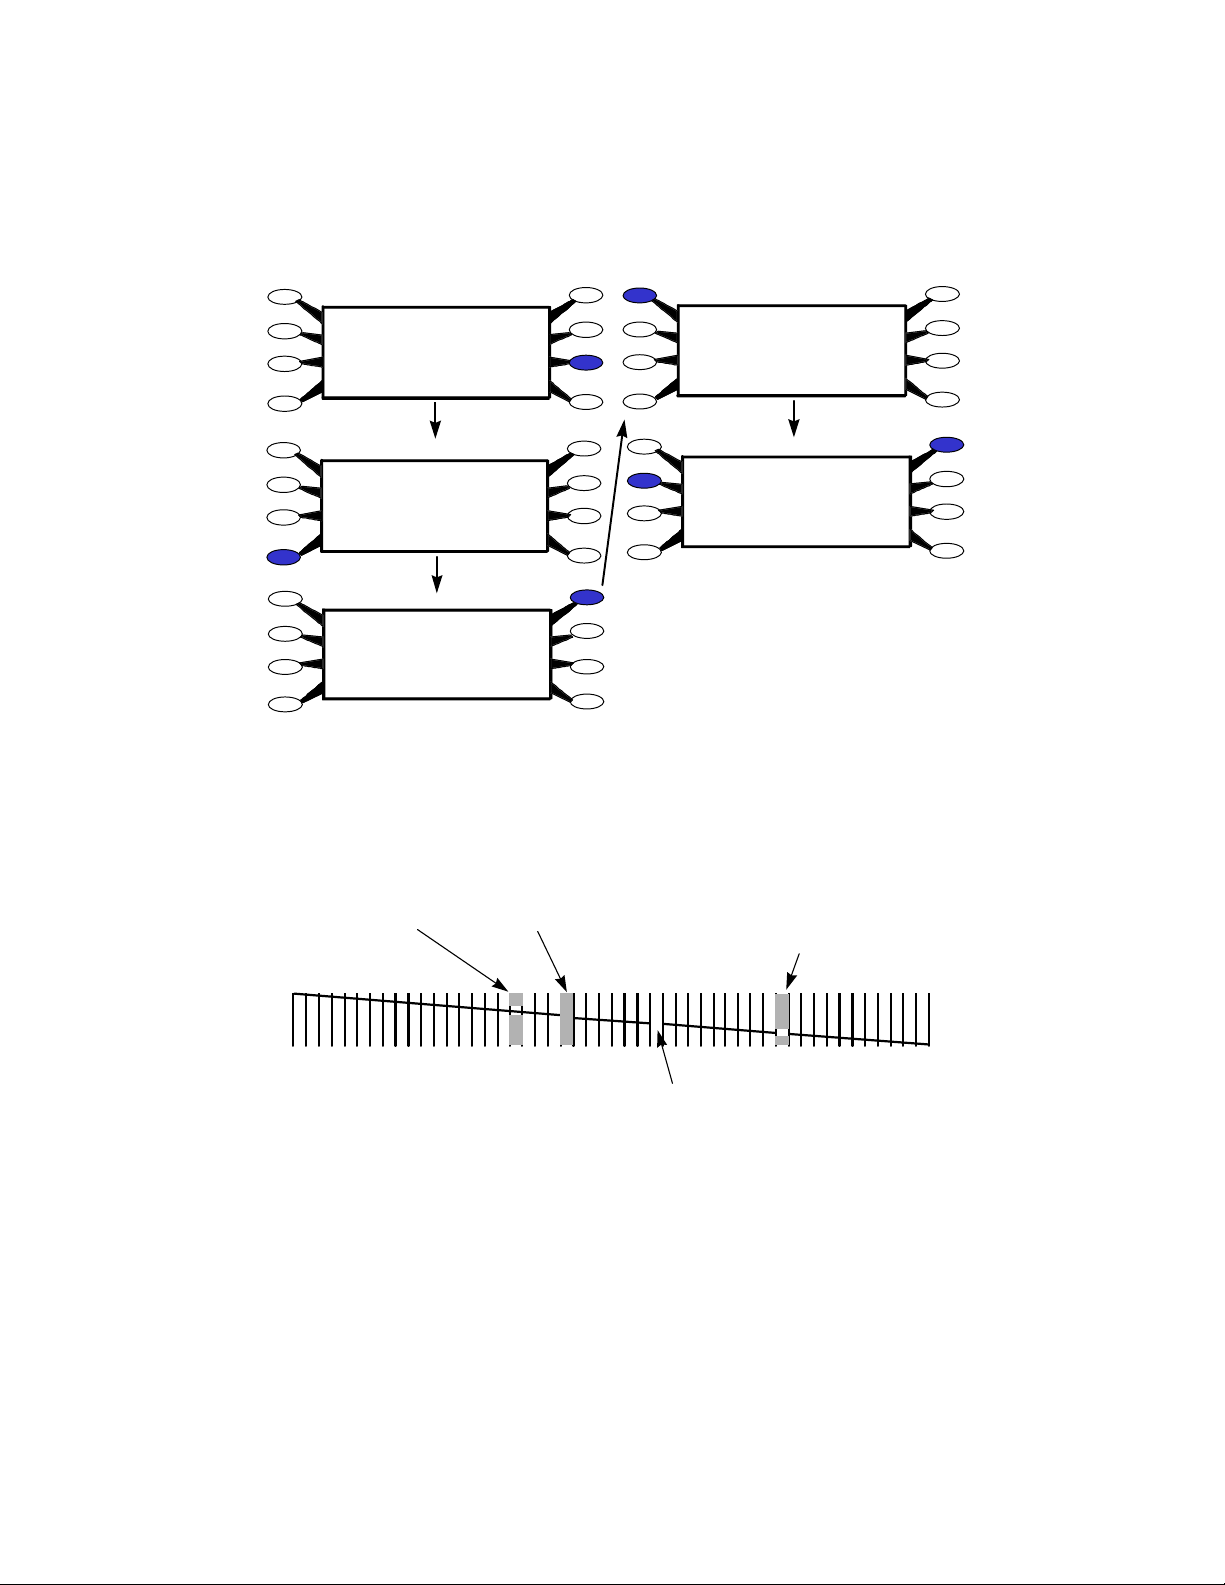
Jet is bad; jet re-
addressed
automatically
Jet is clogged (Jet
electronics are
good though)
Jet manually
bypassed,
jet good
Jet manually bypassed,
jet clogged
Prime
Color Calib Menu
Access Cartridge
Display Settings
Service Menu
Print Settings
Calibration Menu
Exit
Utility Menu
Use Calib X/Y
Paper Axis Test
Open Jet Menu
Exit
Paper Axis
Color Db Menu
Calibration Menu
Load Media
Pause
Cut
Feed Media Menu
Utility Menu
Setup Menu
Reset
Main Menu
Black Edit List
Magenta Edit List
Yellow Edit List
Cyan Edit List
Print Jet List
Exit
Open Jet Menu
Clear List Menu
Paper Axis
# 1: On
Prev Option
Next Option
Toggle Jet
Ok
Black Edit List
Press Next Option until
clogged jet number is
displayed, press Toggle Jet
to turn jet OFF, press OK.
6. Cartridge Jet - Manual Bypass Feature
Example: to manually bypass a clogged black (K) jet, perform the following steps:
NJ750 Training Guide
7
33.00 inches
Distance between the two
“T’s” should be 33.00” +/-
0.05” (inches)
B. Printer Calibrations
A. Paper Axis Test
Prior to running a Paper Axis Test ensure a
minimum of 36 inch media is loaded. To
activate the Paper Axis Test select Utility
Menu - Calibration Menu - Paper Axis Test.
An upside-down "T" will be printed in the
center of the media, the media will advance
approximately 33 inches or 838 mm and
another "T" will be printed. This calibration
is extremely important for paneling and
framing operations to ensure proper line
length accuracy; printer accuracy is
guaranteed to +/- 0.2%. Cut off and measure
the distance between the two T's using a
draftsman ruler, enter the true value under
under 'Paper Axis'. Select Utility Menu, Calibration Menu, Paper Axis, enter the
true value once only. Note: the display will always indicate 33" or 832.2 mm as the
zero reference position but the printer is now adjusted for this media type.
B. Slow Deadband
To activate the Slow Deadband calibration select Utility Menu - Service Menu -
Calibration Menu - Slow Db Test. The Slow dB Test pattern will print very slowly.
This is a mechanical adjustment of the printer servo system and should be
performed monthly. Ensure the vertical lines are straight, if out of alignment, as in
this example, then an adjustment is necessary. Select Utility Menu, Service Menu,
Calibration Menu, Slow Deadband - change the value and rerun the pattern until
correct. NOTE: this calibration is normally not required; for CAD operations mainly.
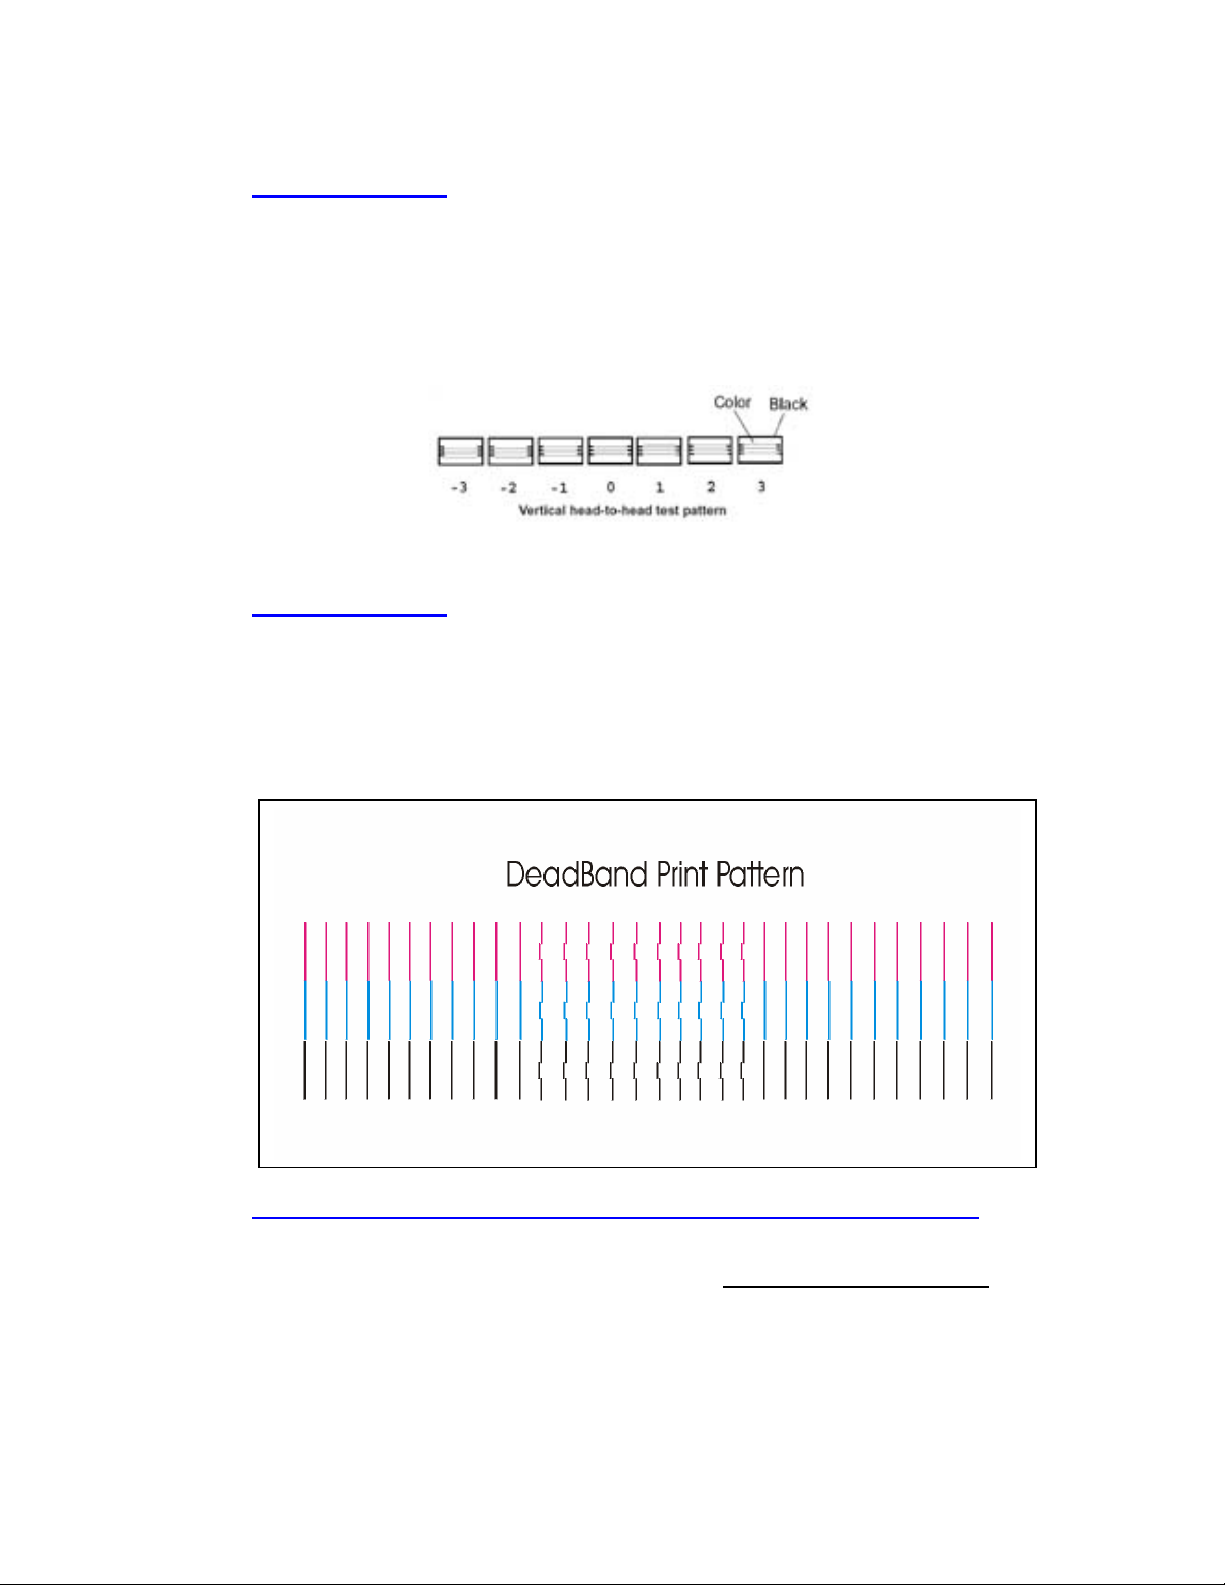
C. Color Deadband
To activate the Color Deadband calibration
select
Utility Menu - Calibration Menu - Color dB Menu -
Color dB Test. The Color dB pattern will print.
This is an electronic calibration for
compensating
the differences in cartridge resistances. Always
perform this calibration whenever a cartridge is
replaced. To adjust left NJ850 print head (i.e.
values 1-4), select Left at control panel. Choose
the best value under each aligning set of colors. To adjust the right print head
(values Y, M, C, and K) select Right at the control panel. Select the value under the
best group of vertical lines in each color. Please do not choose one value to
characterize all colors unless illustrated by the pattern.
NJ750 Training Guide
8
D. Color Calibration
To activate the Color calibration select Utility Menu - Color Calib. Menu – Calib Test
(NJ850: Both Vert Calib Test and Horiz. Calib. Test.) Seven horizontal patterns
followed by seven vertical patterns will print. The color calibration pattern should
be performed whenever a cartridge is removed from the carriage for cleaning or
replacement. Choose the best value under each aligning set of colors, i.e. yellow
to magenta, then magenta to cyan, then cyan to black. Enter the most correct
value for each of the 14 fields. Note: stalls 1 through 4 correspond to the Left 4
cartridges.
E. Deadband Check
To activate the Deadband calibration select Utility Menu - Service Menu -
Calibration Menu - Deadband. The deadband pattern will print very quickly in all
color ranges. This is a final check of printer calibrations to ensure alignment has
been achieved. Ensure the vertical lines are straight with respect to each color, if
severely out of alignment, as in this example, then a re-calibration of the printer is
necessary or cleaning of the encoder strip is necessary. Note: The pattern does
not have to be perfect, just close to maintaining vertical alignments.
F. Controlling Image Skew (not media skew as this is mechanical).
The NovaJet 750/800 series of printers are designed with self-aligning pinch rollers. The
alignment process takes place when media is advancing forward, but not backwards.
Loading media is critical to the media alignment and reducing skew. Many times the
media is loaded at a slight skew and will take several feet of advancing media to get it
aligned properly. This can be improved by following the steps below.
1. Load the media and align the rear media guides.
NJ750 Training Guide
9
2. Advance the media though the printer about 1 foot, using the Feed Media Menu/Forward
button.
3. Put the printer media feed in “Sheet” mode (Set-up Menu/Paper Option Menu/Supply
Type/Sheet). Using the media “Forward” button, drive the media forward until it is pulled tight.
4. Change the media feed back to “Roll” or “Take-up” (Set-up Menu/Paper Option Menu/Supply
Type/
5. Roll or Take-up).
6. Advance the media forward three feet to check alignment with the white media guideline.
7. Start printing the image.
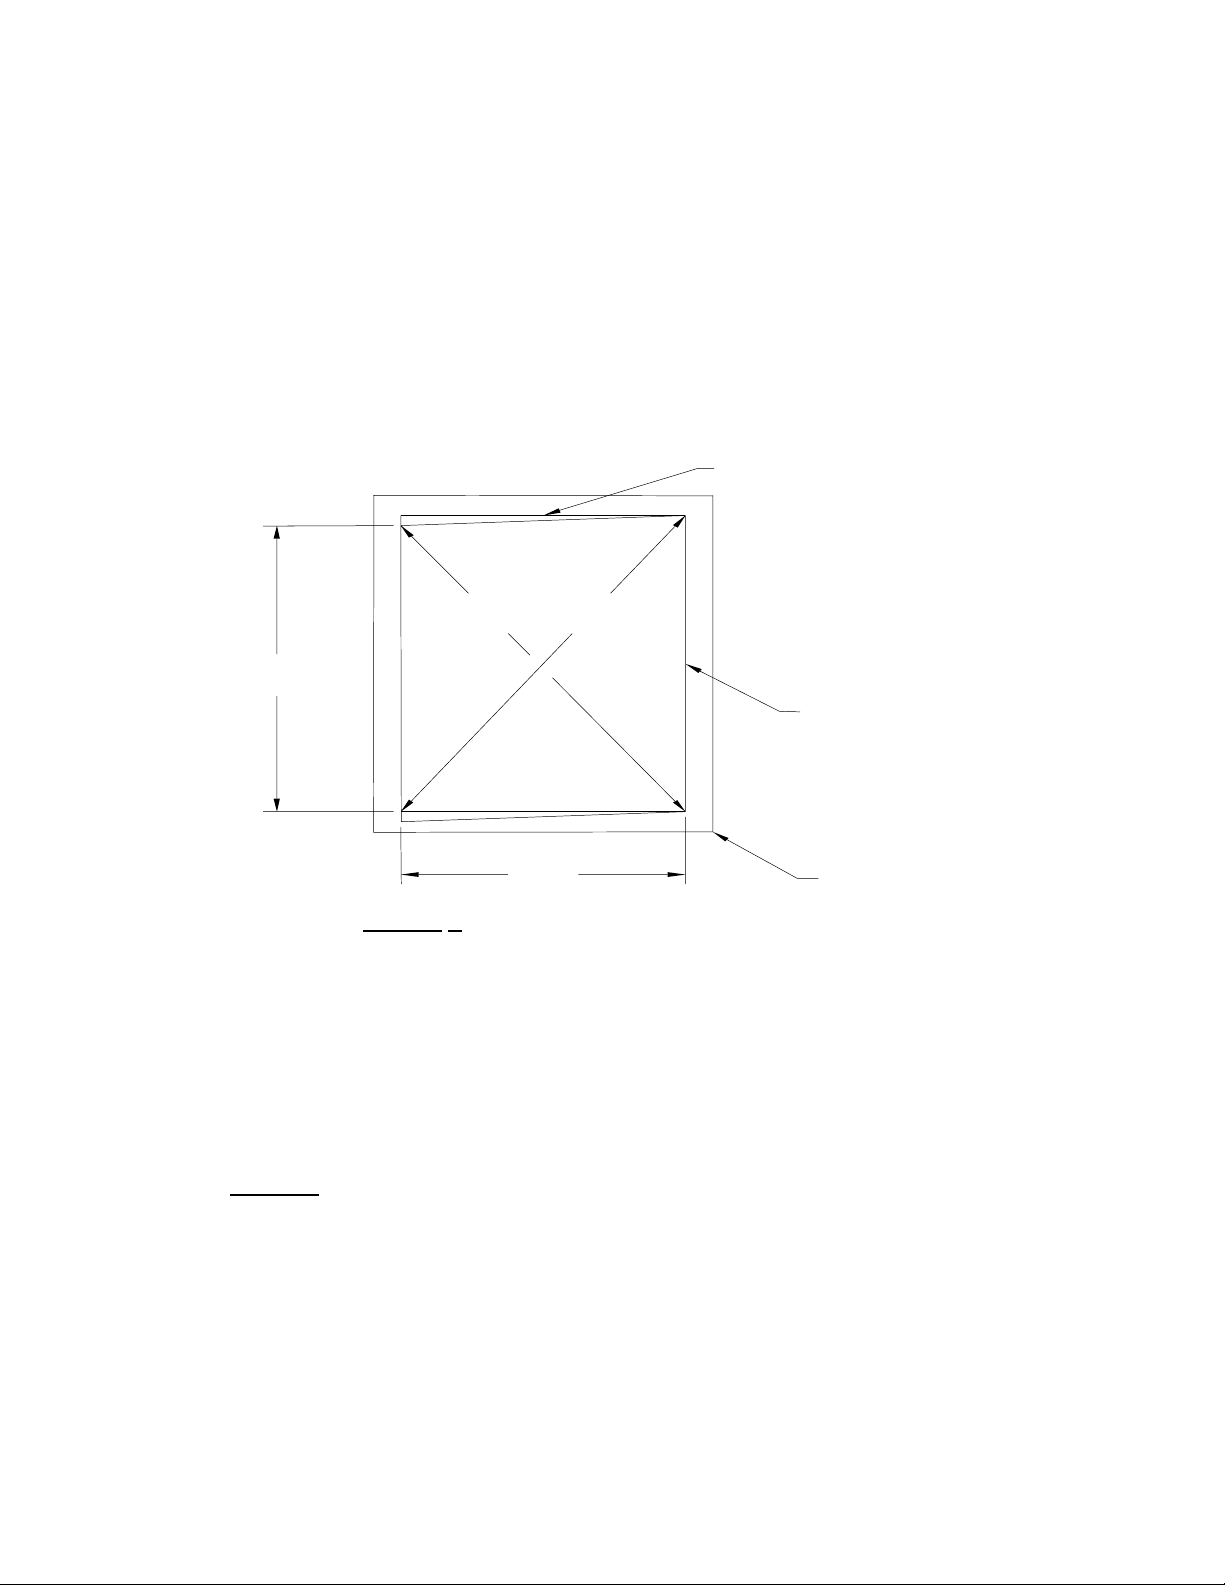
G. ACCEPTABLE IMAGE SKEW:
W
L
L
OU TP UT
ACTUAL
MED I A PERIMETE
R
PERFECT REFERENCE
RECTANGLE
L
12
L
EXHIBIT
A
Assuming the media loading instructions as defined in the user manual
have been followed, Exhibit A describes the maximum permissible
image skew.
The maximum skew is:
0.30% of ∆L = (L
1
- L
2
) – except for NJ880 (no skew specification has been
designated)
Example:
If L
W
= 59.61 inches (1.51 m.), L = 48.00 inches (1.22 m.)
Then: L
1
should equal L
2
= 76.53 inches (1.94 m.)
The actual permissible skew (L
1
- L
2
) = (.003) (76.53) = .229”
(5.82 mm.)
NOTE: This is the only method used to determine skew.
NJ750 Training Guide
10
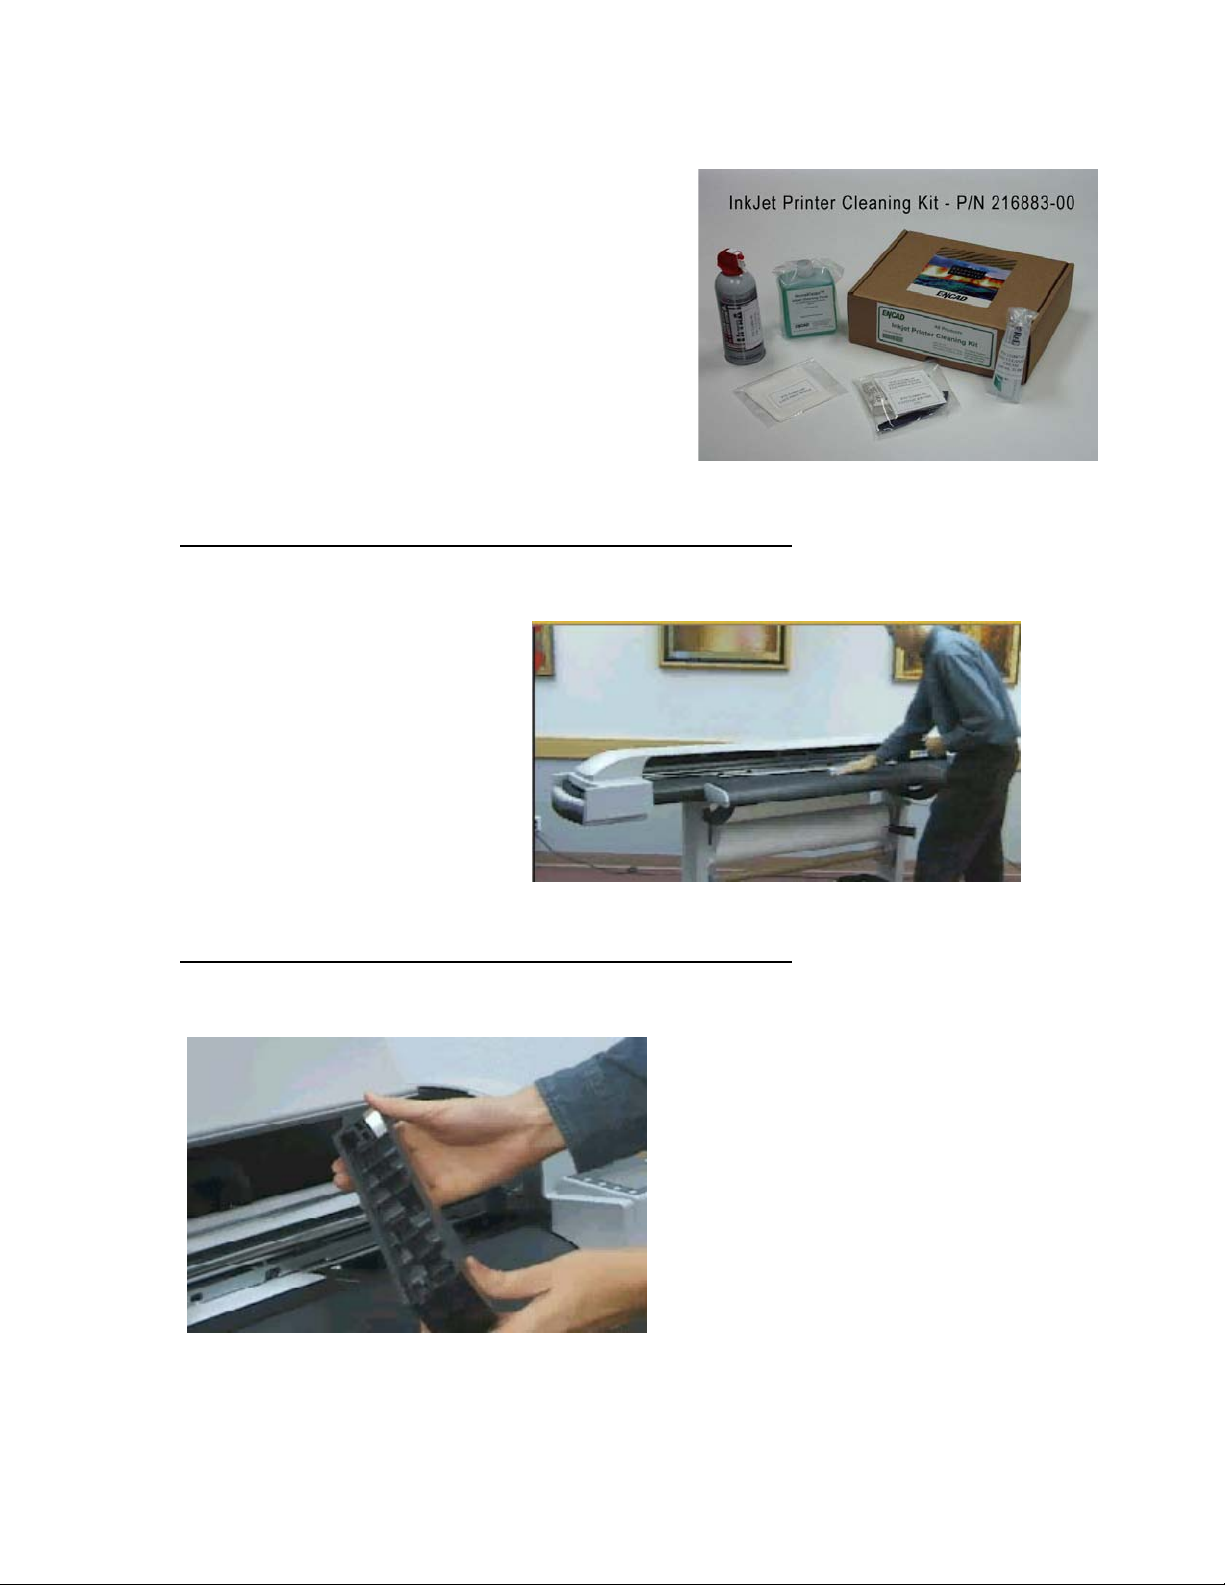
C. Routine Maintenance
1. Perform routine maintenance at
recommended plot time hours and in
accordance with prescribed
documentation.
NOTE: The NovaJet printer must be cleaned and
serviced routinely or print output anomalies or
printer failures may occur during normal
operations. It is strongly suggested to take 15
minutes once a week (i.e. every Monday morning) and
perform printer cleaning rather than attempt to remember each cleaning cycle as listed below.
INTERVAL COMPONENT CLEANING AGENT
25-50 Hours Platen/External Surfaces NovaKlean solution on Lint-Free Towel
Can cause paper sensing errors;
resulting in ‘no printing’ symptoms.
INTERVAL COMPONENT CLEANING AGENT
10-20 Hours Service Station NovaKlean or Distilled Water
 Loading...