


 Loading...
KODAK PROFESSIONAL
DCS Pro SLR/n Digital Camera
User’s Guide
P/N 6B8983_EN

Eastman Kodak Company
343 State Street
Rochester, New York, 14650
© Eastman Kodak Company, 2004
Kodak and Kodak Professional are trademarks of Eastman Kodak Company.

Table of Contents
1 Important Information |
|
System Requirements for Your Computer ........................................................................................................ |
1-1 |
Warranty Registration for your Camera............................................................................................................ |
1-1 |
Warnings......................................................................................................................................................... |
1-2 |
Safety Warnings......................................................................................................................................... |
1-2 |
Operational Warnings ............................................................................................................................... |
1-2 |
Important Safeguards and Precautions ............................................................................................................ |
1-3 |
Electromagnetic Emissions.............................................................................................................................. |
1-6 |
VCCI ................................................................................................................................................................ |
1-6 |
2 About Your Camera |
|
Nomenclature.................................................................................................................................................. |
2-1 |
Camera Front............................................................................................................................................ |
2-1 |
Camera Back ............................................................................................................................................ |
2-2 |
Camera Top .............................................................................................................................................. |
2-2 |
Camera Bottom......................................................................................................................................... |
2-3 |
Left Side................................................................................................................................................... |
2-3 |
Open Media Door ..................................................................................................................................... |
2-4 |
Turning the Camera On and Off....................................................................................................................... |
2-4 |
Viewfinder and Focus Screen........................................................................................................................... |
2-5 |
Digital Buttons................................................................................................................................................. |
2-6 |
Four-way Switch........................................................................................................................................ |
2-6 |
Locking and Unlocking the Four-way Switch ...................................................................................... |
2-7 |
OK Button ................................................................................................................................................. |
2-7 |
Cancel Button ........................................................................................................................................... |
2-7 |
Menu Button............................................................................................................................................. |
2-8 |
Nav+ Button ............................................................................................................................................. |
2-8 |
HotKey Button........................................................................................................................................... |
2-8 |
Digital Status Button.................................................................................................................................. |
2-9 |
Delete Button............................................................................................................................................ |
2-9 |
Tag/Record Button.................................................................................................................................... |
2-9 |
April 29, 2004 |
1 |

Table of Contents
LCDs .............................................................................................................................................................. |
2-10 |
Top Status LCD........................................................................................................................................ |
2-10 |
Image LCD .............................................................................................................................................. |
2-10 |
Turning On the Image LCD ..................................................................................................................... |
2-11 |
Display Activation.................................................................................................................................... |
2-12 |
Turning Off the Image LCD...................................................................................................................... |
2-12 |
Digital Status LCD.................................................................................................................................... |
2-13 |
Using the Menus ............................................................................................................................................ |
2-14 |
Navigating Through the Menus ................................................................................................................ |
2-15 |
Using the Digital Status Button and Digital Status LCD to Highlight Menu Options.................................... |
2-16 |
Using the HotKey Button to Highlight Menu Options ................................................................................ |
2-17 |
Main-Command and Sub-Command Dials...................................................................................................... |
2-18 |
Lens............................................................................................................................................................... |
2-18 |
Mounting the Lens................................................................................................................................... |
2-18 |
Removing the Lens .................................................................................................................................. |
2-19 |
Imager........................................................................................................................................................... |
2-19 |
Viewfinder Diopter ........................................................................................................................................ |
2-20 |
LCD Illuminator ............................................................................................................................................. |
2-20 |
Depth of Field Preview Button........................................................................................................................ |
2-21 |
Imager Plane Indicator.................................................................................................................................. |
2-21 |
Hot Shoe........................................................................................................................................................ |
2-22 |
PC Sync Terminal........................................................................................................................................... |
2-22 |
Remote Release Accessory Port ..................................................................................................................... |
2-22 |
Camera Straps ............................................................................................................................................... |
2-23 |
Attaching the Neck Strap ......................................................................................................................... |
2-23 |
Attaching the Hand Strap......................................................................................................................... |
2-23 |
3 Powering Your Camera |
|
Powering Your Camera using the Power Module ............................................................................................. |
3-2 |
Powering Your Camera using a Battery ............................................................................................................ |
3-2 |
Charging Batteries..................................................................................................................................... |
3-2 |
Inserting/Removing Batteries .................................................................................................................... |
3-4 |
Checking Battery Status ............................................................................................................................. |
3-5 |
Conserving Batteries.................................................................................................................................. |
3-5 |
Situations Using Extra Battery Power................................................................................................... |
3-5 |
CR 2032 Coin Cell ..................................................................................................................................... |
3-6 |
2 |
April 29, 2004 |

Table of Contents
Disposing of Batteries ............................................................................................................................... |
3-6 |
4 The Basics |
|
Basic Mode ..................................................................................................................................................... |
4-1 |
Setting the User Mode ............................................................................................................................... |
4-2 |
Setting Advanced Mode ...................................................................................................................... |
4-2 |
Setting Basic Mode ............................................................................................................................. |
4-2 |
Accessing Functions Using the Basic Menu ............................................................................................... |
4-3 |
Digital Status LCD...................................................................................................................................... |
4-3 |
Using the Digital Status LCD to Highlight Menu Options ............................................................................ |
4-4 |
Setting ISO ................................................................................................................................................ |
4-4 |
White Balance........................................................................................................................................... |
4-5 |
Setting Raw Resolution.............................................................................................................................. |
4-6 |
Setting JPEG Resolution............................................................................................................................. |
4-7 |
Formatting a Card ..................................................................................................................................... |
4-8 |
Changing the Display Contrast................................................................................................................... |
4-9 |
Turning the Overexposure Indicator On and Off ..................................................................................... |
4-10 |
Firmware ................................................................................................................................................ |
4-11 |
Checking the Firmware Version........................................................................................................ |
4-11 |
Updating Firmware........................................................................................................................... |
4-12 |
Setting the Time/Date.............................................................................................................................. |
4-13 |
Using the HotKey button to Highlight Menu Options ................................................................................ |
4-13 |
Composing, Focusing, and Capturing Images................................................................................................. |
4-14 |
5 Configuring your Camera |
|
Setting Battery Save.......................................................................................................................................... |
5-1 |
Camera ..................................................................................................................................................... |
5-1 |
Image LCD ................................................................................................................................................ |
5-1 |
Custom Settings ............................................................................................................................................... |
5-2 |
Custom Settings Table ............................................................................................................................... |
5-2 |
Firmware......................................................................................................................................................... |
5-5 |
Checking the Firmware Version ................................................................................................................ |
5-5 |
Downloading Firmware to your Computer ................................................................................................ |
5-6 |
Updating Firmware on your Camera ......................................................................................................... |
5-6 |
Firmware Features .................................................................................................................................... |
5-7 |
Folder and File Naming ................................................................................................................................... |
5-7 |
Setting HotKeys................................................................................................................................................ |
5-8 |
April 29, 2004 |
3 |

Table of Contents
Using Job Tracker............................................................................................................................................ |
5-9 |
Saving a Job Tracker File to a Card............................................................................................................ |
5-9 |
Loading a Job Tracker File from a Card................................................................................................... |
5-10 |
Loading a Job Tracker File from Camera Memory ................................................................................... |
5-11 |
Selecting a Language...................................................................................................................................... |
5-11 |
Resetting Defaults .......................................................................................................................................... |
5-12 |
User Setups.................................................................................................................................................... |
5-13 |
Creating a New User Setup....................................................................................................................... |
5-13 |
Saved Setups ........................................................................................................................................... |
5-14 |
Loading a Setup from a Card............................................................................................................. |
5-14 |
Saving a Setup to a Card.................................................................................................................... |
5-14 |
Deleting Setups from Camera Memory.............................................................................................. |
5-15 |
Selecting a User Setup ............................................................................................................................. |
5-15 |
Editing an Existing Setup ......................................................................................................................... |
5-15 |
Using Setups on More than One Camera.................................................................................................. |
5-16 |
Time and Date ............................................................................................................................................... |
5-17 |
Setting the User Mode .................................................................................................................................... |
5-18 |
Using the Vertical Release.............................................................................................................................. |
5-19 |
Intervalometer............................................................................................................................................... |
5-20 |
Changing Intervalometer Settings ............................................................................................................ |
5-21 |
Long Exposure............................................................................................................................................... |
5-22 |
Two-Button Reset .......................................................................................................................................... |
5-23 |
ISO ................................................................................................................................................................ |
5-24 |
Setting ISO using the Image LCD.............................................................................................................. |
5-24 |
Setting ISO using Camera Controls .......................................................................................................... |
5-24 |
Drive Mode.................................................................................................................................................... |
5-25 |
Locking Exposure Settings ............................................................................................................................. |
5-25 |
Using the Self Timer....................................................................................................................................... |
5-26 |
Cancelling the Self Timer......................................................................................................................... |
5-26 |
Lens Optimization .......................................................................................................................................... |
5-27 |
Overview ................................................................................................................................................. |
5-27 |
Selecting the Method of Lens Optimization .............................................................................................. |
5-28 |
Auto.................................................................................................................................................. |
5-28 |
Manual ............................................................................................................................................. |
5-29 |
Select a Lens from the User List ........................................................................................................ |
5-29 |
When you Change Lenses.................................................................................................................. |
5-30 |
4 |
April 29, 2004 |

Table of Contents
Maintaining the User List......................................................................................................................... |
5-31 |
Adding Lenses from the Master List .................................................................................................. |
5-31 |
Removing Lenses from the User List ................................................................................................. |
5-33 |
Saving a List ..................................................................................................................................... |
5-34 |
Loading a List ................................................................................................................................... |
5-34 |
Defining New Lenses ............................................................................................................................... |
5-35 |
Defining New Fixed Lenses ............................................................................................................... |
5-35 |
Defining New Zoom Lenses .............................................................................................................. |
5-36 |
Deleting Defined Lenses ................................................................................................................... |
5-37 |
Editing the Lens Name ...................................................................................................................... |
5-38 |
Changing the Strength ............................................................................................................................. |
5-40 |
Determining the Optimum Strength .................................................................................................. |
5-40 |
Assigning Optimum Strengths to Lenses in the User List.................................................................... |
5-41 |
Resetting to Defaults......................................................................................................................... |
5-42 |
6 Setting up Cards, Folders, and Files |
|
Memory Cards................................................................................................................................................. |
6-1 |
Inserting Cards ......................................................................................................................................... |
6-2 |
Removing Cards........................................................................................................................................ |
6-2 |
File Types.................................................................................................................................................. |
6-3 |
Choosing the File Type to be Written to a Card .......................................................................................... |
6-3 |
File Type and ISO ............................................................................................................................... |
6-4 |
Choosing the JPEG File Type ............................................................................................................... |
6-5 |
Formatting Cards ...................................................................................................................................... |
6-6 |
Recovering Deleted Files........................................................................................................................... |
6-7 |
Determining Write Speed .......................................................................................................................... |
6-8 |
For the Most Accurate Write Speed Measurement............................................................................... |
6-8 |
Folders for Captured Images ........................................................................................................................... |
6-9 |
Selecting a Capture Folder ........................................................................................................................ |
6-9 |
Creating a New Folder............................................................................................................................. |
6-10 |
Image Files.................................................................................................................................................... |
6-11 |
Setting the Crop Aspect Ratio .................................................................................................................. |
6-11 |
Setting Raw Resolution............................................................................................................................ |
6-12 |
Setting JPEG Resolution........................................................................................................................... |
6-13 |
Setting JPEG Quality ................................................................................................................................ |
6-14 |
Correcting Digital Exposure .................................................................................................................... |
6-15 |
April 29, 2004 |
5 |

Table of Contents
Exposure Bias ......................................................................................................................................... |
6-15 |
Look ....................................................................................................................................................... |
6-16 |
Noise Reduction...................................................................................................................................... |
6-16 |
Sharpening Level..................................................................................................................................... |
6-17 |
7 Controlling Exposure |
|
White Balance.................................................................................................................................................. |
7-1 |
Preset White Balance................................................................................................................................. |
7-2 |
Click Balance ............................................................................................................................................ |
7-3 |
Using the Current Image for Click Balance.......................................................................................... |
7-3 |
Displaying the Saved Settings Menu..................................................................................................... |
7-4 |
Using a Saved Setting .......................................................................................................................... |
7-5 |
Saving a Setting on the Camera ........................................................................................................... |
7-6 |
Loading Settings from a Card .............................................................................................................. |
7-7 |
Deleting Settings ................................................................................................................................. |
7-7 |
Exposure ......................................................................................................................................................... |
7-8 |
Exposure Metering Systems....................................................................................................................... |
7-8 |
Choosing a Metering System ............................................................................................................... |
7-8 |
Matrix Metering/3D Matrix Metering .................................................................................................. |
7-8 |
Center-Weighted Metering .................................................................................................................. |
7-9 |
Spot Metering ..................................................................................................................................... |
7-9 |
Capturing Images in Each Exposure Mode .............................................................................................. |
7-10 |
Programmed Auto Exposure Mode ................................................................................................... |
7-11 |
Shutter-Priority Auto Exposure Mode................................................................................................ |
7-13 |
Aperture-Priority Auto Exposure Mode ............................................................................................. |
7-14 |
Manual Exposure Mode.................................................................................................................... |
7-15 |
Auto Exposure Lock ................................................................................................................................ |
7-17 |
Exposure Compensation.......................................................................................................................... |
7-19 |
Cancelling Exposure Compensation .................................................................................................. |
7-19 |
Auto Exposure Bracketing....................................................................................................................... |
7-20 |
Cancelling Auto Exposure Bracketing ............................................................................................... |
7-22 |
Bulb Mode Exposure............................................................................................................................... |
7-23 |
8 Focusing |
|
Autofocus ........................................................................................................................................................ |
8-1 |
Focus Modes............................................................................................................................................. |
8-1 |
Choosing a Focus Mode...................................................................................................................... |
8-1 |
6 |
April 29, 2004 |
Table of Contents
AF Area Mode ........................................................................................................................................... |
8-2 |
Choosing an AF Area Mode................................................................................................................. |
8-2 |
Choosing a Focus Area ....................................................................................................................... |
8-3 |
Viewfinder and Top Status LCD Indicators ................................................................................................ |
8-4 |
Operations and Suitable Situations............................................................................................................ |
8-5 |
AF-Assist Illuminator................................................................................................................................. |
8-6 |
Locking Focus........................................................................................................................................... |
8-7 |
Situations where Autofocus May Not Work as Expected............................................................................. |
8-8 |
Manual Focus.................................................................................................................................................. |
8-9 |
Using the Electronic Rangefinder for Manual Focus .................................................................................. |
8-9 |
Depth of Field and Focus Tracking ................................................................................................................ |
8-10 |
Depth of Field ......................................................................................................................................... |
8-10 |
Focus Tracking ....................................................................................................................................... |
8-10 |
9 Capture Workflow |
|
Capture Workflow when the Camera is not Connected to a Computer.............................................................. |
9-1 |
Device and Media Preparation .................................................................................................................. |
9-2 |
Capturing and Evaluating Test Images ....................................................................................................... |
9-3 |
Capturing Images...................................................................................................................................... |
9-3 |
Occasional Verification ............................................................................................................................. |
9-4 |
Transferring Images.................................................................................................................................. |
9-4 |
Editing Images .......................................................................................................................................... |
9-4 |
KODAK PROFESSIONAL DCS Photo Desk ............................................................................................ |
9-5 |
KODAK PROFESSIONAL Extended Range Imaging File Format Module................................................ |
9-5 |
Capture Workflow when the Camera is Connected to a Computer.................................................................... |
9-5 |
Connecting to a Computer and Power Supply............................................................................................ |
9-6 |
Starting the Capture Software .................................................................................................................... |
9-6 |
Device and Media Preparation .................................................................................................................. |
9-6 |
Capturing and Evaluating Test Images ....................................................................................................... |
9-6 |
Capturing Images...................................................................................................................................... |
9-6 |
Occasional Verification ............................................................................................................................. |
9-6 |
Editing Images .......................................................................................................................................... |
9-6 |
10 Flash Photography |
|
Built-in Speedlight......................................................................................................................................... |
10-1 |
D-TTL Flash Control................................................................................................................................ |
10-2 |
Using the Built-in Speedlight ................................................................................................................... |
10-3 |
April 29, 2004 |
7 |

Table of Contents
Flash Shooting Distance Range for the Built-in Speedlight ....................................................................... |
10-5 |
Usable Lenses with the Built-in Speedlight............................................................................................... |
10-6 |
Ready-Light.................................................................................................................................................... |
10-7 |
Hot Shoe........................................................................................................................................................ |
10-8 |
PC Sync Terminal........................................................................................................................................... |
10-8 |
Flash Sync Modes .......................................................................................................................................... |
10-9 |
Flash Sync Modes for Optional Speedlights............................................................................................ |
10-11 |
Flash Exposure Compensation ..................................................................................................................... |
10-12 |
Using Optional Speedlights .......................................................................................................................... |
10-13 |
Notes for Using an Optional Speedlight.................................................................................................. |
10-15 |
11 Working with Images on the Camera |
|
Reviewing Images .......................................................................................................................................... |
11-1 |
Selecting an Image Mode ........................................................................................................................ |
11-1 |
Changing the Duration of the Image Mode Menu Display.................................................................. |
11-2 |
Single-Image Mode ................................................................................................................................. |
11-2 |
Histogram Mode ..................................................................................................................................... |
11-2 |
Interpreting a Histogram .................................................................................................................. |
11-3 |
Zoom Mode ............................................................................................................................................ |
11-3 |
Enabling or Disabling the Region of Interest Box.............................................................................. |
11-3 |
Zooming........................................................................................................................................... |
11-4 |
Panning ............................................................................................................................................ |
11-4 |
Luminometer.................................................................................................................................... |
11-4 |
Multiple Image Mode .............................................................................................................................. |
11-5 |
Status Bar................................................................................................................................................ |
11-5 |
Selecting a Review Folder........................................................................................................................ |
11-6 |
Browsing Through Images ...................................................................................................................... |
11-7 |
Browsing Through Images Using the Nav+ Button ............................................................................ |
11-7 |
Location Bar..................................................................................................................................... |
11-7 |
Selecting an Image .................................................................................................................................. |
11-7 |
Overexposure Indicator .......................................................................................................................... |
11-8 |
Changing Display Contrast and Brightness............................................................................................... |
11-8 |
Auto Review ................................................................................................................................................... |
11-9 |
Slide Show ..................................................................................................................................................... |
11-9 |
Starting/Stopping a Slide Show .............................................................................................................. |
11-10 |
Deleting Images........................................................................................................................................... |
11-11 |
8 |
April 29, 2004 |

Table of Contents
Tagging Images ........................................................................................................................................... |
11-12 |
Recording Sound Files................................................................................................................................. |
11-13 |
12 Using the Video Output Port |
|
Connecting .................................................................................................................................................... |
12-1 |
Enabling/Disabling External Video................................................................................................................. |
12-2 |
13 Connecting to Your Computer |
|
Advantages to an IEEE 1394 Connection........................................................................................................ |
13-1 |
Advantages to a Card Reader ......................................................................................................................... |
13-1 |
Connecting Your Camera to the Computer..................................................................................................... |
13-2 |
Quitting—Disconnecting from the Computer ................................................................................................ |
13-4 |
Using the Card Reader................................................................................................................................... |
13-4 |
14 Camera Care |
|
Handling ....................................................................................................................................................... |
14-1 |
Cleaning ........................................................................................................................................................ |
14-2 |
The Imager.................................................................................................................................................... |
14-3 |
Determining if the Imager is Dirty........................................................................................................... |
14-3 |
Examining a Test Image ................................................................................................................... |
14-3 |
Inspecting and Cleaning the Imager ................................................................................................. |
14-4 |
Storing .......................................................................................................................................................... |
14-5 |
Top and Back Status LCDs ............................................................................................................................. |
14-5 |
15 Serial Data Collection and Global Positioning System |
|
Serial Data Collection .................................................................................................................................... |
15-1 |
Connecting a Device to the Serial Port .................................................................................................... |
15-1 |
Serial In Mode ........................................................................................................................................ |
15-2 |
Serial In Status ................................................................................................................................. |
15-3 |
Serial Out Mode...................................................................................................................................... |
15-3 |
Setting the Baud Rate .............................................................................................................................. |
15-4 |
Global Positioning System.............................................................................................................................. |
15-4 |
Requirements for Using the GPS Feature ................................................................................................. |
15-4 |
Using the GPS Feature ............................................................................................................................. |
15-5 |
Appendix A: Specifications |
|
Burst Depth..................................................................................................................................................... |
A-5 |
Appendix B: Lens Compatibility
April 29, 2004 |
9 |
Compatible Lenses and Lens Accessories ......................................................................................................... |
B-2 |
Incompatible Lenses and Lens Accessories ...................................................................................................... |
B-3 |
Appendix C: Troubleshooting |
|
Problems Indicated in the Top Status LCD ....................................................................................................... |
C-1 |
Other Problems ............................................................................................................................................... |
C-3 |
Appendix D: Warranty |
|
KODAK PROFESSI0NAL DCS Pro SLR/n Digital Camera.................................................................................... |
D-1 |
Warranty Repair Coverage .............................................................................................................................. |
D-1 |
Limitations...................................................................................................................................................... |
D-2 |
Outside the United States ................................................................................................................................ |
D-3 |
Warranty is Not Transferable .......................................................................................................................... |
D-3 |
How to Obtain Service .................................................................................................................................... |
D-4 |
Product Support Options ................................................................................................................................ |
D-5 |
Glossary

1 Important Information
Thank you for purchasing your KODAK PROFESSIONAL DCS Pro SLR/n Digital Camera. This portable camera system, which combines technologies of Eastman Kodak Company and NIKON Corporation, allows you to capture and store high-resolution, high-quality digital images. Before you start using the camera, follow the instructions listed below.
•Read the Warranty statement.
•Verify that your MACINTOSH or WINDOWS-based computer meets the system requirements.
•Read the Warnings section.
•Review the Important Safeguards and Precautions.
•Register your camera. See below.
System Requirements for Your Computer
Refer to the following Web site for system requirements: www.kodak.com/go/dcs.
Warranty Registration for your Camera
So that we may better serve your support needs, please register your camera in one of two ways (listed below). Your registration enables you to download camera firmware, software updates, and technical information for your camera.
•Go to www.kodak.com/go/DCSRegister
•Complete the Registration card (included with your camera).
April 29, 2004 |
1-1 |

Important Information
Warnings
Safety Warnings |
• To prevent fire or shock hazard, use only the recommended accessories |
|
and attachments. |
Operational Warnings • Do not use IEEE 1394 repeaters when connecting your camera. Doing so can damage the camera.
•Be sure the connector orientation is correct when you connect the IEEE 1394 cable to the computer. Connecting incorrectly can damage your camera or computer. At the computer connection, the point on the 6-pin plug must align with the point on the computer port.
•Use extreme care when handling memory cards as they are easily damaged. If a card is dropped, all data on the card can be lost.
•Do not remove a memory card, the KODAK PROFESSIONAL DCS Pro Battery, or the KODAK PROFESSIONAL DCS Pro DC Power Module from the camera while the memory card icon on the Digital Status LCD or the Card Busy LED inside the Media door are blinking. The blinking indicates that data is being read from or written to the card. You may lose data if you remove a card at this time.
•Operate your camera only from the type of power source indicated on the name plate of the KODAK PROFESSIONAL DCS Pro DC Power Module. A line voltage outside this range can destroy the power module and/or the camera.
•Use only the KODAK PROFESSIONAL DCS Pro DC Power Module included with your camera or available from Kodak as an accessory. Do not plug other adapters into the camera.
•The KODAK PROFESSIONAL DCS Pro DC Power Module is for indoor use only.
•Do not use the supplied KODAK PROFESSIONAL DCS Pro DC Power Module for any purpose other than for the KODAK PROFESSIONAL DCS Pro SLR/n Digital Camera.
•Use the Image LCD to verify that a picture was captured correctly during your photo session.
•Do not attempt to replace the Focus screen. Return the camera to an authorized KODAK service center if the focus screen needs replacing.
1-2 |
April 29, 2004 |

Important Information
Important Safeguards and Precautions
Read Instructions—Read all the safety and operating instructions before operating your camera.
Follow Instructions—Follow all operating and usage instructions. Controls—Adjust only those controls that are covered by the operating instructions.
Heed Warnings—Heed all warnings on your camera and in the operating instructions.
Retain Instructions and Packaging—Retain the safety and operating instructions for future reference. Retain the packing case for use if your camera needs to be shipped.
Handling—Handle your camera with care. Treat the imager as you would your best lens. Do not drop your camera. Do not place your camera on an unstable surface. It can fall, causing serious injury to persons and serious damage to your camera.
Dust—If you operate the camera in environments with excessive dust levels, dust may accumulate on the camera.
Water and Moisture—Do not use the camera in dripping or splashing water or near salt spray, and do not immerse your camera in water or other liquids. Do not use the KODAK PROFESSIONAL DCS Pro Charger/AC Adapter near water—for example, near a sink or in a wet room or basement. Disposal—This digital camera contains lead. Disposal of lead may be regulated due to environmental considerations. For disposal or recycling information, please contact your local authorities or, in the U.S.A., the Electronics Industry Alliance: www.eiae.org.
Object or Liquid Entry—Never push foreign objects of any kind into your camera openings. The objects could touch dangerous voltage points or short out parts and cause a fire or electric shock. Never spill liquid of any kind on your camera.
April 29, 2004 |
1-3 |

Important Information
Attachments—Do not use attachments that are not recommended. The use of such attachments may cause hazards and serious damage to your camera.
Overloading—Do not overload power outlets and extension cords; this can result in a risk of fire or electrical shock.
Power-Cord Protections—Route power-supply and other cords so that you are not likely to walk on them or pinch them with items placed on or against them. Pay particular attention to cords at plugs, receptacles, and the point where they leave your camera.
Lightning—For added protection for your camera during a lightning storm, or any time when you will leave your camera unattended for long periods of time, unplug the KODAK PROFESSIONAL DCS Pro Charger / AC Adapter from the power outlet and disconnect the camera from the computer.
Memory cards—Memory cards (not supplied with the camera) are fragile devices that can be damaged if not treated with care. See the documentation accompanying any card you obtain to ensure that you are handling it as specified, and that you are using the card within its operating ranges for temperature, humidity, condensation, etc.
Humidity, Condensation—We recommend operating your camera within the range of 15% to76% relative humidity, non-condensing. If condensation occurs, added time may be required to read from or write to a memory card. Condensation may be present if the camera system and/or memory cards are moved from a relatively cold environment (like an air-conditioned room) into a warm, humid environment. We recommend that you allow sufficient time for the camera system and/or memory cards to normalize within the specified environmental ranges before operation. (Memory cards may have more restrictive humidity ranges. See the specifications accompanying your memory cards.)
Temperature—Do not expose the camera and batteries to excessive heat such as sunshine or fire.
Servicing—Do not attempt to service your camera yourself. Opening or removing covers may expose you to dangerous voltage or other hazards and void the warranty.
1-4 |
April 29, 2004 |

Important Information
Damage Requiring Service—Unplug your camera from the wall outlet and computer, and refer all servicing to the manufacturer under the following conditions:
•If liquid has been spilled or if objects have fallen into your camera.
•If your camera has been exposed to heavy rain or water. (While it is designed to tolerate a reasonable amount of moisture, your camera is not waterproof.)
•If your camera does not operate normally according to the operating instructions.
•If your camera has been dropped or the housing has been damaged.
•When your camera exhibits a distinct change in performance.
Disassembling the Camera—Never attempt to take the camera apart. The camera is shipped as a single unit.
April 29, 2004 |
1-5 |

Important Information
Electromagnetic Emissions
This equipment has been tested and found to comply with the limits for a Class B digital device, pursuant to Part 15 of the FCC Rules. These limits are designed to provide reasonable protection against harmful interference in a residential installation. This equipment generates, uses and can radiate radio energy and, if not installed and used in accordance with the instructions, may cause harmful interference to radio communications. However, there is no guarantee that interference will not occur in a particular installation. If this equipment does cause harmful interference to radio or television reception, which can be determined by turning the equipment off and on, the user is encouraged to try to correct the interference by one or more of the following measures:
•Reorient or relocate the receiving antenna.
•Increase the separation between your camera and receiver.
•Connect your camera into an outlet on a circuit different from that to which the receiver is connected.
•Consult the dealer or an experienced radio/TV technician for help.
VCCI
This is a Class B product based on the standard of the Voluntary Control Council for Interference from Information Technology Equipment (VCCI). If this is used near a radio or television receiver in a domestic environment, it may cause radio interference. Install and use the equipment according to the instruction manual.
1-6 |
April 29, 2004 |
2 About Your Camera
Nomenclature
Camera Front
Self Timer /
AF-Assist Illuminator /
Red-eye Reduction lamp
Shutter Release button
Sub-Command dial
Depth of Field Preview button
Vertical Shutter release

 Exposure Mode dial
 PC Sync terminal Lens Release button
Focus Mode selector


 Remote Release
accessory port
April 29, 2004 |
2-1 |

About Your Camera
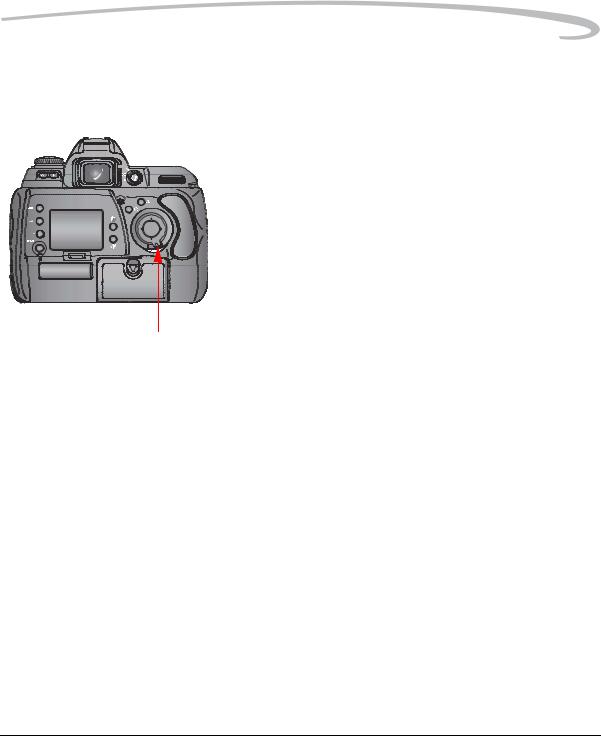
Camera Back
Exposure Mode dial  Flash Sync Mode button Auto Exposure Bracketing button
Image LCD
Menu button
Nav+ button
HotKey button
Digital Status button
Digital Status LCD
Camera Top
Flash Lock Release button
Drive Mode selector lock release
Camera Strap eyelet 
Exposure Mode dial


 Drive Mode selector
Hot shoe
 Viewfinder eyepiece
Diopter Adjustment lever
AE-L/AF-L button
Metering System selector
Main-Command dial

 Microphone
OK button
 Cancel button
 Four-way switch
Four-way switch lock
Delete button
Tag/Record button
 Card Busy LED
  Media door
Power switch
Shutter Release button

 Flash Exposure
Compensation button
Exposure
Compensation button
LCD Illuminator
 Camera Strap eyelet
 Top Status LCD
Imager Plane indicator
2-2 |
April 29, 2004 |
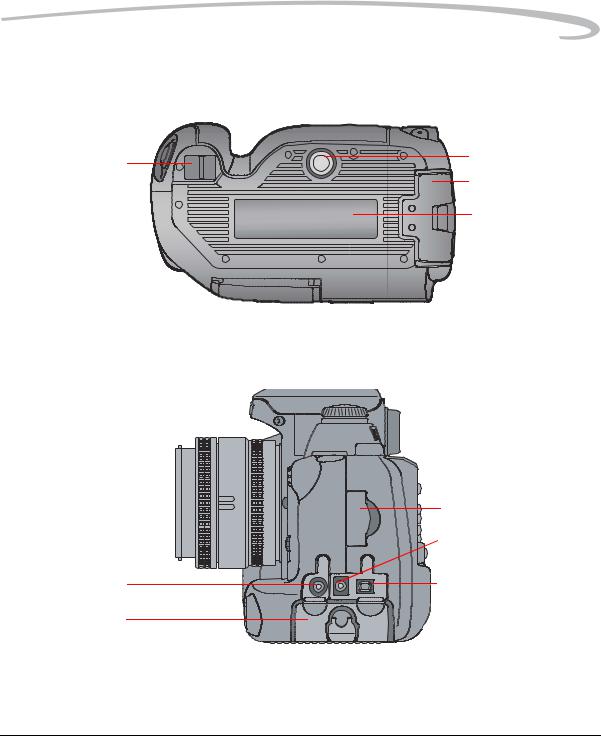
Camera Bottom
Camera strap eyelet
Left Side
Serial port
Battery slot
About Your Camera
Tripod mount
Battery slot
Name plate
Coin cell battery slot
 Video Output port
IEEE 1394 port
April 29, 2004 |
2-3 |
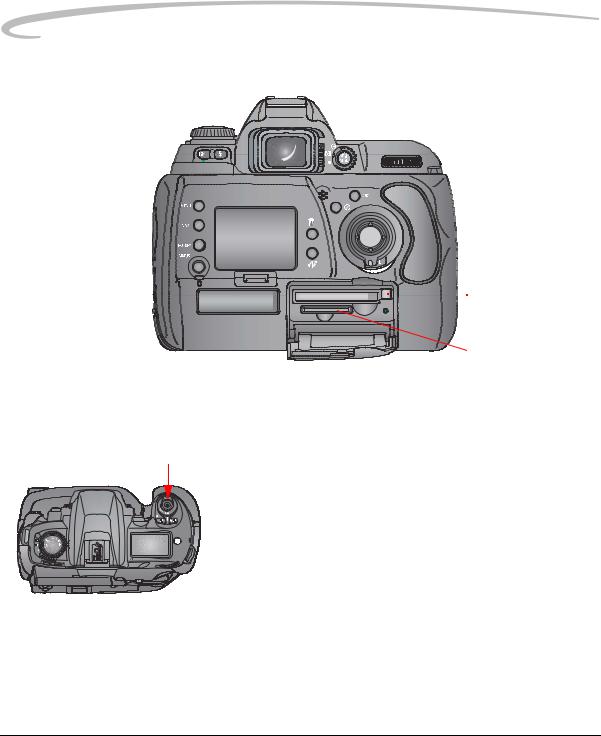
About Your Camera
Open Media Door
 CF Eject button
 CF Card slot
 Card Busy LED
 SD/MMC card slot
Turning the Camera On and Off
Connect your camera to a power source (see page 3-1) before turning it on.
• Turn the Power Switch On or Off.
2-4 |
April 29, 2004 |

About Your Camera
Viewfinder and Focus Screen
|
|
|
|
|
|
|
|
|
|
|
|
|
|
|
|
|
|
|
|
|
|
|
|
|
|
|
|
|
|
|
|
|
|
|
|
|
|
|
|
|
|
|
|
|
|
|
|
|
|
|
|
|
|
|
|
|
|
|
|
|
|
|
|
|
|
|
|
|
|
|
|
|
|
|
|
|
|
|
|
|
|
|
|
|
|
|
|
|
|
|
|
|
|
|
|
|
|
|
|
|
|
|
|
|
|
|
|
|
|
|
|
|
|
|
|
|
|
|
|
|
|
|
|
|
|
|
|
|
|
|
|
|
|
|
|
|
|
|
|
|
|
|
|
|
|
|
|
|
|
|
|
|
|
|
|
|
|
|
|
|
|
|
|
|
|
|
|
|
|
|
|
|
|
|
|
|
|
|
|
|
|
|
|
|
|
|
|
|
|
|
|
|
|
|
|
|
|
|
|
|
|
|
|
|
|
|
|
|
|
|
|
|
|
|
|
|
|
|
|
|
|
|
|
Focus Indicator |
|
|
|
|
|
|
|
|
|
|
|
|
|
|
|
|
|
|
|
|
|
Flash Ready light |
|||||
|
|
|
|
|
|
|
|
|
|
|
|
|
|
|
|
|
|
|
|||||||||
|
|
|
|
|
|
|
|
|
|
|
|
|
|
|
|
|
|
|
Exposure Compensation value / |
||||||||
Focus area |
|
|
|
|
|
|
|
|
|
|
|
|
|
|
|
|
|
|
|
|
|
|
|
||||
|
|
|
|
|
|
|
|
|
|
|
|
|
|
|
|
|
|
|
|
|
|||||||
|
|
|
|
|
|
|
|
|
|
|
|
|
|
|
|
|
|
|
|
Flash Exposure Compensation value |
|||||||
Metering system |
|
|
|
|
|
|
|
|
|
|
|
|
|
|
|
|
|
|
|
|
|||||||
|
|
|
|
|
|
|
|
|
|
|
|
|
|
|
|
|
|
Exposure Compensation |
|||||||||
Auto Exposure Lock indicator |
|
|
|
|
|
|
|
|
|
|
|
|
|
|
|
|
|
||||||||||
|
|
|
|
|
|
|
|
|
|
|
|
|
|
|
|
|
|||||||||||
|
|
|
|
|
|
|
|
|
|
|
|
|
|
||||||||||||||
Shutter Speed |
|
|
|
|
|
|
|
|
|
|
|
|
|
|
|
|
|
Flash Exposure Compensation |
|||||||||
|
|
|
|
|
|
|
|
|
|
|
|
|
|
|
|
|
|
|
|
|
|
||||||
|
|
|
|
|
|
|
|
|
|
|
|
|
|
||||||||||||||
Aperture |
|
|
|
|
|
|
|
|
|
|
|
|
|
|
|
|
|
Exposure mode / |
|||||||||
|
|
|
|
|
|
|
|
|
|
|
|
|
|
|
|
|
|
|
|
|
|
|
|
||||
|
|
|
|
|
|
|
|
|
|
|
|
|
|
|
|
|
|
|
|
|
|
|
|
|
Electronic analog exposure display / |
||
|
|
|
|
|
|
|
|
|
|
|
|
|
|
|
|
|
|
|
|
|
|
|
|
|
Exposure Compensation value display |
||
|
|
|
|
|
|
|
|
|
NOTE: Do not attempt to replace the Focus screen. Return the camera to |
||||||||||||||||||
|
|
|
|
|
|
|
|
|
|
|
|
|
an authorized KODAK service center. |
||||||||||||||
April 29, 2004 |
2-5 |
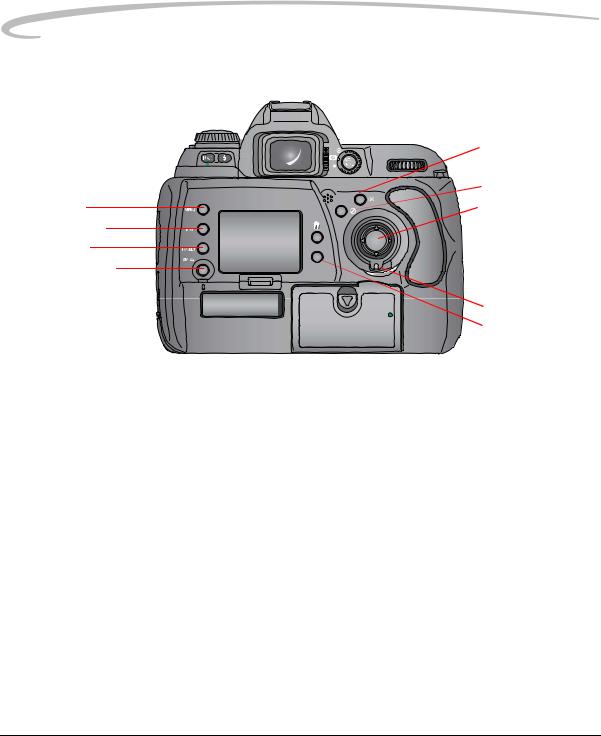
About Your Camera
Digital Buttons
Menu button
Nav+ button
HotKey button
Digital Status button
Four-way Switch
 OK button
 Cancel button
Four-way switch


 Delete button
 Four-way switch lock
 Tag/Record button
NOTE: Use the buttons at the left of the Image LCD with the Four-way switch. Use the buttons at the right of the Image LCD without the Four-way switch.
When the Image LCD is off, use the Four-way switch to select a focus area (see page 8-3). When the Image LCD is on, use the Four-way switch to access digital functions (see below).
Press the right or left side of the Four-way switch to:
•Navigate through images in Image mode
•Move the Region of Interest box right or left in Zoom Image mode
•Navigate among tabbed menus
•When a menu option is highlighted, press the right side of the Four-way switch to display/enable a cascaded menu (press the left side to remove/disable the cascaded menu)
Press the top or bottom of the Four-way switch to:
•Navigate among Image modes
•Move the Region of Interest box up or down in Zoom Image mode
•Navigate among menu options
2-6 |
April 29, 2004 |
About Your Camera
Locking and Unlocking the The Four-way switch does not work if the Four-way switch lock is on. There Four-way Switch may be occasions where you want it locked to prevent changing certain
settings.
•Rotate the Four-way switch lock lever to the right to lock the switch. Rotate it to the left to unlock.
OK Button |
• If the Image LCD is off, turns it on in Image mode (see page 11-1) |
|
• Implements a highlighted menu option |
|
• Enables the Region of Interest box in Zoom Image mode |
|
(see page 11-3) |
|
• Implements a zoom in Zoom Image mode |
|
• Accepts changes and dismisses confirmation screens |
Cancel Button |
• Turns off the Image LCD in Image mode |
|
• Exits menus without applying changes |
|
• Disables the Region of Interest box in Zoom Image mode |
|
• Dismisses a confirmation screen without accepting the change |
|
• Displays Image mode when a menu is displayed |
April 29, 2004 |
2-7 |

About Your Camera
Menu Button |
• If the Image LCD is off, turns it on and displays a menu (last-accessed |
|
menu option highlighted) |
|
• Displays a menu when the Image LCD is in Image mode (last-accessed |
|
menu option is highlighted) |
|
• Displays Image mode when a menu is displayed |
Nav+ Button |
The Nav+ button provides an efficient method of navigating among folders |
|
and images within a folder. |
|
• If the Image LCD is off, turns it on in the last-accessed Image mode with |
|
Nav+ overlay |
|
• If the Image LCD is on, displays the last-accessed Image mode with |
|
Nav+ overlay |
|
• Navigates to higher or lower numbered folders when pressed and held |
|
while you press the top or bottom of the Four-way switch |
|
• Displays every tenth higher or lower numbered image within a folder |
|
when pressed and held while you press the right or left side of the |
|
Four-way switch |
HotKey Button |
The HotKey button provides a shortcut to frequently used (user-definable) |
|
digital functions. |
|
NOTE: The Digital Status button (see page 2-9) provides shortcuts to |
|
specific capture-critical functions. Use the HotKey button for |
|
functions not already available through the Digital Status button. |
|
• If the Image LCD is off, turns it on and displays the menu with the |
|
highlighted menu option associated with the first HotKey position |
|
• If the Image LCD is on, displays the menu with the highlighted menu |
|
option associated with the first HotKey position |
|
• Highlights the menu option for the next / previous HotKey position when |
|
pressed and held while you press the left or right of the Four-way switch |
2-8 |
April 29, 2004 |

About Your Camera
Digital Status Button |
The Digital Status button (used with the Digital Status LCD) provides a |
|
shortcut to capture-critical menu options on the Image LCD. |
|
(See page 2-16.) |
|
• Highlights the last-used function on the Digital Status LCD and highlights |
|
its associated menu option on the Image LCD |
|
• Selects a different function on the Digital Status LCD and highlights its |
|
associated menu option on the Image LCD when pressed and held while |
|
you press the right, left, top, or bottom of the Four-way switch |
|
• If the Image LCD is off, turns it on and displays the menu with the |
|
highlighted menu option associated with the last-accessed Digital Status |
|
LCD function. The menu has a disabled appearance. |
Delete Button |
The Delete button is only enabled when the Image LCD is in Image mode. |
|
• Displays a screen with five options for deleting the image. |
Tag/Record Button |
The Tag/Record button is only enabled when the Image LCD is in Image |
|
mode. |
|
• Press and release quickly (less than one second) to display the tag |
|
options |
|
• Press and hold (longer than one second) to activate the microphone |
|
and record an annotation |
April 29, 2004 |
2-9 |

About Your Camera
LCDs
Top Status LCD
Shutter speed / Exposure Compensation value |
|
|
|
|
|
|
|
|
|
|
|
|
|
|
|
|
|
|
|
Bracketing bar graphs |
|||||||||||||||
|
|
|
|
|
|
|
|
|
|
|
|
|
|
|
|
|
|
|
|
|
|
|
|
Aperture |
|||||||||||
Flash Exposure Compensation |
|
|
|
|
|
|
|
|
|
|
|
|
|
|
|
|
|
|
|
|
|
|
|
|
|
|
|
|
|
|
|
|
|||
|
|
|
|
|
|
|
|
|
|
|
|
|
|
|
|
|
|
|
|
|
|
|
|
|
|
|
|
|
|
|
|
Custom Setting |
|||
|
|
|
|
|
|
|
|
|
|
|
|
|
|
|
|
|
|
|
|
|
|
|
|
|
|
|
|
|
|
|
|
||||
|
|
|
|
|
|
|
|
|
|
|
|
|
|
|
|
|
|
|
|
|
|
|
|
|
|
|
|
|
|
|
|
||||
Exposure Compensation |
|
|
|
|
|
|
|
|
|
|
|
|
|
|
|
|
|
|
|
|
|
|
|
|
|
|
|
|
|
|
|
|
|
||
|
|
|
|
|
|
|
|
|
|
|
|
|
|
|
|
|
|
|
|
|
|
|
|
|
|
|
|
|
|||||||
Flexible Program |
|
|
|
|
|
|
|
|
|
|
|
|
|
|
|
|
|
|
|
|
|
|
|
|
|
|
|
|
|
|
|
|
|
|
Battery power |
|
|
|
|
|
|
|
|
|
|
|
|
|
|
|
|
|
|
|
|
|
|
|
|
|
|
|
|
|
|
|
|
|
Focus area |
||
|
|
|
|
|
|
|
|
|
|
|
|
|
|
|
|
|
|
|
|
|
|
|
|
|
|
|
|
|
|
|
|
|
|||
|
|
|
|
|
|
|
|
|
|
|
|
|
|
|
|
|
|
|
|
|
|
|
|
|
|
|
|
|
|
|
|
|
|||
Flash Sync Mode |
|
|
|
|
|
|
|
|
|
|
|
|
|
|
|
|
|
|
|
|
|
|
|
|
|
|
|
|
|
|
|
|
|
||
|
|
|
|
|
|
|
|
|
|
|
|
|
|
|
|
|
|
|
|
|
|
|
|
|
|
|
|
|
|
|
|
|
|
||
|
|
|
|
|
|
|
|
|
|
|
|
|
|
|
|
|
|
|
|
|
|
|
|
|
|
|
|
|
|
|
|
|
|
||
Image LCD |
|
|
|
|
|
|
|
|
|
|
|
|
|
|
|
|
|
|
|
|
|
|
|
|
|
|
|
|
|
|
|
|
Auto Exposure bracketing |
||
|
|
|
|
|
|
|
|
|
|
|
|
|
|
|
|
|
|
|
|
|
|
|
|
|
|
|
|
|
|
|
|
||||
|
Using the Image LCD you can: |
||||||||||||||||||||||||||||||||||
|
|
|
|
• Conveniently evaluate and review images in the camera |
|||||||||||||||||||||||||||||||
|
|
|
|
NOTE: Occasionally there are a few pixels in the LCD that are either |
|||||||||||||||||||||||||||||||
brighter or darker than the scene depicted. These pixels, few in number, do not affect the quality of the captured image. Furthermore, they do not affect the evaluation of a scene, the exposure or color of the image, or the control of the camera. You are able to fully utilize all the camera features and performance in this instance.
• Use tabbed menus to access digital functions
NOTE: The Image LCD screen shown here appears when the camera is in Advanced mode. In Basic mode (see page 4-1) only some of the information appears.
2-10 |
April 29, 2004 |
Loading...