


 Loading...
User’s Guide for Windows 98/Me
September 2000
www.kodak.com/go/homeprinting
Edition: September 2000
The following paragraph does not apply to any country where such provisions are inconsistent with local law:
LEXMARK INTERNATIONAL, INC., PROVIDES THIS PUBLICATION “AS IS” WITHOUT WARRANTY OF ANY KIND, EITHER EXPRESS OR IMPLIED, INCLUDING, BUT NOT LIMITED TO, THE IMPLIED WARRANTIES OF MERCHANTABILITY OR FITNESS FOR A PARTICULAR PURPOSE. Some states do not allow disclaimer of express or implied warranties in certain transactions; therefore, this statement may not apply to you.
This publication could include technical inaccuracies or typographical errors. Changes are periodically made to the information herein; these changes will be incorporated in later editions. Improvements or changes in the products or the programs described may be made at any time.
Comments about this publication may be addressed to Lexmark International, Inc., Department F95/032-2, 740 West New Circle Road, Lexington, Kentucky 40550, U.S.A. In the United Kingdom and Eire, send to Lexmark International Ltd., Marketing and Services Department, Westhorpe House, Westhorpe, Marlow Bucks SL7 3RQ. Lexmark may use or distribute any of the information you supply in any way it believes appropriate without incurring any obligation to you. You can purchase additional copies of publications related to this product by calling 1-800-553-9727. In the United Kingdom and Eire, call 0628-481500. In other countries, contact your point of purchase.
References in this publication to products, programs, or services do not imply that the manufacturer intends to make these available in all countries in which it operates. Any reference to a product, program, or service is not intended to state or imply that only that product, program, or service may be used. Any functionally equivalent product, program, or service that does not infringe any existing intellectual property right may be used instead. Evaluation and verification of operation in conjunction with other products, programs, or services, except those expressly designated by the manufacturer, are the user’s responsibility.
Lexmark and Lexmark with diamond design are trademarks of Lexmark International, Inc. registered in the United States and/or other countries.
Kodak is a trademark of Eastman Kodak Company.
Iomega and Zip are trademarks of Iomega Corporation registered in the U.S. Patent and Trademark Office and in other countries and the Zip 100 brand block is a trademark of Iomega Corporation.
Other trademarks are the property of their respective owners.
© Copyright 2000 Lexmark International, Inc. and Eastman Kodak Company. All rights reserved.
UNITED STATES GOVERNMENT RESTRICTED RIGHTS
This software and documentation are provided with RESTRICTED RIGHTS. Use, duplication or disclosure by the Government is subject to restrictions as set forth in subparagraph (c)(1)(ii) of the Rights in Technical Data and Computer Software clause at DFARS 252.227-7013 and in applicable FAR provisions: Lexmark International, Inc., Lexington, KY 40550.

Contents
Chapter 1: Getting started ............................................... |
1 |
Setting up your printer ................................................................... |
1 |
Installing the print cartridges .................................................... |
2 |
Loading paper .......................................................................... |
4 |
Aligning the print cartridges ..................................................... |
5 |
Printing a test page .................................................................. |
6 |
Setting up your printer with Windows 98.................................. |
6 |
Setting up your printer with Windows Me................................. |
8 |
Setting up your printer with Windows 2000.............................. |
9 |
Setting up your printer with a Macintosh................................ |
10 |
Chapter 2: Understanding your printer ........................ |
13 |
Identifying the parts of your printer ............................................ |
13 |
Using the operator panel ............................................................ |
15 |
Verifying camera compatibility .................................................... |
15 |
Inserting a camera card .............................................................. |
16 |
Using the Quickstart screen ........................................................ |
17 |
Using Photo and Print Preview ................................................... |
18 |
Understanding the Idle Screen ................................................... |
18 |
Changing Languages .................................................................. |
18 |
Contents
iii

Contents
Chapter 3: Printing photos without |
|
a computer ........................................................................ |
21 |
Understanding the Printer Menus ............................................... |
21 |
Choosing a paper type from the operator panel ......................... |
22 |
Choosing a paper size ................................................................ |
23 |
Changing print quality ................................................................. |
24 |
Choosing the page layout ........................................................... |
24 |
Selecting photos to print ............................................................ |
26 |
Using the Photos to Print option ................................................. |
26 |
Choosing the number of sets to print .......................................... |
27 |
Photo Editing Selections ............................................................. |
27 |
Cropping photos .................................................................... |
28 |
Rotating a photo .................................................................... |
28 |
Selecting a border for your photo .......................................... |
29 |
Adding text to your photo....................................................... |
29 |
Brightness feature.................................................................. |
31 |
Auto Enhance ........................................................................ |
31 |
Resetting Defaults ....................................................................... |
32 |
Chapter 4: Using an external Zip drive ......................... |
33 |
Connecting your external Zip drive ............................................. |
33 |
Attaching your printer to the Zip drive ......................................... |
33 |
Copying photos to your Zip drive ................................................ |
34 |
Erasing photos from your camera card ....................................... |
35 |
Printing from your Zip disk .......................................................... |
35 |
iv

Chapter 5: Using your printer with a PC ...................... |
37 |
Step 1: Load the paper ............................................................... |
38 |
Step 2: Customize the printer settings ........................................ |
39 |
Step 3: Print your document ....................................................... |
42 |
Understanding the Card Reader ................................................. |
42 |
KODAK Picture Page Software ................................................... |
43 |
Chapter 6: Printing beyond the basics ......................... |
45 |
Printing on both sides of a sheet of paper .................................. |
45 |
Printing handouts ........................................................................ |
47 |
Printing booklets ......................................................................... |
48 |
Printing posters ........................................................................... |
50 |
Chapter 7: Caring for your cartridges .......................... |
53 |
Using your computer for cartridge maintenance ......................... |
53 |
Using your operator panel for cartridge maintenance ................. |
58 |
Cleaning and preserving print cartridges .................................... |
59 |
Chapter 8: Troubleshooting .......................................... |
63 |
Understanding the operator panel error messages .................... |
63 |
Printing problems without a computer ......................................... |
65 |
Printing problems with your computer ......................................... |
67 |
General printing problems with or without your computer ........... |
69 |
KODAK Customer Support Center ............................................. |
71 |
Appendix .......................................................................... |
73 |
Installing printer software ............................................................ |
73 |
Uninstalling printer software for Windows ................................... |
73 |
Uninstalling printer software for Macintosh ................................. |
73 |
Contents
v

Contents
Statement of Limited Warranty ................................................... |
74 |
Electronic emission notices ......................................................... |
75 |
Notices ........................................................................................ |
76 |
European Community (EC) directives conformity ...................... |
76 |
Energy Star ................................................................................. |
76 |
Power Supply information .......................................................... |
77 |
Safety information ....................................................................... |
77 |
Index .................................................................................. |
79 |
vi

1 |
Getting started |
|
|
Your printer is a general purpose color inkjet printer that provides high quality text and photos. You can use your printer by itself to print photos or connect it to a computer for other printing needs. The following sections will tell you how to set up your printer for Windows 98, Windows Me, Windows 2000 and Macintosh.
Note: To access the on-line User’s Guide for Windows 2000 or
Macintosh, click on Read User’s Guide under Learn on the CD front end prior to installing your software. This will let you copy and/or view the User’s Guide from your computer. After setting up your printer, this hard copy User’s Guide applies only to Windows98/Me.
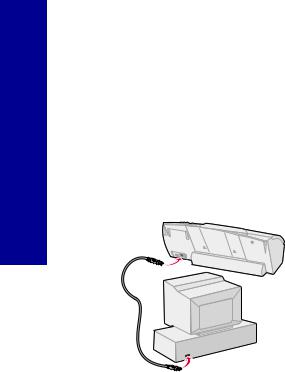
Setting up your printer
1 Connect the power supply.
1
2 

 3
3
Note: Connection 2, above may not be required in some countries.
started Getting
1
Getting started
Select Language appears on the operator panel display to indicate the power is on.
Note: If you need help identifying the operator panel buttons, see page 15.
2Press  or
or  on the operator panel to scroll through the languages.
3Press Select when you see the language you want.
Select Paper Size appears on the operator panel display.
4Press  or
or  on the operator panel to scroll through the paper sizes.
5Press Select when you see the paper size you want.
6Continue with “Installing the print cartridges” in the following section.
Installing the print cartridges
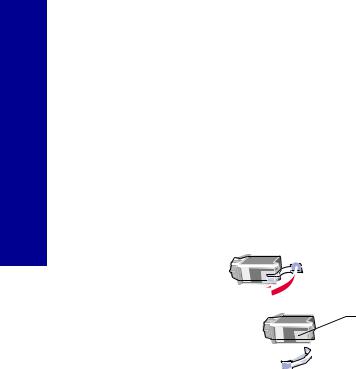
1Remove the sticker and transparent tape from the bottom of the print cartridge.
Note: Be sure to remove the tape and install the cartridges one at a time to prevent leaking.
Warning: DO NOT touch the gold contact area of the print cartridges.
2
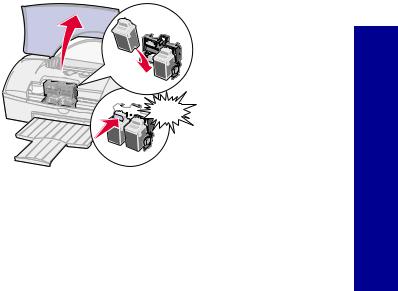
2Insert the color cartridge in the left slot and the photo cartridge in the right slot.
Note: To replace the photo cartridge with a black cartridge, see page 54.
a |
b |
c |
Raise the front |
Insert the |
Push back firmly on |
cover. |
cartridges into the |
the cartridge until it |
|
print cartridge |
snaps securely into |
|
carrier. |
place. |
|
a |
b |
c

 Snap
Snap
3 Close the front cover.
started Getting
3
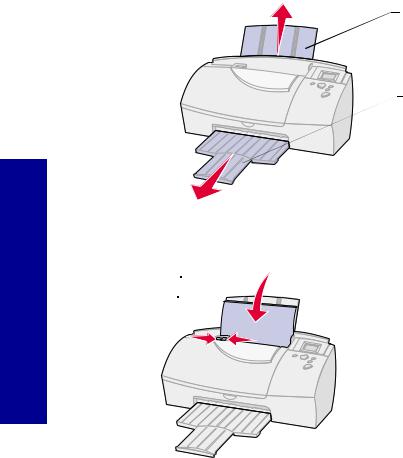
Loading paper
1 Pull out the paper support and paper exit tray.
Paper support
Paper exit tray
Getting started
2Place paper against the right side of the sheet feeder with the print side facing you.
Paper guide 
Release tab
3Squeeze the release tab and the paper guide together, and then slide the paper guide to the left edge of the paper.
4
Aligning the print cartridges
1Load plain paper in the printer. For help loading paper, see the previous section.
2Press Menu.
3Press  until Utilities is highlighted, and then press Select. The Utilities menu appears.
4Press  until Align Cartridges is highlighted, and then press
Select.
5Press  until Yes is highlighted, and then press Select.
“Printing Page, Please Wait” message appears.
The test page prints several alignment patterns, depending on the cartridge combination installed. Each pattern has a number under it. The test page that prints is similar to the one shown:
Note: If you have a color and black cartridge combination installed, you will have two more alignment values, C and D. Follow the same instructions as you would for the color and photo cartridge combinations.
6Choose Values With Straightest Lines message appears, press
Select to continue.
7From each alignment group on the test page, find the number under the alignment pattern that comes closest to forming a straight line.
For example, in sample group A, the arrow points to the pattern that comes closest to forming a straight line.
started Getting
5
Getting started
The Align Cartridge Choose Values screen appears.
8In the Align Cartridge dialog box, press  or
or  to select the numbers from the printed test page that come closest to forming a straight line.
9Press  to highlight Continue and press Select.
10Press Menu to exit the printer menus.
Printing a test page
1Make sure no camera card is inserted.
2Press Print to print a test page.
Setting up your printer with Windows 98
Before you begin:
•Prepare your printer for printing. For help, see page 1.
•Make sure you have a USB cable.
•Make sure Microsoft Windows 98 is running on your PC.
To install the KODAK PPM200 printer software:
1 Connect the USB cable to the computer and printer.
6

2Click Next when the first screen appears.
Note: When you connect your printer to a computer, the Microsoft Windows software on your computer detects new hardware and asks you to navigate through the “Add New Hardware Wizard” with a series of dialog boxes. Complete the following steps to finish this process and reach the
KODAK PPM200 Install Printer Software screen.
3Place the KODAK PPM200 Printer Software CD into your computer’s CD-ROM drive.
4 |
Make sure the first option is selected on the second screen, and |
Getting |
|
||
|
then click Next. |
|
5 |
Select the CD-ROM option on the next screen, and then click |
started |
|
Next. |
|
|
|
|
6 |
Click Next or Finish on any subsequent screens. |
|
|
The KODAK PPM200 software installation screen appears. |
|
|
Note: Prior to installing the KODAK PPM200 software, you can |
|
|
choose other options such as Learn, Registering online or |
|
|
Browse (KODAK Web Site, Technical Support or Personal |
|
|
|
|
|
Picture Maker Supplies). |
|
7 |
Choose from the following install options: |
|
|
– Personal Picture Maker Driver |
|
|
– KODAK Picture Page Software |
|
|
– Install All Software |
|
Note: You must choose Personal Picture Maker Driver or
Install All Software to enable PC printing.
7

8Follow the on-screen instructions.
Note: If the KODAK PPM200 screen does not appear, click Start, Run. Type the letter of your CD-ROM drive followed by :\setup and then click OK.
Congratulations!
You have successfully set up your printer for Windows 98.
Setting up your printer with Windows Me
Before you begin:
|
• |
Prepare your printer for printing. For help, see page 1. |
|
|
• |
Make sure you have a USB cable. |
|
started |
• |
Make sure Windows Me is running. |
|
1 |
Connect the USB cable to the computer and the printer. For help, |
||
|
|||
Getting |
|
see page 6. |
|
|
Note: When you connect your printer to a computer, the Microsoft |
||
|
|
||
|
|
Windows software on your computer detects new |
|
|
|
hardware and asks you to navigate through the “Add New |
|
|
|
Hardware Wizard” with a series of dialog boxes. Complete |
|
|
|
the following steps to finish this process and reach the |
|
|
|
KODAK PPM200 Install Printer Software screen. |
|
|
2 |
Place the KODAK PPM200 Printer Software CD into your |
|
|
|
computer’s CD-ROM drive. |
|
|
3 |
Make sure the first option, Automatic search for a better driver, |
|
|
|
is selected, and then click Next. |
|
|
|
Note: Skip steps 4 and 5 if the following screen does not |
|
|
|
appear. |
|
|
|
The Select Other Driver screen appears. |
|
|
4 |
Select the Inkjet Color Printer LEXUSB.INF file, and then click |
|
|
|
OK. |
8

5Click Next or Finish on any subsequent screens.
The KODAK PPM200 software installation screen appears.
Note: Prior to installing the KODAK PPM200 software, you can choose other options such as Learn, Registering online or Browse (KODAK Web Site, Technical Support or Personal Picture Maker Supplies).
6Choose from the following install options:
–Personal Picture Maker Driver
–KODAK Picture Page Software
–Install All Software
Note: You must choose Personal Picture Maker Driver or
Install All Software to enable PC printing.
7Follow the on-screen instructions.
8If the KODAK PPM200 screen does not appear, click Start, Run. Type the letter of your CD-ROM drive followed by :\setup and then click OK.
Congratulations!
You have successfully set up your printer for Windows Me.
Setting up your printer with Windows 2000
Before you begin:
•Prepare your printer for printing. For help, see page 1.
•Make sure you have a USB cable.
•Make sure Windows 2000 is running.
1Connect the USB cable to the computer and the printer. For help, see page 6.
The Microsoft Windows software appears on your computer to detect new hardware.
started Getting
9

Getting started
2Click CANCEL.
3Place the KODAK PPM200 Printer Software CD into your computer’s CD-ROM drive.
The KODAK PPM200 software installation screen appears.
Note: Prior to installing the KODAK PPM200 software, you can choose other options such as Learn, Registering online or Browse (KODAK Web Site, Technical Support or Personal Picture Maker Supplies).
4Choose from the following install options:
–Personal Picture Maker Driver
–KODAK Picture Page Software
–Install All Software
Note: You must choose Personal Picture Maker Driver or
Install All Software to enable PC printing.
5Follow the on-screen instructions.
6If the KODAK PPM200 screen does not appear, click Start, Run. Type the letter of your CD-ROM drive followed by :\setup and then click OK.
Congratulations!
You have successfully set up your printer for Windows 2000.
Setting up your printer with a Macintosh
Before you begin:
•Prepare your printer for printing. For help, see page 1.
•Make sure you have a USB cable.
•Make sure Mac OS 8.6 or Mac OS 9 is running on your Macintosh computer.
10

To install the KODAK PPM200 printer software:
1 |
Connect the USB cable to the computer and the printer. |
|
2 |
Place the KODAK PPM200 Printer Software CD into your |
|
|
computer’s CD-ROM drive. |
|
|
The KODAK PPM200 Installer main screen appears. |
|
3 |
Click Install and Agree. |
|
|
The KODAK License Agreement screen appears. |
|
4 |
Click Accept. |
|
|
The KODAK PPM200 Installer screen appears. |
|
5 |
Click Install. |
|
|
The KODAK PPM200 Printer Selection screen appears. |
|
6 |
Follow the on-screen instructions. |
Getting |
|
Note: Prior to installing the KODAK PPM200 software, you can |
|
|
|
|
|
choose other options such as Learn, Registering online or |
started |
|
Browse (KODAK Web Site, Technical Support or Personal |
|
|
|
Picture Maker Supplies).
Congratulations!
You have successfully set up your printer on a Macintosh computer.
Note for Macintosh Users:
If your Macintosh computer locks up or freezes while printing, you may need to unplug the printer and turn off your computer. After a few seconds, plug the printer back in and turn your computer back on. The printer driver’s spooler may attempt to start printing the job that was in the queue before the computer locked up. This could cause your system to lock up again. To recover from this problem:
1Unplug the printer and turn off your computer.
2Hold down the Shift key and turn on the computer.
11

3Press and hold the Shift key until you see the Mac OS screen and the words “Extensions Off”.
4Release the Shift key.
5Locate the KODAK PPM200 printer icon on your desktop. The inactive printer spooler has an X over it.
6Double-click the icon to open the KODAK PPM200 dialog box.
7Drag your print jobs to the trash can.
8Restart the computer to enable extensions.
9Plug your printer back in.
Getting started
12

2 Understanding your printer
This chapter describes the parts of your printer and their functions.
Identifying the parts of your printer
Paper support |
Sheet feeder |
|
Release tab |
Operator panel |
|
Paper guide |
Front cover |
|
Camera card |
||
|
||
cover |
|
|
Paper exit tray |
|
Use this... |
When you want to... |
|
|
Paper support |
Keep paper straight in the sheet feeder. |
|
|
Release tab, |
Make sure the paper feeds correctly into your |
Paper guide |
printer. |
|
|
|
|
Sheet feeder |
Load paper. |
|
|
Front cover |
Install or change print cartridges, or clear paper |
|
jams. |
|
|
Paper exit tray |
Keep paper together after printing. |
|
|
Camera card cover |
Insert or remove a camera card. |
|
|
|
13 |
printer your Understanding

...Use this |
...When you want to |
|
|
Operator panel |
• Select setup options. |
|
• Select photos for printing. |
|
• Select special printing options. |
|
• Select photo storage options. |
|
• Display and clear status or error messages. |
|
|
Power supply connector
USB/PC cable  connector
USB external device connector
Use this... |
When you want to... |
|
|
Power supply connector |
Plug the power supply into the printer. |
|
|
USB/PC cable |
Attach the printer to a computer. |
connector |
|
|
|
USB external device |
Attach a Zip drive to the printer. |
connector |
|
|
|
Understanding your printer
14
Using the operator panel
Display Arrow window button 
Brightness Menu 

 control button
Select
button
Print button 
View/Return button
Use this... |
When you want to... |
|
|
Menu button |
Enter and exit the menus. |
|
|
Arrow button |
Navigate through the menus and view your photos. |
|
|
Display window |
Raise or lower the display to view the menus and your |
|
photos. |
|
|
Brightness control |
Adjust the brightness or contrast of the display. |
|
|
Select button |
Select or cancel a photo, enter a submenu, or accept |
|
menu settings. |
|
|
View/Return button |
Change from one view to another or return to a previous |
|
menu level without saving changes from the current |
|
menu option. |
|
|
Print button |
Begin printing. |
|
|
Verifying camera compatibility
Your printer is compatible with most types of digital cameras that use CompactFlash or SmartMedia camera cards. Visit our Web site at www.kodak.com/go/homeprinting for the latest camera compatibility list.
15
printer your Understanding

Inserting a camera card
Before inserting a camera card into its card slot, lift the protective cover located on the top of your printer.
Choosing a camera card slot
Your printer recognizes one source for photos at a time and searches for photos in the following order:
•Left slot (CompactFlash)
•Right slot (SmartMedia)
•Optional external devices (see page 33)
CompactFlash
SmartMedia
 Gold contact area
Camera card slot cover
Understanding your printer
Consider the following information before inserting a camera card:
•If the camera card has a gold contact area, make sure the contact area faces the front of your printer.
•If you are inserting a CompactFlash card, make sure the name label faces the back of your printer.
•If you are inserting the SmartMedia card, make sure you do not place it in the CompactFlash card slot.
•If your camera card or storage disk contains photo images, a Reading Card message appears in the display window. The number of photos contained on the card is also displayed.
16

Using the Quickstart screen
When you insert your camera card into your printer or if you are printing photos from an external device, a Quickstart screen appears that gives you easy print options.You do not need to enter the Main Menu of the printer.
The following table lists the start-up screen options:
Use the up and |
|
down arrows to |
|
select... |
When you want to... |
Print All |
Print all the photos from your camera card or external |
|
device. |
|
|
Print Camera Order |
Print the photo selections chosen in your camera. |
|
Note: This option is only visible when you have selected |
|
photos for printing using your camera. |
|
|
View Photos |
View and select photos for printing. |
|
|
Print Index |
Print thumbnail size photos. |
|
|
PC Card Reader |
View or copy photos to your computer. |
|
Note: This option is only visible if you are connected to |
|
your computer. See page 42. |
|
|
Change Layout |
Change the way your photos are printed on paper. |
|
|
To use the Quickstart screen:
1Insert the appropriate camera card or connect your external device containing photo images.
|
The Quickstart screen appears. |
|
2 |
Press or |
to scroll through the options until the selection you |
|
want is highlighted. |
|
3 |
Press Select. |
|
17
printer your Understanding

Understanding your printer
Note: To return to the Quickstart screen, remove and reinsert your camera card. This resets or clears all current photo selections.
Using Photo and Print Preview
These screens let you select photos and review them before printing.
To use Photo and Print Preview:
1Press  to highlight View Photos from the Quickstart screen and then
  or
or  to view and scroll through your photos.
2Press Select to choose the photos you want to print.
3Press View/Return to preview your selections.
Note: Pressing View/Return changes between photo and page preview screens.
4Press Print.
Note: The Page Preview screens show what your selections will look like, the current settings, and the number of pages to be printed.
Understanding the Idle Screen
An idle screen appears on the display if there is no camera card in the printer. This screen provides you with the current photo printer settings. The display goes blank after approximately 30 minutes. Press any key on the operator panel, or open the printer’s front cover to activate the display.
Changing Languages
Choose the Language option to change the language that appears on the operator panel display.
18

To change the Language Default:
1Press Menu until you see the Main Menu.
2Press  until Preferences is highlighted, and then press Select. The Preferences menu appears.
3Make sure Language is highlighted and press Select.
4Press  or
or  on the operator panel to scroll through and select the language you want.
19
printer your Understanding

Understanding your printer
20

3  Printing photos without a computer
This chapter describes how to print and edit photos using the printer menus.
Understanding the Printer Menus
If you want to print photos using more detailed options, change print settings, or access other printer functions, go to the printer menu by pressing the Menu button.
Menu Categories
Print Setup |
|
Paper |
|
Edit Photo |
|
Storage |
|
Utilities |
|
Preferences |
||||||
|
|
|
Settings |
|
|
|
|
|
|
|
|
|
|
|
|
|
|
|
|
|
|
|
|
|
|
|
|
|
|
|
|
|
|
|
|
|
|
|
|
|
|
|
|
|
|
|
|
|
|
|
Photos to Print |
Paper Type |
Crop |
Copy Card |
PC Card Reader Language |
Layout |
Paper Size |
Rotate |
Erase Card |
Ink Level |
Print Quality |
|
Add Border |
|
Clean Cartridge |
Sets |
|
Add Text |
|
Align Cartridge |
|
|
Brightness |
|
Reset Defaults |
Auto Enhance
Undo all Edits
To use the Menu:
1 Press the Menu button.
2 Press |
or |
to scroll and highlight the menu category you want. |
a without photos Printing computer
21
Loading...