


 Loading...
KODAK EASYSHARE C182
Digital Camera
Extended user guide
www.kodak.com
For interactive tutorials:
www.kodak.com/go/howto
For help with your camera:
www.kodak.com/go/c182support

Eastman Kodak Company
Rochester, New York 14650
© Kodak, 2009
All screen images are simulated.
Kodak, EasyShare, Max, and Perfect Touch are trademarks of Eastman Kodak Company.
4H6513_en
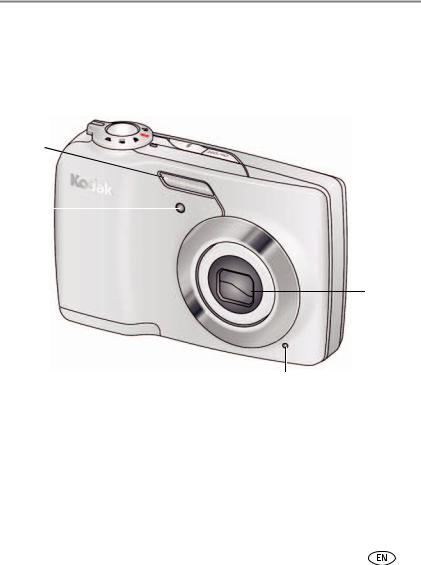
Product features
Front view
|
Shutter |
|
|
|
Mode dial |
|||||
|
|
|
||||||||
|
button |
|
|
|
|
|
Flash button |
|||
|
|
|
|
|
||||||
|
|
|
|
|
|
|
|
|
|
Power button |
Flash |
|
|
|
|
|
|
||||
|
|
|
|
|
|
|
||||
|
|
|
|
|
|
|
||||
|
|
|
|
|
|
|
||||
Self- |
|
|
|
|
|
|
|
|
|
|
|
|
|
|
|
|
|
|
|
|
|
timer |
|
|
|
|
|
|
|
|||
light |
|
|
|
|
|
|
|
|||
Lens/
Cover
Microphone
www.kodak.com/go/support |
i |
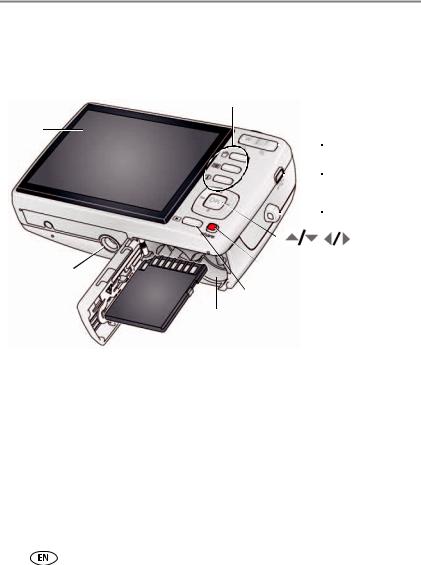
Product features
Back view
LCD
Tripod  socket
ii
Delete, Menu,
Info buttons Zoom (Telephoto,
Wide Angle)  buttons
 USB port
 Strap post
OK button
Share button
Review button
SD/SDHC Card slot/
Battery compartment
www.kodak.com/go/support

Table of contents |
|
|
1 |
Setting up your camera ......................................................................... |
1 |
|
Attaching the strap ....................................................................................... |
1 |
|
Loading the AA batteries............................................................................... |
2 |
|
Turning on the camera .................................................................................. |
2 |
|
Setting the language and date/time............................................................... |
3 |
|
Storing pictures on an SD or SDHC Card ........................................................ |
4 |
2 |
Taking pictures/videos ........................................................................... |
5 |
|
Taking pictures.............................................................................................. |
5 |
|
Using the optical and digital zoom ................................................................ |
6 |
|
Using the flash.............................................................................................. |
7 |
|
Using different modes ................................................................................... |
8 |
|
Taking a video ............................................................................................ |
10 |
|
Using shortcuts ........................................................................................... |
10 |
|
Using the self-timer..................................................................................... |
11 |
|
Taking panoramic pictures........................................................................... |
12 |
|
Understanding the picture-taking icons........................................................ |
13 |
3 |
Working with pictures/videos .............................................................. |
14 |
|
Reviewing pictures/videos ........................................................................... |
14 |
|
Deleting pictures/videos .............................................................................. |
15 |
|
Viewing pictures/videos in different ways..................................................... |
16 |
|
Selecting multiple pictures/videos ................................................................ |
16 |
|
Running a slide show .................................................................................. |
17 |
|
Using the menu button in review................................................................. |
18 |
|
Cropping pictures........................................................................................ |
19 |
|
Using KODAK PERFECT TOUCH Technology................................................. |
19 |
|
Rotating pictures......................................................................................... |
20 |
|
Copying pictures/videos............................................................................... |
20 |
|
Editing videos ............................................................................................. |
21 |
|
Understanding the review icons................................................................... |
23 |
www.kodak.com/go/support |
iii |
|

Table of contents |
|
|
4 Doing more with your camera ............................................................. |
24 |
|
|
Using the menu button to change settings................................................... |
24 |
|
Using the Capture tab ................................................................................. |
24 |
|
Video settings ............................................................................................. |
27 |
|
Using the Setup tab .................................................................................... |
28 |
5 |
Transferring, printing, tagging ............................................................ |
30 |
|
Installing the software................................................................................. |
30 |
|
Transferring pictures/videos......................................................................... |
31 |
|
Printing pictures.......................................................................................... |
32 |
|
Marking/tagging your pictures..................................................................... |
34 |
6 |
Getting help ........................................................................................ |
38 |
|
Getting help from your camera .................................................................... |
38 |
|
Troubleshooting .......................................................................................... |
39 |
|
Getting help on the Web ............................................................................. |
43 |
7 Appendix ............................................................................................. |
44 |
|
|
Camera specifications ................................................................................. |
44 |
|
Care and maintenance ................................................................................ |
46 |
|
Upgrading your software and firmware........................................................ |
47 |
|
Storage capacities ....................................................................................... |
47 |
|
Important safety instructions ....................................................................... |
47 |
|
Battery replacement, battery life .................................................................. |
48 |
|
Limited warranty ......................................................................................... |
49 |
|
Regulatory compliance ................................................................................ |
51 |
iv |
www.kodak.com/go/support |

1 Setting up your camera
IMPORTANT: For package contents, see your product package.
Attaching the strap
www.kodak.com/go/support |
1 |

Setting up your camera
Loading the AA batteries
Purchase cost-effective rechargeable
www.kodak.com/go/c182accessories
batteries and battery charger
Extend battery life |
See page 48. |
Turning on the camera
Press the Power button.
2 |
www.kodak.com/go/support |

Setting up your camera
Setting the language and date/time
Language:
 to change.
OK to accept.
Date/Time:
At the prompt, press OK.
 to change current field.
 for previous/next field.
OK to accept.
OK (press)
NOTE: To change language or date/time in the future, use the Setup menu (see page 28).
www.kodak.com/go/support |
3 |

Setting up your camera
Storing pictures on an SD or SDHC Card
Your camera has internal memory. You can purchase an SD or SDHC Card to conveniently store more pictures/videos. (Maximum supported card size is 32 GB.)
|
CAUTION: |
|
A card can only be inserted one way; forcing it may cause |
|
damage. Inserting or removing a card while the camera is on may |
|
damage the pictures, the card, or the camera. |
1 |
Turn off the camera. |
2 |
Insert or remove the |
|
optional card. |
3 |
Turn on the camera. |
|
Purchase accessories |
www.kodak.com/go/c182accessories |
|
4 |
|
|
|
|
www.kodak.com/go/support |
||
2 Taking pictures/videos
Taking pictures
To get the best pictures:
1Turn the Mode dial to Smart Capture  . Then press the Power button to turn on the camera.
2 Compose the picture.
3Press the Shutter button halfway to focus and set exposure. When the framing marks turn green, press the Shutter button completely down.
Using the framing marks
Framing marks
Framing marks indicate the camera focus area.
1Press the Shutter button halfway.
If the camera is not focusing on the desired subject, release the Shutter button and recompose the scene.
2Press the Shutter button completely down to take the picture.
NOTE: Framing marks do not appear in all modes. Multiple framing marks may appear when faces are detected.
www.kodak.com/go/support |
5 |

Taking pictures/videos
Reviewing the picture/video just taken
After you take a picture/video, the LCD displays a quickview for approximately 5 seconds. (To exit the quickview sooner, press the Shutter button halfway.)
Delete the current picture/video
OK Play/pause a video
To review pictures/videos anytime, see page 14.
Using the optical and digital zoom
1 Use the LCD to frame your subject.
2 To zoom in, press Telephoto (T).
To zoom out, press Wide Angle (W).
3 Take the picture.
NOTE: For focus distances, see Camera Specifications starting on page 44.
Using digital zoom
Use digital zoom to get up to 5X magnification beyond optical zoom when taking pictures/videos. Press Telephoto (T) until the slider on the LCD is at the end of the optical zoom range. Release Telephoto (T), then press it again.
NOTE: You may notice decreased image quality when using digital zoom. The slider pauses and turns red when the picture quality reaches the limit for an acceptable 4 x 6-in. (10 x 15 cm) print.
6 |
www.kodak.com/go/support |
Taking pictures/videos
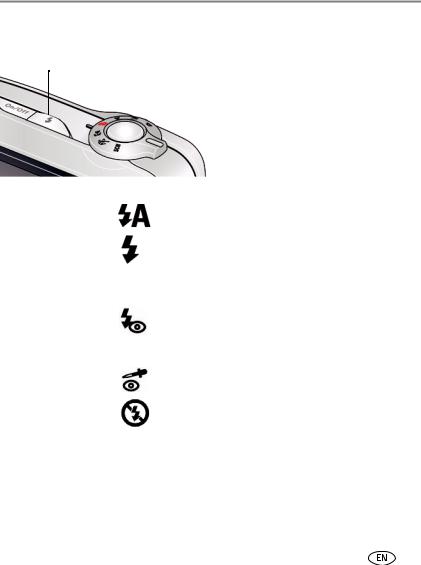
Using the flash
Press the flash button repeatedly to scroll through flash modes.
The current flash mode is shown on the LCD.
Flash modes |
|
|
|
Flash fires |
Auto |
|
|
|
When the lighting conditions require it. |
|
|
|
|
|
Fill (Flash On) |
|
|
|
Every time you take a picture, regardless of the lighting |
|
|
|
||
|
|
|
|
conditions. Use when the subject is in shadow or is |
|
|
|
|
“backlit” (when the light is behind the subject). In low |
|
|
|
|
|
|
|
|
|
light, hold the camera steady or use a tripod. |
Red Eye |
Preflash |
A preflash fires, shrinking the eye pupil, before the |
||
Your camera can correct |
|
|
|
picture is taken. |
red-eye using 2 |
|
|
|
|
methods. To choose a |
Digital |
A preflash does not fire; the camera corrects red eye. |
||
red eye setting, see the |
Correction |
|
||
Setup tab. |
|
|
|
|
|
|
|
|
|
Off |
|
|
|
Never |
|
|
|
|
|
|
|
|
|
|
www.kodak.com/go/support |
7 |

Taking pictures/videos
Using different modes
Turn the Mode dial to the mode that best suits your subjects and surroundings.
Use this mode |
For |
|
|
Smart
Capture
General picture taking—it offers excellent image quality and ease of use. The scene is analyzed for other content and for lighting.
You can choose the best picture size and aspect ratio for your needs—just press the Menu  button and choose Picture Size.
|
|
|
|
|
|
Close-Up |
Close range. Use available light instead of flash, if possible. |
|
|
|
|
|
|
|
|
|
|
|
|
|
|
|
|
|
|
|
|
|
|
Sport |
Subjects that are in motion. |
|
|
|
|||||
|
|
|
|
|
|
|
|
|
|
|
|
|
|
|
|
|
|
|
|
|
|
Scene |
Point-and-shoot simplicity when taking pictures in practically any |
|
|
|
|
|
|
||
|
|
|
|
|
|
|
situation. (See page 9.) |
|
|
|
|
|
|
|
|
|
|
|
|
|
|
|
|
|
|
|
|
|
|
Video |
Capturing video with sound. (See page 10.) |
|
|
|
|
|
|
||
|
|
|
|
|
|
|
NOTE: Sound cannot be played on the camera. Sound is heard after the |
|
|
|
|
|
|
|
video is transferred to your computer. |
|
|
|
|
|
|
|
|
|
|
|
|
|
|
Blur |
Reducing blur caused by camera shake or subject motion. |
|
|
|
|
|
|
||
|
|
|
|
|
|
Reduction |
|
|
|
|
|
|
|
|
|
|
|
|
|
|
|
|
|
|
P |
|
|
|
|
Program |
Access to more manual settings than Smart Capture mode. |
|
|
|
|
|
|
|
8 |
www.kodak.com/go/support |

Taking pictures/videos
Using Scene (SCN) modes
Choose a Scene mode—for great pictures in practically any situation!
1 Turn the Mode dial to SCN.
2Press 
 to view scene mode descriptions.
If the mode description turns off before you finish reading it, press OK.
3 Press OK to choose a Scene mode.
SCN mode |
For |
|
Portrait |
Full-frame portraits of people. |
|
Landscape |
Distant scenes. |
|
Flower |
Close-ups of flowers or other small subjects in bright light. |
|
Sunset |
Subjects at dusk. |
|
Backlight |
Subjects that are in shadow or “backlit.” |
|
Candle Light |
Subjects illuminated by candle light. |
|
Children |
Action pictures of children in bright light. |
|
Manner/ |
Quiet occasions, like a wedding or lecture. Flash and sound are disabled. |
|
Museum |
Place the camera on a steady surface or tripod. |
|
Text |
Documents. Place the camera on a steady surface or tripod. |
|
Beach |
Bright beach scenes. |
|
Snow |
Bright snow scenes. |
|
Fireworks |
Fireworks. Place the camera on a steady surface or tripod. |
|
Self- |
Close-ups of yourself. Assures proper focus and minimizes red eye. |
|
Portrait |
|
|
Night Portrait |
Reduces red eye of people in night scenes or low-light conditions. |
|
Night Landscape |
Distant scenery at night. Flash does not fire. |
|
High ISO |
People indoors, in low-light scenes. |
|
Panorama |
“Stitching” 2 or 3 pictures into 1 panoramic scene. (See page 12.) |
|
(R-L, L-R) |
|
|
Panning Shot |
Emphasizing horizontal motion, keeping the subject sharp. |
|
www.kodak.com/go/support |
9 |
|

Taking pictures/videos
Taking a video
1 Turn the Mode dial to Video  .
.
2Press the Shutter button completely down, then release it. To stop recording, press and release the Shutter button again.
To review and work with videos, see page 14.
NOTE: Sound cannot be played on the camera. Sound is heard after the video is transferred to your computer.
Using shortcuts
Your camera has a clean, uncluttered interface. For quick access to the most popular functions:
1Press the Info  button.
The shortcuts appear.
2Press to access functions like Exposure Compensation, Self-timer, and Auto focus. (You’ll see different functions in different modes.)
3Press  to choose a setting. To hide the shortcuts, press
  .
.

 Shortcuts
10 |
www.kodak.com/go/support |

Taking pictures/videos
Using the self-timer
Use the self-timer when you want to be included in a picture, or to ensure a steady Shutter button press. Place the camera on a tripod or flat surface.
1 In any picture-taking mode, press the Info  button to turn on the shortcut icons.
2 Press  to highlight the self-timer
  icon. Press
  to choose a setting:
10 seconds—10 |
A picture is taken after a 10-second delay (so you have time |
||
to get into the scene). |
|||
2 seconds— |
|
|
A picture is taken after a 2-second delay (for a steady, shutter |
2 |
|||
release on a tripod).
2 shot—2x The first picture is taken after a 10-second delay. A second picture is taken 8 seconds later.
3Compose the scene. Press the Shutter button halfway, then completely down.
The camera takes the picture/pictures after the delay.
Use the same procedure to take a 2- or 10-second self-timer video, but press the Shutter button completely down.
www.kodak.com/go/support |
11 |
Taking pictures/videos
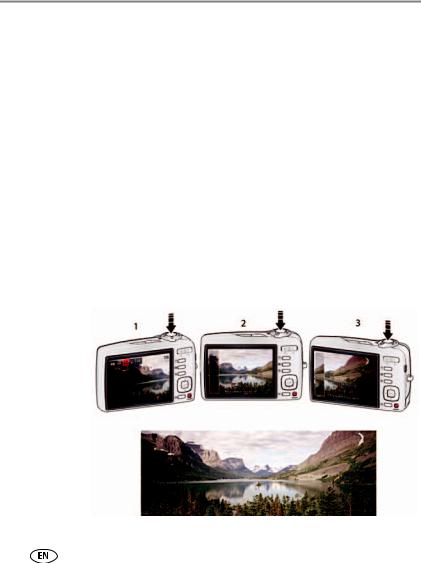
Taking panoramic pictures
Use panorama to “stitch” up to 3 pictures into a panoramic scene.
NOTE: For best results, use a tripod. Only the panoramic picture is saved; individual pictures are not. (Exposure and white balance are set with the first picture. The flash is set to Off.)
1 Turn the Mode dial to SCN.
2Press  to highlight Panorama Left-Right or Panorama Right-Left (depending on the direction you want to pan), then press OK.
3Take the first picture.
After a quickview, the LCD displays the liveview and an “overlay” from the first picture.
4Compose the second picture. Make the overlay from the first picture cover the same portion in the new picture. (You can press the Delete button to re-take a picture.)
5If you are taking only 2 pictures, press OK to stitch them together.
After you take 3 pictures, the pictures are automatically stitched together.
Take 2 or 3 pictures.
Get 1 panoramic picture.
NOTE: To use the self-timer 10-second or 2-second setting, see page 11.
12 |
www.kodak.com/go/support |
Taking pictures/videos
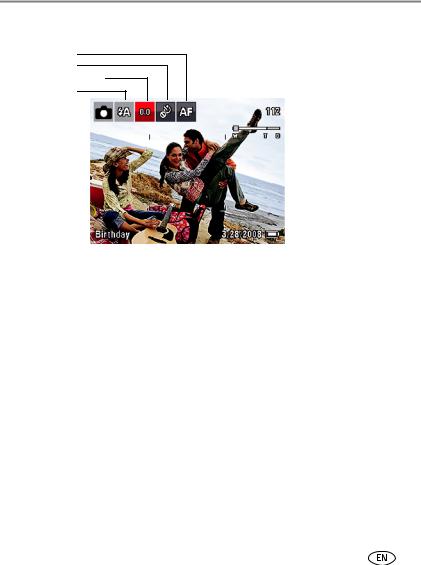
Understanding the picture-taking icons
Focus mode*
Self timer*
Exposure compensation*
Flash mode
Capture mode |
|
|
|
Pictures/time remaining |
|
|
|
||
|
|
|
|
Zoom slider |
|
|
|
|
Tag name |
|
|
|
|
|
Battery level |
|
||||||
|
|
|||||
|
|
|
|
|
|
Date |
|
|
|
|
|
||
|
|
|
|
|
|
* To learn more about shortcuts, see page 10.
www.kodak.com/go/support |
13 |

3 Working with pictures/videos
Reviewing pictures/videos
1 Press the Review  button.
2Press  for previous/next picture/video.
■Press the Shutter button halfway down to return to Capture mode.
■To view pictures/videos as thumbnails, see page 16.
Magnifying a picture
1 Press T to magnify 1X–8X.
2Press 
 to view other parts of a picture.
■ Press OK to return to 1X.
Playing a video
|
Playback speed |
|
|
||
4X |
2X |
1X |
2X |
|
4X |
|
|
|
|
|
|
Reverse |
|
Forward |
|||
Press OK to play a video. Press OK to pause/resume. During playback:
■Press  to play at 2X speed; press again for 4X.
■Press  to reverse at 2X speed; press again for 4X.
NOTE: Sound cannot be played on the camera. Sound is heard after the video is transferred to your computer.
14 |
www.kodak.com/go/support |
Loading...