


Operating Manual
KODAK
EKTAGRAPHIC III
Slide Projectors
PRESENTATION TECHNOLOGIES

Important Safety Instructions
When using your projector, always follow basic safety precautions:
1.Read and understand all instructions before using this equipment.
2.Operate this projector with 110to 125-volt 60 Hz current only. Incorrect voltage can cause projector malfunction. See “ Startup” on page 3 for Models III BR and III ABR, which feature a multi-voltage selector.)
3.Close supervision is necessary when any appliance is used by or near children, or others who may not understand the need for these precautions. Do not leave the projector unattended during use.
4.Be careful not to touch hot parts. For lamp replacement, allow the module to cool before touching the lamp and the surrounding area. Do not place the lamp module on heat-sensitive surfaces.
5.Do not operate your projector if the cord is damaged or if the projector has been dropped or damaged (see “ How to Obtain Service” on page 30 ).
6.Position the cord so that it is not tripped over, pulled, or placed in contact with hot surfaces.
7.If an extension cord is necessary, use a cord with a current rating at least equal to that of the projector. Cords rated for less amperage than the projector may overheat.
8.Always unplug the projector from the electrical outlet before cleaning and servicing and when it is not in use.
9.Allow the projector to cool before storing.
10.Do not immerse this equipment in water or other liquids.
11.Do not disassemble this projector. Use a qualified service technician when service or repair is required. Incorrect reassembly can cause electric shock the next time the projector is used.
12.Use only safety electrical low-voltage (SELV) devices.
13.The use of an accessory attachment not recommended by the manufacturer may increase risk of damage.
14.Keep the air-flow vents unobstructed.
Save These Instructions

Operating Manual
KODAK EKTAGRAPHIC III Slide Projectors

Congratulations!
You have just purchased a KODAK EKTAGRAPHIC III Slide Projector with a KODAK Extra Bright Lamp Module.
This new lamp module procides 30% greater light intensity so your images look brighter, richer and more saturated. This module features a “Lamp On” indicator on the lamp module door.
Contents
Important Safety Instructions . . . . . . . . . . . . . . . . . . . . . . . . . . . . . . . . . . . . 2
Overview . . . . . . . . . . . . . . . . . . . . . . . . . . . . . . . . . . . . . . . . . . . . . . . . . . . . 2
Introduction . . . . . . . . . . . . . . . . . . . . . . . . . . . . . . . . . . . . . . . . . . . . . . . . . . 3
Operation . . . . . . . . . . . . . . . . . . . . . . . . . . . . . . . . . . . . . . . . . . . . . . . . . . . . 3
Startup . . . . . . . . . . . . . . . . . . . . . . . . . . . . . . . . . . . . . . . . . . . . . . . . . . 3
Loading the Slide Tray . . . . . . . . . . . . . . . . . . . . . . . . . . . . . . . . . . . . . . 6
Projecting Your Slides . . . . . . . . . . . . . . . . . . . . . . . . . . . . . . . . . . . . . 10
Editing Your Presentation . . . . . . . . . . . . . . . . . . . . . . . . . . . . . . . . . . 17
Clearing a Gate Jam . . . . . . . . . . . . . . . . . . . . . . . . . . . . . . . . . . . . . . . 18
Using the Built-In Viewer . . . . . . . . . . . . . . . . . . . . . . . . . . . . . . . . . . . 19
Using a Dissolve Control . . . . . . . . . . . . . . . . . . . . . . . . . . . . . . . . . . . 20
Shutdown . . . . . . . . . . . . . . . . . . . . . . . . . . . . . . . . . . . . . . . . . . . . . . . 20
Maintenance . . . . . . . . . . . . . . . . . . . . . . . . . . . . . . . . . . . . . . . . . . . . . . . . |
21 |
Changing the Projection Lamp . . . . . . . . . . . . . . . . . . . . . . . . . . . . . . . |
22 |
Cleaning the Condenser, Heat-Absorbing Glass, and Mirror . . . . . . . |
23 |
Troubleshooting . . . . . . . . . . . . . . . . . . . . . . . . . . . . . . . . . . . . . . . . . . . . . 27
Warranty . . . . . . . . . . . . . . . . . . . . . . . . . . . . . . . . . . . . . . . . . . . . . . . . . . . 29
How to Obtain Service . . . . . . . . . . . . . . . . . . . . . . . . . . . . . . . . . . . . . . . . 30
Appendix A . . . . . . . . . . . . . . . . . . . . . . . . . . . . . . . . . . . . . . . . . . . . . . . . . 31
Serial Number
The serial number of your projector is printed on the label affixed to the power cord retainer on the base of the projector. Record this number, as well as the model identification, date, and place of purchase, for future reference.
|
KODAK EKTAGRAPHIC III Slide Projector |
1 |
|
|
|

Overview
FRONT RIGHT
1 – Tray
2 – Lock Ring
3 – Storage Compartment/Remote
4 – Elevating Foot
5 – Elevating Adjustment Wheel
6 – Elevating Foot Release Button
7 – Lens
8 – Viewer (Model ATS)
9 – Focus Knob
10 – Autofocus (Models A, AMT, & ATS)
11 – Select Bar
12 – Timer (Models AMT & ATS)
13 – Reverse
14 – Forward
15 – Power/Fan/Half Lamp/Full Lamp
BACK RIGHT
16 – Tray Release Latch
17 – Lamp Module
18 – Raised Index Mark
19 – Reading Light Cover
20 – Standby Light (Model E Plus)
21 – Special-Application Receptacle
22 – Remote Receptacle
BASE
23 – Power Cord
24 – Power Cord Retainer
25 – Leveling Foot
2 |
KODAK EKTAGRAPHIC III Slide Projector |
Introduction
Take the time to read the instructions in this operating manual to become familiar with your KODAK EKTAGRAPHIC III Slide Projector and how to operate it properly.
Operation
Startup
Models III BR
and ABR Only
 Important
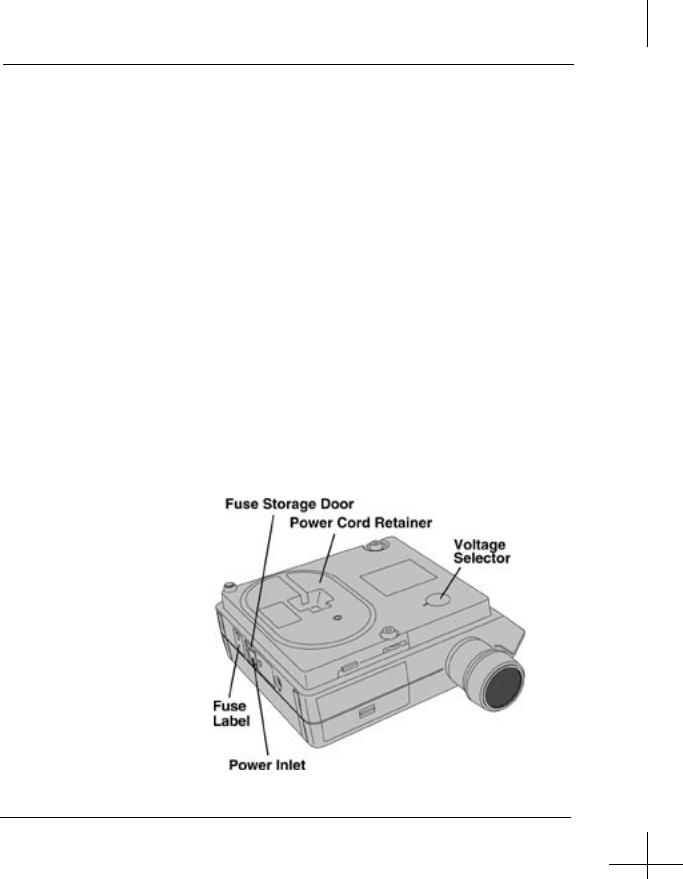
Before you turn on your new KODAK EKTAGRAPHIC III BR or ABR Slide Projector, it is critical to set the voltage selector to the proper setting. Use the proper fuse for the voltage selection. See the fuse label on the back of the projector.
The voltage selector on the KODAK EKTAGRAPHIC III BR or ABR Slide Projector is located on the base of the projector. Using a small object, such as a coin, you can set the voltage selector for the proper voltage (100, 115, 130, 220, 230, and 240 V).
|
KODAK EKTAGRAPHIC III Slide Projector |
3 |
|
|
|

Operation
EKTAGRAPHIC III BR and ABR Slide Projectors have a sensing capability to automatically set the proper power cycle (50 or 60 Hz). This eliminates the need to manually change the two-position switch included on models manufactured before November 1996. These projectors are shipped with a detachable power cord that is packaged separately (not wound on the Power Cord Retainer).
A spare fuse is provided. The fuse is located in the small, pull-out storage door below the Power Inlet. Simply pull the door with your finger. Remove the spent fuse with a small object (e.g., pencil tip) by pushing the fuse up and removing it from the receptacle. Press the spare fuse into the receptacle and close the storage door.
 Important
The EKTAGRAPHIC III BR and ABR Slide Projectors are supplied with a 3-wire grounding power cord to comply with UL122 (USA) and CSA222 (Canada) safety and electrical standards. We urge you to provide a permanent, properly installed 3-wire receptacle as the source of power for this projector. For advice and assistance, call a licensed electrician or your local power company.
When used outside the United States of America, please use a proper adapter that ensures grounding and polarization.
Although the Models III BR and ABR are approved to the standards of UL and CSA, they are not intended to meet approval in all countries worldwide.
4 |
KODAK EKTAGRAPHIC III Slide Projector |
Operation
Models A,
AMT and ATS
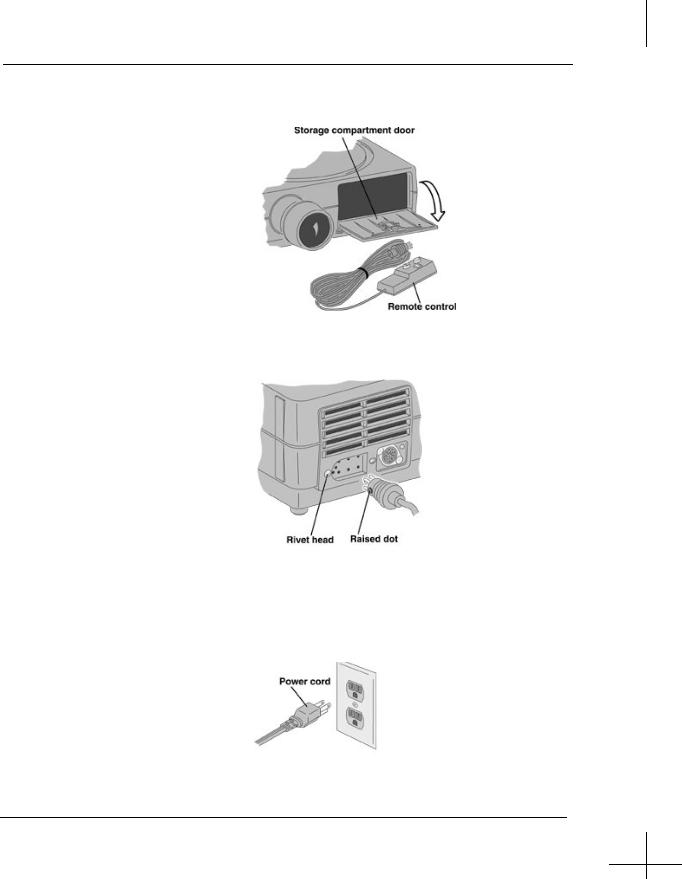
Open the storage compartment and remove the remote control.
Plug the 5-pin cable remote connector into the remote-control receptacle, aligning the raised dot with the metallic rivet head.
This receptacle also accepts plugs for accessories, such as Kodak dissolve controls.
Plug the power cord into a grounded outlet with 110to 125-volt 60 Hz current only.
|
KODAK EKTAGRAPHIC III Slide Projector |
5 |
|
|
|
Operation
Loading the Slide Tray
A KODAK EKTAGRAPHIC Universal Slide Tray is designed to hold up to 80 slides. Be sure that your slide mounts are in good condition; frayed or bent mounts may fail to drop into the projector. A variety of slide trays are available with capacity up to 140 slides. See your dealer in Kodak products for a complete list of Kodak trays and accessories.
Note: Do not attempt to project slides mounted with sticky or loose tape.
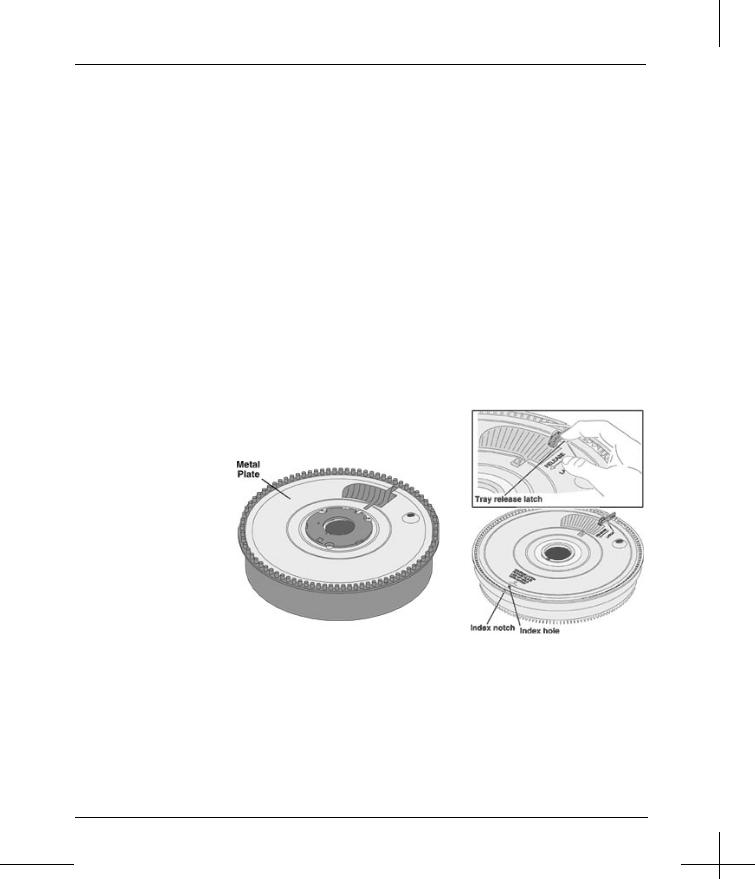
Place the tray over the center post of the projector. Align the "0" slot with the gate index; the tray will drop into position.
If your 80-slide tray does not drop easily, rotate the metal plate on the bottom of the tray until it locks into position. For a 140-slide tray, secure the lock ring, invert the tray, and align the index hole with the index notch. Slide and hold the tray release latch in the direction of the arrow, and turn the bottom plate until the index hole and notch align. Then release the latch.
80-Slide Tray |
140-Slide Tray |
6 |
KODAK EKTAGRAPHIC III Slide Projector |
Operation
Front-Screen
Projection
Remove the lock ring by turning it counterclockwise and lifting it off.
Check each slide’s orientation (horizontal or vertical), and arrange them in the order you wish to show them. Then turn the slides upside down.
Number each mount in the upper right-hand corner of the film’s shiny side.
Insert your first slide into the first slot in the tray so that the number is visible on the outer circumference of the tray. Insert your second slide in the second slot with the emulsion (dull side) facing your first slide, and so on.
|
KODAK EKTAGRAPHIC III Slide Projector |
7 |
|
|
|

Operation
Replace the lock ring by turning it clockwise until it is secure
Rear-Screen
Projection
With a Dissolve
Control
You can easily adapt a show from frontto rear-screen projection. Remove each slide from the tray and turn it around (keeping the slide upside down). This will give the projected slide a mirror image on the screen.
Insert your first slide back into the first slot in the tray. The number is now visible in the inner circumference of the tray.
Replace the lock ring by turning it clockwise until it is secure.
When you use a dissolve control, put your slides into two trays (one for oddand one for even-numbered slides).
8 |
KODAK EKTAGRAPHIC III Slide Projector |
 Loading...