


DC215 Zoom
KODAK DC215 Zoom Digital Camera
User’s Guide
Visit Kodak on the World Wide Web at www.kodak.com

©Eastman Kodak Company, 1999
Kodak, Photolife, and FlashPix ar e trade m arks of
Eastman Kodak Company.
The FlashPix format is defined in a spe ci fic at ion and test suite developed and pub li sh e d b y
Kodak in collaboration with Microsoft, Hewlett-Packard, and Live Picture. Only products
that meet the specification and pass the test suite may use the FlashPix name and logo.

i
Table of Contents
1 Getting Started . . . . . . . . . . . . . . . . . . . . . . . . . . . . . . . . . . . . . . . 1
Preparing to Take Pictures . . . . . . . . . . . . . . . . . . . . . . . . . . . . . . . . . . . . . . . . 2
Loading Batteries . . . . . . . . . . . . . . . . . . . . . . . . . . . . . . . . . . . . . . . . . . . . 2
Turning the Camera On and Off . . . . . . . . . . . . . . . . . . . . . . . . . . . . . . . . . 2
Checking Batteries . . . . . . . . . . . . . . . . . . . . . . . . . . . . . . . . . . . . . . . . . . . . 3
Inserting a Camera Memory Card . . . . . . . . . . . . . . . . . . . . . . . . . . . . . . . 4
Removing a Camera Memory Card . . . . . . . . . . . . . . . . . . . . . . . . . . . . . . . 4
Setting the Clock on Your Camera . . . . . . . . . . . . . . . . . . . . . . . . . . . . . . 5
Adjusting the LCD Brightness . . . . . . . . . . . . . . . . . . . . . . . . . . . . . . . . . . 6
2 Taking Pictures . . . . . . . . . . . . . . . . . . . . . . . . . . . . . . . . . . . . . . . . . 7
Previewing a Picture Before it is Taken . . . . . . . . . . . . . . . . . . . . . . . . . . . . . . 8
Capturing a Picture . . . . . . . . . . . . . . . . . . . . . . . . . . . . . . . . . . . . . . . . . . . . . . 9
Zooming in on Your Subject . . . . . . . . . . . . . . . . . . . . . . . . . . . . . . . . . . . . . . . . 9
Photographing Close-Ups . . . . . . . . . . . . . . . . . . . . . . . . . . . . . . . . . . . . . . . . .10
Putting Yourself in the Picture . . . . . . . . . . . . . . . . . . . . . . . . . . . . . . . . . . . . . 11
Viewing and Deleting the Picture Just Taken . . . . . . . . . . . . . . . . . . . . . . . . .12
Setting the Flash . . . . . . . . . . . . . . . . . . . . . . . . . . . . . . . . . . . . . . . . . . . . . . . .13
Adjusting the Camera Exposure . . . . . . . . . . . . . . . . . . . . . . . . . . . . . . . . . . .14
Locking in an Exposure Setting . . . . . . . . . . . . . . . . . . . . . . . . . . . . . . . . . . . .15
Deleting the Picture Just Taken . . . . . . . . . . . . . . . . . . . . . . . . . . . . . . . . . . . .16
3 Customizing Your Pictures . . . . . . . . . . . . . . . . . . . . . . . . . . . . . . 17
Understanding Quality and Resolution . . . . . . . . . . . . . . . . . . . . . . . . . . . . . .18
Adjusting the Picture Quality . . . . . . . . . . . . . . . . . . . . . . . . . . . . . . . . . . . . . .19
Adjusting the Picture Resolution . . . . . . . . . . . . . . . . . . . . . . . . . . . . . . . . . . 20
Adding a Template to Your Picture . . . . . . . . . . . . . . . . . . . . . . . . . . . . . . . . .21
Adding the Date to Your Pictures . . . . . . . . . . . . . . . . . . . . . . . . . . . . . . . . . 22
Selecting an Image File Type . . . . . . . . . . . . . . . . . . . . . . . . . . . . . . . . . . . . . . 23
Setting a Quickview for Each Picture . . . . . . . . . . . . . . . . . . . . . . . . . . . . . . 24

ii
Formatting Your Camera Memory Card . . . . . . . . . . . . . . . . . . . . . . . . . . . . 25
Adjusting the Video Out Signal . . . . . . . . . . . . . . . . . . . . . . . . . . . . . . . . . . . 26
Selecting a Language for the Camera . . . . . . . . . . . . . . . . . . . . . . . . . . . . . .27
Viewing Camera Information . . . . . . . . . . . . . . . . . . . . . . . . . . . . . . . . . . . . . . 28
4 Reviewing Your Pictures . . . . . . . . . . . . . . . . . . . . . . . . . . . . . . . . 29
Viewing Your Pictures . . . . . . . . . . . . . . . . . . . . . . . . . . . . . . . . . . . . . . . . . . . 30
Magnifying Your Pictures . . . . . . . . . . . . . . . . . . . . . . . . . . . . . . . . . . . . . . . . . 31
Selecting Pictures for Printing . . . . . . . . . . . . . . . . . . . . . . . . . . . . . . . . . . . 32
Cancelling Pictures for Printing . . . . . . . . . . . . . . . . . . . . . . . . . . . . . . . . . . . 33
Deleting One or All of Your Pictures . . . . . . . . . . . . . . . . . . . . . . . . . . . . . . . 34
Running a Slide Show on Your Television . . . . . . . . . . . . . . . . . . . . . . . . . . . 35
5 Installing Your Software . . . . . . . . . . . . . . . . . . . . . . . . . . . . . . . 37
Windows-Based System Requirements . . . . . . . . . . . . . . . . . . . . . . . . . . . . .37
Macintosh System Requirements . . . . . . . . . . . . . . . . . . . . . . . . . . . . . . . . . .37
Kodak Software for Windows-Based Computers . . . . . . . . . . . . . . . . . . . . 38
Software Overview . . . . . . . . . . . . . . . . . . . . . . . . . . . . . . . . . . . . . . . . . . . 38
Kodak Software for Macintosh Computers . . . . . . . . . . . . . . . . . . . . . . . . . 39
Software Overview . . . . . . . . . . . . . . . . . . . . . . . . . . . . . . . . . . . . . . . . . . . 39
Installing the Software . . . . . . . . . . . . . . . . . . . . . . . . . . . . . . . . . . . . . . . . . . 40
6 Connecting Your Camera . . . . . . . . . . . . . . . . . . . . . . . . . . . . . . . .41
Connecting to a Windows-Based Computer . . . . . . . . . . . . . . . . . . . . . . . . . .42
Connecting to a Macintosh Computer . . . . . . . . . . . . . . . . . . . . . . . . . . . . . 43
Starting the Kodak Software for Windows-Based Computers . . . . . . . . . 44
Opening Mounter Software . . . . . . . . . . . . . . . . . . . . . . . . . . . . . . . . . . . 44
Opening Digital Access TWAIN Acquire Software . . . . . . . . . . . . . . . . . 44
Opening Camera Controls Software . . . . . . . . . . . . . . . . . . . . . . . . . . . . 44
Starting the Kodak Software for Macintosh Computers . . . . . . . . . . . . . 45
Opening Picture Transfer Application . . . . . . . . . . . . . . . . . . . . . . . . . . . 45
Opening Digital Access Plug-In Acquire . . . . . . . . . . . . . . . . . . . . . . . . . 45
Copying Digital Access Files to the PlugIn Folder . . . . . . . . . . . . . . . . 45
Navigating to Your Pictures . . . . . . . . . . . . . . . . . . . . . . . . . . . . . . . . . . . . . . 46

iii
7 Tips and Troubleshooting . . . . . . . . . . . . . . . . . . . . . . . . . . . . . . . .47
Connecting with Your Camera . . . . . . . . . . . . . . . . . . . . . . . . . . . . . . . . . . . . . 47
Communicating with the Computer . . . . . . . . . . . . . . . . . . . . . . . . . . . . . . . . 47
Adjusting Your Monitor for Better Viewing . . . . . . . . . . . . . . . . . . . . . . . . . 47
Getting Better Results from Your Printer . . . . . . . . . . . . . . . . . . . . . . . . . . 48
Troubleshooting . . . . . . . . . . . . . . . . . . . . . . . . . . . . . . . . . . . . . . . . . . . . . . . . . 49
8 Where to Get Help . . . . . . . . . . . . . . . . . . . . . . . . . . . . . . . . . . . . .55
Software Help . . . . . . . . . . . . . . . . . . . . . . . . . . . . . . . . . . . . . . . . . . . . . . . . . . 55
Online Services . . . . . . . . . . . . . . . . . . . . . . . . . . . . . . . . . . . . . . . . . . . . . . . . . 55
Faxed Information . . . . . . . . . . . . . . . . . . . . . . . . . . . . . . . . . . . . . . . . . . . . . . . 55
Customer Support . . . . . . . . . . . . . . . . . . . . . . . . . . . . . . . . . . . . . . . . . . . . . . 56
9 Warranty and Regulatory Information . . . . . . . . . . . . . . . . . . . .59
Warranty Time Period . . . . . . . . . . . . . . . . . . . . . . . . . . . . . . . . . . . . . . . . . . . . 59
Warranty Repair Coverage . . . . . . . . . . . . . . . . . . . . . . . . . . . . . . . . . . . . . . . . 59
Limitations . . . . . . . . . . . . . . . . . . . . . . . . . . . . . . . . . . . . . . . . . . . . . . . . . . . . 60
Application Support . . . . . . . . . . . . . . . . . . . . . . . . . . . . . . . . . . . . . . . . . . . . . .61
How to Obtain Service . . . . . . . . . . . . . . . . . . . . . . . . . . . . . . . . . . . . . . . . . . . .61
Regulatory Information . . . . . . . . . . . . . . . . . . . . . . . . . . . . . . . . . . . . . . . . . . 62
FCC Compliance and Advisory . . . . . . . . . . . . . . . . . . . . . . . . . . . . . . . . . 62
Canadian DOC Statement . . . . . . . . . . . . . . . . . . . . . . . . . . . . . . . . . . . . 62
10 Appendix . . . . . . . . . . . . . . . . . . . . . . . . . . . . . . . . . . . . . . . . . . . . 63
Original Camera Default Settings . . . . . . . . . . . . . . . . . . . . . . . . . . . . . . . . . 63
Camera Specifications . . . . . . . . . . . . . . . . . . . . . . . . . . . . . . . . . . . . . . . . . . 64
General Maintenance and Safety . . . . . . . . . . . . . . . . . . . . . . . . . . . . . . . . . 65
Using Your Batteries . . . . . . . . . . . . . . . . . . . . . . . . . . . . . . . . . . . . . . . . . . . . 66
Create Your Own Templates . . . . . . . . . . . . . . . . . . . . . . . . . . . . . . . . . . . . . .68


1
1
1 Getting
Started
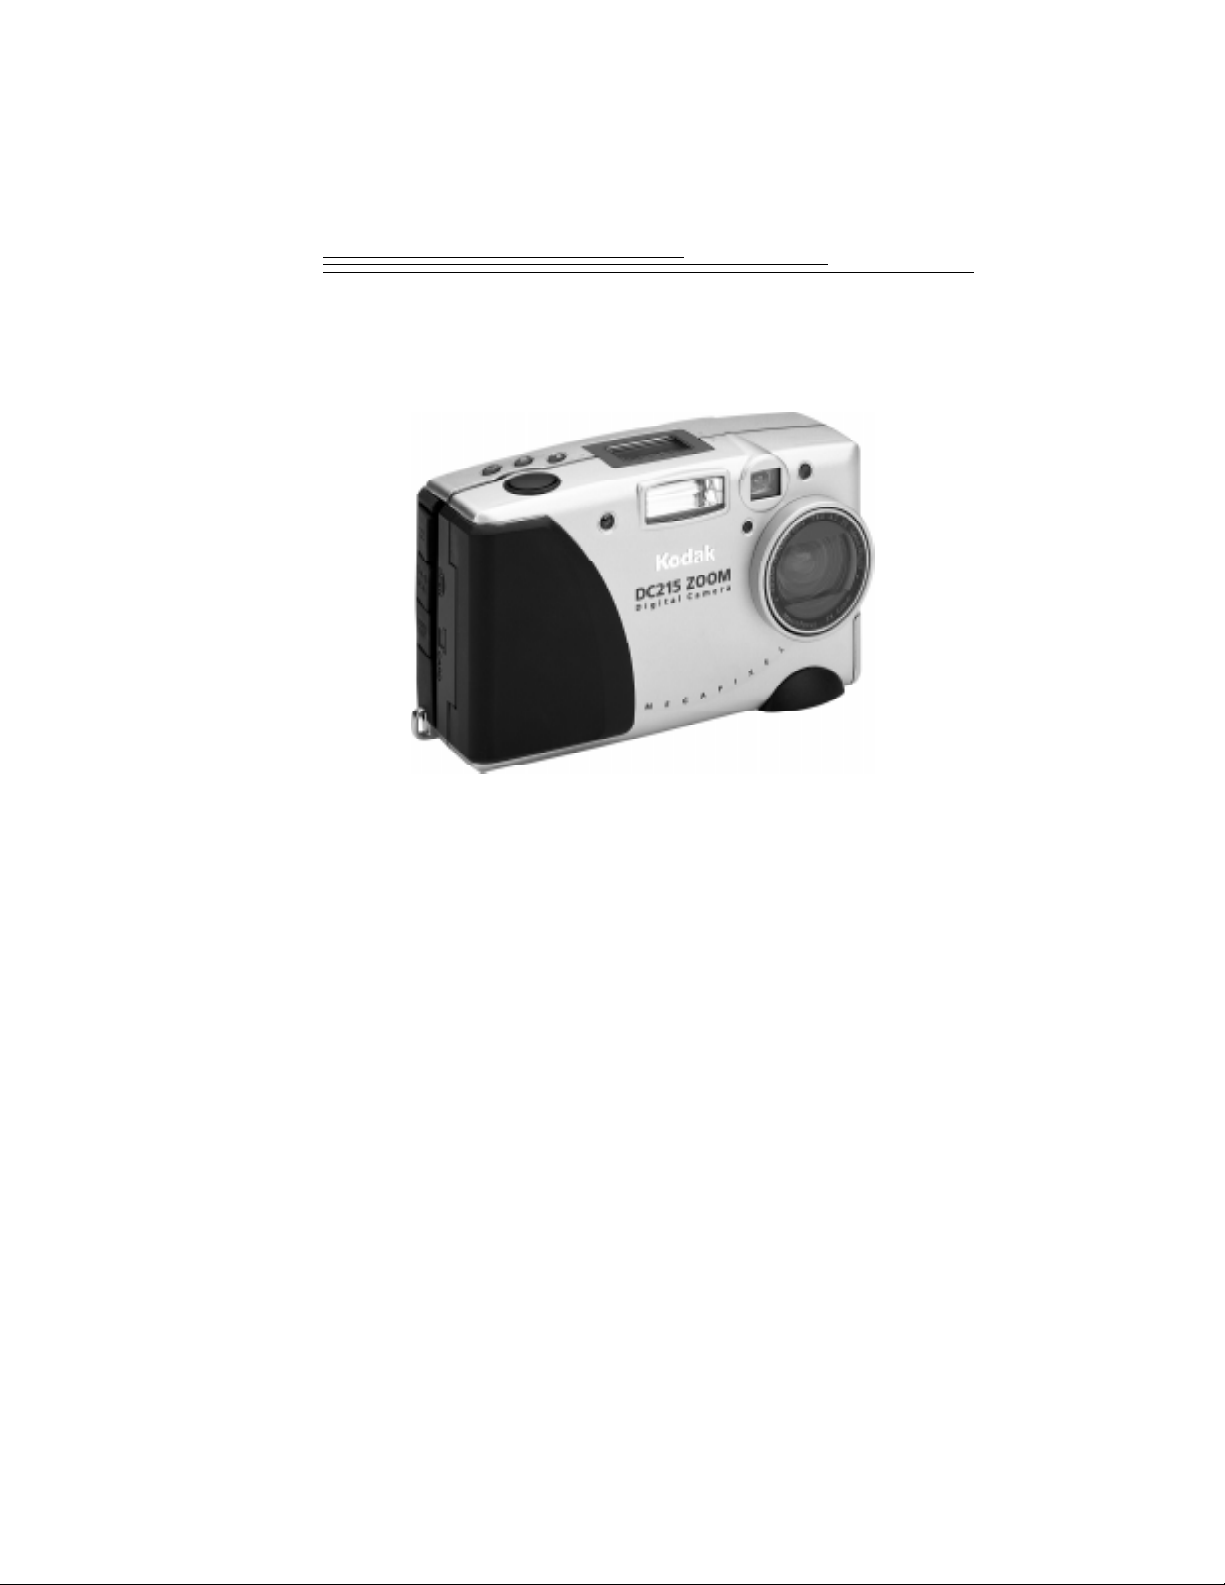
Congratulations on your purchase of a new KODAK DC215 Zoom Digital
Camera—the camera that takes pictures digitally, without the use of film.
With your new camera, picture taking and print making is fun and easy.
The possibilities are endless. Here is just a few examples of what you can
do with your camera:
q
Take digital pictures in unbelievable detail, color, and sharpness.
q
Transfer your pictures to a computer for instant editing,
enhancement, and placement into your document.
q
E-mail your pictures in minutes to friends, family, and business
associates anywhere in the world.
q
Print high-quality pictures at home using KODAK Inkjet Photo
Paper, or take your KODA K Picture Card to a
KODAK Picture Maker System and create photo-quality
enlargements with a touch of a button.
q
Display your pictures to a large audience on a television or video
monitor.
2
Preparing to Take Pictures
Before you start taking pictures with your camera, you first need to install
the batteries or connect a Kodak-specified AC adapter for power, and
insert a KODAK Picture Card (camera memory card) into the camera. A
Kodak-specified AC adapter is available as an accessory from a dealer of
Kodak products or from our Website at
http://www.kodak.com/go/accessories
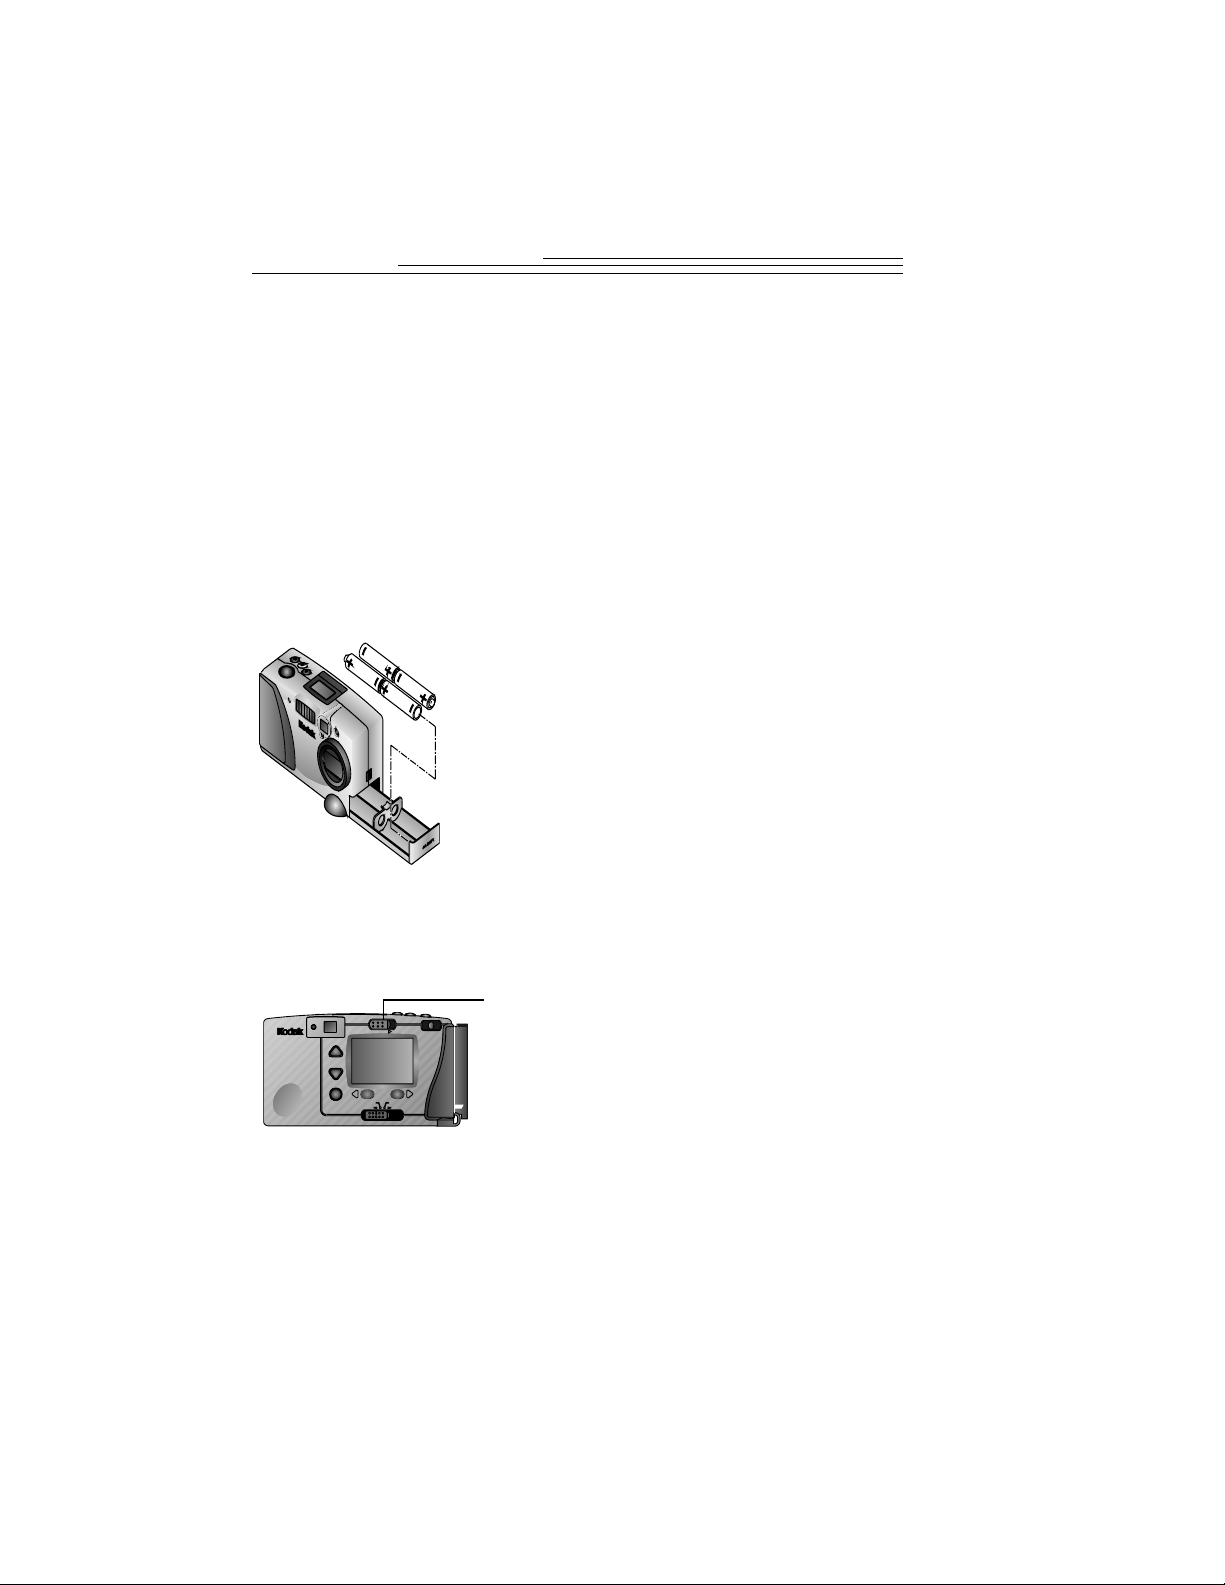
Loading Batteries
Your camera comes wi th four AA batteries so you can start taking
pictures immediately. For information on guidelines for battery usage, see
page 66.
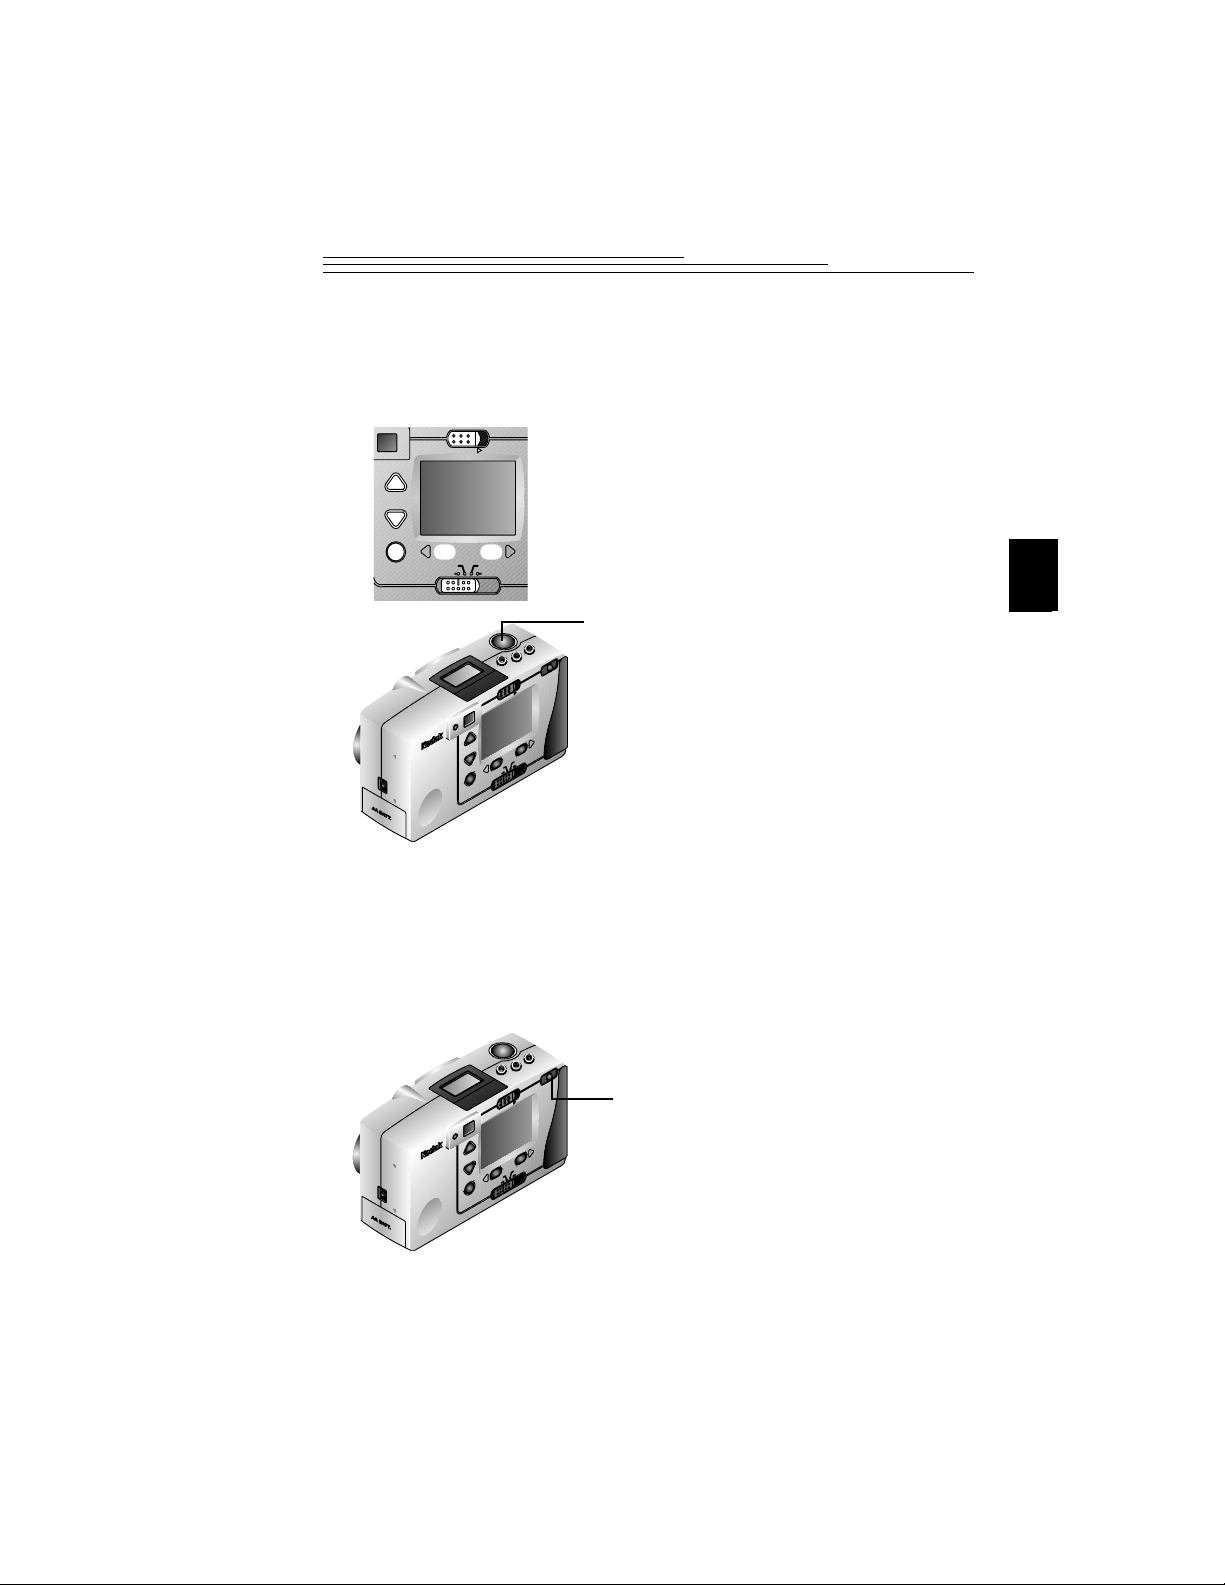
Turning the Camera On and Off
You turn the camera on and off using the Power switch, located on the
back of the camera.
1 Slide the Battery switch located on the side
of the camera to the right to unlock the
battery tray.
2 Slide the battery tray out of the camera.
3 Insert the batteries as indicated on the
battery tray.
4 Slide the battery tray into the camera until
it locks in place.
q
To turn on the camera, slide the Power
switch to the right.
The green ready light next to the
viewfinder, and the Status Display on
top of the camera turn on.
q
To turn off the camera, slide the Power
switch again to the right.
I
P
A
G
E
M
X
TW
POWER
Preferences
Connect
Capture
Review
3
1
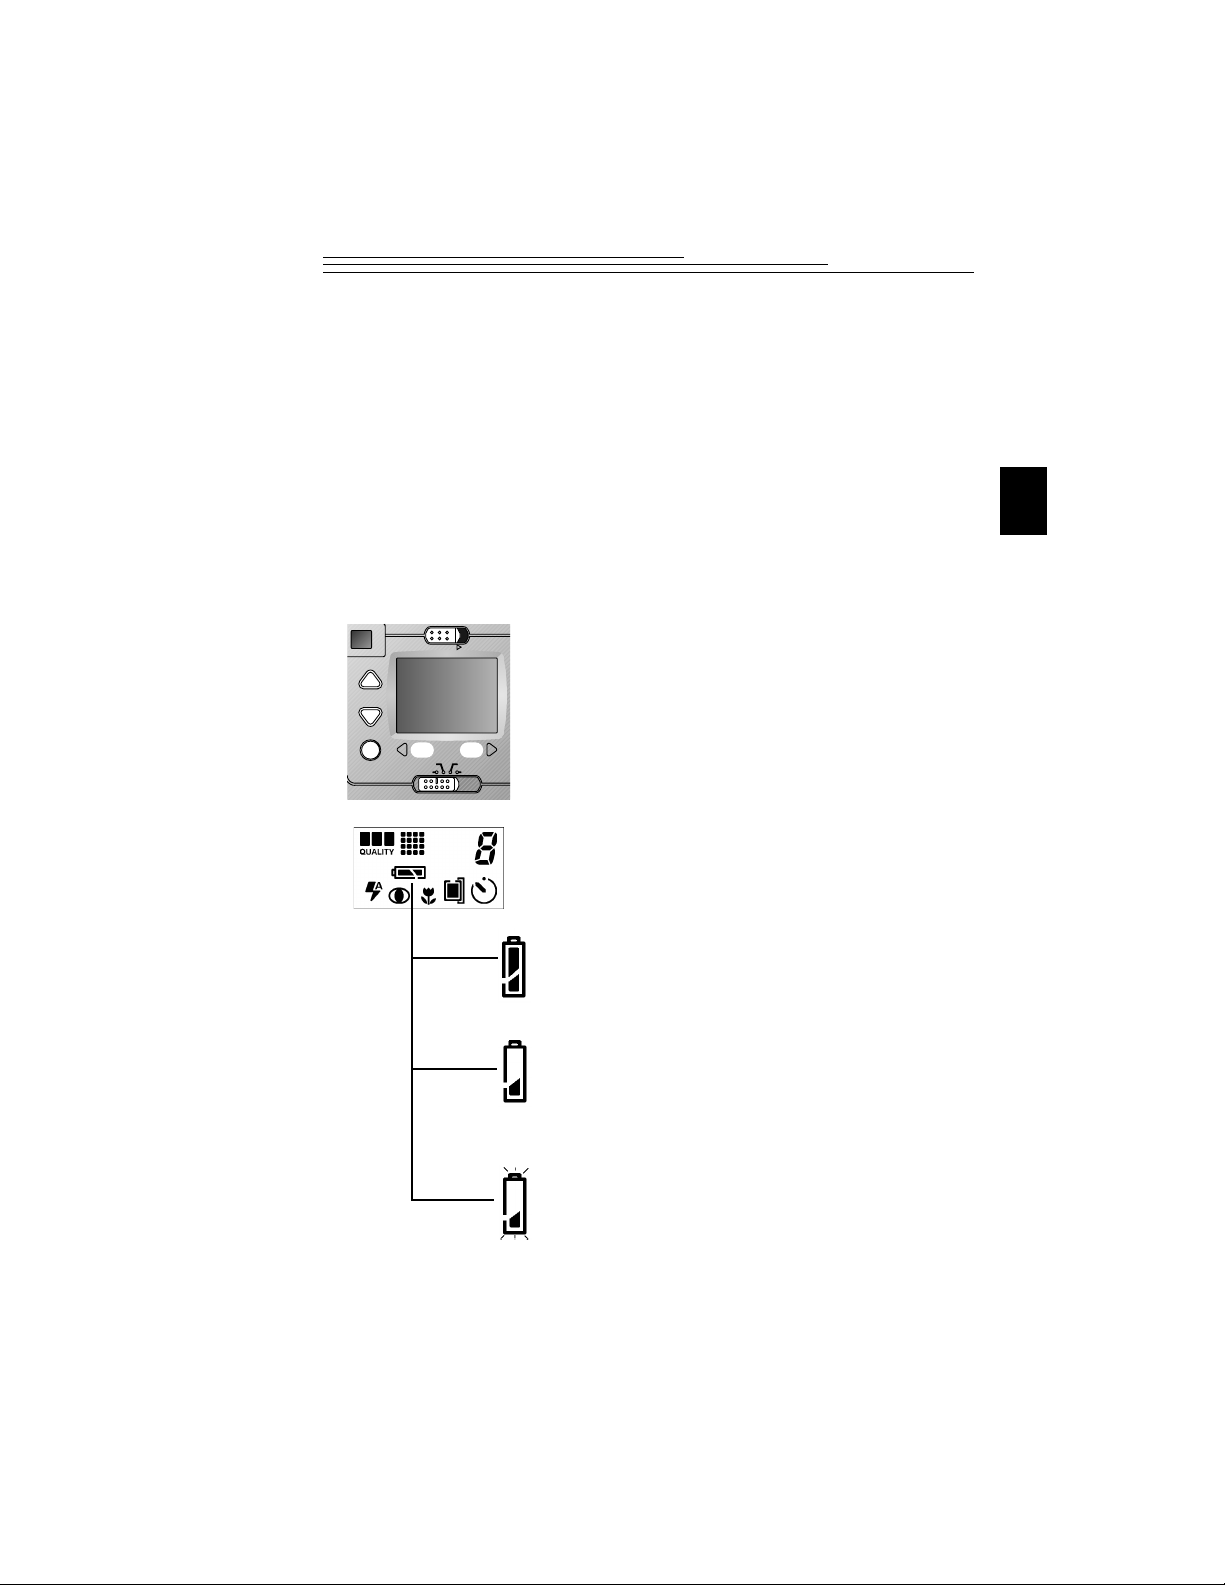
Checking Batteries
So you are never caught with dead batteries, your camera indicates the
power level of the batteries in the form of a battery status symbol, which
appear in the Status Display when you turn on the camera. For
information on guidelines for battery usage, see page 66.
Since digital cameras are very demanding on batteries, keep extra sets of
batteries handy, or consider purchasing either a Kodak-specified AC
adapter or KODAK Ni-MH/Ni-Cd Battery Charger with
KODAK Ni-MH Rechargeable Batteries. Both are available as accessories
from a dealer of Kodak products, or from our Website at
http://www.kodak.com/go/accessories.
1 Set the Slider switch to Capture, Review,
or Preferences.
The battery status symbol is not visible if
you set the camera to Connect.
2 Turn on the camera.
3 Check the battery status symbol that
appears in the Status Display.
q
Full—indicates batteries are charged
and ready to use.
q
Low—indicates batteries are not fully
charged and will soon need to be
replace d or recharged .
q Exhausted (blinking)—indicates
batteries are too weak to power the
camera and need to be replaced.
The red ready light next to the
viewfinder comes on when the batteries
become exhausted.
Review
Capture
Connect
Preferences
POWER
4
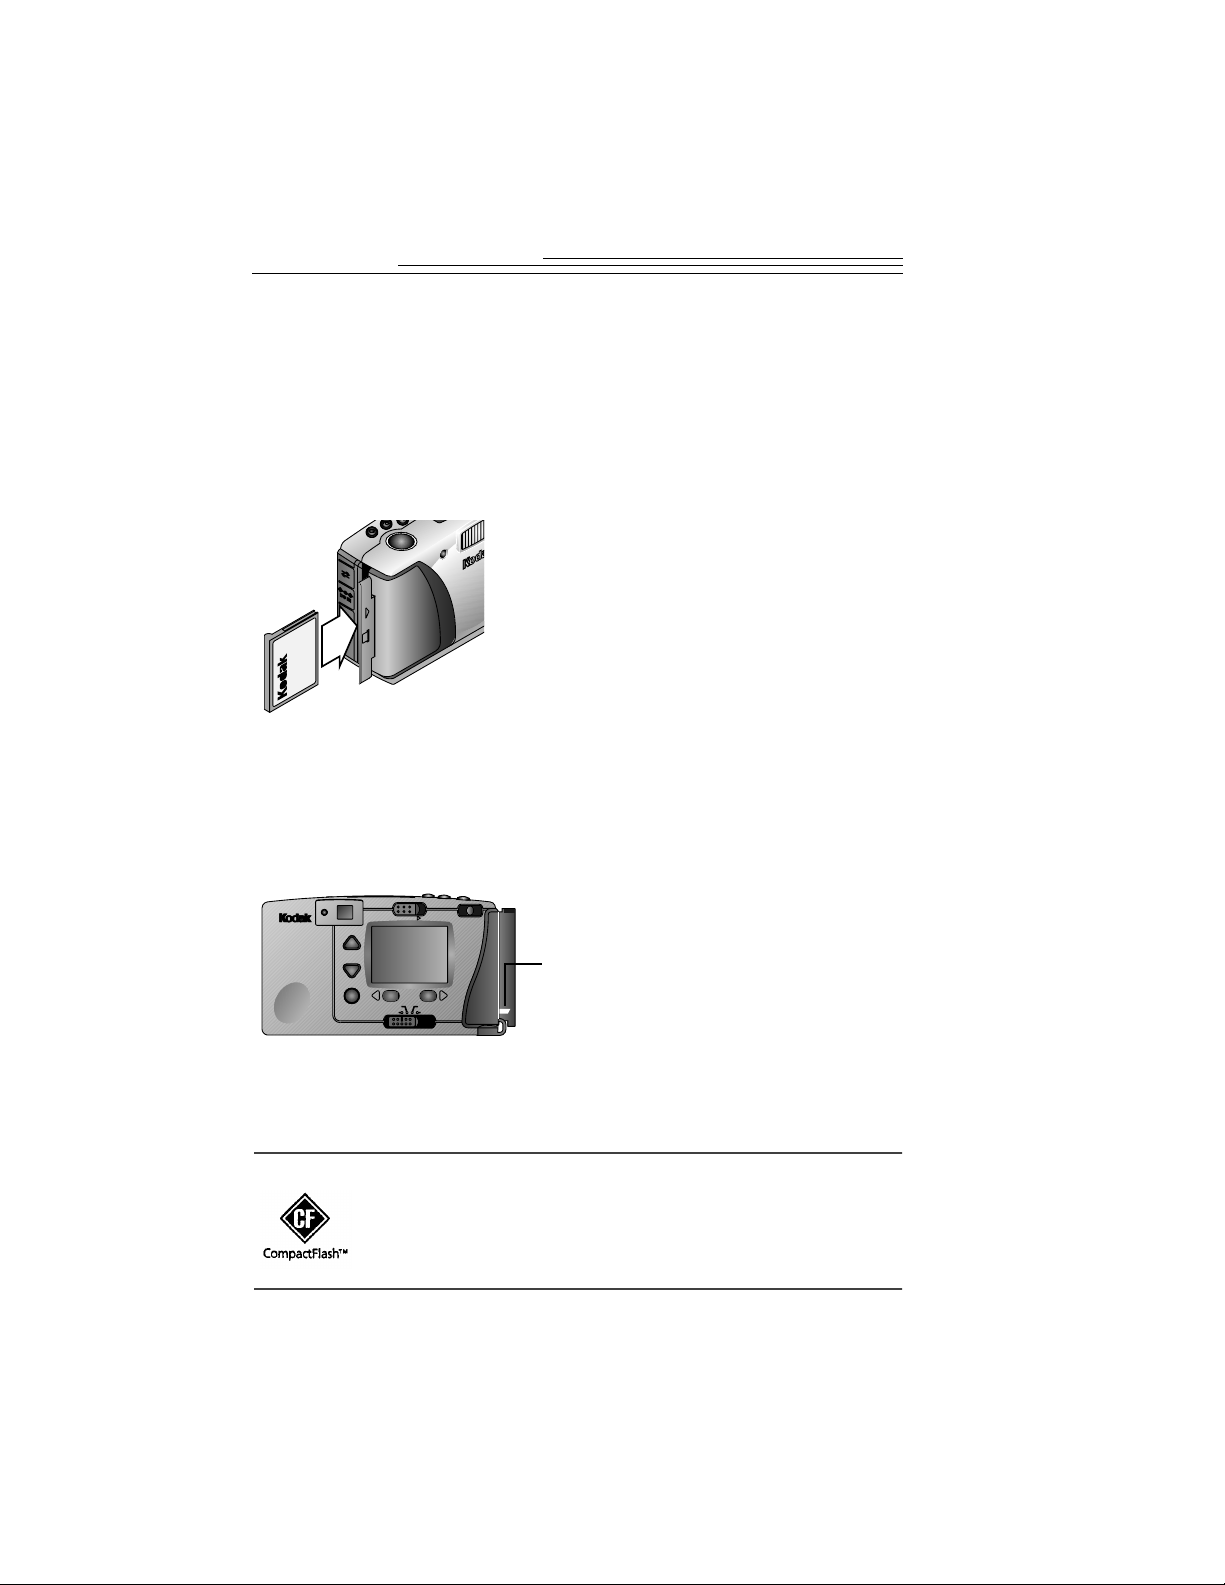
Inserting a Camera Memory Card
Your camera comes with a KODAK Picture Card (camera memory card),
that is used to store pictures taken with the camera. The camera memory
card, also referred to as a CompactFlash card, is removable and reusable
for easy storage and transfer of your pictures. Before you start to take
pictures, insert a camera memory card into the camera. KODAK Picture
Cards are available as an accessory through a dealer of Kodak products or
from our Website at http://www.kodak.com/go/accessories.
Removing a Camera Memory Card
WARNING: Do not insert or eject a camera memory card
when the green ready light, located next to the viewfinder is
blinking. This may damage your pictures or camera. Use
only certified camera memory cards that carry the
CompactFlash logo.
1 Open the camera memory card door on
the camera.
2 Hold the camera memory card by the lip
so the connection end is pointed at the
camera, and the card label with the MB
size is facing the front of the camera.
The camera memory card can only be
inserted one way into the camera. Forcing
the card may damage your camera.
3 Push the camera memory card all the way
into the card slot and close the door.
1 Open the camera memory card door
on the camera.
2 Push the Eject button in the
direction of the arrow.
The camera memory card partially
slides out of the slot.
3 Remove the camera memory card
from the slot and close the door.
E
G
M
OPEN
CARD
TW
POWER
Preferences
Connect
Capture
Review
5
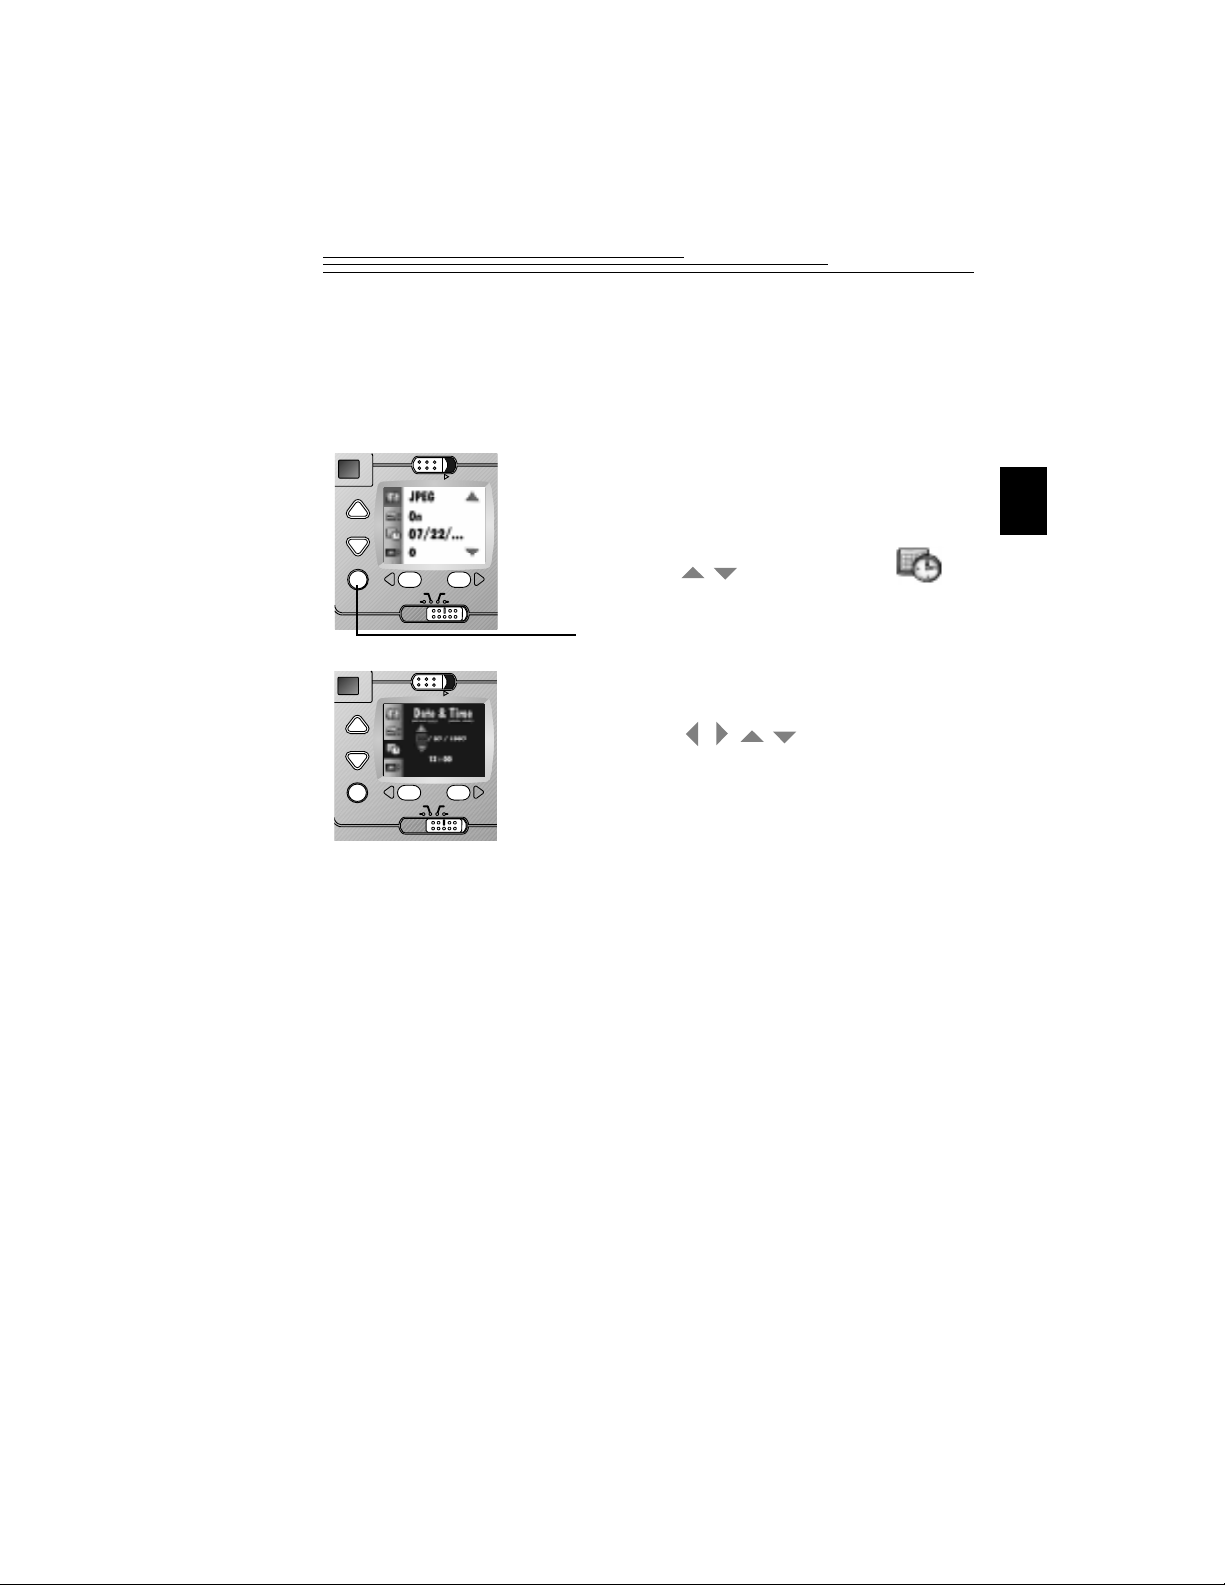
1
Setting the Clock on Your Camera
Your camera has a built-in clock that maintains the date and time in a
24-hour format. The camera clock needs to be set if you plan to use the
Date Stamp feature, which imprints the date on your picture. For
information on using the Date Stamp feature, see page 22.
1 With the camera on , set the Slider switch
to Preferences.
The Preferences screen appears.
2 Press a button until the
icon is highlighted.
3 Press the DO-IT button.
The Date/Time screen appears. The default
date settin g is 01/01/1997.
4 Use the buttons to adjust
the date and time fields.
5 Press the DO-IT button.
The camera accepts the setting and returns to
the Preferences screen.
If you remove the batteries from the
camera for an extended period of time,
or the batteries become exhausted, you
may need to reset the clock.
Review
Capture
Connect
Preferences
POWER
/
Review
Capture
Connect
Preferences
POWER
/
/
6
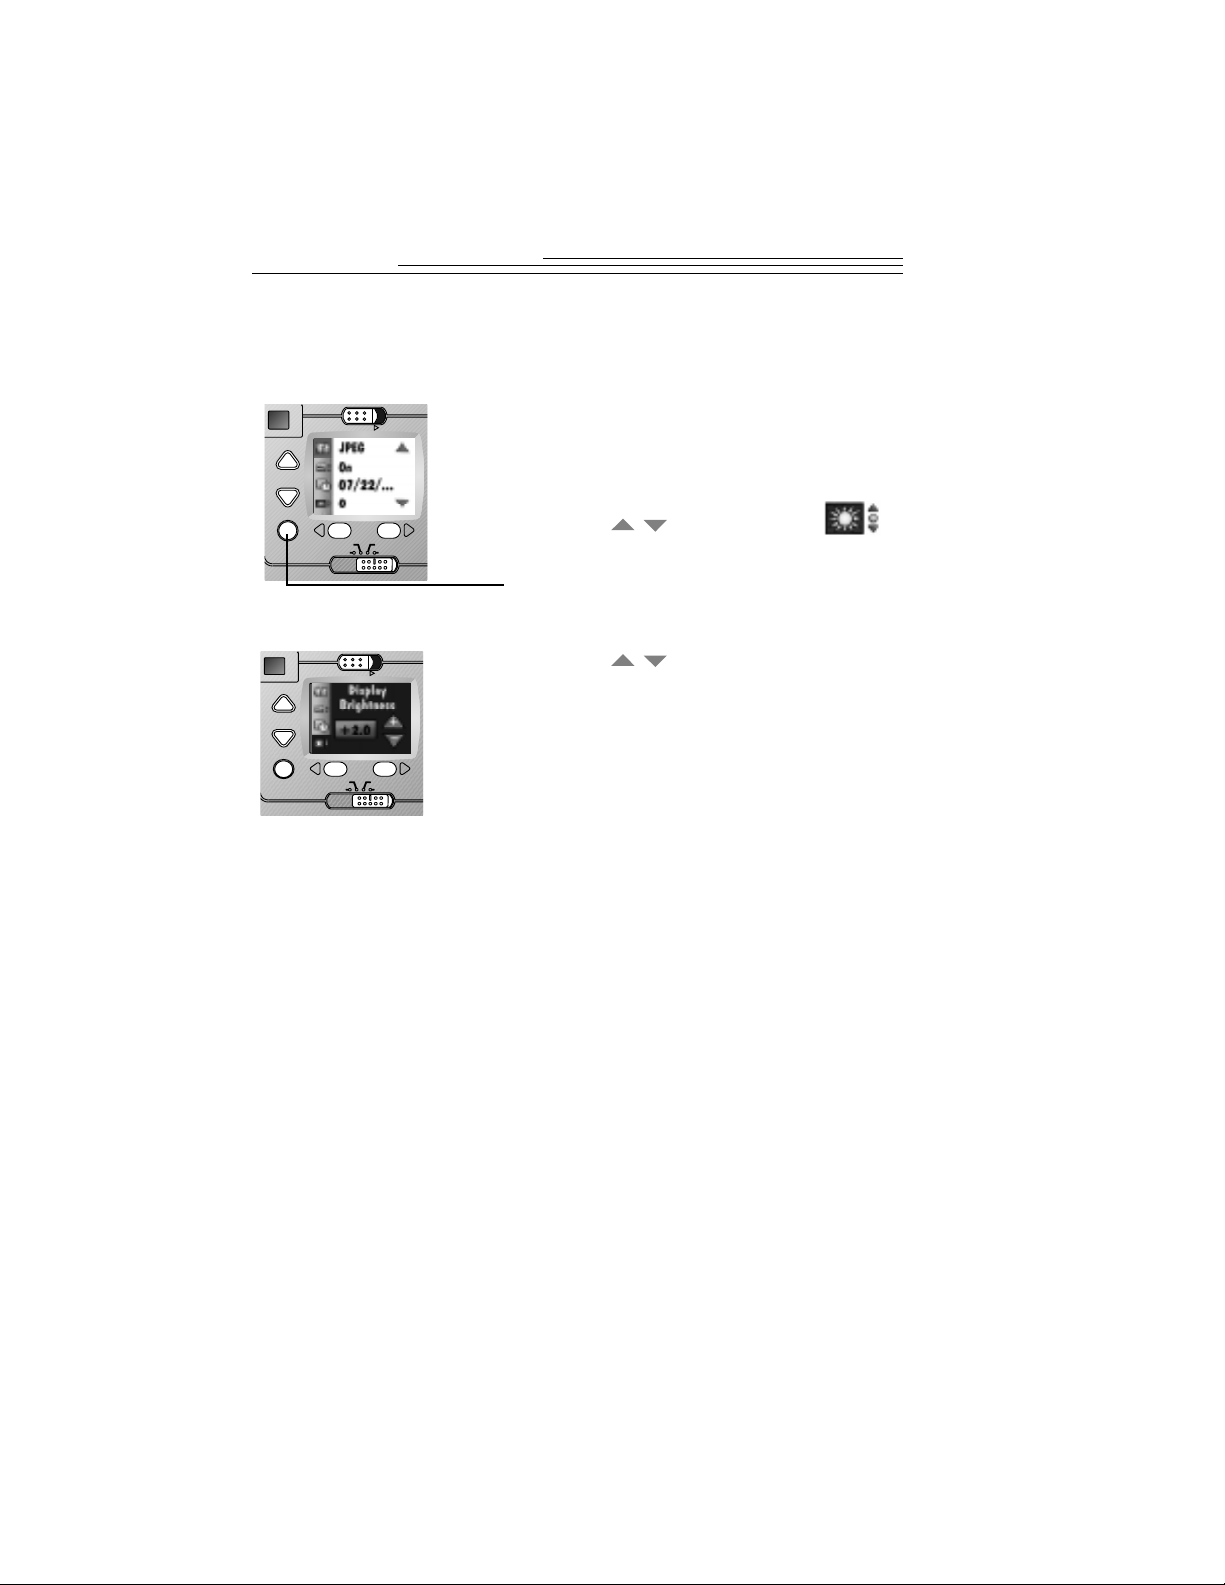
Adjusting the LCD Brightness
You can adjust the brightness level of the color LCD to suit your
particular needs.
1 With the camera on, set the Slider switch
to Preferences.
The Preferences screen appears.
2 Press a button until the
icon is highlighted.
3 Press the DO-IT button.
The LCD Brightness screen appears.
4 Press a button to change the
LCD brightness level.
The brightness the of LCD changes as
you adjust the setting.
q
If the LCD is too dark, increase (+) the
brightness number.
q
If the LCD is too light, decrease (-) the
brightness number.
5 Press the DO-IT button.
The camera accepts the se tting and re turns to
the Preferences screen.
Review
Capture
Connect
Preferences
POWER
/
Review
Capture
Connect
Preferences
POWER
/

7
2
2 Taking
Pictures
Your DC215 camera makes taking pictures fun. Just set the camera to
Capture and you are on your way to creating great pictures. Everything
you need is right at your fingertips. With the DC215 camera you can:
q
Preview the picture before it is taken.
q
Zoom in up to two times closer on your subject.
q
View the picture you just took.
q
Vary the flash settings to give you con trol over the type of flash
needed for specific conditions.
q
Adjust the camera to take close-up pictures.
q
Set the Self-Timer so you can get into the picture.
q
Adjust the exposure for pictures that are too light or too dark.
q
Lock the exposure for a consistent look in all your pictures.
q
Delete unwanted pictures right away.
8
Previewing a Picture Before it is Taken
If you want to see what a picture looks like before you take it, you can
preview the image on the LCD on the back of your camera. The live
image that appears is helpful for framing your subject, especially when
using the Close-Up and Template features. When you use the Preview
feature, batteries are drained faster, so use a Kodak-specified AC adapter
when possible.
1 With the camera on, set the Slider switch
to Capture.
2 Press the DO-IT button.
The LCD displays a live image with the icons
of activated camera features.
q
Exposure Compensation—icon
appears in the LCD if you adjusted
the camera exposure. See page 14 for
details.
q
Exposure Lock—icon appears in the
LCD if you locked the exposure. See
page 15 for details.
q
Templates—icon appears in the LCD
if you selected a template. See page 21
for details.
q
Date Stamp—appears in the LCD if
you turned on the date stamp. See
page 22 for details.
These icons also appear in the LCD when
Quickview is activated. See page 24 for
details.
3 To turn off Preview, press the
DO-IT button.
Review
Capture
Connect
Preferences
POWER
9
2
Capturing a Picture
Taking pictures is a snap with your DC215 camera. You can take a picture
as close as 1.6 ft (0.5 m) in wide angle or 3.3 ft (1.0 m) in telephoto.
Zooming in on Your Subject
You can zoom from Wide Angle, which gives you more of the
surrounding area in pictures, to T elePhoto, which brings the subject up to
two times closer.
1 With the camera on, set the Slider
switch to Capture.
2 Center the subject using the guide
marks in the viewfinder, or turn on
Preview (page 8) and use the LCD to
frame your subject.
3 Press the Shutter button.
The green ready light blinks as the picture
is stored on the card. The Pictures
Remaining icon on the Status Display
changes.
If the amber indicator light next to the
viewfinder comes on, then the flash is
not fully charged. Wait for the flash to
charge before taking the picture.
1 With the camera on, set the Slider
switch to Capture.
2 Press the Zoom control.
When you look through the
viewfinder , the subject appears closer
as you press the T Zoom button, and
farther away as you press the
W Zoom button.
Review
Capture
Connect
Preferences
POWER
Review
Capture
Connect
Preferences
T
POWER
W
Review
Capture
Connect
Preferences
T
POWER
W
10
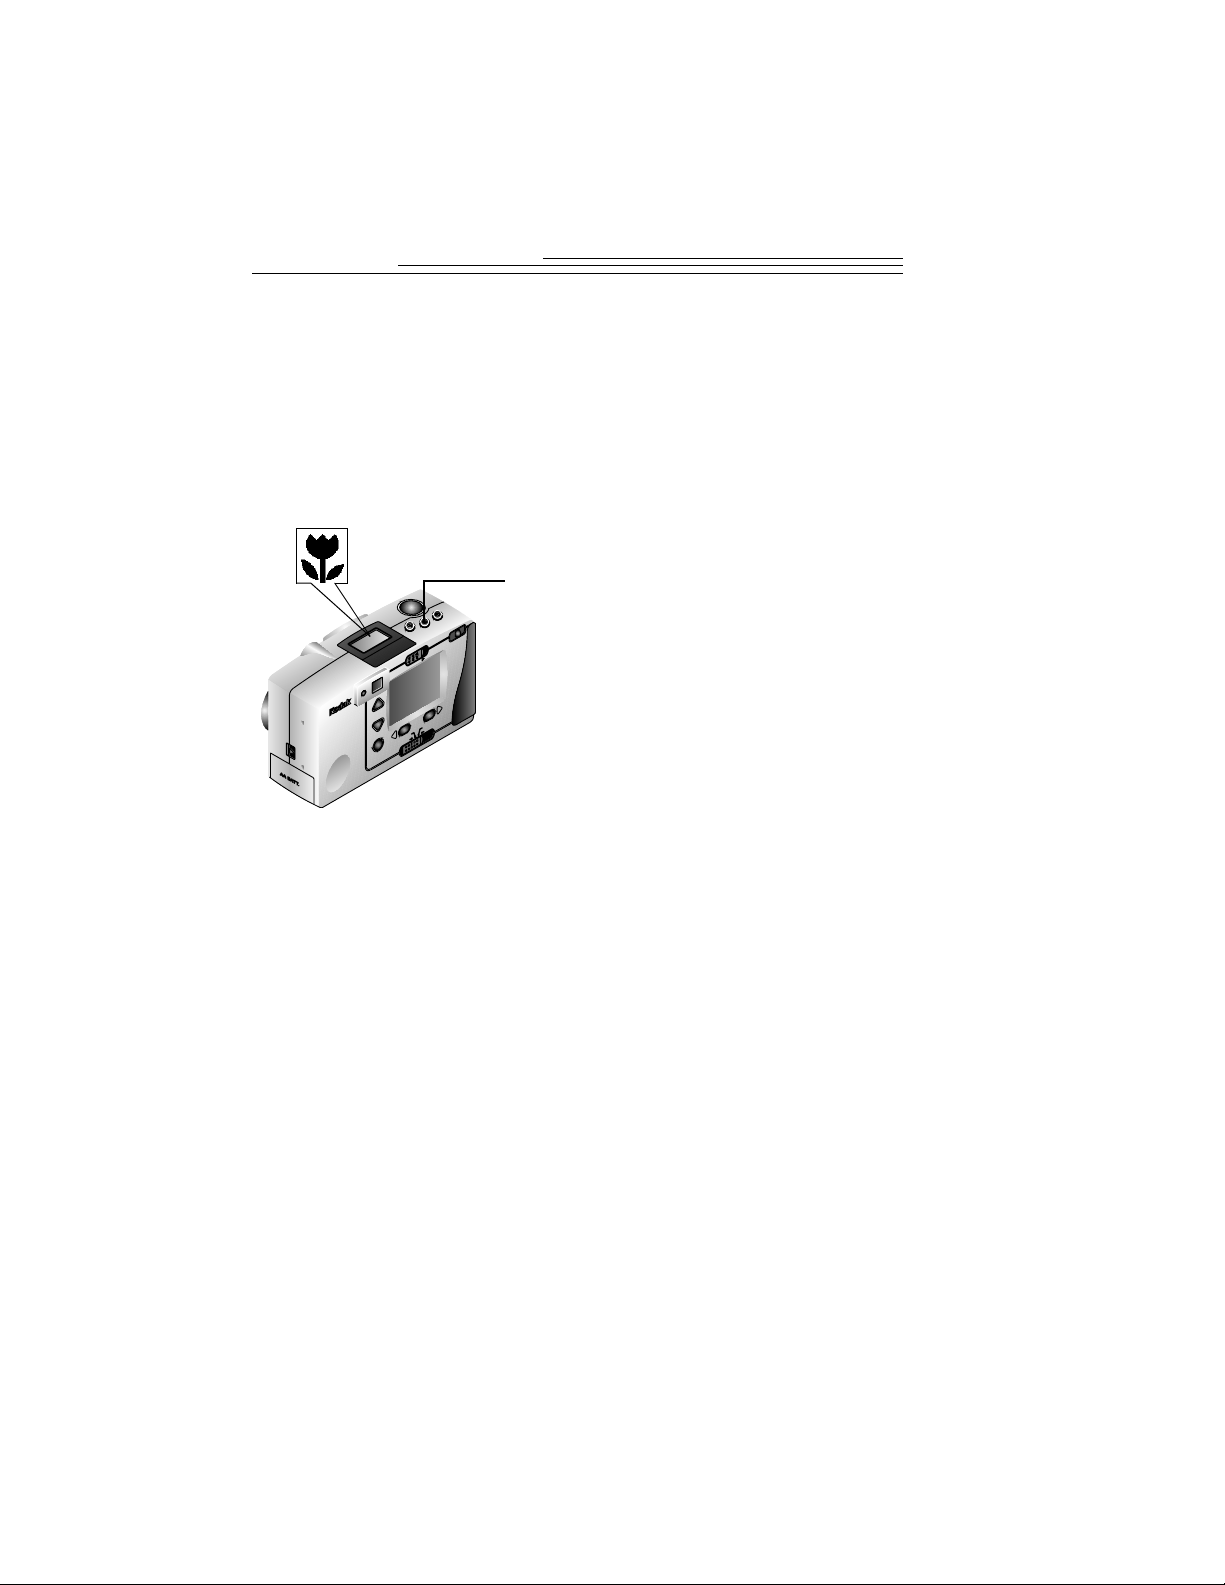
Photographing Close-Ups
If you want to take pictures of objects up close, such as flowers or
artwork, use the Close-Up feature. When selected, the camera
automatically sets the focus distance to 8 in . (0.2 m) and sets the flash to
ensure detail and clarity. Since the viewfinder on the camera may not
accurately frame your picture in Close-Up, the Preview option is
automatically activated. For information on Preview, see page 8.
1 With the camera on, set the Slider switch
to Capture.
2 Press the Close-Up button.
The Close-Up icon appears in the Status
Display as the LCD Preview feature shows a
live image.
When you use the Close-Up feature, the
zoom capabilities on the camera
are disabled.
3 Frame your subject using the LCD and
press the Shutter button to take the
picture.
4 To turn off Close-Up, press the
Close-Up button, or turn off
the camera.
Review
Capture
Connect
Preferences
T
POWER
W
11
2
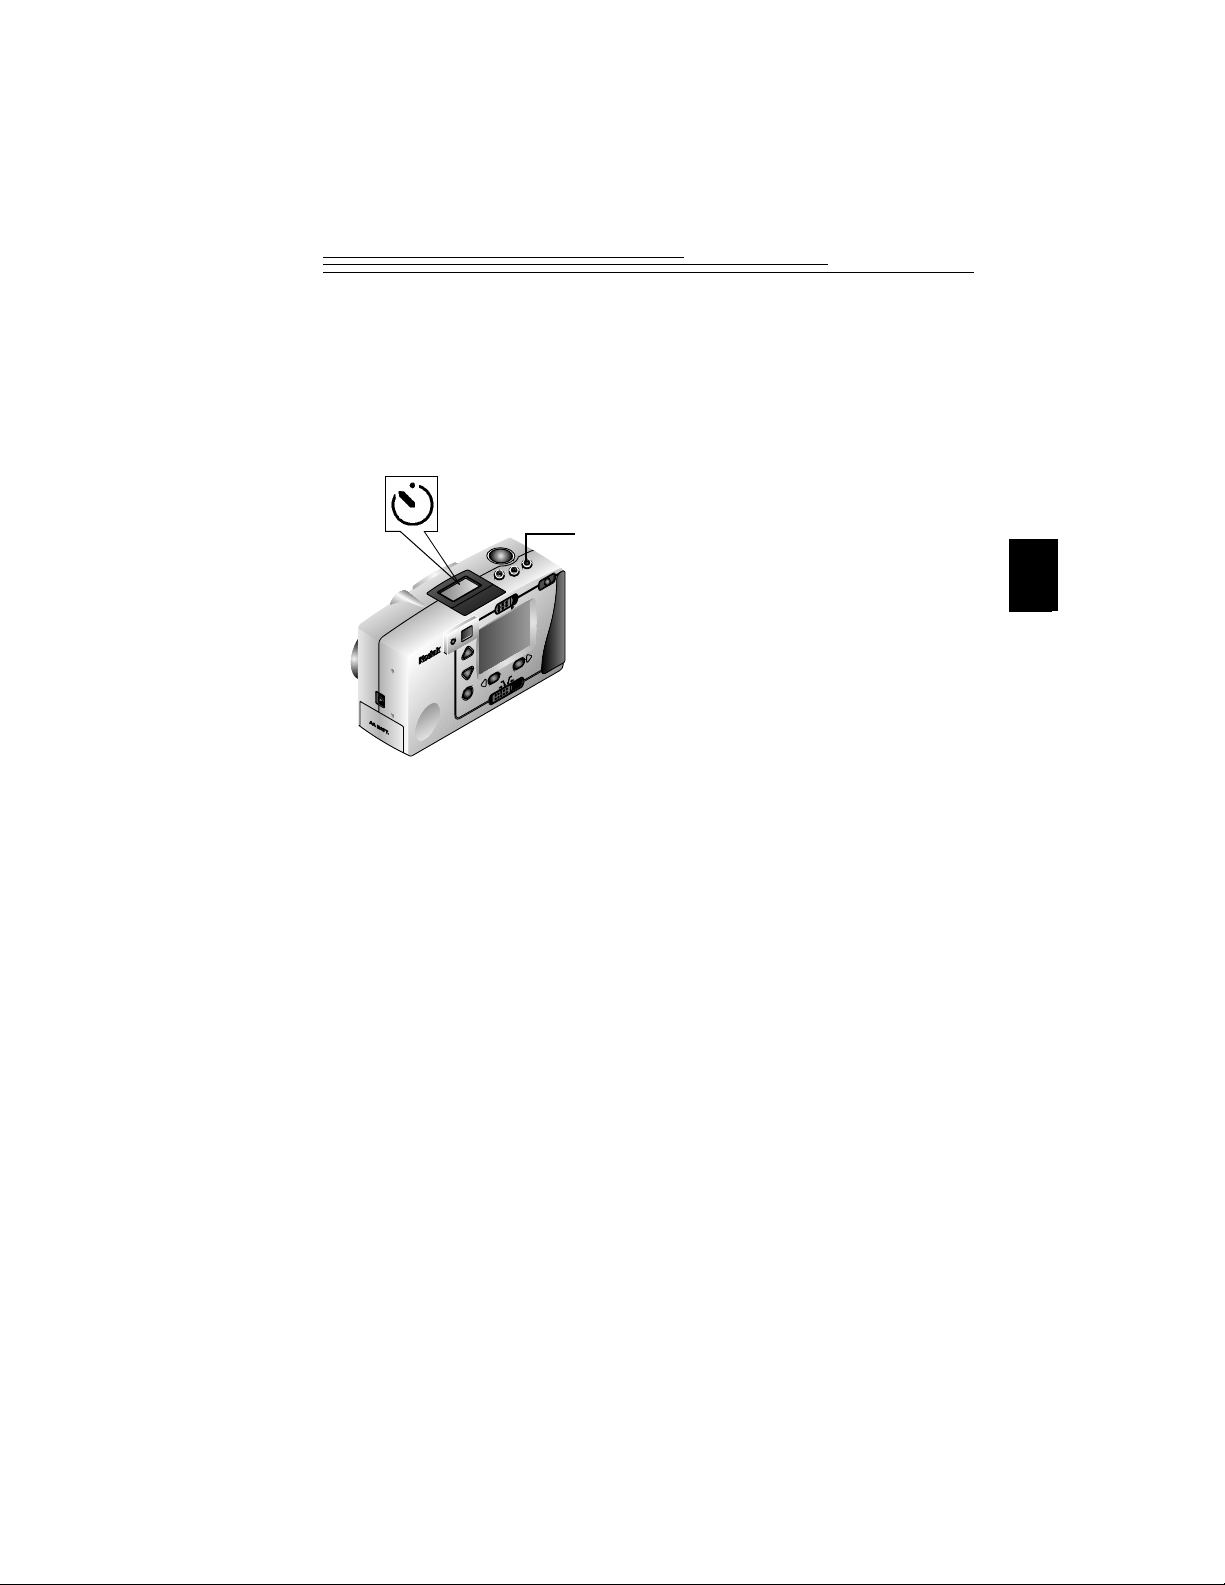
Putting Yourself in the Picture
There might be times when you want everyone, including yourself, to be
in the picture. For these occasions, use the Self-Timer feature to create a
10-second delay between the time you press the Shutter button and the
time the picture is taken.
1 With the camera on, se t the S lider switch
to Capture.
2 Press the Self-Timer button.
The Self-Timer icon appears in the
Status Display.
To cancel the Self-Timer before the
picture is taken, press the Self-Timer
button again or turn off the camera.
3 Place the camera on a flat, stea dy surface
or tripod.
4 Frame your subject in the viewfinder and
press the Shutter button.
The red Self-Timer light, located on the front
of the camera, turns on and stays lit for 8
seconds, then fl a sh es f o r 2 a d di ti on a l s eco n ds
just before the picture is taken.
The Self-Tim er turns off when t he picture
is taken.
Review
Capture
Connect
Preferences
T
POWER
W
12
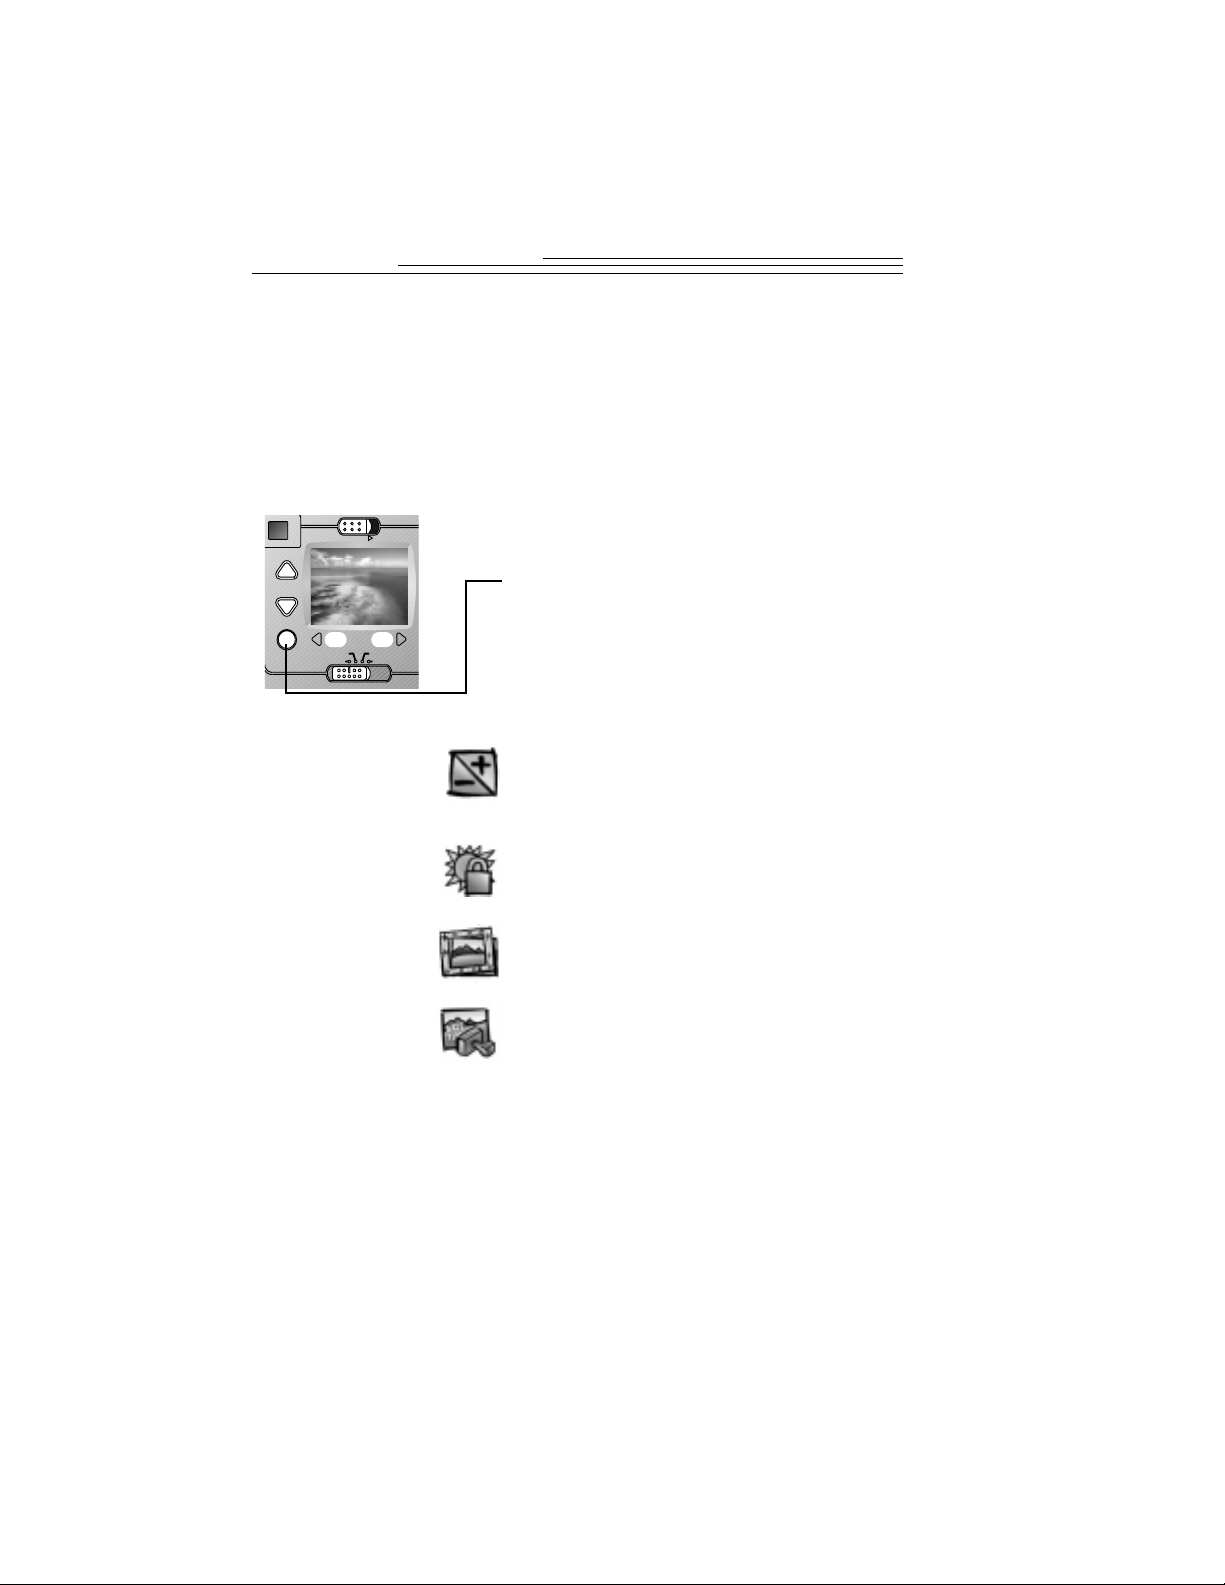
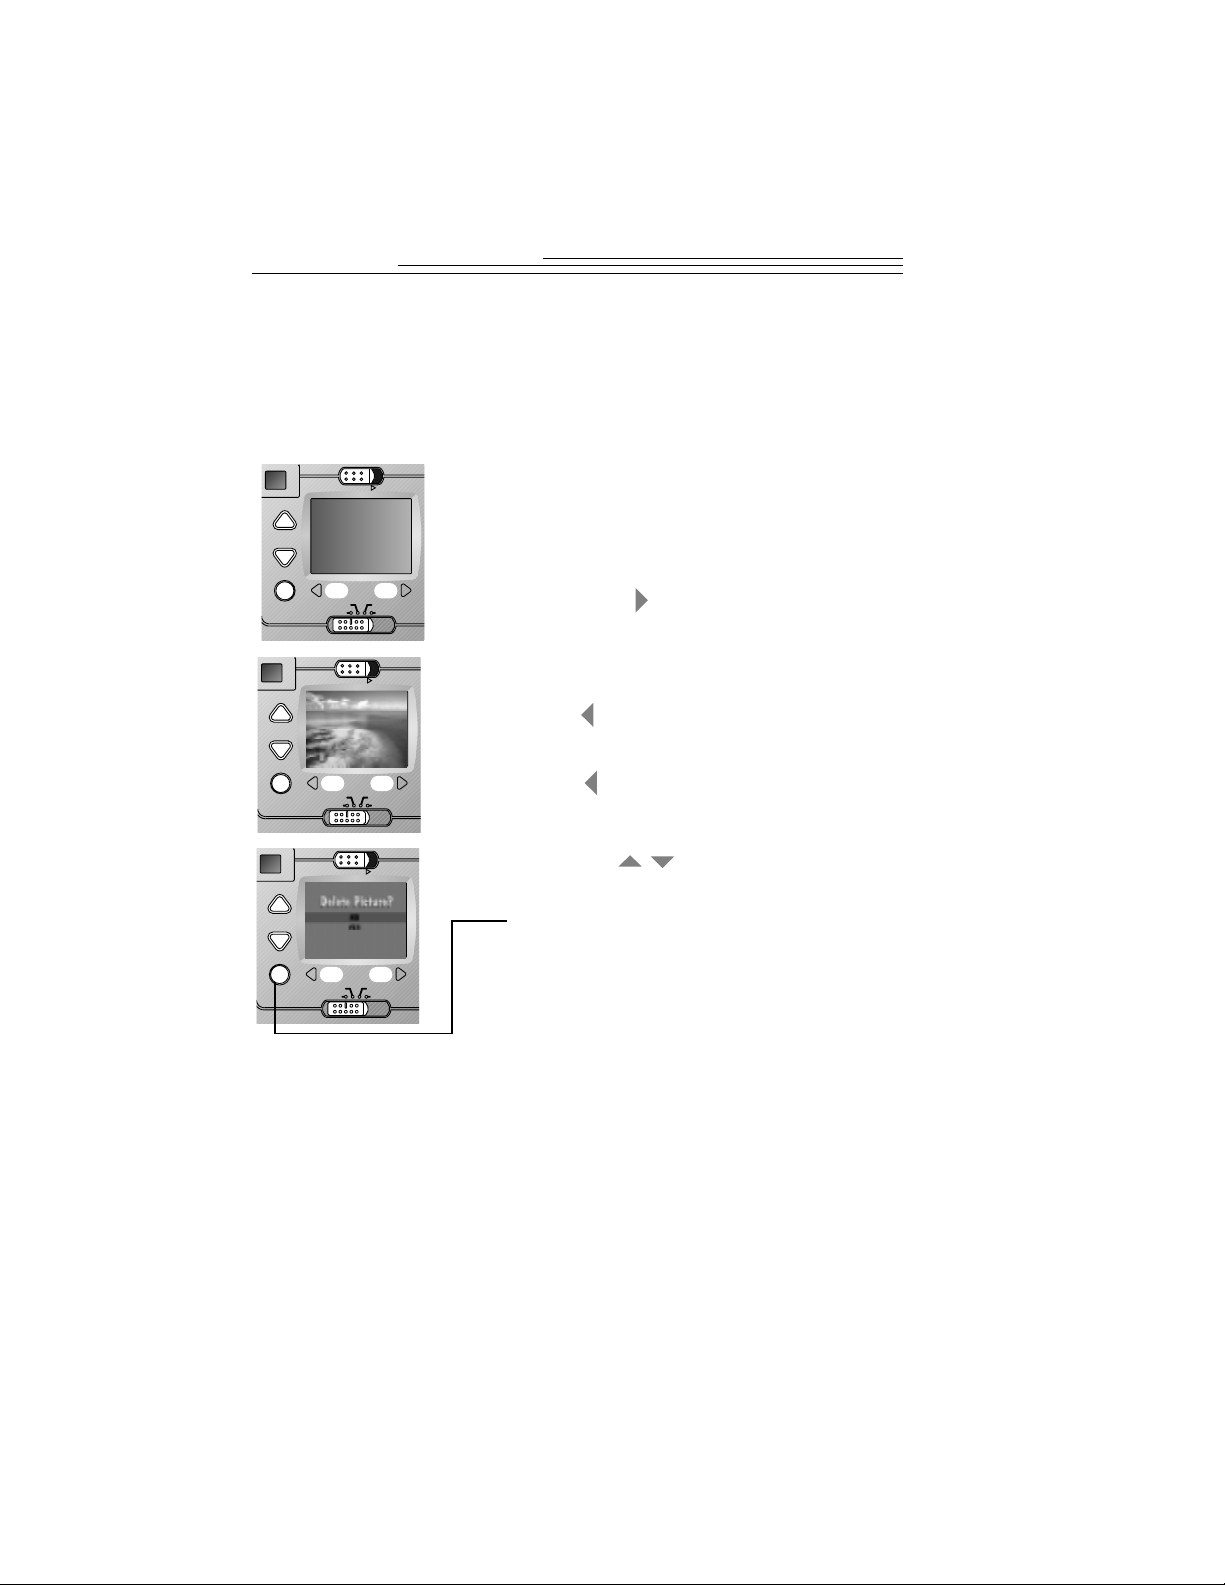
Viewing and Deleting the Picture Just Taken
You can view a picture seconds after it is taken with a touch o f a button.
This is a convenient way to check if the picture you just took was
positioned correctly, and decide if you want to keep it or delete it to save
space on the camera memory card.
1 With the camera on, set the Slid er switch
to Capture.
2 Press the Shutter button to take a
picture.
3 Press the button.
The picture just taken appears in the LCD
for several seconds with the delete icon above
the button.
4 To delete the picture on the LCD, press
the button.
The LCD displays the Delete Picture screen.
5 Press a button until YES
is highlighted.
6 Press the DO-IT button.
The picture is permanently deleted from the
camera memory card.
Review
Capture
Connect
Preferences
POWER
Review
Capture
Connect
Preferences
POWER
Review
Capture
Connect
Preferences
POWER
/
13
2
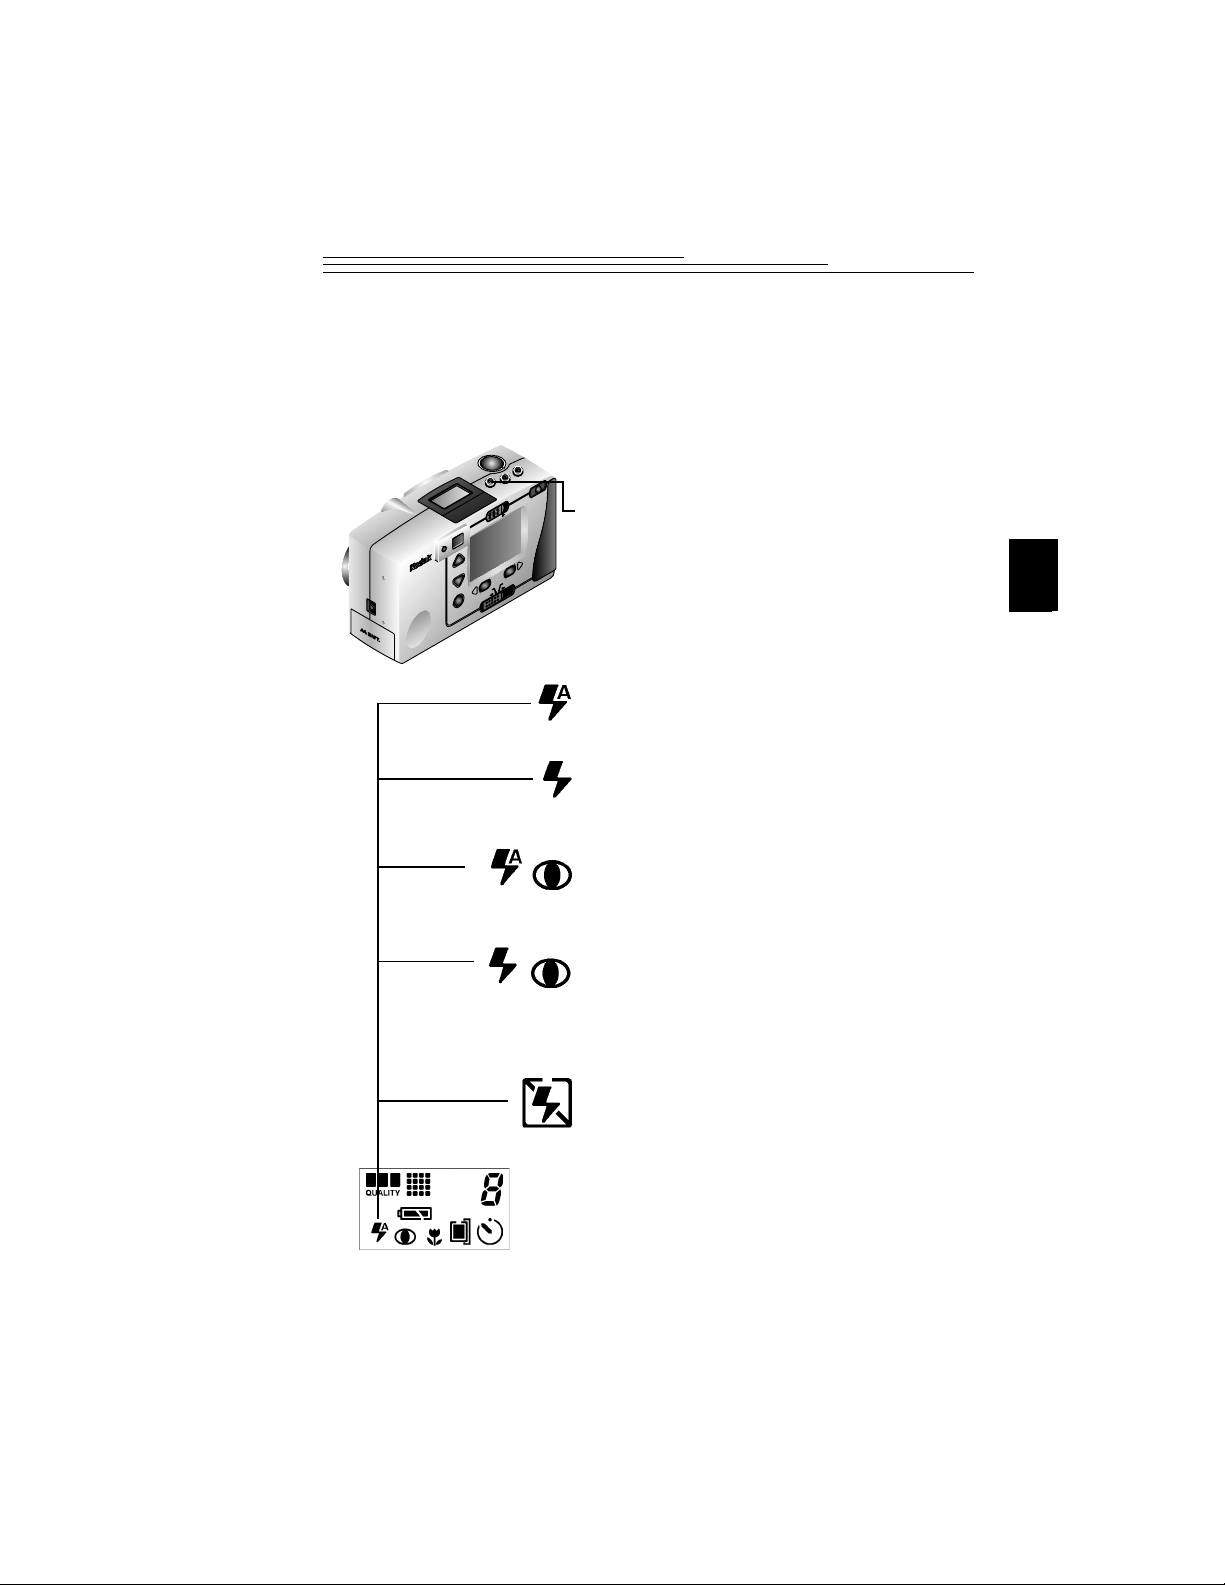
Setting the Flash
When taking pictures at night, indoors, or outdoors in heavy sh adows,
your pictures need flash. Y o ur camera has five different flash options with
a range of 10 ft (3.0 m) to accommodate most picture-taking situations.
1 With the camera on, se t the S lider switch
to Capture.
2 Press the Flash button to scroll though
the flash options.
The Flash setting icon changes in the
Status Display.
q
Auto—flash fires automatically when
needed. Ideal for everyday picture-
taking. This is the main flash setting.
q
Fill—flash fires every time you take a
picture. Ideal for pictures outside
when your subject is in heavy shade.
q
Red-Eye—flash fires once so the eyes
become accustomed to the flash, then
fires again when the picture is taken.
Ideal for pictures of people.
q
Fill Red-Eye—combines both Fill and
Red-Eye flash features. Ideal for
outside pictures of people in heavy
shade where it is too bright for Auto
flash to work.
q
Off—flash does not fire. Ideal for
taking pictures where flash is
prohibited, as in museums.
3 To return to the Auto setting, press the
Flash button, or turn off the camera.
Review
Capture
Connect
Preferences
T
POWER
W
14
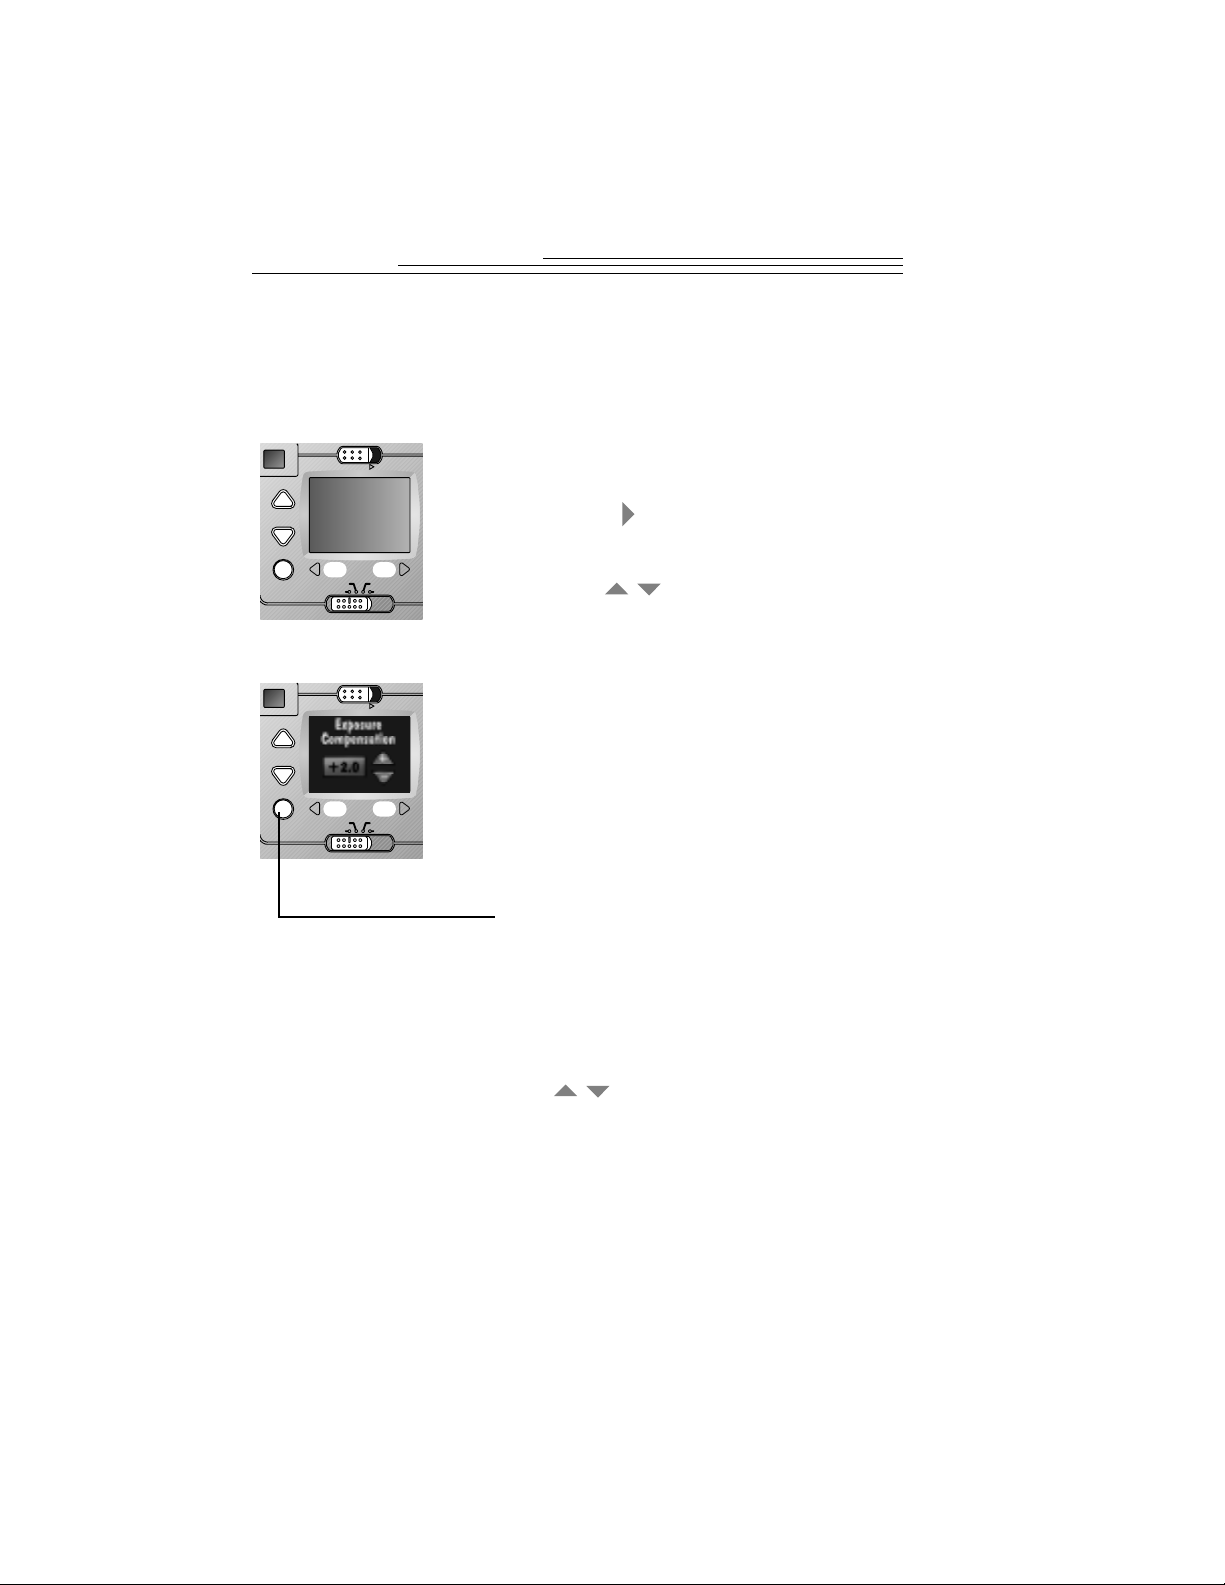
Adjusting the Camera Exposure
If your pictures seem too dark or too light, you can adjust the amount of
light allowed into the camera so your pictures are properly exposed.
These adjustments in lighting are called Exposure Compensation.
1 With the camera on, set the Slider switch
to Capture.
2 Press the button.
The Exposure Compensation screen appears.
3 Press a button to change the
exposure number.
q
If your pictures are too dark, increase
(+) the e xposure nu mber.
q
If your pictures are too light, decrease
(-) the exposure number.
You can adjust the exposure numbers
from +2.0 to -2.0 in 0.5 increments. An
increase of 1.0 doubles the amount of light
allowed into the camera. A decr ease of 1 .0
reduces the amount of light allowed into
the camera by half.
4 Press the DO-IT button to accept the
exposure change.
The Exposure Compensation icon appears in
the LCD if Preview (page 9) or Quickview
(page 24) is activated.
5 To cancel Exposure Compensation, press
a button until 0.0 is highlighted,
then press the DO-IT button, or turn off
the camera.
Review
Capture
Connect
Preferences
POWER
Review
Capture
Connect
Preferences
POWER
/
/
15
2
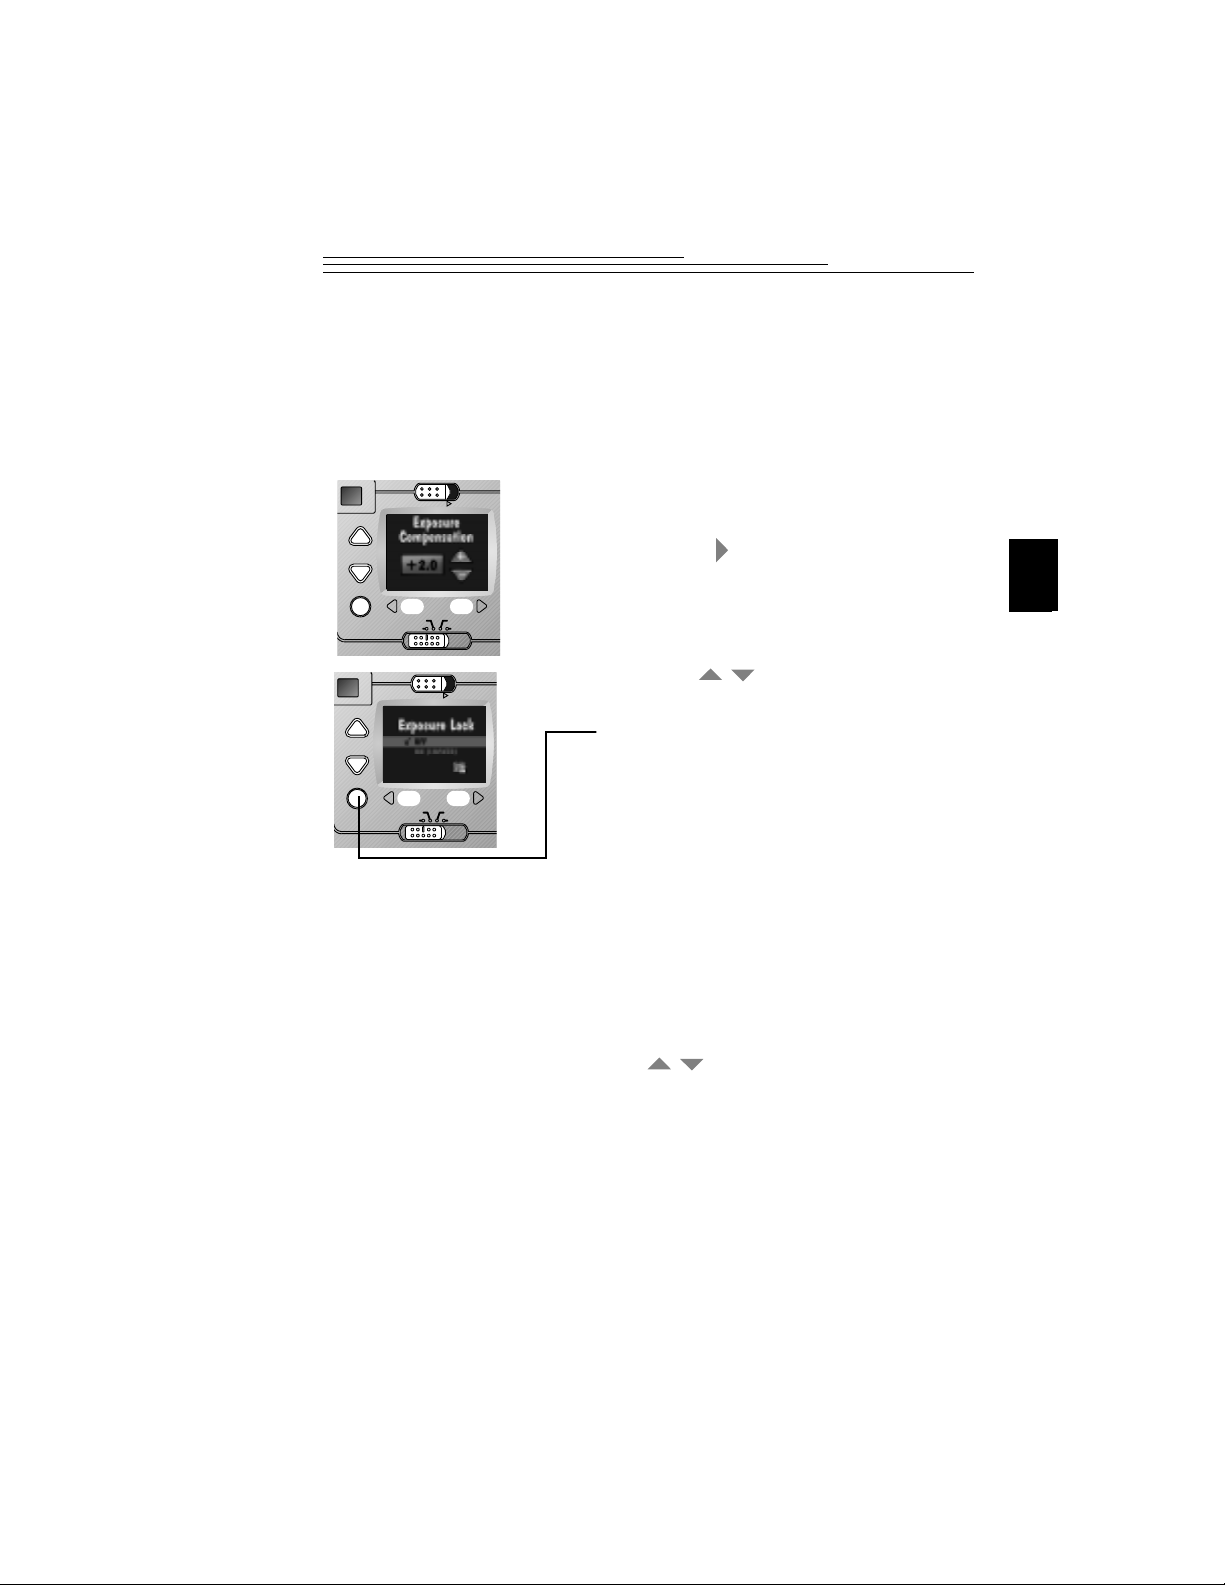
Locking in an Exposure Setting
If you are taking a series of pictures that require a consistent look or a
constant exposure setting, use the Exposure Lock feature. This feature is
great for taking a series of pictures, like a mountain range, and creating a
mural with the prints.
1 With the camera on, set the Slider
switch to Capture.
2 Press the button two times.
The Exposure Compensation screen
appears, followed by the Exposure Lock
screen.
3 Press a button until ON
is highlighted.
4 Press the DO-IT button.
The “Please take a picture to lock capture
settings” screen appears.
5 Center the area you want to lock the
exposure on in the viewfinder.
6 Press the Shutter button to lock in the
exposure setting.
The Exposure Lock icon appears in the
LCD if Preview (page 9) or Quickview
(page 24) are activated.
7 To cancel Exposure Lock, press
a button until OFF is
highlighted, then press the DO-IT
button, or turn off the camera.
Review
Capture
Connect
Preferences
POWER
Review
Capture
Connect
Preferences
POWER
/
/

16
Deleting the Picture Just Taken
If you decide that you do not like a picture, you can delete it from the
camera memory card immediately after it is taken. For the Quick Delete
feature to work, the picture must be displayed on the LCD , so Quickview
needs to be activated. Once you delete the picture, it is permanently
removed from the camera memory card.
1 With the camera on, set the Slider switch
to Capture.
2 Turn on Quickview (page 24).
3 Frame your subject in the viewfinder and
press the Shutter button.
The picture appears on the LCD with the
icon displayed above the button.
4 Press the button.
The Delete Picture screen appears.
5 Press a button until YES
is highlighted.
6 Press the DO-IT button.
The picture is permanently deleted from the
camera memory card.
Review
Capture
Connect
Preferences
POWER
Review
Capture
Connect
Preferences
POWER
Review
Capture
Connect
Preferences
POWER
/

3
17
3 Customizing
Your Pictures
Chapters 1 and 2 explained the basics for taking great digital pictures. In
this chapter, you will learn about some of the custom features available
on your camera. With the digital technology that is built into your
camera, you have the ability to set the camera for almost any picture
taking situation you may encounter. With the camera, you can :
q
Frame your pictures with interesting templates supplied on the
camera memory card.
q
Select specific picture quality and resolution settings to meet your
demanding picture-taking needs.
q
Access camera information to view a complete history of your
cameras use.
q
Adjust a language setting, so you ca n select the language with
which you are most comfortable working.
q
Format other camera memory cards so they work in your camera.

18
Understanding Quality and Resolution
Keep in mind that with your camera you are generally going to get
beautiful digital pictures. But based on two factors, resolution and
quality, some pictures will be of a higher quality than others.
Instead of film, the camera places your pictures on a camera memory
card. These pictures are made up of pixels. The more pixels you have
(or the better the resolution) the more space you use on the camera
memory card.
To save space, you can compress each picture with the Quality setting.
When a picture is compressed, some color and detail information is
discarded. More compression means a lower quality picture. Less
compression means a better quality picture.
Together, quality and r esolution dictate how many pictur es you can fit on
your camera memory card.
q
If the quality of your pictures is most important, use the Best
Quality setting, which results in little compression, and the High
Resolution setting. You may want to do this if you are printing
your pictures on a high-quality printer.
q
If space on your camera memory card is most important, use the
Good or Better quality setting, which results in more compression,
and the Standard Resolution setting. You may want to do this if
you are using your pictures in a Web page or are sending them
through e-mail.
Remember that resolution and quality are two different things.
Resolution is the number of pixels in the picture. Quality is how much
you compress them.
 Loading...