KEYENCE FS-N10 User Manual

96M11513
Digital Fiber Sensor
FS-N10 Series
Instruction Manual
Read this manual before using the product in order to achieve maximum performance. Keep this manual in a safe place after reading it so that it can be used at any time.
Danger |
Failure to follow these instructions may lead to death or seri- |
ous injury. |
|
|
|
Warning |
Failure to follow these instructions may lead to injury. |
|
|
Caution |
Failure to follow these instructions may lead to product dam- |
age (product malfunction, etc.) |
|
|
|
Note Provides additional information on proper operation.
This provides useful tips for the feature being described.
Tip
See "FS-N10 Series User's Manual" for details on the features of the FS-N10 Series and detailed instructions for configuration.
Hints on Correct Use
•This product is just intended to detect the object(s). Do not use this product for the purpose to protect a human body or a part of human body.
• This product is not intended for use as explosion-proof
Warning product. Do not use this product in a hazardous location and/or potentially explosive atmosphere.
•This product uses DC power. Do not apply AC power. The product may explode or burn if an AC voltage is applied.
•Do not wire the amplifier line along with power lines or high-tension lines, as the sensor may malfunction or be damaged due to noise.
•When using a commercially available switching regulator, ground the frame ground terminal and ground terminal.
•Do not use the FS Series outdoors, or in a place where extraneous light can enter the lightreceiving element directly.
•Due to individual dispersion characteristics and the difference in fiber unit models, the maximum sensing distance or displayed value may not be the same on all units.
•If the sensor is used for a long time with the APC function enabled and the LED is imposed with a heavy load, the current consumption of the sensor for light emission will become constant and 'END APC' will be displayed. The sensor can still be used in this case. However, replace the sensor if even small changes in received light intensity should be detected for precise detection.
Precautions on Regulations and Standards
UL Certificate
This product is an UL/C-UL Listed product.
•UL File No. E301717
• Category NRKH,NRKH7
•Enclosure Type 1 (Based on UL50)
Be sure to consider the following specifications when using this product as an UL/C-UL Listed Product.
•Use the power supply with Class 2 output defined in NFPA70 (NEC: National Electrical Code).
•Power supply/ Control input/ Control output shall be connected to a single Class 2 source only.
•Use with the over current protection device which is rated 30V or more and not more than 1A.
FS-N10 Series Quick Start
Quick Start
Fine sensitivity adjustment |
Mode/Output *2 |
|||
Press the [MODE] button once, then |
||||
Up |
Down |
|||
use |
to select L-on or D-on |
|||
|
|
|||
Preset function
Configure easily with a single press when receiving light
Setting value Light intensity |
|
Sensitivity setting |
Power select switch *1 |
Press once each for workpiece/no workpiece |
Standard MEGA (fixed) |
*1 This is a channel switch on 2-output types. This is not equipped with the 0-line type. *2 Press and hold the [MODE] button to make advanced setting changes.
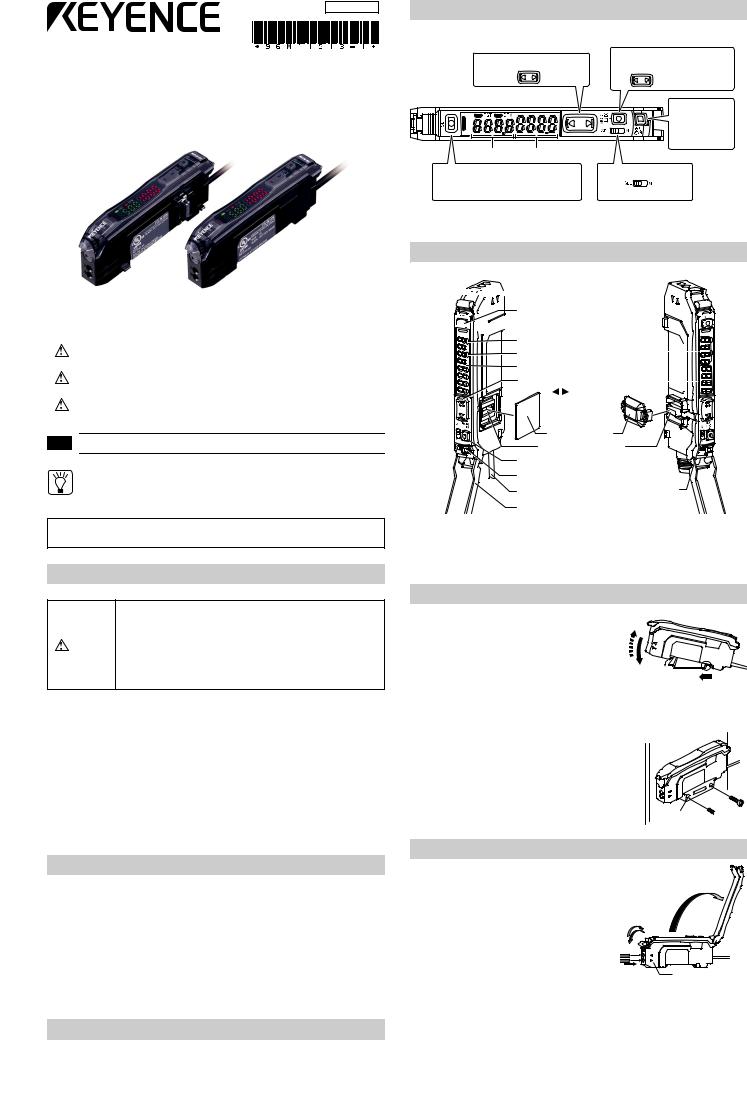
Names of Each Part of the Main Unit and Expansion Unit
 Fiber lock lever
SET button (SET)

 Operation status indicators
PST indicator |
Sub screen |
|
|
|
|||
DTM indicator |
(Displayed in green) |
|
|
|
|
||
|
|
|
|
||||
Digital display |
Main screen |
|
|
|
|||
|
|
|
|
|
|||
Manual button |
(Displayed in red) |
|
|
|
|
|
|
|
|
|
|
|
|||
( |
) |
|
|
|
|
|
|
|
|
|
|
|
|
||
|
|
|
|
|
|
|
|
|
|
|
|
|
|
|
|
|
|
|
|
|
|
|
|
Expansion
protective cover
Expansion connector
MODE button (MODE)
Preset button (PRESET)
Cable*2 |
Power select switch*1 |
Dust cover
*1 Setting to "M" locks the power mode to MEGA mode. The switch is a channel switch for the two output type. This is not equipped with the 0-line type.
*2 On the FS-N1 C , this is an M8 connector rather than a cable. On the FS-N1 EN, this is an e-CON connector.
Mounting Unit
Mounting on a DIN Rail |
3 |
|
1 |
Align the claw at the bottom of the main body with |
|
|
the DIN rail, as shown in figure1. |
|
|
While pushing the main body in the direction of |
2 |
|
the arrow 1, push down in the direction of arrow 2. |
|
2 |
1 |
|
To dismount the sensor, raise the main body in |
figure1 |
|
|
the direction of the arrow 3 while pushing the |
|
|
main body in the direction of arrow 1. |
|
Installation on a Wall (Main Unit Only)
1 Attach the unit to the optional mounting bracket (OP73880), and secure with two M3 screws as shown in figure2.
OP-73880  figure2
Connecting Fiber Unit
1 Open the dust cover in the direction shown by arrow 1.
2 Move the fiber lock lever in the direction shown by arrow 2.
3 Insert a fiber unit into the amplifier as indicated by arrow 3 (approximately 14 mm).
4 Move the fiber lock lever in the direction shown by arrow 4 to secure the fiber.
|
1 |
|
4 |
2 |
|
3 |
Fiber insertion sign |
|
Included accessories
• Instruction Manual 1pc.
1

.
Note • If a thin fiber unit is used, an adapter provided with the thin fiber unit will be required.
Unless the correct adapter is connected, the thin fiber unit will be loose and not detect targets correctly (the adapter is supplied with the fiber unit).
Cable outer dia |
Adapter |
Appearance |
φ1.3 |
Adapter A |
|
(OP-26500) |
|
|
|
|
|
φ1.0 |
Adapter B |
|
(OP-26501) |
|
|
|
|
•To connect the coaxial reflective type fiber unit to the amplifier, connect the single-core fiber to the transmitter side, and connect the multiple-core fiber to the receiver side.
Transmitter
Single-core fiber
Multi-core fiber
Receiver
Connecting Multiple Amplifiers
Up to 16 expansion units can be connected to one main unit. However, two output types will be treated as two main units.
Warning |
Mount on DIN rail and install on metal surface when connecting to |
multiple amplifiers or mounting main units together. |
Note • When connecting with units other than N-bus (a general term for the KEY-
ENCE wire-saving connection system) compatible sensor amplifiers, including the FS-N10 Series, and the network unit NU Series, consult your nearest KEYENCE dealer.
• Turn the power off before connecting multiple expansion units.
• Do not touch the expansion connector with your bare hands.
1 Remove the protection covers from the main unit and expansion unit(s).
2 Install the amplifiers on the DIN rail one at a time.
3 Slide the main unit and expansion unit(s) together. Engage the two claws of the expansion unit with the recesses on the main unit side until you hear/ feel a click.
4 Attach the end units (option: OP-26751) to the DIN rail in the same way as step (2).
5 Secure the amplifiers between the end units. Tighten the screws at the top (two screws x two units) with a Phillips screwdriver to fix the end units.
OP-26751 (a set of two)
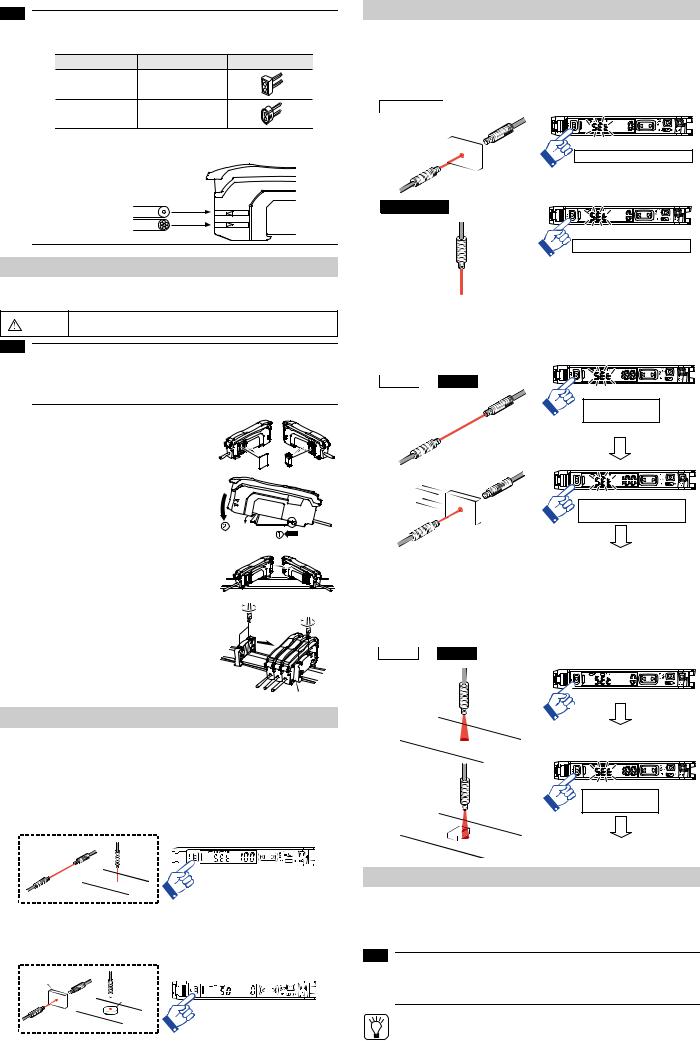
Calibration Method
Detecting Even Small Differences
z Two-point Calibration
Two-point calibration is the basic method of calibration.
Press the [SET] button once without the workpiece, and then press it once again with the workpiece.
1 Press the [SET] button with no workpiece.
[SET] will be displayed on the sub-menu (green display).
2 Press the [SET] button with workpiece.
The values will be set and the submenu (green display) will flash. The values will be set to the mid-point between the light intensity when there is no workpiece, and the light intensity when there is a workpiece.
 Workpiece
If "----" flashes for two seconds on the main screen, the light intensity is too small between conditions when the workpiece is absent and when it is present. These values will be set, but there is the possibility that detection may become unstable.
Other Calibration Methods
Increased Resistance to Dust and Dirt z Maximum Sensitivity Calibration
In the state shown below, press and hold the [SET] button for three seconds or more. Stop pushing when "5'6" flashes.
The sensitivity is set slightly higher than the received light intensity.
Thrubeam model : with workpiece
Workpiece
Press and hold for 3 seconds or more
Reflective model : without workpiece
Press and hold for 3 seconds or more
Calibrate with a Moving Workpiece z Fully Automatic Calibration
Press and hold the [SET] button with no workpiece in place. While “5'6” is flashing, pass a workpiece through. (Continue pressing the [SET] button while the workpiece passes through.)
Common to
Thrubeam and Reflective Models
Press and hold until " " flashes
While pressing the [SET] button pass through a workpiece
 Workpiece
Settings complete
Position Workpiece
z Positioning Calibration
Press the [SET] button with no workpiece.
Place the workpiece in the location you wish to position it. Press and hold the [SET] button for at least 3 seconds. Release the button when "5'6" flashes.
Common to
Thrubeam and Reflective Models
Workpiece
Press [SET] button once with no workpiece
Press and hold [SET] button with workpiece
Press and hold until " " flashes
Settings complete
Simple, User Friendly Functions
Setting the Current Value to 100.0
With the FS-N10 Series, you can set the current value to 100.0 using simple operations. Standardizing the current value makes it possible for the sensor amplifiers to instantly differentiate reductions in light intensity and is useful in predicting the need for maintenance.
Note • The various Preset functions listed below cannot be used when the Zero-
Shift function is enabled. Disable the Zero-Shift function before executing the following functions.
•The Preset functions are not suited for transparent workpieces and other cases of detection with low light intensity differences.
You can disable various Preset functions by pressing and holding the [PRESET]
button.
Tip
2
 Loading...