KEYENCE LS-9030D User Manual

96M12695
LS-9006D/LS-9030D
Instruction Manual
Read this manual before using the product in order to achieve maximum performance.
Keep this manual in a safe place after reading it so that it can be used at any time.
Introduction
This Instruction Manual provides the hardware information of the LS-9006D/ LS-9030D.
When reading the information pertaining to the usage methods and the “WARRANTIES AND DISCLAIMERS” section, be sure to also read the corresponding parts of the “LS-9000 Series User's Manual.”
Keep this manual in a safe place for future reference.
Ensure that the end user of this product receives this manual.
■ Safety precautions on laser products
z Symbols
The following symbols alert you to important messages. Be sure to read these messages carefully.
|
|
|
It indicates a hazardous situation which, if not avoided, will |
|
DANGER |
|
|
|
|
result in death or serious injury. |
|
|
|
|
|
|
|
|
|
|
|
|
It indicates a hazardous situation which, if not avoided, could |
|
WARNING |
|
|
|
|
result in death or serious injury. |
|
|
|
|
|
|
|
|
|
|
|
|
It indicates a hazardous situation which, if not avoided, could |
|
CAUTION |
|
|
|
|
result in minor or moderate injury. |
|
|
|
|
|
|
|
|
|
|
NOTICE |
It indicates a situation which, if not avoided, could result in |
|
|
product damage as well as property damage. |
||
|
|
|
|
|
|
|
|
|
|
|
|
|
|
|
It indicates cautions and limitations that must be followed |
|
Important |
|
|
|
|
during operation. |
|
|
|
|
|
|
|
|
|
|
|
|
|
Point |
|
It indicates additional information on proper operation. |
|
|
|
Mounting the Head
■ Mounting method
zUsing the top mounting holes
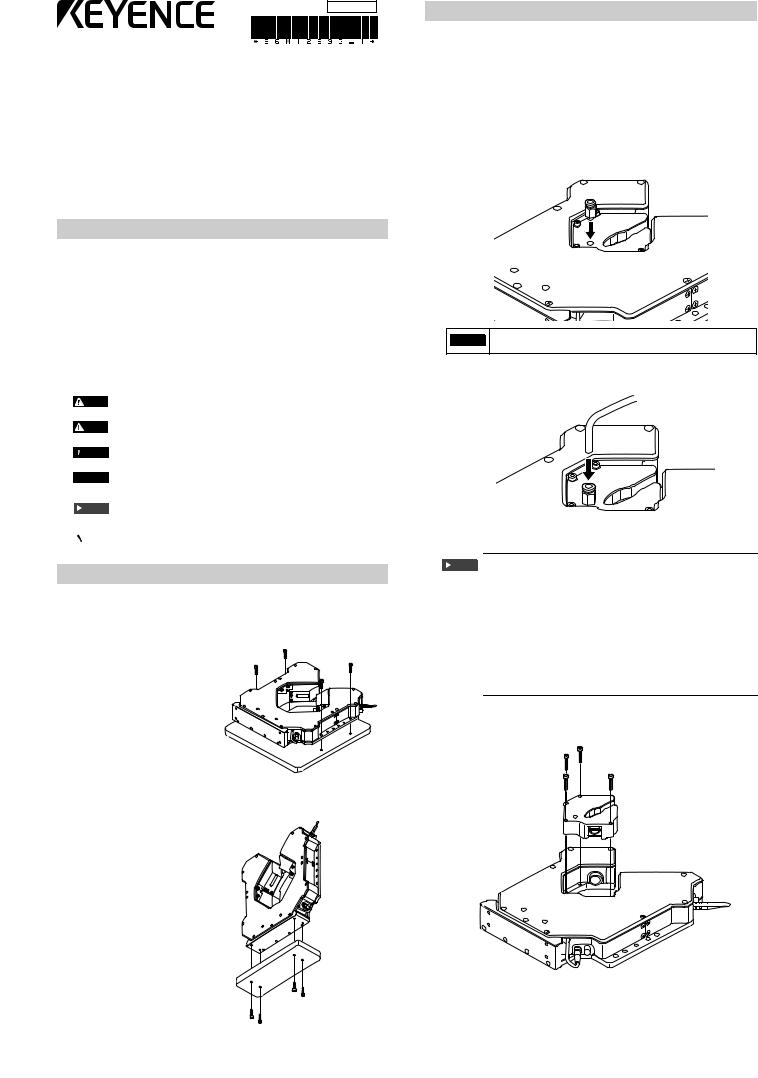
Secure the head by inserting the provided hexagon socket bolts (M6 x L25) through the mounting holes on the base surface and tightening them.
Maximum tightening torque value
• LS-9006D 5.2 N m
• LS-9030D 5.2 N m
LS-9030D mounting example
zUsing the bottom mounting holes
Secure the head using the mounting holes located on the bottom panel of the base (M6 12 mm deep).
Maximum tightening torque value
• LS-9006D 5.2 N m
• LS-9030D 5.2 N m
LS-9030D mounting example
Using the Air Purge Unit
At the time of shipping, the air purge unit is attached to the sensor head. By using the air purge unit, you can reduce the dirt on the transmitter and receiver caused by water, dust and other debris.
■ How to use the air purge unit
zLS-9006D
To use LS-9006D’s air purge unit, prepare the following off-the-shelf items:
•PC6-M5 (PISCO fitting) (Recommended)
•Air tube (Outer diameter φ6
1 Attach the fitting on the air purge unit.
Recommended tightening torque: 1 to 1.5 N m
NOTICE |
If you use an L-shaped fitting, make sure that the threaded |
|
portion will not become loose due to twisting of the tube. |
||
|
2 Insert the air tube into the fitting.
• Supply air flow rate:
Important |
20L/min to 40L/min |
|
|
|
• Air pressure: |
|
Approx. 60 kPa |
|
The air pressure is measured before the air purge. The |
|
pressure will vary depending on the point of measurement. |
|
Be sure to check the performance based on the air flow. |
|
• Be sure to use clean, dry air. |
|
• The air purge performance and the measurement accuracy of |
|
the sizer can be affected by the usage environment and/or the |
|
condition of the air source. Determine the specifications for |
|
the air source and the glass cleaning schedule in accordance |
|
with the actual operating conditions. |
When cleaning the receiver, remove the air purge unit that is secured with four screws as shown below.
Maximum tightening torque for securing the unit: 1.5 N m
1 |
E LS-9006D/LS-9030D |

zLS-9030D
To use LS-9030D’s air purge unit, prepare the following off-the-shelf items:
•PC6-M5 (PISCO fitting) (Recommended)
•Air tube Outer diameter φ6
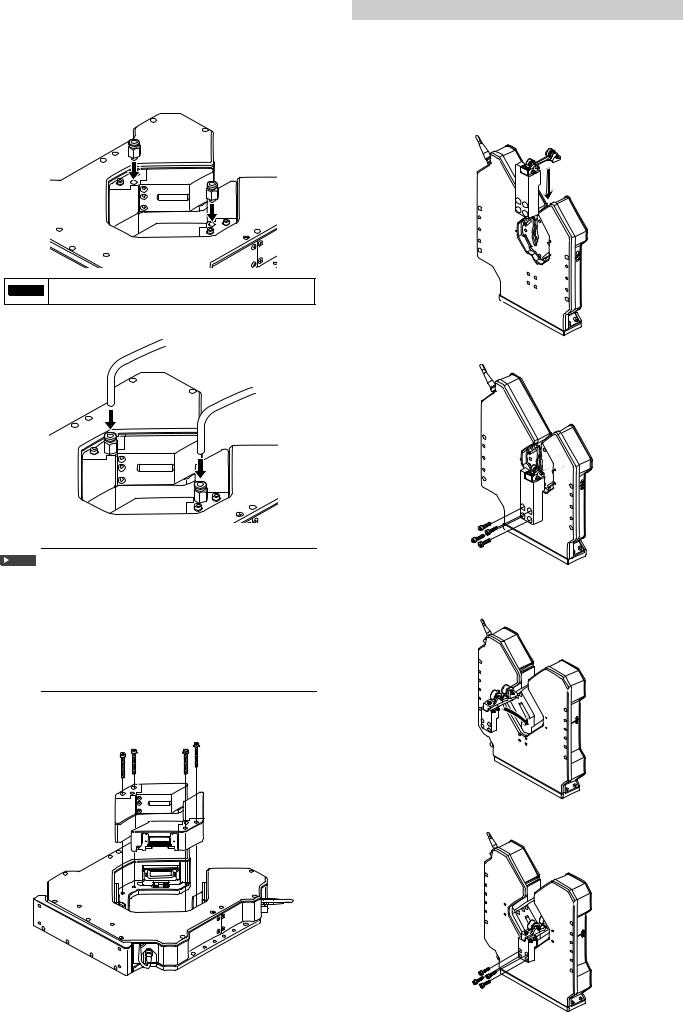
1 Remove the set screw from the inlet to which the fitting will be attached. (2 mounting points)
Recommended tightening torque: 1 to 1.5 N m
Using the Pulley Jig
The following describes how to mount the pulley unit to the casing. The compatible combinations for pulley models and sensor heads are shown below.
•LS-9006D : OP-87750
•LS-9030D : OP-87749
■ For LS-9006D
1 Place the jig into the notched section of air purge unit.
NOTICE |
If you use an L-shaped fitting, make sure that the threaded |
|
portion will not become loose due to twisting of the tube. |
||
|
2 Insert the air tube into the fitting.
2 Secure it using the provided hexagon socket bolts (M5 x L15).
• Supply air flow rate:
Important |
40L/min to 80L/min (20 L/min to 40L/min per unit) |
|
|
|
• Air pressure: |
|
Approx. 40 kPa. |
|
The air pressure is measured before the air purge. The |
|
pressure will vary depending on the point of measurement. |
|
Be sure to check the performance based on the air flow. |
|
• Be sure to use clean, dry air. |
|
• The air purge performance and the sizer’s measurement |
|
accuracy can be affected by the usage environment and/or |
|
the condition of the air source. Determine the specifications |
|
for the air source and the glass cleaning schedule in |
|
accordance with the actual operating conditions. |
When cleaning the receiver, remove the air purge unit that is secured with four screws as shown below.
Maximum tightening torque for securing the unit: 1.5 N m
■ For LS-9030D
1 Place the jig into the notched section of air purge unit.
2 Secure it using the provided hexagon socket bolts (M5 x L15).
E LS-9006D/LS-9030D |
2 |
 Loading...