


KDV-U4349 KDV-U4349M KDV-U4449
DVD-RECEIVER
INSTRUCTION MANUAL
|
|
|
|
|
© 2011 Kenwood Corporation All Rights Reserved. |
|
B64-4818-00/00 (MW/M2W/XW) |
||

Before use |
3 |
|
Audio Adjustments |
25 |
|
For first use |
7 |
|
Audio Control |
|
|
|
Audio Setup |
|
|||
Before using this unit for the first time |
|
|
Preset Equalizer Select |
|
|
Language Setup |
|
|
Manual Equalizer Control |
|
|
DSP Setup |
|
|
Position Control |
|
|
Basic Operation of control panel |
8 |
|
Cabin Selection |
|
|
|
Speaker Setting |
|
|||
General functions |
|
|
|
||
|
|
X’Over Setting |
|
||
Tuner functions |
|
|
DTA (Digital Time Alignment) Setting |
|
|
DVD/ USB/ iPod play functions |
|
|
Audio Preset Memory |
|
|
Function Control/ Setup Menu |
10 |
|
Audio Preset Recall |
|
|
|
Basic Operations of Remote Control 30 |
||||
Clock/ Display Settings |
14 |
||||
Appendix |
31 |
||||
Manual Clock Adjustment |
|
|
|||
Text Display Selection |
|
|
Accessories/ Installation Procedure |
34 |
|
Auxiliary Input Display Setting |
|
|
|||
Theft Deterrent Faceplate |
|
|
Connecting Wires to Terminals |
35 |
|
Tuner Operation |
15 |
|
|||
|
Installation/Removing the Unit |
36 |
|||
Frequency Step Setting |
|
|
|||
Disc/ USB Operations of Remote |
|
|
Troubleshooting Guide |
37 |
|
Control |
16 |
|
|
|
|
|
Specifications |
39 |
|||
Contents |
|
|
|
|
|
Before Use
Playing a Disc
Playing a USB device
Basic Operation
Displaying Status and Control on-screen
DVD-VIDEO Disc Menu
DVD-VR Menu
Video CD PBC Menu
Zoom
Time Search
Direct Search
File Select
iPod Operations of Remote Control |
20 |
Before Use |
|
Playing the iPod |
|
Search Mode |
|
Music disc/Audio file/iPod Operation |
|
of Control Panel |
21 |
Music/Video Search |
|
Music Search for iPod |
|
iPod Control by Hand Mode |
|
Basic Operation of Disc Changer (Optional) |
|
Other Functions |
24 |
Activating Security Code |
|
Deactivating Security Code |
|
About the functions by playback source
In this manual, functions that can be used with various playback sources are indicated as follows:
DVD-VIDEO |
Function of DVD-VIDEO playback. |
DVD-VR |
Function of DVD-VR playback. |
VideoCD |
Function of Video CD playback. |
CD |
Function of CD (CD-DA) playback. |
AudioFile |
Function of Audio file playback. |
MPEG/DivX® |
Function of Video file playback. |
JPEG |
Function of JPEG file playback. |
iPod |
Function of iPod playback. |
2 | KDV-U4349/ KDV-U4349M/ KDV-U4449
Before use
2WARNING
To prevent injury or fire, take the following precautions:
•To prevent a short circuit, never put or leave any metallic objects (such as coins or metal tools) inside the unit.
How to reset your unit
•If this unit or the connected unit (disc auto changer, etc.) fails to operate properly, press the Reset button. The unit returns to factory settings when the Reset button is pressed.
Reset button
Cleaning the Unit
If the faceplate of this unit is stained, wipe it with a dry soft cloth such as a silicon cloth.
If the faceplate is stained badly, wipe the stain off with a cloth moistened with neutral cleaner, then wipe it again with a clean soft dry cloth.
¤
•Applying spray cleaner directly to the unit may affect its mechanical parts. Wiping the faceplate with a hard cloth or using a volatile liquid such as thinner or alcohol may scratch the surface or erases characters.
Cleaning the Faceplate Terminals
If the terminals on the unit or faceplate get dirty, wipe them with a clean soft dry cloth.
Lens Fogging
When you turn on the car heater in cold weather, dew or condensation may form on the lens in the
DVD player of the unit. Called lens fogging, this condensation on the lens may not allow discs to play. In such a situation, remove the disc and wait for the condensation to evaporate. If the unit still does not operate normally after a while, consult your Kenwood dealer.
•If you experience problems during installation, consult your Kenwood dealer.
•When you purchase optional accessories, check with your Kenwood dealer to make sure that they work with your model and in your area.
•The characters which can be displayed by this unit are A-Z 0-9 @ " ‘ ` % & * + – = , . / \ < > [ ] ( ) : ; ^ - { } | ~ .
•The illustrations of the display and the panel appearing in this manual are examples used to explain more clearly how the controls are used. Therefore, what appears on the display in the illustrations may differ from what appears on the display on the actual equipment, and some of the illustrations on the display may be inapplicable.
Handling discs
•Do not touch the recording surface of the disc.
•Do not stick tape etc. on the disc, or use a disc with tape stuck on it.
•Do not use disc type accessories.
•Clean from the center of the disc and move outward.
•When removing discs from this unit, pull them out horizontally.
•If the disc center hole or outside rim has burrs, use the disc only after removing the burrs with a ballpoint pen etc.
Discs that cannot be used
•Discs that are not round cannot be used.
•Discs with coloring on the recording surface or discs that are dirty cannot be used.
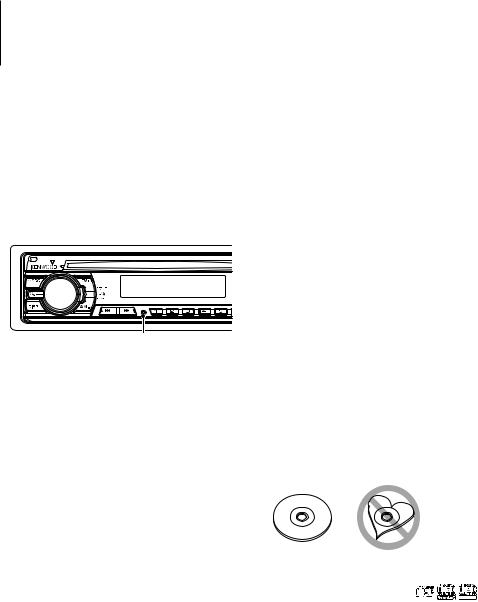
•This unit can only play the CDs with


 . This unit may not correctly play discs which do not
have the mark.
•You cannot play a disc that has not been finalized. (For the finalization process refer to your writing software, and your recorder instruction manual.)
English | 3
Before use
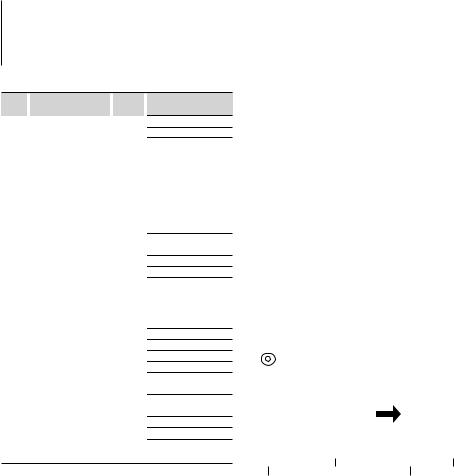
List of playable discs
Disc |
|
Standard |
|
|
|
Support |
|
types |
|
|
|
|
|
|
|
DVD |
|
|
DVD Video |
|
|
|
‡ |
|
|
|
DVD Audio |
|
|
× |
|
|
|
|
DVD-R |
|
|
|
‡ |
|
|
|
|
|
|
|
|
|
|
|
DVD-RW |
|
|
|
‡ |
|
|
|
|
|
|
|
|
|
|
|
DVD+R |
|
|
|
‡ |
|
|
|
|
|
|
|
|
|
|
|
DVD+RW |
|
|
|
‡ |
|
|
|
|
|
|
|
|
|
|
|
DVD-R DL (Dual layer) |
|
|
|
‡ |
|
|
|
DVD+R DL (Double layer) |
|
|
|
‡ |
|
|
|
DVD-RAM |
|
|
× |
|
CD |
|
|
Music CD |
|
|
|
‡ |
|
|
|
CD-ROM |
|
|
|
‡ |
|
|
|
|
|
|
|
|
|
|
|
CD-R |
|
|
|
‡ |
|
|
|
|
|
|
|
|
|
|
|
CD-RW |
|
|
|
‡ |
|
|
|
|
|
|
|
|
|
|
|
DTS-CD |
|
|
× |
|
|
|
|
Video CD (VCD) |
|
|
|
‡ |
|
|
|
Super video CD |
|
|
× |
|
|
|
|
Photo CD |
|
|
× |
|
|
|
|
CD-EXTRA |
% |
|||
|
|
|
|
|
|
|
|
|
|
|
HDCD |
% |
|||
|
|
|
|
|
|
|
|
|
|
|
CCCD |
|
|
× |
|
Others |
|
|
DualDisc |
|
|
|
× |
|
|
|
Super audio CD |
% |
|||
Remark
DTS not supported.
MP3/WMA/WAV/JPEG/ MPEG/DivX Playback Multi-border/Multisession/ (Playback depends on authoring conditions) Video mode supported
VR mode supported (Only DVD-R/RW)
Only video format
CD-TEXT
MP3/WMA/WAV/JPEG/ DivX playback Multisession supported Packet write not supported.
Only music CD session can be played.
Sound quality of normal CD music
Only CD layer can be played.
‡ : Playback is possible.
% : Playback is partly possible. × : Playback is impossible.
⁄
•When buying DRM enabled contents, check the Registration Code in the <DivX registration> (page 13). Registration Code changes each time a file with the displayed Registration Code is played to protect against copying.
Use of “DualDisc”
When playing a “DualDisc” on this unit, the surface of the disc that is not played may be scratched while the disc is inserted or ejected. Since the music CD surface does not conform to the CD standard, playback may be impossible.
(A “DualDisc” is a disc with one surface containing DVD standard signals and the other surface containing music CD signals.)
About Audio files
•Playable Audio file
MP3 (.mp3), WMA (.wma), Linear PCM (WAV) (.wav)
⁄
•If music of normal CD and other playback systems are recorded in the same disc, only the playback system recorded at the first setout is played.
•Acceptable media
CD-R/RW/ROM, DVD±R/RW, mass-storage-class USB device, iPod with KCA-iP102
•Playable disc file format
ISO 9660 Level 1/2, Joliet, Romeo.
•Playable USB device file system
FAT32, FAT16
Although the audio files are complied with the standards listed above, the play maybe impossible depending on the types or conditions of media or device.
•Playing order of the Audio file
In the example of folder/file tree shown below, the files are played in the order from to .
( ): Roott |
|
|
|
|
|||||||
|
v |
|
<<: Folder |
|
|
|
|
|
v |
||
|
|
vv: Audio filefile |
|
|
|
|
|
||||
|
|
|
|
|
|
||||||
|
< |
|
v |
|
|
|
v |
||||
|
|
||||||||||
|
|
|
|
|
|
|
|||||
|
|
|
|
|
|
|
|
v |
|||
|
|
|
|
|
v |
||||||
|
|
|
|
|
|||||||
|
|
|
|
|
|
|
|
||||
|
|
|
|
|
|
||||||
|
v |
|
|
v |
|||||||
|
|
||||||||||
|
|
|
|
|
|||||||
|
|
|
|
v |
|
|
|
v |
|||
|
|
|
|
|
|||||||
|
|
|
|
|
|
|
|||||
|
|
|
|
|
v. |
|
|
|
|
|
v. |
|
|
|
|
|
|
|
|
|
|
||
|
|
|
|
|
|
|
|||||
An online manual about audio files is put on the site, www.kenwood.com/audiofile/. On this online manual, detailed information and notes which are not written in this manual are provided. Make sure to read through the online manual as well.
About Video files
•Acceptable video files
MPEG1, MPEG2, DivX
•Extensions
mpg, mpeg, divx, div, avi
•Acceptable media
CD-R/RW/ROM, DVD±R/RW, mass-storage-class USB device, iPod with KCA-iP102
Acceptable discs, disc formats, USB device file system, file and folder names and playing order are the same as those for audio files. See <About Audio files>.
4 | KDV-U4349/ KDV-U4349M/ KDV-U4449
About Picture files
•Acceptable picture files
JPEG
•Extensions jpg, jpeg
•Acceptable media
CD-R/RW/ROM, DVD±R/RW, mass-storage-class USB device
Acceptable discs, disc formats, USB device file system, file and folder names and playing order are the same as those for audio files. See <About Audio files>.
iPod/iPhone that can be connected to this unit
Made for
•iPod nano (6th generation)
•iPod nano (5th generation)
•iPod nano (4th generation)
•iPod nano (3rd generation)
•iPod nano (2nd generation)
•iPod nano (1st generation)
•iPod with video
•iPod classic
•iPod touch (4th generation)
•iPod touch (3rd generation)
•iPod touch (2nd generation)
•iPod touch (1st generation)
•iPhone 4
•iPhone 3GS
•iPhone 3G
•iPhone
•For the latest compatible list and software version of iPod/iPhone, see: www.kenwood.com/cs/ce/ipod
•You can control an iPod/iPhone from this unit by connecting an iPod/iPhone (commercial product) with Dock connector using an optional accessory iPod connection cable (KCA-iP102). The word “iPod” appearing in this manual indicates the iPod/iPhone connected with the KCA-iP102 (optional accessory).
•By connecting your iPod/iPhone to this unit with an optional accessory iPod connection cable (KCA-
iP102), you can supply power to your iPod/iPhone as well as charge it while playing music. However, the power of this unit must be on.
⁄
•If you start playback after connecting the iPod, the music that has been played by the iPod is played first.
•You cannot operate iPod if “KENWOOD” or “ ” is displayed on the iPod.
•A video file stops playing if you switch to another source while playing it. You cannot play from the last playback position if you switch back to iPod.
About USB device
•In this manual, the word “USB device” is used for flash memories and digital audio players which have USB terminals.
•When the USB device is connected to this unit, it can be charged up provided that this unit is powered.
•Install the USB device in the place where it will not prevent you from driving your vehicle properly.
•You cannot connect a USB device via a USB hub and Multi Card Reader.
•Take backups of the audio files used with this unit. The files can be erased depending on the operating conditions of the USB device.
We shall have no compensation for any damage arising out of erasure of the stored data.
•No USB device comes with this unit. You need to purchase a commercially available USB device.
•When connecting the USB device, usage of the CA-U1EX (option) is recommended.
Normal playback is not guaranteed when a cable other than the USB compatible cable is used. Connecting a cable whose total length is longer than 5 m can result in abnormal playback.
English | 5

Before use
Region codes in the world
The DVD players are given a region code according to the country or area it is marketed, as shown in the following map.
1 |
5 |
|
|
2 |
|
1 |
6 |
2 |
|
|
|
|
3 |
|
4 |
|
1 |
|
|
|
|
5 |
|
|
2 |
|
|
|
4 |
DVD disc marks
Symbol |
|
Description |
ALL |
|
Indicates a region number. The discs with this mark can |
|
be played with any DVD player. |
|
|
|
|
|
|
Indicates the number of audio languages recorded. Up |
8to 8 languages can be recorded in a movie. You can select a favorite language.
32 |
|
Indicates the number of subtitled languages recorded. |
|
|
Up to 32 languages can be recorded. |
|
|
|
9 |
|
If a DVD disc has scenes shot from multiple angles, you |
|
can select a favorite angle. |
|
|
|
|
|
|
Indicates the type of screen for the image. The left mark |
16:9 LB |
|
indicates that a wide image picture (16:9) is displayed |
|
|
on a standard TV set screen (4:3) with a black band at |
|
|
both the top and bottom of the screen (letter box). |
Operation regulatory marks
With this DVD, some functions of this unit such as the play function may be restricted depending on the location where the DVD is playing. In this case, the following marks will appear on the screen. For more information, refer to the disc manual.
Prohibition Mark
Discs with limited period of use
Do not leave discs with a limited period of use in this unit. If you load an already expired disc, you may not be able to remove it from this unit.
6 | KDV-U4349/ KDV-U4349M/ KDV-U4449

For first use
Before using this unit for the first time
Demonstration mode setting
This unit is initially set on the Demonstration mode. When using this unit for the first time, cancel the Demonstration mode setting.
Display |
|
Setting |
“DEMO ON” |
|
The Demonstration mode function is ON. |
“DEMO OFF” |
|
Cancel Demonstration mode (Normal mode). |
TV system selection
You must select the appropriate system mode for your TV system. When the selected system does not coincide with the system of your TV, normal color picture may not be displayed.
Display |
|
Setting |
“P/N PAL” |
|
Select when the unit is connected with PAL-TV. |
“P/N NTSC” |
|
Select when the unit is connected with NTSC-TV. |
1Select Standby
Press the [SRC] button.
Select the “STANDBY” display.
2Enter Function Control mode
Press the [ ] button for at least 1 second.
“FUNCTION” is displayed.
3Enter Menu mode
Turn the [AUD] knob to select “MENU”. Press the [AUD] knob.
4Set the Demonstration mode
Turn the [AUD] knob to select “DEMO”. Press the [AUD] knob for at least 2 seconds.
Select the “DEMO OFF” display.
5Set the TV system
Turn the [AUD] knob to select “P/N”. Press the [4] or [¢] button.
6Exit Function Control mode
Press the [ ] button for at least 1 second.
7Turning OFF the Power
Press the [SRC] button for at least 1 second.
⁄
• These settings can be changed later.
Language Setup
Set a language used for screen display, DVD subtitles, etc.
• “LANGUAGE” item of the Setup menu (page 13)
DSP Setup
To get clear sound, set the sound environment according to the location and size of physically installed speakers with reference to the followings:
•“MENU” > “SWPRE” of <Function Control> (page 10)
•Cabin selection (page 27)
•Speaker Setting (page 27)
•DTA (Digital Time Alignment) setting (page 28)
•X’Over setting (page 28)
⁄
•Setting “DSP SET” to “BYPASS” disables the settings related to the DSP function. Refer to “DSP” > “DSP SET” of <Function Control> (page 11).
English | 7
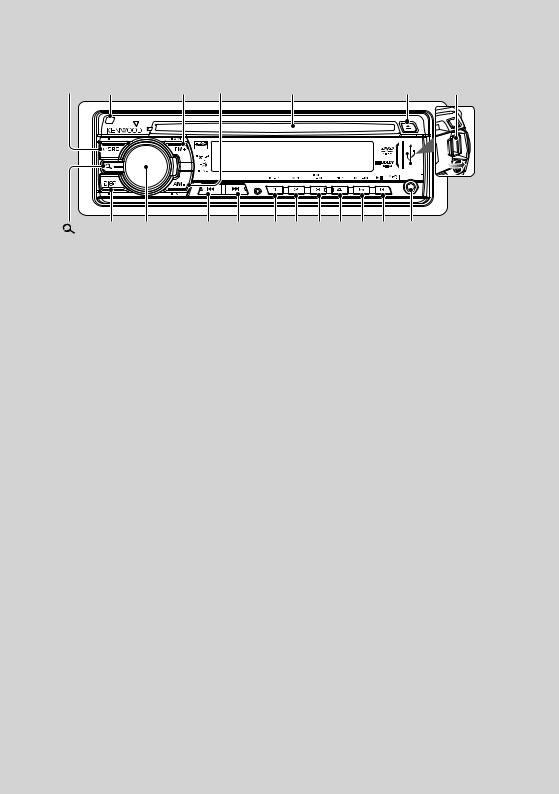
Basic Operation of control panel
[SRC] |
Release |
|
[FM+] [AM–] |
Disc slot |
|
|
|
|
[0] |
USB Terminal |
|
[ |
] |
[DISP] |
[AUD] |
[4] [¢] |
[1] [2] |
[3] |
[4] |
[5] |
[6] |
Auxiliary input |
|
General functions
Power/Source Select button: [SRC]
Turns on the power.
When the power is on, the source switches between Tuner (“TUNER”), USB or iPod (“USB” or “iPod”),
DVD (“DVD”), Auxiliary input (“AUX”), and Standby (“STANDBY”) each time this button is pressed.
Press at least 1 second to turn off the power.
⁄
•When an optional accessory is connected, the source name for each device appears.
Volume control: [AUD] knob
Turn the knob to adjust the volume.
Subwoofer output: [AM–]
Switches between ON (“SW ON”) and OFF (“SW OFF”)
each time this button is pressed for at least 2 seconds.
⁄
•You can do this function when “SWPRE” in <Function Control> (page 10) is set to “SW”.
Auxiliary input
Connect a portable audio device with mini-plug
cable (3.5 ø).
⁄
•Use the mini-plug cable which is stereo type and does not have any resistance.
•The AUX input requires the setting made in “MENU” > “AUX” of <Function Control> (page 11).
Switching display: [DISP]
Changes the information displayed. Refer to page 14 for the details of the display setting.
Text/Title scroll: [DISP]
Scrolls the text display of a CD or audio files when pressed for at least 1 second.
8 | KDV-U4349/ KDV-U4349M/ KDV-U4449
Tuner functions
FM band: [FM+]
Switches between FM1, FM2, and FM3 each time the [FM+] button is pressed.
AM band: [AM–]
Switches to AM.
Tuning: [4]/ [¢]
Changes the frequency.
⁄
•Use the “MENU” > “AUTO1”/ “AUTO2”/ “MANUAL” in <Function Control> (page 11) to change the frequency switching.
•During reception of stereo stations the “ST” indicator is ON.
Preset memory: [1] - [6]
Memorizes the station selected when pressing for at least 2 seconds.
Auto memory entry: [FM+]
Memorizes 6 stations with good reception automatically when pressed for at least 2 seconds.
Preset tuning: [1] - [6]
Recalls the memorized station.
DVD/ USB/ iPod play functions
Disc play: Disc slot
Starts playing when a disc is inserted.
When a disc is inserted, the “IN” indicator is ON.
⁄
•Do not attempt to insert a disc into the slot if another one is already there.
•The unit can only play 12 cm (5 inch) discs. If you insert an 8 cm (3 inch) disc, it will get stuck inside and can cause the unit to malfunction.
Disc ejection: [0]
⁄
•You can eject the disc for 10 minutes after switching off the engine.
USB device/iPod play: USB Terminal
Connecting a USB device starts playback.
⁄
•For the playable audio file, video file, media, and devices, refer to <About Audio file> (page 4), <About Video file> (page 4).
USB device/ iPod removing
To disconnect the USB device/ iPod, stop the playback by pressing the [1] button, and then disconnect the USB device/ iPod.
Pause and play: [6]
Switches between pause and play each time this button is pressed.
Stops playing: [1]
Track/File search: [4]/ [¢]
Changes the chapter/ track/ file when this button is pressed.
Fast reverses or forwards the music while pressing. Pressing these buttons for 5 seconds or longer
accelerates the speed of fast-forward or fast-reverse.
⁄
•For the iPod, the fast-forward or reverse speed does not change.
Title/ Folder search DVD-VIDEO |
DVD-VR AudioFile MPEG/DivX® |
|
JPEG : [FM+]/ [AM–] |
|
|
Changes the title/ folder. |
|
|
Search mode AudioFile CD |
MPEG/DivX® JPEG |
iPod |
: [ ]
]
After pressing this button, you can quickly search songs with the [AUD] knob. See <Music/Video Search> (page 21) for details.
Random play VideoCD AudioFile CD MPEG/DivX® iPod
: [3]
Randomly plays the track/ file in the disc or folder. When Random Play is turned on, “DISC RDM”/ “FOLD
RDM” is displayed.
⁄
•iPod : Disabled when VIDEO is being played.
All Random play AudioFile MPEG/DivX® iPod : [3]
If you press this button for at least 3 seconds while playing a file, all files in the media play at random (“ALL RDM”).
Pressing the button again turns the random play off
(“RDM OFF”).
⁄
•The time required to turn on the all random function may become longer depending on the number of songs in iPod or the folder structure.
•iPod : Turning on the all random function changes
the iPod browse item to “songs”. This browse item will not change even if the all random function is turned off.
• iPod : If the brows item is changed to search for music while the all random function is on, the all random function is turned off and the songs in the browse item are played at random.
English | 9

Function Control/ Setup Menu
Function Control
Functions in the table below can be set up by using Function Control.
1Enter Function Control mode
Press the [ ] button for at least 1 second.
“FUNCTION” is displayed.
2Select your desired setup item
Operation type |
|
Operation |
Movement between items |
|
Turn the [AUD] knob. |
Selection of item |
|
Press the [AUD] knob. |
Return to previous item |
|
Press the [ ] button. |
Repeat selection and determination until your desired setup item is selected.
In this manual, the above selection is indicated as
Press [ ] 1sec., and select “MENU” > “ICON”.
Category |
|
Function of setup item |
|
Condition |
“iPodCTRL” |
Allows you to set up iPod Control by Hand |
|
|
|
|
|
Mode. |
|
|
“DSP” |
Allows you to set up the sound environment. |
|
|
|
|
|
|
|
|
“MENU” |
Allows you to set up the environment. |
|
— |
|
“RETURN” |
|
Exit Function Control mode. |
|
— |
3Make a setting
Press the [AUD] knob or turn the [AUD] knob to select a setting value, and then press the [AUD] knob.
•The value of items with [AUD] mark can be set by pressing the [AUD] knob.
•The value of items with [4/ ¢] mark can be set by pressing the [4] or [¢] button.
•Some items require you to keep pressing the [AUD] knob for 1 or 2 seconds to set. For these items, the time during which you need to keep pressing the [AUD] knob is displayed in the Entry column in seconds.
4Exit Function Control mode
Press the [ ] button for at least 1 second.
Displayed item is depending on currently selected source or mode. The mark in Condition column shows the condition to which the item is displayed.
 : Can be set in other than standby state.
: Can be set in standby state.
 : Can be set only during playback of the iPod source. (USB source used when the iPod is connected)
 : Can be set during USB source.
 : Can be set during DVD source.
 : Can be set during Tuner source.
 : Can be set during FM reception.
 : Can be set while accessing AUX source.
 : Can be set for sources other than the standby source by setting “2ZON” of <Audio Setup> (page
25)to “ON”.
—: Can be set during all sources.
⁄
•Refer to the respective page for information on how to set the items with reference page number.
•Only the items available to the current source are displayed.
•Strong electrical fields (such as from power lines) may cause unstable sound quality when CRSC is turned ON. In such a situation, turn it OFF.
*Factory setting
“MENU”
Item |
|
Setting |
|
Entry |
|
“CODE SET”/ |
|
|
|
1 sec. |
|
“CODE CLR” |
|
|
|
|
|
“DIM” |
|
“OFF”*/ “ON” |
4/ ¢ |
||
|
|
|
|
|
|
“ICON” |
|
“OFF”/ “ON1”/ |
4/ ¢ |
||
|
|
“ON2”* |
|
|
|
“SWPRE” |
|
“R”*/ “SW”/ “AV” |
4/ ¢ |
||
Setting overview |
|
Condition |
|
Page |
Sets/Resets security code. |
|
|
24 |
|
|
|
|
|
|
Adjusts the brightness of the display according to the |
|
— |
|
— |
surrounding illumination. |
|
|
|
|
Sets the Graphics mode of the display. |
|
|
32 |
|
|
|
|
|
|
Sets the preout output. |
|
|
32 |
|
10 | KDV-U4349/ KDV-U4349M/ KDV-U4449
Item |
|
Setting |
|
Entry |
|
“ZONE2” |
|
“F”/ “R”* |
4/ ¢ |
||
|
|
|
|
|
|
“AUTO1”/ “AUTO2”/ |
|
“AUTO1”*/ “AUTO2”/ |
4/ ¢ |
||
“MANUAL” |
|
“MANUAL” |
|
|
|
“CRSC” |
|
“OFF”/ “ON”* |
4/ ¢ |
||
“NAME SET” |
|
|
|
|
|
|
|
|
1 sec. |
||
|
|
|
|
|
|
“P/N” |
|
“PAL”/ “NTSC” |
4/ ¢ |
||
|
|
|
|
|
|
“M/V” |
|
|
|
|
|
“ABOOK” |
|
“SL”/ “NM”/ “FA” |
|
4/ ¢ |
|
“SKIP” |
|
“0.5%”*/ “1%”/ |
4/ ¢ |
||
|
|
“5%”/ “10%” |
|
|
|
“iART” |
|
“OFF”/ “ON”* |
4/ ¢ |
||
|
|
|
|
|
|
“FILETYPE” > “DISC” |
|
“A/V”/ “PIC” |
4/ ¢ |
||
> “USB” |
|
|
|
|
|
|
|
|
|
|
|
“SCL” |
|
“AUTO”*/ “MANU” |
|
4/ ¢ |
|
“AUX” |
|
“OFF”/ “ON1”*/ |
4/ ¢ |
||
|
|
“ON2” |
|
|
|
“DEMO” |
|
“OFF”*/ “ON” |
|
2 sec. |
|
|
|
|
|
|
|
“DIVX” |
|
|
|
|
|
Setting overview |
|
Condition |
|
Page |
Specifies the destination of sub source sound when the Dual |
|
|
32 |
|
Zone function is turned on. |
|
|
|
|
Selects the tuning mode of the radio. |
|
|
31 |
|
|
|
|
|
|
Switches to Monaural to decrease noise when reception is poor. |
|
|
|
— |
Sets the display when switched to AUX source. |
|
|
14 |
|
Sets the color system for the monitor. You have to turn the power |
|
— |
|
— |
off after the setting is changed. |
|
|
|
|
Displays the firmware version of Microvision. |
|
|
|
— |
Sets the audio book playback speed. |
|
|
|
— |
Sets the ratio of skip performed with <Music/Video Search for |
|
|
21 |
|
iPod>. |
|
|
|
|
Specifies whether or not the artworks of the music files are |
|
|
|
— |
displayed. |
|
|
|
|
Selects playback file type when a disc or USB contains different |
|
|
13 |
|
types of files. |
|
|
|
|
You can make advanced settings in the “FILE TYPE” of the Setup |
|
|
|
|
menu. “A” or “V” may appear on the display after setting. |
|
|
|
|
Specifies whether the text is scrolled automatically. |
|
— |
|
— |
Sets whether to display AUX during source selection. |
|
|
31 |
|
|
|
|
|
|
Specifies whether to enable demonstration. |
|
— |
7 |
|
Display the format version of DivX. |
|
|
|
— |
“iPodCTRL”
Item |
|
Setting |
|
Entry Setting overview |
|
Condition Page |
||||
“iPodCTRL” |
|
“HANDS ON”/ |
|
AUD |
|
When set to “HANDS ON”, allows you to operate iPod with the |
|
|
|
22 |
|
|
“MODE OFF”* |
|
|
control on the iPod. |
|
|
|
|
|
|
|
|
|
|
|
|
|
|
||
“DSP”
Item |
|
|
Setting |
|
Entry |
|
“CONTROL” |
“EQ” |
|
|
|
[AUD] |
|
|
|
“B.BOOST” |
|
“OFF”*/ |
|
AUD |
|
|
|
|
“STEP1”/ “2” |
|
|
|
|
|
|
|
|
|
|
|
“HIGHWAY” |
|
“OFF”/ |
|
AUD |
|
|
|
|
“STEP1”/ “2”/ |
|
|
|
|
|
|
|
|
|
|
|
|
|
“3”*/ “4” |
|
|
|
|
“POSITION” |
|
|
|
[AUD] |
|
|
|
|
|
|
|
“SETUP” |
“CABIN” |
|
|
|
[AUD] |
|
|
|
|
|
|
|
|
|
|
“SPEAKER” |
|
|
|
[AUD] |
|
|
|
|
|
|
|
|
|
“DTA” |
|
|
|
[AUD] |
|
|
|
|
|
|
|
|
|
“X’OVER” |
|
|
|
[AUD] |
“PRESET” |
“RECALL” |
|
|
|
[AUD] |
|
|
|
|
|
|
|
|
|
|
“MEMORY” |
|
|
|
[AUD] |
“DSP SET” |
|
|
“BYPASS”/ |
|
AUD |
|
|
|
|
|
“THROUGH”* |
|
|
|
|
|
|
|
|
|
Setting overview |
|
Condition Page |
||
Sets the sound quality. |
|
|
|
25 |
Sets the Bass Boost level in two steps. |
|
|
|
— |
|
|
|
|
|
Compensates the low volume or bass sound being lost by road |
32 |
|||
noises to make vocal sound clearer. |
|
|
|
|
|
|
|
|
|
Compensates the sound environment in accordance with the |
26 |
|||
listening position. |
|
|
|
|
Selects the car type to compensate the distance difference |
27 |
|||
between each speaker. |
|
|
|
|
Sets the connected speaker, speaker size, and installation |
27 |
|||
position. |
|
|
|
|
Makes fine adjustment of the compensation value specified at |
28 |
|||
Cabin. |
|
|
|
|
Makes fine adjustment of the X’Over value specified at Speaker. |
|
|
|
28 |
Registering the value setup by Sound Control. Recalling the |
29 |
|||
sound setup registered by <Audio Preset Memory>. |
|
|
|
|
Registering the value setup by Sound Control. |
29 |
|||
Setting “BYPASS” passes the DSP function. |
|
|
|
— |
Setting “THROUGH” activates the DSP function. |
|
|
|
|
English | 11

Function Control/ Setup Menu
Setup menu of remote control
By using the Setup menu, you can make various adjustments to items such as picture and sound. You can also set a language for the subtitles and the Setup menu, among other things.
1Select DVD or USB source
Press the [SRC] button.
Select the “DVD” or “USB” display.
2Press the [7] button.
3Enter Setup menu mode
Press the [SETUP] button.
4Press the [2]/[3] button to select the menu.
LANGUAGE/ PICTURE/ AUDIO/ OTHER
5Press the [5]/[∞] button to select the desired item, and then press the [ENTER] button.
To cancel pop-up menu, press the [RETURN] button.
6Press the [5]/[∞] button to select the desired setting, and then press the [ENTER] button to confirm your selection.
7Exit Setup menu mode
Press the [SETUP] button.
The Setup menu ends.
⁄
• The memory cannot be erased by the Reset button.
12 | KDV-U4349/ KDV-U4349M/ KDV-U4449
 Loading...