

Chef and Major
KMC010 - KMM020 series
instructions

EEnngglliisshh
page 4 instructions
Congratulations on buying a Kenwood. With such a wide range of attachments available, it’s
more than just a mixer. It’s a state-of-the-art kitchen machine. We hope you’ll enjoy it.
Robust. Reliable. Versatile. Kenwood.
´d°w
¢FKOLU‹ 51 ÅH∫W
≤NMµJr ´Kv ®d«¡ §NU“ ØOMuËœ. ˱l ¢u≠d ¢AJOKW Ë«ßFW ØNcÁ ±s «∞LK∫IU‹, ≠Nu ∞Of ±πdœ îö©W. °q «≤t §NU“ ±D∂a
¨U¥W ≠w «∞dË´W Ë«ô¢IUÊ.«≤MU ≤Q±q ¢L∑FJr °t.
±∑Os, ±u£u‚, ±∑Fbœ «ôß∑FLUô‹, ØOMuËœ.

know your Kenwood kitchen machine
before using your Kenwood appliance
●
Read these instructions carefully and retain for future reference.
●
Remove all packaging and any labels.
safety
●
Switch off and unplug before fitting or removing tools/attachments, after use and before cleaning.
●
Keep your fingers away from moving parts and fitted attachments.
●
Never leave the machine on unattended.
●
Never use a damaged machine. Get it checked or repaired: see ‘service and customer care’.
●
Never operate the mixer with the head in the raised position.
●
Never let the cord hang down where a child could grab it.
●
Never let the power unit, cord or plug get wet.
●
Never use an unauthorised attachment or more than one attachment at once.
●
Never exceed the maximum capacities.
●
When using an attachment, read the safety instructions that come with it.
●
Take care when lifting this appliance as it is heavy. Ensure the head is locked and that the bowl, tools,
outlet covers and cord are secure before lifting.
●
This appliance is not intended for use by persons (including children) with reduced physical, sensory or
mental capabilities, or lack of experience and knowledge, unless they have been given supervision or
instruction concerning use of the appliance by a person responsible for their safety.
●
Children should be supervised to ensure that they do not play with the appliance.
●
Only use the appliance for its intended domestic use. Kenwood will not accept any liability if the
appliance is subject to improper use, or failure to comply with these instructions.
before plugging in
important - UK only●Make sure your electricity supply is the same as the one shown on the underside of your machine.
●
The wires in the cord are coloured as follows:
Blue = Neutral, Brown = Live.
●
The appliance must be protected by a 13A approved (BS1362) fuse.
●
For non-rewireable plugs the fuse cover MUST be refitted when replacing the fuse. If the fuse cover
is lost then the plug must not be used until a replacement can be obtained. The correct fuse cover
is identified by colour and a replacement may be obtained from your Kenwood Authorised Repairer
(see Service).
●
If a non-rewireable plug is cut off it must be DESTROYED IMMEDIATELY. An electric shock hazard
may arise if an unwanted non-rewireable plug is inadvertently inserted into a 13A socket outlet.
●
This appliance conforms to EC directive 2004/108/EC on Electromagnetic Compatibility and EC
regulation no. 1935/2004 of 27/10/2004 on materials intended for contact with food.
before using for the first time
1 Remove all packaging.
2 Wash the parts: see ‘care and cleaning’.
3 Push excess cord into the cord stowage compartment at the back of the machine.
4

know your Kenwood kitchen machine
kknnooww yyoouurr KKeennwwoooodd kkiittcchheenn mmaacchhiinnee
attachment outlets high-speed outlet
medium speed outlet
slow-speed outlet
tool socket
the mixer mixer head
outlet catch
bowl
bowl seating pad
head-lift lever
on/off and speed switch
power unit
K-beater
whisk
dough hook
spatula
spanner
splashguard
5
P
miixxeerr
m
the
tthhee mmiixxiinngg ttoooollss aanndd ssoommee ooff tthheeiirr uusseess
K-beater●For making cakes, biscuits, pastry, icing, fillings, éclairs and mashed
potato.
whisk●For eggs, cream, batters, fatless sponges, meringues, cheesecakes,
mousses, soufflés. Don’t use the whisk for heavy mixtures (eg creaming
fat and sugar) - you could damage it.
dough hook●For yeast mixtures.
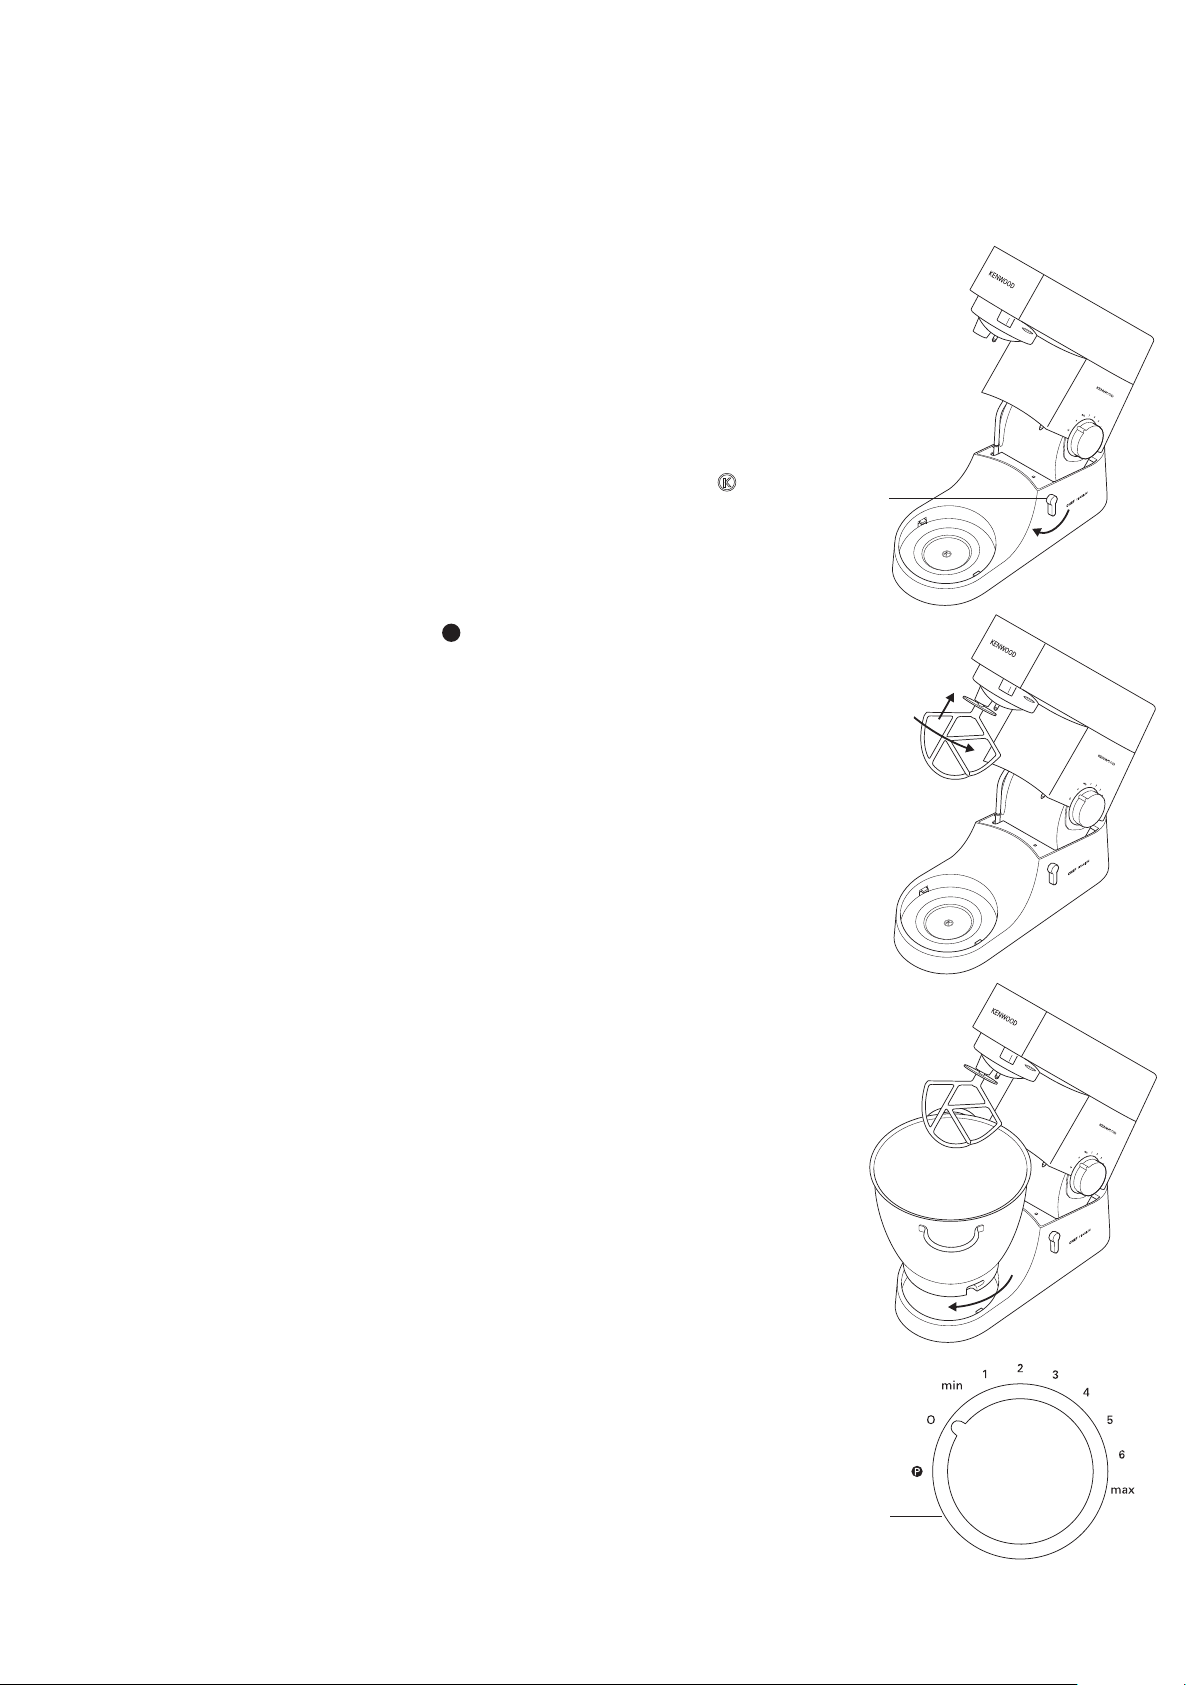
to use your mixer
1 Turn the head-lift lever clockwise and raise the mixer head till it locks.
Ensure the bowl seating pad is correctly fitted with the symbol
uppermost.
to insert a tool 2 Push up till it stops then turn.
3 Fit the bowl onto the base - press down and turn clockwise
4 Lift the mixer head slightly then turn the head-lift lever clockwise and lower the
mixer head till it locks.
5 Switch on by turning the speed switch to the desired setting.
●
Switch to pulse for short bursts.
6 Switch off and unplug after use.
to remove a tool 7 Turn and remove.
hints●Switch off and scrape the bowl with the spatula frequently.
●
Eggs at room temperature are best for whisking.
●
Before whisking egg whites, make sure there’s no grease or egg yolk
on the whisk or bowl.
●
Use cold ingredients for pastry unless your recipe says otherwise.
ppooiinnttss ffoorr bbrreeaadd mmaakkiinngg
important●Never exceed the maximum capacities below - you’ll overload the
machine.
●
If you hear the machine labouring, switch off, remove half the dough
and do each half separately.
●
The ingredients mix best if you put the liquid in first.
mmaaxxiimmuumm ccaappaacciittiieess
CHEF MAJOR
●
sshhoorrttccrruusstt ppaassttrryy
ssttiiffff yyeeaasstt ddoouugghh
ssoofftt yyeeaasstt ddoouugghh
ffrruuiitt ccaakkee mmiixx
eegggg wwhhiitteess
K-beater
Flour weight: 680g - 1lb 8oz Flour weight: 910g - 2lb
●
Flour weight: 1.36kg - 3lb Flour weight: 1.5kg - 3lb 5oz
●
Total weight: 2.18kg - 4lb 13oz Total weight: 2.4kg - 5lb 5oz
●
Flour weight: 1.3kg - 2lb 14oz Flour weight: 2.6kg - 5lb 12oz
●
Total weight: 2.5kg - 5lb 8oz Total weight: 5kg - 11lb
●
Total weight: 2.72kg - 6lb Total weight: 4.55kg - 10lb
●
12 16
ssppeeeedd sswwiittcchh
●
ccrreeaammiinngg ffaatt aanndd ssuuggaarr
●
bbeeaattiinngg eeggggss iinnttoo ccrreeaammeedd mmiixxttuurreess
●
ffoollddiinngg iinn fflloouurr,, ffrruuiitt eettcc
●
aallll iinn oonnee ccaakkeess
●
rruubbbbiinngg ffaatt iinnttoo fflloouurr
start on min speed, gradually increase to max.
whisk●Gradually increase to ‘max’.
dough hook●Start on ‘min’, gradually increasing to 1.
start on min, gradually increasing to ‘max’.
4 - ‘max’.
Min - 1
min - 2.
important
Ensure that no bowl tool is fitted or stored in the bowl when using other
outlets.
6
troubleshooting
pprroobblleemm
●
The whisk or K-beater knocks against the bottom of the bowl or isn’t
reaching the ingredients in the bottom of the bowl.
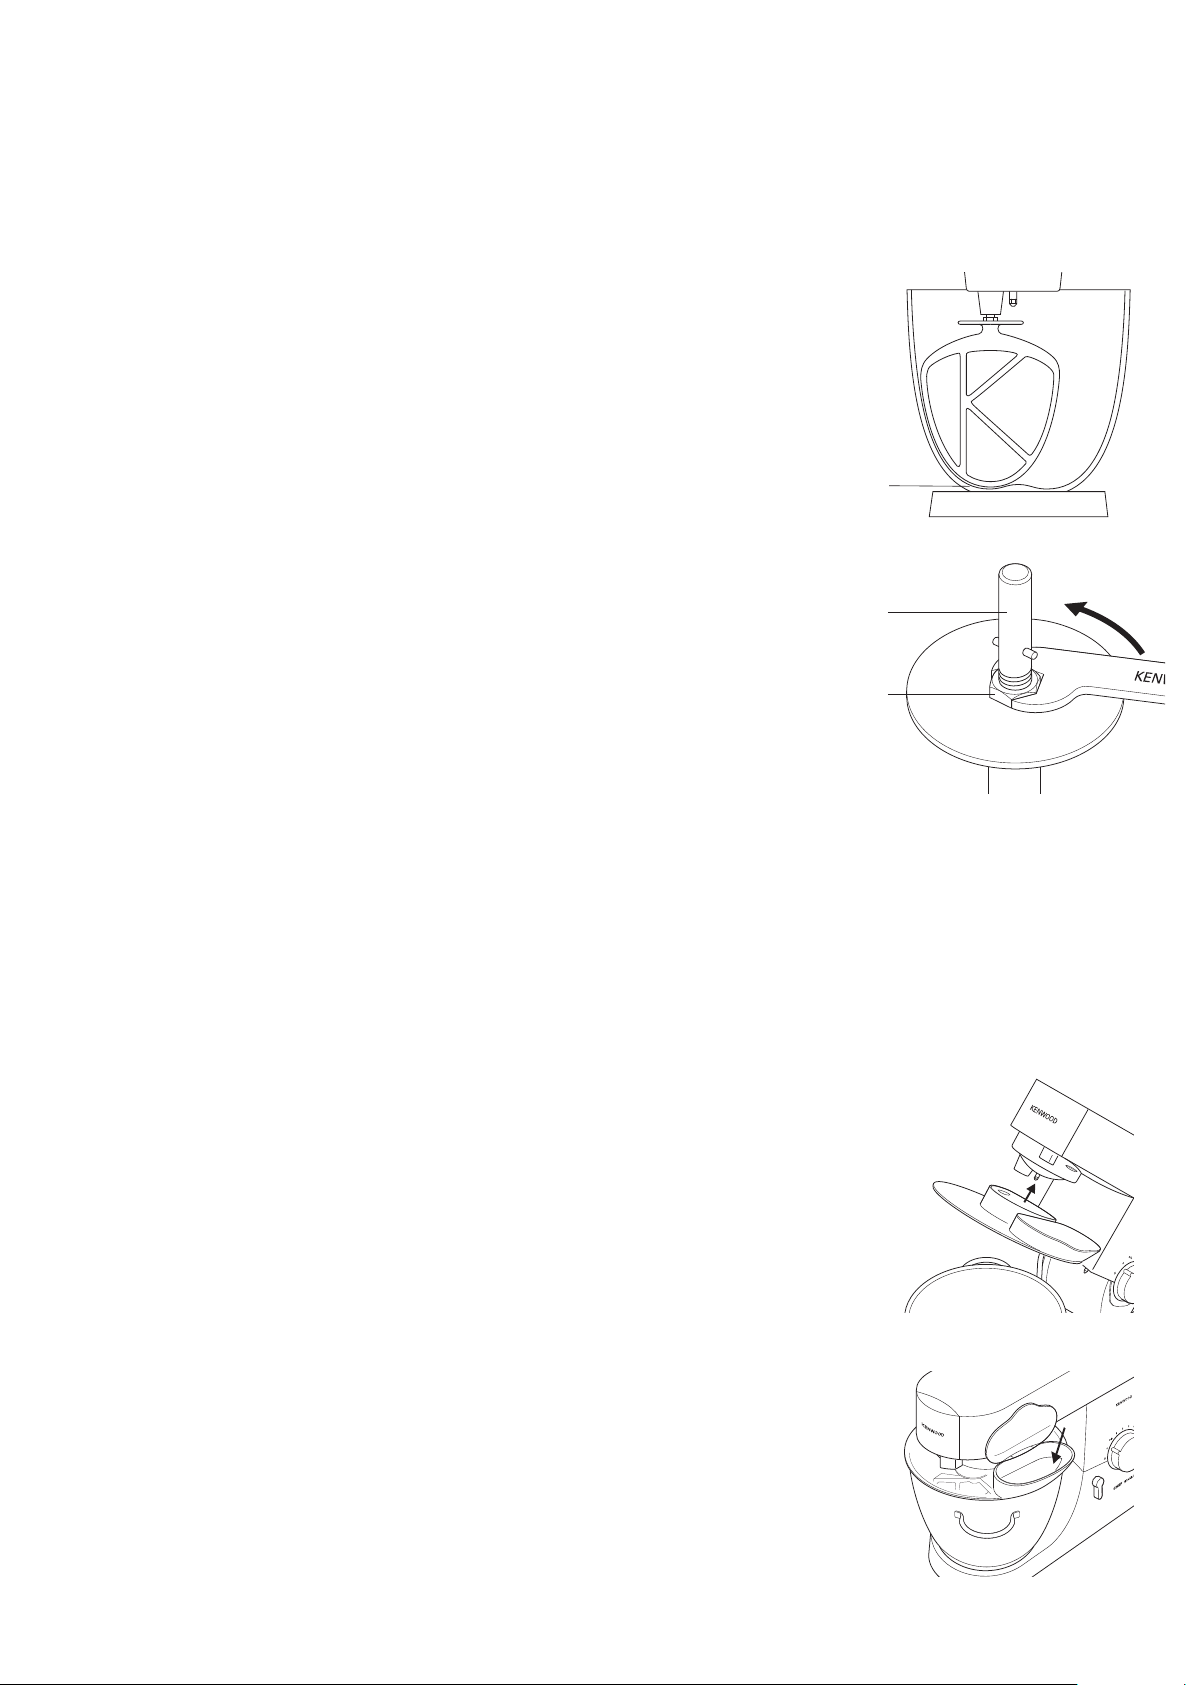
solution●Adjust the height using the spanner provided. Here’s how:
1 Unplug the appliance.
2 Raise the mixer head and insert the whisk or beater.
3 Lower the mixer head. If the clearance needs to be adjusted, raise the
mixer head and remove the tool. Ideally the whisk and K-beater should be
almost touching the bottom of the bowl .
4 Using the spanner provided loosen the nut sufficiently to allow
adjustment of the shaft . To lower the tool closer to the bottom of the
bowl, turn the shaft anti-clockwise. To raise the tool away from the bottom
of the bowl turn the shaft clockwise.
5 Re-tighten the nut.
6 Fit the tool to the mixer and lower the mixer head. (Check its position see
points above).
7 Repeat the above steps as necessary until the tool is set correctly. Once
this is acheived tighten the nut securely.
dough hook - this tool is set at the factory and should require no
adjustment.
pprroobblleemm
●
The mixer stops during operation.
solution●Your mixer is fitted with an overload protection device and will stop if
overloaded to protect the machine. If this happens, switch off and
unplug the mixer. Remove some of the ingredients to reduce the load,
and allow the mixer to stand for a few minutes. Plug in and reselect the
speed. If the mixer does not restart immediately allow to stand for
additional time.
to fit and use your splashguard
1 Raise the mixer head until it locks.
2 Fit the bowl onto the base.
3 Push the splashguard onto the underside of the mixer head until fully
located. The hinged section should be positioned as shown.
4 Insert required tool.
5 Lower the mixer head.
●
During mixing, ingredients can be added directly to the bowl via the
hinged section of the splashguard .
●
You do not need to remove the splashguard to change tools.
6 Remove the splashguard by raising the mixer head and sliding it down.
7
2
3
4
5
1
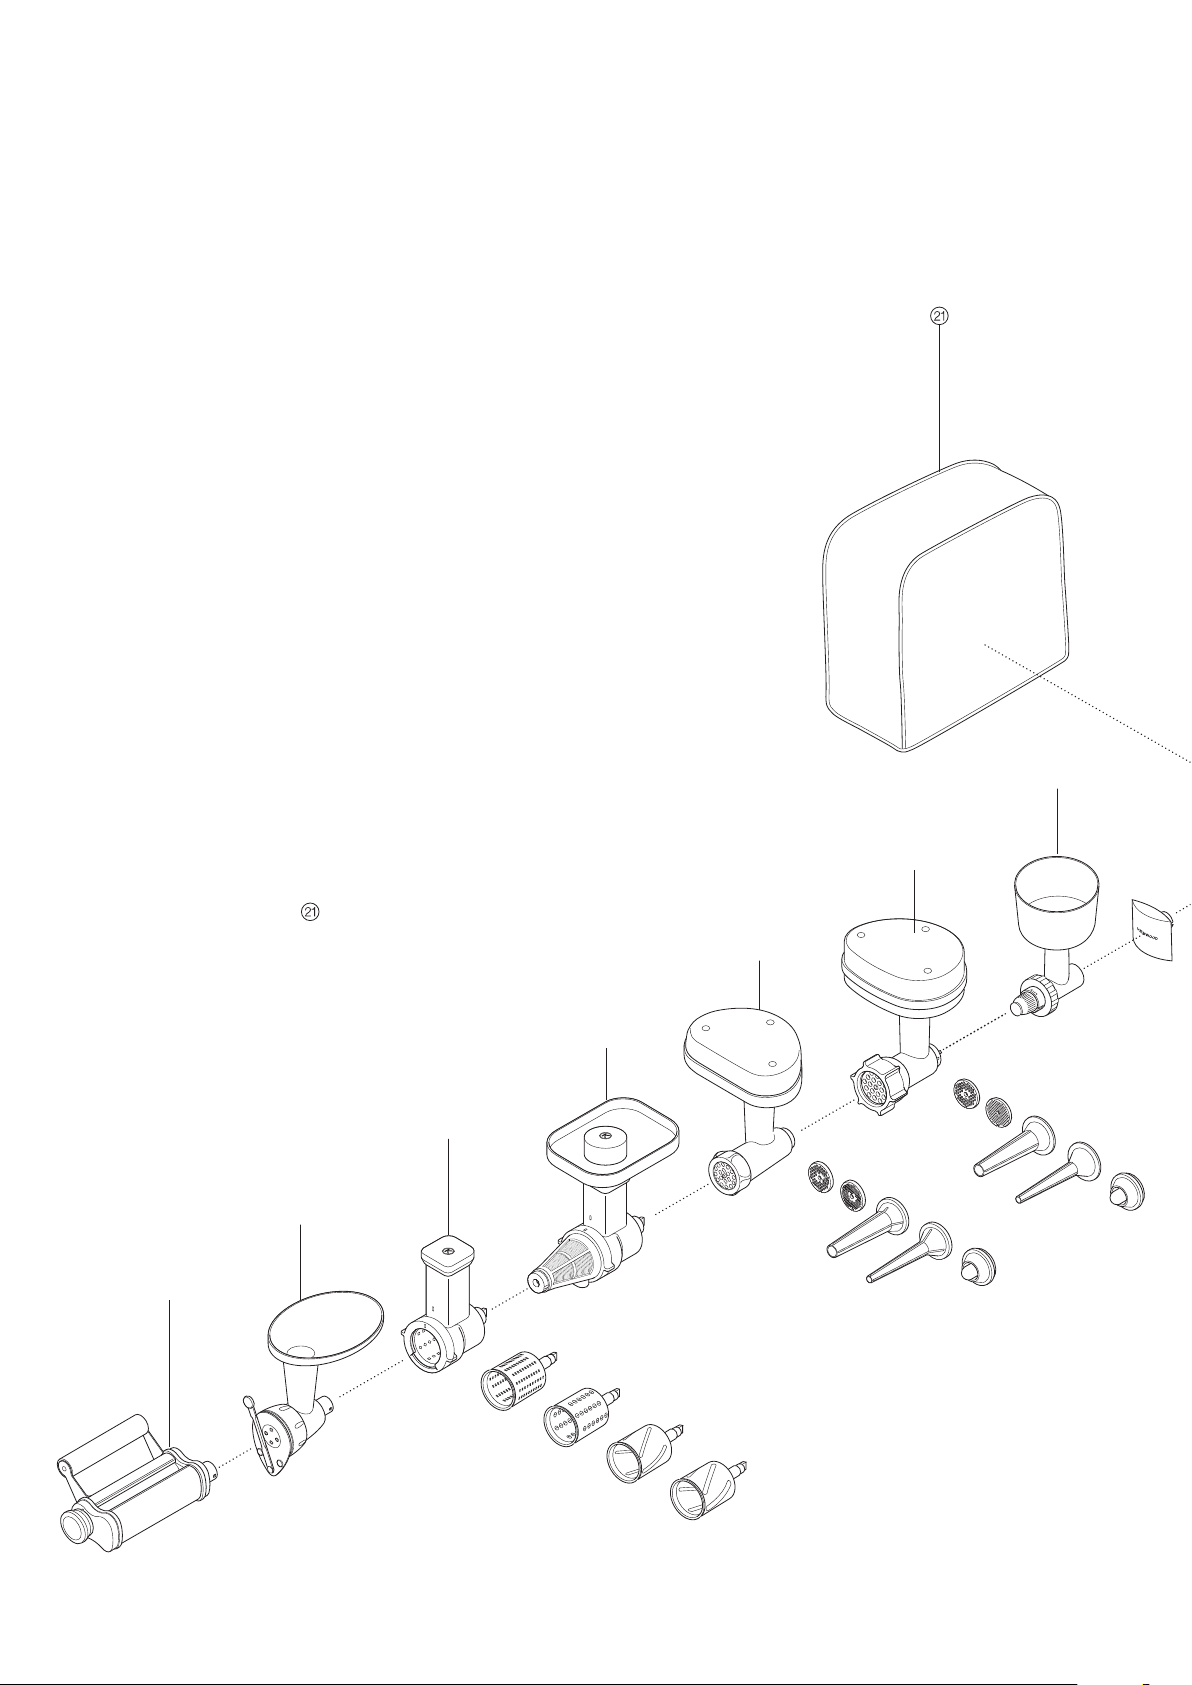
the attachments available
To buy an attachment not included in your pack, see service and customer care.
attachment attachment code
flat pasta maker AT970A
additional pasta attachments AT971A tagliatelle
(not shown) used in conjunction AT972A tagliolini
with AT970A AT973A trenette
AT974A spaghetti
pasta maker AT910 comes with maccheroni rigati die
(12 optional dies plus biscuit maker can be fitted)
roto food cutter AT643 comes with 5 drums
fruit press AT644
multi food grinder AT950A comes with a fine, medium and coarse screen,
a small and large sausage nozzle and a kebbe maker
multi food grinder AT955 comes with a fine, medium and coarse screen,
a small and large sausage nozzle and a kebbe maker
grain mill AT941A
food processor AT647 includes 6 cutting discs and a knife blade
pro slicer/grater AT340 includes 7 cutting discs
citrus press AT312
blender 1.5 l acrylic AT337, 1.6 l thermo resist glass AT358,
1.5 l stainless steel AT339
mini chopper/mill AT320A comes with 4 glass jars and 4 lids for storage
continuous juicer AT641
ice-cream maker CHEF AT956A, MAJOR AT957A
potato peeler CHEF AT444, MAJOR AT445
colander and sieve CHEF AT992A, MAJOR AT930A
scale AT850B
stainless steel bowls CHEF 36385A, MAJOR 36386A
with handles
splashguard CHEF & MAJOR 34445A
flexible beater CHEF AT501, MAJOR AT502
cover CHEF, 533722, MAJOR 606397
8

9

cleaning and service
ccaarree aanndd cclleeaanniinngg
●
Always switch off and unplug before cleaning.
●
A little grease may appear at
it. This is normal - just wipe it off.
when you first use
oouuttlleett
power unit, outlet covers●Wipe with a damp cloth, then dry.
●
Never use abrasives or immerse in water.
bowl●Wash by hand, then dry thoroughly or wash in the dishwasher.
●
Never use a wire brush, steel wool or bleach to clean your
stainless steel bowl. Use vinegar to remove limescale.
●
Keep away from heat (cooker tops, ovens, microwaves).
tools●Wash by hand, then dry thoroughly or wash in the dishwasher.
splashguard●Wash by hand, then dry thoroughly.
sseerrvviiccee aanndd ccuussttoommeerr ccaarree
●
If the cord is damaged it must, for safety reasons, be replaced
by KENWOOD or an authorised KENWOOD repairer.
UK If you need help with:
●
using your machine
●
servicing or repairs (in or out of guarantee)
call KENWOOD Customer Care on 002233 99223399 22333333.
HHaavvee yyoouurr mmooddeell nnuummbbeerr rreeaaddyy - it’s on the underside of the mixer.
●
spares and attachments
call 0844 557 3653.
other countries●Contact the shop where you bought your machine.
●
Designed and engineered by Kenwood in the UK.
●
Made in China.
IMPORTANT INFORMATION FOR CORRECT DISPOSAL OF THE
PRODUCT IN ACCORDANCE WITH EC DIRECTIVE
2002/96/EC.
At the end of its working life, the product must not be disposed of as
urban waste.
It must be taken to a special local authority differentiated waste collection
centre or to a dealer providing this service.
Disposing of a household appliance separately avoids possible negative
consequences for the environment and health deriving from inappropriate
disposal and enables the constituent materials to be recovered to obtain
significant savings in energy and resources. As a reminder of the need to
dispose of household appliances separately, the product is marked with a
crossed-out wheeled dustbin.
gguuaarraanntteeee
●
If your machine goes wrong within one year from the date you
UK only
bought it, we will repair or replace it free of charge provided:
●
you have not misused, neglected or damaged it;
●
it has not been modified;
●
it is not second-hand;
●
it has not been used commercially;
●
you have not fitted a plug incorrectly; and
●
yyoouu ssuuppppllyy yyoouurr rreecceeiipptt ttoo sshhooww wwhheenn yyoouu bboouugghhtt iitt..
This guarantee does not affect your statutory rights.
10

recipes
See important points for bread making.
whhiittee bbrreeaadd
w
ingredients●1.36kg (3lb) strong plain flour
●
15ml (3tsp) salt
●
25g (1oz) fresh yeast; or 15g/20ml (1⁄2oz) dried yeast + 5ml (1tsp) sugar
●
750ml (11⁄4pts) warm water: 43˚C (110˚F). Use a thermometer or add 250ml
(9floz) boiling water to 500ml (18floz) cold water
●
25g (1oz) lard
method 1
ddrriieedd yyeeaasstt
into the bowl. Then add the yeast and the sugar and leave to stand for
about 10 minutes until frothy.
ffrreesshh yyeeaasstt::
ootthheerr ttyyppeess ooff yyeeaasstt::
2 Pour the liquid into the bowl. Then add the flour (with fresh yeast if used),
salt and lard.
3 Knead at minimum speed for 45 - 60 seconds. Then increase to speed 1,
adding more flour if necessary, until a dough has formed.
4 Knead for 3 - 4 more minutes at speed 1 until the dough is smooth, elastic
and leaves the sides of the bowl clean.
5 Put the dough into a greased polythene bag or a bowl covered with a tea
towel. Then leave somewhere warm until doubled in size.
6 Re-knead for 2 minutes at speed 1.
7 Half fill four 450g (1lb) greased tins with the dough, or shape it into rolls.
Then cover with a tea towel and leave somewhere warm until doubled in
size.
8 Bake at 230˚C/450˚F/Gas Mark 8 for 30 - 35 minutes
minutes
●
When ready, the bread should sound hollow when tapped on the base.
stiff British-type dough
(the type that needs reconstituting): pour the warm water
crumble into the flour.
follow the manufacturer’s instructions.
for rolls
.
for loaves
or 10 - 15
sshhoorrttccrruusstt ppaassttrryy
ingredients●450g (1lb) flour, sieved with the salt
●
5ml (1tsp) salt
●
225g (8oz) fat (mix lard and margarine straight from the fridge)
●
About 80ml (4tbsp) water
hint●Don’t overmix
method 1 Put the flour into the bowl. Chop the fat up roughly and add to the flour.
2 Mix at speed 1 until it resembles breadcrumbs. Stop before it looks greasy.
3 Add the water and mix at minimum speed. Stop as soon as the water is
incorporated.
4 Cook at around 200˚C/400˚F/Gas Mark 6, depending on the filling.
ppaavvlloovvaa
ingredients●3 large egg whites
●
175g (6oz) caster sugar
●
275ml (10 fl.oz.) double cream
●
fresh fruit eg raspberries, strawberries, grapes, kiwi fruit
method 1 Whisk the egg whites on a high speed until they form ‘soft peaks’.
2 With the whisk operating on speed 5, gradually add the sugar one
tablespoon at a time, whisking after each addition.
3 Line a baking tray with silicone paper, then spoon the meringue onto the
paper forming a nest approximately 20cm/8” in diameter.
4 Place the baking tray into an oven preheated to 150˚C/300˚F/Gas Mark 2,
then immediately reduce the temperature to 140˚C/275˚F/Gas Mark 1 and
bake for 1 hour. Turn the heat off but leave the pavlova in the oven to cool
down.
5 When ready to serve, peel off the silicone paper and place on a serving
dish. Whip the cream until soft peaks form then spread over the top of the
pavlova and decorate with the fruit.
11

recipes
continued
ssccrruummppttiioouuss cchhooccoollaattee ccaakkee
ingredients●225g (8oz) butter, softened
●
250g (9oz) caster sugar
●
4 eggs
●
5ml (1tsp) instant coffee dissolved in 15ml (1tbsp) hot water
●
30ml (2tbsp) milk
●
5ml (1tsp) almond essence
●
50g (2oz) ground almonds
●
100g (4oz) self raising flour
●
5ml (1tsp) baking powder
●
50g (2oz) unsweetened cocoa powder
method 1 Cream the butter and sugar on a low speed gradually increasing to a
higher speed until the mixture is light and fluffy. Scrape down the bowl
and beater.
2 Beat the eggs in a jug and whilst the mixer is operating on a high speed,
gradually add the egg a little at a time until incorporated. Switch off and
scrape down.
3 Incorporate the dissolved coffee, milk and almond essence on a low
speed. Add the ground almonds, sieved flour, baking powder and cocoa.
Mix on a low speed to incorporate.
4 Divide the mixture between two 20cm/8” cakes tins that have been lined
with greased greaseproof paper. Level the tops then bake at
180˚C/350˚F/Gas Mark 4 for approximately 30 minutes until springy to the
touch.
5 Turn out and cool on a wire rack.
cchhooccoollaattee mmoouusssseelliinnee ffiilllliinngg
ingredients●275g (10oz) plain chocolate, broken into pieces
●
225ml (8 fl.oz.) double cream
method 1 Melt the chocolate by placing in a bowl over a pan of barely
simmering water.
2 Whisk the cream starting on a low speed gradually increasing to a higher
speed until it forms soft peaks.
3 When the chocolate has melted remove the bowl from the heat and, using
a large spoon fold into the cream.
4 Spread the chocolate filling between the cooled cakes.
chilli marinade
Ingredients●200g (7oz) cold clear honey (refrigerated overnight)
●
1 green chilli (whole)
●
5ml (1 tsp) crunchy peanut butter
●
seasoning
method 1 Place all the ingredients into the mini chopper/mill.
2 Fit the attachment to the mixer and allow the ingredients to settle around
the blade.
3 Switch to pulse for 10 seconds.
4 Use as required.
12

32
4 «ß∑ªb±w «∞∑∑∂OKW •ºV «∞∫U§W.
3 ®GKw «∞πNU“ ´Kv Ë{l «∞∑AGOq «∞M∂Cw ∞Lb… 01 £u«Ê.
2 ¸Ø∂w «∞LK∫o ≠w «∞ªö◊ Ë«ßL∫w ∞KLJu≤U‹ °Lq¡ «∞Hd«¨U‹ •u‰ «∞ºJOs «∞∑IDOl.
©d¥IW «∞∑∫COd 1 {Fw Øq «∞LJu≤U‹ ≠w «∞IDU´W/«∞LD∫MW «∞BGOd….
¢u«°q
●
5 ±q (1 ±KFIW ÅGOd…) “°b… ≠u‰ ßuœ«≤w îAMW
●
1 £Ld… ≠KHq √îCd (ØU±KW)
●
«∞LJu≤U‹●002 ¨d«Â ´ºq ≤∫q ÅU≠w °U¸œ (±u{uŸ ©u«‰ «∞KOq œ«îq «∞∏ö§W)
¢∑∂OKW «∞HKHq
4 «≠dœÍ •Au… «∞AuØuô¢W °Os ©∂I∑w «∞JOp «∞∂U¸œ¢Os.
∞Dw «∞AuØuô¢W œ«îq «∞IAb….
3 ´Mb±U ¢cË» «∞AuØuô¢W √“¥Kw «∞ºKDU≤OW ±s ≠u‚ •LU «∞LU¡ «∞ºUîs Ë«ß∑FLKw ±KFIW Ø∂Od…
2 «îHIw «∞IAb… °b¡Î °ºd´W ±MªHCW Ë“¥b¥NU °U∞∑b¸¥Z ≈∞v ßd´W √´Kv •∑v ¢∑JuÊ ÆLLUÎ ∞OMW.
©d¥IW «∞∑∫COd 1 √–¥∂w «∞AuØuô¢W °u{FNU ≠w ßKDU≤OW œ«îq •LU ±U¡ ßUîs ´Kv «∞LuÆb.
522 ÆAb… ØU±KW «∞bßr
●
«∞LJu≤U‹●572 ¨d«Â ®uØuô¢W ßUœ… ±IDFW ≈∞v ÆDl
•Au… ±u” «∞AuØuô¢W
5 ¢IKV Ë¢∑d„ ∞∑∂dœ ´Kv ¸· ±s «∞ºKp.
03 œÆOIW ¢Id¥∂UÎ •∑v ¢B∂` «∞JOJW ±d≤W ´Mb «∞KLf.
°U∞e¥X. ßUËÍ «∞ºD∫Os £r «î∂eÍ ´Kv œ¸§W •d«¸… 081 œ¸§W ±µu¥W/´ö±W «∞GU“ 2 ∞Lb…
4 «ÆºLw «∞FπOMW ≠w ´K∂∑Os ∞Kª∂Oe ÆDd≥LU 02 ßr ±∂DM∑Os °u¸‚ ¨Od ±U’ ∞Kb≥s ±b≥u≤UÎ
Ë«∞bÆOo «∞LMªu‰ ˱º∫u‚ «∞ª∂Oe Ë«∞JUØUË. «´πMw ´Kv ßd´W ±MªHCW ∞b±Z «∞LJu≤U‹.
3 √œ±πw «∞INu… «∞Lc«°W Ë«∞∫KOV Ë≤JNW «∞Ku“ ´Kv ßd´W ±MªHCW. √{OHw «∞Ku“ «∞LIAd
≠w Øq ±d… •∑v ¥Mb±Z. √ËÆHw «∞∑AGOq Ë√≠d¨w «∞L∫∑u¥U‹.
2 «îHIw «∞∂Oi ≠w ≈≤U¡ °OMLU ¢FLq «∞FπU≤W ´Kv ßd´W ´U∞OW Ë√{OHw «∞∂Oi °U∞∑b¸¥Z, «∞IKOq
«∞ºd´W °U∞∑b¸¥Z •∑v ¥B∂` «∞Le¥Z îHOHUΠ˱MHu®UÎ. √≠d¨w ±∫∑u¥U‹ «∞u´U¡ Ë«∞LCd».
©d¥IW «∞∑∫COd 1 «±e§w «∞e°b ±l «∞ºJd ´Kv ßd´W ±MªHCW •∑v ¥ºLp «∞Iu«Â (¥B∂` ØU∞Jd¥LW) £r “¥bÍ
05 ¨d«Â °uœ¸… ØUØUË ¨Od ±∫Kv
●
5 ±q (1 ±KFIW ÅGOd…) ±º∫u‚ î∂Oe
●
001 ¨d«Â œÆOo –«¢w «∞d≠l
●
05 ¨d«Â ∞u“ ±IAd
●
5 ±q (1 ±KFIW ÅGOd…) ≤JNW «∞Ku“
●
03 ±q (2 ±KFIW Ø∂Od…) •KOV
●
5 ±q (1 ±KFIW ÅGOd…) ÆNu… ≠u¸¥W ±c«°W ≠w 51 ±q (±KFIW Ø∂Od…) ±U¡ ßUîs
●
4 °OCU‹
●
052 ¨d«Â ßJd °uœ¸…
●
«∞LJu≤U‹●522 ¨d«Â “°b ©dÍ
¢u¸¢W «∞AuØuô¢W «∞d«zFW
±∑U°FW ËÅHU‹ «∞∑∫COd

22
¢∑JuÊ ÆLLUÎ ∞OMW £r «≠dœ¥NU ´Kv ßD` «∞∂U≠Ku≠U £r §LÒKONU °U∞HUØNW.
5 ´Mb «∞∑Ib¥r, √“¥Kw ˸‚ «∞ºOKOJuÊ Ë«¸≠Fw «∞Ld≤m ´Kv ©∂o «∞∑Ib¥r. «îHIw «∞Jd¥LW •∑v
Ë«•b…. √©Hµw «∞HdÊ Ë∞Js «¢dØw «∞∂U≠Ku≠U ¢∂dœ œ«îq «∞HdÊ.
2, £r √îHCw œ¸§W «∞∫d«¸… ≠u¸«Î ≈∞v 041 œ¸§W ±µu¥W/´ö±W «∞GU“ 1 Ë«î∂eÍ ∞Lb… ßU´W
4 {Fw ÅOMOW «∞ª∂Oe ≠w «∞HdÊ «∞Lºªs ±º∂IUÎ ≈∞v œ¸§W •d«¸… 051 œ¸§W ±µu¥W/´ö±W «∞GU“
ÆDdÁ ¢Id¥∂UÎ 02 ßr.
3 °DÒMw ÅOMOW î∂Oe °u¸‚ «∞ºOKOJuÊ £r «¨d≠w «∞Ld≤m ´Kv «∞u¸‚ ±Ju≤UÎ ±QËÈ ±Hd⁄ ±s «∞b«îq
Ë«îHIw °Fb Øq ≈{U≠W.
2 °OMLU ¢FLq îHUÆW «∞∂Oi ´Kv «∞ºd´W 5, √{OHw «∞ºJd ¢b¸¥πOUÎ °LIb«¸ ±KFIW Ø∂Od… Øq ±d…
©d¥IW «∞∑∫COd 1 «îHIw °OU÷ «∞∂Oi ´Kv ßd´W ´U∞OW •∑v ¢∑JuÊ "ÆLLUÎ ∞OMW".
≠UØNW ©U“§W ±∏U‰: «∞∑u‹ √Ë «∞Hd«Ë∞W √Ë «∞FMV √Ë «∞JOuÍ
●
572 ±q ÆAb… ØU±KW «∞bßr
●
571 ¨d«Â ßJd °uœ¸…
●
«∞Lu«œ●°OU÷ 3 °OCU‹ Ø∂Od…
±d≤m «∞∂U≠Ku≠U
4 «î∂eÍ ´Mb œ¸§W 002 œ¸§W ±µu¥W ¢Id¥∂UÎ/´Mb ´ö±W «∞GU“ 6 Ë≥c« ¥∑uÆn ´Kv «∞∫Au….
«∞FπOMW.
3 √{OHw «∞LU¡ Ë«îKDw ´Kv «∞ºd´W «∞b≤OU "nim". √ËÆHw «∞ªKj °Lπdœ «≤b±Uà «∞LU¡ œ«îq
2 «´πMw «∞ªKOj ´Kv «∞ºd´W 1 •∑v ¥A∂t ≠∑U‹ «∞ª∂e. √ËÆHw «∞ªKj Æ∂q √Ê ¥∂bË «∞ªKOj œ≥MOUÎ.
©d¥IW «∞∑∫COd 1 {Fw «∞bÆOo ≠w «∞u´U¡. ÆDÒFw «∞b≥s Ë√{OHOt ≈∞v «∞bÆOo.
¢KLO`●ô ¢Hd©w ≠w «∞ªKj.
•u«∞w 08 ±q (4 ±ö´o Ø∂Od…) ±U¡
●
522 ¨d«Â œ≥s •Ou«≤w («ß∑ªb±w «∞ºLs ±s «∞∏ö§W ±∂U®d…)
●
5 ±q (1 ±KFIW ÅGOd…) ±K`
●
«∞LJu≤U‹●054 ¨d«Â œÆOo Ë¥Mªq ±l «∞LK`
«∞LFπMU‹ –«‹ «∞IAd… «∞NAW
´Mb±U ¥MCZ «∞ª∂e ßOB∂` ±Hd¨UÎ ±s «∞b«îq Ëß∑AFd¥s °c∞p ´Mb ®It ±s «∞IU´b….
●
∞ú¸¨HW √Ë 01- 51 œÆOIW ∞KHU‹.
8 «î∂eÍ «∞FπOs ´Mb œ¸§W •d«¸… 032 œ¸§W ±µu¥W/´Mb ´ö±W «∞GU“ 8 ∞Lb… 03- 53 œÆOIW
°Hu©W Ë«¢dØONU ≠w ±JUÊ œ«≠T •∑v ¥∑CU´n •πLNU.
7 «±Kµw ≤Bn √¸°FW ´KV ±b≥u≤W °U∞e¥X ßFW 054 ¨d«Â °U∞FπOMW √Ë ®JÒKONU ≈∞v ∞HÒU‹. £r ¨DÒONU
6 √´ObÍ «∞Fπs ∞Lb… œÆOI∑Os ´Kv «∞ºd´W 1.
±JUÊ œ«≠T •∑v ¥∑CU´n •πLNU.
5 {Fw «∞FπOMW ≠w ØOf °öß∑Op ±b≥uÊ °U∞e¥X √Ë ßKDU≤OW ˨DONU °Hu©W. £r «¢dØONU ≠w
«∞u´U¡ ≤EOHW.
4 «´πMw ∞Lb… 3- 4 œÆUzo ≈{U≠OW ´Kv «∞ºd´W 1 •∑v ¢B∂` «∞FπOMW ∞OMW ˱d≤W Ë¢∑d„ §u«≤V
«∞Le¥b ±s «∞bÆOo ≈–« ∞e «_±d •∑v ¢∑JuÊ ´πOMW.
3 «´πMw «∞ªKOj ´Kv «∞ºd´W «∞b≤OU "nim" ∞Lb… 54- 06 £U≤OW. £r “¥bÍ «∞ºd´W ≈∞v 1 Ë√{OHw
Ë«∞LK` Ë«∞b≥s.
2 Å∂Òw «∞ºUzq ≠w «∞u´U¡. £r √{OHw «∞bÆOo («∞LCU· ≈∞Ot «∞ªLOd… «∞DU“§W ≈Ê «ß∑ªb±∑ONU)
√≤u«Ÿ «∞ªLOd… «_îdÈ: «¢∂Fw ¢FKOLU‹ «∞LÔBMÒl.
«∞ªLOd… «∞DU“§W: ≠∑∑ONU œ«îq «∞bÆOo.
«∞ªLOd… Ë«∞ºJd Ë«¢dØONU ¢Nb√ ∞Lb… 01 œÆUzo •∑v ¢∑JuÊ ¸¨u….
©d¥IW «∞∑∫COd 1 «∞ªLOd… «∞πU≠W («∞MuŸ «∞cÍ ¥∫∑Uà ≈´Uœ… ¢AJOq): Å∂Òw «∞LU¡ «∞b«≠T ≠w «∞u´U¡. £r √{OHw
«∞bÆOo œ≠FW Ë«•b….
¢º∑FLq ≤Bn «∞JLOW Ë¥CU·
±Oπu¸. °U∞Mº∂W «∞v «§Ne… ¢AOn,
«Ê ≥cÁ «∞JLOW ≥w ∞Dd«“«‹ «§Ne…
«∞LJu≤U‹●63\1 ØOKu¨d«Â œÆOo «∞ª∂e «∞GMw
52 ¨d«Â œ≥s •Ou«≤w
●
≈∞v 005 ±q ±s «∞LU¡ «∞∂U¸œ
057 ±q ±U¡ œ«≠T: 34 œ¸§W ±µu¥W. «ß∑ªb±w £d±u±∑d √Ë √{OHw 052 ±q ±s «∞LU¡ «∞LGKw
●
52 ¨d«Â îLOd… ©U“§W √Ë 51 ¨d«Â / 02 ±q îLOd… §U≠W + 5 ±q (±KFIW ÅGOd…) ßJd
●
51 ±q (3 ±ö´o ÅGOd…) ±K`
●
«∞ª∂e «_°Oi «∞FπOMW «∞ºLOJW ´Kv «∞Dd¥IW «∞∂d¥DU≤OW
¸«§Fw «∞MIU◊ «∞NU±W ∞∑∫COd «∞ª∂e ÅH∫W.
ËÅHU‹ «∞∑∫COd

12
´ö±W ßKW ±NLö‹ –«‹ «∞Fπö‹ ±ADu°W.
Ë«∞Lu«¸œ. Ë∞K∑cØOd °u§u» «∞∑ªKh ±s «_§Ne… «∞LMe∞OW Ë°AJq ±MHBq Ë{l ´Kv «∞LM∑Z
«ù§d«¡ ¥ºU´b ≠w ≈´Uœ… «ß∑ªb«Â «∞Lu«œ «∞∑QßOºOW ±LU ¥u≠d §U≤∂UÎ ≠FUôÎ ±s «∞DUÆW
«∞L∑d¢∂W ´Kv «∞∂OµW Ë«∞B∫W Ë«∞MU§LW ´s «∞∑ªKh ±s «_§Ne… °Bu¸… ¨Od ßKOLW ØLU √Ê ≥c«
±u“Ÿ ¥Ib ≥cÁ «∞ªb±W .≈Ê «∞∑ªKh ±s «_§Ne… «∞LMe∞OW °AJq ±MHBq ¥πMV «ü£U¸ «∞ºK∂OW
«∞∫Cd¥W. ô °b ±s √îc «∞LM∑Z ≈∞v ±dØe ßKDW ±∫KOW îUÅW ±∑ªBBW ≠w §Ll «∞MHU¥U‹ √Ë
´Mb «≤∑NU¡ «∞FLd «∞∑AGOKw ∞KLM∑Z ¥πV ´b «∞∑ªKh ±s «∞LM∑Z ≠w ±ªKHU‹ «∞LMU©o
«∞LπLu´W «ôÆ∑BUœ¥W «_˸˰OW CE/69/2002.
±FKu±U‹ ≥U±W •u‰ ØOHOW «∞∑ªKh «∞B∫O∫W ±s «∞LM∑Z •ºV ¢u§ONU‹
● ÅMl ≠w «∞BOs.
● ¢BLOr Ë¢Du¥d doowneK ≠w «∞LLKJW «∞L∑∫b….
«¢BKw °U∞L∑πd «∞cÍ ÆLX °Ad«¡ «∞πNU“ ±Mt.
●
≈§d«¡ «∞BOU≤W √Ë «ß∑∂b«‰ «_§e«¡
●
«ß∑ªb«Â «∞πNU“ √Ë
●
∞K∫Bu‰ ´Kv ±ºU´b… •u‰:
DOOWNEK √Ë ±dØe ÅOU≤W ±F∑Lb ±s Æ∂q DOOWNEK.
≠w •U∞W ¢Kn «∞ºKp «∞JNd°w, ¥πV «ß∑∂b«∞t _ß∂U» ±∑FKIW °U∞ºö±W ±s Æ∂q
●
«∞BOU≤W ˸´U¥W «∞FLö¡
±U≤l «∞d–«–●¨ºOq ¥bËÍ £r «∞∑πHOn §Ob«Î.
«_œË«‹●¨ºOq ¥bËÍ £r «∞∑πHOn §Ob«Î √Ë ¨ºOq ≠w ¨ºU∞W «_©∂U‚.
√°Fb¥t ´s ±BUœ¸ «∞∫d«¸… (ßD` «∞LuÆb, «_≠d«Ê, «∞LU¥JdËË¥n).
●
«∞u´U¡ «∞LBMuŸ ±s «∞BKV ´b¥r «∞Bb√. «ß∑ªb±w «∞ªq ù“«∞W «∞D∂IW «∞πOd¥W.
¥∫c¸ «ß∑ªb«Â ≠d®U… ±s «∞ºKp √Ë «∞Bu· «∞LFb≤w √Ë ±u«œ «∞∑∂OOi ´Mb ¢MEOn
●
«∞u´U¡●¨ºOq ¥bËÍ £r «∞∑πHOn §Ob«Î √Ë ¨ºOq ≠w ¨ºU∞W «_©∂U‚.
¥∫c¸ «ß∑ªb«Â ±u«œ ØU®DW √Ë ¨Ld «∞πNU“ ≠w «∞LU¡.
●
Ë•b… «∞DUÆW, «¨DOW «∞LMU≠c●±º` °IDFW ±s «∞ILU‘ ¸©∂W, £r «∞∑πHOn.
«±º∫Ot.
Æb ¥ENd ÆKOq ±s «∞A∫r ´Mb «∞Lªdà ´Mb «ôß∑ªb«Â _ˉ ±d… .≥c« √±d ´UœÍ. ≠Ij
●
√ËÆHw œ«zLUÎ ¢AGOq «∞πNU“ Ë«≠BKOt ´s ±Bb¸ «∞∑OU¸ «∞JNd°w Æ∂q «∞∑MEOn.
●
«∞FMU¥W Ë«∞∑MEOn
«∞∑MEOn Ë«∞ªb±W

02
2
3
4
5
1
¨DU¡ FEHC 227335, ROJAM 793606
«∞LCd» «∞LdÊ FEHC 105TA, ROJAM 205TA
±U≤l «∞d–«– FEHC ËROJAM A54443
±l «∞LIU°i
ßö©Os «ß∑U≤Kf ß∑Oq FEHC A58363, ROJAM A68363
«∞LOe«Ê B058TA
±BHU… ˱Mªq FEHC A299TA, ROJAM A039TA
ÆAU¸… «∞∂DU©f FEHC 444TA, ROJAM 544TA
±UØOMW ÅMl «ü¥f Ød¥r FEHC A659TA, ROJAM A759TA
«∞FBU¸… «∞Lº∑Ld… 146TA
«∞IDU´W/«∞LD∫MW «∞BGOd… A023TA ¢Q¢w ±l 4 √Ë´OW “§U§OW Ë4 √¨DOW ∞K∑ªe¥s
«∞BKV ´b¥r «∞Bb√ 933TA
«∞ªö◊ 5\1 ∞∑d ±s «_Ød¥KOp 733TA œË¸‚ “§U§w ±IUË ∞K∫d«¸… ßFW 6\1 ∞∑d 853TA
«∞FBU¸… 213TA
±K∫o «∞∑IDOl Ë«∞∂Ad 043TA ¥∑CLs 7 √ßD` ¢IDOl
§NU“ ¢∫COd «∞DFU 746TA ¥∑CLs 6 √ßD` ¢IDOl ËßJOs ¢IDOl
±D∫MW «∞∫∂u» A149TA
Ë«∞J∂Od… ËÅU≤FW «∞J∂W «∞AU±OW.
±Hd±W «∞LJu≤U‹ ±∑Fbœ… «ôß∑ªb«±U‹ 559TA ±eËœ… °H∑∫U‹ ≠d ≤U´r ˱∑ußj ËîAs, ≠u≥W «∞MIU≤o «∞BGOd…
Ë«∞J∂Od… ËÅU≤FW «∞J∂W «∞AU±OW.
±Hd±W «∞LJu≤U‹ ±∑Fbœ… «ôß∑ªb«±U‹ A059TA ±eËœ… °H∑∫U‹ ≠d ≤U´r ˱∑ußj ËîAs, ≠u≥W «∞MIU≤o «∞BGOd…
´BU¸… «∞Hu«Øt 446TA
ÆDU´W «∞DFU «∞bË«¸… 346TA ¢Q¢w ±l 5 √ßDu«≤U‹
±K∫o ¢∫COd «∞LJdË≤W 019TA ¥Q¢w ±l ÆU∞V ±JdË≤w ¸¥πU¢w
(¨Od ±u{∫W) ¢º∑ªb ±l A079TA A279TA ¢U¨KOu∞OMw
±K∫IU‹ ≈{U≠OW ∞KLJdË≤W A179TA ¢U¨KOU¢OKw
±K∫o ¢∫COd «∞LJdË≤W «∞LºD∫W A079TA
(21 ÆU∞V «î∑OU¸Í ˱K∫o ¢∫COd °ºJu¥X ¥LJs ¢dØO∂Nr)
A479TA ß∂U¨O∑w
A379TA ¢d¥MO∑w
«∞LK∫IW ¸±e «∞LK∫IW
∞Ad«¡ ±K∫IW ¨Od ±∑CLMW ±l ±πLu´∑p, «¢BKw °LdØe ÅOU≤W DOOWNEK «∞Id¥V ±Mp.
«∞LK∫IU‹ «∞L∑u≠d…

91

81
6 √“¥Kw ±U≤l «∞d–«– ´s ©d¥o ¸≠l ¸√” «∞FπU≤W Ëœ≠Ft ∞ö≤eô‚ _ßHq.
∞s ¢∫∑U§w ù“«∞W ±U≤l «∞d–«– ´Mb ¢GOOd «_œË«‹.
●
«∞d–«– .
√£MU¡ «∞Fπs, ¥LJs ≈{U≠W «∞LJu≤U‹ ±∂U®d… ≈∞v «∞u´U¡ ´s ©d¥o «∞πe¡ «∞LHBKw ±s ±U≤l
●
5 √îHCw ¸√” «∞FπU≤W.
4 √œ¸§w «_œ«… «∞LDKu°W.
¥JuÊ ±u{l «∞πe¡ «∞LHBKw ØLU ≥u ±∂Os.
3 «œ≠Fw ±U≤l «∞d–«– ≈∞v «∞πU≤V «∞ºHKw ±s ¸√” «∞FπU≤W •∑v ¥∑r ¢dØO∂t. ¥πV √Ê
2 «{∂Dw «∞ºKDU≤OW ´Kv «∞IU´b….
1 «¸≠Fw ¸√” «∞FπU≤W •∑v ¢IHq.
¢dØOV Ë«ß∑ªb«Â ±U≤l «∞d–«–
«∞ªö◊ ≠u¸«Î ≠U¢dØOt ∞H∑d… ≈{U≠OW •∑v ¥∂dœ.
œÆUzo. √ËÅKw «∞IU°f «∞JNd°Uzw Ë√´ObÍ ¢∫b¥b «∞ºd´W. ≠w •U∞W ´b °b√ ¢AGOq
«∞JNd°Uzw. √“¥Kw °Fi «∞LJu≤U‹ ∞∑ªHOn «∞∫Lq Ë«¢dØw «∞ªö◊ °bËÊ ¢AGOq ∞∂Cl
«∞IBuÈ Ë–∞p ∞∫LU¥W «∞πNU“. ≈–« •bÀ –∞p, ≠QËÆHw «∞∑AGOq Ë√“¥Kw «∞IU°f
«∞∫q●«∞ªö◊ ±eËœ °πNU“ •LU¥W ±s «∞∫Lq «∞e«zb Ëßu· ¥∑uÆn ≈–« “«œ‹ •Lu∞∑t ´s «∞ºFW
¥∑uÆn «∞ªö◊ √£MU¡ «∞∑AGOq.
●
«∞LAJKW
îDU· «∞FπOs - ¢r {∂j ≥cÁ «_œ«… ≠w «∞LBMl Ëô ¢∫∑Uà _Í {∂j.
«∞uÅu‰ ≈∞v «∞LºU≠W «∞B∫O∫W √•JLw ¸°j «∞BU±u∞W.
7 Ød¸Í «∞ªDu«‹ «∞ºU°IW •ºV «∞∫U§W •∑v ¥∑r {∂j «_œ«… °AJq Å∫O`. °Lπdœ
±s ±u{l «_œ«… °U∞Mº∂W ∞IUŸ «∞ºKDU≤OW, ¸«§Fw «∞MIU◊ «∞ºU°IW).
6 ¸Ø∂w «_œ«… ≠w «∞ªö◊ «∞DU≥w «∞DU≥w Ë«îHCw ¸√” «∞ªö◊ «∞DU≥w «∞DU≥w. (¢QØbÍ
5 √´ObÍ ≈•JU ¸°j «∞BU±u∞W.
«∞u´U¡, ∞Hw ±∫u¸ «∞b˸«Ê ≠w «¢πUÁ ´IU¸» «∞ºU´W.
«∞ºKDU≤OW, ∞Hw ±∫u¸ œË¸«Ê ≠w «¢πUÁ ´Jf ´IU¸» «∞ºU´W. ∞d≠l «_œ«… °FOb«Î ´s ÆUŸ
«∞b˸«Ê . ∞ªHi «_œ«… ≠w «¢πUÁ ÆUŸ
4 °Uß∑ªb«Â ±H∑UÕ «∞d°j «∞LeËœ ≠Jw «∞BU±u∞W °AJq ØU· ∞KºLUÕ °C∂j ±∫u¸
Ë√“¥Kw «_œ«…. ±s «∞L∏U∞w √Ê ¥Lf «∞LCd»/ ±Cd» «∞FπOs K °U∞JUœ ÆUŸ «∞u´U¡ .
3 «îHCw ¸√” «∞ªö◊. ≈–« ØU≤X «∞LºU≠W ¢∫∑Uà ≈∞v «∞C∂j, «¸≠Fw ¸√” «∞ªö◊
2 «¸≠Fw ¸√” «∞ªö◊ ˸Ø∂w îHUÆW «∞∂Oi √Ë «∞LCd».
1 «≠BKw «∞πNU“ ´s ±Bb¸ «∞∑OU¸ «∞JNd°w.
«∞∫q●«{∂Dw «ô¸¢HUŸ °Uß∑ªb«Â ±H∑UÕ «∞d°j «∞LeËœ. ≠OLU ¥Kw «∞Dd¥IW:
«∞Lu§uœ… ≠w ÆUŸ «∞u´U¡.
îHUÆW «∞∂Oi √Ë ±Cd» «∞FπOs K ¥IdŸ ÆUŸ «∞u´U¡ √Ë ô ¥Bq ≈∞v «∞LJu≤U‹
●
«∞LAJKW
«ß∑JAU· «_îDU¡ Ë≈Åö•NU

71
P
√îdÈ.
¢QØbÍ ±s ´b ¢dØOV √Ë ¢ªe¥s √Í √œ«… √îdÈ îUÅW °U∞ºKDU≤OW ´Mb «ß∑ªb«Â ±ªU¸Ã
≥UÂ
îDU· «∞FπOs●«°bzw °U∞ºd´W «∞b≤OU "nim" £r “¥b¥NU ¢b¸¥πOUÎ ≈∞v «∞ºd´W 1.
«∞ªHo●“¥bÍ «∞ºd´ W ¢b¸¥πOUÎ ≈∞v «∞ºd´W «∞FU∞OW "xam".
≥d” «∞ºLs ±l «∞bÆOo «°bzw ´Kv «∞ºd´W «∞b≤OU "nim" ≈∞v «∞ºd´W 2.
●
«∞FU∞OW "xam".
«∞JOp ±∑Fbœ «∞LJu≤U‹ «°bzw ´Kv «∞ºd´W «∞b≤OU "nim" ±l «∞e¥Uœ… ¢b¸¥πOUÎ ≈∞v «∞ºd´W
●
«∞∑bË¥d «∞∂Dw¡ ∞KbÆOo Ë«∞HUØNW «∞a «°bzw ´Kv «∞ºd´W «∞b≤OU "nim" £r «∞ºd´W 1.
●
"xam".
îHo «∞∂Oi ±l «∞ªKDU‹ –«‹ «∞Iu«Â «∞Jd¥Lw 4- ±s «∞ºd´W 4 ≈∞v «∞ºd´W «∞FU∞OW
●
«∞FU∞OW "xam".
«∞LªHIW ´Kv ®Jq K●îKDW «∞ºLs ±l «∞ºJd, «°bzw °U∞ºd´W «∞b≤OU "nim" £r “¥b¥NU ¢b¸¥πOUÎ ≈∞v «∞ºd´W
±H∑UÕ «∞ºd´W
°OU÷ «∞∂Oi●21 61
îKDW ØOp «∞HUØNW
«∞u“Ê «∞JKw: 27.2 Øπr «∞u“Ê «∞JKw: 55.4 Øπr
●
«∞u“Ê «∞JKw: 5.2 Øπr «∞u“Ê «∞JKw: 5 Øπr
●
´πOMW îLOd… ©d¥W●Ë“Ê «∞bÆOo: 3.1 Øπr Ë“Ê «∞bÆOo: 6.2 Øπr
«∞u“Ê «∞JKw: 81.2 Øπr «∞u“Ê «∞JKw: 4.2 Øπr
´πOMW «∞ªLOd… «∞ºLOJW
«∞LFπMU‹ «∞NAW
●
Ë“Ê «∞bÆOo:63.1 Øπr Ë“Ê «∞bÆOo: 5.1 Øπr
●
Ë“Ê «∞bÆOo:086 §r Ë“Ê «∞bÆOo:019 §r
●
FEHC ROJAM
«∞JLOU‹ «∞IBuÈ
∞K∫Bu‰ ´Kv √≠Cq ≤∑UzZ ∞ªKj «∞LJu≤U‹ √{OHw «∞ºu«zq √ËôÎ ≠w «∞u´U¡.
●
≤Bn ´Kv •b….
≈–« ßLFX Åu‹ «∞πNU“ ±∏IöÎ, ≠QËÆHw «∞∑AGOq Ë√“¥Kw ≤Bn «∞FπOs £r ¢FU±Kw ±l Øq
●
«∞πNU“.
±ö•EW ≥U±W●¥∫c¸ «∞e¥Uœ… ´s «∞ºFW «∞IBuÈ «∞LcØu¸… √´öÁ ßu· ¢∑º∂∂w ≠w «∞∫Lq «∞e«zb ´Kv
≤IU◊ ≥U±W ∞∑∫COd «∞ª∂e
«ß∑ªb±w ±Ju≤U‹ °U¸œ… ∞KFπOs ±U ∞r ¢cØd «∞uÅHW îö· –∞p.
●
«∞u´U¡.
Æ∂q îHo °OU÷ «∞∂Oi, ¢QØbÍ ±s ´b ˧uœ “¥X √Ë ÅHU¸ °Oi ´Kv ±Cd» «∞∂Oi √Ë
●
∞K∫Bu‰ ´Kv √≠Cq «∞M∑UzZ «îHIw «∞∂Oi «∞Lu§uœ ≠w œ¸§W •d«¸… «∞Gd≠W.
●
¢KLO∫U‹●√ËÆHw «∞Fπs Ë«ØADw «∞ºKDU≤OW ±s √ßHq °Uß∑ªb«Â ±KFIW «∞∑IKOV ±s •Os üîd.
ù“«∞W √œ«… 7 √œ¥d¥NU Ë√“¥KONU.
6 √ËÆHw ¢AGOq «∞πNU“ Ë«≠BKOt ´s ±Bb¸ «∞∑OU¸ «∞JNd°w °Fb «ô≤∑NU¡ ±s «ß∑ªb«±t.
√œ¥dÍ «∞LH∑UÕ ≈∞v Ë{l «∞M∂i ∞K∑AGOq «∞IBOd.
●
5 «°bzw «∞∑AGOq ´s ©d¥o ≈œ«¸… ±H∑UÕ «∞ºd´U‹ ≈∞v ±u{l «∞ºd´W «∞LDKu°W.
«∞ªö◊ •∑v ¥∑r ¢FAOINU ≠w ±u{l ¢∏∂OX «∞ªHi ±Bb¸… Åu‹ ©IDIW.
4 √îHCw ¸√” «∞ªö◊ ÆKOöÎ £r ∞Hw –¸«Ÿ ¸≠l ¸√” «∞ªö◊ ≠w «¢πUÁ ´IU¸» «∞ºU´W £r √îHCw ¸√”
3 «{∂Dw «∞ºKDU≤OW ´Kv «∞IU´b… - «{GDw _ßHq Ë√œ¥dÍ ≠w «¢πUÁ ´IU¸» «∞ºU´W .
ùœ¸«Ã √œ«… 2 «œ≠Fw «_œ«… •∑v ¢∑uÆn £r √œ¥d¥NU.
©IDIW. ¢QØbÍ ±s ¢dØOV ÆU´b… «∞u´U¡ °AJq Å∫O` •OY ¢JuÊ «∞Fö±W ±u«§NW _´Kv.
¢FAOINU ≠w ±u{l ¢∏∂OX «∞d≠l ±Bb¸… Åu‹
1 ∞Hw –¸«Ÿ ¸≠l ¸√” «∞ªö◊ ≠w «¢πUÁ ´IU¸» «∞ºU´W Ë«¸≠Fw ¸√” «∞FπU≤W •∑v ¥∑r
ôß∑FLU‰ «∞ªö◊
îDU· «∞FπOs●∞KªKDU‹ «∞Lº∑ªb ≠ONU «∞ªLOd….
«∞ºLOJW (±∏q ±eà «∞ºLs ±l «∞ºJd •∑v ¥ºLp «∞Iu«Â) ≠Ib ¢∑KHONU.
«∞∫KuÈ («∞Ld≤m) ËØOp «∞π∂s Ë«∞Lu” Ë«∞ºu≠KOt .ô ¢º∑ªb±w îHUÆW «∞∂Oi ∞KªKDU‹
îHUÆW «∞∂Oi●∞ªHo «∞∂Oi Ë«∞e°b Ë«∞IAb… Ë«∞FπUzs «∞ºUzKW Ë«∞JOp «ùßHMπw îU∞w «∞bßr Ë√¨DOW
Ë«∞∂DU©f «∞LNdËßW.
«∞LªHIW °AJq K●∞FLq «∞JOp Ë«∞∂ºJu¥X Ë«∞LFπMU‹ Ë«∞GDU¡ «∞ºJdÍ ∞K∫KuÈ Ë«∞∫Au«‹ ˧U¢uÁ «ùØKOd
√œË«‹ «∞ªKj Ë°Fi ±s «ß∑ªb«±U¢NU
«∞ªö◊

61
±U≤l «∞d–«–
±H∑UÕ ¸°j
±IADW
îDU· «∞FπOs
îHUÆW «∞∂Oi
±Cd» «∞FπOs K
Ë•b… «∞DUÆW
«∞ªö◊ ¸√” «∞ªö◊
±MU≠c «∞LK∫IU‹ ±MHc «∞ºd´W «∞Ld¢HFW
±H∑UÕ «∞∑AGOq/«ô¥IU· Ë«∞ºd´W
–¸«Ÿ ¸≠l «∞d√”
ÆU´b… «∞u´U¡
Ë´U¡
±eôÃ «∞LªdÃ
±I∂f ¢dØOV «_œ«… («∞LK∫o)
±MHc «∞ºd´W «∞LMªHCW
±MHc «∞ºd´W «∞L∑ußDW
«ß∑JAU· §NU“ «∞LD∂a «∞L∑JU±q ±s doowneK
«ß∑JAU· §NU“ «∞LD∂a «∞L∑JU±q ±s doowneK

51
«∞πNU“ ±s «∞ªKn.
3 «œ≠Fw ±U ¥e¥b ´s •U§∑p ±s «∞ºKp «∞JNd°Uzw ≈∞v œ«îq ±JUÊ ¢ªe¥s «∞ºKp «∞Lu§uœ ≠w
2 «¨ºKw «_§e«¡ «∞LºLuÕ °GºKNU: ¸«§Fw ƺr å«∞FMU¥W Ë«∞∑MEOnò.
1 √“¥Kw Øq ±Ju≤U‹ «∞∑GKOn.
Æ∂q «ôß∑FLU‰ ∞KLd… «ôË∞v
«∞L∑FKIW °U∞Lu«œ «∞L∑ö±ºW ±l «∞DFUÂ.
«∞JNd˱GMU©Oºw Ë¢MEOLU‹ «∞LπLu´W «_˸˰OW ¸Ær 4002/5391 °∑U¸¥a 72/01/4002
¥∑u«≠o ≥c« «∞πNU“ ±l ¢u§ONU‹ «∞LπLu´W «_˸˰OW CE/801/4002 «∞L∑FKIW °U∞∑u«≠o
●
∞KπNU“.
¢QØbÍ ±s ¢LU£q ±u«ÅHU‹ «∞LBb¸ «∞JNd°w ±l «∞Lu«ÅHU‹ «∞Lu{∫W ´Kv «∞πU≤V «∞ºHKw
●
Æ∂q «∞∑uÅOq °U∞JNd°U¡
¢Fd÷ «∞πNU“ ∞öß∑ªb«Â ¨Od «∞B∫O` √Ë ´b «ô∞∑e«Â °NcÁ «∞∑FKOLU‹.
«ß∑ªb±w «∞πNU“ ≠w «ôß∑ªb«Â «∞LMe∞w ≠Ij. ô ¢∑∫Lq doowneK √¥W ±ºµu∞OW ≠w •U∞W
●
¥πV ±ö•EW «_©HU‰ ∞K∑QØb ±s ´b ´∂∏Nr °U∞πNU“.
●
√Ë «∞∑u§Ot ±s Æ∂q ®ªh ±ºRˉ ´s ßö±∑Nr.
•ºOW √Ë §ºb¥W ±MªHCW √Ë œËÊ î∂d… ˱Fd≠W °Uß∑ªb«Â «∞πNU“, ≈ô ≠w •U∞W «ù®d«· ´KONr
≥c« «∞πNU“ ¨Od ±BLr ∞öß∑ªb«Â °u«ßDW √®ªU’ (¥∑CLs –∞p «_©HU‰) °Ib¸«‹ ´IKOW √Ë
●
Ë«∞Lªdà ˫∞ºKp «∞JNd°Uzw Æ∂q •Lq «∞πNU“.
«≤∑∂Nw ´Mb •Lq ≥c« «∞πNU“ ≠Nu £IOq. ¢QØbÍ ±s ÆHq ¸√” «∞FπU≤W Ë¢Q±Os «∞ºKDU≤OW Ë«_œË«‹
●
´Mb «ß∑ªb«Â ±K∫IW ±U, ¥πV Æd«¡… ¢FKOLU‹ «_±UÊ «∞u«¸œ… ±FNU.
●
¥∫c¸ “¥Uœ… «∞L∫∑uÈ ´s «∞∫b «_ÆBv «∞LcØu¸ ≠w.
●
¥∫c¸ «ß∑ªb«Â ±K∫IW ¨Od ±dîBW √Ë √Ø∏d ±s ±K∫IW ≠w «∞Ld… «∞u«•b….
●
¥∫c¸ ¢Fd÷ Ë•b… «∞DUÆW √Ë «∞ºKp «∞JNd°w √Ë ÆU°f «∞∑uÅOq ∞KLU¡.
●
¥∫c¸ ¢d„ «∞ºKp «∞JNd°Uzw ±∑b∞OUÎ ≠w •U∞W ˧uœ ©Hq ≠Ib ¥M∑e´t.
●
¥∫c¸ «ß∑ªb«Â «∞FπU≤W ´Mb±U ¥JuÊ «∞d√” ±d≠u´UÎ.
●
˸´U¥W «∞FLö¡".
¥∫c¸ «ß∑ªb«Â §NU“ ≠w •U∞W ¢KHt. ¥πV ≠∫h «∞πNU“ √Ë ≈Åö•t : ¸«§Fw ƺr "«∞BOU≤W
●
¥∫c¸ ¢d„ «∞πNU“ ±NLöÎ √£MU¡ «∞∑AGOq.
●
√°FbÍ √ÅU°Fp ´s «_§e«¡ «∞L∑∫dØW Ë«∞LK∫IU‹ «∞∑w ¢r ¢dØO∂NU.
●
«ôß∑ªb«Â ËÆ∂q «∞∑MEOn.
√ËÆHw «∞∑AGOq Ë√“¥Kw «∞IU°f ±s «∞JNd°U¡ Æ∂q ¢dØOV √Ë ≈“«∞W «_œË«‹/ «∞LK∫IU‹ °Fb
●
«_±UÊ
Æu±w °S“«∞W ±Ju≤U‹ «∞∑GKOn Ë√¥W ±KBIU‹.
●
Æu±w °Id«¡… «∞∑FKOLU‹ «∞∑U∞OW Ë«ô•∑HUÿ °NU ∞öß∑ªb«±U‹ «∞Lº∑I∂KOW «∞Ld§FOW.
●
Æ∂q «ß∑ªb«Â §NU“ doowneK
«ß∑JAU· §NU“ «∞LD∂a «∞L∑JU±q ±s doowneK
´d°w

HEAD OFFICE: Kenwood Limited, 1-3 Kenwood Business Park, New Lane, Havant, Hampshire PO9 2NH
KW00800107/1
 Loading...