

Kenwood Chef KM300, KM400 series
Major KM600, KM800 series

page 1 instructions
Congratulations on buying a Kenwood. With such a wide range of
attachments available, it’s more than just a mixer. It’s a state-of-the-art
kitchen machine. We hope you’ll enjoy it.
Robust. Reliable. Versatile. Kenwood.
page
9 mode d’emploi
Félicitations pour l’achat de votre robot Kenwood. Avec une gamme
impressionnante d’accessoires adaptables, votre robot est plus qu’un
simple batteur: c’est un robot de cuisine ultra-perfectionné qui vous
donnera entière satisfaction. Nous espérons que vous l’apprécierez.
Solide. Sûr. sur-mesure. Kenwood.
página
17 instrucciones
Felicidades por comprar un aparato Kenwood. Con el abanico de
accesorios disponibles, Ud. ha comprado algo más que una
mezcladora. Es una obra de arte para la cocina. Esperamos que lo
disfrute.
Sólida. Fiable. Versátil. Kenwood.
página
25 instruções
Parabéns pela compra da sua Kenwood. Com a grande variedade de
acessórios para ela disponíveis, esta máquina é mais que uma
batedeira. É uma máquina de cozinha super moderna. Esperamos que
a sua Kenwood lhe dê muito prazer.
Robusta. Fiável. Versátil. Kenwood.
Kenwood
English
Français
Español
Portugêus
´d°w
¢FKOLU‹ 33 ÅH∫W
≤NMµJr ´Kv ®d«¡ §NU“ ØOMuËœ. ˱l ¢u≠d ¢AJOKW Ë«ßFW ØNcÁ ±s «∞LK∫IU‹, ≠Nu ∞Of ±πdœ
îö©W. °q «≤t §NU“ ±D∂a ¨U¥W ≠w «∞dË´W Ë«ô¢IUÊ.«≤MU ≤Q±q ¢L∑FJr °t.
±∑Os, ±u£u‚, ±∑Fbœ «ôß∑FLUô‹, ØOMuËœ.

important - UK only
attachment outlets
the mixer
safety
Switch off and unplug before fitting or removing tools/attachments, after
use and before cleaning.
This machine is not intended for use by young children or infirm persons
without supervision.
Keep your fingers away from moving parts and fitted attachments.
Never leave the machine on unattended.
Never use a damaged machine. Get it checked or repaired: see
‘service’, page
6.
Never use an unauthorised attachment or more than one attachment
at once.
Never exceed the maximum capacities on page
2.
Don’t let children play with this machine.
When using an attachment, read the safety instructions that come with it.
Only use this machine for domestic food preparation.
before plugging in
Make sure your electricity supply is the same as the one shown on
the underside of your machine.
The wires in the cord are coloured as follows:
Blue = Neutral, Brown = Live.
This machine complies with European Economic Community Directive
89/336/EEC.
before using for the first time
Remove all packaging.
Wash the parts: see ‘care and cleaning’, page
6
.
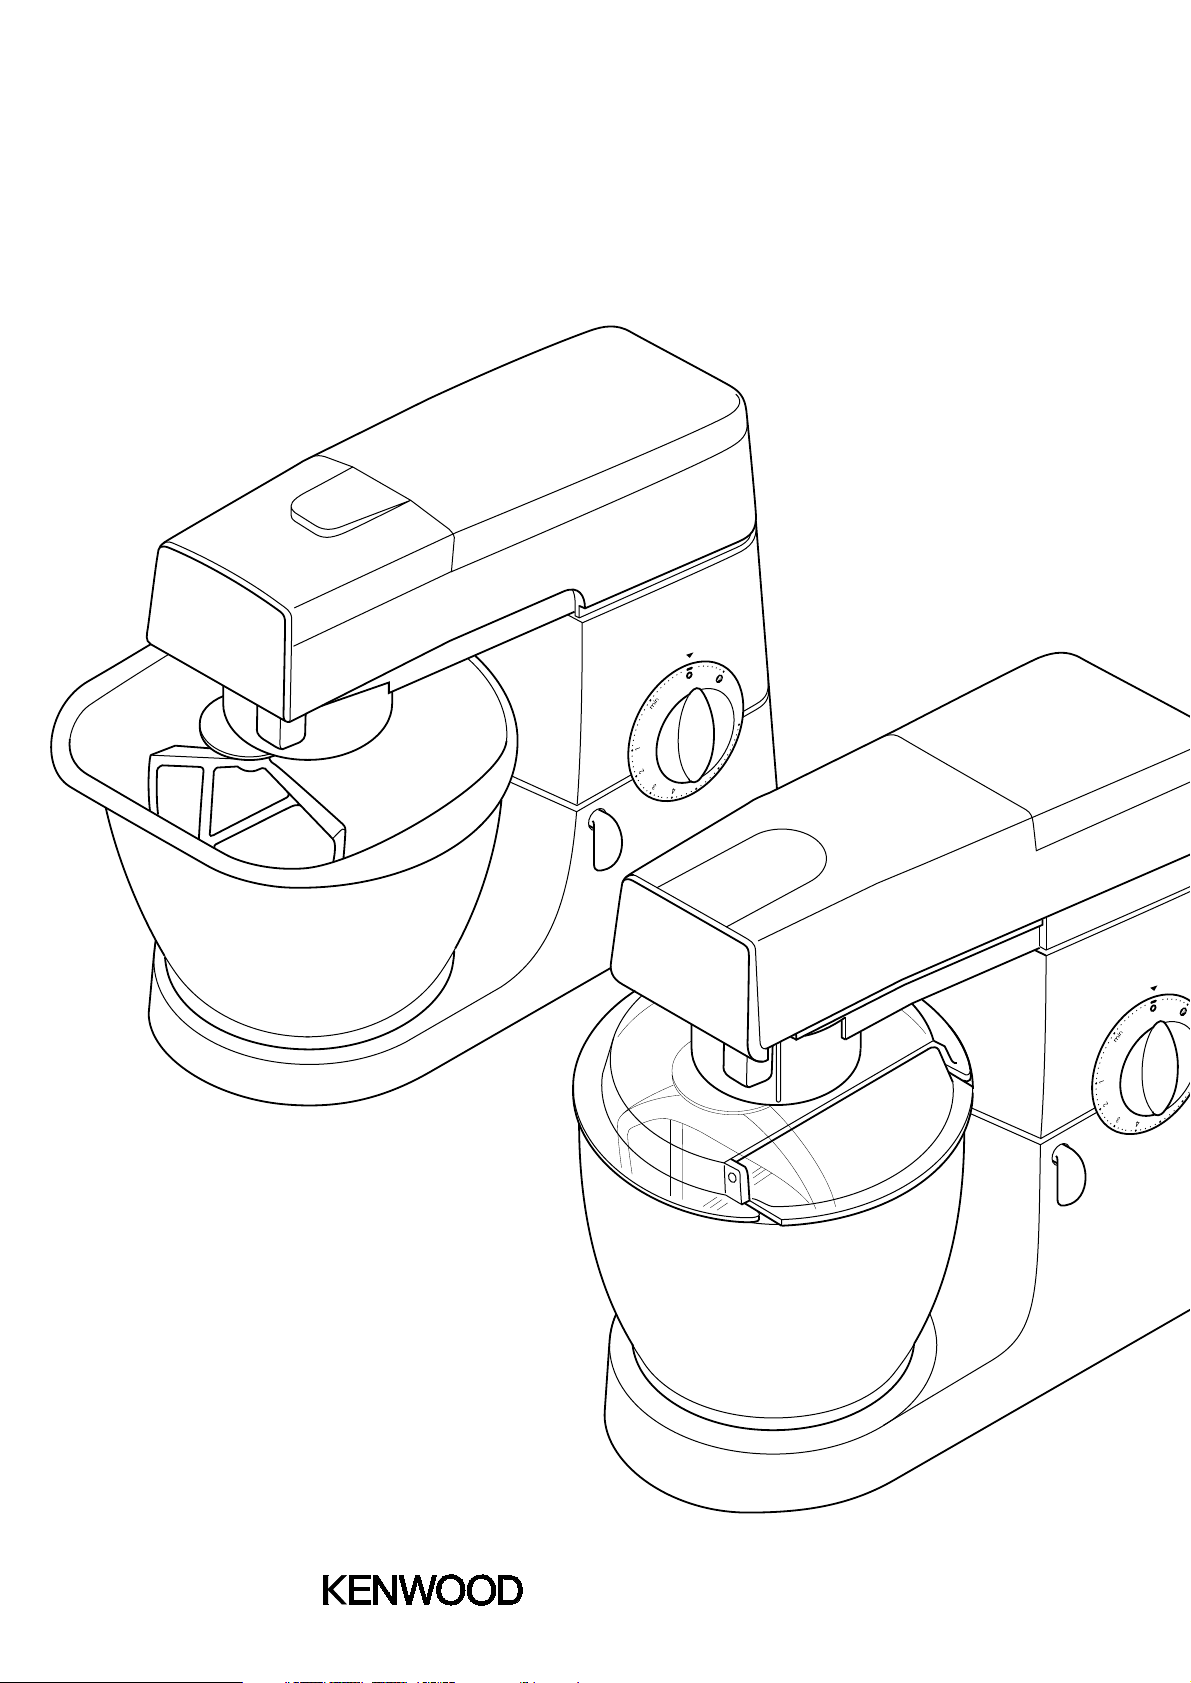
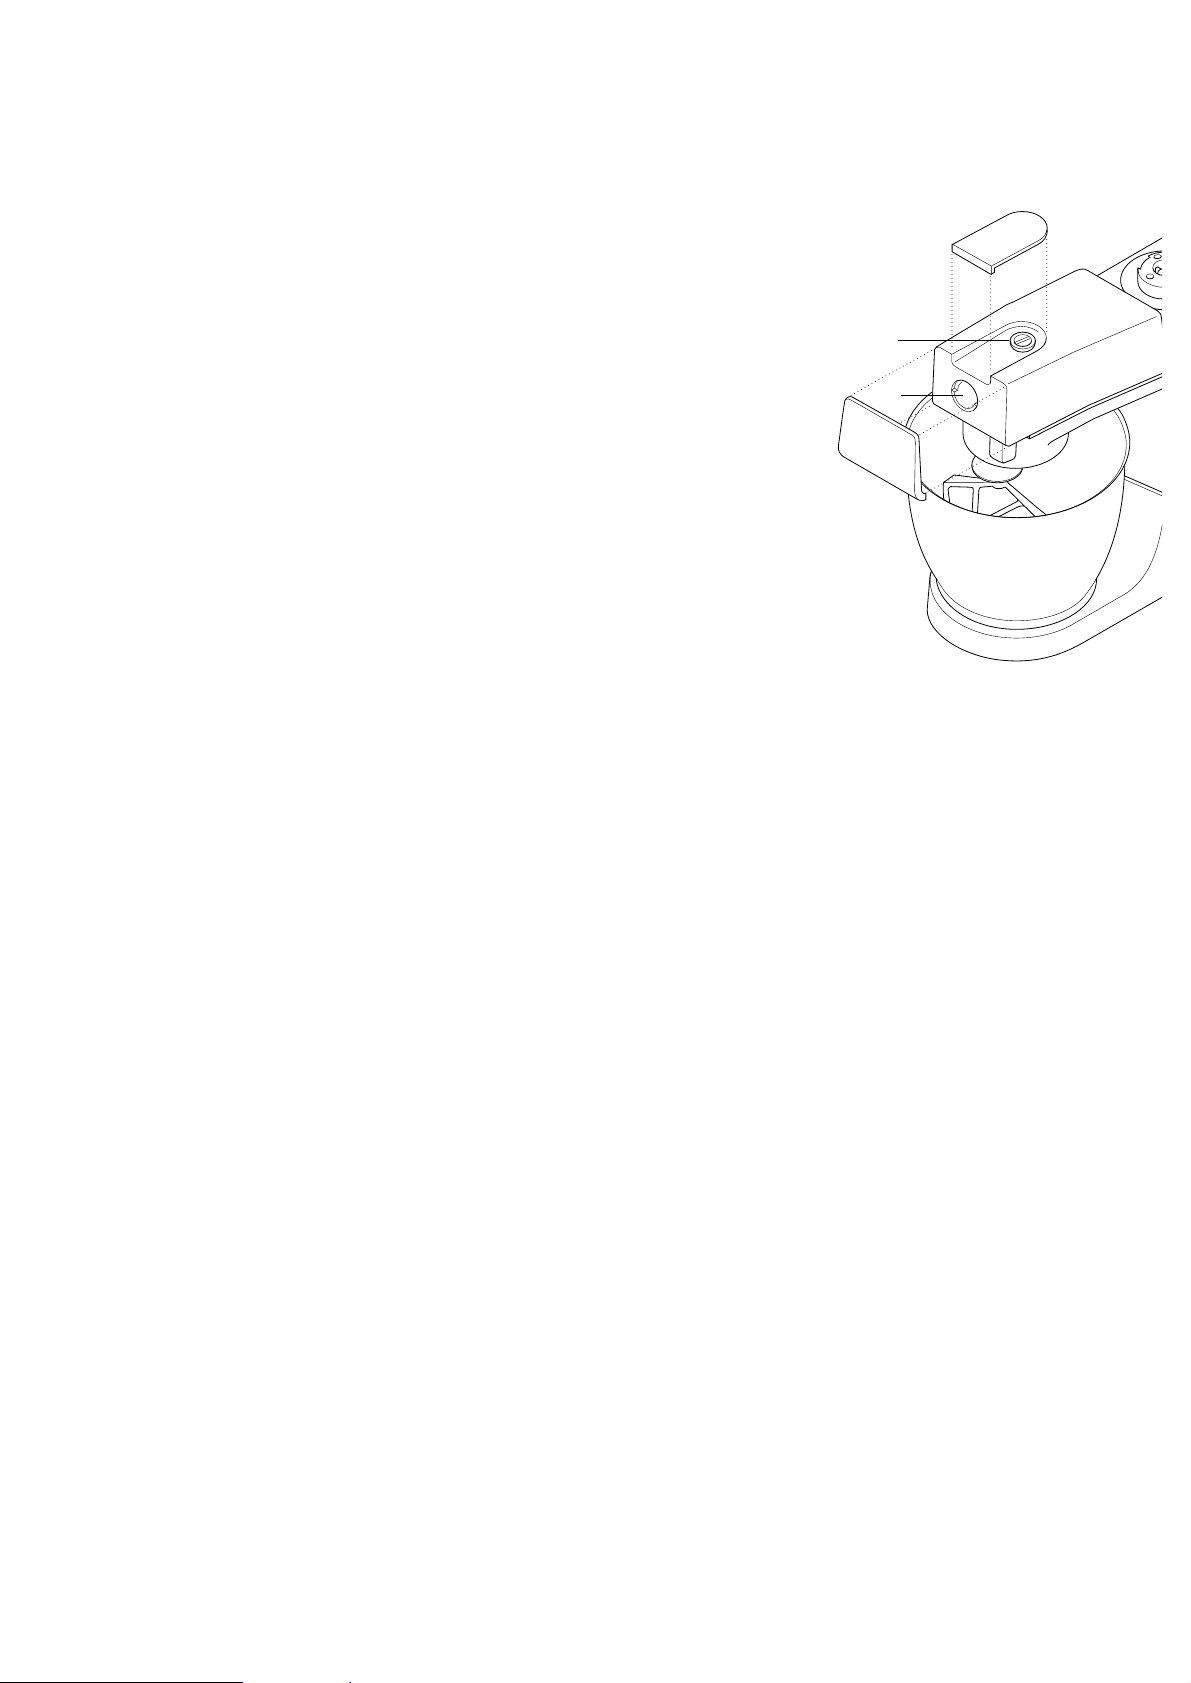
know your Kenwood kitchen machine
high-speed outlet
citrus juicer outlet
slow-speed outlet
tool socket
mixer head
outlet catch
bowl
head-lift lever
on/off and speed switch
power unit
K-beater
whisk
dough hook
spatula
know your Kenwood kitchen machine
●
●
●
●
●
●
●
●
●
●
●
●
●
1
2
1
English
K-beater
whisk
dough hook
to insert a tool
to remove a tool
hints
important
shortcrust pastry
stiff yeast dough
British type
soft yeast dough
continental type
fruit cake mix
egg whites
K-beater
whisk
dough hook
the mixer
●
●
●
1
2
3
4
5
●
6
●
●
●
●
●
●
●
●
●
●
●
●
●
●
●
●
●
●
●
●
●
2
the mixing tools and some of their uses
For making cakes, biscuits, pastry, icing, fillings, éclairs and mashed
potato.
For eggs, cream, batters, fatless sponges, meringues, cheesecakes,
mousses, soufflés.
Don’t use the whisk for heavy mixtures (eg creaming
fat and sugar) - you could damage it.
For yeast mixtures.
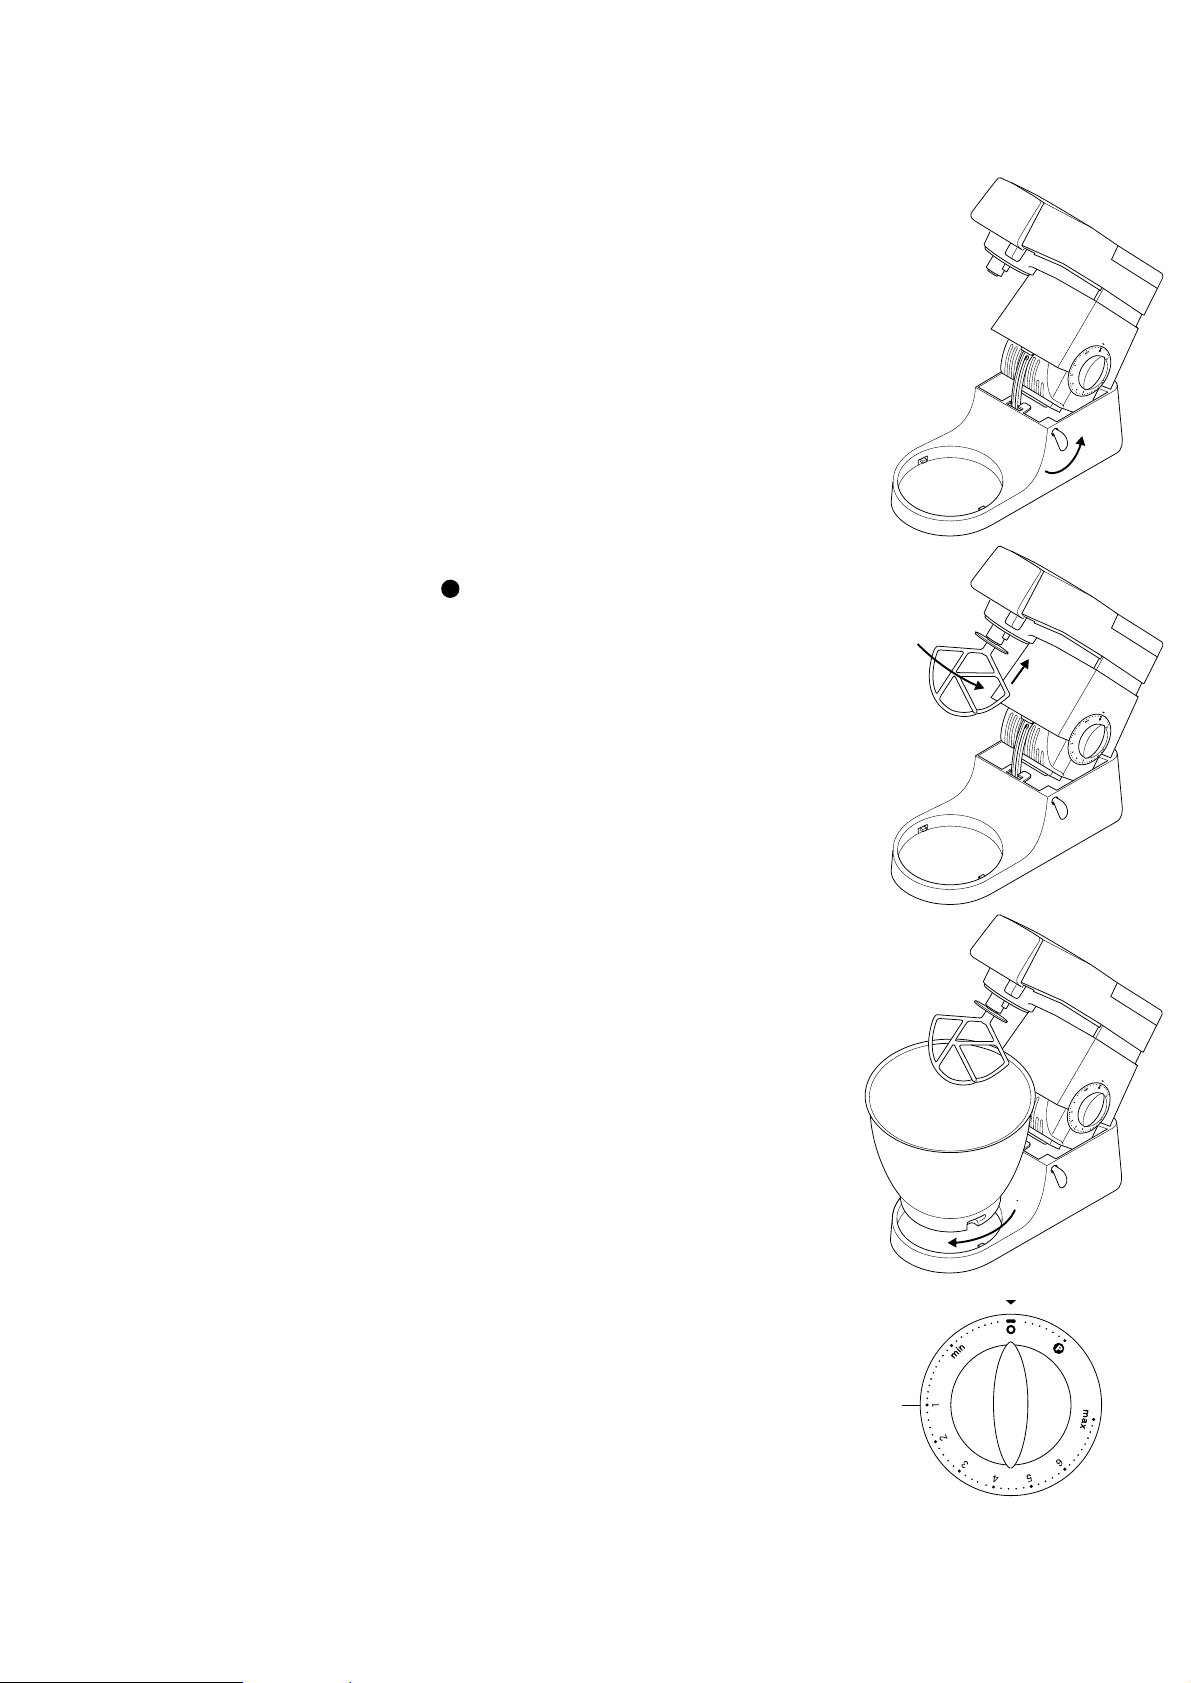
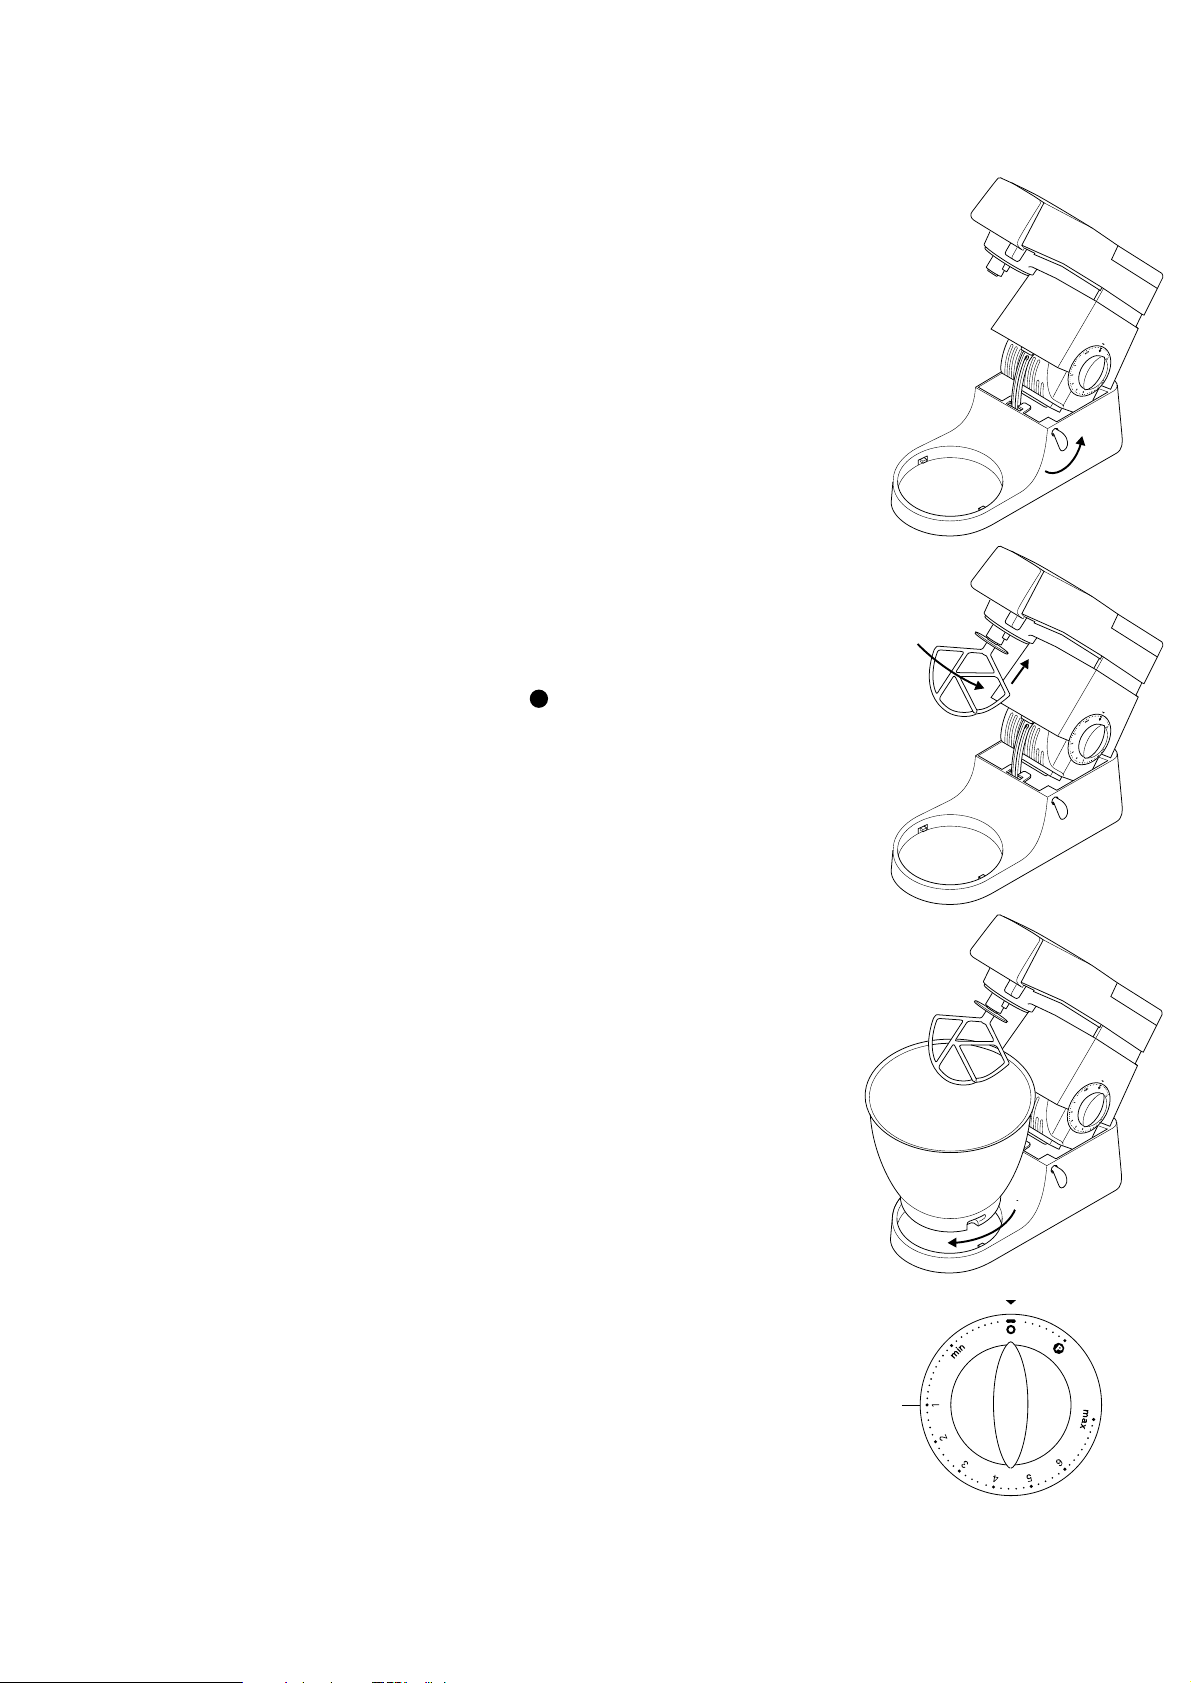
to use your mixer
Turn the head-lift lever anti-clockwise and raise the mixer head till it
locks.
Turn till it stops
then push.
Fit the bowl onto the base - press down and turn clockwise
Turn the head-lift lever anti-clockwise and lower the mixer head till it locks.
Select a speed, then switch on by turning the speed switch.
Switch to pulse for short bursts.
Unscrew.
Switch off and scrape the bowl with the spatula frequently.
Eggs at room temperature are best for whisking.
Before whisking egg whites, make sure there’s no grease or egg yolk
on the whisk or bowl.
Use cold ingredients for pastry unless your recipe says otherwise.
points for bread making
Never exceed the maximum capacities below - you’ll overload the
machine.
If you hear the machine labouring, switch off, remove half the dough
and do each half separately.
The ingredients mix best if you put the liquid in first.
maximum capacities
KM300, 400, 410 models KM600, 800, 810 models
Flour weight: 680g - 1lb 8oz Flour weight: 910g - 2lb
Flour weight:
1.36kg - 3lb Flour weight: 1.5kg - 3lb 5oz
Total weight:
2.18kg - 4lb 13oz Total weight: 2.4kg - 5lb 5oz
Flour weight:
1.3kg - 2lb 14oz Flour weight: 2.6kg - 5lb 12oz
Total weight:
2.5
kg - 5lb 8oz Total weight: 5kg - 11lb
Total weight:
2.72kg - 6lb Total weight: 4.55kg - 10lb
12 16
speeds
creaming fat and sugar start on min, gradually increasing to max.
beating eggs into creamed mixtures 4
- ‘max’.
folding in flour, fruit etc Min - 1.
all in one cakes start on min speed, gradually increase to max.
rubbing fat into flour min - 2.
Gradually increase to ‘max’.
Start on ‘min’, gradually increasing to
1.
for
cleaning see page 6
P
troubleshooting
solution
●
●
1
2
3
4
5
6
1
2
3
4
5
●
●
6
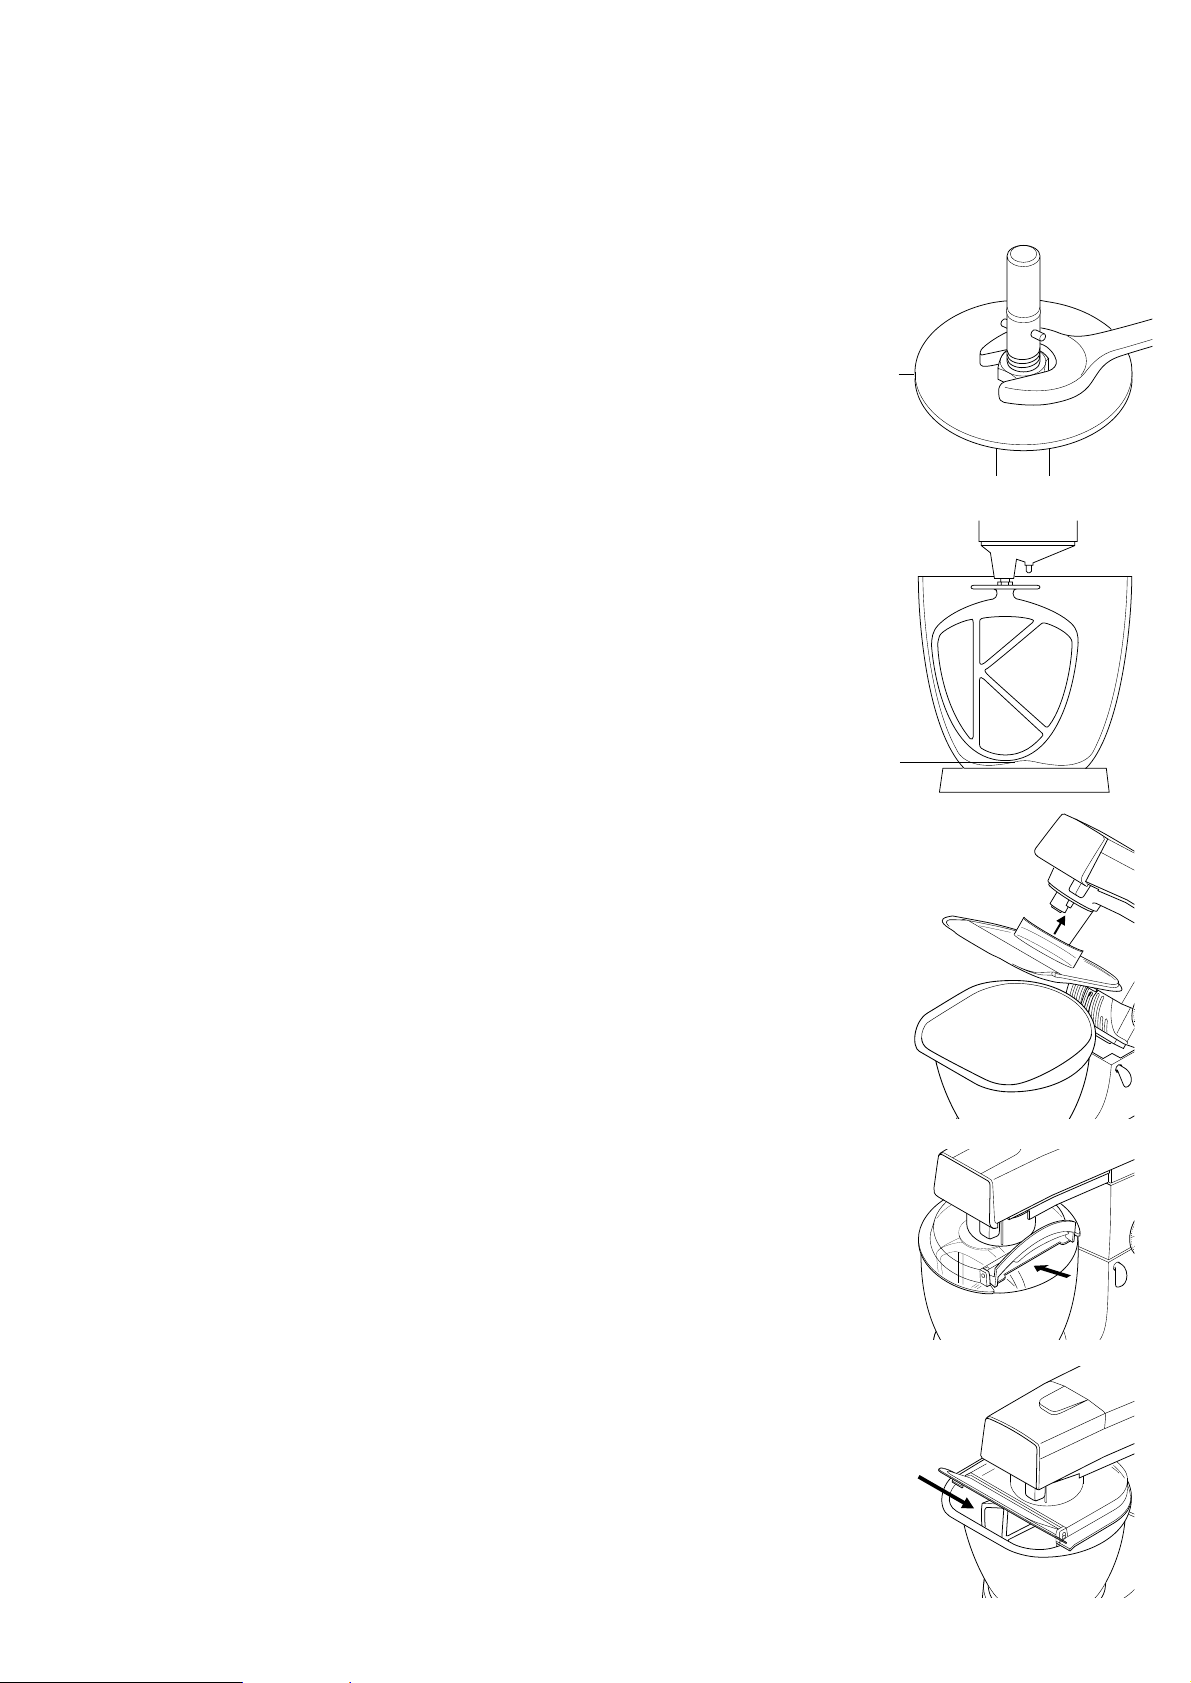
problem
The whisk or K-beater knocks against the bottom of the bowl or isn’t
reaching the ingredients in the bottom of the bowl.
Adjust the height. Here’s how:
Unplug.
Raise the mixer head and insert the whisk or beater.
Hold it, then loosen the nut
Lower the mixer head.
Adjust the height by turning the shaft. Ideally the whisk/K-beater should
be
almost touching the bottom of the bowl
Raise the head, hold the whisk/K-beater and tighten the nut.
to fit and use your round/D-shaped
splashguard (if supplied)
Raise the mixer head until it locks.
Fit the bowl onto the base.
Push the splashguard on until fully located
. The hinged section
should be positioned as shown round
and D-shaped
Insert required tool.
Lower the mixer head ensuring the splashguard follows the shape of
the bowl.
During mixing, ingredients can be added directly to the bowl via the
hinged section of the splashguard.
You do not need to remove the splashguard to change tools.
Remove the splashguard by raising the mixer head and sliding it down.
3

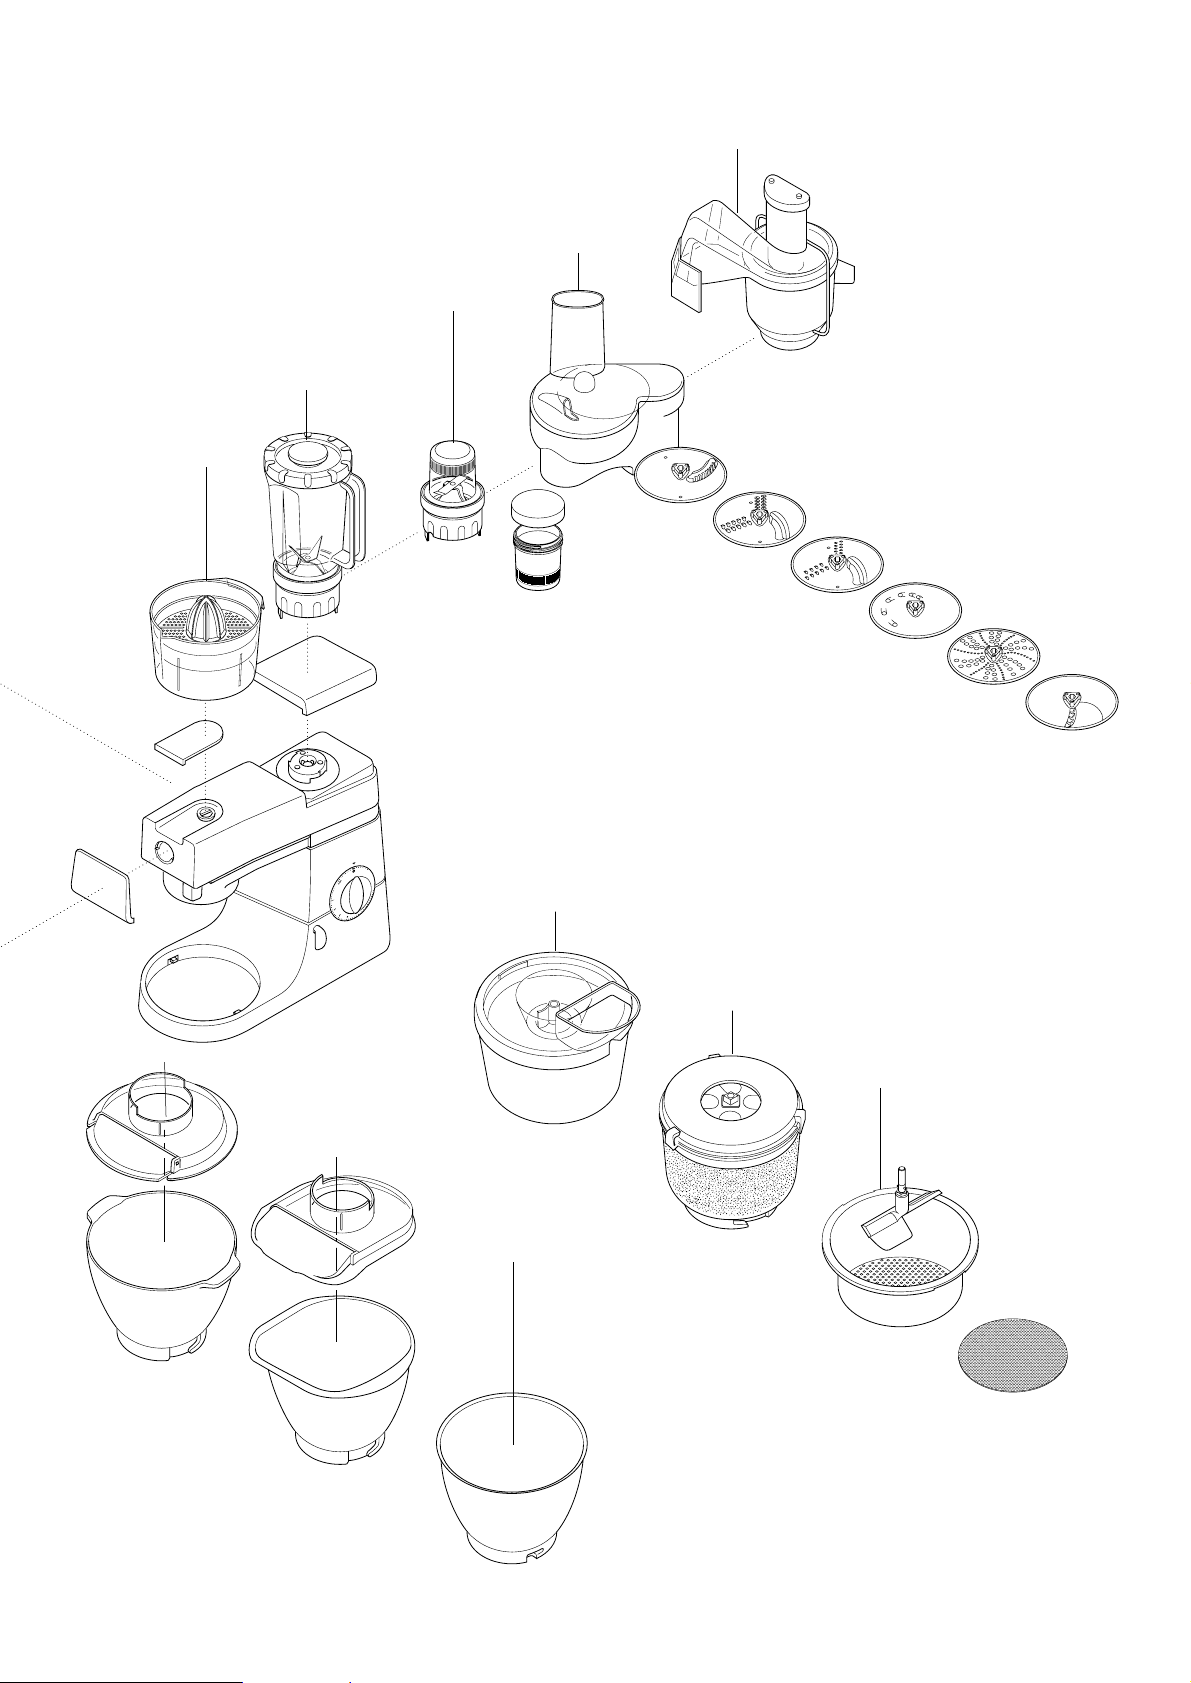
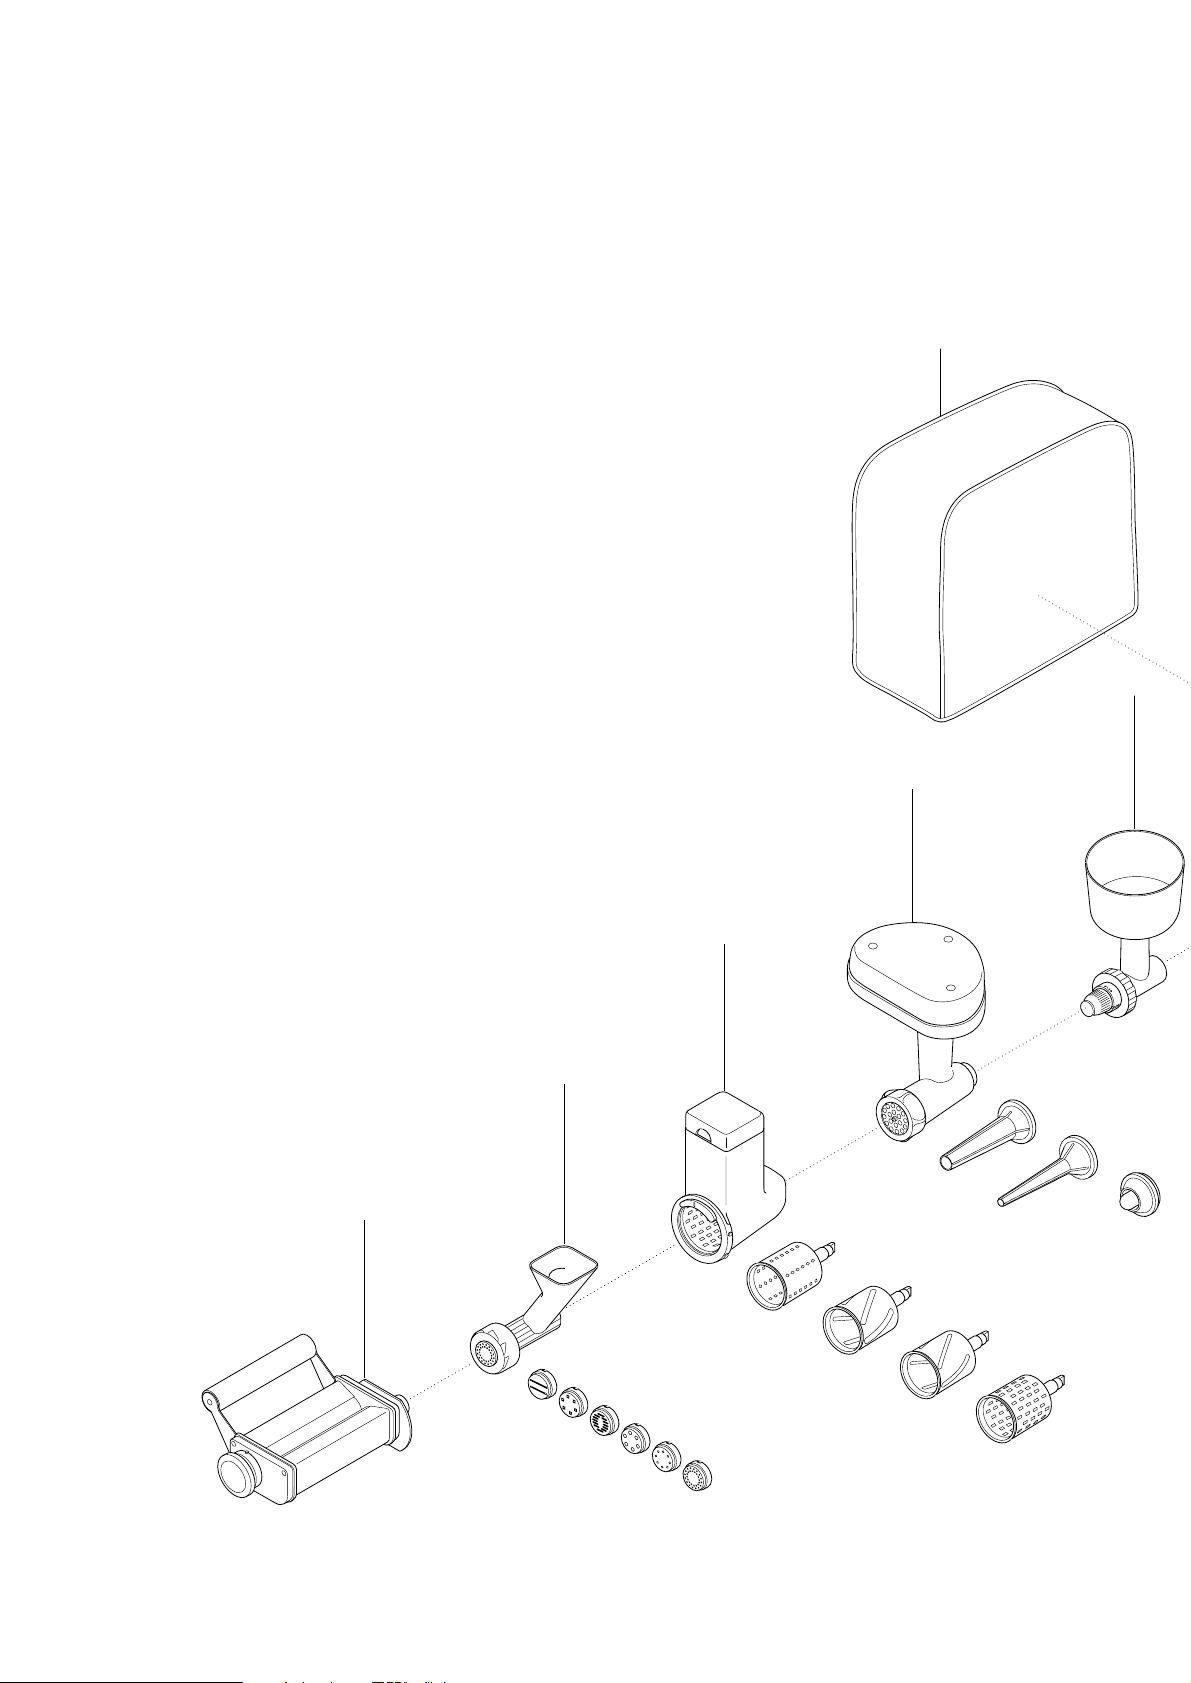
the attachments available
To buy an attachment not included in your pack, call your KENWOOD
repairer.
4
attachment code
A970
A971
tagliatelle
A972 taglionlini
A973 trenette
A974 spaghetti
A936 comes with 6 screens
A948 comes with 4 drums
A950 comes with
large sausage nozzle
small sausage nozzle
kebbe maker
A941
A995
1.2 l acrylic A993A,
1.2 l glass
A994A,
1.5 l stainless steel
A996A
A938A
comes with 3 glass jars and 3 lids for storage
A998 comes with 3 cutting plates
extra coarse shredder
part number 639021
rasping plate part number 639150
standard chipper part number 639083
A935
CHEF A953, MAJOR A954
CHEF A934, MAJOR A952
CHEF A992, MAJOR A930
CHEF 265026
,
MAJOR 412095
CHEF & MAJOR 444347
CHEF 489969
CHEF 604349
polished: CHEF 638821, MAJOR 642779
CHEF 533722, MAJOR 606397
attachment
flat pasta maker
additional pasta attachments
(not shown) used in conjunction
with A970
pasta maker
slow speed slicer
/shredder
super mincer
grain mill
citrus press
liquidiser
multi
-mill
high speed slicer
/shredder
optional plates
continuous juice extractor
ice-cream maker
potato peeler
colander and sieve
kenlyte round bowl
round splashguard
kenlyte D-shaped bowl
D-shaped splashguard
stainless steel bowls
cover
a
b
c
a
b
c
a
a
b
c
a
5
a
a
b
c
a
cleaning and service
6
power unit
bowls
tools
splashguard
UK
Eire
other countries
●
●
●
●
●
●
●
●
●
●
●
●
●
●
●
●
●
●
●
●
●
care and cleaning
Always switch off and unplug before cleaning.
A little grease may appear at
outlets and when you first use
them. This is normal - just wipe it off.
Wipe with a damp cloth, then dry.
Never use abrasives or immerse in water.
Wash by hand, then dry thoroughly.
If you have a stainless steel bowl, never use a wire brush, steel
wool or bleach. Use vinegar to remove limescale. The stainless
steel bowl may also be washed in the dishwasher.
Keep away from heat (cooker tops, ovens, microwaves).
Wash by hand, then dry thoroughly.
Discolouration of the K beater, whisk and dough hook may occur if
placed within a dishwasher.
Wash by hand, then dry thoroughly.
service and customer care
If the cord is damaged it must, for safety reasons, be replaced
by
KENWOOD or an authorised KENWOOD repairer.
If you need help with:
using your machine
servicing or repairs (in or out of guarantee)
call
KENWOOD on 023 92392333 and ask for Customer Care.
Have your model number ready - it’s on the underside of the mixer.
Alternatively, contact your authorised
KENWOOD
repairer:
look in Yellow Pages under ‘Electrical appliance repairs’.
See our advertisement in Golden Pages.
Contact the shop where you bought your machine.
guarantee UK only
If your machine goes wrong within one year from the date you
bought it, we will repair or replace it free of charge provided:
you have not misused, neglected or damaged it;
it has not been modified;
it is not second-hand;
it has not been used commercially;
you have not fitted a plug incorrectly; and
you supply your receipt to show when you bought it.
This guarantee does not affect your statutory rights.

ingredients
method
ingredients
This quantity is for models
KM600,
800
and 810. For models KM300,
400
and 410, halve the quantities
and add all the flour in one go
method
recipes
See important points for bread making on page
2.
●
●
●
●
●
1
2
3
4
5
6
7
8
●
●
●
●
●
●
●
●
1
2
3
4
5
6
7
8
●
7
white bread stiff British-type dough
1.36
kg (3lb) strong plain flour
15ml (3tsp) salt
25g (1oz) fresh yeast; or 15g/20ml (
1
⁄2oz) dried yeast + 5ml (1tsp) sugar
750ml (1
1
⁄4pts) warm water: 43˚C (110˚F). Use a thermometer or add
250ml (9fl oz) boiling water to 500
ml (18fl oz) cold water
25g (1
oz) lard
dried yeast (the type that needs reconstituting): pour the warm water
into the bowl. Then add the yeast and the sugar and leave to stand for
about
10 minutes until frothy.
fresh yeast: crumble into the flour.
other types of yeast: follow the manufacturer’s instructions.
Pour the liquid into the bowl. Then add the flour (with fresh yeast if used),
salt and lard.
Knead at minimum speed for
45 - 60 seconds. Then increase to speed 1,
adding more flour if necessary, until a dough has formed.
Knead for
3 - 4
more minutes at speed 1 until the dough is smooth,
elastic and leaves the sides of the bowl clean.
Put the dough into a greased polythene bag or a bowl covered with a tea
towel. Then leave somewhere warm until doubled in size.
Re-knead for
2 minutes at speed 1.
Half fill four
450g (1lb) greased tins with the dough, or shape it into rolls.
Then cover with a tea towel and leave somewhere warm until doubled in
size.
Bake at
230˚C/450˚F/Gas Mark 8 for 30 - 35 minutes for loaves or 10 - 15
minutes for rolls.
When ready, the bread should sound hollow when tapped on the base.
white bread soft continental-type dough
2.6kg (5lb
12oz) ordinary plain flour
1.3 litre (
2
1
⁄4pts) milk
300g (
10oz) sugar
450
g (1lb) margarine
100g (4oz) fresh yeast or 50g (2oz) dried yeast
6 eggs, beaten
5 pinches salt
Melt the margarine in the milk and bring to
43˚C (110˚F).
dried yeast (the type that needs reconstituting): add the yeast and
sugar to the milk and leave to stand for about 10 minutes until frothy.
fresh yeast: crumble into the flour and add the sugar.
other types of yeast: follow the manufacturer’s instructions.
Pour the milk into the bowl. Add the beaten eggs and
2kg (4lb 6oz) flour.
Mix at minimum speed for 1 minute, then at speed 1 for a further minute.
Scrape down.
Add the remaining flour and mix at minimum speed for 1 minute, then at
speed
1 for 2 - 3 minutes until smooth and evenly mixed.
Half fill some
450g (1lb) greased tins with the dough, or shape it into
rolls. Then cover with a tea towel and leave somewhere warm until
doubled in size.
Bake at
200˚C/400˚F/Gas Mark 6 for 20 - 25 minutes for loaves or 15
minutes for rolls.
When ready, the bread should sound hollow when tapped on the base.
Makes about 10 loaves.

ingredients: sponge
filling and decoration
method
ingredients
method
ingredients
hint
method
ingredients
method
strawberry and apricot gâteau
3
eggs
75g (3oz) caster sugar
75g (3
oz) plain flour
150ml (
1
⁄4pt) double cream
Sugar to taste
225g (8oz) strawberries
225g (8oz) apricots
Halve the apricots and remove the stones. Cook gently in very little
water, adding sugar to taste, until soft.
Wash and halve the strawberries.
To make the sponge, whisk the eggs and sugar at maximum speed until
very pale and thick.
Remove the bowl and the whisk. Fold in the flour by hand using a large
metal spoon - do this carefully to keep the sponge light.
Put the mixture into two
18cm (7”) greased and lined sandwich tins.
Bake at
180˚C/350˚F/Gas Mark 4 for about 20 minutes until the cake
springs back when lightly touched.
Turn out onto a wire rack.
Whisk the cream at maximum speed until stiff. Add sugar to taste.
Roughly chop the apricots and a third of the strawberries. Fold them into
half the cream.
Spread this over one of the sponges, then put the other sponge on top.
Spread the remaining cream on top and decorate with the remaining
strawberries.
meringues
4
egg whites
250
g (9oz) icing sugar, sieved
Line your baking tray with non-stick baking parchment.
Whisk the egg whites and sugar at maximum speed for about
10 minutes
until it stands in peaks.
Spoon the mixture onto the baking tray (or use a piping bag with a
2.5cm
(
1”) star nozzle).
Bake at
110˚C/225˚F/Gas Mark
1
⁄
4 for about 4 - 5
hours until firm and
crisp. If they start to brown, leave the oven door slightly ajar.
Store meringues in an airtight tin.
shortcrust pastry
450
g (1
lb) flour, sieved with the salt
5ml (1tsp) salt
225g (8oz) fat (mix lard and margarine straight from the fridge)
About
80ml (4tbsp) water
Don’t overmix
Put the flour into the bowl. Chop the fat up roughly and add to the flour.
Mix at speed
1 until it resembles breadcrumbs. Stop before it looks
greasy.
Add the water and mix at minimum speed. Stop as soon as the water is
incorporated.
Cook at around
200˚C/400˚F/Gas Mark 6, depending on the filling.
beefburgers
250
g (9oz) prime sinewless beef
Cut into
2.5cm (1”) cubes.
If you don’t have a mincer, use your liquidiser and mince small amounts
at a time. Use speed
2 for 15 seconds maximum. Clean around the
blades between one batch and the next.
Mix with seasonings such as chopped onion, mixed herbs (fresh or
dried), coarse black pepper, and the juice and rind of a lemon.
Shape into
2 beefburgers and grill on medium to high heat until
thoroughly cooked.
recipes continued
●
●
●
●
●
●
●
1
2
3
4
5
6
7
8
9
10
11
●
●
1
2
3
4
●
●
●
●
●
●
1
2
3
4
●
1
2
3
4
8

sécurité
●
Éteignez et débranchez l'appareil avant d'adapter ou de retirer tout
élément/accessoire, après l'utilisation et avant le nettoyage.
●
Cet appareil n'est pas prévu pour être utilisé par de jeunes enfants
ou des personnes infirmes sans surveillance.
●
N’approchez jamais vos doigts des éléments en mouvement ou des
accessoires fixés sur votre robot.
●
Ne laissez jamais votre appareil sans surveillance lorsqu’il fonctionne
et maintenez-le hors de portée des enfants.
●
N’utilisez jamais un appareil endommagé ou en mauvais état. Faitesle vérifier et réparer. Pour cela reportez-vous à la rubrique 'service
après-vente' en page 14.
●
N’utilisez jamais un accessoire non adapté à cet appareil et n’utilisez
pas plus d’un accessoire à la fois.
●
Ne dépassez jamais les capacités maximales de charge de l’appareil
telles qu’elles sont précisées en page 10.
●
Ne laissez pas un enfant jouer avec cet appareil.
●
Lorsque vous utilisez un accessoire, lisez attentivement les
instructions sur la sécurité concernant cet accessoire.
●
Cette machine est uniquement destinée à une utilisation domestique.
avant de brancher l’appareil
●
Assurez-vous que le courant électrique que vous utilisez est le même
que celui indiqué sous votre appareil.
●
Cet appareil est conforme à la directive 89/336/CEE de la C. E.
avant d’utiliser votre appareil pour la première fois
1 Retirez tous les emballages.
2 Lavez les différentes parties de l’appareil. Reportez-vous pour cela à
la page 14: 'entretien et nettoyage de l’appareil'.
faites connaissance avec votre robot de cuisine Kenwood
orifices de branchement sortie ultra-rapide
des différents accessoires
sortie presse-agrumes
sortie lente
sortie planétaire
le batteur
tête du batteur
loquet de blocage
bol
manette pour soulever la tête du batteur
bouton marche/arrêt (on/off) et de réglage de la vitesse
bloc moteur
batteur 'K'
fouet
crochet à pâte
spatule
faites connaissance avec votre robot de cuisine Kenwood
9
Français
les accessoires du batteur et quelques unes de leurs
utilisations possibles
batteur 'K'●Pour la confection de cakes, biscuits, pâtisseries, glaçages, garnitures,
éclairs et purées de pommes de terre.
fouet●Pour les oeufs, la crème, la pâte à frire, les gâteaux (type gâteau de
Savoie) sans matière grasse, les meringues, les gâteaux au fromage,
les mousses, les soufflés. N’utilisez pas le fouet pour les mélanges
épais (comme par exemple pour travailler les matières grasses ou le
sucre) car vous pourriez l’endommager.
crochet à pâte
●
pour les mélanges à base de levure.
pour utiliser le batteur
1
Tournez la manette pour soulever la tête du batteur dans le sens contraire
des aiguilles d’une montre
et soulevez la tête du batteur jusqu’à ce
qu’elle s’enclenche en position.
pour insérer un accessoire 2 Tournez l’accessoire jusqu’à ce qu’il s’arrête puis pousser.
3 Adaptez le bol sur la base - pressez vers le bas et tournez dans le sens
des aiguilles d’une montre
4 Tournez la manette pour soulever la tête du batteur dans le sens contraire
des aiguilles d’une montre et abaissez la tête du batteur jusqu’à ce qu’il
se verrouille en position.
5 Choisissez la vitesse qui convient, puis mettez votre robot en marche en
tournant le bouton de réglage de la vitesse.
●
Passez en mode pulsateur pour procéder par brèves impulsions.
pour retirer un accessoire 6 Dévissez.
astuces●Eteignez l’appareil et raclez fréquemment le bol avec la spatule.
●
Pour battre les oeufs, il est conseillé d’utiliser des oeufs à température
ambiante.
●
Avant de monter les blancs en neige, vérifiez qu’il n’y a pas de restes de
graisse ou de jaune d’oeuf sur le fouet ou dans le bol.
●
Utilisez des ingrédients froids pour la pâte sauf indications contraires
mentionnées sur votre recette.
points importants pour la fabrication du pain
important●Ne dépassez jamais les capacités maximales signalées ci-dessous car
vous risqueriez de surcharger votre appareil.
●
Si vous entendez votre appareil forcer, éteignez l’appareil, retirez la moitié
de la pâte et travaillez chaque moitié séparément.
●
Les ingrédients se mélangeront mieux si vous mettez les liquides en
premier dans l’appareil.
capacités maximales
modèles KM300, 400, 410 Modèles KM600, 800, 810
pâte brisée
●
Quantité de farine: 680g 910g
pâte ferme à base de levure
●
Quantité de farine: 1,36kg 1,5kg
type anglais ●Quantité de farine: 2,18kg 2,4kg
pâte souple à base de levure
●
Quantité de farine: 1,3kg 2,6kg
type continental●Quantité de farine: 2,5kg 5kg
cake aux fruits
●
Quantité de farine: 2,72kg 4,55kg
blancs d’oeufs
●
12 16
vitesses
batteur “K”●Travailler les corps gras en crème avec le sucre commencez
sur min, augmentez progressivement jusqu'au max.
●
Incorporer les œufs à une crème 4 - "max".
●
Incorporer la farine, les fruits, etc. Min - 1.
●
Battre tous les ingrédients d'un gâteau simultanément
commencez à vitesse min, augmentez progressivement jusqu'au max.
●
Incorporer les corps gras à la farine min - 2.
fouet●Augmentez progressivement jusqu’à 'max'.
crochet à pâte●Commencez sur 'min', puis augmentez graduellement jusqu’à passer
sur 1.
pour le
nettoyage de l’appareil reportez-vous à la page 14.
P
10
le batteur
problème
●
Le fouet ou le batteur 'K' vient heurter le fond du bol ou ne peut pas
atteindre les ingrédients situés au fond du bol.
solution
●
Ajuster la hauteur de la manière suivante :
1 Débranchez l’appareil.
2 Levez la tête du batteur et introduisez le fouet ou batteur.
3 Maintenez-le, puis desserrez l’écrou.
4 Abaissez la tête du batteur.
5 Réglez la hauteur en tournant l'axe. Le fouet/batteur en K est en
position idéale lorsqu'il touche presque le fond du bol.
6 Levez à nouveau la tête, maintenez le fouet/batteur en K et resserrez
l’écrou.
installation et utilisation du couvercle
de protection (s'il est fourni)
1 Levez la tête du batteur jusqu'en position verrouillée.
2
Installez le bol sur le socle.
3 Enfoncez le couvercle de protection jusqu'à mise en place complète
. La section articulée doit être positionnée comme indiqué : rond
et en D .
4 Introduisez l'élément requis.
5 Abaissez la tête du batteur en veillant à ce que le couvercle de
protection suive la forme du bol.
●
Durant le mélange, les ingrédients peuvent être ajoutés directement
dans le bol par la section articulée du couvercle de protection.
●
Il n'est pas nécessaire de retirer le couvercle pour changer les
éléments.
6 Pour retirer le couvercle, levez la tête du batteur et glissez-le vers le
bas.
solutionner les problèmes
11
les accessoires disponibles
Si vous souhaitez acheter un accessoire qui n’a pas été livré avec votre appareil,
contactez votre specialiste conseil
KENWOOD.
accessoire code accessoire
appareil à pâtes plates
A970
accessoires supplémentaires A971 tagliatelle
pour pâtes (non illustrés)
A972 tagliolini
à utiliser avec A970
A973 trenette
A974 spaghetti
appareil à pâtes
A936 livré avec 6 grilles
éminceur/râpe lent
A948 livrée avec 4 cônes
hachoir
A950 livré avec
a grand adaptateur à saucisses
b petit adaptateur à saucisses
c adaptateur à kebbés
moulin à céréales
A941
presse-agrumes A995
mixer 1,2 l acrylique A993A, 1,2 l verre A994A, 1,5 l acier inoxydable A996A
mini cuve A938A livrée avec 3 pots en verre et 3 couvercles de rangement
éminceur/râpe rapide
A998 livré avec 3 grilles
grilles supplémentaires a moulin extra robuste
référence 639021
b grille râpe référence 639150
c coupe frites référence 639083
centrifugeuse A935
appareil à glace CHEF A953, MAJOR A954
éplucheuse CHEF A934, MAJOR A952
passoire et tamis CHEF A992, MAJOR A930
bol rond en kenlyte CHEF 265026, MAJOR 412095
couvercle de protection rond a CHEF & MAJOR 444347
bol en D en kenlyte CHEF 489969
couvercle de protection en D a
CHEF 604349
bols en acier inoxydable polis : CHEF 638821, MAJOR 642779
housse CHEF 533722, MAJOR 606397
12
b
c
a

13
a
a
b
c
a

nettoyage de l’appareil et service après-vente
entretien et nettoyage
●
Eteignez toujours votre appareil et débranchez-le avant de le nettoyer.
●
De petites traces de gras peuvent apparaître sur les orifices et
lorsque vous les utilisez la première fois. Ceci est tout à fait normal et
vous devez simplement les essuyer.
bloc moteur
●
Essuyez avec un chiffon humide, puis séchez.
●
N’utilisez jamais d’abrasifs et n‘immergez jamais dans l’eau.
bols
●
Lavez-les à la main puis séchez soigneusement.
●
Si vous disposez d’un bol en acier inoxydable, n’utilisez jamais
de brosse en acier, de paille de fer ou de détergent. Utilisez
simplement du vinaigre pour enlever le tartre. Les bols en acier
inoxydable sont aussi lavable au lave-vaisselle.
●
Tenez votre ou vos robots de cuisine toujours éloignés des sources de
chaleurs (plaques de cuisson, fours traditionnels, fours à micro-ondes).
accessoires
●
Lavez à la main, puis séchez soigneusement.
●
Une décoloration du batteur en K, du fouet et du crochet à pâte est
susceptible de se produire s'ils sont passés au lave-vaisselle.
couvercle de protection
●
Lavez à la main, puis séchez soigneusement.
service après-vente et assistance clientèle
●
Si le cordon souple de votre robot est endommagé, il faut
impérativement, pour des raisons de sécurité, que celui-ci soit
remplacé par un réparateur agréé
KENWOOD ou par KENWOOD.
Si vous avez besoin d’assistance pour:
●
utiliser votre appareil
●
commander un autre accessoire
●
faire réparer ou entretenir votre appareil:
Contactez le magasin où vous avez acheté votre appareil.
14

recettes
Pour connaître les points importants de la fabrication du pain,
veuillez vous reporter à la page 10.
pain blanc pâte souple type continental
●
2,6kg de farine ordinaire
●
1,3 litre de lait
●
300g de sucre
●
450g de margarine
●
100g de levure fraîche ou 50g de levure sèche
●
6 oeufs, préalablement battus
●
5 pincées de sel
méthode
1 Faites dissoudre la margarine dans le lait et portez la température à 43˚C.
2 levure sèche (à reconstituer) : Ajoutez la levure et le sucre au lait et
laissez reposer pendant environ 10 minutes jusqu’à ce que le mélange
obtenu soit mousseux.
levure fraîche: incorporez à la farine en émiettant et ajoutez le sucre.
autres types de levure : reportez-vous aux instructions du fabricant.
3 Versez le lait dans le bol, ajoutez-y les oeufs battus et 2kg de farine.
4 Mélangez à la vitesse minimale pendant 1 minute puis à la vitesse 1
pendant une minute supplémentaire.
5 Ajoutez le neste de la farine et le stel et mélangez le tout à la vitesse
minimale pendant une minute, puis à la vitesse 1 pendant 2 - 3 minutes
jusqu’à ce le mélange soit homogène et bien mélangé.
6 Remplissez à moitié plusieurs moules de 450g avec la pâte. (Ces
moules doivent être préalablement beurrés) ou bien réalisez des petits
pains avec la pâte. Couvrez ensuite avec un torchon de cuisine et
laissez reposer dans un endroit chaud jusqu’à ce que la pâte ait doublé
de volume.
7
Faites cuire à 200˚C/Thermostat 6 pendant 20 - 25 minutes pour les
miches de pain et 15 minutes pour les petits pains.
8 Lorsque le pain est cuit, il doit sonner creux lorsqu’on le tapote sur la
base.
●
Permet de réaliser environ 10 miches de pain.
gâteau aux fraises et aux abricots
ingrédients: type gâteau de Savoie●3 oeufs
●
75g de sucre en poudre
●
75g de farine
garniture et décoration
●
150ml de crème fraîche épaisse
●
Sucre à volonté
●
225g de fraises
●
225g d’abricots
méthode
1 Coupez les abricots en deux et retirez les noyaux. Faites cuire à petit
feu dans très peu d’eau, en ajoutant du sucre selon votre goût, jusqu’à
ce que le mélange devienne moelleux.
2 Lavez et coupez les fraises en deux.
3 Pour réaliser la génoise du gâteau, fouettez les oeufs et le sucre à la
vitesse maximum jusqu’à ce que le mélange soit de couleur pâle et de
consistance épaisse.
4 Retirez le bol et le fouet. Incorporez la farine à la main à l'aide d'une
grande cuillère métallique – effectuez cette opération avec soin afin de
préserver la légèreté de la génoise.
5 Mettez le mélange ainsi obtenu dans deux moules à manqué de 18cm
préalablement beurrés.
6 Faites cuire à 180˚C/Thermostat 4 pendant environ 20 minutes jusqu’à ce
que le gâteau soit de consistance ferme et élastique lorsque vous le
touchez légèrement.
7 Démoulez le gâteau et laissez-le refroidir sur une grille de cuisson.
8 Fouettez la crème à la vitesse maximale jusqu’à ce qu’elle prenne une
consistance ferme. Ajoutez le sucre selon votre goût.
9 Hachez grossièrement les abricots et un tiers des fraises, puis
incorporez-les lentement dans la moitié de la quantité de crème.
10 Etalez cette préparation entre les deux biscuits.
11 Recouvrez le dessus du gâteau avec la crème restante et décorez avec
les fraises restantes.
15
ingrédients
Ces quantités s’appliquent
aux modèles
KM600, 800.
Pour les modèles
KM300, 400
et 410, 420, réduire
les quantités de moitié et
ajoutez la farine en une fois.

recettes suite
meringues
ingrédients●4 blancs d’oeufs
●
250g de sucre glace, tamisé
méthode
1 Recouvrez votre grille de cuisson avec du papier de cuisson non-
collant.
2 Battez les blancs d’oeufs et le sucre à la vitesse maximum pendant
environ 10 minutes jusqu’à ce que le mélange fasse des petits pics à la
surface lorsque vous en retirez le fouet.
3 Déposez le mélange ainsi obtenu sur la plaque de cuisson (ou utilisez
un sac à douille en étoile de 2,5cm).
4 Faites cuire à 110˚C/Thermostat
1
⁄4 pendant environ 4 - 5 heures jusqu’à
ce que les meringues soient fermes et croustillantes.
Si les meringues commencent à brunir, laissez la porte du four
légèrement entrouverte.
●
Conservez les meringues dans une boîte hermétique.
pâte brisée
ingrédients●450g de farine tamisée avec du sel
●
5ml de sel
●
225g de matière grasse (mélange de lard et de margarine directement
sortis du réfrigérateur)
●
Environ 80ml d’eau (soit l’équivalent de 4 cuillères à soupe)
astuce
●
Ne mélangez pas pendant trop longtemps.
méthode
1 Mettez la farine dans le bol. Découpez la matière grasse que vous
utilisez en morceaux grossiers et ajoutez à la farine.
2
Mélangez à vitesse 1 jusqu'à obtenir l'apparence de miettes de pain.
Arrêtez avant d'obtenir une apparence grasse.
3 Ajoutez l’eau et mélangez à la vitesse minimale. Arrêtez dès que l’eau
est bien incorporée au mélange.
4 Faites cuire à environ 200˚C/Thermostat 6, selon la garniture.
beefburgers
ingrédients●250g de boeuf de premier choix non tendineux
méthode
1 Coupez en petits cubes de 2,5cm.
2 Si vous ne disposez pas d’un hachoir, utilisez votre mixeur en ne
broyant que de petites quantités à la fois. Utilisez la vitesse 2 pendant
15 secondes
maximum. Nettoyez les lames entre deux séries
d’aliments.
3 Mélangez avec l’assaisonnement comme les oignons hachés, le
mélange d’herbes (fraîches ou sèches), le poivre noir grossièrement
moulu et le jus et le zeste d’un citron.
4 Réalisez deux beefburgers et faites griller sur chaleur moyenne à forte
jusqu’à ce que les beefburgers soient bien cuits.
16

seguridad
●
Apague y desenchufe el aparato antes de colocar o quitar
piezas/accesorios, después de usarlo y antes de limpiarlo.
●
Este aparato no está destinado a ser usado por niños pequeños o
personas discapacitadas sin supervisión.
●
Mantenga los dedos lejos de las partes movibles y de los accesorios
fijos.
●
Nunca deje el aparato desatendido mientras esté funcionando y
mantenga a los niños fuera del alcance.
●
Nunca utilice un aparato dañado. Que lo revisen o arreglen: vea
‘servicio’ en la página 22.
●
Nunca utilice un accesorio no autorizado o más de un accesorio al
mismo tiempo.
●
Nunca exceda las capacidades máximas indicadas en la página 18.
●
No permita a los niños jugar con el aparato.
●
Cuando vaya a utilizar un accesorio, lea las instrucciones de seguridad
adjuntas.
●
Este aparato es únicamente para uso doméstico.
antes de enchufarlo
●
Asegúrese de que la corriente eléctrica es la misma que se muestra en
la parte inferior de su aparato.
●
Este aparato cumple con la Directiva de la Comunidad Económica
Europea
89/336/CEE.
antes de usarlo por primera vez
1 Retire todo el embalaje.
2 Lave las partes: ver ‘mantenimiento y limpieza’ en la página 22.
conozca su aparato de cocina Kenwood
salidas de los accesorios salida de alta velocidad
salida para la exprimidora para la exprimidor de jugos cítricos
salida de baja velocidad
enchufe de los utensilios
la mezcladora
cabezal de la mezcladora
colector de salida
bol
palanca para levantar el cabezal
botón de velocidades y de encendido / apagado
unidad de potencia
batidor K
batidora
gancho para amasar
espátula
conozca su aparato de cocina Kenwood
17
Español

los utensilios para mezclar y algunos de sus usos
batidor K●Para hacer tartas, galletas, pastas, garapiñar, rellenos, relámpagos de
chocolate y puré de patata.
batidora
●
Para batir huevos, nata, batidos, bizcochos ligeros, merengues, tartas
de queso, mousses, soufflés. No la utilice para batir masas pesadas
(por ej. montar grasa y azúcar) - podría dañarla.
gancho para amasar
●
Para las mezclas con levadura.
para usar la mezcladora
1 Gire la palanca para levantar el cabezal hacia la izquierda y levante el
cabezal de la mezcladora hasta que se cierre.
Para insertar un instrumento
2 Gire hasta que se pare
, luego empuje.
3 Coloque el bol sobre la base - apriete y gírelo en el sentido de las agujas
del reloj
4 Gire la palanca para levantar el cabezal hacia la izquierda y baje el
cabezal de la mezcladora hasta que se cierre.
5 Elija la velocidad, luego póngala en marcha girando el botón de la
velocidad.
●
Cambie a impulso para ráfagas cortas.
Para quitar un utensilio
6 Desenrosque.
Consejos
●
Apáguela y rasque el bol con la espátula con regularidad.
●
Se baten mejor los huevos a temperatura ambiente.
●
Antes de batir claras de huevo, asegúrese de que no haya grasa o yema
de huevo en la batidora de varillas o en el bol.
●
Utilice ingredientes fríos para las pastas a no ser que su receta indique lo
contrario.
puntos para hacer pan
importante●Nunca exceda la capacidad máxima que se indica abajo-
sobrecargará el aparato.
●
Si le parece que el aparato funciona con dificultad, apáguelo, saque la
mitad de la masa y trátelas por separado.
●
Los ingredientes se mezclan mejor si pone primero el líquido.
capacidad máxima
Modelos KM300, 400, 410 Modelos KM600, 800, 810
pasta quebradiza
●
Peso de la harina: 680g Peso de la harina: 910g
masa con levadura espesa
●
Peso de la harina: 1,36kg Peso de la harina: 1,5kg
tipo británico
●
Peso total: 2,18kg Peso total: 2,4kg
masa con levadura ligera
●
Peso de la harina: 1,3kg Peso de la harina: 2,6kg
tipo continental
●
Peso total: 2,5kg Peso total: 5kg
mezcla para pastel
de frutas
●
Peso total: 2,72kg Peso total: 4,55kg
claras de huevos
●
12 16
velocidades
batidor K●batir manteca y azúcar empiece con min y aumente
gradualmente hasta max.
●
batir huevos en mezclas cremosas 4 – “max”.
●
mezclar harina, frutas, etc. Min – 1.
●
mezclar a la vez todos los ingredientes de un pastel empiece
con velocidad min y aumente gradualmente hasta max.
●
ligar manteca y harina min. – 2
batidora
●
Aumentar gradualmente hasta ‘max’.
gancho para amasar
●
Empezar en ‘min’ y aumentar gradualmente hasta 1.
para
limpieza vea la página 22
P
18
la mezcladora

problema
●
La batidora o el batidor K golpean la parte inferior del bol o no llegan a
los ingredientes del fondo del bol.
solución
●
Ajuste la altura del modo siguiente:
1 Desconéctela de la red.
2 Levante el cabezal de la mezcladora e introduzca el batidor de varillas
o el batidor K.
3 Sujetando el batidor, afloje la tuerca .
4 Baje el cabezal.
5 Ajuste la altura girando el eje. Para unos resultados óptimos, coloque
el batidor de modo que casi toque el fondo del bol
.
6 Levante el cabezal, sujete el batidor y apriete la tuerca.
para acoplar y utilizar la tapa
antisalpicaduras redonda/en forma
de D (si se incluye)
1 Levante el cabezal de la mezcladora hasta que quede bloqueado.
2
Coloque el bol en la base.
3 Coloque bien la tapa antisalpicaduras presionándola . La parte
articulada debe quedar situada según se muestra
(redonda) y
(en forma de D).
4 Introduzca el accesorio pertinente.
5 Baje el cabezal asegurándose de que la tapa antisalpicaduras encaja
en la forma del bol.
●
Mientras se mezcla, se pueden añadir ingredientes directamente al bol
por la parte articulada de la tapa antisalpicaduras.
●
Para cambiar de accesorio no es preciso quitar la tapa.
6 Retire la tapa antisalpicaduras levantando el cabezal y deslizándola
hacia abajo.
posibles problemas
19

los accesorios disponibles
Para comprar un accesorio que no esté incluido en su paquete,
lame al técnico de
KENWOOD.
20
piezas extra código de la pieza extra
para elaborar pasta plana
A970
otras piezas para elaborar A971 tagliatelle
pasta (sin ilustración) para
A972 tagliolini
uso con A970
A973 trenette
A974 spaghetti
para elaborar
A936 con 4 moldes 6
rebanador/troceador
veloci. lenta
A948 con 4 tambores
superpicador
A950 con una
a boquilla ancha para salchichas
b boquilla pequeña para salchichas
c para hacer kebbe
molinillo de grano
A941
exprimidor A995
licuador 1.2 l acrílico A993A, 1.2 l vidrio A994A, 1.5 l acero inoxidable A996A
multimolinillo A938A con 3 recipientes de vidrio y 3 tapas para guardar
rebanador/troceador
gran veloci.
A998 con 3 placas cortantes
placas optativas a troceador extra grueso,
número de pieza 639021
b placa de rallar, número de pieza 639150
c para cortar patatas fritas, número de pieza 639083
extractor continuo de
zumo
A935
heladora CHEF A953, MAJOR A954
pelapatatas CHEF A934, MAJOR A952
colador y escurridor CHEF A992, MAJOR A930
cuenco redondo kenlyte CHEF 265026, MAJOR 412095
antisalpicaduras redondo a CHEF & MAJOR 444347
cuenco con forma -D kenlyte CHEF 489969
antisalpicaduras con forma -D a
CHEF 604349
cuencos de acero
inoxidable
brillante: CHEF 638821, MAJOR 642779
tapa CHEF 533722, MAJOR 606397
b
c
a

21
a
a
b
c
a

limpieza y servicio
mantenimiento y limpieza
●
Apague y desenchúfela siempre antes de limpiar.
●
Puede que haya un poco de grasa en las salidas y cuando las
utilice por primera vez. Esto es normal. Páseles un paño.
unidad de potencia
●
Pase un trapo húmedo, luego séquela.
●
Nunca utilice productos abrasivos o la sumerja en agua.
boles
●
Lávelos a mano, luego séquelos bien.
●
Si tiene un bol de acero inoxidable, no utilice nunca un cepillo de
alambre, nanas o lejía. Use vinagre para limpiar la cal. El cuenco
de acero inoxidable se puede limpiar también en lavavajillas.
●
Manténgalos lejos del calor (cocinas, hornos, microondas).
utensilios
●
Lávelos a mano, luego séquelos bien.
●
Si se ponen en el lavavajillas, el batidor en forma de K, el batidor de
varillas y el gancho de amasar pueden descolorirse.
tapa antisalpicaduras
●
Lávela a mano y séquela bien.
servicio y atención al cliente
●
Si el cable de alimentación eléctrica del aparato está dañado, por
razones de seguridad debe ser sustituido por el fabricante o un
técnico autorizado de
KENWOOD.
Si necesita ayuda sobre:
●
el uso del aparato
●
el pedido de otro accesorio
●
servicio o asistencia técnica
Contacte con la tienda donde compró su aparato.
22

recetas
Vea los puntos importantes para hacer pan de la página 18
pan blanco masa blanda al estilo continental
ingrediente
●
2,6kg de harina normal
●
1,3 l de leche
●
300g de azúcar
●
450g de margarina
●
100g de levadura fresca o 50g de levadura seca
●
6 huevos batidos
●
5 pellizcos de sal
preparaciòn
1
Derrita la margarina en la leche y caliéntelo hasta 43˚C.
2 Levadura seca (de la clase que necesita reconstitución): añada la
levadura y el azúcar a la leche y déjelo durante unos 10 minutos hasta
que se haga una espuma.
Levadura fresca: desmenúcela en la harina y añada el azúcar.
Otras clases de levaduras: siga las instrucciones del fabricante.
3 Eche la leche al bol. Añada los huevos batidos y 2kg de harina.
4 Mézclelo a velocidad mínima durante 1 minuto y después a velocidad 1
durante otro minuto más. Junte la masa.
5 Añada la sal y el resto de la harina y mézclela a la velocidad mínima
durante 1 minuto, luego use la velocidad 1 durante otros 2 - 3 minutos
hasta que esté suave y uniforme.
6 Llene por la mitad algunos moldes de 450g untados con grasa con la
masa, o deles la forma de bollos. Luego cúbralos con un paño de
cocina y déjelos en un sitio templado hasta que se doble la cantidad.
7 Métalos en el horno a 200˚C/Marca de gas 6 durante 20 - 25 minutos si
son hogazas y 15 minutos si se trata de bollos.
8
Una vez hechos, deben sonar a hueco cuando se golpeen en la base.
●
Haga unas 10 hogazas.
tarta de fresas y albaricoques
ingrediente: bizcocho●3 huevos
●
75g de azúcar blanquilla
●
75g de harina
relleno y decoración●150ml de nata de montar
●
Azúcar a su gusto
●
225g de fresas
●
225g de albaricoques
preparaciòn
1 Corte los albaricoques por la mitad y quite los huesos. Cocínelos a
fuego lento con muy poca agua, añadiendo azúcar a su gusto, hasta
que estén blandos.
2 Lave y corte las fresas por la mitad.
3 Para hacer el bizcocho, bata los huevos y el azúcar a la velocidad
máxima hasta que pierdan el color y se pongan espesos.
4 Retire el bol y el batidor de varillas. Mezcle la harina a mano con una
cuchara grande de metal (con cuidado para que el bizcocho quede
ligero).
5 Ponga la mezcla en dos moldes de 18cm con papel pastelero untados
con grasa.
6 Métalas al horno a 180˚C/Marca de gas 4 durante 20 minutos hasta que
la tarta se levante un poco por detrás con el contacto ligero.
7 Páselos a una bandeja de rejilla para enfriar.
8 Bata la nata a la velocidad máxima hasta que se monte. Añada el
azúcar a su gusto.
9 Trocee los albaricoques y
1
⁄3 de las fresas. Échelos en la mitad de la
nata.
10 Espárzalo en uno de los bizcochos, luego ponga el otro encima.
11 Esparza el resto de la nata por encima y decórelo con el resto de las
fresas.
23
Esta cantidad es para los
modelos
KM600, 800 y 810.
Para los modelos
KM300, 400
y
410, utilice la mitad de las
medidas y añada toda la
harina al mismo tiempo.

recetas continuación
merengues
ingrediente●4 claras de huevo
●
250g de azúcar glas, colada
preparaciòn 1 Ponga papel pastelero del que no se pega en la bandeja.
2 Bata las claras de los huevos y el azúcar a la velocidad máxima
durante 10 minutos hasta que forme picos.
3 Ponga con una cuchara la mezcla en la bandeja (o utilice una manga
pastelera con una boquilla de 2,5cm.
4 Métalo al horno a 110˚C/Marca de gas
1
⁄4 durante 4 - 5 horas hasta que
se solidifiquen y estén crujientes. Si se empiezan a dorar demasiado,
deje la puerta del horno un poquito abierta.
●
Conserve los merengues en latas de aire comprimido.
pastas quebradizas
ingrediente●450g de harina, colada con sal
●
5ml (1 cuchara) de sal
●
225g de grasa (mezcle manteca de cerdo y margarina recién sacada
del frigorífico)
●
Unos 80ml (4 cucharas) de agua
Consejo●No lo mezcle demasiado
preparaciòn 1 Ponga la harina en el bol. Corte la grasa: en trozos y añádala a la
harina.
2 Mézclelo a velocidad 1 hasta obtener una consistencia parecida a las
migas de pan. Deje de mezclar antes de que quede untuoso.
3 Añada el agua y mézclelo a la velocidad mínima. Pare tan pronto como
el agua se haya ligado.
4 Cocine a unos 200˚C/Marca de gas 6, dependiendo del relleno.
hamburguesas
ingrediente●250g de ternera de primera sin nervios
preparaciòn 1 Córtela en cuadraditos de 2,5cm
2
Si no tiene picadora use la licuadora y pique trocitos pequeños. Use la
velocidad 2 durante 15 segundos
máximo. Limpia alrededor de las
cuchillas entre remesas.
3 Mezcle los condimentos como cebollas troceadas, hierbas (frescas o
secas), pimienta negra molida, y el zumo y la corteza de un limón.
4
Dé la forma de hamburguesas y póngalo al grill con calor de medio a
fuerte hasta que estén cocinadas.
24

segurança
●
Desligue a máquina antes de instalar ou retirar acessórios, após a
utilização ou antes de a limpar.
●
Esta máquina não se destina a ser utilizada por crianças pequenas ou
por pessoas debilitadas sem supervisão.
●
Mantenha os dedos afastados das peças móveis e dos acessórios
montados.
●
Nunca deixe a máquina a funcionar sem supervisão e mantenha as
crianças afastadas da mesma.
●
Nunca utilize uma máquina danificada. Mande-a inspeccionar ou
reparar; consulte a secção ‘Assistência Técnica’ na página 30.
●
Nunca utilize um acessório não autorizado ou mais que um acessório
de cada vez.
●
Nunca exceda as capacidades máximas indicadas na página 26.
●
Não deixe que as crianças brinquem com esta máquina.
●
Ao utilizar um acessório, leia as instruções de segurança que o
acompanham.
●
Utilize a máquina exclusivamente para a preparação doméstica de
alimentos.
antes de ligar à corrente
●
Certifique-se de que a tensão da corrente da sua rede corresponde à
indicada na base da sua máquina.
●
Esta máquina cumpre os requisitos da Directiva
89/336/CEE da
Comunidade Económica Europeia.
antes de utilizar a máquina pela primeira vez
1 Retire todos os materiais de embalagem.
2 Lave as peças: consulte a secção ‘manutenção e limpeza’ na
página 30.
conheça a sua máquina de cozinha Kenwood
tomadas dos acessórios tomada de alta velocidade
tomada do espremedor de citrinos
tomada de baixa velocidade
encaixe de acessórios
a máquina
cabeça da máquina
trinco da tomada de acessórios
tigela
patilha de elevação da cabeça da máquina
interruptor de ligar/desligar e selector de velocidades
bloco do motor
batedor em ‘K’
pinha
gancho para amassar
espátula
conheça a sua máquina de cozinha Kenwood
25
Portugêus

os acessórios de misturar e algumas das suas funções
batedor em ‘K’●para fazer bolos, biscoitos, massas de pastelaria, coberturas para
bolos, recheios, éclairs e puré de batata.
pinha
●
para ovos, natas, massas para fritos, pão-de-ló sem gordura,
merengues, tartes de requeijão, mousses e soufflés. Não utilize a
pinha para preparados pesados (por ex. para bater manteiga com
açúcar) - caso contrário poderá danificá-la.
gancho para massas
●
para massas com fermento.
como utilizar a sua máquina
1 Rode a patilha de elevação da cabeça da máquina para a esquerda
e eleve a cabeça da máquina até esta prender.
para introduzir um acessório
2 Rode até parar e depois empurre.
3 Coloque a tigela na base - pressione-a rodando-a para a direita
4 Rode a patilha de elevação da cabeça da máquina para a esquerda e
baixe a cabeça da máquina até esta prender.
5 Seleccione uma velocidade e depois ligue rodando o selector de
velocidades.
●
Seleccione para impulsos curtos.
para retirar um acessório
6 Desenrosque-o.
sugestões
●
Desligue a máquina e raspe a tigela com a espátula frequentemente.
●
Os ovos à temperatura ambiente são melhores de bater.
●
Antes de bater claras em castelo, certifique-se de que não há gordura ou
gema de ovo na pinha ou na tigela.
●
Utilize ingredientes frios para massas de pastelaria, a não ser que a
receita indique que deve fazer algo diferente.
conselhos para fazer pão
importante●Nunca exceda as capacidades máximas abaixo ou sobrecarregará
a máquina.
●
Se ouvir a máquina a trabalhar com dificuldade, desligue-a, retire metade
da massa e bata cada metade separadamente.
●
Os ingredientes misturarão melhor se introduzir primeiro o líquido.
capacidades máximas
Modelos KM300, 400 e 410 KM600, 800 e 810
massa para tartes
●
Peso de farinha: 680g Peso de farinha: 910g
massa com fermento rija
●
Peso de farinha: 1,36kg Peso de farinha: 1,5kg
tipo britânico
●
Peso total: 2,18kg Peso total: 2,4kg
massa com fermento mole
●
Peso de farinha: 1,3kg Peso de farinha: 2,8kg
tipo continental
●
Peso total: 2,5kg Peso total: 5kg
massa para bolo de frutas
●
Peso total: 2,72kg Peso total: 4,55kg
claras de ovo
●
12 16
velocidades
batedor em ‘K’●bater manteiga e açúcar até estarem cremosos comece no
mínimo e aumente gradualmente até ao máximo.
●
incorporar ovos nas misturas em creme 4 - máximo.
●
envolver farinha, fruta, etc. mínimo - 1.
●
bolos de pacote comece no mínimo e aumente gradualmente até ao
máximo.
●
incorporar manteiga ou margarina em farinha mínimo - 2.
pinha
●
Aumente gradualmente para a velocidade ‘max.’ (máximo).
gancho para massas
●
Comece no ‘min’ (mínimo) e aumente gradualmente para 1.
para
limpeza, veja a pág. 30
P
26
a máquina

problema
●
A pinha ou o batedor em ‘K’ bate contra o fundo da tigela ou não
alcança os ingredientes que se encontram no fundo da tigela.
solução
●
ajuste a altura do acessório. Faça o seguinte:
1 Retire a ficha da tomada.
2 Eleve a cabeça da máquina e introduza o batedor de arames ou
batedor em “K”.
3 Segure no acessório e afrouxe a porca .
4 Baixe a cabeça da máquina.
5 Ajuste a altura do acessório rodando o eixo. Idealmente, o batedor de
arames/batedor em “K” deverá quase tocar o fundo da taça
.
6 Eleve a cabeça da máquina, segure o batedor de arames/batedor em
“K” e aperte a porca.
instalação e utilização do seu
resguardo anti-salpicos redondo/em
“D” (se for fornecido)
1
Eleve a cabeça da máquina até esta prender.
2 Coloque a taça na base.
3 Instale o resguardo anti-salpicos, empurrando-o até estar bem
encaixado
. A secção articulada deve ser posicionada tal como
ilustrado em
para o formato redondo e como ilustrado em para o
formato em “D”.
4
Introduza o acessório pretendido.
5 Baixe a cabeça da máquina, certificando-se de que o formato do
resguardo anti-salpicos acompanha o formato da taça.
●
Durante a mistura, os ingredientes podem ser adicionados
directamente à taça através da secção articulada do resguardo antisalpicos.
●
Não precisa de retirar o resguardo anti-salpicos ao trocar os
acessórios.
6
Retire o resguardo anti-salpicos elevando a cabeça da máquina e
puxando-o levemente para baixo.
resolução de problemas
27

os acessórios disponíveis
Para comprar um acessório não incluído com o seu aparelho, contacte um técnico
autorizado
KENWOOD.
acessório código do acessório
aparelho para massas
direitas
A970
acessórios adicionais para A971 tagliatelle
massas (não ilustrado) utilizado
A972 tagliolini
em conjuntocom o A970
A973 trenette
A974 esparguete
aparelho para massas
A936 traz 6 discos
disco para corte/picado de
baixa velocidade
A948 traz 4 tambores
super picador de carne
A950 traz
a funil de enchidos grande
b funil de enchidos pequeno
c aparelho para kebbe
moinho de cereais
A941
espremedor de citrinos
A995
liquidificador 1.2 l acrílico A993A, 1.2 l vidro A994A, 1.5 l aço inoxidável A996A
moinho de especiarias A938A traz 3 boiões de vidro e 3 tampas para armazenagem
disco para corte/picado de
alta velocidade
A998 traz 3 discos
discos opcionais a para picado extra grosso,
peça nº 639021
b de raspar, peça nº 639150
c para palitos de batata médios, peça nº 639083
centrifugador de sumos A935
sorveteira CHEF A953, MAJOR A954
pelador de batatas CHEF A934, MAJOR A952
coador e passador CHEF A992, MAJOR A930
taça kenlyte redonda CHEF 265026, MAJOR 412095
resguardo anti-salpicos redondo a CHEF e MAJOR 444347
taça kenlyte em “D” CHEF 489969
resguardo anti-salpicos em “D” a
CHEF 604349
taças em aço inoxidável polida: CHEF 638821, MAJOR 642779
capa CHEF 533722, MAJOR 606397
28
b
c
a

29
a
a
b
c
a

limpeza e assistência técnica
manutenção e limpeza
●
Desligue sempre a máquina no interruptor e retire a ficha da tomada
de corrente antes de a limpar.
●
Um pouco de gordura poderá aparecer nas tomadas de
acessórios
e ao utilizá-las pela primeira vez. Isto é normal -
remova simplesmente a gordura com um pano.
bloco do motor
●
Limpe com um pano húmido e depois com um seco.
●
Nunca utilize abrasivos nem mergulhe em água.
tigelas
●
Lave-as à mão e seque-as bem em seguida.
●
Se tiver uma tigela de aço inoxidável, nunca utilize uma escova
de arame, palha de aço ou lixívia. Utilize vinagre para remover
depósitos calcários. A taça em aço inoxidável pode também ser
lavada na máquina de lavar loiça.
●
Mantenha-as afastadas do calor (bicos de fogão, fornos normais e
fornos microondas).
acessórios
●
Lave-os à mão e seque-os bem em seguida.
●
O batedor em “K”, o batedor de arames e o gancho para amassar não
devem ser lavados na máquina de lavar loiça, caso contrário poderão
sofrer descoloração.
resguardo anti-salpicos
●
Lave-o à mão e depois seque-o bem
assistência técnica e atendimento ao cliente
●
Se o fio estiver danificado, deverá, por razões de segurança, ser
substituído pela
KENWOOD ou por um técnico autorizado KENWOOD.
Se necessitar de ajuda em relação ao seguinte:
●
utilização da sua máquina
●
encomenda de outro acessório
●
assistência técnica ou reparações
Contacte o estabelecimento onde adquiriu o seu aparelho.
30

receitas
Consulte os ‘Conselhos para Fazer Pão’ na página 26.
pão branco massa suave do tipo continental
ingredientes
●
2,6kg de farinha branca normal
●
1,3 litros de leite
●
300g de açúcar
●
450g de margarina
●
100g de fermento fresco ou 50g de fermento seco
●
6 ovos, batidos
●
5 pitadas de sal
método
1 Derreta a margarina no leite e eleve a temperatura aos 43˚C.
2 fermento seco (do tipo que necessita de ser reconstituído): adicione o
fermento e o açúcar ao leite e deixe repousar cerca de 10 minutos até
criar espuma.
fermento fresco: desfaça-o e incorpore-o na farinha e adicione o
açúcar.
outros tipos de fermento: siga as instruções do fabricante.
3 Deite o leite na tigela. Adicione os ovos batidos e 2kg de farinha.
4 Bata à velocidade mínima por 1 minuto e depois à velocidade 1 por
mais um minuto. Raspe para baixo.
5 Adicione o sal e a farinha restante e misture à velocidade mínima por 1
minuto e depois à velocidade 1 por 2 - 3 minutos até a massa ficar
suave e homogénea.
6 Unte e encha de massa, até metade, quatro formas de 450g ou prepare
pãezinhos. Seguidamente cubra com um pano de loiça e deixe num
local quente até duplicarem de volume.
7 Coza no forno, à temperatura de 200˚C/400˚F/Gás Marca 6, por 20 - 25
minutos para o pão de forma ou por 15 minutos para os pãezinhos.
8
Quando pronto, o pão deverá soar a oco quando se lhe bater levemente
na base.
●
Quantidade suficiente para cerca de 10 pães de forma.
pão-de-ló recheado com morangos e alperces
ingredientes: pão-de-ló●3 ovos
●
75g de açúcar branco
●
75g de farinha sem fermento
recheio e decoração
●
150ml de natas
●
Açúcar a gosto
●
225g de morangos
●
225g de alperces
método
1 Parta os alperces ao meio e remova os caroços. Coza em fogo lento,
em muito pouca água, adicionando açúcar a gosto, até estarem
macios.
2 Lave e corte ao meio os morangos.
3 Para preparar o pão-de-ló, bata os ovos e açúcar à velocidade máxima
até a massa ficar muito pálida e espessa.
4 Retire a taça e o batedor de arames. Incorpore manualmente a farinha,
com uma colher metálica grande - faça isto cuidadosamente para
manter o pão-de-ló leve.
5 Introduza a mistura em duas formas redondas de 18 cm de diâmetro,
untadas e forradas.
6
Coza no forno, à temperatura de 180˚C/350˚F/Gás Marca 4, por cerca
de 20 minutos, até o bolo estar fofo ao ser tocado ligeiramente.
7 Vire em cima de uma rede de arame.
8 Bata as natas à velocidade máxima até ficarem firmes. Adicione açúcar
a gosto.
9
Corte grosseiramente os alperces e um terço dos morangos. Envolva-os
em metade das natas.
10 Espalhe este recheio sobre uma das metades do pão-de-ló e depois
coloque a outra metade sobre a primeira.
11 Espalhe as natas restantes por cima do bolo e decore-o com os
morangos restantes.
31
Estas quantidades destinam-
se aos modelos KM600, 800 e
810. Para os modelos KM300,
400
e 410, utilize metade das
quantidades e adicione a
farinha toda de uma só vez.

receitas continuação
Merengues
ingredientes●4 claras de ovo
●
250g de açúcar em pó, peneirado
método
1 Forre o seu tabuleiro de ir ao forno com papel vegetal antiaderente.
2 Bata as claras de ovo e o açúcar à velocidade máxima por cerca de
10 minutos até formarem picos.
3 Coloque colheradas de merengue no tabuleiro (ou utilize um saco de
pasteleiro com um bico de 2,5cm em estrela).
4 Coza no forno, à temperatura de 110˚C/225˚F/Gás Marca
1
⁄4, por cerca
de 4 - 5 horas, até estarem firmes e estaladiços. Se começarem a
dourar, deixe a porta do forno ligeiramente aberta.
●
Guarde os merengues numa lata hermética.
massa para tartes
ingredientes●450g de farinha, peneirada com o sal
●
5ml (1 colher de chá) de sal
●
225g de gordura (misture banha e margarina, directamente do
frigorífico)
●
Cerca de 80ml de água
sugestão
●
Não bata excessivamente.
método
1 Coloque a farinha na tigela. Corte grosseiramente a gordura e
adicione-a à farinha.
2 Misture à velocidade 1 até obter a consistência de pão ralado. Pare
antes que a mistura adquira um aspecto gorduroso
3 Adicione a água e misture à velocidade mínima. Pare assim que a
água esteja incorporada.
4
Coza no forno, à temperatura de cerca de 200˚C/400˚F/Gás Marca 6,
dependendo do recheio.
Hamburgers
ingredientes●250g de boa carne de vaca, sem nervos
método
1 Corte-a em cubos de 2,5cm.
2 Se não tiver um picador, utilize o liquidificador e pique pequenas
quantidades de cada vez. Utilize a velocidade 2 por um
máximo de
15 segundos. Limpe em volta das lâminas entre um lote e o seguinte.
3
Misture com temperos, tais como cebola picada, ervas aromáticas
mistas (frescas ou secas), pimenta preta grossa e sumo e raspas de
um limão.
4 Enforme dois hamburgers e grelhe-os com calor entre médio a alto até
estarem bem cozinhados.
32

«∞Lu«: «ôßHMπW
«∞∫Au Ë«∞∑e¥Os
«∞Dd¥IW
«∞Lu«œ
«∞Dd¥IW
«∞Lu«œ
±ö•EW ±HOb…
«∞Dd¥IW
«∞Lu«œ
«∞Dd¥IW
ØU¢u «∞Hd«Ë∞W Ë«∞LALg
3 °OCU‹
57 §r (3 «Ë≤BW) ßJd «∞JUß∑d
57 §r ( 3 «Ë≤BW) œÆOo ´UœÍ
051 ±q (52.0 °U¥MX) Ød¥r ±eœËÃ
ßJd •ºV «∞cË‚
522 §r (8 «Ë≤BW) ≠d«Ë∞W
522 §r ( 8 «Ë≤BW) ±ALg
¥IDl «∞LALg «∞v ≤BHOs Ë¢e«‰ «∞∂c˸. ¢D∂a °d≠o °IKOq §b« ±s «∞LU¡, ±l «{U≠W «∞ºJd
•ºV «∞cË‚, «∞v «Ê ¥B∂` ©d¥U.
¢Gºq «∞Hd«Ë∞W Ë¢IDl «∞v «≤BU·.
∞FLq «ôßHMπW, ¥ªHo «∞∂Oi Ë«∞ºJd ´Kv «∞ºd´W «∞IBuÈ «∞v «Ê ¢B∂` «∞Lu«œ ®U•∂W §b«
Ë£ªOMW «∞Iu«Â.
¥e«‰ «∞u´U¡ Ë«∞LªHIW. ¥b±Z «∞bÆOo °U∞Ob °Uß∑FLU‰ ±KFIW ±Fb≤OW Ø∂Od… - ¥MHc ≥c« °Jq ´MU¥W
ô°IU¡ «ôßHMπW îHOHW.
¥u{l «∞Le¥Z ≠w 2 Ë´U¡ ßU≤bË¥∑g ±Fb≤w ±e¥X ˱∂Ds, ÆOU” 81 ßr (7 °uÅW).
¥ª∂e «∞Le¥Z °b¸§W •d«¸… 081 / 053· / ´ö±W «∞GU“4 ∞Lb… 02 œÆOIW ¢Id¥∂U «∞v «Ê ¥d¢b
«∞JOp ±d≤U ´Mb ∞Lºt °d≠o.
¢IKV ´Kv ¸· ßKJw.
¥ªHo «∞Jd¥r ´Kv «∞ºd´W «∞IBuÈ «∞v «Ê ¥B∂` Ø∏OHU. ¥CU· «∞ºJd •ºV «∞cË‚.
¥IDl ÆKOö «∞LALg Ë£KY ØLOW «∞Hd«Ë∞W . Ë¢b±Z ≠w ≤Bn «∞Jd¥r.
¥MAd ≥c« ´Kv Ë«•b… ±s «∞LUœ… «ôßHMπOW, £r ¢u{l «ôßHMπW «ôîdÈ ≠u‚ «ôË∞v.
¥MAd «∞Jd¥r «∞L∑∂Iw ´Mb «ô´Kv Ë¥e¥Òs °U∞Hd«Ë∞W «∞L∑∂IOW.
«∞Ld≤m
4 °OCU‹
052 §r (9 «Ë≤BW) ßJd £Kπw, ±Mªu‰
¢∂Ds ÅOMOW «∞ª∂e °u¸‚ ≠dÊ ±CUœ ∞ö∞∑BU‚.
¥ªHo °OU÷ «∞∂Oi Ë«∞ºJd ´Kv «∞ºd´W «∞IBuÈ ∞∫u«∞w 01 œÆUzo •∑v ¢∑JuÊ Ø∑q ±d¢HFW.
¥MIq «∞Le¥Z, °Uß∑FLU‰ ±KFIW, «∞v ÅOMOW «∞ª∂e («Ë ¥º∑FLq ØOf «≤∂u°w –Ë ≠u≥W ≤πLOW
ÆOU” 5.2ßr (1 °uÅW)).
¥ª∂e «∞Le¥Z °b¸§W •d«¸… 011 / 522· / ´ö±W «∞GU“ - ∞∫u«∞w 4-5 ßU´U‹ «∞v ¥B∂`
±J∑Me« Ë≥AU. «–« «îc‹ «∞Lu«œ °Uô•Ld«¸ ¥∑d„ °U» «∞HdÊ ±H∑u•U °Hd§W ÅGOd….
¥ªeÊ «∞Ld≤m ≠w ´K∂W ±Fb≤OW ±U≤FW ∞bîu‰ «∞Nu«¡.
«∞LFπMU‹ ¸ÆOIW «∞IAd…
054 (1 °UË≤b) œÆOo, ±Mªu‰ ±l «∞LK`
5 ±q (±KFIW ®UÍ) ±K`
522 §r (8 «Ë≤BW) ßLs (¥Leà «∞A∫r Ë«∞Ld§d¥s ±∂U®d… ±s «∞∂d«œ)
•u«∞w 08 ±q (4 ±KFIW ©FUÂ) ±U¡
ô ¢Hd◊ °U∞LeÃ
{l «∞bÆOo ≠w «∞u´U¡. ¥IDl «∞ºLs Ë¥CU· «∞v «∞bÆOo.
«±eà ´Kv «∞ºd´W 1 •∑v ¥B∂` «∞Le¥Z °NOµW غd î∂e. «ËÆn «∞Leà Æ∂q «Ê ¢∂bË «∞Lu«œ
œ≥MOW «∞Iu«Â.
«{n «∞LU¡ Ë«±eà ´Kv «∞ºd´W «∞IBuÈ. «ËÆn «∞∑AGOq •U∞LU ¥∑r œ±Z «∞LU¡.
«î∂e ´Kv œ¸§W •d«¸… •u«∞w 002 / 004· / ´ö±W «∞GU“ 6, «´∑LUœ« ´Kv ≤uŸ «∞∫Au.
°d§d «∞∂Id
052 §r (9 «Ë≤BW) ∞∫r °Id °bËÊ «´BU» ±s «∞MuŸ «∞πOb
¥IDl «∞K∫r «∞v ±JF∂U‹ ÆOU” 5.2ßr (1 °uÅW).
«–« ∞r ¢∑u≠d ∞b¥Jr ±Hd±W, ¥º∑FLq §NU“ «∞∑ºOOq ∞Hd ØLOU‹ ÆKOKW ±s «∞K∫r ≠w Øq œ≠FW.
¢º∑FLq «∞ºd´W 2 ∞Lb… 51 £U≤OW •b «ÆBv. ¢MEn «∞LMDIW •u‰ «∞ºJOs °Os œ≠FW Ë«îdÈ.
¥Leà ±l ±u«œ «∞∑∑∂Oq ±∏q «∞∂Bq «∞LIDl, «ô´AU» «∞LLe˧W («∞DU“§W «Ë «∞πU≠W), ≠KHq
«ßuœ îAs, Ë´BOd Ë∞V ∞OLu≤W.
¥AJq «∞Le¥Z °NOµW 2 °d§d °Id Ë¥AuÈ ´Kv •d«¸… ±∑ußDW «∞v ±d¢HFW «∞v «Ê ¥MCZ ¢LU±U.
©d‚ «∞DNw ¢∑LW
●
●
●
●
●
●
●
1
2
3
4
5
6
7
8
9
10
11
●
●
1
2
3
4
●
●
●
●
●
●
1
2
3
4
●
1
2
3
4
40

«∞Lu«œ
«Ê ≥cÁ «∞JLOU‹ ≥w ∞KDd«“«‹ Øw «Â
006 Ë 008 Ë018. °U∞Mº∂W ∞KDd«“«‹
Øw «Â 003 Ë004 Ë014 ¢º∑FLq ≤Bn
«∞JLOW Ë¥CU· «∞bÆOo œ≠FW Ë«•b….
©d‚ «∞DNw, ¢U°l
«∞Dd¥IW
©d‚ «∞DNw
«≤Ed «±u¸ ≥U±W ¢∑FKo °FLq «∞ª∂e ≠w «∞BH∫W 34.
●
●
●
●
●
●
●
1
2
3
4
5
6
7
8
●
39
´πOs î∂e «°Oi ©dÍ ±s «∞MuŸ Øu≤∑OMM∑U‰
6.2 Øπr (5 °UË≤b Ë 21 «Ë≤BW) œÆOo ´UœÍ
3.1 ∞∑d ( 52.2 °U¥MX) •KOV
003 §r ( 01 «Ë≤BW) ßJd
054 §r (1 °UË≤b) ±d¨d¥s
001 §r (4 «Ë≤BW) îLOd… ©U“§W «Ë 05 §r (2 «Ë≤BW) îLOd… §U≠W
6 °OCU‹, ±ªHuÆW
5 Æ∂BW ±K`
¥cËÒ» «∞Ld¨d¥s ≠w «∞∫KOV Ë¥πFq °b¸§W •d«¸… 34 (011·).
«∞ªLOd… «∞πU≠W («∞MuŸ «∞cÍ ¥Ke ∞t «´b«œ): «ßJV «∞LU¡ «∞b«≠T ≠w «∞u´U¡. £r «{n
«∞ªLOd… Ë«∞ºJd Ë«¢dØt ¥º∑Id ∞∫u«∞w 01 œÆUzo «∞v «Ê ¥B∂` ±e°b«.
«∞ªLOd… «∞DU“§W: ¢b±Z ≠w «∞bÆOo.
«≤u«Ÿ «∞ªLOd… «ôîdÈ: «¢∂l ¢FKOLU‹ «∞LM∑Z.
¥ºJV «∞∫KOV ≠w «∞u´U¡. ¥CU· «∞∂Oi «∞LªHu‚ Ë 2 Øπr (4 °UË≤b Ë 6 «Ë≤BW) ±s «∞bÆOo.
¢Leà «∞Lu«œ ´Kv «∞ºd´W «∞b≤OU ∞Lb… œÆOIW Ë«•b…, £r ´Kv «∞ºd´W 1 ∞Lb… œÆOIW «îdÈ. ¢IAj
«∞Lu«œ ∞ößHq.
¥CU· «∞bÆOo «∞L∑∂Iw Ë¢Leà «∞Lu«œ ´Kv «∞ºd´W «∞b≤OU ∞Lb… œÆOIW Ë«•b… £r ´Kv «∞ºd´W 1
∞Lb… 2-3 œÆUzo, •∑v ¥B∂` «∞FπOs ßKºU ˱∑πU≤ºU.
«±ú «∞v «∞LM∑Bn, «Ë´OW ±Fb≤OW ±e¥∑W ßFW 054 §r (1 °UË≤b) °U∞FπOs «Ë ®Jq «∞FπOs ´Kv
≥OµW ∞HUzn. £r ¨DNU °LMAHW Ë«¢dØNU ≠w ±JUÊ œ«≠T «∞v «Ê ¥∑CU´n •πLNU.
¥ª∂e «∞FπOs °b¸§W •d«¸… 002Â/004·/ ´ö±W «∞GU“6 ∞Lb… 02-52 œÆOIW ∞ö¸¨HW «∞J∂Od…
«Ë 51 œÆOIW ∞KHUzn.
´Mb±U ¥JuÊ «∞ª∂e §U≥e« ¥πV «Ê ¥Bb¸ ±Mt Åu‹ ËØQ≤t ±πu· ´Mb ≤IdÁ ´Kv «∞IU´b….
●
¢JHw ∞FLq •u«∞w 01 «¸¨HW.

«∞∑MEOn Ë«∞ªb±W
38
Ë•b… «∞DUÆW, «¨DOW «∞LMU≠c
«ôË´OW
«∞Fbœ
Ë«ÆOW «∞∑MU£d
●
●
●
●
●
●
●
●
●
●
●
●
●
«∞FMU¥W Ë«∞∑MEOn
œ«zLU «ËÆn «∞∑AGOq Ë«≠Bq ±s «∞JNd°U¡ Æ∂q «∞∑MEOn.
Æb ¥ENd ÆKOq ±s «∞A∫r ´Mb «∞LMHc¥s Ë ´Mb±U ¥º∑FLq ∞KLd… «ôË∞v. ≥c« «±d
«´∑OUœÍ - ±πdœ ¥Lº` ∞Jw ¥e«‰.
¢Lº` °IDFW ÆLU‘ ¸©∂W, £r ¢πHn.
«°b« ô ¢º∑FLq ±u«œ ¢MEOn •UØW Ëô ¢GLd≥U °U∞LU¡.
¢Gºq °U∞Ob £r ¢πHn §Ob«.
«–« ØUÊ ∞b¥Jr Ë´U¡ ±s ≠uô– ô¥Bb√, «°b« ô ¢º∑FLq ≠d®U… ßKJOW «Ë Åu· ≠uô–Í «Ë
±u«œ ÆUÅd… ∞∑MEOHt. «ß∑FLq «∞ªq ô“«∞W «∞∑dß∂U‹ «∞JKºOW. ¥LJs «¥CU ¨ºq «∞u´U¡
«∞LBMuŸ ±s ≠uô– ô ¥Bb√ ≠w ¨ºU∞W «∞B∫uÊ.
«°It °FOb« ´s «∞∫d«¸… (±u«Æb «∞D∂UŒ, «ô≠d«Ê, «≠d«Ê «∞LOJdËË¥n).
¢Gºq °U∞Ob £r ¢πHn §Ob«.
Æb ¥∑Q£d ∞uÊ «∞LªHIW Ë«œ«… «∞ªHo ËîDU· «∞FπOs «–« Ë{FX ≠w ¨ºU∞W Å∫uÊ.
¢Gºq °U∞Ob £r ¢πHn ¢LU±U.
«∞ªb±W ˸´U¥W «∞e°Uzs
«–« ¢Cd¸ ßKp «∞JNd°U¡ ≠OπV, ôß∂U» ¢∑FKo °U∞ºö±W, «ß∑∂b«∞t ±s Æ∂q ØOMuËœ «Ë §NW
¢BKO` ±ªu∞W ±s Æ∂q ØOMuËœ.
«–« «•∑π∑r «∞v ±ºU´b… °AQÊ:
«ß∑FLU‰ «∞LJMW
«∞ªb±W «Ë «∞∑BKO`
«∞d§U¡ «ô¢BU‰ °U∞L∑πd «∞cÍ «®∑d¥∑r ±Mt «∞LJMW.

b
c
a
¸Ær «∞IDFW «∞LK∫IW
079A
elletailgat 179A
iniloilgat 279A
ettenert 397A
ittehgaps 479A
639A
¢Q¢w ±l 6 ®∂JU‹
849A ¢Q¢w ±l 4 «ßDu«≤U‹
059A ¢Q¢w ±l:
≠u≥W ßπo Ø∂Od…
≠u≥W ßπo ÅGOd…
«œ«… ´Lq «∞J∂W
149A
599A
«Ød¥Kp 2.1 ∞∑d A399A, “§Uà 2.1 ∞∑d A499A, ≠uô– ô ¥Bb√ 5.1 ∞∑d A699A
A839A-8
¢Q¢w ±l 3 «Ë´OW “§U§OW Ë 3 «¨DOW ∞K∑ªe¥s.
899A -9 ±A∑LKW ´Kv 3 ÅHUz` ¢IDOl
«œ«… ¢IDOl îAs §b«, ÆDFW ¸Ær 120936
ÅHO∫W ÆAj, ÆDFW ¸Ær 051936
«œ«… ¢IDOl ÆOUßOW, ÆDFW ¸Ær 380936
539A-01
¢AOn 359A, ±Oπu¸ 459A
¢AOn 439A, ±Oπu¸ 259A
¢AOn 299A, ±Oπu¸ 039A
¢AOn 620562, ±Oπu¸ 590214
¢AOn ˱Oπu¸ 743444
¢AOn 969984
¢AOn 943406
±BIu‰: ¢AOn 128836, ±Oπu¸ 977246
¢AOn 227335, ±Oπu¸ 793606
«ßr «∞IDFW «∞LK∫IW
«œ«… ´Lq «∞∂Uß∑U «∞LM∂ºDW
ÆDl ±K∫IW «{U≠OW ∞FLq «∞∂Uß∑U (¨Od ±∂OMW)
Ë¢º∑FLq ±l 079A
«œ«… ´Lq «∞∂Uß∑U
«œ«… ´Lq ®d«z`/¢IDOl ±MªHCW «∞ºd´W
±Hd±W ßu°d
±D∫MW •∂u»
±J∂f •LCOU‹
§NU“ ¢ºOOq
±D∫MW ±∑Fbœ…
«œ«… ´Lq ®d«z`/¢IDOl ±d¢HFW «∞ºd´W
ÅHUz` «î∑OU¸¥W
§NU“ «ß∑ªö’ «∞FBOd °AJq ±∑u«Åq
§NU“ ÅMl «∞∂u™W
ÆAU¸… °DU©f
±BHU… ˱Mªq
Ë´U¡ œ«zdÍ ØMö¥X (etylnek)
Ë«ÆOW ¢MU£d œ«zd¥W
Ë´U¡ ØMö¥X ´Kv ®Jq D
Ë«ÆOW ¢MU£d ´Kv ®Jq D
«Ë´OW ±s ≠uô– ô ¥Bb√
¨DU¡
a
b
c
a
b
c
a
a
«∞LK∫IU‹ «∞L∑u≠d…
∞Ad«¡ ÆDFW ±K∫IW ¨Od ±u§uœ… ∞b¥p, «¢Bq °πNW ¢BKO` ØOMuËœ.
37

a
a
b
c
a
36

¢∫dÍ «∞ªKq Ë«Åö•t
«∞∫q
●
●
1
2
3
4
5
6
1
2
3
4
5
●
●
6
«∞LAJKW
«∞LªHIW «Ë «∞LªHIW «∞∑w °AJq K ¢d¢Dr °IFd «∞u´U¡ «Ë «≤NU ô ¢Bq «∞v «∞Lu«œ «∞Lu§uœ…
≠w «ßHq «∞u´U¡.
´bÒ‰ «ô¸¢HUŸ. ØLU ¥Kw:
«≠Bq «∞πNU“ ±s «∞JNd°U¡.
«¸≠l ¸√” «∞ªö©W Ë«œîq «∞LªHIW «Ë «œ«… «∞ªHo.
«±ºJNU, £r «¸Œ «∞BLu∞W .
«îHi ¸√” «∞ªö©W.
´bÒ‰ «ô¸¢HUŸ °∂d «∞FLuœ. ≠w «∞u{FOW «∞L∏U∞OW, ¢JUœ «∞LªHIW «Ê ¢∑ö±f ±l ÆFd «∞u´U¡ .
«¸≠l «∞d√”, «±ºp «∞LªHIW Ë®b «∞BLu∞W.
∞∑dØOV Ë«ß∑FLU‰ Ë«ÆOW «∞∑MU£d/ Ë«ÆOW «∞∑MU£d
°AJq
D («–« ¢r ¢eË¥b≥U)
«¸≠l ¸√” «∞ªö©W •∑v ¥IHq.
¸ØV «∞u´U¡ ´Kv «∞IU´b….
«œ≠l Ë«ÆOW «∞∑MU£d •∑v ¢πKf ¢LU±U ≠w ±∫KNU . «Ê «∞πe¡ «∞LHBKw ¥πV «Ê ¥dØV ØLU
≥u ±∂Os Ê Ë«∞u«ÆOW °AJq D, .
«œîq «ôœ«… «∞LDKu°W.
«îHi ¸√” «∞ªö©W.
¥LJs, «£MU¡ ´LKOW «∞LeÃ, «{U≠W «∞Lu«œ ±∂U®d… ≠w «∞u´U¡ ´∂d «∞πe¡ «∞LHBKw ±s Ë«ÆOW
«∞∑MU£d.
ô ¥Ke «“«∞W Ë«ÆOW «∞∑MU£d ô§q ¢∂b¥q «∞Fbœ.
«“‰ Ë«ÆOW «∞∑MU£d °d≠l ¸√” «∞ªö©W Ëœ≠FNU «∞v «ôßHq.
35

«∞LªHIW °AJq K
«∞LªHIW
îDU· «∞FπOs
ôœîU‰ «œ«… ±U
ô“«∞W ´b… ±U
±ö•EU‹ ±HOb…
±ö•EW ≥U±W
±FπMU‹ ¸ÆOIW «∞IAd…
´πOMW îLOd… ÆUßOW
«∞MuŸ «∞∂d¥DU≤w
´πOMW îLOd… ©d¥W
≤uŸ Øu≤∑OMM∑U‰
±e¥Z ØOp «∞HUØNW
°OU÷ «∞∂Oi
«∞LªHIW ´Kv ®Jq K
«∞ªHo
îDU· «∞FπOs
«∞ªö©W
●
●
●
1
2
3
4
5
●
6
●
●
●
●
●
●
●
●
●
●
●
●
●
●
●
●
●
●
●
●
●
34
´bœ («œË«‹) «∞ªKj («∞LeÃ) Ë°Fi ±s «ß∑FLUô¢NU
∞FLq «∞JOp Ë«∞∂ºJu¥X Ë«∞LFπMU‹ Ë«∞GDU¡ «∞πKObÍ Ë«≤u«Ÿ «∞∫Au Ë«ÅU°l «∞∫KuÈ
Ë«∞∂DU©f «∞LNdËßW.
∞K∂Oi Ë«∞Jd¥r Ë«∞LªOi Ë«∞∫KuÈ «ôßHMπOW ´b¥LW «∞bßr Ë«∞Ld≤m ËØFp «∞π∂MW Ë«∞LußOW
Ë«∞MHOªW. ô ¢º∑FLq «∞LªHIW ô≤u«Ÿ «∞Le¥Z «∞∏IOKW (±∏q ´Lq Ød¥r «∞ºLs Ë«∞ºJd) - ≠Ib
¢K∫o «∞Cd¸ °NU.
_±e§W «∞ªLOd….
ôß∑FLU‰ «∞ªö©W
«°d ´∑KW ¸≠l «∞d√” °U¢πUÁ •dØW «∞ºU´W Ë«¸≠l ¸√” «∞ªö©W •∑v ¥IHq.
«°d «∞v «Ê ¢∑uÆn £r «œ≠l.
¸ØV «∞u´U¡ ´Kv «∞IU´b… - «{GDt ∞ößHq £r «°d °U¢πUÁ •dØW «∞ºU´W .
∞ªHi ¸√” «∞ªö©W, «¸≠Ft ÆKOö, £r «°d ´∑KW ¸≠l «∞d√” °U¢πUÁ •dØW «∞ºU´W. «îHCt
•∑v ¥IHq.
«≤∑o ßd´W ±U, £r ®Gq «∞πNU“ °∂d ±H∑UÕ «∞ºd´W.
{l «∞LH∑UÕ ´Kv ±u{l «∞∑AGOq ´Kv œ≠FU‹ ∞K∑AGOq ´Kv œ≠FU‹ ÆBOd….
≠JNU.
«ËÆn «∞∑AGOq Ë«ÆAj «∞Lu«œ ¢Jd«¸« ±º∑FLö «∞LIADW.
«Ê «∞∂Oi «∞cÍ ≥u °b¸§W •d«¸… «∞Gd≠W ≥u «ô≠Cq ∞KªHo.
Æ∂q îHo °OU÷ «∞∂Oi, ¢QØb ±s ´b ˧uœ ®∫r «Ë ÅHU¸ °Oi ´Kv «∞LªHIW «Ë ≠w «∞u´U¡.
«ß∑FLq ±u«œ« °U¸œ… ∞KLFπMU‹ ±U ∞r ¢b´u ©d¥IW «∞FLq «∞v îö· –∞p.
«±u¸ ¢∑FKo °FLq «∞ª∂e
«°b« ô ¢∑πUË“ «∞JLOU‹ «∞IBuÈ «∞LcØu¸… «œ≤UÁ - ≠Ib ¢∫Lq «∞LJMW «Ø∏d ±s ©UÆ∑NU.
«–« ßLFX «∞LJMW ¢∫Uˉ «∞FLq °BFu°W, «ËÆn «∞∑AGOq Ë«îdà ≤Bn «∞FπOs Ë≤Hc «∞FLq
´Kv œ≠F∑Os ±MHBK∑Os.
¢Leà «∞Lu«œ ´Kv «≠Cq ˧t «–« Ë{l «∞ºUzq «Ëô.
«∞JLOU‹ «∞IBuÈ
¢AOn ±Oπu¸
Ë“Ê «∞bÆOo: 086 §r - °UË≤b Ë8 «Ë≤BW Ë“Ê «∞bÆOo: 019 §r - 2 °UË≤b
Ë“Ê «∞bÆOo: 63.1 Øπr - 3 °UË≤b Ë“Ê «∞bÆOo: 5.1 Øπr - 3 °UË≤b Ë 5 «Ë≤BW
«∞u“Ê «∞JKw: 81.2 Øπr - 4 °UË≤b Ë 31 «Ë≤BW «∞u“Ê «∞JKw: 4.2 Øπr - 5 °UË≤b Ë 5 «Ë≤BW
Ë“Ê «∞bÆOo: 3.1 Øπr - 2 °UË≤b Ë 41 «Ë≤BW Ë“Ê «∞bÆOo: 6.2 Øπr - 5 °UË≤b Ë 21 «Ë≤BW
«∞u“Ê «∞JKw: 5.2 Øπr - 5 °UË≤b Ë 8 «Ë≤BW «∞u“Ê «∞JKw: 5 Øπr - 11 °UË≤b
«∞u“Ê «∞JKw: 27.2 Øπr - 6 °UË≤b «∞u“Ê «∞JKw: 55.4 Øπr - 01 °UË≤b
21 61
±H∑UÕ «∞ºd´W
∞FLq Ød¥r «∞ºLs Ë«∞ºJd, «°b√ ´Kv «∞ºd´W «∞b≤OU "nim", £r «¸≠l «∞ºd´W ¢b¸¥πOU «∞v
«∞b¸§W «∞IBuÈ "
xam".
îHo «∞∂Oi ∞OB∂` ±e¥Z Ød¥Lw «∞Iu«Â 4- «∞∫b «ôÆBv.
«∞b±Z ≠w «∞bÆOo, «∞HUØNW «∞a «∞∫b «ôœ≤v- 1.
«≤u«Ÿ «∞JOp, «°b« °U∞ºd´W «∞b≤OU £r ¸≠FNU ¢b¸¥πOU «∞v «∞ºd´W «∞IBuÈ.
œ±Z «∞ºLs ≠w «∞bÆOo «∞ºd´W «∞b≤OU-2.
¢e«œ «∞ºd´W ¢b¸¥πOU «∞v «∞∫b «ôÆBv.
«°b√ °U∞ºd´W «∞b≤OU Ë«¸≠FNU ¢b¸¥πOU «∞v 1.
P

«∞ºö±W
«ËÆn «∞∑AGOq Ë«≠Bq «∞πNU“ ±s «∞JNd°U¡ Æ∂q ¢dØOV «Ë «“«∞W «∞Fbœ/«∞LK∫IU‹ Ë°Fb
«ôß∑FLU‰ ËÆ∂q «∞∑MEOn.
«Ê ≥cÁ «∞LJMW ∞OºX ±BLLW ∞öß∑FLU‰ ±s Æ∂q «ô©HU‰ «Ë «ô®ªU’ «∞u«≥MOs °bËÊ ±d«Æ∂W.
«°o «ÅU°Fp °FOb« ´s «ô§e«¡ «∞L∑∫dØW Ë«∞LK∫IU‹ «∞LdØ∂W.
«°b« ô ¢∑d„ «∞LJMW ±A∑GKW °bËÊ «®d«·.
«°b« ô ¢º∑FLq ±JMW ±∑Cd¸…. °q ¥πV «∞JAn ´KONU «Ë ¢BKO∫NU: «≤Ed "«∞ªb±W", ÅH∫W
38.
«°b« ô ¢º∑FLq ÆDFW ±K∫IU‹ ¨Od ±ªu‰ «ß∑FLU∞NU «Ë «Ø∏d ±s ÆDFW ±K∫IW Ë«•b… ≠w –«‹
«∞uÆX.
«°b« ô ¢∑πUË“ «∞JLOU‹ «∞IBuÈ «∞LcØu¸… ´Kv «∞BH∫W 34.
ô ¢ºL` ∞ö©HU‰ °U∞KFV °NcÁ «∞LJMW.
´Mb «ß∑FLU‰ ÆDFW ±K∫IW ±U, «Æd√ ¢FKOLU‹ «∞ºö±W «∞u«¸œ… ±FNU.
«ß∑FLq ≥cÁ «∞LJMW ∞Gd÷ «´b«œ «∞DFU ∞ö¨d«÷ «∞LMe∞OW ≠Ij.
Æ∂q «∞∑uÅOq °U∞JNd°U¡
¢QØb ±s «Ê «∞JNd°U¡ «∞L∑u≠d… ∞b¥Jr ≥w –«‹ «∞MuŸ «∞LcØu¸ ´Kv «∞πNW «∞∑∫∑OW ±s «∞LJMW.
«Ê «ôßö„ «∞Lu§uœ… ≠w ØU°q «∞JNd°U¡ ±Ku≤W ØLU ¥Kw:
«“¸‚ = ±∑FUœ‰, °Mw = •w.
¢∑DU°o ≥cÁ «∞LJMW ±l ¢u§Ot «∞LπLu´W «ôÆ∑BUœ¥W «ô˸˰OW ¸Ær CEE/633/98.
Æ∂q «ôß∑FLU‰ ∞KLd… «ôË∞v
¢e«‰ §LOl ±u«œ «∞∑GKOn.
¢Gºq «ô§e«¡: «≤Ed "«∞FMU¥W Ë«∞∑MEOn", «∞BH∫W 38.
¢Fd≠u« ´Kv ±JMW «∞LD∂a ØOMuËœ
±MHc «∞ºd´W «∞Ld¢HFW
±MHc ´BÒd… «∞∫LCOU‹
±MHc «∞ºd´W «∞LMªHCW
±I∂f «∞Fbœ
¸√” «∞ªö©W
±Ußp «∞LMHc
Ë´U¡
´∑KW ¸≠l «∞d√”
±H∑UÕ «∞∑AGOq/«ô¥IU· Ë«∞ºd´W
Ë•b… «∞DUÆW
±ªHIW °AJq K
±ªHIW
îDU· «∞FπOs
±IADW
¢Fd≠u« ´Kv ±JMW «∞LD∂a ØOMuËœ
●
●
●
●
●
●
●
●
●
●
●
●
●
1
2
33
±ö•EW ≥U±W - «∞LLKJW «∞L∑∫b… ≠Ij
«∞ªö©W
±MU≠c «∞LK∫IU‹
´d°w

KW88762/2
Kenwood Limited, New Lane, Havant, Hampshire PO9 2NH, UK
www.kenwood.co.uk
English
French
Spanish
Portuguese
Arabic
 Loading...