


KM280 series
instructions

English |
2 - 8 |
w∂ |
¸´ |
01-61 |
|
|
|
|
AT282 |
AT283 |
|
|
|
|
|
|
|
|
|
|
|
|
|
|
|
|
|
|
|
|
|
|
|
|
|
|
|
|
|
|
|
|
|
|
|
|
|


|
|
|


AT282 |
AT286 |
& AT284 |
|
|
|
|
|
|
|
|
|
|
|
|
|
|
|
|
|
|
|
|
|
|
|
|
|
|
|
|
|
|
|
|
|
|
|
|
|
|
|
|
|
|
|
|
|
|
|
|
|
|
|
|
|
|
|
|
|
|||
|
|
|
|
|
|
|
|
|
|
|
|
|
|
|
|
|
|
|
|
|
|
|
|
|
||
|
|
|
|
|
|
|
||
|
|
|
|
|
|
|
||
|
|
|
|
|
|
|
|
|
|
|
|
|
|
|
|
|
|
|
|
|
|
|
|
|
|
|
|
|
|
|
|
|
|
|
|
|
|
|
|
|
|
|
|
|
|
|
|
|
|
|
|
|
|
|
|
|
|
|
|
|
|
|
|
|
|
|
|
|
|
|
|
|
|
|
|
|
|
|
|
|
|
|
|
|
|
|
|
|
|
AT283 |
|
|
|
|
|
|
|
|
|
|
|
|
|
|
|
|
|
|
|
|
|
|
|
|
|
|
|
AT285 |
|
|
|
AT281 |
|
|
|
|
|
|
|
|
|
|
||
|
|
|
|
|
|
|
|
|
|
|
|
|
|
|
|
|
|
|
|
|
|
|
|
|
|
|
|
|
|
|
|
|
|
||
|
|
|
|
|
|
|
|
|
|
|
|
|
|
|
|||
|
|
|
|
|
|
|
||
|
|
|
|
|
|
|
|
|
|
|
|
|
|
|
|
|
|
|
|
|
|
|
|
|
|
|
|
|
|
|
|
|
|
|
|
|
|
|
|
|
|
|
|
|
|
|
|
|
|
|
|
|
|
|
|
|
|
|
|
|
|
|
|
|
|
|
|
|
|
|
|
|
|
|
|
|
|
|
|
|
|
|
|
|
|
|
|
|
|
|
|
|
|
|
|
|
|
|
|
|
|
|
|
|
|
|
|

before using your Kenwood appliance/attachments
●Read these instructions carefully and retain for future reference.
●Remove all packaging and any labels.
●Wash the parts: see ‘care and cleaning’.
●Push excess cord in the cord storage compartment in the back of the appliance.
safety
●Switch off and unplug before fitting or removing tools and attachments, after use and before cleaning.
●Never let the cord hang down where a child could grab it.
●Keep your fingers away from moving parts and fitted tools/attachments. Never put your fingers etc in the hinge mechanism.
●Never leave the appliance unattended when it is operating.
●Never use a damaged appliance or attachment. Get it checked or repaired: see ‘service and customer care’.
●Never let the power unit, cord or plug get wet.
●Never use an unauthorised attachment or more than one attachment at a time.
●When using an attachment also read the safety information included in this manual relating to that particular product.
●Never exceed the maximum capacities.
●Take care when lifting this appliance. Ensure the head is locked and that the bowl, tools, and cord are secure before lifting.
●This appliance is not intended for use by persons (including children) with reduced physical, sensory or mental capabilities, or lack of experience and knowledge, unless they have been given supervision or instruction concerning use of the appliance by a person responsible for their safety.
●Children should be supervised to ensure that they do not play with the appliance.
●Only use the appliance for its intended domestic use. Kenwood will not accept any liability if the appliance is subject to improper use, or failure to comply with these instructions.
before plugging in
●Make sure your electricity supply is the same as the one shown on the underside of your appliance.
important - UK only
●The wires in the cord are coloured as follows: Blue = Neutral,
Brown = Live.
●The appliance must be protected by a 13A approved (BS1362) fuse.
Note:
●For non-rewireable plugs the fuse cover MUST be refitted when replacing the fuse. If the fuse cover is lost then the plug must not be used until a replacement can be obtained. The correct fuse cover is identified by colour and a replacement may be obtained from your Kenwood Authorised Repairer (see Service).
●If a non-rewireable plug is cut off it must be DESTROYED IMMEDIATELY.An electric shock hazard may arise if an unwanted non-rewireable plug is inadvertently inserted into a 13A socket outlet.
●This appliance conforms to EC directive 2004/108/EC on Electromagnetic Compatibility and EC regulation no. 1935/2004 of 27/10/2004 on materials intended for contact with food.
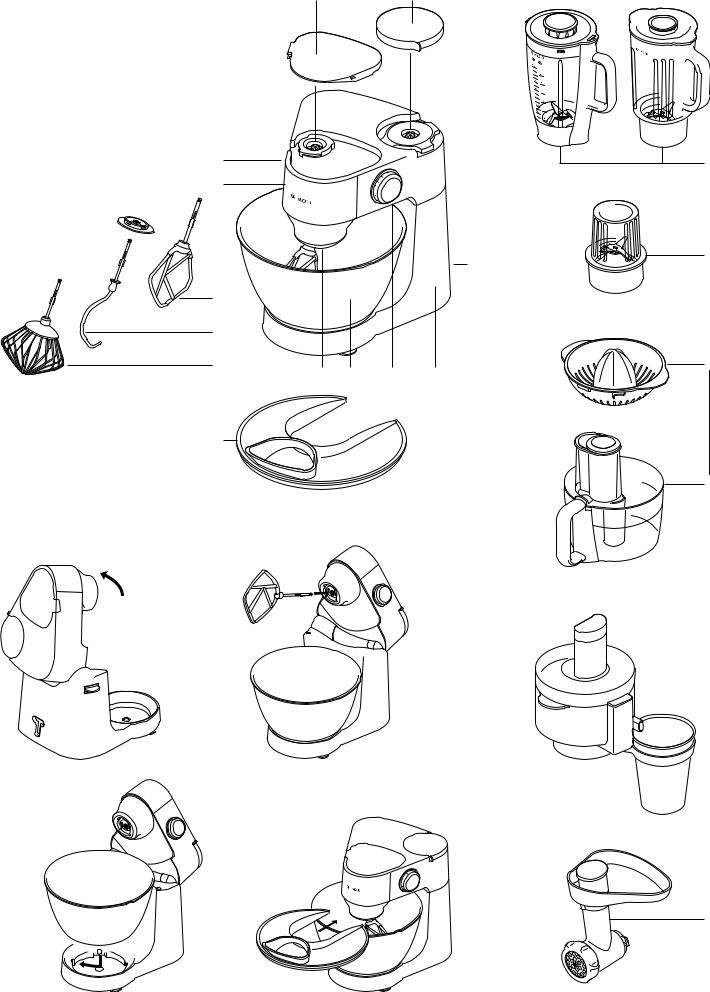
key
kitchen machine
medium speed outlet
high speed outlet
tool socket
head release lever
mixer head
bowl
on/off and speed switch
power unit
cord storage compartment
beater
dough hook with removable guard
whisk
splashguard
attachments
Not all of the attachments listed will necessarily be included with your kitchen machine. Attachments are dependent upon the model variant.
blender (AT282 and AT283)
mill (AT286)
citrus press
food processor (AT284)
centrifugal juicer (AT285)
multi food grinder (AT281)
the mixing tools and some of their uses
beater
●For making cakes, biscuits, pastry, icing, fillings, éclairs and mashed potato. whisk
●For eggs, cream, batters, fatless sponges, meringues, cheesecakes, mousses, soufflés. Don’t use the whisk for heavy mixtures (eg creaming fat and sugar) - you could damage it.
dough hook
●For yeast mixtures.
to use your mixer
1Press down on the head release lever and raise the mixer head until it locks into position.
2Select a tool and push into the tool socket .
●Always ensure the guard is fitted onto the shaft of the dough hook before inserting into the outlet. Once inserted fit the guard to the mixer outlet to prevent food ingress.
3Fit the bowl into the base and turn clockwise to lock into position .
4Press down on the head release lever and lower the mixer head until it locks into position.
5Plug into the power supply then switch on and turn the speed switch to the desired setting. To switch off turn to ‘0’.
● Switch to pulse P for short bursts
6Unplug from the power supply.
7Raise the mixer head and whilst holding it steady, pull the tool from the outlet.
important
●Some movement of the mixer head is normal when mixing heavy loads such as bread dough.
●If the mixer head is raised during operation, the machine will stop working straight away. To re-start the mixer, lower the mixer head, turn the speed switch to the off position, wait a few seconds and then re-select the speed. The mixer should resume operating straight away.
●If for any reason power to the mixer is interrupted and the machine stops working, turn the speed switch to the off position, wait a few seconds and then re-select the speed. The mixer should resume operating straight away.
●The mixer will not operate unless all the outlet covers are correctly fitted to the machine.
●If you hear the machine labouring either switch off and remove some of the mixture or increase the speed.
●Always remove attachments fitted to the medium and high speed outlets before raising the mixer head.
3
hints
●Switch off and scrape the bowl with a spatula when necessary.
●Eggs at room temperature are best for whisking.
●Before whisking egg whites, make sure there’s no grease or egg yolk on the whisk or bowl.
●Use cold ingredients for pastry unless your recipe states otherwise.
●When creaming fat and sugar for cake mixes, always use the fat at room temperature or soften it first.
●Your mixer has been fitted with a ‘soft start’ feature to minimise spillage. However if the machine is switched on with a heavy mixture in the bowl such as bread dough, you may notice that the mixer takes a few seconds to reach the selected speed.
points for bread making
important
●Never exceed the maximum capacities stated - you will overload the machine.
●Some movement of the mixer head is normal when mixing heavy loads such as bread dough.
●The ingredients mix best if you put the liquid in first.
●At intervals stop the machine and scrape the mixture off the dough hook.
●Different batches of flour vary considerably in the quantities of liquid required and the stickiness of the dough can have a marked effect on the load imposed on the machine. You are advised to keep the machine under observation whilst the dough is being mixed; the operation should take no longer than 6-8 minutes.
speed switch
These are a guide only and will vary depending upon the quantity of mix in the bowl and the ingredients being mixed.
beater
●creaming fat and sugar start on min gradually increasing to a higher speed
●beating eggs into creamed mixtures use a medium to high speed
●folding in flour, fruit etc use a low to medium speed
●all in one cakes start on a low speed gradually increasing to a higher speed
●rubbing fat into flour use a low to medium speed whisk
●Gradually increase to maximum dough hook
●Use a low to medium speed
maximum capacities
shortcrust pastry |
450g flour weight |
sponge cake (one stage mix) |
1.6 Kg total mix |
fruit cake mix |
1.8 Kg total mix |
bread dough |
500g flour weight |
egg whites |
8 |
electronic speed sensor control
Your mixer is fitted with an electronic speed sensor control that is designed to maintain the speed under different load conditions, such as when kneading bread dough or when eggs are added to a cake mix. You may therefore hear some variation in speed during the operation as the mixer adjusts to the load and speed selected - this is normal.
to fit and use the splashguard
1Fit the bowl into the base and add the ingredients.
2Fit the tool then lower the mixer head
3Fit the splashguard onto the bowl by sliding the cut away section around the mixer head .
4To remove the splashguard reverse the above procedure.
● During mixing, ingredients can be added directly to the bowl via the chute.
care and cleaning
●Always switch off and unplug before cleaning. power unit
●Wipe with a damp cloth, then dry.
●Never use abrasives or immerse in water.
bowl, tools, splashguard, removable guard on dough hook
●Wash by hand, then dry thoroughly or wash in the dishwasher.
●Never use a wire brush, steel wool or bleach to clean your stainless steel bowl. Use vinegar to remove limescale.
●Keep away from heat (cooker tops, ovens, microwaves).
4
 Loading...