


KMM-202 KMM-102GY KMM-122Y KMM-102AY KMM-102RY
DIGITAL MEDIA RECEIVER
INSTRUCTION MANUAL
ЦИФРОВОЙ МЕДИА-РЕСИВЕР
ИHCTPУKЦИЯ ПO ЭKCПЛУATAЦИИ
© 2015 JVC KENWOOD Corporation |
B5A-0893-01 (EN/E2N) |

Information on Disposal of Old Electrical and Electronic Equipment and Batteries (applicable for countries that have adopted separate waste collection systems)
Products and batteries with the symbol (crossed-out wheeled bin) cannot be disposed as household waste.
Old electrical and electronic equipment and batteries should be recycled at a facility capable of handling these items and their waste byproducts.
Contact your local authority for details in locating a recycle facility nearest to you. Proper recycling and waste disposal will help conserve resources whilst preventing detrimental effects on our health and the environment.
Notice: |
The sign “Pb” below the symbol for batteries indicates that this battery contains lead. |
|
|
For Israel |
|
For Turkey
Bu ürün 28300 sayılı Resmi Gazete’de yayımlanan Atik Elektrikli ve Elektronik Eşyalarin Kontrolü Yönetmeliğe uygun olarak üretilmiştir.
Eski Elektrik ve Elektronik Ekipmanların İmha Edilmesi Hakkında Bilgi (atık yan ürün toplama sistemlerini kullanan ülkeleri için uygulanabilir)
Sembollü (üzerinde çarpı işareti olan çöp kutusu) ürünler ev atıkları olarak
atılamaz.
Eski elektrik ve elektronik ekipmanlar, bu ürünleri ve ürün atıklarını geri dönüştürebilecek bir tesiste değerlendirilmelidir. Yaşadığınız bölgeye en yakın geri dönüşüm tesisinin yerini öğrenmek için yerel makamlara müracaat edin. Uygun geri dönüşüm ve atık imha yöntemi sağlığımız ve çevremiz üzerindeki zararlı etkileri önlerken kaynakların korunmasına da yardımcı olacaktır.
Declaration of Conformity with regard to the EMC Directive
Declaration of Conformity with regard to the RoHS Directive 2011/65/EU Manufacturer:
JVC KENWOOD Corporation
3-12, Moriya-cho, Kanagawa-ku, Yokohama-shi, Kanagawa, 221-0022, Japan
EU Representative:
JVCKENWOOD NEDERLAND B.V.
Amsterdamseweg 37, 1422 AC UITHOORN, The Netherlands
Декларация соответствия относительно Директивы Электромагнитная совместимость
Декларация соответствия относительно Директивы 2011/65/EU об ограничении содержания вредных веществ Производитель:
ДжейВиСи КЕНВУД Корпорейшн
3-12, Moriya-cho, Kanagawa-ku, Yokohama-shi, Kanagawa, 221-0022, Япония
Представительство в EC:
ДжейВиСиКЕНВУД Нидерланд Би.Ви. Amsterdamseweg 37, 1422 AC UITHOORN, Нидерланды
i

Дата изготовления (месяц/год) находится на этикетке устройства.
В соответствии с Законом Российской Федерации “О защите прав потребителей” срок службы (годности) данного товара “по истечении которого он может представлять опасность для жизни, здоровья потребителя, причинять вред его имуществу или окружающей среде” составляет семь (7) лет со дня производства. Этот срок является временем, в течение которого потребитель данного товара может безопасно им пользоваться при условии соблюдения инструкции по эксплуатации данного товара, проводя необходимое обслуживание, включающее замену расходных материалов и/или соответствующее ремонтное обеспечение в специализированном сервисном центре.
Дополнительные косметические материалы к данному товару, поставляемые вместе с ним, могут храниться в течение двух (2) лет со дня его производства.
Срок службы (годности), кроме срока хранения дополнительных косметических материалов, упомянутых в предыдущих двух пунктах, не затрагивает никаких других прав потребителя, в частности, гарантийного свидетельства KENWOOD, которое он может получить в соответствии с законом о правах потребителя или других законов, связанных с ним.
ii

CONTENTS
BEFORE USE |
2 |
BASICS |
3 |
|
|
GETTING STARTED |
3 |
1Select the display language and cancel the demonstration
2 Set the clock and date
3 Set the initial settings
RADIO |
5 |
USB / iPod / ANDROID |
7 |
|
|
AUX |
9 |
|
|
AUDIO SETTINGS |
10 |
|
|
DISPLAY SETTINGS |
11 |
|
|
TROUBLESHOOTING |
12 |
|
|
REFERENCES |
13 |
Maintenance |
|
More information |
|
|
|
SPECIFICATIONS |
15 |
|
|
INSTALLATION / |
|
CONNECTION |
16 |
BEFORE USE
IMPORTANT
•To ensure proper use, please read through this manual before using this product. It is especially important that you read and observe Warning and Caution in this manual.
•Please keep the manual in a safe and accessible place for future reference.
 Warning
Do not operate any function that takes your attention away from safe driving.
 Caution
Volume setting:
•Adjust the volume so that you can hear sounds outside the car to prevent accidents.
•Lower the volume before playing digital sources to avoid damaging the speakers by the sudden increase of the output level.
General:
•Avoid using the external device if it might hinder safe driving.
•Make sure all important data has been backed up. We shall bear no responsibility for any loss of recorded data.
•Never put or leave any metallic objects (such as coins or metal tools) inside the unit to prevent a short circuit.
•Depending on the types of cars, the antenna will automatically extend when you turn on the unit with the antenna control wire connected ( 17). Turn off the unit or change the source to STANDBY when parking at a low ceiling area.
How to read this manual
•Operations are explained mainly using buttons on the faceplate of 


 .
.
•English indications are used for the purpose of explanation. You can select the display language from the [FUNCTION] menu. ( 5)
5)
•[XX] indicates the selected items.
•( XX) indicates references are available on the stated page.
2

BASICS
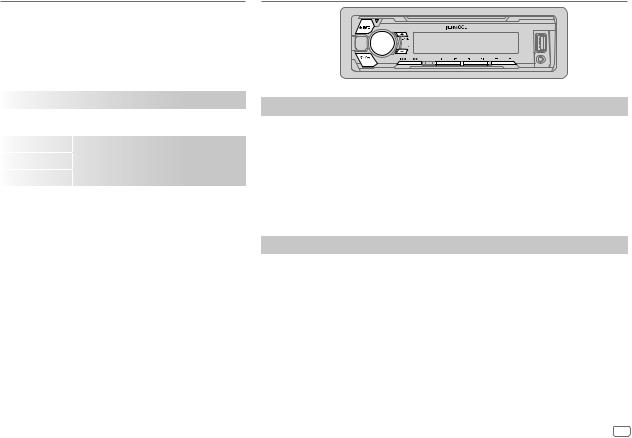
Faceplate
Display window
Volume knob
|
|
|
|
|
|
|
|
|
|
|
|
|
|
|
|
|
|
|
|
|
|
|
|
|
|
|
|
|
|
|
|
|
|
|
|
|
|
|
|
|
|
|
|
|
|
|
|
|
|
|
|
|
|
|
|
|
|
|
|
|
|
|
|
|
|
|
|
|
|
|
|
|
|
|
|
|
|
|
|
|
|
|
|
|
|
|
|
|
|
|
|
|
|
|
|
|
|
|
|
|
|
|
|
|
|
|
|
|
|
|
|
|
|
|
|
|
|
|
|
|
|
|
|
|
|
|
|
|
|
|
|
|
|
|
|
|
|
|
|
|
|
|
|
|
|
|
|
|
|
|
|
|
|
|
|
|
|
|
|
|
|
|
|
|
|
|
|
|
|
|
|
|
|
|
|
|
|
|
|
|
|
|
|
|
|
|
|
|
|
|
|
|
|
|
|
|
|
|
|
|
|
|
|
|
|
|
|
|
|
|
|
|
|
|
|
|
|
|
|
|
|
|
|
|
|
|
|
|
|
|
|
|
|
|
|
|
|
|
|
|
|
|
|
|
|
|
|
|
|
|
|
|
|
|
|
|
|
|
|
|
|
|
|
|
|
|
|
|
|
|
|
|
|
|
|
|
|
|
|
|
|
|
|
|
|
|
|
|
|
|
|
|
|
|
|
|
|
|
|
|
|
|
|
|
|
|
|
|
|
|
|
|
|
|
|
|
|
|
|
|
|
|
|
|
|
|
Detach button |
|
|
|
|
|
|
|
: Flashes when the unit |
|||||||||||||||
|
|
|
|
|
|
|
|
|
|
|||||||||||||||||
|
|
|
|
|
|
|
|
|
|
|
|
|
|
|
enters searching status. |
|||||||||||
|
|
|
|
|
|
|
|
|
|
|
|
|
|
|
|
|
|
|
|
|
|
|
|
|
|
|
Attach |
|
Detach |
|
How to reset |
||||||||||||||||||||||
Your preset adjustments will be erased except stored radio stations.
To |
On the faceplate |
|
Turn on the power |
Press |
. |
|
• Press and hold to turn off the power. |
|
|
|
|
Adjust the volume |
Turn the volume knob. |
|
|
|
|
Select a source |
Press |
repeatedly. |
|
|
|
Change the display information |
Press DISP repeatedly. ( 14) |
|
|
|
|
GETTING STARTED
1Select the display language and cancel the demonstration
When you turn on the power (or after you reset the unit), the display shows: “SEL LANGUAGE”  “PRESS”
  “VOLUME KNOB”
1Turn the volume knob to select [ENG] (English), [RUS] (Russian) or [SPA] (Spanish), then press the knob.
[ENG] is selected for the initial setup.
Then, the display shows: “CANCEL DEMO”  “PRESS”
  “VOLUME KNOB”.
2Press the volume knob.
[YES] is selected for the initial setup.
3Press the volume knob again.
“DEMO OFF” appears.
ENGLISH 3
GETTING STARTED
2Set the clock and date
1 Press the volume knob to enter [FUNCTION].
2 Turn the volume knob to select [CLOCK], then press the knob.
To adjust the clock
3 Turn the volume knob to select [CLOCK ADJUST], then press the knob.
4Turn the volume knob to make the settings, then press the knob.
Hour  Minute
5 Turn the volume knob to select [CLOCK FORMAT], then press the knob. 6 Turn the volume knob to select [12H] or [24H], then press the knob.
To set the date
7 Turn the volume knob to select [DATE FORMAT], then press the knob.
8Turn the volume knob to select [DD/MM/YY] or [MM/DD/YY], then press the knob.
9 Turn the volume knob to select [DATE SET], then press the knob.
10Turn the volume knob to make the settings, then press the knob.
Day  Month
Month  Year or Month
  Day
Day  Year
Year
11Press and hold 
 to exit.
To return to the previous setting item, press 
 .
.
3Set the initial settings
1 Press  repeatedly to enter STANDBY. 2 Press the volume knob to enter [FUNCTION].
• Pressing AUD enters [AUDIO CONTROL] directly.
3Turn the volume knob to select an item (see the following table), then press the knob.
4 |
Repeat step 3 until the desired item is selected or activated. |
|
5 |
Press and hold |
to exit. |
To return to the previous setting item, press 
 .
.
Default: XX
AUDIO CONTROL
SWITCH PREOUT REAR/ SUB-W or REAR/ SUBWOOFER: Selects whether rear speakers or a subwoofer are connected to the line out terminals on the rear (through an external amplifier).
|
SP SELECT |
OFF/ 5/4/ 6 × 9/6/ OEM: Selects according to the speaker size |
|||
|
|
|
(5 inches or 4 inches, 6×9 inches or 6 inches) or OEM speakers for |
||
|
|
|
optimum performance. |
||
|
|
|
|
|
|
DISPLAY |
|
|
|
||
|
|
|
|
|
|
|
EASY MENU |
(For |
|
) |
|
|
|
|
ON: Both display and button illumination change to white color when |
||
|
|
|
entering [FUNCTION]. ; OFF: Both display and button illumination |
||
|
|
|
remain as [COLOR SELECT] color. ( 11) |
||
|
|
|
|
|
|
TUNER SETTING |
|
|
|
||
|
|
|
|
|
|
|
PRESET TYPE |
NORMAL: Memorizes one station for each preset button in each band |
|||
|
|
|
(FM1/ FM2/ FM3/ MW/ LW). ; MIX: Memorizes one station for each |
||
|
|
|
preset button, regardless of the selected band. |
||
|
|
|
|
|
|
SYSTEM |
|
|
|
||
|
|
|
|
|
|
|
KEY BEEP |
ON: Activates the keypress tone. ; OFF: Deactivates. |
|||
|
|
|
|
|
|
|
SOURCE SELECT |
|
|
|
|
|
|
|
|
|
|
|
|
BUILT-IN AUX |
ON: Enables AUX in source selection. ; OFF: Disables. ( 9) |
||
|
|
|
|
|
|
|
P-OFF WAIT |
Applicable only when the demonstration mode is turned off. |
|||
|
|
|
Sets the duration when the unit will automatically turn off (while in |
||
|
|
|
standby mode) to save the battery. |
||
|
|
|
20M: 20 minutes ; 40M: 40 minutes ; 60M: 60 minutes ; |
||
|
|
|
WAIT TIME – – – or OFF – – –: Cancels |
||
|
|
|
|
|
|
4
GETTING STARTED
|
F/W UPDATE |
|
|||
|
|
|
|
|
|
|
|
UPDATE SYSTEM |
|
||
|
|
|
|
|
|
|
|
|
F/W UP xx.xx |
YES: Starts upgrading the firmware. ; NO: Cancels |
|
|
|
|
|
(upgrading is not activated). |
|
|
|
|
|
For details on how to update the firmware, see: |
|
|
|
|
|
www.kenwood.com/cs/ce/ |
|
CLOCK |
|
||||
|
|
|
|
|
|
|
CLOCK DISPLAY |
ON: The clock time is shown on the display even |
|||
|
|
|
|
when the unit is turned off. ; OFF: Cancels. |
|
|
|
|
|
|
|
ENGLISH |
Select the display language for [FUNCTION] menu |
||||
|
|
|
|
||
РУССКИЙ |
and music information if applicable. |
||||
|
|
|
|
By default, [ENGLISH] is selected. |
|
ESPANOL |
|||||
|
|||||
|
|
|
|
|
|
RADIO
Search for a station
1 Press  repeatedly to select TUNER.
2 Press  repeatedly to select FM1/ FM2/ FM3/ MW/ LW. 3 Press S/ Tto search for a station.
•To change the searching method for S/ T: Press  repeatedly.
AUTO1 : Automatically search for a station. AUTO2 : Search for a preset station. MANUAL : Manually search for a station.
•To store a station: Press and hold one of the number buttons (1 to 6).
•To select a stored station: Press one of the number buttons (1 to 6).
Other settings
1 Press the volume knob to enter [FUNCTION].
2 Turn the volume knob to select an item ( 6), then press the knob.
3 Repeat step 2 until the desired item is selected or activated. 4 Press and hold 
 to exit.
To return to the previous setting item, press 
 .
.
ENGLISH 5
RADIO
Default: XX
TUNER SETTING
|
LOCAL SEEK |
ON: Searches only stations with good reception. ; OFF: Cancels. |
|
|
• Settings made are applicable only to the selected source/station. Once |
|
|
you change the source/station, you need to make the settings again. |
|
AUTO |
YES: Automatically starts memorizing 6 stations with good reception. ; |
|
MEMORY |
NO: Cancels. |
|
|
• Selectable only if [NORMAL] is selected for [PRESET TYPE]. ( 4) |
|
|
|
|
MONO SET |
ON: Improves the FM reception, but the stereo effect may be lost. ; |
|
|
OFF: Cancels. |
|
|
|
|
NEWS SET |
ON: The unit will temporarily switch to News Programme if available. ; |
|
|
OFF: Cancels. |
|
REGIONAL |
ON: Switches to another station only in the specific region using the “AF” |
|
|
control. ; OFF: Cancels. |
|
AF SET |
ON: Automatically searches for another station broadcasting the same |
|
|
program in the same Radio Data System network with better reception |
|
|
when the current reception is poor. ; OFF: Cancels. |
|
|
|
|
TI |
ON: Allows the unit to temporarily switch to Traffic Information if available |
|
|
(“TI” lights up). ; OFF: Cancels. |
|
|
|
|
PTY SEARCH |
1 Press the volume knob to enter PTY language selection. |
|
|
2 Turn the volume knob to select the PTY language (ENGLISH/ FRENCH/ |
|
|
GERMAN), then press the knob. |
|
|
3 Turn the volume knob to select the available Program Type (see the |
|
|
following). |
|
|
4 Press S / T to start searching. |
|
|
|
CLOCK
TIME SYNC |
ON: Synchronizes the unit’s time to the Radio Data System station time. ; |
|
OFF: Cancels. |
Available Program Type
SPEECH : NEWS, AFFAIRS, INFO (information), SPORT, EDUCATE, DRAMA, CULTURE, SCIENCE, VARIED, WEATHER, FINANCE, CHILDREN, SOCIAL, RELIGION, PHONE IN, TRAVEL, LEISURE, DOCUMENT
MUSIC : POP M (music), ROCK M (music), EASY M (music), LIGHT M (music),
CLASSICS, OTHER M (music), JAZZ, COUNTRY, NATION M (music), OLDIES, FOLK M (music)
The unit will search for the Program Type categorized under [SPEECH] or [MUSIC] if selected.
•[LOCAL SEEK]/ [MONO SET]/ [NEWS SET]/ [REGIONAL]/ [AF SET]/ [TI]/ [PTY SEARCH] is selectable only when the band is FM1/ FM2/ FM3.
•If the volume is adjusted during reception of traffic information or news bulletin, the adjusted volume is memorized automatically. It will be applied the next time traffic information or news bulletin is turned on.
6
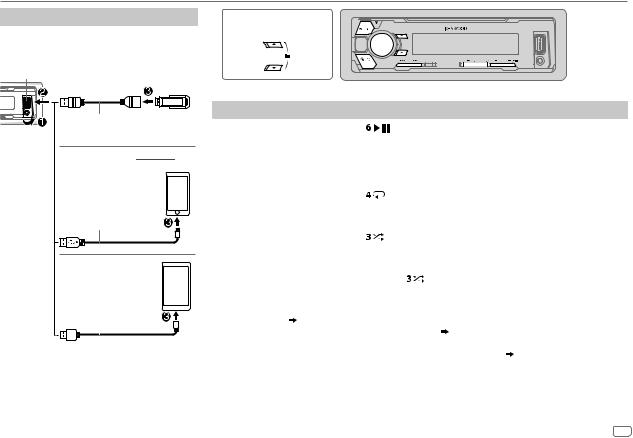
USB / iPod / ANDROID
Start playback
The source changes automatically and playback starts.
USB input terminal
USB
CA-U1EX (max.: 500 mA) (optional accessory)
iPod/iPhone (for 


 )
)
KCA-iP102 / KCA-iP103 (optional accessory)*1 or accessory cable of the iPod/iPhone*2
ANDROID*3
Micro USB 2.0 cable*2 (commercially available)
*1 |
|
|
|
|
|
|
|
|
|
KCA-iP102 : 30-pin type, KCA-iP103 : Lightning type |
||||
*2 |
Do not leave the cable inside the car when not using. |
|||
|
|
|
|
|
|
|
|
|
|
|
|
|
|
|
|
|
|
|
|
|
|
|
|
|
|
|
|
|
|
|
|
|
|
|
|
|
|
|
|
|
|
|
|
|
|
|
|
|
|
|
|
|
|
|
|
|
|
|
|
|
|
|
|
|
|
|
|
|
|
|
|
|
|
|
|
|
|
|
|
|
|
|
|
|
|
|
|
|
|
|
|
|
|
|
|
|
|
|
|
|
|
|
|
|
|
|
|
|
|
|
|
|
|
|
|
|
|
|
|
|
|
|
|
|
|
|
|
|
|
|
|
|
|
|
|
|
|
|
|
|
|
|
|
|
|
|
|
|
|
|
|
|
|
|
|
|
|
|
|
|
|
|
|
|
|
|
|
|
|
|
|
|
|
|
|
|
|
|
|
|
|
|
|
|
|
|
|
|
|
|
|
To |
|
|
|
|
|
|
|
On the faceplate |
|
|
|
|
|
|
|
|
|
|
|
||||
Playback / pause |
Press |
. |
|
|
|
|
|
|
|
|
|
|
|
|
|
||||||||
Reverse / Fast-forward*4 |
Press and hold S / T. |
||||||||||||||||||||||
Select a track/file |
Press S / T. |
|
|
|
|
|
|
|
|
|
|
|
|||||||||||
|
|
|
|
|
|
|
|
|
|
|
|
|
|
|
|
|
|
|
|
|
|
|
|
Select a folder*5 |
Press J / K. |
|
|
|
|
|
|
|
|
|
|
|
|||||||||||
Repeat play*6 |
Press |
repeatedly. |
|||||||||||||||||||||
|
|
|
|
|
|
|
|
FILE REPEAT/ FOLDER REPEAT/ ALL REPEAT : MP3/WMA/WAV/FLAC file |
|||||||||||||||
|
|
|
|
|
|
|
|
FILE REPEAT/ FOLDER REPEAT/ REPEAT OFF : iPod or ANDROID |
|||||||||||||||
|
|
|
|
|
|
|
|
|
|
|
|
|
|
|
|
|
|
|
|
|
|
|
|
Random play*6 |
Press |
repeatedly. |
|||||||||||||||||||||
|
|
|
|
|
|
|
|
FOLDER RANDOM/ RANDOM OFF : MP3/WMA/WAV/FLAC file, iPod or |
|||||||||||||||
|
|
|
|
|
|
|
|
|
|
|
|
|
|
|
|
ANDROID |
|||||||
|
|
|
|
|
|
|
|
|
|
|
|
|
|
|
|
|
|
|
|
|
|
|
|
|
|
|
|
|
|
|
|
Press and hold |
to select ALL RANDOM. |
||||||||||||||
|
|
|
|
|
|
|
|
|
|
|
|
|
|
|
|
|
|
|
|
|
|||
*3 |
When connecting an Android device, “Press [VIEW] to install KENWOOD MUSIC PLAY APP” is shown. Follow the instructions |
||||||||||||||||||||||
|
to install the application. You can also install the latest version of KENWOOD MUSIC PLAY application on your Android device |
||||||||||||||||||||||
*4 |
before connecting. ( 13) |
|
|
|
|
|
|
|
|
|
|
|
|
|
|
|
|
||||||
For ANDROID: Applicable only when [BROWSE MODE] is selected. ( 8) |
|||||||||||||||||||||||
*5 |
Only for MP3/WMA/WAV/FLAC files. This does not work for iPod/ ANDROID. |
||||||||||||||||||||||
*6 |
For iPod/ ANDROID: Applicable only when [MODE OFF]/ [BROWSE MODE] is selected. ( 8) |
||||||||||||||||||||||
ENGLISH 7
USB / iPod / ANDROID
Select control mode
While in IPOD source, press 5 repeatedly.
MODE ON : Control iPod using the iPod itself. However, you can still play/pause, file skip, fast-forward or reverse from this unit.
MODE OFF : Control iPod from this unit.
While in ANDROID source, press 5 repeatedly.
BROWSE MODE : Control Android device from this unit via KENWOOD MUSIC PLAY application installed in the Android device.
HAND MODE : Control Android device using the Android device itself via other media player applications installed in the Android device. However, you can still play/ pause and file skip from this unit.
Select music drive
Press 5 repeatedly.
Stored songs in the following drive will be played back.
•Selected internal or external memory of a smartphone (Mass Storage Class).
•Selected drive of a multiple drives device.
Select a file from a folder/list
1 |
Press |
. |
|
2 |
Turn the volume knob to select a folder/list, then press the knob. |
||
3 |
Turn the volume knob to select a file, then press the knob. |
||
|
|
|
|
|
|
Quick Search |
|
|
|
If you have many files, you can search through them quickly. |
|
|
|
Turn the volume knob quickly to browse through the list quickly. |
|
–Not applicable for iPod.
(or)
Press S/ Tto search at a preset skip search ratio. ( 9, [SKIP SEARCH])
• Pressing and holding S/ Tsearches at a 10% ratio.
– Not applicable for MP3/WMA/WAV/FLAC files.
Alphabet Search (applicable only for iPod)
You can search for a file according to the first character.
Turn the volume knob quickly to enter character search.
Turn the volume knob to select the character.
To search for a character other than A to Z and 0 to 9, enter only “*”. Press S/ Tto move to the entry position.
• You can enter up to 3 characters.
Press the volume knob to start searching.
•To return to the root folder/ first file/ top menu, press 5.
•To return to the previous setting item, press 
 .
.
•To cancel, press and hold 
 .
.
•For iPod, applicable only when [MODE OFF] is selected.
•For ANDROID, applicable only when [BROWSE MODE] is selected.
8
USB / iPod / ANDROID |
|
AUX |
|||
|
|
|
|
Preparation: |
|
Listen to TuneIn Radio/ TuneIn Radio Pro/ Aupeo |
|||||
|
Select [ON] for [BUILT-IN AUX]. ( 4) |
||||
(for |
|
) |
|
||
|
|
|
|||
While listening to TuneIn Radio, TuneIn Radio Pro or Aupeo, connect the iPod/iPhone to the USB input terminal of the unit.
• The unit will output the sound from these applications.
Start listening
1Connect a portable audio player (commercially available).
Auxiliary input jack
Other settings
1 Press the volume knob to enter [FUNCTION].
2Turn the volume knob to select an item (see the following table), then press the knob.
3 Repeat step 2 until the desired item is selected or activated. 4 Press and hold 
 to exit.
To return to the previous setting item, press 
 .
.
|
|
Default: XX |
USB |
|
|
|
|
|
|
MUSIC DRIVE |
DRIVE CHANGE: The next drive ([DRIVE 1] to [DRIVE 5]) is |
|
|
selected automatically and playback starts. |
|
|
Repeat steps 1 to 3 to select the following drives. |
|
SKIP SEARCH |
0.5%/ 1%/ 5%/ 10%: While listening to iPod or ANDROID, selects |
|
|
the skip search ratio over the total files. |
|
|
|
Portable audio player
3.5 mm stereo mini plug with “L” shaped connector (commercially available)
2 Press 
 repeatedly to select AUX.
3 Turn on the portable audio player and start playback.
Set the AUX name
While listening to a portable audio player connected to the unit...
1 |
Press the volume knob to enter [FUNCTION]. |
|
2 |
Turn the volume knob to select [SYSTEM], then press the knob. |
|
3 |
Turn the volume knob to select [AUX NAME SET], then press the knob. |
|
4 |
Turn the volume knob to select an item, then press the knob. |
|
5 |
AUX (default)/ DVD/ PORTABLE/ GAME/ VIDEO/ TV |
|
Press and hold |
to exit. |
|
To return to the previous setting item, press 
 .
.
ENGLISH 9
 Loading...